如果您想了解android–如何在集群管理器中的标记中调用showinfowindow()?的相关知识,那么本文是一篇不可错过的文章,我们将对集群管理器如何配置进行全面详尽的解释,并且为您提供关于An
如果您想了解android – 如何在集群管理器中的标记中调用showinfowindow()?的相关知识,那么本文是一篇不可错过的文章,我们将对集群管理器如何配置进行全面详尽的解释,并且为您提供关于Android Google Maps v2永久标记InfoWindow、Android PopupWindow的showAsDropDown位置失效的问题、android window (三) lWindow 添加流程、android window(四)WindowToken的有价值的信息。
本文目录一览:- android – 如何在集群管理器中的标记中调用showinfowindow()?(集群管理器如何配置)
- Android Google Maps v2永久标记InfoWindow
- Android PopupWindow的showAsDropDown位置失效的问题
- android window (三) lWindow 添加流程
- android window(四)WindowToken
?(集群管理器如何配置)")
android – 如何在集群管理器中的标记中调用showinfowindow()?(集群管理器如何配置)
我正在使用群集中的标记(谷歌地图),在调用onclick方法时显示信息窗口没有问题.
问题是我找不到如何使用方法showInfoWindow(),就像我在标记上一样打开信息而不给出点击.
当我使用标记时
marker = map.addMarker(new MarkerOptions()
                    .position(position)
                    .snippet(info));
然后我打电话
marker.showInfoWindow();
我如何使用集群管理器中的地图上的标记(ClusterItem)来做同样的事情?
MarkCluster cluster = new MarkCluster(Lat, Lon, info);
mClusterManager.addItem(cluster);
它是我想要显示infoWindow的标记

解决方法:
试试这个,这是我在使用群集时获取地图标记引用的方法:
创建ClusterManager时,如果不调用.setRenderer()方法并将其传递给自己的ClusterRenderer实现的实例,则它始终会创建并使用DefaultClusterRenderer的实例.如果您让ClusterManager创建自己的DefaultClusterRenderer,关键是要显式添加它,以便您可以保留对它的引用(因为ClusterManager没有getter方法,因此您可以获得对其使用的ClusterRenderer的引用):
mClusterManager = new ClusterManager<ClusterItem>(getActivity(), mMap);
mRenderer = new DefaultClusterRenderer(getActivity(), mMap, mClusterManager);
mClusterManager.setRenderer(mRenderer);
mClusterManager.addItem(ClusterItem);
然后,当您需要访问标记时,将ClusterRenderer传递给与标记关联的ClusterItem.用于查找标记的ClusterItem将是您传递给ClusterManager以将标记最初添加到集群的ClusterItem:
Marker marker = mRenderer.getMarker(ClusterItem);
if(marker != null){
    marker.showInfoWindow();
}
如果标记尚未在地图上呈现,则Marker对象将为null,因此请务必在使用之前检查标记对象是否为null.
如果您确定在调用.getMarker()时标记已放置在地图上且标记仍为null,则覆盖.equals()方法
在对象中用于实现ClusterItem接口以确保您可以找到呈现器保持的正确ClusterItem对象.

Android Google Maps v2永久标记InfoWindow
InfoWindow的默认行为是隐藏标记所在的地图或点击标记本身时隐藏.
有什么方法可以使InfoWindow永久保存,从而无法将其隐藏?
我已禁用了地图中的所有手势,但是当您点击时,“信息窗口”仍然消失.
解决方法:
visceralG的解决方案首先是我要做的,但还有(未试用的)替代方案:
>保留对显示信息窗口的标记的引用(来自getInfoContents)
>在onMapClick中调用markerShowingInfoWindow.showInfoWindow()将其强制返回
>如果上述方法无效,则将markerShowingInfoWindow.showInfoWindow()放入Runnable.run()并使用Handler或View发布

Android PopupWindow的showAsDropDown位置失效的问题
忽然发现Android PopupWindow的showAsDropDown位置失效,据说是Android的sdk版本兼容问题,需要自己重写改方法,安卓的坑真多啊
在网上找了好多方法不管用,最后终于找到一个可以的:
贴一下解决方法,感谢
重写showAsDropDown(view)就解决了。
public class SupportPopupWindow extends PopupWindow {
public SupportPopupWindow(View contentView, int width, int height){
    super(contentView,width,height);
}

[@Override](https://my.oschina.net/u/1162528)
public void showAsDropDown(View anchor) {
    if(Build.VERSION.SDK_INT >= 24) {
        Rect rect = new Rect();
        anchor.getGlobalVisibleRect(rect);
        int h = anchor.getResources().getDisplayMetrics().heightPixels - rect.bottom;
        setHeight(h);
    }
    super.showAsDropDown(anchor);
}

[@Override](https://my.oschina.net/u/1162528)
public void showAsDropDown(View anchor, int xoff, int yoff) {
    if(Build.VERSION.SDK_INT >= 24) {
        Rect rect = new Rect();
        anchor.getGlobalVisibleRect(rect);
        int h = anchor.getResources().getDisplayMetrics().heightPixels - rect.bottom;
        setHeight(h);
    }
    super.showAsDropDown(anchor, xoff, yoff);
}
}
 lWindow 添加流程")
android window (三) lWindow 添加流程
http://androidxref.com/6.0.1_r10/xref/frameworks/base/services/core/java/com/android/server/wm/WindowManagerService.java
http://androidxref.com/6.0.1_r10/xref/frameworks/base/core/java/android/view/WindowManagerImpl.java
http://androidxref.com/6.0.1_r10/xref/frameworks/base/core/java/android/view/WindowManagerGlobal.java
http://androidxref.com/6.0.1_r10/xref/frameworks/base/core/java/android/view/ViewRootImpl.java
http://androidxref.com/6.0.1_r10/xref/frameworks/base/services/core/java/com/android/server/wm/WindowManagerService.java
http://androidxref.com/6.0.1_r10/xref/frameworks/base/services/core/java/com/android/server/wm/Session.java
http://androidxref.com/6.0.1_r10/xref/frameworks/base/core/java/android/view/IWindow.aidl

WindowManagerService 只负责窗口管理,并不负责 View 的绘制跟图层混合,本文就来分析 WMS 到底是怎么管理窗口的。初接触 Android 时感觉:Activity 似乎就是 Google 封装好的窗口,APP 只要合理的启动新的 Activity 就打开了新窗口,这样理解没什么不对,Activity 确实可以看做一种窗口及 View 的封装,不过从源码来看,Activity 跟 Window 还是存在不同。本文主要从窗口的添加流程来将 APP 端、WMS 端、SurfaceFlinger 端三块串联起来,主要说一下几个方面
- 窗口的分类:Activity、Dialog、PopupWindow、Toast 等对应窗口的区别
- Window、IWindow 、WindowState、WindowToken、AppToken 等之间的关系
- 窗口的添加及 Surface 申请与 Binder 传递
窗口的分类简述
在 Android 系统中,PopupWindow、Dialog、Activity、Toast 等都有窗口的概念,但又各有不同,Android 将窗口大致分为三类:应用窗口、子窗口、系统窗口。其中,Activity 与 Dialog 属于应用窗口、PopupWindow 属于子窗口,必须依附到其他非子窗口才能存在,而 Toast 属于系统窗口,Dialog 可能比较特殊,从表现上来说偏向于子窗口,必须依附 Activity 才能存在,但是从性质上来说,仍然是应用窗口,有自己的 WindowToken,不同窗口之间的关系后面会更加详细的分析,这里有一个概念即可。
窗口的添加
Activity 并不是 View 展示的唯一方式,分析窗口添加流程的话,Activity 也并不是最好的例子,因为 Activity 还会牵扯到 AMS 的知识,这里我们不用 Activity,而是用一个悬浮 View 的展示来分析窗口的添加,代码入下:
private void addTextViewWindow(Context context){
    TextView mview=new TextView(context);
    ...//设置颜色 样式
    //关键点1
    WindowManager mWindowManager = (WindowManager) context.getApplicationContext().getSystemService(Context.WINDOW_SERVICE);
    WindowManager.LayoutParams wmParams = new WindowManager.LayoutParams();
    //关键点2
    wmParams.type = WindowManager.LayoutParams.TYPE_TOAST;
    wmParams.format = PixelFormat.RGBA_8888;
    wmParams.width = 800;
    wmParams.height = 800;
    //关键点3
    mWindowManager.addView(mview, wmParams);
} @Override
public Object getSystemService(String name) {
return SystemServiceRegistry.getSystemService(this, name);
}SystemServiceRegistry 类用静态字段及方法中封装了一些服务的代理,其中就包括 WindowManagerService
public static Object getSystemService(ContextImpl ctx, String name) {
        ServiceFetcher<?> fetcher = SYSTEM_SERVICE_FETCHERS.get(name);
        return fetcher != null ? fetcher.getService(ctx) : null;
    }

    static {
             ...
             registerService(Context.WINDOW_SERVICE, WindowManager.class,
                new CachedServiceFetcher<WindowManager>() {
            @Override
            public WindowManager createService(ContextImpl ctx) {
                return new WindowManagerImpl(ctx.getDisplay());
            }});
            ...
    }
因此 context.getApplicationContext ().getSystemService () 最终可以简化为 new WindowManagerImpl (ctx.getDisplay ()),下面看下 WindowManagerImpl 的构造方法,它有两个实现方法,对于 Activity 跟 Application 其实是有区别的,这点后面分析:
http://androidxref.com/6.0.1_r10/xref/frameworks/base/core/java/android/view/WindowManagerImpl.java
public WindowManagerImpl(Display display) {
    this(display, null);
}

private WindowManagerImpl(Display display, Window parentWindow) {
    mDisplay = display;
    mParentWindow = parentWindow;
} @Override
public void addView(@NonNull View view, @NonNull ViewGroup.LayoutParams params) {
applyDefaultToken(params);
mGlobal.addView(view, params, mDisplay, mParentWindow);
}不过很明显 WindowManagerImpl 最后是委托 mGlobal 来进行这项操作,WindowManagerGlobal 是一个单利,一个进程只有一个:
接着看 WindowManagerGlobal 的 addView,对于添加系统窗口,这里将将代码精简一下,不关系子窗口等之类的逻辑public void addView(View view, ViewGroup.LayoutParams params,
//...
final WindowManager.LayoutParams wparams = (WindowManager.LayoutParams) params;
if (parentWindow != null) {
parentWindow.adjustLayoutParamsForSubWindow(wparams);
} else {
// If there''s no parent, then hardware acceleration for this view is
// set from the application''s hardware acceleration setting.
final Context context = view.getContext();
if (context != null
&& (context.getApplicationInfo().flags
& ApplicationInfo.FLAG_HARDWARE_ACCELERATED) != 0) {
wparams.flags |= WindowManager.LayoutParams.FLAG_HARDWARE_ACCELERATED;
}
}
ViewRootImpl root;
View panelParentView = null;
synchronized (mLock) {
//...
root = new ViewRootImpl(view.getContext(), display);
view.setLayoutParams(wparams);
mViews.add(view);
mRoots.add(root);
mParams.add(wparams);
}
// do this last because it fires off messages to start doing things
try {
root.setView(view, wparams, panelParentView);
} catch (RuntimeException e) {
//...
}
}public void setView(View view, WindowManager.LayoutParams attrs, View panelParentView) {
synchronized (this) {
if (mView == null) {
mView = view;
...
//关键点1
// Schedule the first layout -before- adding to the window
// manager, to make sure we do the relayout before receiving
// any other events from the system.
requestLayout();
if ((mWindowAttributes.inputFeatures
& WindowManager.LayoutParams.INPUT_FEATURE_NO_INPUT_CHANNEL) == 0) {
mInputChannel = new InputChannel();
}
try {
//关键点2
res = mWindowSession.addToDisplay(mWindow, mSeq, mWindowAttributes,
getHostVisibility(), mDisplay.getDisplayId(),
mAttachInfo.mContentInsets, mAttachInfo.mStableInsets,
mAttachInfo.mOutsets, mInputChannel);
} catch (RemoteException e) {
...
}
}public ViewRootImpl(Context context, Display display) {
mContext = context;
mWindowSession = WindowManagerGlobal.getWindowSession();
mWindow = new W(this);
}

static class W extends IWindow.Stub {
        private final WeakReference<ViewRootImpl> mViewAncestor;
        private final IWindowSession mWindowSession;

        W(ViewRootImpl viewAncestor) {
            mViewAncestor = new WeakReference<ViewRootImpl>(viewAncestor);
            mWindowSession = viewAncestor.mWindowSession;
        }

        @Override
        public void resized(Rect frame, Rect overscanInsets, Rect contentInsets,
                Rect visibleInsets, Rect stableInsets, Rect outsets, boolean reportDraw,
                Configuration newConfig) {
            final ViewRootImpl viewAncestor = mViewAncestor.get();
            if (viewAncestor != null) {
                viewAncestor.dispatchResized(frame, overscanInsets, contentInsets,
                        visibleInsets, stableInsets, outsets, reportDraw, newConfig);
            }
        }

        @Override
        public void moved(int newX, int newY) {
            final ViewRootImpl viewAncestor = mViewAncestor.get();
            if (viewAncestor != null) {
                viewAncestor.dispatchMoved(newX, newY);
            }
        }

        @Override
        public void dispatchAppVisibility(boolean visible) {
            final ViewRootImpl viewAncestor = mViewAncestor.get();
            if (viewAncestor != null) {
                viewAncestor.dispatchAppVisibility(visible);
            }
        }

        @Override
        public void dispatchGetNewSurface() {
            final ViewRootImpl viewAncestor = mViewAncestor.get();
            if (viewAncestor != null) {
                viewAncestor.dispatchGetNewSurface();
            }
        }

        @Override
        public void windowFocusChanged(boolean hasFocus, boolean inTouchMode) {
            final ViewRootImpl viewAncestor = mViewAncestor.get();
            if (viewAncestor != null) {
                viewAncestor.windowFocusChanged(hasFocus, inTouchMode);
            }
        }

        private static int checkCallingPermission(String permission) {
            try {
                return ActivityManagerNative.getDefault().checkPermission(
                        permission, Binder.getCallingPid(), Binder.getCallingUid());
            } catch (RemoteException e) {
                return PackageManager.PERMISSION_DENIED;
            }
        }

        @Override
        public void executeCommand(String command, String parameters, ParcelFileDescriptor out) {
            final ViewRootImpl viewAncestor = mViewAncestor.get();
            if (viewAncestor != null) {
                final View view = viewAncestor.mView;
                if (view != null) {
                    if (checkCallingPermission(Manifest.permission.DUMP) !=
                            PackageManager.PERMISSION_GRANTED) {
                        throw new SecurityException("Insufficient permissions to invoke"
                                + " executeCommand() from pid=" + Binder.getCallingPid()
                                + ", uid=" + Binder.getCallingUid());
                    }

                    OutputStream clientStream = null;
                    try {
                        clientStream = new ParcelFileDescriptor.AutoCloseOutputStream(out);
                        ViewDebug.dispatchCommand(view, command, parameters, clientStream);
                    } catch (IOException e) {
                        e.printStackTrace();
                    } finally {
                        if (clientStream != null) {
                            try {
                                clientStream.close();
                            } catch (IOException e) {
                                e.printStackTrace();
                            }
                        }
                    }
                }
            }
        }

        @Override
        public void closeSystemDialogs(String reason) {
            final ViewRootImpl viewAncestor = mViewAncestor.get();
            if (viewAncestor != null) {
                viewAncestor.dispatchCloseSystemDialogs(reason);
            }
        }

        @Override
        public void dispatchWallpaperOffsets(float x, float y, float xStep, float yStep,
                boolean sync) {
            if (sync) {
                try {
                    mWindowSession.wallpaperOffsetsComplete(asBinder());
                } catch (RemoteException e) {
                }
            }
        }

        @Override
        public void dispatchWallpaperCommand(String action, int x, int y,
                int z, Bundle extras, boolean sync) {
            if (sync) {
                try {
                    mWindowSession.wallpaperCommandComplete(asBinder(), null);
                } catch (RemoteException e) {
                }
            }
        }

        /* Drag/drop */
        @Override
        public void dispatchDragEvent(DragEvent event) {
            final ViewRootImpl viewAncestor = mViewAncestor.get();
            if (viewAncestor != null) {
                viewAncestor.dispatchDragEvent(event);
            }
        }

        @Override
        public void dispatchSystemUiVisibilityChanged(int seq, int globalVisibility,
                int localValue, int localChanges) {
            final ViewRootImpl viewAncestor = mViewAncestor.get();
            if (viewAncestor != null) {
                viewAncestor.dispatchSystemUiVisibilityChanged(seq, globalVisibility,
                        localValue, localChanges);
            }
        }

        @Override
        public void onAnimationStarted(int remainingFrameCount) {
            final ViewRootImpl viewAncestor = mViewAncestor.get();
            if (viewAncestor != null) {
                viewAncestor.dispatchWindowAnimationStarted(remainingFrameCount);
            }
        }

        @Override
        public void onAnimationStopped() {
            final ViewRootImpl viewAncestor = mViewAncestor.get();
            if (viewAncestor != null) {
                viewAncestor.dispatchWindowAnimationStopped();
            }
        }

        @Override
        public void dispatchWindowShown() {
            final ViewRootImpl viewAncestor = mViewAncestor.get();
            if (viewAncestor != null) {
                viewAncestor.dispatchWindowShown();
            }
        }
}public static IWindowSession getWindowSession() {
synchronized (WindowManagerGlobal.class) {
if (sWindowSession == null) {
try {
InputMethodManager imm = InputMethodManager.getInstance();
//关键点1
IWindowManager windowManager = getWindowManagerService();
//关键点2
sWindowSession = windowManager.openSession(
new IWindowSessionCallback.Stub() {
@Override
public void onAnimatorScaleChanged(float scale) {
ValueAnimator.setDurationScale(scale);
}
},
imm.getClient(), imm.getInputContext());
} catch (RemoteException e) {
Log.e(TAG, "Failed to open window session", e);
}
}
return sWindowSession;
}
}
public static IWindowManager getWindowManagerService() {
        synchronized (WindowManagerGlobal.class) {
            if (sWindowManagerService == null) {
                sWindowManagerService = IWindowManager.Stub.asInterface(
                        ServiceManager.getService("window"));
                try {
                    sWindowManagerService = getWindowManagerService();
                    ValueAnimator.setDurationScale(sWindowManagerService.getCurrentAnimatorScale());
                } catch (RemoteException e) {
                    Log.e(TAG, "Failed to get WindowManagerService, cannot set animator scale", e);
                }
            }
            return sWindowManagerService;
        }
}@Override
public IWindowSession openSession(IWindowSessionCallback callback, IInputMethodClient client,
IInputContext inputContext) {
if (client == null) throw new IllegalArgumentException("null client");
if (inputContext == null) throw new IllegalArgumentException("null inputContext");
Session session = new Session(this, callback, client, inputContext);
return session;
}到这里看到如何获取 Session,下面就是利用 Session 来 add 一个窗口:其实是调用 Session.java 的 addToDisplayWithoutInputChannel 函数
http://androidxref.com/6.0.1_r10/xref/frameworks/base/services/core/java/com/android/server/wm/Session.java
final class Session extends IWindowSession.Stub
        implements IBinder.DeathRecipient {
      //...
        @Override
    public int addToDisplay(IWindow window, int seq, WindowManager.LayoutParams attrs,
        int viewVisibility, int displayId, Rect outContentInsets, Rect outStableInsets,
        Rect outOutsets, InputChannel outInputChannel) {
         return mService.addWindow(this, window, seq, attrs, viewVisibility, displayId,
               outContentInsets, outStableInsets, outOutsets, outInputChannel);
  }
}
在 WindowManager 的 LayoutParams 中,与 type 同等重要的还有 token。
上面说到:在源码中 token 一般代表的是 Binder 对象,作用于 IPC 进程间数据通讯。并且它也包含着此次通讯所需要的信息,在 ViewRootImpl 里,token 用来表示 mWindow (W 类,即 IWindow),并且在 WmS 中只有符合要求的 token 才能让 Window 正常显示。
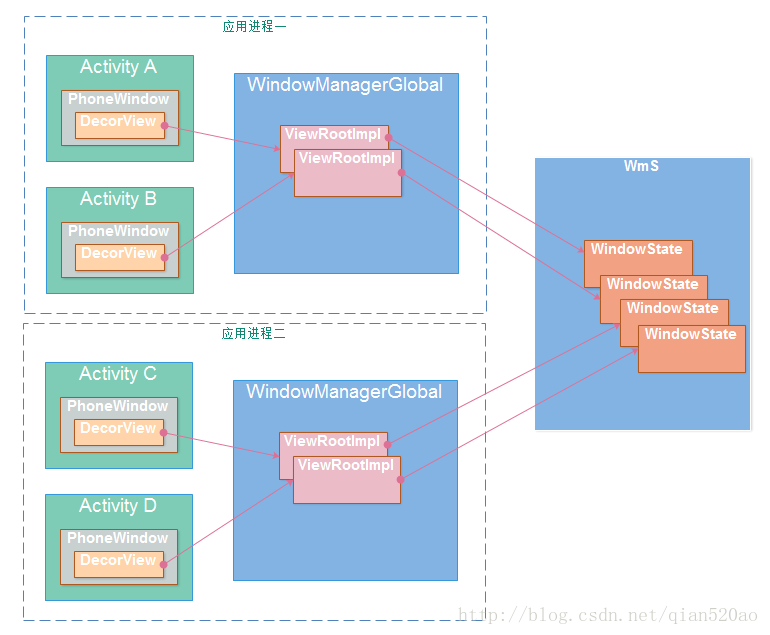
如此一来,Window 的添加请求就交给 WmS 去处理了,在 WmS 内部会为每一个应用保留一个单独的 Session。在 WmS 端会创建一个 WindowState 对象用来表示当前添加的窗口。 WmS 负责管理这里些 WindowState 对象。至此,Window 的添加过程就结束了。
至于 Window 的删除和更新过程,举一反三,也是使用 WindowManagerGlobal 对 ViewRootImpl 的操作,最终也是通过 Session 的 IPC 跨进程通信通知到 WmS。整个过程的本质都是同出一辙的。
在 WMS 中 addWindow 又做了什么呢,就像名字写的,负责添加一个窗口,代码精简后如下:
http://androidxref.com/6.0.1_r10/xref/frameworks/base/services/core/java/com/android/server/wm/WindowManagerService.java
public int addWindow(Session session, IWindow client, int seq,
            WindowManager.LayoutParams attrs, int viewVisibility, int displayId,
            Rect outContentInsets, Rect outStableInsets, Rect outOutsets,
            InputChannel outInputChannel) {
        ...
        synchronized(mWindowMap) {
        ...
        //关键点1 不能重复添加
            if (mWindowMap.containsKey(client.asBinder())) {
                return WindowManagerGlobal.ADD_DUPLICATE_ADD;
            }
        //关键点2 对于子窗口类型的处理 1、必须有父窗口 2,父窗口不能是子窗口类型
            if (type >= FIRST_SUB_WINDOW && type <= LAST_SUB_WINDOW) {
                parentWindow = windowForClientLocked(null, attrs.token, false);
                if (parentWindow == null) {
                    return WindowManagerGlobal.ADD_BAD_SUBWINDOW_TOKEN;
                }
                if (parentWindow.mAttrs.type >= FIRST_SUB_WINDOW
                        && parentWindow.mAttrs.type <= LAST_SUB_WINDOW) {
                    return WindowManagerGlobal.ADD_BAD_SUBWINDOW_TOKEN;
                }}
           ...
           boolean addToken = false;
            //关键点3 根据IWindow 获取WindowToken WindowToken是窗口分组的基础,每个窗口必定有一个分组-
            WindowToken token = mTokenMap.get(attrs.token);
          //关键点4对于Toast类系统窗口,其attrs.token可以看做是null, 如果目前没有其他的类似系统窗口展示,token仍然获取不到,仍然要走新建流程
            if (token == null) {
            ...
                token = new WindowToken(this, attrs.token, -1, false);
                addToken = true;
            }
            ...
             //关键点5 新建WindowState,WindowState与窗口是一对一的关系,可以看做是WMS中与窗口的抽象实体
            WindowState win = new WindowState(this, session, client, token,
                    attachedWindow, appOp[0], seq, attrs, viewVisibility, displayContent);
            ...
            if (addToken) {
                mTokenMap.put(attrs.token, token);
            }
            win.attach();
            mWindowMap.put(client.asBinder(), win);
            ...
           //关键点6
          addWindowToListInOrderLocked(win, true);
        return res;
    }
这里有几个概念需要先了解下:
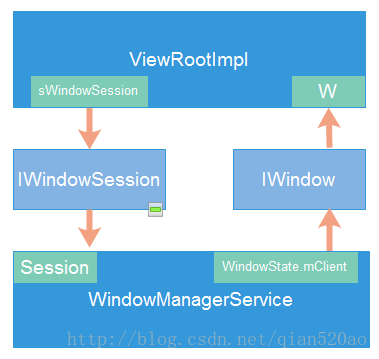
- IWindow:APP 端窗口暴露给 WMS 的抽象实例,在 ViewRootImpl 中实例化,与 ViewRootImpl 一一对应,同时也是 WMS 向 APP 端发送消息的 Binder 通道。
- WindowState:WMS 端窗口的令牌,与 IWindow,或者说与窗口一一对应,是 WMS 管理窗口的重要依据。
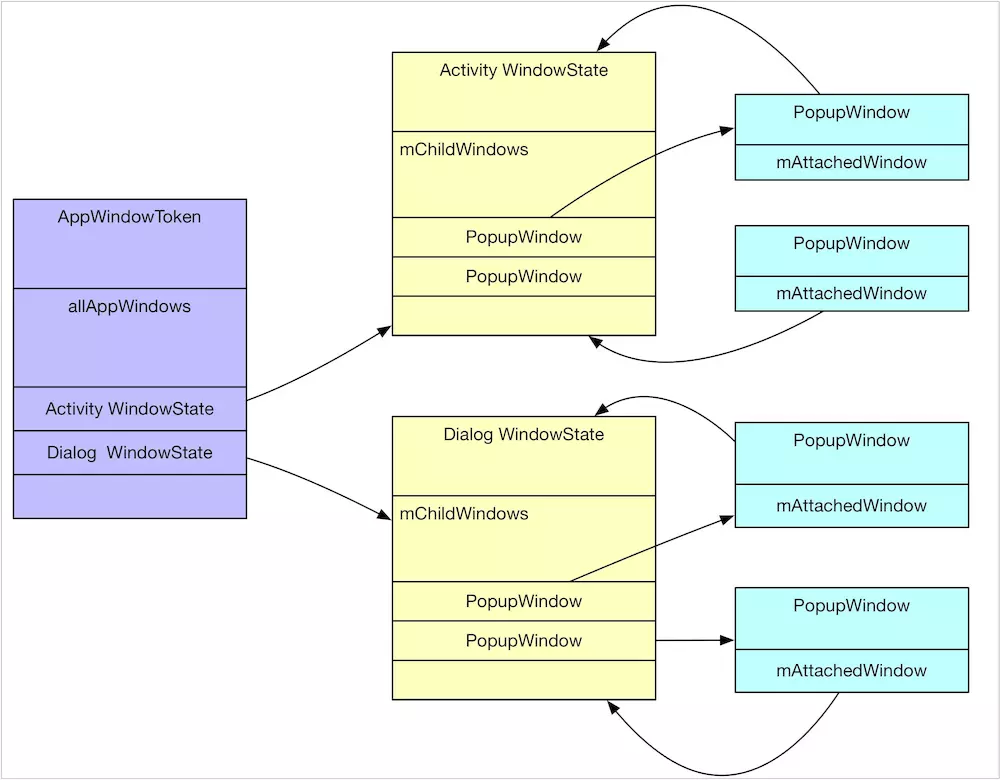
- WindowToken:窗口的令牌,其实也可以看做窗口分组的依据,在 WMS 端,与分组对应的数据结构是 WindowToken(窗口令牌),而与组内每个窗口对应的是 WindowState 对象,每块令牌(AppWindowToken、WindowToken)都对应一组窗口(WindowState),Activity 与 Dialog 对应的是 AppWindowToken,PopupWindow 对应的是普通的 WindowToken。
- AppToken:其实是 ActivityRecord 里面的 IApplicationToken.Stub appToken 代理,也是 ActivityClientRecord 里面的 token,可以看做 Activity 在其他服务(非 AMS)的抽象
那么接着
关键点 1:一个窗口不能被添加两次,IWindow 是一个 Binder 代理,在 WMS 端,一个窗口只会有一个 IWindow 代理,这是由 Binder 通信机制保证的,这个对象不能被添加两次,否则会报错。
关键点 2,如果是子窗口的话,父窗口必须已被添加,由于我们分析的是系统 Toast 窗口,可以先不用关心;
关键点 3,WindowManager.LayoutParams 中有一个 token 字段,该字段标志着窗口的分组属性,比如 Activity 及其中的 Dialog 是复用用一个 AppToken,Activity 里的 PopupWindow 复用一个 IWindow 类型 Token,其实就是 Activity 的 ViewRootImpl 里面创建的 IWindow,而对于我们现在添加的 Toast 类系统窗口,并未设置其 attrs.token,那即是 null,其实所有的 Toast 类系统窗口的 attrs.token 都可以看做 null,就算不是 null,也会在 WMS 被强制设置为 null。所以 Toast 类系统窗口必定复用一个 WindowToken,也可以说所有的 Toast 类系统窗口都是位于同一分组,这也是因为该类型系统窗口太常用,而且为所有进程服务,直接用一个 WindowToken 管理更加快捷,毕竟快速新建与释放 WindowToken 也算是一种开销。假设到我们添加系统窗口的时候,没有任何系统窗口展示,是获取不到 key=null 的 WindowToken 的,要新建 WindowToken,并且添加到全局的 TokenMap 中,
而关键点 5,其实就是新建窗口在 WMS 端的抽象实例:WindowState,它同窗口一一对应,详细记录了窗口的参数、Z 顺序、状态等各种信息,新建只有会被放入全局的 Map 中,同时也会被附加到相应的 WindowToken 分组中去,到这里 APP 端向 WMS 注册窗口的流程就算走完了,不过只算完成了前半部分,WMS 还需要向 SurfaceFlinger 申请 Surface,才算完成真正的分配了窗口。在向 SurfaceFlinger 申请 Surface 之前,WMS 端需要获得 SF 的代理,在 WindowState 对象创建后会利用 win.attach () 函数为当前 APP 申请建立 SurfaceFlinger 的链接:
void attach() {
    if (WindowManagerService.localLOGV) Slog.v(
    mSession.windowAddedLocked();
}

void windowAddedLocked() {
    if (mSurfaceSession == null) {
       // SurfaceSession新建
        mSurfaceSession = new SurfaceSession();
        mService.mSessions.add(this);
       ...
    }
    mNumWindow++;
}
可以看到 SurfaceSession 对于 Session 来说是单利的,也就是与 APP 的 Seesion 一一对应,SurfaceSession 所握着的 SurfaceFlinger 的代理其实就是 SurfaceComposerClient,其实现如下:
public SurfaceSession() {
        mNativeClient = nativeCreate();
    }

    static jlong nativeCreate(JNIEnv* env, jclass clazz) {
        SurfaceComposerClient* client = new SurfaceComposerClient();
        client->incStrong((void*)nativeCreate);
        return reinterpret_cast<jlong>(client);
    }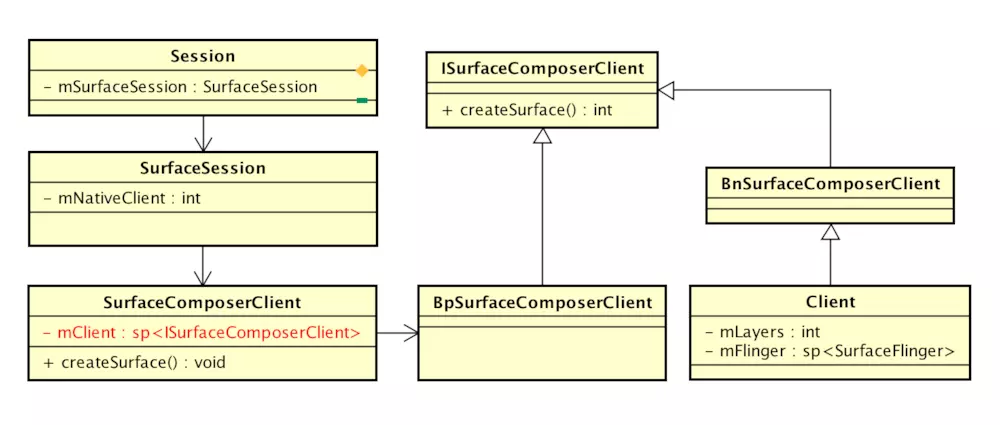
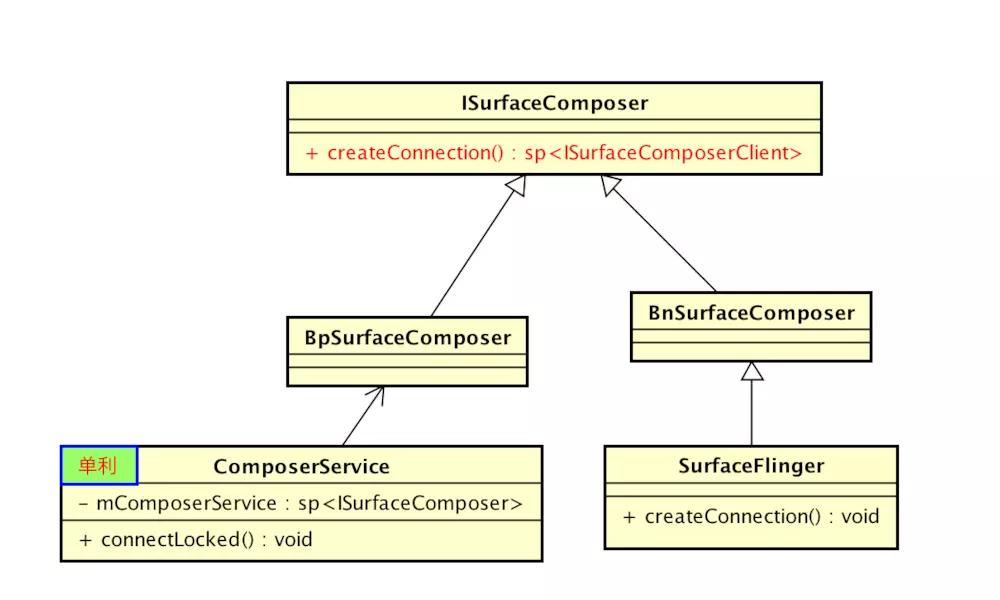
SurfaceComposerClient::SurfaceComposerClient()
    : mStatus(NO_INIT), mComposer(Composer::getInstance())
{
}
// 单利的,所以只有第一次的时候采用
void SurfaceComposerClient::onFirstRef() {
    sp<ISurfaceComposer> sm(ComposerService::getComposerService());
    if (sm != 0) {
        sp<ISurfaceComposerClient> conn = sm->createConnection();
        if (conn != 0) {
            mClient = conn;
            mStatus = NO_ERROR;
        }
    }
}

sp<ISurfaceComposerClient> SurfaceFlinger::createConnection()
{
    sp<ISurfaceComposerClient> bclient;
    sp<Client> client(new Client(this));
    status_t err = client->initCheck();
    if (err == NO_ERROR) {
        bclient = client;
    }
    return bclient;
}
void scheduleTraversals() {
    if (!mTraversalScheduled) {
        mTraversalScheduled = true;

            //关键点1 添加塞子
        mTraversalBarrier = mHandler.getLooper().getQueue().postSyncBarrier();
        //关键点2 添加异步消息任务
        mChoreographer.postCallback(
                Choreographer.CALLBACK_TRAVERSAL, mTraversalRunnable, null);
...private void performTraversals() {
final View host = mView;
...
if (mFirst || windowShouldResize || insetsChanged ||
viewVisibilityChanged || params != null) {
//关键点1 申请Surface或者重新设置参数
relayoutResult = relayoutWindow(params, viewVisibility, insetsPending);
//关键点2 测量
performMeasure(childWidthMeasureSpec, childHeightMeasureSpec);
}
//关键点3 布局
performLayout(lp, desiredWindowWidth, desiredWindowHeight);
//关键点4 更新window
try {
mWindowSession.setInsets(mWindow, insets.mTouchableInsets,
contentInsets, visibleInsets, touchableRegion);
...
//关键点5 绘制
performDraw();
...
}private int relayoutWindow(WindowManager.LayoutParams params, int viewVisibility,
boolean insetsPending) throws RemoteException {
...
int relayoutResult = mWindowSession.relayout(
mWindow, mSeq, params, ... mSurface);
...
return relayoutResult;
}public int relayoutWindow(Session session, IWindow client, int seq,... Surface outSurface) {
WindowState win = windowForClientLocked(session, client, false);
WindowStateAnimator winAnimator = win.mWinAnimator;
//关键点1
SurfaceControl surfaceControl = winAnimator.createSurfaceLocked();
if (surfaceControl != null) {
//关键点2
outSurface.copyFrom(surfaceControl);
} else {
outSurface.release();
}static jlong nativeCreate(JNIEnv* env, jclass clazz, jobject sessionObj,
jstring nameStr, jint w, jint h, jint format, jint flags) {
ScopedUtfChars name(env, nameStr);
//关键点1
sp<SurfaceComposerClient> client(android_view_SurfaceSession_getClient(env, sessionObj));
//关键点2
sp<SurfaceControl> surface = client->createSurface(
String8(name.c_str()), w, h, format, flags);
surface->incStrong((void *)nativeCreate);
return reinterpret_cast<jlong>(surface.get());
}关键点 1 是取到 SurfaceSession 对象中 SurfaceComposerClient 对象,之后调用 SurfaceComposerClient 的 createSurface 方法进一步创建 SurfaceControl,
sp<SurfaceControl> SurfaceComposerClient::createSurface(
        const String8& name,
        uint32_t w,
        uint32_t h,
        PixelFormat format,
        uint32_t flags)
{
    sp<SurfaceControl> sur;
    if (mStatus == NO_ERROR) {
        sp<IBinder> handle;
        sp<IGraphicBufferProducer> gbp;
        //关键点1 获取图层的关键信息handle, gbp
        status_t err = mClient->createSurface(name, w, h, format, flags,
                &handle, &gbp);
         //关键点2 根据返回的图层关键信息 创建SurfaceControl对象
        if (err == NO_ERROR) {
            sur = new SurfaceControl(this, handle, gbp);
        }
    }
    return sur;
}status_t Client::createSurface(
const String8& name,
uint32_t w, uint32_t h, PixelFormat format, uint32_t flags,
sp<IBinder>* handle,
sp<IGraphicBufferProducer>* gbp){
...
//关键点2 这里并未直接创建 ,而是通过发送了一个MessageCreateLayer消息
sp<MessageBase> msg = new MessageCreateLayer(mFlinger.get(),
name, this, w, h, format, flags, handle, gbp);
mFlinger->postMessageSync(msg);
return static_cast<MessageCreateLayer*>( msg.get() )->getResult();
}Client 并不会直接新建图层,而是向 SurfaceFlinger 发送一个 MessageCreateLayer 消息,通知 SurfaceFlinger 服务去执行,其 handler 代码如下:
class MessageCreateLayer : public MessageBase {
        SurfaceFlinger* flinger;
        Client* client;
            virtual bool handler() {
            result = flinger->createLayer(name, client, w, h, format, flags,
                    handle, gbp);
            return true;
        }
    };
其实就是调用 SurfaceFlinger 的 createLayer,创建一个图层,到这里才是真正的创建图层:
status_t SurfaceFlinger::createLayer(
        const String8& name,
        const sp<Client>& client,
        uint32_t w, uint32_t h, PixelFormat format, uint32_t flags,
        sp<IBinder>* handle, sp<IGraphicBufferProducer>* gbp)
{
    if (int32_t(w|h) < 0) {
        return BAD_VALUE;
    }

    status_t result = NO_ERROR;

    sp<Layer> layer;
     //关键点1 新建不同图层
    switch (flags & ISurfaceComposerClient::eFXSurfaceMask) {
        case ISurfaceComposerClient::eFXSurfaceNormal:
            result = createNormalLayer(client,
                    name, w, h, flags, format,
                    handle, gbp, &layer);
            break;
        case ISurfaceComposerClient::eFXSurfaceDim:
            result = createDimLayer(client,
                    name, w, h, flags,
                    handle, gbp, &layer);
            break;
        default:
            result = BAD_VALUE;
            break;
    }

    if (result != NO_ERROR) {
        return result;
    }
   ...
}
SurfaceFlinger 会根据不同的窗口参数,创建不同类型的图层,这里只看一下 createNormalLayer 普通样式的图层,
status_t SurfaceFlinger::createNormalLayer(const sp<Client>& client,
        const String8& name, uint32_t w, uint32_t h, uint32_t flags, PixelFormat& format,
        sp<IBinder>* handle, sp<IGraphicBufferProducer>* gbp, sp<Layer>* outLayer)
{
    // initialize the surfaces
    switch (format) {
    case PIXEL_FORMAT_TRANSPARENT:
    case PIXEL_FORMAT_TRANSLUCENT:
        format = PIXEL_FORMAT_RGBA_8888;
        break;
    case PIXEL_FORMAT_OPAQUE:
        format = PIXEL_FORMAT_RGBX_8888;
        break;
    }
    //关键点 1
    *outLayer = new Layer(this, client, name, w, h, flags);
    status_t err = (*outLayer)->setBuffers(w, h, format, flags);
    //关键点 2
    if (err == NO_ERROR) {
        *handle = (*outLayer)->getHandle();
        *gbp = (*outLayer)->getProducer();
    }
  return err;
}
可以看到 图层最终对应的是 Layer,这里会新建一个 Layer 对象,Layer 中包含着与这个图层对应的 Handle 及 Producer 对象,Handle 可以看做是 Surface 的唯一性标识,不过好像没太大的作用,最多是一个标识,将来清理的时候有用。相比之下 gbp = (*outLayer)->getProducer () 比较重要,它实际是一个 BufferQueueProducer 对象,关系到共享内存的分配问题,后面会专门分析,这里到此打住,我们终于得到了一个图层对象,到这里之后,我们梳理一下,图层如何建立的:
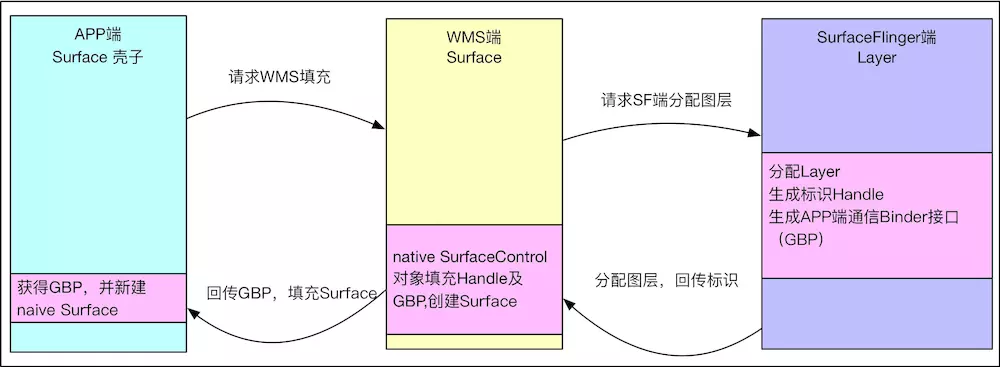
- 首先 APP 端新建一个 Surface 图层的容器壳子,
- APP 通过 Binder 通信将这个 Surface 的壳子传递给 WMS,
- WMS 为了填充 Surface 去向 SurfaceFlinger 申请真正的图层,
- SurfaceFlinger 收到 WMS 请求为 APP 端的 Surface 分配真正图层
- 将图层相关的关键信息 Handle 及 Producer 传递给 WMS
Layer 建立之后,SurfaceFlinger 会将图层标识信息 Handle 及 Producer 传递给 WMS,WMS 利用这两者创建一个 SurfaceControl 对象,之后再利用该对象创建 Surface,具体代码如下:
void getSurface(Surface outSurface) {
    outSurface.copyFrom(mSurfaceControl);
}

public void copyFrom(SurfaceControl other) {
long surfaceControlPtr = other.mNativeObject;
long newNativeObject = nativeCreateFromSurfaceControl(surfaceControlPtr);
synchronized (mLock) {
    setNativeObjectLocked(newNativeObject);
}
}
可以看到 Surface 的拷贝函数其实就是直接修改 Surface native 对象指针值,native 的 Surface 对象中包含 mGraphicBufferProducer 对象,很重要,会被传递给 APP 端。
static jlong nativeCreateFromSurfaceControl(JNIEnv* env, jclass clazz,
        jlong surfaceControlNativeObj) {

    sp<SurfaceControl> ctrl(reinterpret_cast<SurfaceControl *>(surfaceControlNativeObj));
    sp<Surface> surface(ctrl->getSurface());
    if (surface != NULL) {
        surface->incStrong(&sRefBaseOwner);
    }
    return reinterpret_cast<jlong>(surface.get());
}

sp<Surface> SurfaceControl::getSurface() const
{
    Mutex::Autolock _l(mLock);
    if (mSurfaceData == 0) {
        mSurfaceData = new Surface(mGraphicBufferProducer, false);
    }
    return mSurfaceData;
}
到这里 WMS 端 Surface 创建及填充完毕,并且 Surface 其实与 WMS 的 SurfaceControl 一一对应,当 APP 端需要在图层级别进行操控的时候,其实还是要依靠 SurfaceControl 的,WMS 的 Surface 创建完毕后,需要传递给 APP 端,之后 APP 端就获得直接同 SurfaceFlinger 通信的能力,比如绘图与 UI 更新,怎传递的呢?我们知道 Surface 实现了 Parcel 接口,因此可以传递序列化的数据,其实看一下 Surface nativeReadFromParcel 就知道到底是怎么传递的了,利用 readStrongBinder 获取 IGraphicBufferProducer 对象的句柄,之后转化为 IGraphicBufferProducer 代理其实就是 BpGraphicBufferProducer,之后利用 BpGraphicBufferProducer 构建 Surface,这样 APP 端 Surface 就被填充完毕,可以同 SurfaceFlinger 通信了:
static jlong nativeReadFromParcel(JNIEnv* env, jclass clazz,
        jlong nativeObject, jobject parcelObj) {
    Parcel* parcel = parcelForJavaObject(env, parcelObj);
    if (parcel == NULL) {
        doThrowNPE(env);
        return 0;
    }
     sp<Surface> self(reinterpret_cast<Surface *>(nativeObject));
    sp<IBinder> binder(parcel->readStrongBinder());
    if (self != NULL
            && (IInterface::asBinder(self->getIGraphicBufferProducer()) == binder)) {
        return jlong(self.get());
    }
    sp<Surface> sur;
    sp<IGraphicBufferProducer> gbp(interface_cast<IGraphicBufferProducer>(binder));
    if (gbp != NULL) {
        sur = new Surface(gbp, true);
        sur->incStrong(&sRefBaseOwner);
    }

    if (self != NULL) {
        self->decStrong(&sRefBaseOwner);
    }

    return jlong(sur.get());
}
到这里为止,APP<->WMS <->WMS 通信申请 Surface 的流程算走完了
总结
窗口的添加流程简化如下,这里暂且忽略窗口的分组管理。
- APP 首先去 WMS 登记窗口
- WMS 端登记窗口
- APP 新建 Surface 壳子,请求 WMS 填充 Surface
- WMS 请求 SurfaceFlinger 分配窗口图层
- SurfaceFlinger 分配 Layer,将结果回传给 WMS
- WMS 将窗口信息填充到 Surface 传输到 APP
- APP 端获得填充信息,获取与 SurfaceFlinger 通信的能力
WindowToken")
android window(四)WindowToken
在WindowManagerService中有两种常见的Token,WindowToken,和AppWindowToken。
WindowToken
http://androidxref.com/6.0.1_r10/xref/frameworks/base/services/core/java/com/android/server/wm/WindowToken.java
class WindowToken {
    // The window manager!
    final WindowManagerService service;
    final IBinder token;
    final int windowType;
    final boolean explicit;
    String stringName;
    // If this is an AppWindowToken, this is non-null.
    AppWindowToken appWindowToken;

    // All of the windows associated with this token.
    final WindowList windows = new WindowList();
    //...
}
成员变量token是IBinder对象,具有系统唯一性,因此向WMS的mWindowMap或者mTokenMap中插入对象时都是使用token值作为索引。
explicit为false表示这个Token是在WMS中创建的,为true表示其他模块通过addAppToken()或者addWindowToke()方法显示创建的。成员变量windows的类型是WindowList,他包含一个WindowState对象的列表,所有拥有相同WindowToken的窗口都在这个列表中。成员变量windowType表示窗口类型。
AppWindowToken
AppWindowToken从WindowToken类派生,它是一种比较特殊的WindowToken,代表应用窗口,主要是Activity中创建的顶层窗口。一个WindowToken对象成员变量appWinowToken为Null,那么他就不是AppWindowToken对象。
http://androidxref.com/6.0.1_r10/xref/frameworks/base/services/core/java/com/android/server/wm/AppWindowToken.java
class AppWindowToken extends WindowToken {
    final IApplicationToken appToken;
    // All of the windows and child windows that are included in this
    // application token.  Note this list is NOT sorted!
    final WindowList allAppWindows = new WindowList();
    final AppWindowAnimator mAppAnimator;

    final WindowAnimator mAnimator;
//...

}
appToken用来表示应用Token,它是ActivityManagerService中创建的,代表一个应用。
allAppWindows也是一个WindowList,它保存了所有拥有相同AppWindowToken类型的Token
WindowToken
1.WindowToken的意义
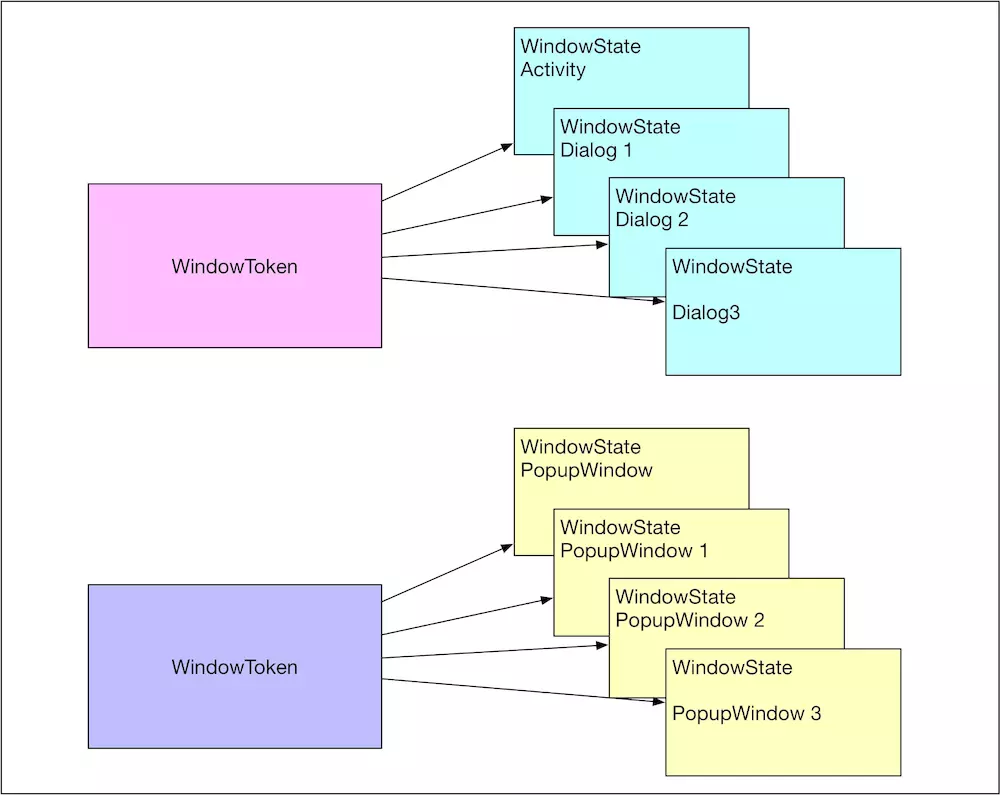
WindowToken将属于同一个应用组件的窗口组织在了一起。所谓的应用组件可以是Activity、InputMethod、Wallpaper以及Dream。在WMS对窗口的管理过程中,用WindowToken指代一个应用组件。例如在进行窗口ZOrder排序时,属于同一个WindowToken的窗口会被安排在一起,而且在其中定义的一些属性将会影响所有属于此WindowToken的窗口。这些都表明了属于同一个WindowToken的窗口之间的紧密联系。
WindowToken具有令牌的作用,是对应用组件的行为进行规范管理的一个手段。WindowToken由应用组件或其管理者负责向WMS声明并持有。应用组件在需要新的窗口时,必须提供WindowToken以表明自己的身份,并且窗口的类型必须与所持有的WindowToken的类型一致。在创建系统类型的窗口时不需要提供一个有效的Token,WMS会隐式地为其声明一个WindowToken,看起来谁都可以添加个系统级的窗口。难道Android为了内部使用方便而置安全于不顾吗?非也,addWindow()函数一开始的mPolicy.checkAddPermission()的目的就是如此。它要求客户端必须拥有SYSTEM_ALERT_WINDOW或INTERNAL_SYSTEM_WINDOW权限才能创建系统类型的窗口。
2.向WMS声明WindowToken
既然应用组件在创建一个窗口时必须指定一个有效的WindowToken才行,那么WindowToken究竟该如何声明呢?
final class Session extends IWindowSession.Stub
        implements IBinder.DeathRecipient {
      //...
        @Override
    public int addToDisplay(IWindow window, int seq, WindowManager.LayoutParams attrs,
        int viewVisibility, int displayId, Rect outContentInsets, Rect outStableInsets,
        Rect outOutsets, InputChannel outInputChannel) {
         return mService.addWindow(this, window, seq, attrs, viewVisibility, displayId,
               outContentInsets, outStableInsets, outOutsets, outInputChannel);
  }
}
mService是WindowManagerService
http://androidxref.com/6.0.1_r10/xref/frameworks/base/services/core/java/com/android/server/wm/WindowManagerService.java
为了验证这一点,来看一下addWindow的代码,如下所示:public int addWindow(Session session, IWindow client, int seq,
WindowManager.LayoutParams attrs, int viewVisibility, int displayId,
Rect outContentInsets, Rect outStableInsets, Rect outOutsets,
InputChannel outInputChannel) {
WindowToken token = mTokenMap.get(attrs.token);
AppWindowToken atoken = null;
if (token == null) {
...
token = new WindowToken(this, attrs.token, -1, false);
addToken = true;
}
}WindowToken对于客户端来说只是一个令牌,一个可以添加窗口的许可,WindowToken对于WMS来说,是一个WindowToken的实例对象,存储在mTokenMap中。WindowToken将同一个应用组件(Activity,InputMethod,Wallpaper,Dream)的窗口组织在一起
来看一下另一个addWindowToken的代码
使用wms.addWindowToken()函数声明mToken作为它的令牌,所以在添加窗口时,通过设置lp.token为mToken向WMS进行出示,从而获得WMS添加窗口的许可。这说明,只要是一个Binder对象(随便一个),都可以作为Token向WMS进行声明。对于WMS的客户端来说,Token仅仅是一个Binder对象而已。
,如下所示:
http://androidxref.com/6.0.1_r10/xref/frameworks/base/services/core/java/com/android/server/wm/WindowManagerService.java
  @Override
    publicvoid addWindowToken(IBinder token, int type) {
        // 需要声明Token的调用者拥有MANAGE_APP_TOKENS的权限
        if(!checkCallingPermission(android.Manifest.permission.MANAGE_APP_TOKENS,
               "addWindowToken()")) {
            thrownew SecurityException("Requires MANAGE_APP_TOKENS permission");
        }
        synchronized(mWindowMap){
            ......
           // 注意其构造函数的参数与addWindow()中不同,最后一个参数为true,表明这个Token
           // 是显式申明的
            wtoken= new WindowToken(this, token, type, true);
            mTokenMap.put(token,wtoken);
            ......
        }
    }
使用addWindowToken()函数声明Token,将会在WMS中创建一个WindowToken实例,并添加到mTokenMap中,键值为客户端用于声明Token的Binder实例。与addWindow()函数中隐式地创建WindowToken不同,这里的WindowToken被声明为显式的。隐式与显式的区别在于,当隐式创建的WindowToken的最后一个窗口被移除后,此WindowToken会被一并从mTokenMap中移除。显式创建的WindowToken只能通过removeWindowToken()显式地移除。
addWindowToken()这个函数告诉我们,WindowToken其实有两层含义:
- 对于显示组件(客户端)而言的Token,是任意一个Binder的实例,对显示组件(客户端)来说仅仅是一个创建窗口的令牌,没有其他的含义。
- 对于WMS而言的WindowToken这是一个WindowToken类的实例,保存了对应于客户端一侧的Token(Binder实例),并以这个Token为键,存储于mTokenMap中。客户端一侧的Token是否已被声明,取决于其对应的WindowToken是否位于mTokenMap中。
注意 在一般情况下,称显示组件(客户端)一侧Binder的实例为Token,而称WMS一侧的WindowToken对象为WindowToken。但是为了叙述方便,在没有歧义的前提下不会过分仔细地区分这两个概念。
接下来,看一下各种显示组件是如何声明WindowToken的。
(1) Wallpaper和InputMethod的Token
Wallpaper的Token声明在WallpaperManagerService中。参考以下代码:
boolean bindWallpaperComponentLocked(......) {
    ......
   WallpaperConnection newConn = new WallpaperConnection(wi, wallpaper);
    ......
    mIWindowManager.addWindowToken(newConn.mToken,
                         WindowManager.LayoutParams.TYPE_WALLPAPER);
    ......
}
WallpaperManagerService是Wallpaper管理器,它负责维护系统已安装的所有的Wallpaper并在它们之间进行切换,而这个函数的目的是准备显示一个Wallpaper。newConn.mToken与SampleWindow例子一样,是一个简单的Binder对象。这个Token将在即将显示出来的Wallpaper被连接时传递给它,之后Wallpaper即可通过这个Token向WMS申请创建绘制壁纸所需的窗口了。
注意 :WallpaperManagerService向WMS声明的Token类型为TYPE_WALLPAPER,所以,Wallpaper仅能本分地创建TYPE_WALLPAPER类型的窗口。
相应的,WallpaperManagerService会在detachWallpaperLocked()函数中取消对Token的声明:
boolean detachWallpaperLocked(WallpaperData wallpaper){
    ......
    mIWindowManager.removeWindowToken(wallpaper.connection.mToken);
    ......
}
再此之后,如果这个被detach的Wallpaper想再要创建窗口便不再可能了。
WallpaperManagerService使用WindowToken对一个特定的Wallpaper做出了如下限制:
- Wallpaper只能创建TYPE_WALLPAPER类型的窗口。
- Wallpaper显示的生命周期由WallpaperManagerService牢牢地控制着。仅有当前的Wallpaper才能创建窗口并显示内容。其他的Wallpaper由于没有有效的Token,而无法创建窗口。
InputMethod的Token的来源与Wallpaper类似,其声明位于InputMethodManagerService的startInputInnerLocked()函数中,取消声明的位置在InputmethodManagerService的unbindCurrentMethodLocked()函数。InputMethodManagerService通过Token限制着每一个InputMethod的窗口类型以及显示生命周期。
Activity的Token
Activity的Token的使用方式与Wallpaper和InputMethod类似,但是其包含更多的内容。毕竟,对于Activity,无论是其组成还是操作都比Wallpaper以及InputMethod复杂得多。对此,WMS专为Activity实现了一个WindowToken的子类:AppWindowToken。
既然AppWindowToken是为Activity服务的,那么其声明自然在ActivityManagerService中。具体位置为ActivityStack.startActivityLocked(),也就是启动Activity的时候。相关代码如下:
ActivityStack.startActivityLocked()
http://androidxref.com/6.0.1_r10/xref/frameworks/base/services/core/java/com/android/server/am/ActivityStack.java
private final void startActivityLocked(......) {
    ......
    mService.mWindowManager.addAppToken(addPos,r.appToken, r.task.taskId,
                               r.info.screenOrientation, r.fullscreen);
    ......
}
startActivityLocked()向WMS声明r.appToken作为此Activity的Token,这个Token是在ActivityRecord的构造函数中创建的。随然后在realStartActivityLocked()中将此Token交付给即将启动的Activity。
ActivityStack.realStartActivityLocked()
final boolean realStartActivityLocked(......) {
    ......
    app.thread.scheduleLaunchActivity(newIntent(r.intent), **r.appToken,**
                System.identityHashCode(r), r.info,
                newConfiguration(mService.mConfiguration),
                r.compat, r.icicle, results, newIntents,!andResume,
    mService.isNextTransitionForward(),profileFile, profileFd,
                profileAutoStop);
    ......
}
动后的Activity即可使用此Token创建类型为TYPE_APPLICATION的窗口了。
取消Token的声明则位于ActivityStack.removeActivityFromHistoryLocked()函数中。
Activity的Token在客户端是否和Wallpaper一样,仅仅是一个基本的Binder实例呢?其实不然。看一下r.appToken的定义可以发现,这个Token的类型是IApplicationToken.Stub。其中定义了一系列和窗口相关的一些通知回调,它们是:
- windowsDrawn(),当窗口完成初次绘制后通知AMS。
- windowsVisible(),当窗口可见时通知AMS。
- windowsGone(),当窗口不可见时通知AMS。
- keyDispatchingTimeout(),窗口没能按时完成输入事件的处理。这个回调将会导致ANR。
- getKeyDispatchingTimeout(),从AMS处获取界定ANR的时间。
AMS通过ActivityRecord表示一个Activity。而ActivityRecord的appToken在其构造函数中被创建,所以每个ActivityRecord拥有其各自的appToken。而WMS接受AMS对Token的声明,并为appToken创建了唯一的一个AppWindowToken。因此,这个类型为IApplicationToken的Binder对象appToken粘结了AMS的ActivityRecord与WMS的AppWindowToken,只要给定一个ActivityRecord,都可以通过appToken在WMS中找到一个对应的AppWindowToken,从而使得AMS拥有了操纵Activity的窗口绘制的能力。例如,当AMS认为一个Activity需要被隐藏时,以Activity对应的ActivityRecord所拥有的appToken作为参数调用WMS的setAppVisibility()函数。此函数通过appToken找到其对应的AppWindowToken,然后将属于这个Token的所有窗口隐藏。
注意: 每当AMS因为某些原因(如启动/结束一个Activity,或将Task移到前台或后台)而调整ActivityRecord在mHistory中的顺序时,都会调用WMS相关的接口移动AppWindowToken在mAppTokens中的顺序,以保证两者的顺序一致。在后面讲解窗口排序规则时会介绍到,AppWindowToken的顺序对窗口的顺序影响非常大。
今天关于android – 如何在集群管理器中的标记中调用showinfowindow()?和集群管理器如何配置的讲解已经结束,谢谢您的阅读,如果想了解更多关于Android Google Maps v2永久标记InfoWindow、Android PopupWindow的showAsDropDown位置失效的问题、android window (三) lWindow 添加流程、android window(四)WindowToken的相关知识,请在本站搜索。
本文标签:


