对于HTML5CanvasdrawImage比率错误iOS感兴趣的读者,本文将会是一篇不错的选择,我们将详细介绍canvasdrawbitmap,并为您提供关于canvasdrawImage、canv
对于HTML5 Canvas drawImage比率错误iOS感兴趣的读者,本文将会是一篇不错的选择,我们将详细介绍canvas drawbitmap,并为您提供关于canvas drawImage、canvas drawImage属性、canvas drawimage绘制图像出错(默认canvas300*150)解决办法、canvas 中的 drawImage的有用信息。
本文目录一览:- HTML5 Canvas drawImage比率错误iOS(canvas drawbitmap)
- canvas drawImage
- canvas drawImage属性
- canvas drawimage绘制图像出错(默认canvas300*150)解决办法
- canvas 中的 drawImage
")
HTML5 Canvas drawImage比率错误iOS(canvas drawbitmap)
我想使用HTML5 Canvas调整从客户端iOS摄像头拍摄的图像的大小,但是我一直在运行这个怪异的bug,该图像中的图像比例大于1.5mb时显示错误的比例
它可以在桌面上运行,但不能在具有媒体上传API的最新iOS版本中使用。
知道如何解决这个问题吗?这是内存问题吗?
$(''#file'').on(''change'', function (e) { var file = e.currentTarget.files[0]; var reader = new FileReader(); reader.onload = function (e) { var image = $(''<img/>''); image.on(''load'', function () { var square = 320; var canvas = document.createElement(''canvas''); canvas.width = square; canvas.height = square; var context = canvas.getContext(''2d''); context.clearRect(0, 0, square, square); var imageWidth; var imageHeight; var offsetX = 0; var offsetY = 0; if (this.width > this.height) { imageWidth = Math.round(square * this.width / this.height); imageHeight = square; offsetX = - Math.round((imageWidth - square) / 2); } else { imageHeight = Math.round(square * this.height / this.width); imageWidth = square; offsetY = - Math.round((imageHeight - square) / 2); } context.drawImage(this, offsetX, offsetY, imageWidth, imageHeight); var data = canvas.toDataURL(''image/jpeg''); var thumb = $(''<img/>''); thumb.attr(''src'', data); $(''body'').append(thumb); }); image.attr(''src'', e.target.result); }; reader.readAsDataURL(file);});答案1
小编典典有一个JavaScript画布调整大小库,可解决在iOS设备上在画布上绘制缩放图像时遇到的二次采样和垂直压扁问题:
当使用Alpha通道缩放图像(因为它使用Alpha通道进行问题检测)以及尝试调整现有画布元素的大小时,存在一些附带问题,但这是我发现的第一个实际解决此问题的方法。

canvas drawImage
canvas里面点击一次,就画一张图,然后怎么给没张图加一个时间,或者获取到当前位置是否画过了那张图。
canvas drawImage属性
使用canvas绘制动态视频 :
每20毫秒,代码就会复制视频的当前帧:
var v = document.getElementById(''video1'')
var c = document.getElementById(''myCanvas'')
ctx = c.getContext(''2d'')
v.addEventListener(''play'', function () {
var i = window.setINterval(function () {
ctx.drawImage(v, 0, 0, 270, 135)
}, 20)
}, false)
v.addEventListener(''pause'', function () {
window.clearInterval(i)
}, false)
v.addEventListener(''ended'', function () {
clearInterval(i)
})
解决办法")
canvas drawimage绘制图像出错(默认canvas300*150)解决办法
今天在开发中,再一次踩了以前踩过的坑,写完程序在这里写一下,分享给大家也避免再次遇坑。
//默认的canvas
<canvas id ="canvas"></canvas>
此时,他的宽高是默认的300*150
如果这样声明:
<canvas id ="canvas"></canvas>按理说,宽高应该是500/300,但是获取到的宽高是 300*150。
我通过js设置的$("#canvas").get(0).style.width,自适应屏幕宽高,也是上述情况。
像这种类似的在style里设置宽高,都会造成与实际不符。所以要避免这种赋值方法。
正确书写方法:
Canvas元素默认宽 300px, 高 150px, 设置其宽高使用如下方法:
方法一:
1 <canvas width="500" height="500"$amp;>amp;$lt;/canvas>

方法二:使用HTML5 Canvas API操作
1 var canvas = document.getElementById(''欲操作canvas的id'');
2 canvas.width = 500;
3 canvas.width = 500;

若通过如下方法设置宽高,那么canvas宽高还是300*150:
错误方法一:使用CSS 会被拉伸
1 #canvas{
2     width:1000px;
3     height:1000px;
4 }

也包含了行间样式中的。也就是上面的例子。

错误方法二:使用HTML5 Canvas API操作
1 var canvas = document.getElementById(''canvas的id'');
2 canvas.style.width = "1000px";
3 canvas.style.height = "1000px";

错误方法三 :用jquery的$("#id").get(0).style.width();

canvas 中的 drawImage
一、在 canvas 画布中如何加载图片
--- 用 drawImage ( ) 方法
drawImage 用法的三种情况:
1、在画布指定位置定义图像
ctx.drawImage(img,x,y);注:此时画布上显示的图片大小是图片的默认大小
2、在画布上定位图像,并规定图像的宽度和高度:
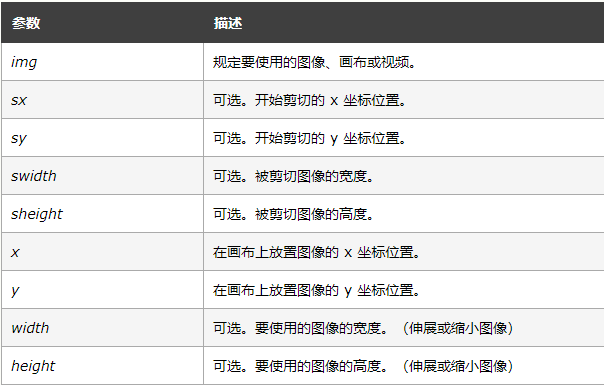
ctx.drawImage(img,x,y,width,height);3、剪切图像,并在画布上定位被剪切的部分:
ctx.drawImage(img,sx,sy,swidth,sheight,x,y,width,height);参数值
4、加载图片的两种方法
(1)、document.getElementById('' img '');
(2)、var image = new Image( ) ;
二、在画布中心加载部分图片
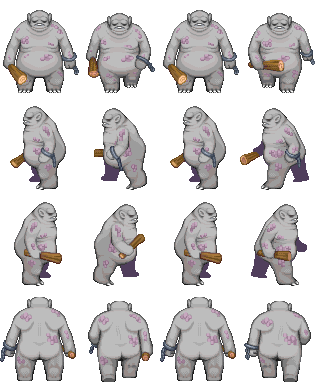
如上图、加载第一行的第一个小怪兽
<script>
        var Person = function(canvas){
          this.ctx = document.querySelector("canvas").getContext("2d");
          this.canvasWidth = this.ctx.canvas.width;
          this.canvasHeight = this.ctx.canvas.height;
          this.src = "image/04.png";
          this.init();
        }
        Person.prototype.init = function(){
          var that = this;
          this.loadImage(function(image){
            // 获取图片的宽高
            that.imageWidth = image.width;
            that.imageHeight = image.height;
            // 获取单个小怪兽区域的宽高
            that.positionWidth = that.imageWidth / 4;
            that.positionHeight = that.imageHeight / 4;

            // 默认是从左上角显示的
            that.x0 = that.canvasWidth / 2 - that.positionWidth / 2;
            that.y0 = that.canvasHeight / 2 - that.positionHeight / 2;

            // 绘制图片
            that.ctx.drawImage(image, 0, 0, that.positionWidth, that.positionHeight, that.x0,
              that.y0, that.positionWidth, that.positionHeight);

          })
        }
        Person.prototype.loadImage = function(callback){
          var image = new Image();
          // 图片加载完成后执行
          image.onload = function(){
            callback && callback(image);
          }
          image.src = this.src;
        }

        var person = new Person();
</script> 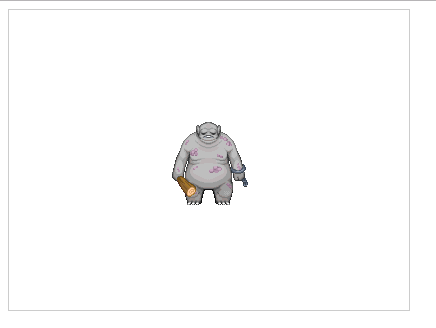
三、绘制小人行走的帧动画
<s<script>
        var Person = function(canvas){
          this.ctx = document.querySelector("canvas").getContext("2d");
          this.canvasWidth = this.ctx.canvas.width;
          this.canvasHeight = this.ctx.canvas.height;
          this.src = "image/04.png";
          this.init();
        }
        Person.prototype.init = function(){
          var that = this;
          this.loadImage(function(image){
            // 获取图片的宽高
            that.imageWidth = image.width;
            that.imageHeight = image.height;
            // 获取单个小怪兽区域的宽高
            that.positionWidth = that.imageWidth / 4;
            that.positionHeight = that.imageHeight / 4;

            // 默认是从左上角显示的
            that.x0 = that.canvasWidth / 2 - that.positionWidth / 2;
            that.y0 = that.canvasHeight / 2 - that.positionHeight / 2;

            // 绘制图片
            that.ctx.drawImage(image, 0, 0, that.positionWidth, that.positionHeight, that.x0,
              that.y0, that.positionWidth, that.positionHeight);
            var index = 0;
            setInterval(function(){
              that.ctx.clearRect(0, 0, that.canvasWidth, that.canvasHeight);
              index++;
              that.ctx.drawImage(image, index * that.positionWidth, 0, that.positionWidth, that.positionHeight, that.x0, that.y0,
         that.positionWidth, that.positionHeight);
              if(index >= 3){
                index = 0;
              }
            }, 100);
          })
        }
        Person.prototype.loadImage = function(callback){
          var image = new Image();
          // 图片加载完成后执行
          image.onload = function(){
            callback && callback(image);
          }
          image.src = this.src;
        }

        var person = new Person();
      </script>
四、绘制疾走的小怪兽
可以通过键盘上下左右键控制小人在画布中任意行走
<<script>
        var Person = function(canvas){
          this.ctx = document.querySelector("canvas").getContext("2d");
          this.canvasWidth = this.ctx.canvas.width;
          this.canvasHeight = this.ctx.canvas.height;
          this.stepX = 0;
          this.stepY = 0;
          this.stepSize = 10;
          this.index = 0;
          this.direction = 0;
          this.src = "image/04.png";
          this.init();
        }
        Person.prototype.init = function(){
          var that = this;
          this.loadImage(function(image){
            // 获取图片的宽高
            that.imageWidth = image.width;
            that.imageHeight = image.height;
            // 获取单个小怪兽区域的宽高
            that.positionWidth = that.imageWidth / 4;
            that.positionHeight = that.imageHeight / 4;

            // 默认是从左上角显示的
            that.x0 = that.canvasWidth / 2 - that.positionWidth / 2;
            that.y0 = that.canvasHeight / 2 - that.positionHeight / 2;

            // 绘制图片
            that.ctx.drawImage(image, 0, 0, that.positionWidth, that.positionHeight, that.x0,
              that.y0, that.positionWidth, that.positionHeight);
            var index = 0;
            document.onkeydown = function(e){
              that.ctx.clearRect(0, 0, that.canvasWidth, that.canvasHeight);
              switch(e.keyCode){
                case 37 :
                  console.log(''左'');
                  that.direction = 1;
                  that.stepX--;
                  that.showImage(image);
                  break;
                case 38 :
                  console.log(''上'');
                  that.direction = 3;
                  that.stepY--;
                  that.showImage(image);
                  break;
                case 39 :
                  console.log(''右'');
                  that.direction = 2;
                  that.stepX++;
                  that.showImage(image);
                  break;
                case 40 :
                  console.log(''下'');
                  that.direction = 0;
                  that.stepY++;
                  that.showImage(image);
                  break;

              }
            }

          })
        }
        Person.prototype.loadImage = function(callback){
          var image = new Image();
          // 图片加载完成后执行
          image.onload = function(){
            callback && callback(image);
          }
          image.src = this.src;
        }
        Person.prototype.showImage = function(image){
          this.index++;
          console.log(this.index);
           this.ctx.drawImage(image, this.index * this.positionWidth, this.direction * this.positionHeight, this.positionWidth, this.positionHeight, this.x0 + this.stepX * this.stepSize, this.y0 + this.stepY * this.stepSize, this.positionWidth, this.positionHeight);
           if(this.index >= 3){
             this.index = 0;
           }
        }
        var person = new Person();
      </script>
关于HTML5 Canvas drawImage比率错误iOS和canvas drawbitmap的介绍已经告一段落,感谢您的耐心阅读,如果想了解更多关于canvas drawImage、canvas drawImage属性、canvas drawimage绘制图像出错(默认canvas300*150)解决办法、canvas 中的 drawImage的相关信息,请在本站寻找。
本文标签:


