如果您想了解swift学习笔记一的相关知识,那么本文是一篇不可错过的文章,我们将对swift入门教程进行全面详尽的解释,并且为您提供关于android学习笔记一、ApacheShiro安全(权限框架)
如果您想了解swift 学习笔记一的相关知识,那么本文是一篇不可错过的文章,我们将对swift入门教程进行全面详尽的解释,并且为您提供关于android 学习笔记一、Apache Shiro安全(权限框架)学习笔记一、Berkely DB Java Edition 学习笔记一(转载)、c++学习笔记一的有价值的信息。
本文目录一览:- swift 学习笔记一(swift入门教程)
- android 学习笔记一
- Apache Shiro安全(权限框架)学习笔记一
- Berkely DB Java Edition 学习笔记一(转载)
- c++学习笔记一
")
swift 学习笔记一(swift入门教程)
看 Developing IOS 8 Apps with swift 的时候看到一些比较有用的点,记录一下:
1、将函数作为参数传递。例如:
写一个两个数求和的函数:performOperation(multiply)
        func performOperation(operation:(Double,Double) -> Double) {
            if operandStack.count >= 2 {
                dispalayValue = operation(operandStack.removeLast(),operandStack.removeLast())
                enter()
            }
        }

        func multiply(op1: Double,op2: Double) -> Double {
            return op1 * op2
        }
以上,有更酷的实现,用闭包的方法:
改进为:
        performOperation ({ (op1: Double,op2: Double) -> Double in
            return op1 * op2
        })

        func performOperation(operation:(Double,operandStack.removeLast())
                enter()
            }
        }
编译器会根据上下文推断类型,所以,以上的 performOperaion 又可以简化为:
        performOperation ({ (op1,op2) in
            return op1 * op2
        })
op1,op2 的类型可以推断,当然返回类型也可以推断,故而返回类型也可省去,甚至连 return 也可以省去。
由于编译器不强制你一定要写形参,故这里的 op1,op2 也可以省去,用 $0,$1,$2,...... 分别代表第一个第二第三个参数等等,
所以,上面又可以再次简化为:
performOperation ({ op1 * op2 })
swift的编译器真 TMD 只能,哈哈!
等等,还没完,
再简化为:
performOperation () { op1 * op2 }</span>
有个条件,就是 op1 * op2 是作为最后一个参数传递的时候就可以这样做,把函数参数移到括号外面,如上。其他的,如果有另外的参数的话就可以像之前的那样放在括号()里面;如果只有一个参数的话,括号还可以直接去掉,如下:
performOperation { op1 * op2 }
至此,简化完毕。
2、swift 支持多态,What an amazing !
例如,当你要求一个数的平方根的时候,而已还是想用回原来的函数 performOperation ,但是这个函数要求的形参是一个包含两个 Double 类型的函数,求平方根只需要传入一个参数就行了啊,那么来改造一下这个函数吧,在写一个同名的函数 performOperation ,然后定义为只需要一个形参就好了。
注意:swift 支持在一个类中同时存在同名的多个函数,形参不一样就好了,就是多态啦~
那么,再增加一个 performOperation 函数,如下:
        func performOperation(operation: Double -> Double) {
            if operandStack.count >= 1 {
                dispalayValue = operation(operandStack.removeLast())
                enter()
            }
        }
现在就可以这样调用来计算数值平方根了。
performOperation { sqrt($0) } 更多,可以观看《Developing IOS 8 Apps with Swift》的 More Xcode and Swift,MVC 一节。
android 学习笔记一
入门文档推荐
http://hukai.me/android-training-course-in-chinese/basics/firstapp/starting-activity.html
刚刚开始不太清除项目对应关系,和文件关系,请一定用 android studio 来开发 / 学习
android 文件大类(入门理解看看就好)
三大类 布局文件 资源文件 逻辑文件
布局文件. xml
这个文件位于 layout 文件夹下,这个文件下都是都是布局文件(android studio 自动生成)
关于 xml 文件里的内容,其实和 html 数据十分相似的概念,只是名字不同和一些 android 的一些不同的概念(大体上还是十分相似的)
正常的 web 开发中,我们的 html 元素有 <div> <span> .... 等等一些标签,和一些自定义标签 和 标签中的属性 id class style 样式之类的属性。
android 它也有一套自己的标签类 像是这些 <EditText/> <Button/>.. 等等
举例,我们定义一个 android 的 button 按钮
<Button
        android:id="@+id/ebutton"
        android:layout_width="wrap_content"
        android:layout_height="wrap_content"
        android:onClick="sendMessage"
        android:text="@string/a_button" />
上面是一个简单的按钮组件,首先看到的是他的定义 Button 大写开头,明确的声明了一个 button 按钮
然后第一个属性 android:id = "@+id/ebutton", 这里其实是给这个 button 按钮声明了一个 id 类似于 html 中的 <div id = xxx>
视图的唯一标识符(android:id)
它们的区别?为什么 android 声明 id 时上面会有 @+id / 这个奇怪的东西?
文档中声明 @+id/
@表示这个属性是一个会被其他地方引用到的类型 。+ 号表示这个资源第一次使用需要被创建 .id 这是资源类型 / 之后就是它的名称
我需要引用一个资源 @+ 它的类型是 id 写成 @+id/name (这里的引用其实就是在逻辑文件中使用)
接下来的 android:layout_width 和 android:layout_height 很明显的意思 设置按钮组件的布局高宽,
这里其实高宽可以自己定义数组 100 10 之类的 但是 android 的高宽布局有我们上面写的 warp_content 意思就是按照内容来占用空间
还有其他按照权重比来分配空间类似于 css 中的 flex:1 这样的属性 在 android 中它的名字叫 android:layout_weight="1"
这里有一个要十分注意的重点,当你设置权重比例时,那么你就不能在使用 android:layout_width=warp_content 之类的。
我们可以的把 android:layout_width 显示的设置成 android:layout_width="0dp"
android:onClick="sendMessage" 这个也很好理解他声明了,这个按钮组件他有一个 onclick 事件,事件名称是 sendMessage,
这个名字很重要,因为你的 android 的逻辑触发事件方法也必须是这个名字 类似 html 中我给一个 div 声明了一个点击事件
<div onclick = onc >
<script>function onc () {console.log (这是一个事件函数)}</script>
android:text="@string/a_button" 前面说过,如果我们要引用资源时需要使用 @这个就是引用了一个文本资源,这个资源就是 android 的资源类型(稍后再说)
简单的说,android 的 xml 布局文件,它提供了类似于 html 的功能 展示组件,组件布局 事件的声明。
资源文件.xml
前面说到过,我们需要引用一个资源的时候,需要使用 @来表示应用,如果第一次创建还需要 + 类型的名称。
<Button
        android:id="@+id/ebutton"
        android:layout_width="wrap_content"
        android:layout_height="wrap_content"
        android:onClick="sendMessage"
        android:text="@string/a_button" />
还是这个按钮组件,继续上面说的 android:text="@string/a_button" 这里可以理解成,引用一个 string 类型 他的名称叫做 a_button
那么这个 a_button 存在哪里呢,其实这就是存储在资源文件中,已经声明的资源数值。
进入项目目录,打开 res 目录,values 下,会有多个 xml 这里存放的一些资源文件,也是 xml。
打开一个叫做 strings.xml 的文件,我们可以在这里定义 字符串资源
// 定义一个资源
// resources 资源

<resources>
 <string name="a_button">It is Button</string>
</resources>
这里我们上面的 button 组件,引用的字符串类型就有了
资源类型有许多,其实一些图标文件也是使用 xml 储存起来的。可以用 @来引用他们
例如 colors.xml 这里可能存着可能是颜色样式的值。和 drawable 文件夹下的一些 xml 文件这里可能存放这图标文件
其实资源文件有点像 css 文件在 web 前端中起到的作用,定义了一些常用的显示数据库,通过设置在组件中展示出来。
比如 css 中的 content:''string''
逻辑文件.java
这些 java 文件控制组件的交互,转跳,信息传递,类似于 web 中的 Javascript 起到的作用,但是语法非常不同,如果理解 typescript
对 java 还是可以很快的简单上手使用一些简单的逻辑
学习笔记一")
Apache Shiro安全(权限框架)学习笔记一


1. 授权需要继承 AuthorizingRealm 类, 并实现其 doGetAuthorizationInfo 方法
2. AuthorizingRealm 类继承自 AuthenticatingRealm, 但没有实现 AuthenticatingRealm 中的
doGetAuthenticationInfo, 所以认证和授权只需要继承 AuthorizingRealm 就可以了. 同时实现他的两个抽象方法.

1. 为什么使用 MD5 盐值加密:
即使两个人的密码一样,加密后的值 也是不一样,更加安全
2. 如何做到:
1). 在 doGetAuthenticationInfo 方法返回值创建 SimpleAuthenticationInfo 对象的时候, 需要使用
SimpleAuthenticationInfo(principal, credentials, credentialsSalt, realmName) 构造器
2). 使用 ByteSource.Util.bytes() 来计算盐值.
3). 盐值需要唯一: 一般使用随机字符串或 user id
4). 使用 new SimpleHash(hashAlgorithmName, credentials, salt, hashIterations); 来计算盐值加密后的密码的值.

1. 如何把一个字符串加密为 MD5
2. 替换当前 Realm 的 credentialsMatcher 属性. 直接使用 HashedCredentialsMatcher 对象, 并设置加密算法即可.

密码的比对:
通过 AuthenticatingRealm 的 credentialsMatcher 属性来进行的密码的比对!

1. 获取当前的 Subject. 调用 SecurityUtils.getSubject();
2. 测试当前的用户是否已经被认证. 即是否已经登录. 调用 Subject 的 isAuthenticated()
3. 若没有被认证, 则把用户名和密码封装为 UsernamePasswordToken 对象
1). 创建一个表单页面
2). 把请求提交到 SpringMVC 的 Handler
3). 获取用户名和密码.
4. 执行登录: 调用 Subject 的 login(AuthenticationToken) 方法.
5. 自定义 Realm 的方法, 从数据库中获取对应的记录, 返回给 Shiro.
1). 实际上需要继承 org.apache.shiro.realm.AuthenticatingRealm 类
2). 实现 doGetAuthenticationInfo(AuthenticationToken) 方法.
6. 由 shiro 完成对密码的比对.Apache Shiro参考文档
简介:
Apache Shiro 是 Java 的一个安全(权限)框架。
• Shiro 可以非常容易的开发出足够好的应用,其不仅可以用在
JavaSE 环境,也可以用在 JavaEE 环境。
• Shiro 可以完成:认证、授权、加密、会话管理、与Web 集成、缓存
等。
• 下载:http://shiro.apache.org/
基本功能:
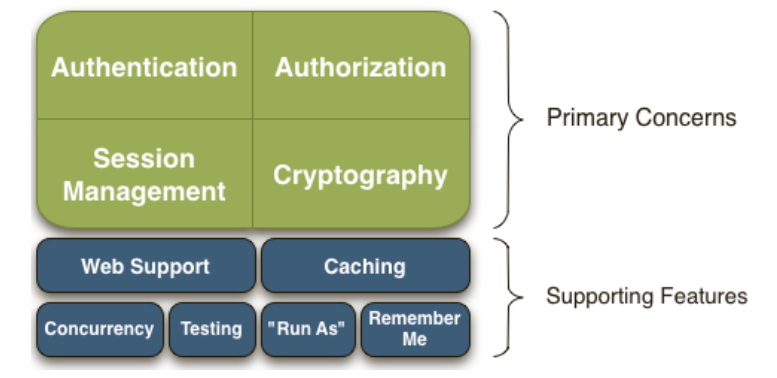
Authentication:身份认证/登录,验证用户是不是拥有相应的身份;
• Authorization:授权,即权限验证,验证某个已认证的用户是否拥有某个权限;即判断用
户是否能进行什么操作,如:验证某个用户是否拥有某个角色。或者细粒度的验证某个用户
对某个资源是否具有某个权限;
• Session Manager:会话管理,即用户登录后就是一次会话,在没有退出之前,它的所有
信息都在会话中;会话可以是普通 JavaSE 环境,也可以是 Web 环境的;
• Cryptography:加密,保护数据的安全性,如密码加密存储到数据库,而不是明文存储;
• Web Support:Web 支持,可以非常容易的集成到Web 环境;
• Caching:缓存,比如用户登录后,其用户信息、拥有的角色/权限不必每次去查,这样可
以提高效率;
• Concurrency:Shiro 支持多线程应用的并发验证,即如在一个线程中开启另一个线程,能
• 把权限自动传播过去;
• Testing:提供测试支持;• Run As:允许一个用户假装为另一个用户(如果他们允许)的身份进行访问;
• Remember Me:记住我,这个是非常常见的功能,即一次登录后,下次再来的话不用登
录了
Shiro 架构 (Shiro外部来看)
• 从外部来看Shiro ,即从应用程序角度的来观察如何使用 Shiro 完成
工作:
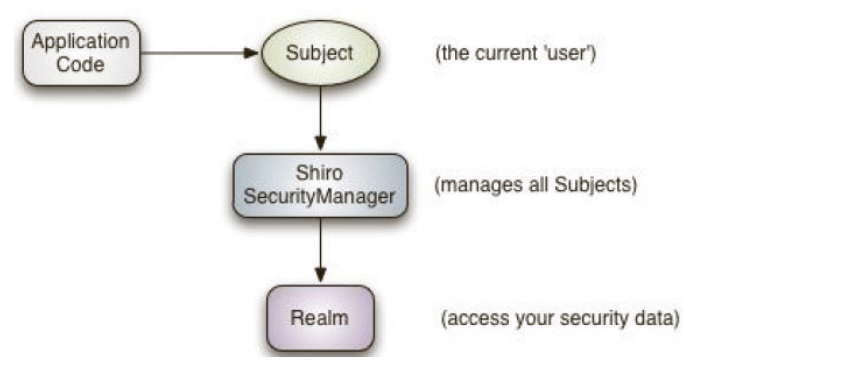
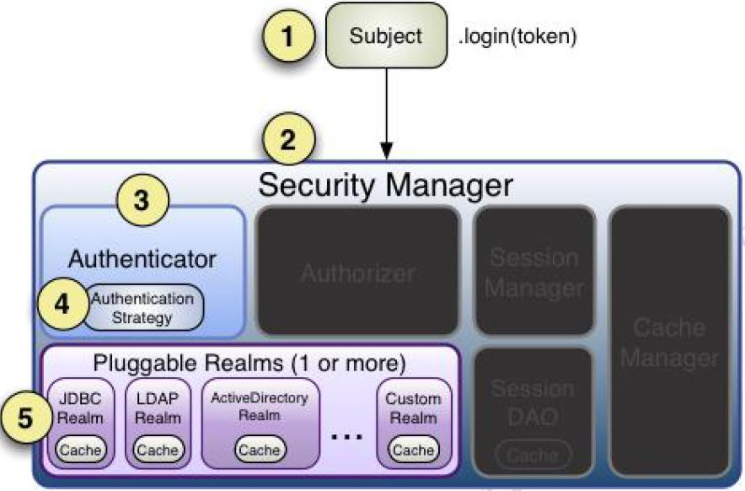
Subject:应用代码直接交互的对象是 Subject,也就是说 Shiro 的对外
API 核心就是 Subject。Subject 代表了当前“用户”, 这个用户不一定
是一个具体的人,与当前应用交互的任何东西都是 Subject,如网络爬虫,
机器人等;与 Subject 的所有交互都会委托给 SecurityManager;
Subject 其实是一个门面,SecurityManager 才是实际的执行者;
• SecurityManager:安全管理器;即所有与安全有关的操作都会与
SecurityManager 交互;且其管理着所有 Subject;可以看出它是 Shiro
的核心,它负责与 Shiro 的其他组件进行交互,它相当于 SpringMVC 中
DispatcherServlet 的角色
• Realm:Shiro 从 Realm 获取安全数据(如用户、角色、权限),就是说
SecurityManager 要验证用户身份,那么它需要从 Realm 获取相应的用户
进行比较以确定用户身份是否合法;也需要从 Realm 得到用户相应的角色/
权限进行验证用户是否能进行操作;可以把 Realm 看成 DataSource
Shiro架构(Shiro内部来看)
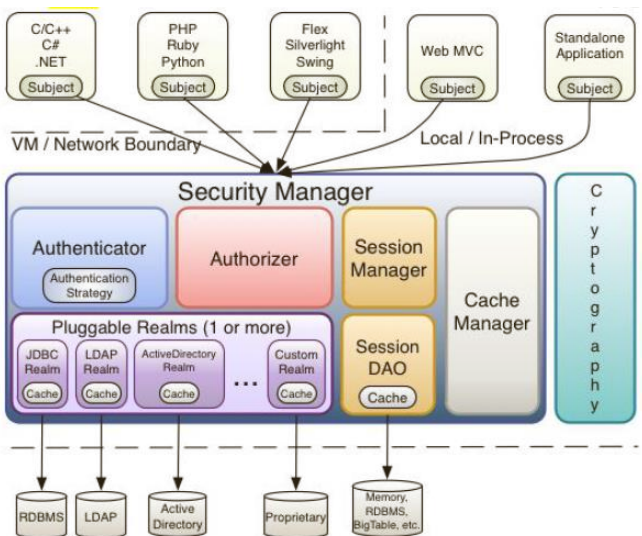
Subject:任何可以与应用交互的“用户”;
• SecurityManager :相当于SpringMVC 中的 DispatcherServlet;是 Shiro 的心脏;
所有具体的交互都通过 SecurityManager 进行控制;它管理着所有 Subject、且负责进
行认证、授权、会话及缓存的管理。
• Authenticator:负责 Subject 认证,是一个扩展点,可以自定义实现;可以使用认证
策略(Authentication Strategy),即什么情况下算用户认证通过了;
• Authorizer:授权器、即访问控制器,用来决定主体是否有权限进行相应的操作;即控
制着用户能访问应用中的哪些功能;
• Realm:可以有 1 个或多个 Realm,可以认为是安全实体数据源,即用于获取安全实体
的;可以是JDBC 实现,也可以是内存实现等等;由用户提供;所以一般在应用中都需要
实现自己的 Realm;
• SessionManager:管理 Session 生命周期的组件;而 Shiro 并不仅仅可以用在 Web
环境,也可以用在如普通的 JavaSE 环境
• CacheManager:缓存控制器,来管理如用户、角色、权限等的缓存的;因为这些数据
基本上很少改变,放到缓存中后可以提高访问的性能
• Cryptography:密码模块,Shiro 提高了一些常见的加密组件用于如密码加密/解密。
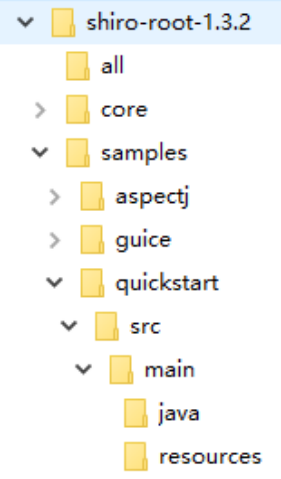
HelloWorld应用
加入如下 jar 包:
– shiro-all-1.3.2.jar
– log4j-1.2.15.jar
– slf4j-api-1.6.1.jar
– slf4j-log4j12-1.6.1.jar


package com.mikey.www;

/**
 * @author Mikey
 * @Title:
 * @Description:
 * @date 2018/11/1 21:32
 * @Version 1.0
 */
import org.apache.shiro.SecurityUtils;
import org.apache.shiro.authc.*;
import org.apache.shiro.config.IniSecurityManagerFactory;
import org.apache.shiro.mgt.SecurityManager;
import org.apache.shiro.session.Session;
import org.apache.shiro.subject.Subject;
import org.apache.shiro.util.Factory;
import org.slf4j.Logger;
import org.slf4j.LoggerFactory;


/**
 * Simple Quickstart application showing how to use Shiro''s API.
 *
 * @since 0.9 RC2
 */
public class Quickstart {

    private static final transient Logger log = LoggerFactory.getLogger(Quickstart.class);


    public static void main(String[] args) {

        // The easiest way to create a Shiro SecurityManager with configured
        // realms, users, roles and permissions is to use the simple INI config.
        // We''ll do that by using a factory that can ingest a .ini file and
        // return a SecurityManager instance:

        // Use the shiro.ini file at the root of the classpath
        // (file: and url: prefixes load from files and urls respectively):
        Factory<SecurityManager> factory = new IniSecurityManagerFactory("classpath:shiro.ini");
        SecurityManager securityManager = factory.getInstance();

        // for this simple example quickstart, make the SecurityManager
        // accessible as a JVM singleton.  Most applications wouldn''t do this
        // and instead rely on their container configuration or web.xml for
        // webapps.  That is outside the scope of this simple quickstart, so
        // we''ll just do the bare minimum so you can continue to get a feel
        // for things.
        SecurityUtils.setSecurityManager(securityManager);

        // Now that a simple Shiro environment is set up, let''s see what you can do:

        // get the currently executing user:
        // 获取当前的 Subject. 调用 SecurityUtils.getSubject();
        Subject currentUser = SecurityUtils.getSubject();

        // Do some stuff with a Session (no need for a web or EJB container!!!)
        // 测试使用 Session
        // 获取 Session: Subject#getSession()
        Session session = currentUser.getSession();
        session.setAttribute("someKey", "aValue");
        String value = (String) session.getAttribute("someKey");
        if (value.equals("aValue")) {
            log.info("---> Retrieved the correct value! [" + value + "]");
        }

        // let''s login the current user so we can check against roles and permissions:
        // 测试当前的用户是否已经被认证. 即是否已经登录.
        // 调动 Subject 的 isAuthenticated()
        if (!currentUser.isAuthenticated()) {
            // 把用户名和密码封装为 UsernamePasswordToken 对象
            UsernamePasswordToken token = new UsernamePasswordToken("lonestarr", "vespa");
            // rememberme
            token.setRememberMe(true);
            try {
                // 执行登录.
                currentUser.login(token);
            }
            // 若没有指定的账户, 则 shiro 将会抛出 UnknownAccountException 异常.
            catch (UnknownAccountException uae) {
                log.info("----> There is no user with username of " + token.getPrincipal());
                return;
            }
            // 若账户存在, 但密码不匹配, 则 shiro 会抛出 IncorrectCredentialsException 异常。
            catch (IncorrectCredentialsException ice) {
                log.info("----> Password for account " + token.getPrincipal() + " was incorrect!");
                return;
            }
            // 用户被锁定的异常 LockedAccountException
            catch (LockedAccountException lae) {
                log.info("The account for username " + token.getPrincipal() + " is locked.  " +
                        "Please contact your administrator to unlock it.");
            }
            // ... catch more exceptions here (maybe custom ones specific to your application?
            // 所有认证时异常的父类.
            catch (AuthenticationException ae) {
                //unexpected condition?  error?
            }
        }

        //say who they are:
        //print their identifying principal (in this case, a username):
        log.info("----> User [" + currentUser.getPrincipal() + "] logged in successfully.");

        //test a role:
        // 测试是否有某一个角色. 调用 Subject 的 hasRole 方法.
        if (currentUser.hasRole("schwartz")) {
            log.info("----> May the Schwartz be with you!");
        } else {
            log.info("----> Hello, mere mortal.");
            return;
        }

        //test a typed permission (not instance-level)
        // 测试用户是否具备某一个行为. 调用 Subject 的 isPermitted() 方法。
        if (currentUser.isPermitted("lightsaber:weild")) {
            log.info("----> You may use a lightsaber ring.  Use it wisely.");
        } else {
            log.info("Sorry, lightsaber rings are for schwartz masters only.");
        }

        //a (very powerful) Instance Level permission:
        // 测试用户是否具备某一个行为.
        if (currentUser.isPermitted("user:delete:zhangsan")) {
            log.info("----> You are permitted to ''drive'' the winnebago with license plate (id) ''eagle5''.  " +
                    "Here are the keys - have fun!");
        } else {
            log.info("Sorry, you aren''t allowed to drive the ''eagle5'' winnebago!");
        }

        //all done - log out!
        // 执行登出. 调用 Subject 的 Logout() 方法.
        System.out.println("---->" + currentUser.isAuthenticated());

        currentUser.logout();

        System.out.println("---->" + currentUser.isAuthenticated());

        System.exit(0);
    }
}
集成Spring
•加入 Spring 和 Shiro 的 jar 包
• 配置 Spring 及 SpringMVC
• 参照:1.3.2\shiro-root-1.3.2-source-release\shiro-root-1.3.2\samples\spring 配置web.xml 文件和 Spring 的配置文件
与Web 集成
• Shiro 提供了与 Web 集成的支持,其通过一个ShiroFilter 入口来拦截需要安全控制的URL,然后进行相应的控制
• ShiroFilter 类似于如 Strut2/SpringMVC 这种web 框架的前端控制器,是安全控制的入口点,其负责读取配置(如ini 配置文件),然后判断URL是否需要登录/权限等工作
工作原理:

•ShiroFilterDelegatingFilterProxy 作用是自动到 Spring 容器查找名字为 shiroFilter(filter-name)的 bean 并把所有 Filter的操作委托给它。
部分细节
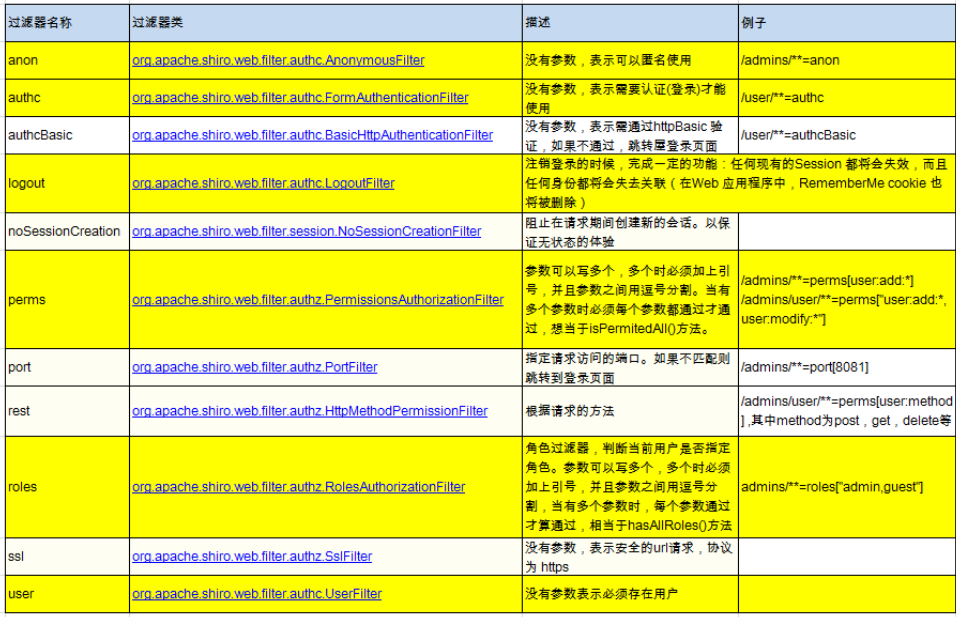
• [urls] 部分的配置,其格式是: “url=拦截器[参数],拦截器[参数]”;
• 如果当前请求的 url 匹配 [urls] 部分的某个 url 模式,将会执行其配置的拦截器。
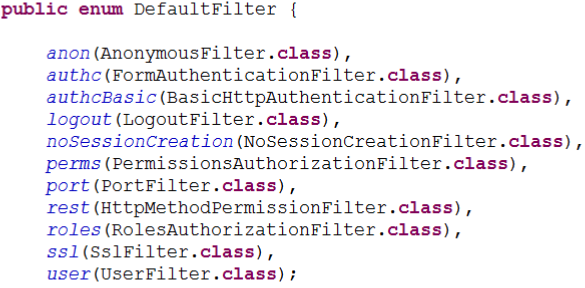
• anon(anonymous) 拦截器表示匿名访问(即不需要登录即可访问)
• authc (authentication)拦截器表示需要身份认证通过后才能访问
shiro中默认的过滤器
URL 匹配模式
• url 模式使用 Ant 风格模式
• Ant 路径通配符支持 ?、*、**,注意通配符匹配不包括目录分隔符“/”:
– ?:匹配一个字符,如 /admin? 将匹配 /admin1,但不匹配 /admin 或 /admin/;
– *:匹配零个或多个字符串,如 /admin 将匹配 /admin、/admin123,但不匹配 /admin/1;
– **:匹配路径中的零个或多个路径,如 /admin/** 将匹配 /admin/a 或 /admin/a/b
URL 匹配顺序
• URL 权限采取第一次匹配优先的 方式,即从头开始使用第一个匹配的 url 模式对应的拦截器链。
• 如:
– /bb/**=filter1
– /bb/aa=filter2
– /**=filter3
– 如果请求的url是“/bb/aa”,因为按照声明顺序进行匹配,那么将使用 filter1 进行拦截。
认证:
Shiro 架构 (Shiro外部来看)
• 从外部来看Shiro ,即从应用程序角度的来观察如何使用 Shiro 完成
工作:

身份认证:
•身份验证:一般需要提供如身份 ID 等一些标识信息来表明登录者的身份,如提供 email,用户名/密码来证明。
• 在 shiro 中,用户需要提供 principals (身份)和 credentials(证明)给 shiro,从而应用能验证用户身份:
• principals:身份,即主体的标识属性,可以是任何属性,如用户名、邮箱等,唯一即可。一个主体可以有多个 principals,但只有一个Primary principals,一般是用户名/邮箱/手机号。
• credentials:证明/凭证,即只有主体知道的安全值,如密码/数字证书等。
• 最常见的 principals 和 credentials 组合就是用户名/密码了
身份验证基本流程
• 1、收集用户身份/凭证,即如用户名/密码
• 2、调用 Subject.login 进行登录,如果失败将得到相应的 AuthenticationException 异常,根据异常提示用户错误信息;否则登录成功
• 3、创建自定义的 Realm 类,继承org.apache.shiro.realm.AuthorizingRealm 类,实现doGetAuthenticationInfo()
身份认证流程
1、首先调用 Subject.login(token) 进行登录,其会自动委托给SecurityManager
2、SecurityManager 负责真正的身份验证逻辑;它会委托给Authenticator 进行身份验证;
3、Authenticator 才是真正的身份验证者,Shiro API 中核心的身份认证入口点,此处可以自定义插入自己的实现;
4、Authenticator 可能会委托给相应的 AuthenticationStrategy 进行多 Realm 身份验证,默认 ModularRealmAuthenticator 会调用AuthenticationStrategy 进行多 Realm 身份验证;
5、Authenticator 会把相应的 token 传入 Realm,从 Realm 获取身份验证信息,如果没有返回/抛出异常表示身份验证失败了。此处可以配置多个Realm,将按照相应的顺序及策略进行访问。
方法身份验证示例
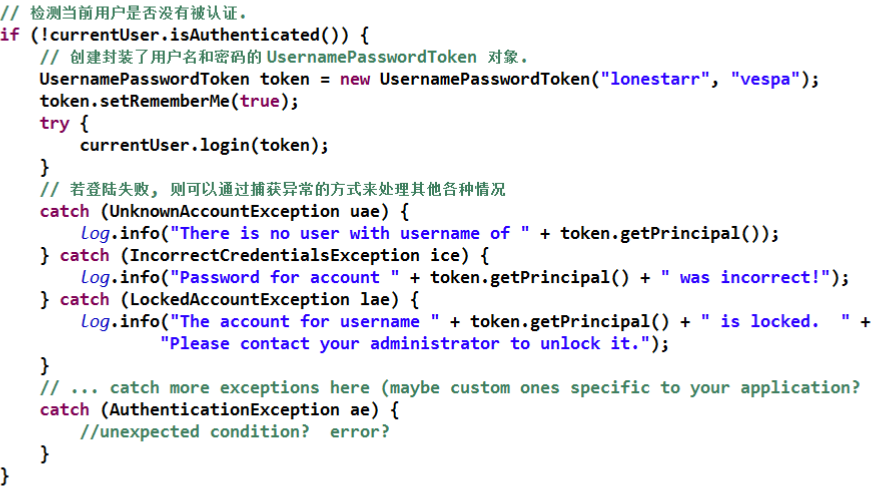
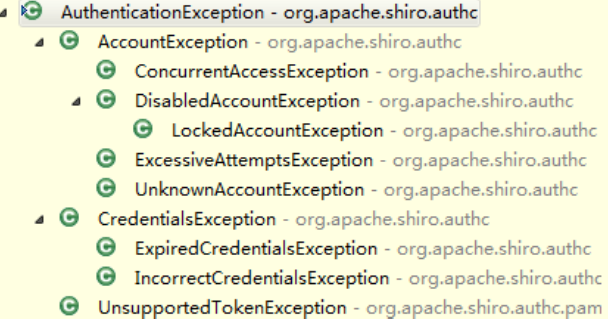
AuthenticationException
• 如果身份验证失败请捕获 AuthenticationException 或其子类
• 最好使用如“用户名/密码错误”而不是“用户名错误”/“密码错误”,防止一些恶意用户非法扫描帐号库;
认证流程
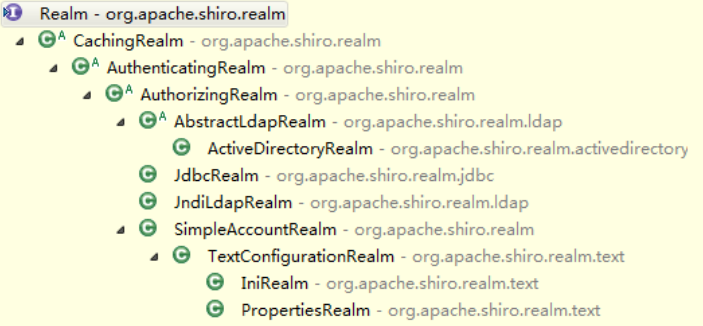
Realm
Realm:Shiro 从 Realm 获取安全数据(如用户、角色、权限),即 SecurityManager 要验证用户身份,那么它需要从 Realm 获取相应的用户进行比较以确定用户身份是否合法;也需要从Realm得到用户相应的角色/权限进行验证用户是否能进行操作
Realm接口如下:

一般继承 AuthorizingRealm(授权)即可;其继承了AuthenticatingRealm(即身份验证),而且也间接继承了CachingRealm(带有缓存实现)。
• Realm 的继承关系:
Authenticator
• Authenticator 的职责是验证用户帐号,是 Shiro API 中身份验证核心的入口点:如果验证成功,将返回AuthenticationInfo 验证信息;此信息中包含了身份及凭证;如果验证失败将抛出相应的 AuthenticationException 异常
• SecurityManager 接口继承了 Authenticator,另外还有一个ModularRealmAuthenticator实现,其委托给多个Realm 进行验证,验证规则通过 AuthenticationStrategy 接口指定
AuthenticationStrategy
• AuthenticationStrategy 接口的默认实现:
• FirstSuccessfulStrategy:只要有一个 Realm 验证成功即可,只返回第一个 Realm 身份验证成功的认证信息,其他的忽略;
• AtLeastOneSuccessfulStrategy:只要有一个Realm验证成功即可,和FirstSuccessfulStrategy 不同,将返回所有Realm身份验证成功的认证信息;
• AllSuccessfulStrategy:所有Realm验证成功才算成功,且返回所有Realm身份验证成功的认证信息,如果有一个失败就失败了。
• ModularRealmAuthenticator 默认是 AtLeastOneSuccessfulStrategy策略
授权
• 授权,也叫访问控制,即在应用中控制谁访问哪些资源(如访问页面/编辑数据/页面操作
等)。在授权中需了解的几个关键对象:主体(Subject)、资源(Resource)、权限
(Permission)、角色(Role)。
• 主体(Subject):访问应用的用户,在 Shiro 中使用 Subject 代表该用户。用户只有授权
后才允许访问相应的资源。
• 资源(Resource):在应用中用户可以访问的 URL,比如访问 JSP 页面、查看/编辑某些
数据、访问某个业务方法、打印文本等等都是资源。用户只要授权后才能访问。
• 权限(Permission):安全策略中的原子授权单位,通过权限我们可以表示在应用中用户
有没有操作某个资源的权力。即权限表示在应用中用户能不能访问某个资源,如:访问用
户列表页面查看/新增/修改/删除用户数据(即很多时候都是CRUD(增查改删)式权限控
制)等。权限代表了用户有没有操作某个资源的权利,即反映在某个资源上的操作允不允
许。
• Shiro 支持粗粒度权限(如用户模块的所有权限)和细粒度权限(操作某个用户的权限,
即实例级别的)
• 角色(Role):权限的集合,一般情况下会赋予用户角色而不是权限,即这样用户可以拥有
一组权限,赋予权限时比较方便。典型的如:项目经理、技术总监、CTO、开发工程师等
都是角色,不同的角色拥有一组不同的权限。
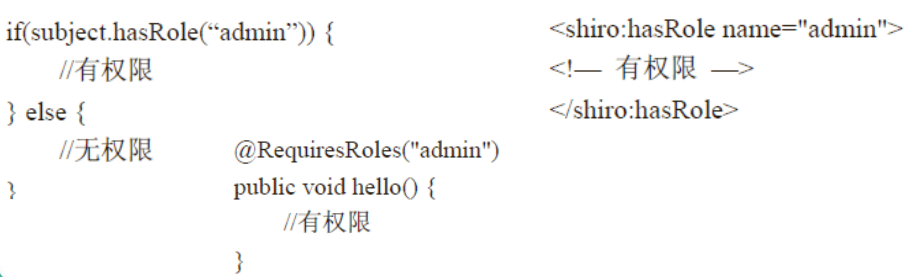
授权方式
• Shiro 支持三种方式的授权:
– 编程式:通过写if/else 授权代码块完成
– 注解式:通过在执行的Java方法上放置相应的注解完成,没有权限将抛出相应的异常
– JSP/GSP 标签:在JSP/GSP 页面通过相应的标签完成
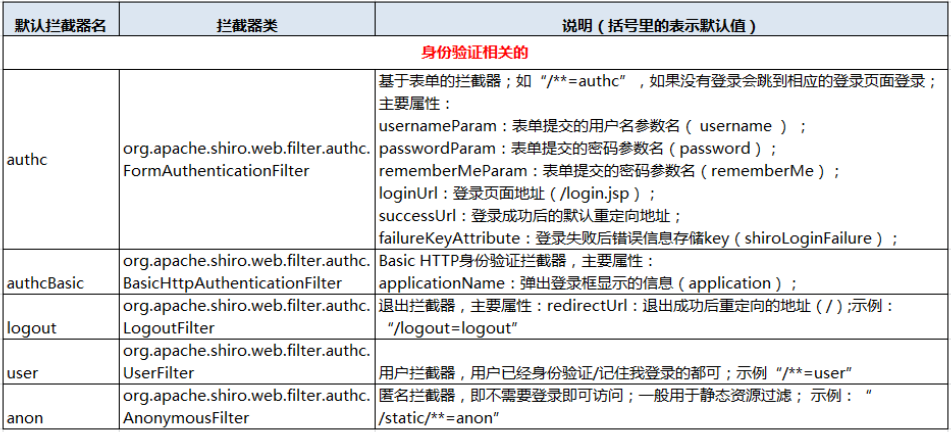
默认拦截器
• Shiro 内置了很多默认的拦截器,比如身份验证、授权等相关的。默认拦截器可以参考
org.apache.shiro.web.filter.mgt.DefaultFilter中的枚举
拦截器:
身份验证相关的

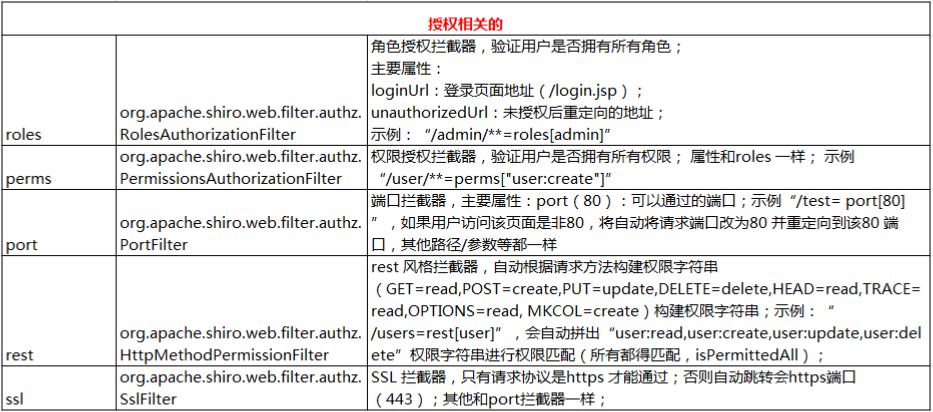
授权相关的:
其他:

Permissions
• 规则: 资源标识符:操作:对象实例 例 ID 即对哪个资源的哪个实例可以进行什么操作. 其 默认支持通配符权限字符串,: 表示 资源/ / 操作/ / 实例的分割;, 表示 操作的 分割,* 表示 任意资源/ / 操作/ / 实例。
• 多层次管理:
– 例如:user:query、user:edit
– 冒号 是一个特殊字符,它用来分隔权限字符串的下一 部件:第一部分是权限被操作的领域(打印机),第二部分是被执行的操作。
– 多个值: 每个 部件能够保护多个值。因此,除了授予用户 user:query和 user:edit 权限外,也 可以 简单地授予他们一 个: user: query , edit
– 还可以用 用 * 号 代替所有的值,如:user:* , 也可以写:*:query,表示某个用户在所有的领域都有 query 的权限
Shiro 的 Permissions
• 实例 级访问控制
– 这种情况通常会使用三个部件: 域、操作、被付诸实施的实例。如:user:edit:manager
– 也 可以使用通配符来定义,如:user:edit:*、user:*:*、user:*:manager
– 部分 省略 通配符:缺少的部件意味着用户可以访问所有与之匹配的值,比如:user:edit 等价于 user:edit :*、user 等价于 user:*:*
– 注意: 通配符只能 从字符串的结尾处省略部件,也就是说 user:edit 并不等价于 user:*:edit
授权流程:

授权流程
• 流程如下:
• 1、首先调用 Subject.isPermitted*/hasRole* 接口,其会委托给SecurityManager,而 SecurityManager 接着会委托给 Authorizer;
• 2、Authorizer是真正的授权者,如果调用如isPermitted(“user:view”),其首先会通过
• PermissionResolver 把字符串转换成相应的 Permission 实例;
• 3、在进行授权之前,其会调用相应的 Realm 获取 Subject 相应的角色/权限用于匹配传入的角色/权限;
• 4、Authorizer 会判断 Realm 的角色/权限是否和传入的匹配,如果有多个Realm,会委托给 ModularRealmAuthorizer 进行循环判断,如果匹配如 isPermitted*/hasRole* 会返回true,否则返回false表示授权失败。
ModularRealmAuthorizer
• ModularRealmAuthorizer 进行多 Realm 匹配流程:
– 1、首先检查相应的 Realm 是否实现了实现了Authorizer;
– 2、如果实现了 Authorizer,那么接着调用其相应的isPermitted*/hasRole* 接口进行匹配;
– 3、如果有一个Realm匹配那么将返回 true,否则返回 false。
Shiro 标签
• Shiro 提供了 JSTL 标签用于在 JSP 页面进行权限控制,如根据登录用户显示相应的页面按钮。
• guest 标签:用户没有身份验证时显示相应信息,即游客访问信息:

• user 标签:用户已经经过认证/记住我登录后显示

authenticated 标签:用户已经身份验证通过,即Subject.login登录成功,不是记住我登录的

• notAuthenticated 标签:用户未进行身份验证,即没有调用Subject.login进行登录,包括记住我自动登录的也属于未进行身份验证。
pincipal 标签:显示用户身份信息,默认调用Subject.getPrincipal() 获取,即 Primary Principal。

• hasRole 标签:如果当前 Subject 有角色将显示 body 体内容:

• hasAnyRoles 标签:如果当前Subject有任意一个角色(或的关系)将显示body体内容。

lacksRole:如果当前 Subject 没有角色将显示 body 体内容

hasPermission:如果当前 Subject 有权限将显示 body 体内容

lacksPermission:如果当前Subject没有权限将显示body体内容。

权限注解
• @RequiresAuthentication:表示当前Subject已经通过login进行了身份验证;即 Subject. isAuthenticated() 返回 true
• @RequiresUser:表示当前 Subject 已经身份验证或者通过记住我登录的。
• @RequiresGuest:表示当前Subject没有身份验证或通过记住我登录过,即是游客身份。
• @RequiresRoles(value={“admin”, “user”}, logical=Logical.AND):表示当前 Subject 需要角色 admin 和user
• @RequiresPermissions (value={“user:a”, “user:b”},logical= Logical.OR):表示当前 Subject 需要权限 user:a 或user:b。
自定义拦截器
• 通过自定义拦截器可以扩展功能,例如:动态url-角色/权限访问控制的实现、根据 Subject 身份信息获取用户信息绑定到 Request(即设置通用数据)、验证码验证、在线用户信息的保存等
会话管理
概述
• Shiro 提供了完整的企业级会话管理功能,不依赖于底层容器(如web容器tomcat),不管 JavaSE 还是 JavaEE 环境都可以使用,提供了会话管理、会话事件监听、会话存储/持久化、容器无关的集群、失效/过期支持、对Web 的透明支持、SSO 单点登录的支持等特性。
会话相关的 API
• Subject.getSession():即可获取会话;其等价于Subject.getSession(true),即如果当前没有创建 Session 对象会创建一个;Subject.getSession(false),如果当前没有创建 Session 则返回null
• session.getId():获取当前会话的唯一标识
• session.getHost():获取当前Subject的主机地址
• session.getTimeout() & session.setTimeout(毫秒):获取/设置当前Session的过期时间
• session.getStartTimestamp() & session.getLastAccessTime():获取会话的启动时间及最后访问时间;如果是 JavaSE 应用需要自己定期调用 session.touch() 去更新最后访问时间;如果是 Web 应用,每次进入 ShiroFilter 都会自动调用 session.touch() 来更新最后访问时间。
• session.touch() & session.stop():更新会话最后访问时间及销毁会话;当Subject.logout()时会自动调用 stop 方法来销毁会话。如果在web中,调用 HttpSession. invalidate()也会自动调用Shiro Session.stop 方法进行销毁Shiro 的会话
• session.setAttribute(key, val) &session.getAttribute(key) &session.removeAttribute(key):设置/获取/删除会话属性;在整个会话范围内都可以对这些属性进行操作
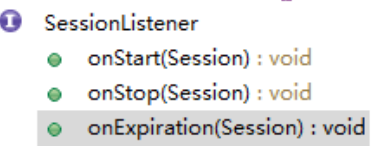
会话监听器
• 会话监听器用于监听会话创建、过期及停止事件
SESSIONDAO:
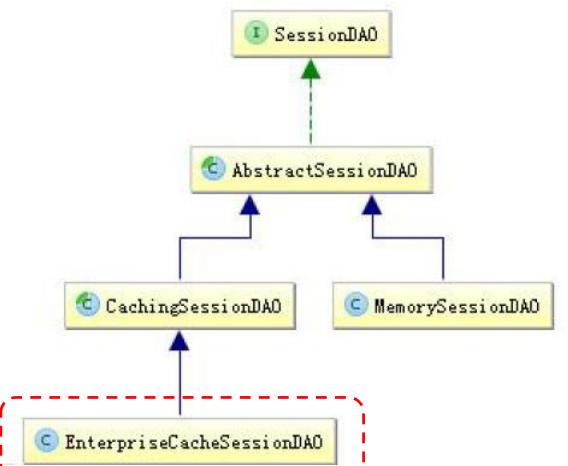
AbstractSessionDAO 提供了 SessionDAO 的基础实现,如生成会话ID等
• CachingSessionDAO 提供了对开发者透明的会话缓存的功能,需要设置相应的 CacheManager
• MemorySessionDAO 直接在内存中进行会话维护
• EnterpriseCacheSessionDAO 提供了缓存功能的会话维护,默认情况下使用 MapCache 实现,内部使用ConcurrentHashMap 保存缓存的会话。
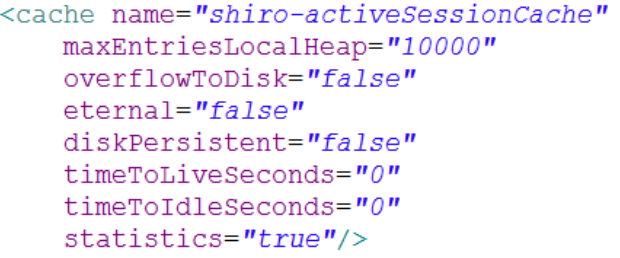
配置示例:
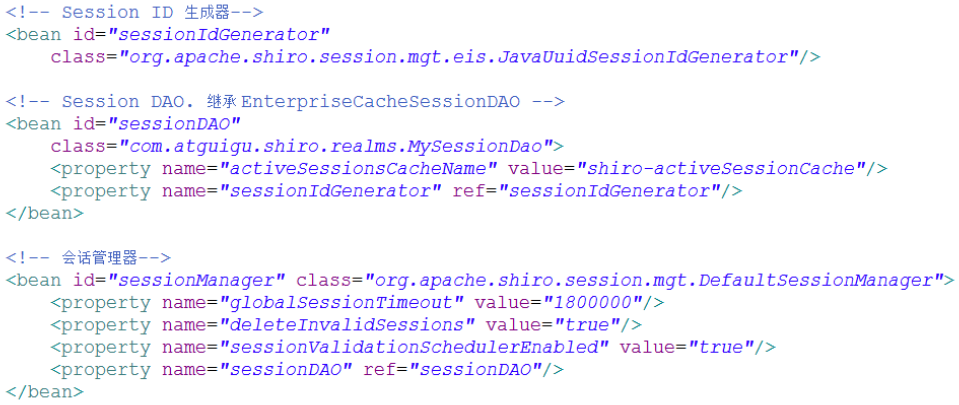
配置示例
数据表
create table sessions (
id varchar(200),
session varchar(2000),
constraint pk_sessions primary key(id)
) charset=utf8 ENGINE=InnoDB;
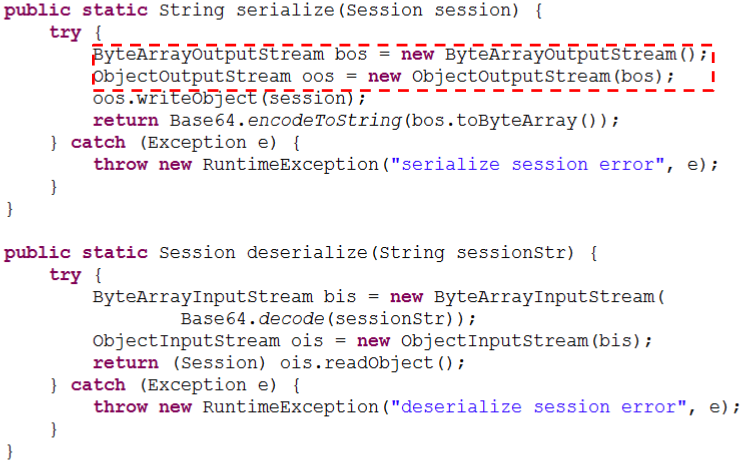
Session Dao
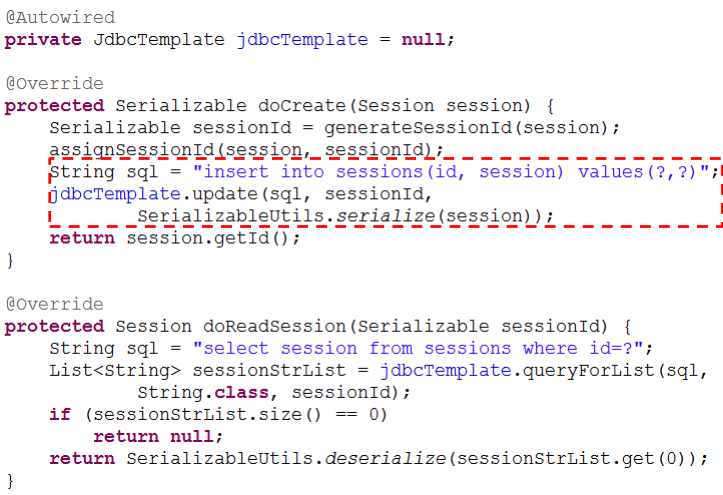
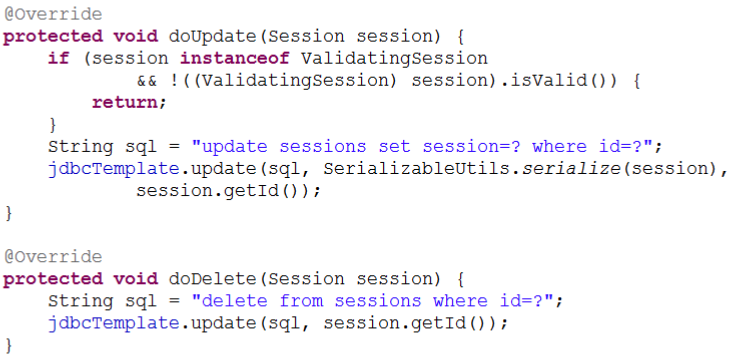
SerializableUtils
会话验证
• Shiro 提供了会话验证调度器,用于定期的验证会话是否已过期,如果过期将停止会话
• 出于性能考虑,一般情况下都是获取会话时来验证会话是否过期并停止会话的;但是如在 web 环境中,如果用户不主动退出是不知道会话是否过期的,因此需要定期的检测会话是否过期,Shiro 提供了会话验证调度器SessionValidationScheduler
• Shiro 也提供了使用Quartz会话验证调度器:QuartzSessionValidationScheduler
缓存
CacheManagerAware 接口
• Shiro 内部相应的组件(DefaultSecurityManager)会自动检测相应的对象(如Realm)是否实现了CacheManagerAware 并自动注入相应的CacheManager。
Realm 缓存
• Shiro 提供了 CachingRealm,其实现了
CacheManagerAware 接口,提供了缓存的一些基础实现;
• AuthenticatingRealm 及 AuthorizingRealm 也分别提
供了对AuthenticationInfo 和 AuthorizationInfo 信息的缓
存。
Session 缓存
• 如 SecurityManager 实现了 SessionSecurityManager,其会判断 SessionManager 是否实现了CacheManagerAware 接口,如果实现了会把CacheManager 设置给它。
• SessionManager 也会判断相应的 SessionDAO(如继承自CachingSessionDAO)是否实现了CacheManagerAware,如果实现了会把 CacheManager设置给它
• 设置了缓存的 SessionManager,查询时会先查缓存,如果找不到才查数据库。
RememberMe
概述
• Shiro 提供了记住我(RememberMe)的功能,比如访问如淘宝等一些网站时,关闭了浏览器,下次再打开时还是能记住你是谁,下次访问时无需再登录即可访问,基本流程如下:
• 1、首先在登录页面选中 RememberMe 然后登录成功;如果是浏览器登录,一般会把 RememberMe 的Cookie 写到客户端并保存下来;
• 2、关闭浏览器再重新打开;会发现浏览器还是记住你的;
• 3、访问一般的网页服务器端还是知道你是谁,且能正常访问;
• 4、但是比如我们访问淘宝时,如果要查看我的订单或进行支付时,此时还是需要再进行身份认证的,以确保当前用户还是你。
认证和记住我
• subject.isAuthenticated() 表示用户进行了身份验证登录的,即使有 Subject.login 进行了登录;
• subject.isRemembered():表示用户是通过记住我登录的,此时可能并不是真正的你(如你的朋友使用你的电脑,或者你的cookie 被窃取)在访问的
• 两者二选一,即 subject.isAuthenticated()==true,则subject.isRemembered()==false;反之一样。
建议
• 访问一般网页:如个人在主页之类的,我们使用user 拦截器即可,user 拦截器只要用户登录(isRemembered() || isAuthenticated())过即可访问成功;
• 访问特殊网页:如我的订单,提交订单页面,我们使用authc 拦截器即可,authc 拦截器会判断用户是否是通过Subject.login(isAuthenticated()==true)登录的,如果是才放行,否则会跳转到登录页面叫你重新登录。
身份验证相关的
实现
• 如果要自己做RememeberMe,需要在登录之前这样创建Token:UsernamePasswordToken(用户名,密码,是否记住我),且调用UsernamePasswordToken 的:token.setRememberMe(true); 方法
配置:
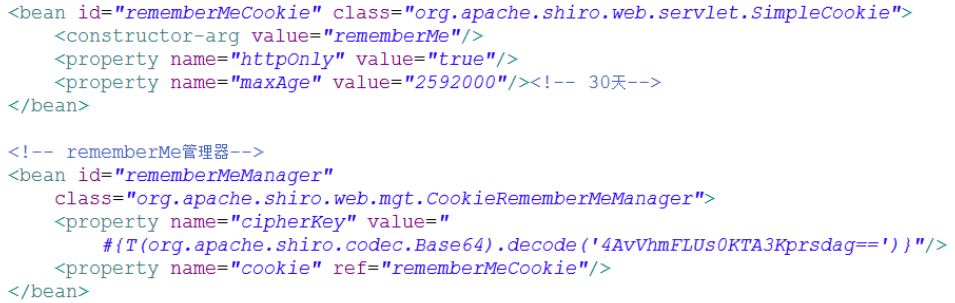
完整代码:


<?xml version="1.0" encoding="UTF-8"?>
<web-app xmlns:xsi="http://www.w3.org/2001/XMLSchema-instance"
xmlns="http://java.sun.com/xml/ns/javaee"
xsi:schemaLocation="http://java.sun.com/xml/ns/javaee http://java.sun.com/xml/ns/javaee/web-app_2_5.xsd"
id="WebApp_ID" version="2.5">
<!-- needed for ContextLoaderListener -->
<context-param>
<param-name>contextConfigLocation</param-name>
<param-value>classpath:applicationContext.xml</param-value>
</context-param>
<!-- Bootstraps the root web application context before servlet initialization -->
<listener>
<listener-class>org.springframework.web.context.ContextLoaderListener</listener-class>
</listener>
<!-- The front controller of this Spring Web application, responsible for handling all application requests -->
<servlet>
<servlet-name>spring</servlet-name>
<servlet-class>org.springframework.web.servlet.DispatcherServlet</servlet-class>
<load-on-startup>1</load-on-startup>
</servlet>
<!-- Map all requests to the DispatcherServlet for handling -->
<servlet-mapping>
<servlet-name>spring</servlet-name>
<url-pattern>/</url-pattern>
</servlet-mapping>
<!-- Shiro Filter is defined in the spring application context: -->
<!--
1. 配置 Shiro 的 shiroFilter.
2. DelegatingFilterProxy 实际上是 Filter 的一个代理对象. 默认情况下, Spring 会到 IOC 容器中查找和
<filter-name> 对应的 filter bean. 也可以通过 targetBeanName 的初始化参数来配置 filter bean 的 id.
-->
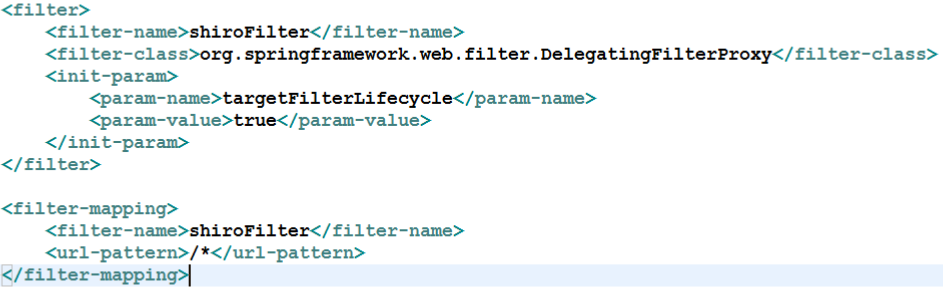
<filter>
<filter-name>shiroFilter</filter-name>
<filter-class>org.springframework.web.filter.DelegatingFilterProxy</filter-class>
<init-param>
<param-name>targetFilterLifecycle</param-name>
<param-value>true</param-value>
</init-param>
</filter>
<filter-mapping>
<filter-name>shiroFilter</filter-name>
<url-pattern>/*</url-pattern>
</filter-mapping>
</web-app>

<?xml version="1.0" encoding="UTF-8"?>
<beans xmlns="http://www.springframework.org/schema/beans"
    xmlns:xsi="http://www.w3.org/2001/XMLSchema-instance"
    xsi:schemaLocation="http://www.springframework.org/schema/beans http://www.springframework.org/schema/beans/spring-beans.xsd">

    <!-- =========================================================
         Shiro Core Components - Not Spring Specific
         ========================================================= -->
    <!-- Shiro''s main business-tier object for web-enabled applications
         (use DefaultSecurityManager instead when there is no web environment)-->
    <!--
    1. 配置 SecurityManager!
    -->
    <bean id="securityManager" class="org.apache.shiro.web.mgt.DefaultWebSecurityManager">
        <property name="cacheManager" ref="cacheManager"/>
        <property name="authenticator" ref="authenticator"></property>

        <property name="realms">
            <list>
                <ref bean="jdbcRealm"/>
                <ref bean="secondRealm"/>
            </list>
        </property>

        <property name="rememberMeManager.cookie.maxAge" value="10"></property>
    </bean>

    <!-- Let''s use some enterprise caching support for better performance.  You can replace this with any enterprise
         caching framework implementation that you like (Terracotta+Ehcache, Coherence, GigaSpaces, etc -->
    <!--
    2. 配置 CacheManager.
    2.1 需要加入 ehcache 的 jar 包及配置文件.
    -->
    <bean id="cacheManager" class="org.apache.shiro.cache.ehcache.EhCacheManager">
        <!-- Set a net.sf.ehcache.CacheManager instance here if you already have one.  If not, a new one
             will be creaed with a default config:
             <property name="cacheManager" ref="ehCacheManager"/> -->
        <!-- If you don''t have a pre-built net.sf.ehcache.CacheManager instance to inject, but you want
             a specific Ehcache configuration to be used, specify that here.  If you don''t, a default
             will be used.: -->
        <property name="cacheManagerConfigFile" value="classpath:ehcache.xml"/>
    </bean>

    <bean id="authenticator"
        class="org.apache.shiro.authc.pam.ModularRealmAuthenticator">
        <property name="authenticationStrategy">
            <bean class="org.apache.shiro.authc.pam.AtLeastOneSuccessfulStrategy"></bean>
        </property>
    </bean>

    <!-- Used by the SecurityManager to access security data (users, roles, etc).
         Many other realm implementations can be used too (PropertiesRealm,
         LdapRealm, etc. -->
    <!--
        3. 配置 Realm
        3.1 直接配置实现了 org.apache.shiro.realm.Realm 接口的 bean
    -->
    <bean id="jdbcRealm" class="com.atguigu.shiro.realms.ShiroRealm">
        <property name="credentialsMatcher">
            <bean class="org.apache.shiro.authc.credential.HashedCredentialsMatcher">
                <property name="hashAlgorithmName" value="MD5"></property>
                <property name="hashIterations" value="1024"></property>
            </bean>
        </property>
    </bean>

    <bean id="secondRealm" class="com.atguigu.shiro.realms.SecondRealm">
        <property name="credentialsMatcher">
            <bean class="org.apache.shiro.authc.credential.HashedCredentialsMatcher">
                <property name="hashAlgorithmName" value="SHA1"></property>
                <property name="hashIterations" value="1024"></property>
            </bean>
        </property>
    </bean>

    <!-- =========================================================
         Shiro Spring-specific integration
         ========================================================= -->
    <!-- Post processor that automatically invokes init() and destroy() methods
         for Spring-configured Shiro objects so you don''t have to
         1) specify an init-method and destroy-method attributes for every bean
            definition and
         2) even know which Shiro objects require these methods to be
            called. -->
    <!--
    4. 配置 LifecycleBeanPostProcessor. 可以自定的来调用配置在 Spring IOC 容器中 shiro bean 的生命周期方法.
    -->
    <bean id="lifecycleBeanPostProcessor" class="org.apache.shiro.spring.LifecycleBeanPostProcessor"/>

    <!-- Enable Shiro Annotations for Spring-configured beans.  Only run after
         the lifecycleBeanProcessor has run: -->
    <!--
    5. 启用 IOC 容器中使用 shiro 的注解. 但必须在配置了 LifecycleBeanPostProcessor 之后才可以使用.
    -->
    <bean class="org.springframework.aop.framework.autoproxy.DefaultAdvisorAutoProxyCreator"
          depends-on="lifecycleBeanPostProcessor"/>
    <bean class="org.apache.shiro.spring.security.interceptor.AuthorizationAttributeSourceAdvisor">
        <property name="securityManager" ref="securityManager"/>
    </bean>

    <!-- Define the Shiro Filter here (as a FactoryBean) instead of directly in web.xml -
         web.xml uses the DelegatingFilterProxy to access this bean.  This allows us
         to wire things with more control as well utilize nice Spring things such as
         PropertiesPlaceholderConfigurer and abstract beans or anything else we might need: -->
    <!--
    6. 配置 ShiroFilter.
    6.1 id 必须和 web.xml 文件中配置的 DelegatingFilterProxy 的 <filter-name> 一致.
                      若不一致, 则会抛出: NoSuchBeanDefinitionException. 因为 Shiro 会来 IOC 容器中查找和 <filter-name> 名字对应的 filter bean.
    -->
    <bean id="shiroFilter" class="org.apache.shiro.spring.web.ShiroFilterFactoryBean">
        <property name="securityManager" ref="securityManager"/>
        <property name="loginUrl" value="/login.jsp"/>
        <property name="successUrl" value="/list.jsp"/>
        <property name="unauthorizedUrl" value="/unauthorized.jsp"/>

        <property name="filterChainDefinitionMap" ref="filterChainDefinitionMap"></property>

        <!--
            配置哪些页面需要受保护.
            以及访问这些页面需要的权限.
            1). anon 可以被匿名访问
            2). authc 必须认证(即登录)后才可能访问的页面.
            3). logout 登出.
            4). roles 角色过滤器
        -->
        <!--
        <property name="filterChainDefinitions">
            <value>
                /login.jsp = anon
                /shiro/login = anon
                /shiro/logout = logout

                /user.jsp = roles[user]
                /admin.jsp = roles[admin]

                # everything else requires authentication:
                /** = authc
            </value>
        </property>
        -->
    </bean>

    <!-- 配置一个 bean, 该 bean 实际上是一个 Map. 通过实例工厂方法的方式 -->
    <bean id="filterChainDefinitionMap"
        factory-bean="filterChainDefinitionMapBuilder" factory-method="buildFilterChainDefinitionMap"></bean>

    <bean id="filterChainDefinitionMapBuilder"
        class="com.atguigu.shiro.factory.FilterChainDefinitionMapBuilder"></bean>

    <bean id="shiroService"
        class="com.atguigu.shiro.services.ShiroService"></bean>

</beans>

<ehcache>

    <!-- Sets the path to the directory where cache .data files are created.

         If the path is a Java System Property it is replaced by
         its value in the running VM.

         The following properties are translated:
         user.home - User''s home directory
         user.dir - User''s current working directory
         java.io.tmpdir - Default temp file path -->
    <diskStore path="java.io.tmpdir"/>

    <cache name="authorizationCache"
           eternal="false"
           timeToIdleSeconds="3600"
           timeToLiveSeconds="0"
           overflowToDisk="false"
           statistics="true">
    </cache>

    <cache name="authenticationCache"
           eternal="false"
           timeToIdleSeconds="3600"
           timeToLiveSeconds="0"
           overflowToDisk="false"
           statistics="true">
    </cache>

    <cache name="shiro-activeSessionCache"
           eternal="false"
           timeToIdleSeconds="3600"
           timeToLiveSeconds="0"
           overflowToDisk="false"
           statistics="true">
    </cache>

    <!--Default Cache configuration. These will applied to caches programmatically created through
        the CacheManager.

        The following attributes are required for defaultCache:

        maxInMemory       - Sets the maximum number of objects that will be created in memory
        eternal           - Sets whether elements are eternal. If eternal,  timeouts are ignored and the element
                            is never expired.
        timeToIdleSeconds - Sets the time to idle for an element before it expires. Is only used
                            if the element is not eternal. Idle time is now - last accessed time
        timeToLiveSeconds - Sets the time to live for an element before it expires. Is only used
                            if the element is not eternal. TTL is now - creation time
        overflowToDisk    - Sets whether elements can overflow to disk when the in-memory cache
                            has reached the maxInMemory limit.

        -->
    <defaultCache
        maxElementsInMemory="10000"
        eternal="false"
        timeToIdleSeconds="120"
        timeToLiveSeconds="120"
        overflowToDisk="true"
        />

    <!--Predefined caches.  Add your cache configuration settings here.
        If you do not have a configuration for your cache a WARNING will be issued when the
        CacheManager starts

        The following attributes are required for defaultCache:

        name              - Sets the name of the cache. This is used to identify the cache. It must be unique.
        maxInMemory       - Sets the maximum number of objects that will be created in memory
        eternal           - Sets whether elements are eternal. If eternal,  timeouts are ignored and the element
                            is never expired.
        timeToIdleSeconds - Sets the time to idle for an element before it expires. Is only used
                            if the element is not eternal. Idle time is now - last accessed time
        timeToLiveSeconds - Sets the time to live for an element before it expires. Is only used
                            if the element is not eternal. TTL is now - creation time
        overflowToDisk    - Sets whether elements can overflow to disk when the in-memory cache
                            has reached the maxInMemory limit.

        -->

    <!-- Sample cache named sampleCache1
        This cache contains a maximum in memory of 10000 elements, and will expire
        an element if it is idle for more than 5 minutes and lives for more than
        10 minutes.

        If there are more than 10000 elements it will overflow to the
        disk cache, which in this configuration will go to wherever java.io.tmp is
        defined on your system. On a standard Linux system this will be /tmp"
        -->
    <cache name="sampleCache1"
        maxElementsInMemory="10000"
        eternal="false"
        timeToIdleSeconds="300"
        timeToLiveSeconds="600"
        overflowToDisk="true"
        />

    <!-- Sample cache named sampleCache2
        This cache contains 1000 elements. Elements will always be held in memory.
        They are not expired. -->
    <cache name="sampleCache2"
        maxElementsInMemory="1000"
        eternal="true"
        timeToIdleSeconds="0"
        timeToLiveSeconds="0"
        overflowToDisk="false"
        /> -->

    <!-- Place configuration for your caches following -->

</ehcache>

<?xml version="1.0" encoding="UTF-8"?>
<beans xmlns="http://www.springframework.org/schema/beans"
    xmlns:xsi="http://www.w3.org/2001/XMLSchema-instance"
    xmlns:mvc="http://www.springframework.org/schema/mvc"
    xmlns:context="http://www.springframework.org/schema/context"
    xsi:schemaLocation="http://www.springframework.org/schema/mvc http://www.springframework.org/schema/mvc/spring-mvc-4.0.xsd
        http://www.springframework.org/schema/beans http://www.springframework.org/schema/beans/spring-beans.xsd
        http://www.springframework.org/schema/context http://www.springframework.org/schema/context/spring-context-4.0.xsd">

    <context:component-scan base-package="com.atguigu.shiro"></context:component-scan>

    <bean class="org.springframework.web.servlet.view.InternalResourceViewResolver">
        <property name="prefix" value="/"></property>
        <property name="suffix" value=".jsp"></property>
    </bean>

    <mvc:annotation-driven></mvc:annotation-driven>
    <mvc:default-servlet-handler/>

</beans>


package com.atguigu.shiro.factory;

import java.util.LinkedHashMap;

public class FilterChainDefinitionMapBuilder {

    public LinkedHashMap<String, String> buildFilterChainDefinitionMap(){
        LinkedHashMap<String, String> map = new LinkedHashMap<>();

        map.put("/login.jsp", "anon");
        map.put("/shiro/login", "anon");
        map.put("/shiro/logout", "logout");
        map.put("/user.jsp", "authc,roles[user]");
        map.put("/admin.jsp", "authc,roles[admin]");
        map.put("/list.jsp", "user");

        map.put("/**", "authc");

        return map;
    }

}

package com.atguigu.shiro.handlers;

import javax.servlet.http.HttpSession;

import org.apache.shiro.SecurityUtils;
import org.apache.shiro.authc.AuthenticationException;
import org.apache.shiro.authc.UsernamePasswordToken;
import org.apache.shiro.subject.Subject;
import org.springframework.beans.factory.annotation.Autowired;
import org.springframework.stereotype.Controller;
import org.springframework.web.bind.annotation.RequestMapping;
import org.springframework.web.bind.annotation.RequestParam;

import com.atguigu.shiro.services.ShiroService;

@Controller
@RequestMapping("/shiro")
public class ShiroHandler {

    @Autowired
    private ShiroService shiroService;

    @RequestMapping("/testShiroAnnotation")
    public String testShiroAnnotation(HttpSession session){
        session.setAttribute("key", "value12345");
        shiroService.testMethod();
        return "redirect:/list.jsp";
    }

    @RequestMapping("/login")
    public String login(@RequestParam("username") String username,
            @RequestParam("password") String password){
        Subject currentUser = SecurityUtils.getSubject();

        if (!currentUser.isAuthenticated()) {
            // 把用户名和密码封装为 UsernamePasswordToken 对象
            UsernamePasswordToken token = new UsernamePasswordToken(username, password);
            // rememberme
            token.setRememberMe(true);
            try {
                System.out.println("1. " + token.hashCode());
                // 执行登录.
                currentUser.login(token);
            }
            // ... catch more exceptions here (maybe custom ones specific to your application?
            // 所有认证时异常的父类.
            catch (AuthenticationException ae) {
                //unexpected condition?  error?
                System.out.println("登录失败: " + ae.getMessage());
            }
        }

        return "redirect:/list.jsp";
    }

}

package com.atguigu.shiro.realms;

import org.apache.shiro.authc.AuthenticationException;
import org.apache.shiro.authc.AuthenticationInfo;
import org.apache.shiro.authc.AuthenticationToken;
import org.apache.shiro.authc.LockedAccountException;
import org.apache.shiro.authc.SimpleAuthenticationInfo;
import org.apache.shiro.authc.UnknownAccountException;
import org.apache.shiro.authc.UsernamePasswordToken;
import org.apache.shiro.crypto.hash.SimpleHash;
import org.apache.shiro.realm.AuthenticatingRealm;
import org.apache.shiro.util.ByteSource;

public class SecondRealm extends AuthenticatingRealm {

    @Override
    protected AuthenticationInfo doGetAuthenticationInfo(
            AuthenticationToken token) throws AuthenticationException {
        System.out.println("[SecondReaml] doGetAuthenticationInfo");

        //1. 把 AuthenticationToken 转换为 UsernamePasswordToken
        UsernamePasswordToken upToken = (UsernamePasswordToken) token;

        //2. 从 UsernamePasswordToken 中来获取 username
        String username = upToken.getUsername();

        //3. 调用数据库的方法, 从数据库中查询 username 对应的用户记录
        System.out.println("从数据库中获取 username: " + username + " 所对应的用户信息.");

        //4. 若用户不存在, 则可以抛出 UnknownAccountException 异常
        if("unknown".equals(username)){
            throw new UnknownAccountException("用户不存在!");
        }

        //5. 根据用户信息的情况, 决定是否需要抛出其他的 AuthenticationException 异常.
        if("monster".equals(username)){
            throw new LockedAccountException("用户被锁定");
        }

        //6. 根据用户的情况, 来构建 AuthenticationInfo 对象并返回. 通常使用的实现类为: SimpleAuthenticationInfo
        //以下信息是从数据库中获取的.
        //1). principal: 认证的实体信息. 可以是 username, 也可以是数据表对应的用户的实体类对象.
        Object principal = username;
        //2). credentials: 密码.
        Object credentials = null; //"fc1709d0a95a6be30bc5926fdb7f22f4";
        if("admin".equals(username)){
            credentials = "ce2f6417c7e1d32c1d81a797ee0b499f87c5de06";
        }else if("user".equals(username)){
            credentials = "073d4c3ae812935f23cb3f2a71943f49e082a718";
        }

        //3). realmName: 当前 realm 对象的 name. 调用父类的 getName() 方法即可
        String realmName = getName();
        //4). 盐值.
        ByteSource credentialsSalt = ByteSource.Util.bytes(username);

        SimpleAuthenticationInfo info = null; //new SimpleAuthenticationInfo(principal, credentials, realmName);
        info = new SimpleAuthenticationInfo("secondRealmName", credentials, credentialsSalt, realmName);
        return info;
    }

    public static void main(String[] args) {
        String hashAlgorithmName = "SHA1";
        Object credentials = "123456";
        Object salt = ByteSource.Util.bytes("admin");;
        int hashIterations = 1024;

        Object result = new SimpleHash(hashAlgorithmName, credentials, salt, hashIterations);
        System.out.println(result);
    }
}

package com.atguigu.shiro.realms;

import java.util.HashSet;
import java.util.Set;

import org.apache.shiro.authc.AuthenticationException;
import org.apache.shiro.authc.AuthenticationInfo;
import org.apache.shiro.authc.AuthenticationToken;
import org.apache.shiro.authc.LockedAccountException;
import org.apache.shiro.authc.SimpleAuthenticationInfo;
import org.apache.shiro.authc.UnknownAccountException;
import org.apache.shiro.authc.UsernamePasswordToken;
import org.apache.shiro.authz.AuthorizationInfo;
import org.apache.shiro.authz.SimpleAuthorizationInfo;
import org.apache.shiro.crypto.hash.SimpleHash;
import org.apache.shiro.realm.AuthorizingRealm;
import org.apache.shiro.subject.PrincipalCollection;
import org.apache.shiro.util.ByteSource;

public class ShiroRealm extends AuthorizingRealm {

    @Override
    protected AuthenticationInfo doGetAuthenticationInfo(
            AuthenticationToken token) throws AuthenticationException {
        System.out.println("[FirstRealm] doGetAuthenticationInfo");

        //1. 把 AuthenticationToken 转换为 UsernamePasswordToken
        UsernamePasswordToken upToken = (UsernamePasswordToken) token;

        //2. 从 UsernamePasswordToken 中来获取 username
        String username = upToken.getUsername();

        //3. 调用数据库的方法, 从数据库中查询 username 对应的用户记录
        System.out.println("从数据库中获取 username: " + username + " 所对应的用户信息.");

        //4. 若用户不存在, 则可以抛出 UnknownAccountException 异常
        if("unknown".equals(username)){
            throw new UnknownAccountException("用户不存在!");
        }

        //5. 根据用户信息的情况, 决定是否需要抛出其他的 AuthenticationException 异常.
        if("monster".equals(username)){
            throw new LockedAccountException("用户被锁定");
        }

        //6. 根据用户的情况, 来构建 AuthenticationInfo 对象并返回. 通常使用的实现类为: SimpleAuthenticationInfo
        //以下信息是从数据库中获取的.
        //1). principal: 认证的实体信息. 可以是 username, 也可以是数据表对应的用户的实体类对象.
        Object principal = username;
        //2). credentials: 密码.
        Object credentials = null; //"fc1709d0a95a6be30bc5926fdb7f22f4";
        if("admin".equals(username)){
            credentials = "038bdaf98f2037b31f1e75b5b4c9b26e";
        }else if("user".equals(username)){
            credentials = "098d2c478e9c11555ce2823231e02ec1";
        }

        //3). realmName: 当前 realm 对象的 name. 调用父类的 getName() 方法即可
        String realmName = getName();
        //4). 盐值.
        ByteSource credentialsSalt = ByteSource.Util.bytes(username);

        SimpleAuthenticationInfo info = null; //new SimpleAuthenticationInfo(principal, credentials, realmName);
        info = new SimpleAuthenticationInfo(principal, credentials, credentialsSalt, realmName);
        return info;
    }

    public static void main(String[] args) {
        String hashAlgorithmName = "MD5";
        Object credentials = "123456";
        Object salt = ByteSource.Util.bytes("user");;
        int hashIterations = 1024;

        Object result = new SimpleHash(hashAlgorithmName, credentials, salt, hashIterations);
        System.out.println(result);
    }

    //授权会被 shiro 回调的方法
    @Override
    protected AuthorizationInfo doGetAuthorizationInfo(
            PrincipalCollection principals) {
        //1. 从 PrincipalCollection 中来获取登录用户的信息
        Object principal = principals.getPrimaryPrincipal();

        //2. 利用登录的用户的信息来用户当前用户的角色或权限(可能需要查询数据库)
        Set<String> roles = new HashSet<>();
        roles.add("user");
        if("admin".equals(principal)){
            roles.add("admin");
        }

        //3. 创建 SimpleAuthorizationInfo, 并设置其 reles 属性.
        SimpleAuthorizationInfo info = new SimpleAuthorizationInfo(roles);

        //4. 返回 SimpleAuthorizationInfo 对象.
        return info;
    }
}

package com.atguigu.shiro.realms;

import org.apache.shiro.authc.AuthenticationException;
import org.apache.shiro.authc.AuthenticationInfo;
import org.apache.shiro.authc.AuthenticationToken;
import org.apache.shiro.authz.AuthorizationInfo;
import org.apache.shiro.realm.AuthorizingRealm;
import org.apache.shiro.subject.PrincipalCollection;

public class TestRealm extends AuthorizingRealm {

    //用于授权的方法.
    @Override
    protected AuthorizationInfo doGetAuthorizationInfo(
            PrincipalCollection principals) {
        // TODO Auto-generated method stub
        return null;
    }

    //用于认证的方法
    @Override
    protected AuthenticationInfo doGetAuthenticationInfo(
            AuthenticationToken token) throws AuthenticationException {
        // TODO Auto-generated method stub
        return null;
    }

}

package com.atguigu.shiro.services;

import java.util.Date;

import org.apache.shiro.SecurityUtils;
import org.apache.shiro.authz.annotation.RequiresRoles;
import org.apache.shiro.session.Session;

public class ShiroService {

    @RequiresRoles({"admin"})
    public void testMethod(){
        System.out.println("testMethod, time: " + new Date());

        Session session = SecurityUtils.getSubject().getSession();
        Object val = session.getAttribute("key");

        System.out.println("Service SessionVal: " + val);
    }

}


<%@ page language="java" contentType="text/html; charset=ISO-8859-1"
    pageEncoding="ISO-8859-1"%>
<%@ taglib prefix="shiro" uri="http://shiro.apache.org/tags" %>

<!DOCTYPE html PUBLIC "-//W3C//DTD HTML 4.01 Transitional//EN" "http://www.w3.org/TR/html4/loose.dtd">
<html>
<head>
<meta http-equiv="Content-Type" content="text/html; charset=ISO-8859-1">
<title>Insert title here</title>
</head>
<body>

    <h4>List Page</h4>

    Welcome: <shiro:principal></shiro:principal>

    <shiro:hasRole name="admin">
    <br><br>
    <a href="admin.jsp">Admin Page</a>
    </shiro:hasRole>

    <shiro:hasRole name="user">
    <br><br>
    <a href="user.jsp">User Page</a>
    </shiro:hasRole>

    <br><br>
    <a href="shiro/testShiroAnnotation">Test ShiroAnnotation</a>

    <br><br>
    <a href="shiro/logout">Logout</a>

</body>
</html>

<%@ page language="java" contentType="text/html; charset=ISO-8859-1"
    pageEncoding="ISO-8859-1"%>
<!DOCTYPE html PUBLIC "-//W3C//DTD HTML 4.01 Transitional//EN" "http://www.w3.org/TR/html4/loose.dtd">
<html>
<head>
<meta http-equiv="Content-Type" content="text/html; charset=ISO-8859-1">
<title>Insert title here</title>
</head>
<body>

    <h4>Login Page</h4>

    <form action="shiro/login" method="POST">
        username: <input type="text" name="username"/>
        <br><br>

        password: <input type="password" name="password"/>
        <br><br>

        <input type="submit" value="Submit"/>
    </form>

</body>
</html> 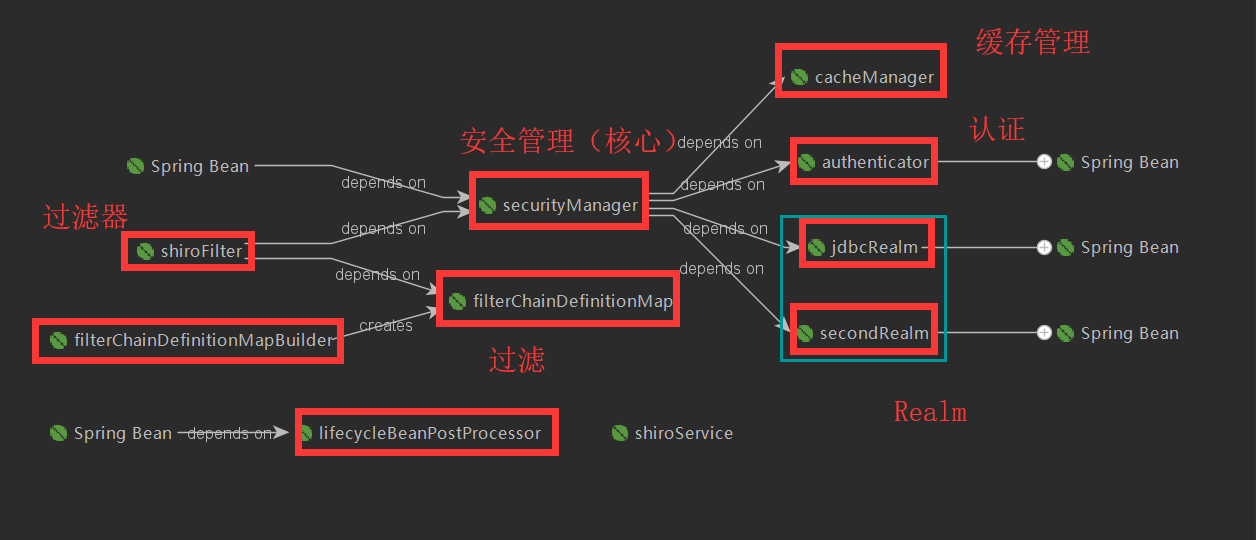
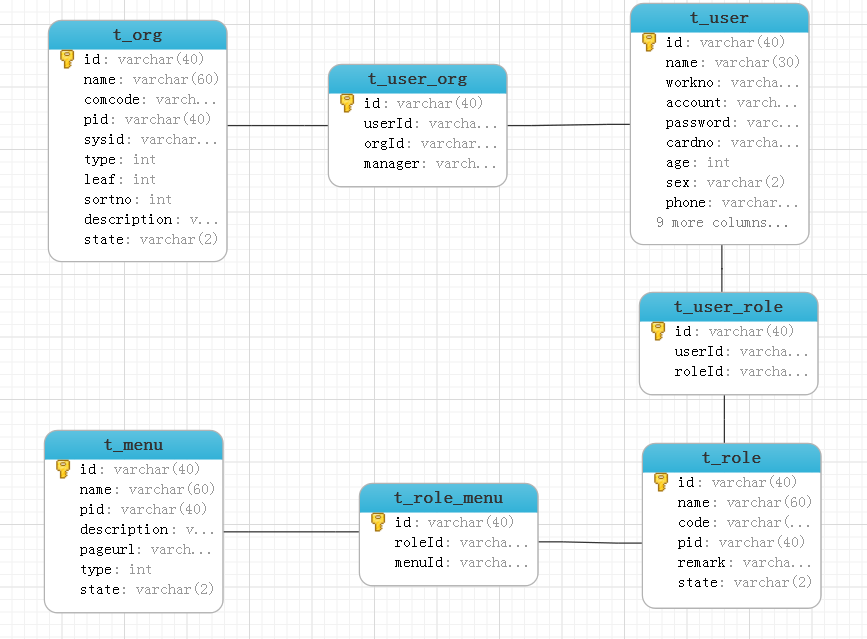
权限表的设计:
参考:这篇博客
日常报错:
1.Tomcat报错:部署项目失败:Unknown version string [4.0]. Default version will be used.


Connected to server
[2018-11-01 10:26:13,142] Artifact Shiro_Spring_Web:war exploded: Artifact is being deployed, please wait...
十一月 01, 2018 10:26:13 下午 org.apache.catalina.deploy.WebXml setVersion
警告: Unknown version string [4.0]. Default version will be used.
十一月 01, 2018 10:26:13 下午 org.apache.catalina.startup.TldConfig execute
信息: At least one JAR was scanned for TLDs yet contained no TLDs. Enable debug logging for this logger for a complete list of JARs that were scanned but no TLDs were found in them. Skipping unneeded JARs during scanning can improve startup time and JSP compilation time.
十一月 01, 2018 10:26:13 下午 org.apache.catalina.core.StandardContext startInternal
严重: One or more listeners failed to start. Full details will be found in the appropriate container log file
十一月 01, 2018 10:26:13 下午 org.apache.catalina.core.StandardContext startInternal
严重: Context [] startup failed due to previous errors
[2018-11-01 10:26:13,545] Artifact Shiro_Spring_Web:war exploded: Error during artifact deployment. See server log for details.
报错原因:

解决方法:

重新配置run as 的Tomcat
参考博客:https://blog.csdn.net/qq_32483145/article/details/80292463
SpingBoot集成shiro,MyRealm中无法@Autowired注入Service的问题
https://blog.csdn.net/u011961421/article/details/78803998
")
Berkely DB Java Edition 学习笔记一(转载)

Environment:
首先要接触的就是 Environment 了,使用它来 open database 以及做一管理方面的事情.
创建 Environment,还需要 Environment 的一些配置信息 EnvironmentConfig。
下面是创建的过程:
- EnvironmentConfig envConfig = new EnvironmentConfig();
- envConfig.setAllowCreate(true);
- myDbEnvironment = new Environment(new File("/export/dbEnv"),
- envConfig);
其中 EnvironmentConfig 提供了许多配置参数,常用的有:
envConfig.setAllowCreate ()// 如果不存在的 env 的话,是否要创建一个新的
envConfig.setReadOnly ()// 是否为只读的
envConfig.setTransactional ()// 是否使用事务
参数都是 boolean 类型的
除了 EnvironmentConfig 外,还有 EnvironmentMutableConfig,他实际是 EnvironmentConfig 的父类,使用他来配置在创建完 Environment 之后可以改变
的属性:
setCachePercent ()// 设置 cache 的大小占 JVM memory 的百分比
setCacheSize ()// 设置 cache 的大小
setTxnNoSync ()// 事务提交是否将改变的记录写入磁盘
setTxnWriteNoSync ()// 事务提交是否将 log 写入磁盘
下面看一下使用 EnvironmentMutableConfig 的方法:
- Environment myEnv = new Environment(new File("/export/dbEnv"), null);
- EnvironmentMutableConfig envMutableConfig =
- new EnvironmentMutableConfig();
- envMutableConfig.setTxnNoSync(true);
- myEnv.setMutableConfig(envMutableConfig);
Environment 通过 close 来关闭,释放资源
下面看看 Environment 在管理方面的一些方法:
可以通过 Environment 获得 EnvironmentStats,他提供了 Environment 一些状态信息,
例如使用
- long cacheMisses = myEnv.getStats(null).getNCacheMiss();
我们可以获得 cache 未命中的次数,据此来调整 cache 的大小
可以同过 Environment.getDatabaseNames () 来获得 Environment 的数据库的名字:
- List myDbNames = myDbEnv.getDatabaseNames();
- for(int i=0; i < myDbNames.size(); i++) {
- System.out.println("Database Name: " + (String)myDbNames.get(i));
- }
可以通过 Environment.removeDatabase () 来删除一个数据库:
- String dbName = myDB.getDatabaseName();
- myDB.close();
- myDBEnv.removeDatabase(null,dbName);
可以使用 Environment.renameDatabase () 来重新命名一个数据库:
- String dbName = myDB.getDatabaseName();
- String dbNewName = new String(dbName + ".new", "UTF-8");
- myDB.close();
- myDBEnv.renameDatabase(null,dbName,dbNewName);
可以使用 Environment.truncateDatabase () 来删除数据库中的所有记录:
- myEnv.truncate(null, // txn handle
- myDatabase.getDatabaseName(), // database name
- true//whether to return the count of deleted records
- );
第三个参数是否返回删除的记录数,性能有很大不同。false 的话会很快
Database:
最重要的一些操作大多都在 Database 里了,和 Environment 一样,它也有许多
配置的选项 DatabaseConfig, 我们先看看选项:
DatabaseConfig.setAllowCreate ()// 不能存在的话是 open 操作否创建新的
DatabaseConfig.setBtreeComparator ()// 设置 Btree 的比较器
DatabaseConfig.setDuplicateComparator ()// 设置判断重复的比较器
DatabaseConfig.setSortedDuplicates ()// 是否允许重复的记录
DatabaseConfig.setExclusiveCreate ()// 设为 true, 如果当前数据库已存在,则 open 失败,也就是说 open 操作会导致一个新的数据库被创建,默认为 false
DatabaseConfig.setReadOnly ()// 是否是只读的
DatabaseConfig.setTransactional ()// 是否使用事务
下面我们看看 Database 的使用流程:
- EnvironmentConfig envConfig = new EnvironmentConfig();
- envConfig.setAllowCreate(true);
- myDbEnvironment = new Environment(new File("/export/dbEnv"), envConfig);
- DatabaseConfig dbConfig = new DatabaseConfig();
- dbConfig.setAllowCreate(true);
- myDatabase = myDbEnvironment.openDatabase(null,
- "sampleDatabase",
- dbConfig);
我们通过 Environment 的 openDatabase 来创建 Database 对象。使用完了 Database 使用
close 方法来关闭数据库释放资源。
Database Records
Database Record 是保存在数据库的内容,包含 Key 和 value 两部分,他们都被封装成
DatabaseEntry,DatabaseEntry 只能存放字节数组,所以只要能把 Key 和 Value 是什么
类型的,只要能转化成字节数组就可以被 DatabaseEntry 封装。基本类型 JE 都有对应的 Binding, 复杂的类型可以使用序列化和自定义 binding 来实现。
下那面我们看看一个使用方法:
- String aKey = "key";
- String aData = "data";
- try {
- DatabaseEntry theKey = new DatabaseEntry(aKey.getBytes("UTF-8"));
- DatabaseEntry theData = new DatabaseEntry(aData.getBytes("UTF-8"));
- } catch (Exception e) {
- }
我们不应该依赖机器默认的编码,通常要指定特定的编码方法 getBytes ("UTF-8");
我们先看看怎么从数据库中读写记录:
通过 Database.put () 和 Database.get () 我们可以从数据库中读写记录
put:
- String aKey = "myFirstKey";
- String aData = "myFirstData";
- try {
- DatabaseEntry theKey = new DatabaseEntry(aKey.getBytes("UTF-8"));
- DatabaseEntry theData = new DatabaseEntry(aData.getBytes("UTF-8"));
- myDatabase.put(null, theKey, theData);
- } catch (Exception e) {
- }
get:
- String aKey = "myFirstKey";
- try {
- DatabaseEntry theKey = new DatabaseEntry(aKey.getBytes("UTF-8"));
- DatabaseEntry theData = new DatabaseEntry();
- if (myDatabase.get(null, theKey, theData, LockMode.DEFAULT) ==
- OperationStatus.SUCCESS) {
- byte[] retData = theData.getData();
- String foundData = new String(retData, "UTF-8");
- System.out.println("For key: ''" + aKey + "'' found data: ''" +
- foundData + "''.");
- } else {
- System.out.println("No record found for key ''" + aKey + "''.");
- }
- } catch (Exception e) {
- }
删除操作:
- String aKey = "myFirstKey";
- DatabaseEntry theKey = new DatabaseEntry(aKey.getBytes("UTF-8"));
- myDatabase.delete(null, theKey);
使用 BIND APIs 来操作基本类型:
我们可以使用 JE 提供的 Bind Apis 来操作数字类型和字符串类型:
以 Long 为例:
存储数据使用 Bind Apis 一般步骤如下:
1、通过 EntryBinding binding =TupleBinding.getPrimitiveBinding (Long.class);
2、通过 EntryBinding 把数据放到 DatabaseEntry 中:
myBinding.objectToEntry(data, dataEntry);
获取数据使用 Bind Apis 一般步骤如下:
1、通过 EntryBinding binding =TupleBinding.getPrimitiveBinding (Long.class);
2、通过 EntryBinding 将 Entry 转换成 Object Long theLong = (Long) myBinding.entryToObject (theData);
下面代码以测试的形式演示了整个过程:
- package edu.jlu.fuliang;
- import java.io.File;
- import com.sleepycat.bind.EntryBinding;
- import com.sleepycat.bind.tuple.TupleBinding;
- import com.sleepycat.je.Database;
- import com.sleepycat.je.DatabaseConfig;
- import com.sleepycat.je.DatabaseEntry;
- import com.sleepycat.je.Environment;
- import com.sleepycat.je.EnvironmentConfig;
- import com.sleepycat.je.LockMode;
- import junit.framework.TestCase;
- public class PrimitiveBindingTest extends TestCase{
- private Environment env;
- private Database db;
- private String key = "akey";
- private Long data = 1234556633L;
- public void setUp()throws Exception{
- EnvironmentConfig envConfig = new EnvironmentConfig();
- envConfig.setAllowCreate(true);
- env = new Environment(new File("etc/dbEnv"),envConfig);
- DatabaseConfig dbConfig = new DatabaseConfig();
- dbConfig.setAllowCreate(true);
- db = env.openDatabase(null, "myDB", dbConfig);
- DatabaseEntry keyEntry = new DatabaseEntry(key.getBytes("UTF-8"));
- DatabaseEntry dataEntry = new DatabaseEntry();
- EntryBinding myBinding = TupleBinding.getPrimitiveBinding(Long.class);
- myBinding.objectToEntry(data, dataEntry);
- db.put(null, keyEntry, dataEntry);
- }
- public void testGet()throws Exception{
- DatabaseEntry keyEntry = new DatabaseEntry(key.getBytes("UTF-8"));
- DatabaseEntry dataEntry = new DatabaseEntry();
- EntryBinding binding = TupleBinding.getPrimitiveBinding(Long.class);
- db.get(null, keyEntry, dataEntry, LockMode.DEFAULT);
- Long l = (Long)binding.entryToObject(dataEntry);
- assertEquals(l,data);
- }
- public void tearDown()throws Exception{
- db.close();
- env.truncateDatabase(null, "myDB",false);
- env.close();
- }
- }
序列化复杂的类型
步骤如下:
1、要存储的对象的类需要实现 java.io.Serializable
2、打开两个数据库,一个存放数据,另一个存放类的信息
3、实例化 com.sleepycat.bind.serial.StoredClassCatalog 对象
4、创建 uses com.sleepycat.bind.serial.SerialBinding 对象
5、使用 SerialBinding 把对象放到 DatabaseEntry 中
下面是使用一个能够完整描述这个过程的例子来说明这个过程:
- package edu.jlu.fuliang;
- import java.io.File;
- import com.sleepycat.bind.EntryBinding;
- import com.sleepycat.bind.serial.SerialBinding;
- import com.sleepycat.bind.serial.StoredClassCatalog;
- import com.sleepycat.je.Database;
- import com.sleepycat.je.DatabaseConfig;
- import com.sleepycat.je.DatabaseEntry;
- import com.sleepycat.je.DatabaseException;
- import com.sleepycat.je.Environment;
- import com.sleepycat.je.EnvironmentConfig;
- import com.sleepycat.je.LockMode;
- import junit.framework.TestCase;
- public class SerializableTypeTest extends TestCase{
- private Person person;
- private Environment env;
- private Database db,classDB;
- private StoredClassCatalog classCatalog;
- public void setUp()throws Exception{
- person = new Person();
- person.setAge(12);
- person.setName("zhansan");
- person.setSex(''m'');
- EnvironmentConfig envConfig = new EnvironmentConfig();
- envConfig.setAllowCreate(true);
- env = new Environment(new File("etc/dbEnv"),envConfig);
- DatabaseConfig dbConfig = new DatabaseConfig();
- dbConfig.setAllowCreate(true);
- db = env.openDatabase(null, "myDB", dbConfig);
- classDB = env.openDatabase(null, "classDB", dbConfig);
- classCatalog = new StoredClassCatalog(classDB);
- EntryBinding dataBinding = new SerialBinding(classCatalog,Person.class);
- DatabaseEntry keyEntry = new DatabaseEntry(person.getName().getBytes("UTF-8"));
- DatabaseEntry dataEntry = new DatabaseEntry();
- dataBinding.objectToEntry(person, dataEntry);
- db.put(null, keyEntry, dataEntry);
- }
- public void testGet()throws Exception{
- EntryBinding dataBinding = new SerialBinding(classCatalog,Person.class);
- DatabaseEntry keyEntry = new DatabaseEntry(person.getName().getBytes("UTF-8"));
- DatabaseEntry dataEntry = new DatabaseEntry();
- db.get(null, keyEntry, dataEntry, LockMode.DEFAULT);
- Person p = (Person)dataBinding.entryToObject(dataEntry);
- assertEquals(p.getName(),person.getName());
- assertEquals(p.getAge(),person.getAge());
- assertEquals(p.getSex(), person.getSex());
- }
- public void tearDown()throws Exception{
- db.close();
- classDB.close();
- env.truncateDatabase(null, "myDB", false);
- env.truncateDatabase(null, "classDB", false);
- env.close();
- }
- }
要存储的对象对应的类
- package edu.jlu.fuliang;
- import java.io.Serializable;
- public class Person implements Serializable{
- private String name;
- private int age;
- private char sex;
- public int getAge() {
- return age;
- }
- public void setAge(int age) {
- this.age = age;
- }
- public String getName() {
- return name;
- }
- public void setName(String name) {
- this.name = name;
- }
- public char getSex() {
- return sex;
- }
- public void setSex(char sex) {
- this.sex = sex;
- }
- }
自定义元组绑定:
存储复杂对象自定义元组绑定的步骤:
1、创建要存储的对象,这个对象的类没有必要实现 Serializable 接口:
2、扩展 com.sleepycat.bind.tuple.TupleBinding 来实现自定义的 Binging
3、创建 2 步欻关键的自定义 binding 对象
4、将创建的对象是用自定义个 binding 放到 DatabaseEntry 中
5、使用 put 方法存入数据库
下面的例子说明了这个过程:
自定义 Binging:
- package edu.jlu.fuliang;
- import com.sleepycat.bind.tuple.TupleBinding;
- import com.sleepycat.bind.tuple.TupleInput;
- import com.sleepycat.bind.tuple.TupleOutput;
- public class PersonTupleBinding extends TupleBinding{
- @Override
- public Object entryToObject(TupleInput ti) {
- Person person = new Person();
- person.setName(ti.readString());
- person.setAge(ti.readInt());
- person.setSex(ti.readChar());
- return person;
- }
- @Override
- public void objectToEntry(Object obj, TupleOutput output) {
- Person person = (Person)obj;
- output.writeString(person.getName());
- output.writeInt(person.getAge());
- output.writeChar(person.getSex());
- }
- }
put/get 的使用过程:
- package edu.jlu.fuliang;
- import java.io.File;
- import com.sleepycat.je.Database;
- import com.sleepycat.je.DatabaseConfig;
- import com.sleepycat.je.DatabaseEntry;
- import com.sleepycat.je.DatabaseException;
- import com.sleepycat.je.Environment;
- import com.sleepycat.je.EnvironmentConfig;
- import com.sleepycat.je.LockMode;
- import junit.framework.TestCase;
- public class CustomTupleBindingTest extends TestCase{
- private Person person;
- private Environment env;
- private Database db;
- public void setUp()throws Exception{
- person = new Person();
- person.setAge(12);
- person.setName("zhansan");
- person.setSex(''m'');
- EnvironmentConfig envConfig = new EnvironmentConfig();
- envConfig.setAllowCreate(true);
- env = new Environment(new File("etc/dbEnv"),envConfig);
- DatabaseConfig dbConfig = new DatabaseConfig();
- dbConfig.setAllowCreate(true);
- db = env.openDatabase(null, "myDB", dbConfig);
- PersonTupleBinding binding = new PersonTupleBinding();
- DatabaseEntry keyEntry = new DatabaseEntry(person.getName().getBytes("UTF-8"));
- DatabaseEntry dataEntry = new DatabaseEntry();
- binding.objectToEntry(person, dataEntry);
- db.put(null, keyEntry, dataEntry);
- }
- public void testGet()throws Exception{
- PersonTupleBinding binding = new PersonTupleBinding();
- DatabaseEntry keyEntry = new DatabaseEntry(person.getName().getBytes("UTF-8"));
- DatabaseEntry dataEntry = new DatabaseEntry();
- db.get(null, keyEntry, dataEntry, LockMode.DEFAULT);
- Person p = (Person)binding.entryToObject(dataEntry);
- assertEquals(p.getName(),person.getName());
- assertEquals(p.getAge(),person.getAge());
- assertEquals(p.getSex(), person.getSex());
- }
- public void tearDown()throws Exception{
- db.close();
- env.truncateDatabase(null, "myDB", false);
- env.close();
- }
- }

c++学习笔记一
基本概念第一个程序 helloword
/*标准头文件*/
#include<iostream>
using namespace std;
int main()
{
cout<<"helloworld!\n";
return 0;
}
1 名称
c++中可以命名的五种元素
函数
变量
类型
标签
命名空间
注:名称不能以数字开头,中间不能有空白字符
包含两个下划线的名称,以一个下划线开头后跟一个大写字母,是标准库的保留字
名称中允许含有16进制字符\Udddd,d表示16进制数
2 命名空间
using namespace std;
cout的全名就是:std::cout //这里的:是范围解析运算符
这样上面的例子可以改写为如下样式:
/*标准头文件*/
#include<iostream>
/*定义命名空间*/
int main()
{
std::cout<<"helloworld!\n";
return 0;
}
为了不用每次都写std:: 可以用命名空间来指定
代码如下:
using std::out;
3 关键字
c++中的一些保留字
4 语句和语句块
声明变量: double result=0.0;
5 程序结构
头文件:所需的数据类型的代码和其他类型的声时 (通常源文件的开头包含他们)
后缀名为.h
源文件 函数声时,程序的可执行代码
后缀名为.cpp .cxx或是.cc
6 程序和函数和执行
main()为入口函数
7 从源文件中创建可执行文件
第一步: 编译器把cpp文件编译成对像文件(源文件内容对应的机器码)
第二步: 链接程序把对像文件合并到包含完整可执行程序的文件中
编译
链接
动态链接库的优点:可以在几个并行执行的文件之间共享
在调用其中的函数之前是不会加载到内存中的
8 c++的源字符(共96个)
大小写字母a-z
数字0-9
控制字符:换行符、水平和垂直制表符、换页符
字符:_{}[]<>%:;?*+-/^&~!=,\"''
通用字符集 ucs-2 ucs-4(同unicode码)
三字符序列
转义字符序列 如:\n(等同于endl)等 十六进制数\x111 八进制数\111
语句中的空白:换行符、水平和垂直制表符、换页符
9 程序的注释
//
/* 信息 */
10 标准库
可以用using 引入
第二章 基本数据类型和计算
1 数据和数据类型
2 简单的计算 字面量
整数的算术运算 +-*/%
运算符的优先级和相关性
美化输出结果 如:cout<<setw(10)<<10+20
3 变量
变量名:任意字母、数字、下划线 (必须以字母和下划线开头)
(1)整型变量:在定义变量时一定要指定其初始值,如不知道则指定为0
整型变量类型 :char(一个字节)、 short int、 int、long int
无符号的unsigned short int、 unsigned int、unsigned long int
整数的取值范围
类型 字节数 取值范围
char 1 -128~127
unsigned char 1 0U~255U
short 2 -32768~32767
unsigned short 2 0U~65535U
int 4 -2147483648~2147483647
unsigned int 4 0U~4294967295
long 8 -9223372036854775808L~9223372036854775807L
unsigned long 8 0~18446744073709551615UL
整型字面量类型
没有前缀 十进制
前缀0x或0X 十六进制
前缀0 八进制
后缀u或U 不带符号的类型
后缀为L或l long
(2)赋值运算符
=
多次赋值 如:apples=(ofrangs=10)
op= 赋值运算符
(3)整数的递增和递减 ++ --
(4) const关键字 固定常量
(5) 整数的数字函数 如:abs() div()
(6) 生成随机数 如: int random_value=std::rand();
\
浮点数
小数形式:110.11
指数形式:11E1
浮点数的类型:float double long double
浮点数类型的取值范围
类型 精度 取值范围
float 7 1.2*10(-38)~3.4*10(38)
double 15 2.2*10(-308)~1.8*10(308)
long double 19 3.3*10(-4932)~1.2*10(4932)
浮点数的操作
数值函数
<cmath> 标准库头文件 三角函数和数值函数
字符
字符字面量
初始化字符 char =''apples'';
关于swift 学习笔记一和swift入门教程的介绍已经告一段落,感谢您的耐心阅读,如果想了解更多关于android 学习笔记一、Apache Shiro安全(权限框架)学习笔记一、Berkely DB Java Edition 学习笔记一(转载)、c++学习笔记一的相关信息,请在本站寻找。
本文标签:


