本文将为您提供关于iosAppDelegate.swift上的simple_auth_flutter导入更改无法启动的详细介绍,我们还将为您解释flutter,swift的相关知识,同时,我们还将为您
本文将为您提供关于ios AppDelegate.swift 上的 simple_auth_flutter 导入更改无法启动的详细介绍,我们还将为您解释flutter,swift的相关知识,同时,我们还将为您提供关于"AppDelegate.h" 和"AppDelegate.cpp" 分析、AppDelegate 中常用的代理方法回调的时机、AppDelegate 中调用UNUserNotificationCenter *center = [UNUserNotificationCenter currentNotificationCe...、AppDelegate 中跳转任意界面的实用信息。
本文目录一览:- ios AppDelegate.swift 上的 simple_auth_flutter 导入更改无法启动(flutter,swift)
- "AppDelegate.h" 和"AppDelegate.cpp" 分析
- AppDelegate 中常用的代理方法回调的时机
- AppDelegate 中调用UNUserNotificationCenter *center = [UNUserNotificationCenter currentNotificationCe...
- AppDelegate 中跳转任意界面
")
ios AppDelegate.swift 上的 simple_auth_flutter 导入更改无法启动(flutter,swift)
如何解决ios AppDelegate.swift 上的 simple_auth_flutter 导入更改无法启动
我想在我的 Flutter 应用程序中使用 the russian part says "failed to install *** to ***" 以针对 Instagram 对用户进行身份验证。所以我遵循了文档页面并应用了所有更改。我尝试将上述行添加到我的 AppDelegate.swift 中,如下所示:
import UIKit
import Flutter
import SimpleAuth;

@UIApplicationMain
@objc class AppDelegate: FlutterAppDelegate {
  override func application(
    _ application: UIApplication,didFinishLaunchingWithOptions launchOptions: [UIApplicationLaunchOptionsKey: Any]?
  ) -> Bool {
    GeneratedpluginRegistrant.register(with: self)
    return super.application(application,didFinishLaunchingWithOptions: launchOptions)
  }
    override func application(_ app: UIApplication,open url: URL,options: [UIApplication.OpenURLOptionsKey : Any]?) -> Bool{
        return SimpleAuth.CheckUrl(url);
    }
}
当我尝试执行 Flutter run 时,我看到错误:
no such module ''SimpleAuth'' import SimpleAuth;
那我应该怎么做才能解决AppDelegate中的import呢?我的 pubspec.yml 使用:
simple_auth: ^2.0.7
simple_auth_Flutter: ^2.0.7
解决方法
我想我已经找到了一个允许我的应用程序构建的解决方案。
import UIKit
import Flutter
import simple_auth_flutter;

@UIApplicationMain
@objc class AppDelegate: FlutterAppDelegate {
  override func application(
    _ application: UIApplication,didFinishLaunchingWithOptions launchOptions: [UIApplication.LaunchOptionsKey: Any]?
  ) -> Bool {
    GeneratedPluginRegistrant.register(with: self)
    return super.application(application,didFinishLaunchingWithOptions: launchOptions)
  }

   override func application(_ app: UIApplication,open url: URL,options: [UIApplication.OpenURLOptionsKey : Any]?) -> Bool{
        return SimpleAuthFlutterPlugin.check(url);
    }
}
"AppDelegate.h" 和"AppDelegate.cpp" 分析
转自 http://blog.163.com/jtyp_2000/blog/static/9910426201310893932976/

AppDelegate 中常用的代理方法回调的时机
方法如下:
当应用程序正常启动时(不包括已在后台转到前台的情况),调用此回调。launchOptions 是启动参数,假如用户通过点击 push 通知启动的应用,(这是非正常启动的情况,包括本地通知和远程通知),这个参数里会存储一些 push 通知的信息。
– (BOOL)application:(UIApplication *)application didFinishLaunchingWithOptions:(NSDictionary *)launchOptions NS_AVAILABLE_IOS(3_0);当应用程序全新启动,或者在后台转到前台,完全激活时,都会调用这个方法。如果应用程序是以前运行在后台,这时可以选择刷新用户界面。
// Restart any tasks that were paused (or not yet started) while the application was inactive. If the application was previously in the background, optionally refresh the user interface.– (void)applicationDidBecomeActive:(UIApplication *)application;当应用从活动状态主动变为非活动状态的时候,应用程序时会调用这个方法。这可导致产生某些类型的临时中断(如传入电话呼叫或 SMS 消息)。或者当用户退出应用程序,它开始过渡到的背景状态。使用此方法可以暂停正在进行的任务,禁用定时器,降低 OpenGL ES 的帧速率。游戏应该使用这个方法来暂停游戏。
调用时机可能有以下几种:锁屏,单击 HOME 键,下拉状态栏,双击 HOME 键弹出底栏等情况。// Sent when the application is about to move from active to inactive state. This can occur for certain types of temporary interruptions (such as an incoming phone call or SMS message) or when the user quits the application and it begins the transition to the background state. // Use this method to pause ongoing tasks, disable timers, and throttle down OpenGL ES frame rates. Games should use this method to pause the game. // 当应用从活动状态主动变为非活动状态的时候 – (void)applicationWillResignActive:(UIApplication *)application;这个方法已不再支持,可能会在以后某个版本中去掉。在 iOS9 中被别的方法取代了,不建议使用了。
– (BOOL)application:(UIApplication *)application handleOpenURL:(NSURL *)url;替代为
这个方法在 iOS9 中被别的方法取代了,不建议使用了。
// 当用户通过其它应用启动本应用时,会回调这个方法,url参数是其它应用调用openURL:方法时传过来的。– (BOOL)application:(UIApplication *)application openURL:(NSURL *)url sourceApplication:(NSString *)sourceApplication annotation:(id)annotation NS_AVAILABLE_IOS(4_2);建议使用下面这个方法,替换掉
- (BOOL)application:(UIApplication *)app openURL:(NSURL *)url options:(NSDictionary<NSString*, id> *)options NS_AVAILABLE_IOS(9_0); // no equiv. notification. return NO if the application can''t open for some reason当应用可用内存不足时,会调用此方法,在这个方法中,应该尽量去清理可能释放的内存。如果实在不行,可能会被强行退出应用。
// try to clean up as much memory as possible. next step is to terminate app
– (void)applicationDidReceiveMemoryWarning:(UIApplication *)application;
当应用退出,并且进程即将结束时会调到这个方法,一般很少主动调到,更多是内存不足时是被迫调到的,我们应该在这个方法里做一些数据存储操作。
// Called when the application is about to terminate. Save data if appropriate. See also applicationDidEnterBackground:– (void)applicationWillTerminate:(UIApplication *)application;当客户端注册远程通知时,会回调下面两个方法。
如果成功,则回调第一个,客户端把 deviceToken 取出来发给服务端,push 消息的时候要用。
如果失败了,则回调第二个,可以从 error 参数中看一下失败原因。(1) - (void)application:(UIApplication *)application didRegisterForRemoteNotificationsWithDeviceToken:(NSData *)deviceToken NS_AVAILABLE_IOS(3_0);(2) - (void)application:(UIApplication *)application didFailToRegisterForRemoteNotificationsWithError:(NSError *)error NS_AVAILABLE_IOS(3_0);注意
注册远程通知使用如下方法:
7.0 及其以下版本的系统
UIRemoteNotificationType type = UIRemoteNotificationTypeBadge|UIRemoteNotificationTypeAlert|UIRemoteNotificationTypeSound;
[application registerForRemoteNotificationTypes:type];
8.0 及其以上版本的系统
UIUserNotificationSettings *setting = [UIUserNotificationSettings settingsForTypes: (UIRemoteNotificationTypeBadge | UIRemoteNotificationTypeSound | UIRemoteNotificationTypeAlert) categories:nil];
      [application registerUserNotificationSettings:setting];
当应用在前台运行中,收到远程通知时 (不会弹出系统通知界面),会回调这个方法。
当应用在后台状态时,点击 push 消息启动应用,也会回调这个方法。
当应用完全没有启动时,点击 push 消息启动应用,就不会回调这个方法。– (void)application:(UIApplication *)application didReceiveRemoteNotification:(NSDictionary *)userInfo NS_AVAILABLE_IOS(3_0);当应用收到本地通知时会调这个方法,同上面一个方法类似。
如果在前台运行状态直接调用
如果在后台状态,点击通知启动时,也会回调这个方法
当应用完全没有启动时,点击 push 消息启动应用,就不会回调这个方法。– (void)application:(UIApplication *)application didReceiveLocalNotification:(UILocalNotification *)notification NS_AVAILABLE_IOS(4_0);当用户从前台状态转入后台时,调用此方法。使用此方法来释放资源共享,保存用户数据,无效计时器,并储存足够的应用程序状态信息,以便程序被终止后,将应用程序恢复到目前的状态。
如果您的应用程序支持后台运行,这个方法被调用,否则调用 applicationWillTerminate:用户退出。// Use this method to release shared resources, save user data, invalidate timers, and store enough application state information to restore your application to its current state in case it is terminated later. // If your application supports background execution, this method is called instead of applicationWillTerminate: when the user quits. – (void)applicationDidEnterBackground:(UIApplication *)application NS_AVAILABLE_IOS(4_0);当应用在后台状态,将要进入到前台运行时,会调用此方法。
如果应用不在后台状态,而是直接启动,则不会回调此方法。// Called as part of the transition from the background to the inactive state; here you can undo many of the changes made on entering the background.– (void)applicationWillEnterForeground:(UIApplication *)application NS_AVAILABLE_IOS(4_0);

AppDelegate 中调用UNUserNotificationCenter *center = [UNUserNotificationCenter currentNotificationCe...
2019年2月27日:
修复bug:

查找资料:
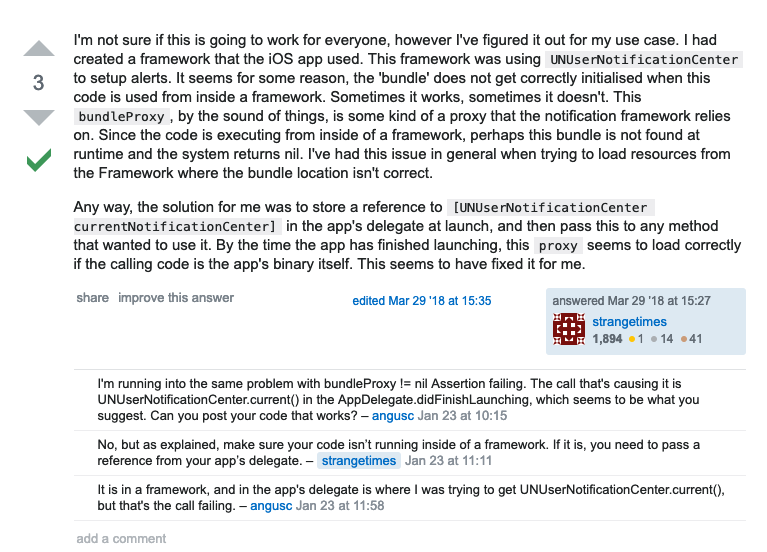
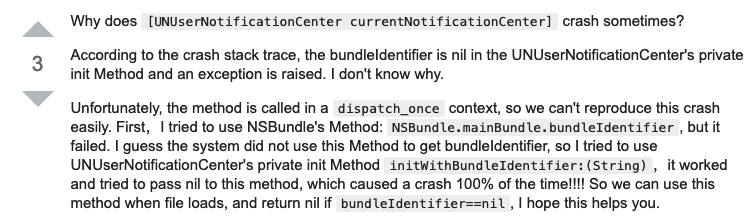
解决方式:添加分类,对系统方法替换,做非空校验
#import "UNUserNotificationCenter+Hack.h"
#import <objc/runtime.h>
@implementation UNUserNotificationCenter (Hack)
+ (void)load {
static dispatch_once_t _onceToken;
dispatch_once(&_onceToken, ^{
[self safeHook];
});
}
+ (void)safeHook {
/*hook UNUserNotificationCenter''s systemMethod - (id)initWithBundleProxy:(id)arg1;*/
NSString * orig_initWithBundleProxyName = @"initWithBundleProxy:";
SEL orig_initWithBundleSelector = NSSelectorFromString(orig_initWithBundleProxyName);
if (![self instancesRespondToSelector:orig_initWithBundleSelector]) {
return;
}
SEL alt_initWithBundleSelector = @selector(hk_initWithBundleProxy:);
Method origMethod = class_getInstanceMethod(self, orig_initWithBundleSelector);
Method altMethod = class_getInstanceMethod(self, @selector(hk_initWithBundleProxy:));
class_addMethod(self,
orig_initWithBundleSelector,
class_getMethodImplementation(self, orig_initWithBundleSelector),
method_getTypeEncoding(origMethod));
class_addMethod(self,
alt_initWithBundleSelector,
class_getMethodImplementation(self, alt_initWithBundleSelector),
method_getTypeEncoding(altMethod));
method_exchangeImplementations(origMethod, altMethod);
}
- (instancetype)hk_initWithBundleProxy:(id)arg1 {
if (nil==arg1||NSNull.null==arg1) return nil;
// return [self hk_initWithBundleProxy:nil]; //crash
return [self hk_initWithBundleProxy:arg1];
}
@end

AppDelegate 中跳转任意界面
{
return [self topViewControllerWithRootViewController:self.window.rootViewController];
}
- (UIViewController*)topViewControllerWithRootViewController:(UIViewController*)rootViewController
{
if ([rootViewController isKindOfClass:[UITabBarController class]]) {
UITabBarController *tabBarController = (UITabBarController *)rootViewController;
return [self topViewControllerWithRootViewController:tabBarController.selectedViewController];
} else if ([rootViewController isKindOfClass:[UINavigationController class]]) {
UINavigationController* navigationController = (UINavigationController*)rootViewController;
return [self topViewControllerWithRootViewController:navigationController.visibleViewController];
} else if (rootViewController.presentedViewController) {
UIViewController* presentedViewController = rootViewController.presentedViewController;
return [self topViewControllerWithRootViewController:presentedViewController];
} else {
return rootViewController;
}
}
今天关于ios AppDelegate.swift 上的 simple_auth_flutter 导入更改无法启动和flutter,swift的分享就到这里,希望大家有所收获,若想了解更多关于"AppDelegate.h" 和"AppDelegate.cpp" 分析、AppDelegate 中常用的代理方法回调的时机、AppDelegate 中调用UNUserNotificationCenter *center = [UNUserNotificationCenter currentNotificationCe...、AppDelegate 中跳转任意界面等相关知识,可以在本站进行查询。
本文标签:


