在本文中,我们将给您介绍关于如何在Android设备的uiautomator测试用例中打开wifi?的详细内容,并且为您解答androidui测试的相关问题,此外,我们还将为您提供关于android8
在本文中,我们将给您介绍关于如何在Android设备的uiautomator测试用例中打开wifi?的详细内容,并且为您解答android ui测试的相关问题,此外,我们还将为您提供关于android 8.0 以后 uiautomator 无法直接使用的问题、Android Studio + uiautomator 配置运行、android UI 定位工具 - uiautomator2 的使用、android uiautomator 学习(一)创建工程的知识。
本文目录一览:- 如何在Android设备的uiautomator测试用例中打开wifi?(android ui测试)
- android 8.0 以后 uiautomator 无法直接使用的问题
- Android Studio + uiautomator 配置运行
- android UI 定位工具 - uiautomator2 的使用
- android uiautomator 学习(一)创建工程
")
如何在Android设备的uiautomator测试用例中打开wifi?(android ui测试)
我想在android中使用uiautomator工具打开wifi作为测试用例的一部分.我尝试在uiautomator测试用例中使用以下代码:
WifiManager wi = (WifiManager) this.getSystemService(Context.WIFI_SERVICE);
      if(wi.isWifiEnabled()){
        wi.setWifiEnabled(false);
      }else{
        wi.setWifiEnabled(true);
    }
但它给出了这个错误:
“getSystemservice” method is undefined for Mainclass
解决方法:
您实际上可以使用UIAutomator来打开和关闭WiFi设置.我今天晚上写了代码:)
这是代码.您可以将其添加到Android示例(此处为http://developer.android.com/tools/testing/testing_ui.html)
在类的顶部添加以下枚举
private enum OnOff {
    Off,
    On
};
之后添加新代码:
    // Validate that the package name is the expected one
    UiObject settingsValidation = new UiObject(new UiSelector()
    .packageName("com.android.settings"));
    assertTrue("Unable to detect Settings", settingsValidation.exists());
这是新代码:
    UiSelector settingsItems = new UiSelector().className(android.widget.TextView.class.getName());
    UiObject wiFi = appViews.getChildByText(settingsItems, "Wi-Fi");

    // We can click on Wi-Fi, e.g. wiFi.clickAndWaitForNewWindow();
    // So we kNow we have found the Wi-Fi setting

    UiSelector switchElement = new UiSelector().className(android.widget.Switch.class.getName());
    setSwitchTo(OnOff.Off); // Or set it to On as you wish :)
}

private void setSwitchTo(OnOff value) throws UiObjectNotFoundException {

    String text;
    UiObject switchObject = getSwitchObject();
    for (int attempts = 0; attempts < 5; attempts++) {
        text = switchObject.getText();
        boolean switchIsOn = switchObject.isChecked();
        final OnOff result;
        if (switchIsOn) {
            result = OnOff.On;
        } else {
            result = OnOff.Off;
        }

        System.out.println("Value of switch is " + switchObject.isSelected() + ", " + text + ", " + switchIsOn);
        if (result == value) {
            System.out.println("Switch set to correct value " + result);
            break;
        } else {
            switchObject.click();
        }
    }
}

private UiObject getSwitchObject() {
    UiObject switchObject = new UiObject(new UiSelector().className(android.widget.Switch.class.getName()));
    assertTrue("Unable to find the switch object", switchObject.exists());
    String text;
    return switchObject;
}
循环是为了补偿我观察到的一些行为,其中点击似乎没有改变开关位置.

android 8.0 以后 uiautomator 无法直接使用的问题
android8.1 以后 sdk tools 自带的 uiautomator 直接打开,截取不到设备界面信息。
可以使用以下方法手动截取。
首先操作设备定位到要分析的界面。
1. 截取 uix 资源文件
adb shell uiautomator dump /sdcard/screen.uix
adb pull /sdcard/screen.uix D:/screen.uix
2. 截取截图
adb shell screencap -p /sdcard/screen.png
adb pull /sdcard/screen.png D:/screen.png
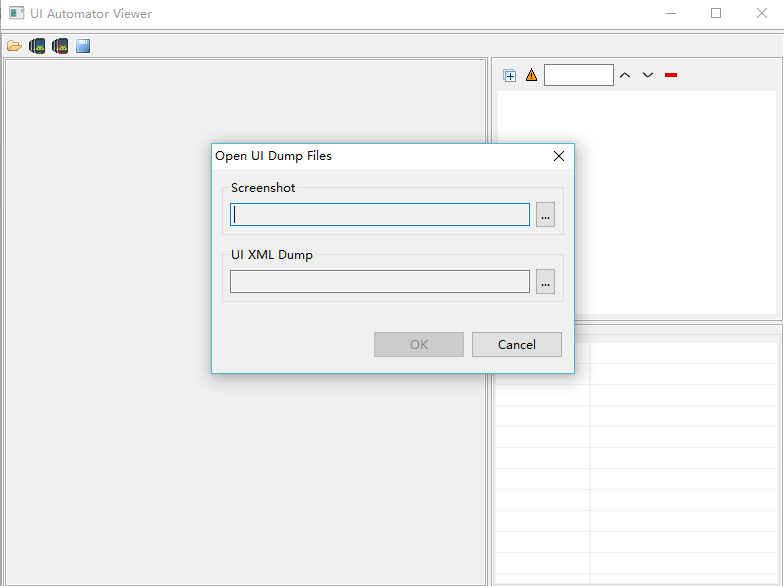
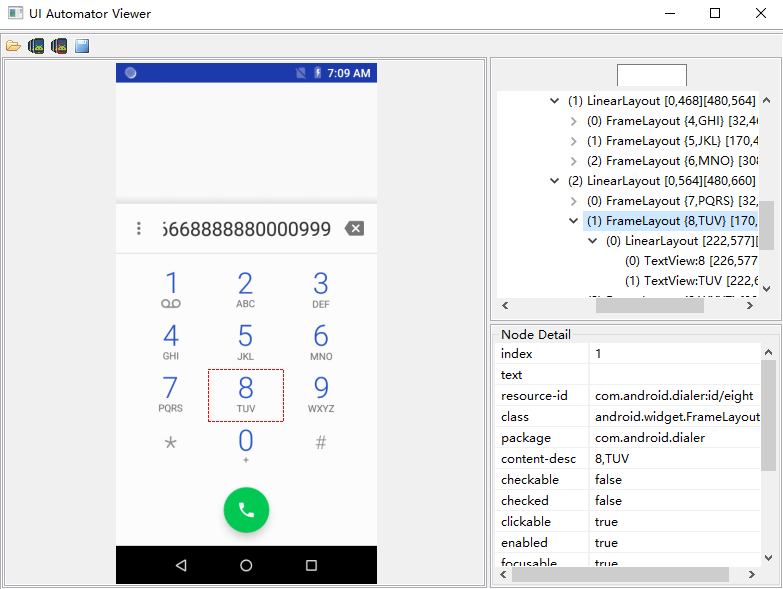
运行 sdk/tools 目录下的 uiautomatorviewer.bat,导入从设备获取的截图和资源文件

Android Studio + uiautomator 配置运行
1.在build.gradle中添加依赖:
androidTestImplementation ''com.android.support.test.uiautomator:uiautomator-v18:2.1.3''
implementation ''com.android.support.test.uiautomator:uiautomator-v18:2.1.3''implementation ''junit:junit:4.12''androidTestImplementation ''com.android.support.test:runner:1.0.2''
androidTestImplementation ''com.android.support.test.espresso:espresso-core:3.0.2''2.新建实例:在androidTest文件下新建测试类方法(例:test1.java)
package com.example.myapplication;

import android.os.Bundle;
import android.support.test.InstrumentationRegistry;
import android.support.test.uiautomator.UiDevice;
import android.support.test.uiautomator.UiObject;
import android.support.test.uiautomator.UiObjectNotFoundException;
import android.support.test.uiautomator.UiSelector;
import android.util.Log;

import org.junit.Test;

import static android.support.test.InstrumentationRegistry.getArguments;

public class test1{

    private UiDevice uiDevice = UiDevice.getInstance(InstrumentationRegistry.getInstrumentation());
    //获取参数
    Bundle bundle = getArguments();
    private int displayWidth = uiDevice.getDisplayWidth();
    private int displayHeight = uiDevice.getDisplayHeight();

    @Test
    public void test() throws InterruptedException, UiObjectNotFoundException {
        uiDevice.pressHome();
        Log.i("test1", "在等待1111111111111");
        uiDevice.swipe(displayWidth / 2, displayHeight / 2, 0, displayHeight / 2, 10);
        while (true) {
            UiObject objectA = uiDevice.findObject(new UiSelector().text("华为钱包"));
            Thread.sleep(1000);
            if (objectA.exists()) {
                Thread.sleep(1000);
//                objectA.click();
//                Thread.sleep(1000);
                uiDevice.pressHome();
                ShellRunner.shell("curl -d \"123\" http://192.168.51.225:8000/ud");
                Thread.sleep(1000);
            }
        }
    }
}
启动uiautomator测试方法
shell命令启动
am instrument -w -r -e debug false -e class com.example.myapplication.test1#test com.example.myapplication.test/android.support.test.runner.AndroidJUnitRunner
com.example.myapplication.test1#test com.example.myapplication.test
格式为:报名.测试类名#测试方法 报名.test/android.support.test.runner.AndroidJUnitRunner
报名.test/android.support.test.runner.AndroidJUnitRunner为固定格式
android UI 定位工具 - uiautomator2 的使用
介绍:
uiautomator2 是一个可以使用 Python 对 Android 设备进行 UI 自动化的库。其底层基于 Google uiautomator,Google 提供的 uiautomator 库可以获取屏幕上任意一个 APP 的任意一个控件属性,并对其进行任意操作,但有两个缺点:
1、测试脚本只能使用 Java 语言。
2、测试脚本必须每次被上传到设备上运行。 我们希望测试能够用一个更脚本化的语言,例如 Python 编写,同时可以每次所见即所得地修改测试、运行测试。
安装:
pip install --pre uiautomator2
pip install pillow
初始化:
部署相关的守护进程。
电脑连接上一个手机或多个手机,确保 adb 已经添加到环境变量中,执行下面的命令会自动安装本库所需要的设备端程序:uiautomator-server 、atx-agent、openstf/minicap、openstf/minitouch
python -m uiautomator2 init安装完成,设备上会多一个 uiautomator 的应用。
weditor 安装:
我们可以借助 Android SDK 自的 uiautomatorviewer 查看元素,这就要求手机必须以 USB 的方式连接 PC,我前面使用的是 WIFI 连接进行连接的。所以,openatx 提供了另外一个工具 weditor 来解决这个问题。
weditor 是一个可以让 uiautomator 显示 Android UI 界面的工具。
pip install --pre --upgrade weditor使用:
python -m weditor执行命令后,默认会通过浏览器打开页面
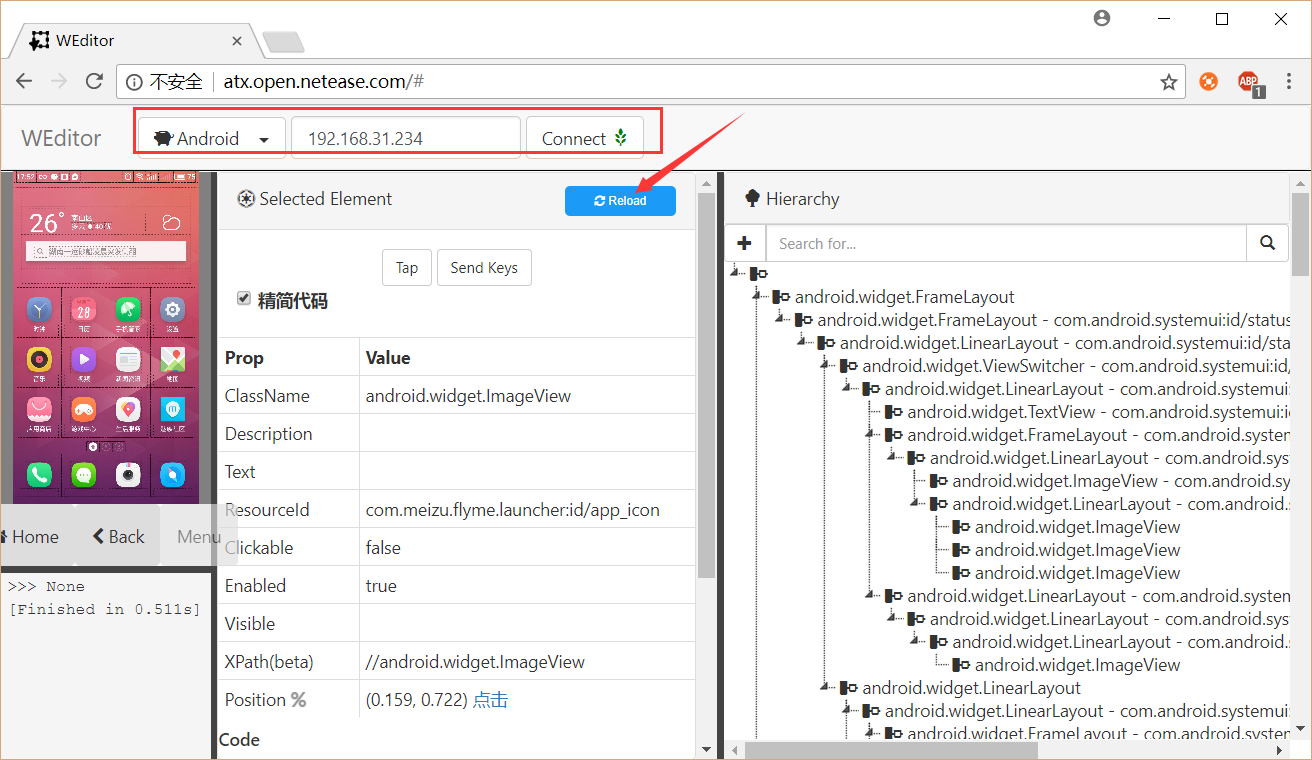
在页面左上角选择 Android,输入设备 IP(192.168.31.234),点击 Connect 按钮。
当我们操作完手机后,可以点击 “Reload” 按钮进行刷新,从而保持与设备上的界面保持同步。weditor 还可以帮我们生成代码。
*** 还可以无线链接,在同一 WiFi 下,手机链接 IP 地址。
GitHub 地址:https://github.com/openatx/uiautomator2
GitHub 地址:https://github.com/openatx/weditor
创建工程")
android uiautomator 学习(一)创建工程
转:http://blog.csdn.net/robinzhou/article/details/8447058
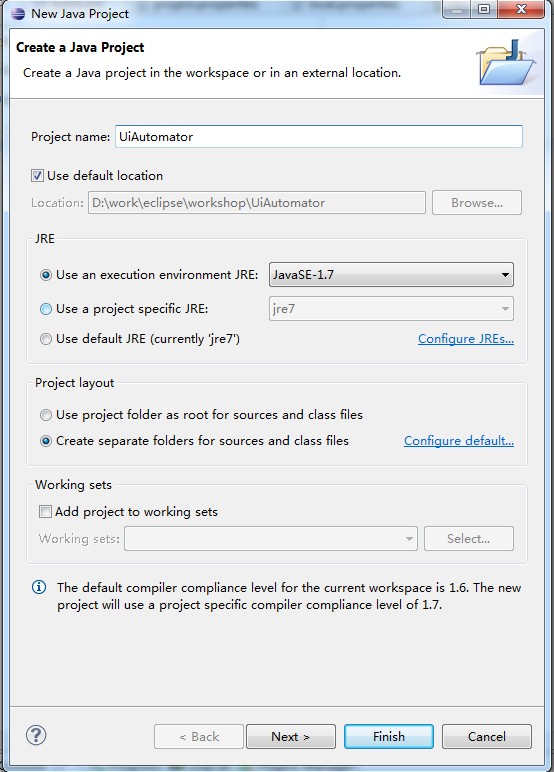
要写 UIAutomator 的 testcase,首先要用 Eclipse 创建一个 JavaProject
需要将 Junit 的 lib 加入到工程里
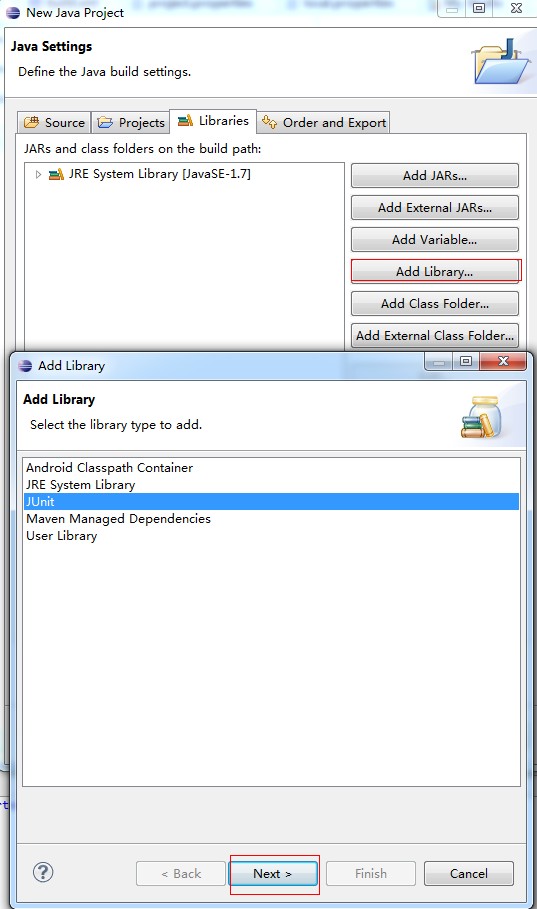
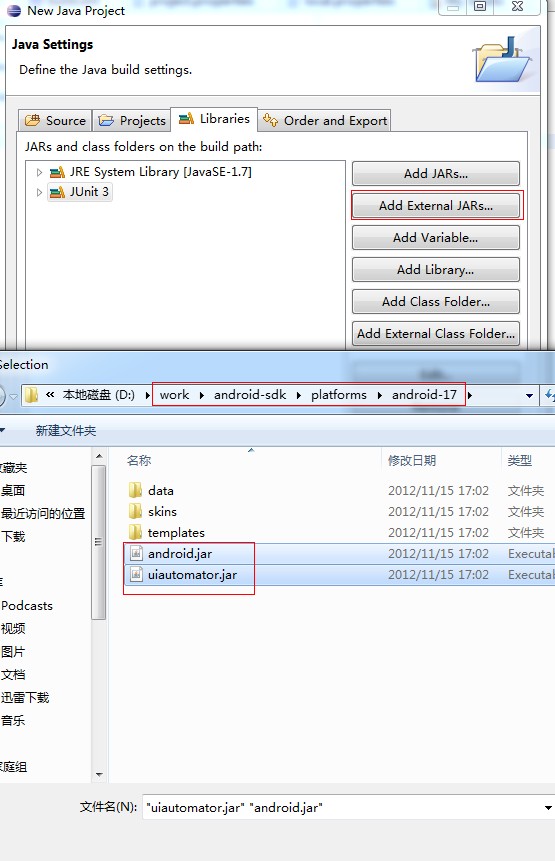
还要添加 Android.jar 和 uiautomator.jar,这两个文件在 android sdk 中,没有升级 SDK 的朋友,建议升级到最新的 SDK,因为 uiautomator 还有些不完善,在老的 SDK 上有些功能还不能用
创建好工程后,就可以写 case 了,我们使用官方帮助中的例子,为了简单,采用官网上的例子,并且精简至一个 home 命令,方便大家把流程先跑起来
http://developer.android.com/tools/testing/testing_ui.html
// Import the uiautomator libraries
	package com.uia.example.my;

	import com.android.uiautomator.core.UiObject;
	import com.android.uiautomator.core.UiObjectNotFoundException;
	import com.android.uiautomator.core.UiScrollable;
	import com.android.uiautomator.core.UiSelector;
	import com.android.uiautomator.testrunner.UiAutomatorTestCase;

	public class test extends UiAutomatorTestCase {
	   public void testDemo() throws UiObjectNotFoundException {

	      // Simulate a short press on the HOME button.
	      getUiDevice().pressHome();
	   }
	}
创建一个编译配置文件
<android-sdk>/tools/android create uitest-project -n <name> -t 1 -p <path>说明一下各个参数的作用,如果已经将 android sdk 的路径配置到了系统的 path 中,输入命令 “android create uitest-project” 就可以查看到相应的帮助
-n --name : Project name. 就是在 eclipse 中创建的项目的名字。
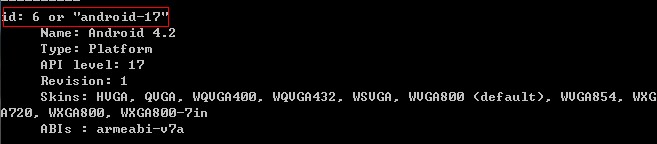
-t --target : Target ID of the new project. [required] 这个 id 是本机上 android targets 的 id,可以通过命令 “android list” 来查询,得到如下图的结果,选择 android-17 以上版本前面所对应的 id
根据我电脑的情况我的命令是这样的
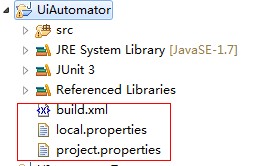
D:\work\android-sdk\tools>android create uitest-project -n UiAutomator -t 6 -p D:\work\eclipse\workshop\UiAutomator 创建成功的输出如下

从 eclipse 中可以看到有 3 个新增加的文件
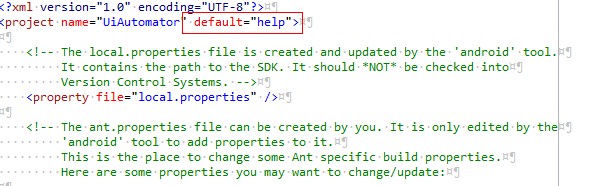
在 build.xml 上点击右键,选择 “Run As” -> "Ant Build", 可以看到下面的输出,这个输出实际上是一个帮助,是对 build.xml 的作用进行说明的。在 build.xml 中配置上相应的选项可以完成相应的操作。
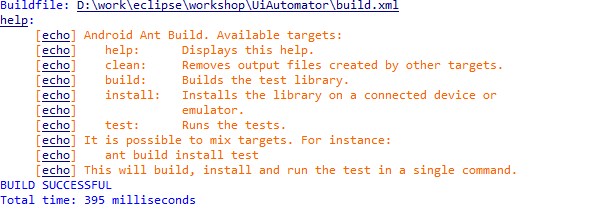
在 build.xml 的配置上,将 default 后面的选项改为 "build" 后,就可以 build jar 包了。
同样执行 Run As 操作,就可以 build 成功了。目标文件声称在工程目录下的 bin 文件夹下。
剩下的操作就和官方网站上一样了。将 jar push 到手机中,然后执行就可以了
adb push UiAutomator.jar /data/local/tmp/
adb shell uiautomator runtest UiAutomator.jar -c com.uia.example.my.test
今天关于如何在Android设备的uiautomator测试用例中打开wifi?和android ui测试的介绍到此结束,谢谢您的阅读,有关android 8.0 以后 uiautomator 无法直接使用的问题、Android Studio + uiautomator 配置运行、android UI 定位工具 - uiautomator2 的使用、android uiautomator 学习(一)创建工程等更多相关知识的信息可以在本站进行查询。
本文标签:


