以上就是给各位分享Kubernetes因限制内存配置引发的错误,其中也会对kubernetes资源限制进行解释,同时本文还将给你拓展Kubernetes-LaunchSingleNodeKuberne
以上就是给各位分享Kubernetes 因限制内存配置引发的错误,其中也会对kubernetes 资源限制进行解释,同时本文还将给你拓展Kubernetes - Launch Single Node Kubernetes Cluster、kubernetes - 使用 kubeadm 部署 kubernetes 集群、Kubernetes ---- kubeadm安装kubernetes、Kubernetes as Database: 使用kubesql查询kubernetes资源等相关知识,如果能碰巧解决你现在面临的问题,别忘了关注本站,现在开始吧!
本文目录一览:- Kubernetes 因限制内存配置引发的错误(kubernetes 资源限制)
- Kubernetes - Launch Single Node Kubernetes Cluster
- kubernetes - 使用 kubeadm 部署 kubernetes 集群
- Kubernetes ---- kubeadm安装kubernetes
- Kubernetes as Database: 使用kubesql查询kubernetes资源
")
Kubernetes 因限制内存配置引发的错误(kubernetes 资源限制)
今天对一个 pod 进行内存资源调整后,一直卡在 ContainerCreating 的状态,执行 describe 命令查看该 Pod 详细信息后发现如下 。
[root@master-01 ~]# kubectl describe pod busybox-deploy-b9b6d4ff9-vwfnq ...Events:Type Reason Age From Message---- ------ ---- ---- -------Normal Scheduled 40s default-scheduler Successfully assigned default/busybox-deploy-b9b6d4ff9-vwfnq to 192.168.209.132Warning FailedCreatePodSandBox 28s (x4 over 37s) kubelet, 192.168.209.132 Failed create pod sandbox: rpc error: code = Unknown desc = failed to start sandbox container for pod "busybox-deploy-b9b6d4ff9-vwfnq": Error response from daemon: OCI runtime create failed: container_linux.go:344: starting container process caused "process_linux.go:297: getting the final child''s pid from pipe caused \"read init-p: connection reset by peer\"": unknownWarning FailedCreatePodSandBox 26s (x9 over 38s) kubelet, 192.168.209.132 Failed create pod sandbox: rpc error: code = Unknown desc = failed to start sandbox container for pod "busybox-deploy-b9b6d4ff9-vwfnq": Error response from daemon: OCI runtime create failed: container_linux.go:344: starting container process caused "process_linux.go:293: copying bootstrap data to pipe caused \"write init-p: broken pipe\"": unknownNormal SandboxChanged 26s (x12 over 37s) kubelet, 192.168.209.132 Pod sandbox changed, it will be killed and re-created.
通过查看以上 Event 信息中,能解读到的信息极其有限 connection reset by peer: 连接被重置。 Pod sandbox changed, it will be killed and re-created: pause 容器引导的 Pod 环境被改变,重新创建 Pod 中的 pause 引导。 copying bootstrap data to pipe caused "write init-p: broken pipe"": unknown:Google 说的 docker 和内核不兼容。 参考 https://github.com/docker/for-linux/issues/595 Pod sandbox changed, it will be killed and re-created: pause 容器引导的 Pod 环境被改变,重新创建 Pod 中的 pause 引导。 看完以上错误并不能定位出问题根源,只能大致了解到是因为创建 SandBox 失败导致的,接下来查看 kubelet 的日志。
4月 01 16:22:06 master-01 kubelet[69210]: I0401 16:22:06.994710 69210 operation_generator.go:567] MountVolume.SetUp succeeded for volume "default-token-tb5bg" (UniqueName: "kubernetes.io/secret/968128e3-5456-11e9-8874-000c29721372-default-token-tb5bg") pod "busybox-deploy-bcd9cc57f-k2pzt" (UID: "968128e3-5456-11e9-8874-000c29721372")4月 01 16:22:07 master-01 kubelet[69210]: I0401 16:22:07.009632 69210 handler.go:325] Added event &{/kubepods/pod968128e3-5456-11e9-8874-000c29721372/88060715d0bfa605b05ba1ec0dfc637b112f328be76e38537f31a778c52d54ca 2019-04-01 16:22:07.381370221 +0800 CST m=+9485.400866715 oom {<nil>}}4月 01 16:22:07 master-01 kubelet[69210]: I0401 16:22:07.009673 69210 manager.go:1242] Created an OOM event in container "/kubepods/pod968128e3-5456-11e9-8874-000c29721372/88060715d0bfa605b05ba1ec0dfc637b112f328be76e38537f31a778c52d54ca" at 2019-04-01 16:22:07.381370221 +0800 CST m=+9485.4008667154月 01 16:22:07 master-01 kubelet[69210]: I0401 16:22:07.009682 69210 handler.go:325] Added event &{/kubepods/pod968128e3-5456-11e9-8874-000c29721372 2019-04-01 16:22:07.381370221 +0800 CST m=+9485.400866715 oomKill {0xc000807480}}4月 01 16:22:07 master-01 kubelet[69210]: E0401 16:22:07.087320 69210 remote_runtime.go:96] RunPodSandbox from runtime service failed: rpc error: code = Unknown desc = failed to start sandbox container for pod "busybox-deploy-bcd9cc57f-k2pzt": Error response from daemon: OCI runtime create failed: container_linux.go:344: starting container process caused "process_linux.go:293: copying bootstrap data to pipe caused \"write init-p: broken pipe\"": unknown4月 01 16:22:07 master-01 kubelet[69210]: E0401 16:22:07.087372 69210 kuberuntime_sandbox.go:65] CreatePodSandbox for pod "busybox-deploy-bcd9cc57f-k2pzt_default(968128e3-5456-11e9-8874-000c29721372)" failed: rpc error: code = Unknown desc = failed to start sandbox container for pod "busybox-deploy-bcd9cc57f-k2pzt": Error response from daemon: OCI runtime create failed: container_linux.go:344: starting container process caused "process_linux.go:293: copying bootstrap data to pipe caused \"write init-p: broken pipe\"": unknown4月 01 16:22:07 master-01 kubelet[69210]: E0401 16:22:07.087389 69210 kuberuntime_manager.go:662] createPodSandbox for pod "busybox-deploy-bcd9cc57f-k2pzt_default(968128e3-5456-11e9-8874-000c29721372)" failed: rpc error: code = Unknown desc = failed to start sandbox container for pod "busybox-deploy-bcd9cc57f-k2pzt": Error response from daemon: OCI runtime create failed: container_linux.go:344: starting container process caused "process_linux.go:293: copying bootstrap data to pipe caused \"write init-p: broken pipe\"": unknown
kubelet 的日志中,与 describe 出来的信息差不多,tail 的时候更直观的感觉到频繁的 Sandbox 创建的过程,可以看到有 OCI 运行时报错,只能去 docker 的日志中找找看了。
4月 01 16:43:03 master-01 dockerd[68740]: time="2019-04-01T16:43:03.379216541+08:00" level=error msg="Handler for POST /v1.38/containers/33e5014e5a63ebd3a07d0f238fe5ef4dd23c1a28490ef59f16a1f6e3efd5c050/start returned error: OCI runtime create failed: container_linux.go:344: starting container process caused \"process_linux.go:293: copying bootstrap data to pipe caused \\\"write init-p: broken pipe\\\"\": unknown"4月 01 16:43:04 master-01 dockerd[68740]: time="2019-04-01T16:43:04.421003016+08:00" level=error msg="stream copy error: reading from a closed fifo"4月 01 16:43:04 master-01 dockerd[68740]: time="2019-04-01T16:43:04.421724442+08:00" level=error msg="stream copy error: reading from a closed fifo"4月 01 16:43:04 master-01 dockerd[68740]: time="2019-04-01T16:43:04.459995603+08:00" level=error msg="f51e1feaed0f43d47447802bee4b356a0ce3866263dd3573d1dae88a84e77d91 cleanup: failed to delete container from containerd: no such container"4月 01 16:43:04 master-01 dockerd[68740]: time="2019-04-01T16:43:04.460063726+08:00" level=error msg="Handler for POST /v1.38/containers/f51e1feaed0f43d47447802bee4b356a0ce3866263dd3573d1dae88a84e77d91/start returned error: OCI runtime create failed: container_linux.go:344: starting container process caused \"process_linux.go:297: getting the final child''s pid from pipe caused \\\"read init-p: connection reset by peer\\\"\": unknown"4月 01 16:43:05 master-01 dockerd[68740]: time="2019-04-01T16:43:05.508063189+08:00" level=error msg="stream copy error: reading from a closed fifo"4月 01 16:43:05 master-01 dockerd[68740]: time="2019-04-01T16:43:05.508756604+08:00" level=error msg="stream copy error: reading from a closed fifo"4月 01 16:43:05 master-01 dockerd[68740]: time="2019-04-01T16:43:05.556766523+08:00" level=error msg="a25dcbe45d6cde5e8bcf141c8a3e88accb1a2660390f2effa1ca8d6364c0d504 cleanup: failed to delete container from containerd: no such container"4月 01 16:43:05 master-01 dockerd[68740]: time="2019-04-01T16:43:05.556842037+08:00" level=error msg="Handler for POST /v1.38/containers/a25dcbe45d6cde5e8bcf141c8a3e88accb1a2660390f2effa1ca8d6364c0d504/start returned error: OCI runtime create failed: container_linux.go:344: starting container process caused \"process_linux.go:297: getting the final child''s pid from pipe caused \\\"read init-p: connection reset by peer\\\"\": unknown"4月 01 16:43:06 master-01 dockerd[68740]: time="2019-04-01T16:43:06.579456571+08:00" level=error msg="stream copy error: reading from a closed fifo"4月 01 16:43:06 master-01 dockerd[68740]: time="2019-04-01T16:43:06.579428794+08:00" level=error msg="stream copy error: reading from a closed fifo"4月 01 16:43:06 master-01 dockerd[68740]: time="2019-04-01T16:43:06.618244855+08:00" level=error msg="df537cafea28982180b226574bc0534416042001653829017f514576efd96a3c cleanup: failed to delete container from containerd: no such container"4月 01 16:43:06 master-01 dockerd[68740]: time="2019-04-01T16:43:06.618342042+08:00" level=error msg="Handler for POST /v1.38/containers/df537cafea28982180b226574bc0534416042001653829017f514576efd96a3c/start returned error: OCI runtime create failed: container_linux.go:344: starting container process caused \"process_linux.go:297: getting the final child''s pid from pipe caused \\\"read init-p: connection reset by peer\\\"\": unknown"4月 01 16:43:07 master-01 dockerd[68740]: time="2019-04-01T16:43:07.721668002+08:00" level=error msg="stream copy error: reading from a closed fifo"4月 01 16:43:07 master-01 dockerd[68740]: time="2019-04-01T16:43:07.724387734+08:00" level=error msg="stream copy error: reading from a closed fifo"4月 01 16:43:07 master-01 dockerd[68740]: time="2019-04-01T16:43:07.768836577+08:00" level=error msg="de574260f24893b4385ce0cb4e530aadc153fac4b8549b85ba6da47070f5091a cleanup: failed to delete container from containerd: no such container"4月 01 16:43:07 master-01 dockerd[68740]: time="2019-04-01T16:43:07.768881236+08:00" level=error msg="Handler for POST /v1.38/containers/de574260f24893b4385ce0cb4e530aadc153fac4b8549b85ba6da47070f5091a/start returned error: OCI runtime create failed: container_linux.go:344: starting container process caused \"process_linux.go:297: getting the final child''s pid from pipe caused \\\"read init-p: connection reset by peer\\\"\": unknown"4月 01 16:43:08 master-01 dockerd[68740]: time="2019-04-01T16:43:08.747728984+08:00" level=error msg="stream copy error: reading from a closed fifo"4月 01 16:43:08 master-01 dockerd[68740]: time="2019-04-01T16:43:08.747780229+08:00" level=error msg="stream copy error: reading from a closed fifo"
Docker 的日志中,除了已经看了很多遍的 connection reset by peer 之外没啥大发现,Docker 的日志和 kubelet 的日志的共同点就是,kubelet 频繁 recreate Sandbox。
执行 docker ps -a 命令发现存在大量 create 状态的 pause 容器
CONTAINER ID IMAGE COMMAND CREATED STATUS PORTS NAMESfdfec614a029 hub.test.tech/library/pod-infrastructure:latest "/pod" Less than a second ago Created k8s_POD_busybox-deploy-bcd9cc57f-k2pzt_default_968128e3-5456-11e9-8874-000c29721372_366056be0890536c hub.test.tech/library/pod-infrastructure:latest "/pod" 1 second ago Created k8s_POD_busybox-deploy-bcd9cc57f-k2pzt_default_968128e3-5456-11e9-8874-000c29721372_3659cf8cb3311a60 hub.test.tech/library/pod-infrastructure:latest "/pod" 2 seconds ago Created k8s_POD_busybox-deploy-bcd9cc57f-k2pzt_default_968128e3-5456-11e9-8874-000c29721372_3658bedd3580b8a2 hub.test.tech/library/pod-infrastructure:latest "/pod" 4 seconds ago Created k8s_POD_busybox-deploy-bcd9cc57f-k2pzt_default_968128e3-5456-11e9-8874-000c29721372_365711969320abcf hub.test.tech/library/pod-infrastructure:latest "/pod" 5 seconds ago Created k8s_POD_busybox-deploy-bcd9cc57f-k2pzt_default_968128e3-5456-11e9-8874-000c29721372_3656c7facaef9671 hub.test.tech/library/pod-infrastructure:latest "/pod" 6 seconds ago Created k8s_POD_busybox-deploy-bcd9cc57f-k2pzt_default_968128e3-5456-11e9-8874-000c29721372_365538a23131e0e2 hub.test.tech/library/pod-infrastructure:latest "/pod" 7 seconds ago Created k8s_POD_busybox-deploy-bcd9cc57f-k2pzt_default_968128e3-5456-11e9-8874-000c29721372_36541951dd1736ee hub.test.tech/library/pod-infrastructure:latest "/pod" 8 seconds ago Created k8s_POD_busybox-deploy-bcd9cc57f-k2pzt_default_968128e3-5456-11e9-8874-000c29721372_3653dc3b3037c100 hub.test.tech/library/pod-infrastructure:latest "/pod" 9 seconds ago Created k8s_POD_busybox-deploy-bcd9cc57f-k2pzt_default_968128e3-5456-11e9-8874-000c29721372_3652266f48961a4e hub.test.tech/library/pod-infrastructure:latest "/pod" 10 seconds ago Created k8s_POD_busybox-deploy-bcd9cc57f-k2pzt_default_968128e3-5456-11e9-8874-000c29721372_3651c56159f99738 hub.test.tech/library/pod-infrastructure:latest "/pod" 11 seconds ago Created k8s_POD_busybox-deploy-bcd9cc57f-k2pzt_default_968128e3-5456-11e9-8874-000c29721372_365035fb00ce7522 hub.test.tech/library/pod-infrastructure:latest "/pod" 12 seconds ago Created k8s_POD_busybox-deploy-bcd9cc57f-k2pzt_default_968128e3-5456-11e9-8874-000c29721372_36494445f2ce25e6 hub.test.tech/library/pod-infrastructure:latest "/pod" 13 seconds ago Created k8s_POD_busybox-deploy-bcd9cc57f-k2pzt_default_968128e3-5456-11e9-8874-000c29721372_3648890e1a7dfd53 hub.test.tech/library/pod-infrastructure:latest "/pod" 14 seconds ago Created k8s_POD_busybox-deploy-bcd9cc57f-k2pzt_default_968128e3-5456-11e9-8874-000c29721372_3647
查看 demesg -T 信息,发现了大量 oom-killer 的字眼的日志,初步判断是由于内存溢出,导致系统主动 kill 进程.
[一 4月 1 17:22:49 2019] Task in /kubepods/pod968128e3-5456-11e9-8874-000c29721372/0c04b9baa40f781fbeb4d53e0ca67101e6e6d588ecdcbec5874e753f1a42e457 killed as a result of limit of /kubepods/pod968128e3-5456-11e9-8874-000c29721372[一 4月 1 17:22:49 2019] memory: usage 0kB, limit 0kB, failcnt 48032[一 4月 1 17:22:49 2019] memory+swap: usage 0kB, limit 9007199254740988kB, failcnt 0[一 4月 1 17:22:49 2019] kmem: usage 0kB, limit 9007199254740988kB, failcnt 0[一 4月 1 17:22:49 2019] Memory cgroup stats for /kubepods/pod968128e3-5456-11e9-8874-000c29721372: cache:0KB rss:0KB rss_huge:0KB mapped_file:0KB swap:0KB inactive_anon:0KB active_anon:0KB inactive_file:0KB active_file:0KB unevictable:0KB[一 4月 1 17:22:49 2019] Memory cgroup stats for /kubepods/pod968128e3-5456-11e9-8874-000c29721372/0c04b9baa40f781fbeb4d53e0ca67101e6e6d588ecdcbec5874e753f1a42e457: cache:0KB rss:0KB rss_huge:0KB mapped_file:0KB swap:0KB inactive_anon:0KB active_anon:0KB inactive_file:0KB active_file:0KB unevictable:0KB[一 4月 1 17:22:49 2019] [ pid ] uid tgid total_vm rss nr_ptes swapents oom_score_adj name[一 4月 1 17:22:49 2019] [121875] 0 121875 5749 1418 16 0 -999 5[一 4月 1 17:22:49 2019] Memory cgroup out of memory: Kill process 121875 (5) score 0 or sacrifice child[一 4月 1 17:22:49 2019] Killed process 121875 (5) total-vm:22996kB, anon-rss:3028kB, file-rss:432kB, shmem-rss:2212kB[一 4月 1 17:22:49 2019] docker0: port 4(veth0a5cbbd) entered disabled state[一 4月 1 17:22:49 2019] device veth0a5cbbd left promiscuous mode[一 4月 1 17:22:49 2019] docker0: port 4(veth0a5cbbd) entered disabled state[一 4月 1 17:22:50 2019] docker0: port 4(veth3bbadf8) entered blocking state[一 4月 1 17:22:50 2019] docker0: port 4(veth3bbadf8) entered disabled state[一 4月 1 17:22:50 2019] device veth3bbadf8 entered promiscuous mode[一 4月 1 17:22:50 2019] IPv6: ADDRCONF(NETDEV_UP): veth3bbadf8: link is not ready[一 4月 1 17:22:50 2019] docker0: port 4(veth3bbadf8) entered blocking state[一 4月 1 17:22:50 2019] docker0: port 4(veth3bbadf8) entered forwarding state[一 4月 1 17:22:50 2019] docker0: port 4(veth3bbadf8) entered disabled state[一 4月 1 17:22:50 2019] SLUB: Unable to allocate memory on node -1 (gfp=0xd0)[一 4月 1 17:22:50 2019] cache: kmalloc-4096(19:1db6c350afbbf07ad909f2c9f896a69333e182d83d513fc283d728cd7d6cf0b5), object size: 4096, buffer size: 4096, default order: 3, min order: 0[一 4月 1 17:22:50 2019] node 0: slabs: 0, objs: 0, free: 0[一 4月 1 17:22:50 2019] exe invoked oom-killer: gfp_mask=0xd0, order=0, oom_score_adj=-999[一 4月 1 17:22:50 2019] exe cpuset=1db6c350afbbf07ad909f2c9f896a69333e182d83d513fc283d728cd7d6cf0b5 mems_allowed=0[一 4月 1 17:22:50 2019] CPU: 1 PID: 121918 Comm: exe Kdump: loaded Tainted: G ------------ T 3.10.0-957.el7.x86_64 #1[一 4月 1 17:22:50 2019] Hardware name: VMware, Inc. VMware Virtual Platform/440BX Desktop Reference Platform, BIOS 6.00 04/13/2018[一 4月 1 17:22:50 2019] Call Trace:[一 4月 1 17:22:50 2019] [<ffffffff94f61dc1>] dump_stack+0x19/0x1b[一 4月 1 17:22:50 2019] [<ffffffff94f5c7ea>] dump_header+0x90/0x229[一 4月 1 17:22:50 2019] [<ffffffff949b9dc6>] ? find_lock_task_mm+0x56/0xc0[一 4月 1 17:22:50 2019] [<ffffffff94a31118>] ? try_get_mem_cgroup_from_mm+0x28/0x60[一 4月 1 17:22:50 2019] [<ffffffff949ba274>] oom_kill_process+0x254/0x3d0[一 4月 1 17:22:50 2019] [<ffffffff94a34f16>] mem_cgroup_oom_synchronize+0x546/0x570[一 4月 1 17:22:50 2019] [<ffffffff94a34390>] ? mem_cgroup_charge_common+0xc0/0xc0[一 4月 1 17:22:50 2019] [<ffffffff949bab04>] pagefault_out_of_memory+0x14/0x90[一 4月 1 17:22:50 2019] [<ffffffff94f5acf2>] mm_fault_error+0x6a/0x157[一 4月 1 17:22:50 2019] [<ffffffff94f6f7a8>] __do_page_fault+0x3c8/0x500[一 4月 1 17:22:50 2019] [<ffffffff94f6f915>] do_page_fault+0x35/0x90[一 4月 1 17:22:50 2019] [<ffffffff94f6b758>] page_fault+0x28/0x30[一 4月 1 17:22:50 2019] Task in /kubepods/pod968128e3-5456-11e9-8874-000c29721372/1db6c350afbbf07ad909f2c9f896a69333e182d83d513fc283d728cd7d6cf0b5 killed as a result of limit of /kubepods/pod968128e3-5456-11e9-8874-000c29721372[一 4月 1 17:22:50 2019] memory: usage 0kB, limit 0kB, failcnt 48062[一 4月 1 17:22:50 2019] memory+swap: usage 0kB, limit 9007199254740988kB, failcnt 0[一 4月 1 17:22:50 2019] kmem: usage 0kB, limit 9007199254740988kB, failcnt 0[一 4月 1 17:22:50 2019] Memory cgroup stats for /kubepods/pod968128e3-5456-11e9-8874-000c29721372: cache:0KB rss:0KB rss_huge:0KB mapped_file:0KB swap:0KB inactive_anon:0KB active_anon:0KB inactive_file:0KB active_file:0KB unevictable:0KB[一 4月 1 17:22:50 2019] Memory cgroup stats for /kubepods/pod968128e3-5456-11e9-8874-000c29721372/1db6c350afbbf07ad909f2c9f896a69333e182d83d513fc283d728cd7d6cf0b5: cache:0KB rss:0KB rss_huge:0KB mapped_file:0KB swap:0KB inactive_anon:0KB active_anon:0KB inactive_file:0KB active_file:0KB unevictable:0KB[一 4月 1 17:22:50 2019] [ pid ] uid tgid total_vm rss nr_ptes swapents oom_score_adj name[一 4月 1 17:22:50 2019] [121918] 0 121918 5749 1481 15 0 -999 exe[一 4月 1 17:22:50 2019] Memory cgroup out of memory: Kill process 121918 (exe) score 0 or sacrifice child[一 4月 1 17:22:50 2019] Killed process 121918 (exe) total-vm:22996kB, anon-rss:3052kB, file-rss:2872kB, shmem-rss:0kB[一 4月 1 17:22:50 2019] docker0: port 4(veth3bbadf8) entered disabled state[一 4月 1 17:22:50 2019] device veth3bbadf8 left promiscuous mode[一 4月 1 17:22:50 2019] docker0: port 4(veth3bbadf8) entered disabled state
发生这样的情况的概率并不高,一般情况下有两种类型的 oom kill。
1. 由于 pod 内进程超出了 pod 指定 Limit 限制的值,将导致 oom kill, 此时 pod 退出的 Reason 会显示 OOMKilled。
2. 另一种情况是 pod 内的进程给自己设置了可用内存,比如 jvm 内存限制设置为 2G, pod Limit 设置为 6G, 此时由于程序的原因导致内存使用超过 2G 时,也会引发 oom kill。
这两种内存溢出的 kill 区别是第一种原因直接显示在 pod 的 Event 里;第二种你在 Event 里找不到,在宿主机的 dmesg 里面可以找到 invoked oom-killer 的日志
这次的情况看起来像属于第二种情况,于是赶紧再次 describe pod, 查看 Limit 限制
[root@master-01 ~]# kubectl describe pod busybox-deploy-b9b6d4ff9-vwfnq
终于找到了原因,就是因为对内存的 Limit 导致的。这里显示内存 Limit 为 300m, 实际上是因为在创建资源时,写的是 300m,资源单位为(CPU - 单位 m、内存 - 单位 Mi)
理论上来说,按照之前的经验,此种情况 (实际使用内存超过 Limit 内存的情况) 应该属于第一种,会在 Event 里显示的由于 OOMkilled 原因导致 Terminated 状态。但实际情况却是在 Event 里找不到 oom kill 的日志,且 pod 状态处于 ContainerCreating 状态.
由于 OOMkilled 处于 Terminated 的状态是因为 pod 已经正常被引导创建后,导致的内存溢出
由于系统 invoked oom-killer 导致的处于 ContainerCreating 状态的 pod 是因为 pod 还没正常被创建,pod 中的 pause 容器都没有被正常引导就已经被 cgroup 的内存限制而招来杀身之祸
注意:调整资源的时候单位可得写对,不然可能会出莫名其妙的问题
往期文章一览
1、Kubernetes 集群搭建之系统初始化配置篇
2、Kubernetes 集群搭建之企业级环境中基于 Harbor 搭建自己的私有仓库
3、Kubernetes 集群搭建之 Etcd 集群配置篇
4、Kubernetes 集群搭建之 CNI-Flanneld 部署篇
5、Kubernetes 集群搭建之 Master 配置篇
6、Kubernetes 系列之 Coredns and Dashboard 介绍篇
7、Kubernetes 系列之监控 Metres-server 实战篇
如果您觉得不错,请别忘了转发、分享、点赞让更多的人去学习, 您的举手之劳,就是对小编最好的支持,非常感谢!


Kubernetes - Launch Single Node Kubernetes Cluster
Minikube is a tool that makes it easy to run Kubernetes locally. Minikube runs a single-node Kubernetes cluster inside a VM on your laptop for users looking to try out Kubernetes or develop with it day-to-day.
More details can be found at https://github.com/kubernetes/minikube
Step 1 - Start Minikube
Minikube has been installed and configured in the environment. Check that it is properly installed, by running the minikube version command:
minikube versionStart the cluster, by running the minikube start command:
minikube startGreat! You now have a running Kubernetes cluster in your online terminal. Minikube started a virtual machine for you, and a Kubernetes cluster is now running in that VM.
Step 2 - Cluster Info
The cluster can be interacted with using the kubectl CLI. This is the main approach used for managing Kubernetes and the applications running on top of the cluster.
Details of the cluster and its health status can be discovered via
kubectl cluster-infoTo view the nodes in the cluster using
kubectl get nodesIf the node is marked as NotReady then it is still starting the components.
This command shows all nodes that can be used to host our applications. Now we have only one node, and we can see that it’s status is ready (it is ready to accept applications for deployment).
Step 3 - Deploy Containers
With a running Kubernetes cluster, containers can now be deployed.
Using kubectl run, it allows containers to be deployed onto the cluster -
kubectl run first-deployment --image=katacoda/docker-http-server --port=80The status of the deployment can be discovered via the running Pods -
kubectl get podsOnce the container is running it can be exposed via different networking options, depending on requirements. One possible solution is NodePort, that provides a dynamic port to a container.
kubectl expose deployment first-deployment --port=80 --type=NodePortThe command below finds the allocated port and executes a HTTP request.
export PORT=$(kubectl get svc first-deployment -o go-template=''{{range.spec.ports}}{{if .nodePort}}{{.nodePort}}{{"\n"}}{{end}}{{end}}'') echo "Accessing host01:$PORT" curl host01:$PORTThe results is the container that processed the request.
Step 4 - Dashboard
The Kubernetes dashboard allows you to view your applications in a UI. In this deployment, the dashboard has been made available on port 30000.
The URL to the dashboard is https://2886795296-30000-ollie02.environments.katacoda.com/

kubernetes - 使用 kubeadm 部署 kubernetes 集群
k8s 官网介绍
Kubernetes 是一个可移植的,可扩展的开源平台,用于管理容器化的工作负载和服务,可促进声明式配置和自动化。它拥有一个庞大且快速增长的生态系统。Kubernetes 的服务,支持和工具广泛可用。
Kubernetes 这个名字起源于希腊语,意思是舵手或飞行员。Google 在 2014 年开源了 Kubernetes 项目。Kubernetes 建立在 Google 大规模运行生产工作负载的十年半的经验的基础上,并结合了社区中最好的想法和实践。
Kubeadm 是一个工具,它提供了 kubeadm init 以及 kubeadm join 这两个命令作为快速创建 kubernetes 集群的最佳实践。
相关配置来自李哥博客
配置软件源:
# 安装系统工具
apt-get update && apt-get install -y apt-transport-https
# 安装 GPG 证书
curl https://mirrors.aliyun.com/kubernetes/apt/doc/apt-key.gpg | apt-key add -
# 写入软件源;注意:我们用系统代号为 bionic,但目前阿里云不支持,所以沿用 16.04 的 xenial
cat << EOF >/etc/apt/sources.list.d/kubernetes.list
> deb https://mirrors.aliyun.com/kubernetes/apt/ kubernetes-xenial main
> EOF
安装 kubeadm, kubelet 和 kubectl:
apt-get update
apt-get install -y kubelet kubeadm kubectl
Reading package lists... Done
root@boke-master:~# apt-get install -y kubelet kubeadm kubectl
Reading package lists... Done
Building dependency tree
Reading state information... Done
The following additional packages will be installed:
  conntrack cri-tools kubernetes-cni socat
The following NEW packages will be installed:
  conntrack cri-tools kubeadm kubectl kubelet kubernetes-cni socat
0 upgraded, 7 newly installed, 0 to remove and 140 not upgraded.
Need to get 54.3 MB of archives.
After this operation, 291 MB of additional disk space will be used.
Get:1 http://mirrors.aliyun.com/ubuntu bionic/main amd64 conntrack amd64 1:1.4.4+snapshot20161117-6ubuntu2 [30.6 kB]
Get:2 http://mirrors.aliyun.com/ubuntu bionic/main amd64 socat amd64 1.7.3.2-2ubuntu2 [342 kB]
Get:3 https://mirrors.aliyun.com/kubernetes/apt kubernetes-xenial/main amd64 cri-tools amd64 1.13.0-00 [8,776 kB]
Get:4 https://mirrors.aliyun.com/kubernetes/apt kubernetes-xenial/main amd64 kubernetes-cni amd64 0.7.5-00 [6,473 kB]
Get:5 https://mirrors.aliyun.com/kubernetes/apt kubernetes-xenial/main amd64 kubelet amd64 1.16.2-00 [20.7 MB]
Get:6 https://mirrors.aliyun.com/kubernetes/apt kubernetes-xenial/main amd64 kubectl amd64 1.16.2-00 [9,234 kB]
Get:7 https://mirrors.aliyun.com/kubernetes/apt kubernetes-xenial/main amd64 kubeadm amd64 1.16.2-00 [8,761 kB]
Fetched 54.3 MB in 6s (9,086 kB/s)
Selecting previously unselected package conntrack.
(Reading database ... 83213 files and directories currently installed.)
Preparing to unpack .../0-conntrack_1%3a1.4.4+snapshot20161117-6ubuntu2_amd64.deb ...
Unpacking conntrack (1:1.4.4+snapshot20161117-6ubuntu2) ...
Selecting previously unselected package cri-tools.
Preparing to unpack .../1-cri-tools_1.13.0-00_amd64.deb ...
Unpacking cri-tools (1.13.0-00) ...
Selecting previously unselected package kubernetes-cni.
Preparing to unpack .../2-kubernetes-cni_0.7.5-00_amd64.deb ...
Unpacking kubernetes-cni (0.7.5-00) ...
Selecting previously unselected package socat.
Preparing to unpack .../3-socat_1.7.3.2-2ubuntu2_amd64.deb ...
Unpacking socat (1.7.3.2-2ubuntu2) ...
Selecting previously unselected package kubelet.
Preparing to unpack .../4-kubelet_1.16.2-00_amd64.deb ...
Unpacking kubelet (1.16.2-00) ...
Selecting previously unselected package kubectl.
Preparing to unpack .../5-kubectl_1.16.2-00_amd64.deb ...
Unpacking kubectl (1.16.2-00) ...
Selecting previously unselected package kubeadm.
Preparing to unpack .../6-kubeadm_1.16.2-00_amd64.deb ...
Unpacking kubeadm (1.16.2-00) ...
Setting up conntrack (1:1.4.4+snapshot20161117-6ubuntu2) ...
Setting up kubernetes-cni (0.7.5-00) ...
Setting up cri-tools (1.13.0-00) ...
Setting up socat (1.7.3.2-2ubuntu2) ...
Setting up kubelet (1.16.2-00) ...
Created symlink /etc/systemd/system/multi-user.target.wants/kubelet.service → /lib/systemd/system/kubelet.service.
Setting up kubectl (1.16.2-00) ...
Processing triggers for man-db (2.8.3-2ubuntu0.1) ...
 # 注意这里的kubeadm版本号 后面要用到
Setting up kubeadm (1.16.2-00) ...
# 设置 kubelet 自启动,并启动 kubelet
systemctl enable kubelet && systemctl start kubelet# 导出配置文件
kubeadm config print init-defaults --kubeconfig ClusterConfiguration > kubeadm.yml修改配置文件:
apiVersion: kubeadm.k8s.io/v1beta2
bootstrapTokens:
- groups:
  - system:bootstrappers:kubeadm:default-node-token
  token: abcdef.0123456789abcdef
  ttl: 24h0m0s
  usages:
  - signing
  - authentication
kind: InitConfiguration
localAPIEndpoint:
  # 修改为自己的ip
  advertiseAddress: 192.168.17.180
  bindPort: 6443
nodeRegistration:
  criSocket: /var/run/dockershim.sock
  name: boke-master
  taints:
  - effect: NoSchedule
    key: node-role.kubernetes.io/master
---
apiServer:
  timeoutForControlPlane: 4m0s
apiVersion: kubeadm.k8s.io/v1beta2
certificatesDir: /etc/kubernetes/pki
clusterName: kubernetes
controllerManager: {}
dns:
  type: CoreDNS
etcd:
  local:
    dataDir: /var/lib/etcd
    # 修改阿里云镜像
imageRepository: registry.aliyuncs.com/google_containers
kind: ClusterConfiguration
   # 修改版本号
kubernetesVersion: v1.16.2
networking:
  dnsDomain: cluster.local
  # 配置成 Calico 的网段(后面会用到)
  podSubnet: "10.244.0.0/16"
  serviceSubnet: 10.96.0.0/12
scheduler: {}
---
# 开启 IPVS 模式
apiVersion: kubeproxy.config.k8s.io/v1alpha1
kind: KubeProxyConfiguration
featureGates:
  SupportIPVSProxyMode: true
mode: ipvs
初始化 kubeadm:
kubeadm init --config=kubeadm.yml | tee kubeadm-init.log


[init] Using Kubernetes version: v1.16.2
[preflight] Running pre-flight checks
	[WARNING IsDockerSystemdCheck]: detected "cgroupfs" as the Docker cgroup driver. The recommended driver is "systemd". Please follow the guide at https://kubernetes.io/docs/setup/cri/
[preflight] Pulling images required for setting up a Kubernetes cluster
[preflight] This might take a minute or two, depending on the speed of your internet connection
[preflight] You can also perform this action in beforehand using ''kubeadm config images pull''
[kubelet-start] Writing kubelet environment file with flags to file "/var/lib/kubelet/kubeadm-flags.env"
[kubelet-start] Writing kubelet configuration to file "/var/lib/kubelet/config.yaml"
[kubelet-start] Activating the kubelet service
[certs] Using certificateDir folder "/etc/kubernetes/pki"
[certs] Generating "ca" certificate and key
[certs] Generating "apiserver" certificate and key
[certs] apiserver serving cert is signed for DNS names [boke-master kubernetes kubernetes.default kubernetes.default.svc kubernetes.default.svc.cluster.local] and IPs [10.96.0.1 192.168.17.180]
[certs] Generating "apiserver-kubelet-client" certificate and key
[certs] Generating "front-proxy-ca" certificate and key
[certs] Generating "front-proxy-client" certificate and key
[certs] Generating "etcd/ca" certificate and key
[certs] Generating "etcd/server" certificate and key
[certs] etcd/server serving cert is signed for DNS names [boke-master localhost] and IPs [192.168.17.180 127.0.0.1 ::1]
[certs] Generating "etcd/peer" certificate and key
[certs] etcd/peer serving cert is signed for DNS names [boke-master localhost] and IPs [192.168.17.180 127.0.0.1 ::1]
[certs] Generating "etcd/healthcheck-client" certificate and key
[certs] Generating "apiserver-etcd-client" certificate and key
[certs] Generating "sa" key and public key
[kubeconfig] Using kubeconfig folder "/etc/kubernetes"
[kubeconfig] Writing "admin.conf" kubeconfig file
[kubeconfig] Writing "kubelet.conf" kubeconfig file
[kubeconfig] Writing "controller-manager.conf" kubeconfig file
[kubeconfig] Writing "scheduler.conf" kubeconfig file
[control-plane] Using manifest folder "/etc/kubernetes/manifests"
[control-plane] Creating static Pod manifest for "kube-apiserver"
[control-plane] Creating static Pod manifest for "kube-controller-manager"
[control-plane] Creating static Pod manifest for "kube-scheduler"
[etcd] Creating static Pod manifest for local etcd in "/etc/kubernetes/manifests"
[wait-control-plane] Waiting for the kubelet to boot up the control plane as static Pods from directory "/etc/kubernetes/manifests". This can take up to 4m0s
[apiclient] All control plane components are healthy after 16.002589 seconds
[upload-config] Storing the configuration used in ConfigMap "kubeadm-config" in the "kube-system" Namespace
[kubelet] Creating a ConfigMap "kubelet-config-1.16" in namespace kube-system with the configuration for the kubelets in the cluster
[upload-certs] Skipping phase. Please see --upload-certs
[mark-control-plane] Marking the node boke-master as control-plane by adding the label "node-role.kubernetes.io/master=''''"
[mark-control-plane] Marking the node boke-master as control-plane by adding the taints [node-role.kubernetes.io/master:NoSchedule]
[bootstrap-token] Using token: abcdef.0123456789abcdef
[bootstrap-token] Configuring bootstrap tokens, cluster-info ConfigMap, RBAC Roles
[bootstrap-token] configured RBAC rules to allow Node Bootstrap tokens to post CSRs in order for nodes to get long term certificate credentials
[bootstrap-token] configured RBAC rules to allow the csrapprover controller automatically approve CSRs from a Node Bootstrap Token
[bootstrap-token] configured RBAC rules to allow certificate rotation for all node client certificates in the cluster
[bootstrap-token] Creating the "cluster-info" ConfigMap in the "kube-public" namespace
[addons] Applied essential addon: CoreDNS
[addons] Applied essential addon: kube-proxy

Your Kubernetes control-plane has initialized successfully!

To start using your cluster, you need to run the following as a regular user:
  # 配置kubectl
  mkdir -p $HOME/.kube
  sudo cp -i /etc/kubernetes/admin.conf $HOME/.kube/config
  sudo chown $(id -u):$(id -g) $HOME/.kube/config

You should now deploy a pod network to the cluster.
Run "kubectl apply -f [podnetwork].yaml" with one of the options listed at:
  https://kubernetes.io/docs/concepts/cluster-administration/addons/

Then you can join any number of worker nodes by running the following on each as root:

# 子节点加入命令
kubeadm join 192.168.17.180:6443 --token abcdef.0123456789abcdef \
    --discovery-token-ca-cert-hash sha256:ea37964dc96f76f3e658b27ffdc220f60ced82de387aafd8effafe9618f5e6cb
子节点加入命令的token有效期默认是1天,可以在kubeadm.yml中修改,失效可以从官方文档查看解决办法

配置kubectl:
mkdir -p $HOME/.kube
  sudo cp -i /etc/kubernetes/admin.conf $HOME/.kube/config
  sudo chown $(id -u):$(id -g) $HOME/.kube/config
查看是否配置成功:
kubectl get nodes
# 能打印出节点信息就成功了
NAME          STATUS     ROLES    AGE   VERSION
boke-master   NotReady   master   39m   v1.16.2

Kubernetes ---- kubeadm安装kubernetes
之前就已经装过k8s了,有些东西不常用真的就是容易忘掉,今天我又搞了一遍,并记录下来以此加深印象;
一、环境描述:
kubernetes的版本选择的是v1.15.0版本(之前第一次装还是1.11);
| 操作系统 | IP地址 | 集群中角色 | k8s需用的docker镜像 |
| Centos 7 | 192.168.222.100 | Master |
quay.io/coreos/flannel:v0.12.0-amd64 k8s.gcr.io/kube-proxy:v1.15.0 k8s.gcr.io/kube-apiserver:v1.15.0 k8s.gcr.io/kube-scheduler:v1.15.0 k8s.gcr.io/kube-controller-manager:v1.15.0 k8s.gcr.io/coredns:1.3.1 k8s.gcr.io/etcd:3.3.10 k8s.gcr.io/pause:3.1 |
| Centos 7 | 192.168.222.101 | Node |
quay.io/coreos/flannel:v0.12.0-amd64 k8s.gcr.io/kube-proxy:v1.15.0 k8s.gcr.io/pause:3.1 |
| Centos 7 | 192.168.222.102 | Node |
quay.io/coreos/flannel:v0.12.0-amd64 k8s.gcr.io/kube-proxy:v1.15.0 k8s.gcr.io/pause:3.1 |
二、环境准备:
1.修改本地hosts文件,添加GitHub及集群内部主机的解析(添加了GitHub相关的地址后会省去很多麻烦= =)node节点也要加哦.
~]# vim /etc/hosts
127.0.0.1 localhost localhost.localdomain localhost4 localhost4.localdomain4
::1 localhost localhost.localdomain localhost6 localhost6.localdomain6
192.168.222.100 node1
192.168.222.101 node2
192.168.222.192 node3
# GitHub Start
52.74.223.119 github.com
192.30.253.119 gist.github.com
54.169.195.247 api.github.com
185.199.111.153 assets-cdn.github.com
151.101.76.133 raw.githubusercontent.com
151.101.108.133 user-images.githubusercontent.com
151.101.76.133 gist.githubusercontent.com
151.101.76.133 cloud.githubusercontent.com
151.101.76.133 camo.githubusercontent.com
151.101.76.133 avatars0.githubusercontent.com
151.101.76.133 avatars1.githubusercontent.com
151.101.76.133 avatars2.githubusercontent.com
151.101.76.133 avatars3.githubusercontent.com
151.101.76.133 avatars4.githubusercontent.com
151.101.76.133 avatars5.githubusercontent.com
151.101.76.133 avatars6.githubusercontent.com
151.101.76.133 avatars7.githubusercontent.com
151.101.76.133 avatars8.githubusercontent.com
# GitHub End
2.关闭防火墙以及停用Selinux.
~]# systemctl stop firewalld
~]# setenfoce 0
3. 配置Kubernetes的yum源(以下内容是阿里云的内容).
源地址:https://developer.aliyun.com/mirror/kubernetes
~]# cat <<EOF > /etc/yum.repos.d/kubernetes.repo
[kubernetes]
name=Kubernetes
baseurl=https://mirrors.aliyun.com/kubernetes/yum/repos/kubernetes-el7-x86_64/
enabled=1
gpgcheck=1
repo_gpgcheck=1
gpgkey=https://mirrors.aliyun.com/kubernetes/yum/doc/yum-key.gpg https://mirrors.aliyun.com/kubernetes/yum/doc/rpm-package-key.gpg
EOF
4. 配置docker源
~]# yum install -y yum-utils device-mapper-persistent-data lvm2
~]# yum-config-manager --add-repo https://mirrors.aliyun.com/docker-ce/linux/centos/docker-ce.repo
三、安装、配置Master
1. 首先要在各服务器上执行以下命令安装软件包.(手动指定软件包版本是很不错的选择,刚开始没指定,默认会安装最新版的,最后你在国内找不到最新版的镜像才是最衰的,血淋淋的例子!.)
~]# yum -y install docker-ce
~]# yum -y install kubeadm-1.15.0 kubectl-1.15.0 kubelet-1.15.0
2. 启动docker
~]# systemctl start docker
3. 撰写(下载->改名->删除镜像)脚本(由于初始化需要下载镜像,但镜像都在外网,所以采用以下方法,脚本比较无脑,不过倒是能用,还是Python大法好,我本地没装python3,没办法= =)
    #!/bin/bash
    docker pull registry.cn-hangzhou.aliyuncs.com/google_containers/kube-apiserver:v1.15.0
    docker pull registry.cn-hangzhou.aliyuncs.com/google_containers/kube-controller-manager:v1.15.0
    docker pull registry.cn-hangzhou.aliyuncs.com/google_containers/kube-scheduler:v1.15.0
    docker pull registry.cn-hangzhou.aliyuncs.com/google_containers/kube-proxy:v1.15.0
    docker pull registry.cn-hangzhou.aliyuncs.com/google_containers/pause:3.1
    docker pull registry.cn-hangzhou.aliyuncs.com/google_containers/etcd:3.3.10
    docker pull registry.cn-hangzhou.aliyuncs.com/google_containers/coredns:1.3.1

    docker tag registry.cn-hangzhou.aliyuncs.com/google_containers/kube-apiserver:v1.15.0 k8s.gcr.io/kube-apiserver:v1.15.0
    docker tag registry.cn-hangzhou.aliyuncs.com/google_containers/kube-controller-manager:v1.15.0 k8s.gcr.io/kube-controller-manager:v1.15.0
    docker tag registry.cn-hangzhou.aliyuncs.com/google_containers/kube-scheduler:v1.15.0 k8s.gcr.io/kube-scheduler:v1.15.0
    docker tag registry.cn-hangzhou.aliyuncs.com/google_containers/kube-proxy:v1.15.0 k8s.gcr.io/kube-proxy:v1.15.0
    docker tag registry.cn-hangzhou.aliyuncs.com/google_containers/pause:3.1 k8s.gcr.io/pause:3.1
    docker tag registry.cn-hangzhou.aliyuncs.com/google_containers/etcd:3.3.10 k8s.gcr.io/etcd:3.3.10
    docker tag registry.cn-hangzhou.aliyuncs.com/google_containers/coredns:1.3.1 k8s.gcr.io/coredns:1.3.1

    docker rmi registry.cn-hangzhou.aliyuncs.com/google_containers/kube-apiserver:v1.15.0
    docker rmi registry.cn-hangzhou.aliyuncs.com/google_containers/kube-controller-manager:v1.15.0
    docker rmi registry.cn-hangzhou.aliyuncs.com/google_containers/kube-scheduler:v1.15.0
    docker rmi registry.cn-hangzhou.aliyuncs.com/google_containers/kube-proxy:v1.15.0
    docker rmi registry.cn-hangzhou.aliyuncs.com/google
4. 编辑kubelet配置文件,增加忽略swap相关配置
注意:如果执行过kubeadm reset("恢复出厂设置")命令,则需要重新编辑此文件(因为我第一次初始化的时候出了问题,所以最后才发现默认此文件也恢复了.)
~]# vim /etc/sysconfig/kubelet
    KUBELET_EXTRA_ARGS="--fail-swap-on=false"
5. 开始初始化Master,初始化如果成功了的话呢,就会看到"successfully"字样,如果有问题则去看"/var/log/message"的日志;(记得保留初始化成功后的信息;)
# 建议添加"--apiserver-advertise-address"参数,指定Master的地址,我这里就傻了,没有指定,结果莫名其妙的给了我一个地址,我也不知道是什么鬼东西
~]# kubeadm init --pod-network-cidr 10.244.0.0/16 --service-cidr 10.96.0.0/12 --ignore-preflight-errors=swap
可能出现的问题:
The HTTP call equal to 'curl -sSL http://localhost:10248/healthz' Failed with error:
这个问题,网上众说纷纷,有说没有在hosts文件里定义的,也有说要在cat /usr/lib/systemd/system/kubelet.service.d/10-kubeadm.conf加东西的,其实就是因为swap内存的原因,当出现这个问题的时候回到第4步检查一下配置文件里是否还有添加的那条指令.
6. 配置网络(flannel),下面的命令是flannel官方提供的,只要是k8s1.7+版本以上的就可直接使用
~]# kubectl apply -f https://raw.githubusercontent.com/coreos/flannel/master/Documentation/kube-flannel.yml
7. 镜像打包传输至node节点
[Master节点操作]
~]# mkdir imgs
~]# docker save quay.io/coreos/flannel:v0.12.0-amd64 -o flannel.tar
~]# docker save k8s.gcr.io/kube-proxy:v1.15.0 -o kube-proxy.tar
~]# docker save k8s.gcr.io/pause:3.1 -o pause.tar
~]# mv *.tar imgs/
~]# scp -r imgs/ root@192.168.222.100:/root
8. Master上检查(为什么我下面突然变了用户,是当你初始化结束后要创建一个普通用户,并拷贝到home目录下,初始化成功后控制台有操作步骤)
# 检查一下集群状态,现在node节点还没有添加进来,所以只有这一条,而且你看的时候不一定是Ready状态(因为基于系统命名空间的一些Pod不一定都启动完成了)
[kubeadm@node1 ~]$ kubectl get nodes
NAME    STATUS   ROLES    AGE     VERSION
node1   Ready    master   3h25m   v1.15.0
# 检查一下系统级命名空间的pod是否已经启动成功,我有些pod分布在node2,node3上是因为我已经将他们加入集群了.
[kubeadm@node1 ~]$ kubectl get pods - n kube-system -o wide

# 查看控制器的状态,目前都是ok正常的,那么可以继续啦
[kubeadm@node1 ~]$ kubectl get cs

四、安装、配置各Node
各Node节点上的前三步与Master上的1、2、4步骤相同,此处不再过多演示
4. 将Node加入至cluster(这条命令在初始化了maser后会自动产生,直接copy过来即可,除了"--ignore-preflight-error=swap"需手动添加)
~]# kubeadm join 192.168.133.128:6443 --token u2pjqq.dxkbgfjtawmc7933     --discovery-token-ca-cert-hash \
sha256:520516b0ea9516f638ffdb5fdef8a50de5d0e14f1afc1b98e6c61d20f77fc8ac --ignore-preflight-errors=swap
5. 加载Master传过来的镜像,成功加入至集群后控制台也会打印一定信息,我记不住打啥了,然后加载镜像就ok.
~]# docker load -i /root/img/flannel.tar
~]# docker load -i /root/img/kube-proxy.tar
~]# docker load -i /root/img/pause.tar
~]# systemctl restart kubelet
五、回到Master检查集群状态及各Pod状态
~]$ kubectl get pods -n kube-system -o wide

~]$ kubectl get nodes

至此,Kubernetes集群搭建完成,谢谢大家观看!

Kubernetes as Database: 使用kubesql查询kubernetes资源
写在前面
kubectl虽然查询单个的kubernetes资源或者列表都已经比较方便,但是进行更为多个资源的联合查询(比如pod和node),以及查询结果的二次处理方面却是kubectl无法胜任的。所以一直以来,我都有想法将kubernetes作为数据库进行查询。在去年,我开发了第二个版本的kubesql。相关信息在https://xuxinkun.github.io/2019/03/11/kubesql/,代码留存在https://github.com/xuxinkun/kubesql/tree/python。这个版本较之我最早的spark离线方式已经有所改观,但是无法应对中型、甚至较小规模的集群,性能上存在较大问题。部署上也较为繁杂,且不够稳定,有一些bug(会异常退出)。而且对于label等字段都无法处理,可用性较差。我总起来不满意,但是一直没时间去重构。直到最近,听了关于presto的一个分享,我感觉重构的机会来了。
这一次kubesql完全抛弃了原有的架构,基于presto进行开发。这里摘抄一段presto的简介:presto是一个开源的分布式SQL查询引擎,适用于交互式分析查询,数据量支持GB到PB字节。Presto的设计和编写完全是为了解决像Facebook这样规模的商业数据仓库的交互式分析和处理速度的问题。presto具有丰富的插件接口,可以极为便捷的对接外部存储系统。
考虑使用presto的主要原因是避免了SQL查询引擎的逻辑耦合到kubesql中,同时其稳定和高性能保证了查询的效率。这样kubesql的主要逻辑专注于获取k8s的resource变化,以及将resource转化为关系型数据的逻辑上。
kubesql使用
重构后的kubesql开源项目地址在https://github.com/xuxinkun/kubesql。
先介绍下如何部署和使用。部署方式目前主要使用docker部署,很快会支持k8s的部署方式。
部署前需要获取kubeconfig。假设kubeconfig位于/root/.kube/config路径下,则只要一条命令即可运行。
docker run -it -d --name kubesql -v /root/.kube/config:/home/presto/config xuxinkun/kubesql:latest
如果桥接网络不能通k8s api,则可以使用物理机网络,加入--net=host参数即可。注意presto端口使用8080,可能会有端口冲突。
而后就可以进行使用了。使用命令为
docker exec -it kubesql presto --server localhost:8080 --catalog kubesql --schema kubesql
这时自动进入交互式查询模式,即可进行使用了。目前已经支持了pods和nodes两种资源的查询,对应为三张表,nodes,pods和containers(container是从pod中拆出来的,具体原因见下文原理一节)。
三张表支持的列参见https://github.com/xuxinkun/kubesql/blob/master/docs/table.md。
presto支持一些内置的函数,可以用这些函数来丰富查询。https://prestodb.io/docs/current/functions.html。
这里我举一些使用kubesql查询的例子。
比如想要查询每个pod的cpu资源情况(requests和limits)。
presto:kubesql> select pods.namespace,pods.name,sum("requests.cpu") as "requests.cpu" ,sum("limits.cpu") as "limits.cpu" from pods,containers where pods.uid = containers.uid group by pods.namespace,pods.name
     namespace     |                 name                 | requests.cpu | limits.cpu
-------------------+--------------------------------------+--------------+------------
 rongqi-test-01    | rongqi-test-01-202005151652391759    |          0.8 |        8.0
 ljq-nopassword-18 | ljq-nopassword-18-202005211645264618 |          0.1 |        1.0
又比如我想要查询每个node上剩余可以分配的cpu情况(用node上allocatable.cpu减去node上所有pod的requests.cpu的总和)
presto:kubesql> select nodes.name, nodes."allocatable.cpu" - podnodecpu."requests.cpu" from nodes, (select pods.nodename,sum("requests.cpu") as "requests.cpu" from pods,containers where pods.uid = containers.uid group by pods.nodename) as podnodecpu where nodes.name = podnodecpu.nodename;
    name     |       _col1
-------------+--------------------
 10.11.12.29 | 50.918000000000006
 10.11.12.30 |             58.788
 10.11.12.32 | 57.303000000000004
 10.11.12.34 |  33.33799999999999
 10.11.12.33 | 43.022999999999996
再比如需要查询所有所有2020-05-12后创建的pod。
presto:kube> select name, namespace,creationTimestamp from pods where creationTimestamp > date(''2020-05-12'') order by creationTimestamp desc;
                         name                         |        namespace        |    creationTimestamp
------------------------------------------------------+-------------------------+-------------------------
 kube-api-webhook-controller-manager-7fd78ddd75-sf5j6 | kube-api-webhook-system | 2020-05-13 07:56:27.000
还可以根据标签来查询,查询所有标签的appid是springboot,且尚未调度成功的pod。以及计数。
标签appid在pods表里则会有一列,列名为"labels.appid",使用该列作为条件来删选pod。
presto:kubesql> select namespace,name,phase from pods where phase = ''Pending'' and "labels.appid" = ''springboot'';
     namespace      |     name     |  phase
--------------------+--------------+---------
 springboot-test-rd | v6ynsy3f73jn | Pending
 springboot-test-rd | mu4zktenmttp | Pending
 springboot-test-rd | n0yvpxxyvk4u | Pending
 springboot-test-rd | dd2mh6ovkjll | Pending
 springboot-test-rd | hd7b0ffuqrjo | Pending

 presto:kubesql> select count(*) from pods where phase = ''Pending'' and "labels.appid" = ''springboot'';
  _col0
 -------
      5
kubesql原理
kubesql的架构如图所示:
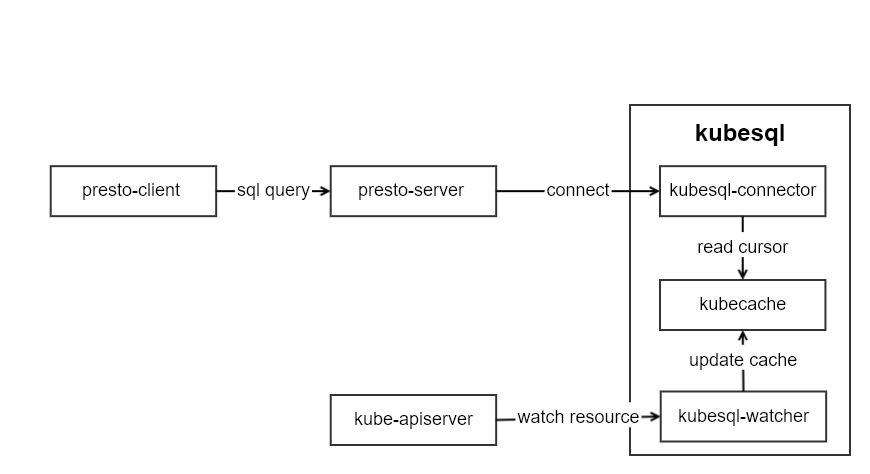
kubesql里主要有三个模块部分:
- kubesql-watcher: 监听k8s api pod和node的变化。并将pod和node的结构化数据转化为关系型数据(以Map的方式进行保存)。
- kubecache: 用于缓存pod和node的数据。
- kubesql-connector: 作为presto的connector,接受来自presto的调用,通过kubecache查询列信息和对应数据,并返回给presto关于列和数据的信息。
其中最主要的部分是kubesql-connector。presto插件开发指南可以参考https://prestodb.io/docs/current/develop.html。我没有选择从零开始,而是基于已有的localfile插件https://github.com/prestodb/presto/tree/0.234.2/presto-local-file进行的开发。如何进行presto的插件开发,后面我再写文章来解读。
由于所有数据都缓存在内存中,因此几乎无磁盘需求。但是也需要根据集群的规模来提供较大的内存。
以pod数据为例,pod中主要数据分成三部分,metadata,spec和status。
metadata中比较难以处理的部分是label和annotation。我将label这个map进行展平,每个key都作为一列。比如
labels:
    app: mysql
    owner: xxx
我使用labels作为前缀,拼合labels里面的key作为列名。从而得到两条数据为:
labels.app: mysql
labels.owner: xxx
对于pod A存在app的label但是pod B并没有该标签,则对于pod B来说,该列labels.app的值则为null。
类似的annotations也是类似的处理方式。从而让annotations也就可以成为可以用于筛选pod的条件了。
对于spec来说,最大的困难在于containers的处理。因为一个pod里面可能有若干个containers,因此我直接将containers作为一张新的表。同时在containers表里增加一个uid的列,用来表明该行数据来自于哪个pod。containers里面的字段也对应都加入到containers表中。containers中比较重要的关于资源的如request和limit,我直接使用requests.作为前缀,拼合resource作为列名。比如requests.cpu,requests.memory等。这里cpu的单独处理为double类型,单位为核,比如100m这里会转化为0.1。内存等则为bigint,单位为B。
对于status中,比较难于处理的是conditions和containerStatus。conditions是一个列表,但是每个condition的type不相同。因此我将type作为前缀,用来生成conditon的列名。比如:
  conditions:
  - lastProbeTime: null
    lastTransitionTime: 2020-04-22T09:03:10Z
    status: "True"
    type: Ready
  - lastProbeTime: null
    lastTransitionTime: 2020-04-22T09:03:10Z
    status: "True"
    type: ContainersReady
那么在pod表中,我对应可以得到这些列:
| Column | Type | Extra | Comment |
|---|---|---|---|
| containersready.lastprobetime | timestamp | ||
| containersready.lasttransitiontime | timestamp | ||
| containersready.message | varchar | ||
| containersready.reason | varchar | ||
| containersready.status | varchar | ||
| ready.lastprobetime | timestamp | ||
| ready.lasttransitiontime | timestamp | ||
| ready.message | varchar | ||
| ready.reason | varchar | ||
| ready.status | varchar |
这样我就可以通过"ready.status" = "True" 来筛选condition里type为ready且status为True的pod了。
containerStatus因为与containers一一对应,因此我将containerStatus合并到containers表里,并且根据container name一一对应起来。
后记
本次重构后kubesql我直接发布为1.0.0版本,并且已经在日常使用了。且借助于内存和presto的高性能,我测试过5万pod的集群,查询时间为毫秒级。目前暂未发现明显的bug。大家有发现bug或者新的feature也可以提issue给我。我后期也会再维护该项目。
因为目前只有pods和nodes资源,相对于k8s庞大的资源来说,还只是冰山一角。但是增加每个资源要加入相当数量的代码。我也在考虑如何使用openapi的swagger描述来自动生成代码。
部署上现在是用docker来部署,马上也会增加kubernetes的部署方式,这样会更加便捷。
同时我在考虑,在未来,让presto的每个worker负责一个集群的cache。这样一个presto集群可以查询所有的k8s集群的信息。该功能还需要再做设计和考虑。
关于Kubernetes 因限制内存配置引发的错误和kubernetes 资源限制的介绍已经告一段落,感谢您的耐心阅读,如果想了解更多关于Kubernetes - Launch Single Node Kubernetes Cluster、kubernetes - 使用 kubeadm 部署 kubernetes 集群、Kubernetes ---- kubeadm安装kubernetes、Kubernetes as Database: 使用kubesql查询kubernetes资源的相关信息,请在本站寻找。
本文标签:


