在本文中,您将会了解到关于ansible批量自动配置Juniper的新资讯,同时我们还将为您解释ansible批量配置ip的相关在本文中,我们将带你探索ansible批量自动配置Juniper的奥秘,
在本文中,您将会了解到关于ansible批量自动配置Juniper的新资讯,同时我们还将为您解释ansible 批量配置ip的相关在本文中,我们将带你探索ansible批量自动配置Juniper的奥秘,分析ansible 批量配置ip的特点,并给出一些关于ansible 002 连接被控端 inventory ansible.cfg ansible-adhoc ansible 原理、ansible(playbook)批量自动化部署nginx、ansible(playbook)批量自动化部署zabbix客户端、ansible之数据提取与Juniper实例演示的实用技巧。
本文目录一览:- ansible批量自动配置Juniper(ansible 批量配置ip)
- ansible 002 连接被控端 inventory ansible.cfg ansible-adhoc ansible 原理
- ansible(playbook)批量自动化部署nginx
- ansible(playbook)批量自动化部署zabbix客户端
- ansible之数据提取与Juniper实例演示
")
ansible批量自动配置Juniper(ansible 批量配置ip)
一、需求
有几台新上线的Juniper,需要批量配置下syslog,ntp,snmp基础配置
二、拓扑

三、实施步骤
1.读取配置并输出作为初步核查
2.把配置载入网络其中一台网络设备中,并做一个show | compare输出,然后做一个commit check核查,最后退出设备
3.输出一个提醒,要求输入yes 或者no。yes代表继续tasks,进入第4步;no代表退出playbook,终止程序
4.将配置输入到设备,并设定一个10分钟倒回时间
5.commit check 确认配置,停止倒回时间
四、脚本
1. 创建一个变量文件夹junos_config_vars
mkdir junos_config_vars
2.在变量文件夹里创建一个变量文件vsrx_vars.yml
nano junos_config_vars/vsrx_vars.yml
---
  vsrx_config:
  #系统基本参数配置
    - set system syslog host 1.1.1.1 any any
    - set system syslog source-address 192.168.62.44
    - set system ntp server 192.168.62.254
    - set system ntp source-address 192.168.62.44
    - set snmp location "Shanghai China"
    - set snmp contact "lisl"
    - set snmp community public authorization read-only
    - set snmp trap-group gingerdoc targets 192.168.62.253
3.编辑inventory文件
nano lisl_hosts
[junos]
junipervsrx02 junos_host=192.168.2.43
junipervsrx01 junos_host=192.168.2.44
4.编辑层次化变量组文件
nano group_vars/junos.yaml
---
ansible_connection: local
ansible_network_os: junos
ansible_user: admin
ansible_ssh_pass: juniper123
5.编辑剧本playbook:config.yml
---
- name: 配置SRX
  hosts: junipervsrx01
  gather_facts: no
  vars_files:
    - junos_config_vars/vsrx_vars.yml
  roles:
    - Juniper.junos

  tasks:
  - name: "配置如下:"
    debug:
      var: vsrx_config

  - name: 导入配置进入第一台vSRX,仅作核查之用
    juniper_junos_config:
      config_mode: ''exclusive''
      load: ''set''
      lines: "{{vsrx_config}}"
      commit: no
      check: yes
      diff: yes
      provider:
        host: "{{junos_host}}"
        timeout: 120
    register: check_result

  - name: "show | compare输出如下:"
    debug:
      msg: "{{check_result.diff_lines}}"
    when: check_result.diff_lines is defined

#第二个play
- name: 配置SRX
  hosts: junos
  gather_facts: no
  vars_files:
    - junos_config_vars/vsrx_vars.yml
  roles:
    - Juniper.junos
  vars_prompt:
    - name: "confirm_result"
      prompt: "请确认上述核查结果,满意输入:yes,不满意输入:no.\n\n请输入"
      private: no
  tasks:

  - name: 判断结果
    debug:
      msg: 谢谢确认,核查完毕,开始批量配置阶段!
    when: confirm_result == "yes"
    run_once: yes
    delegate_to: localhost
  - fail:
      msg: 谢谢确认,由于您不满意核查结果,playbook即将退出,谢谢!
    when: confirm_result != "yes"

  - name: 导入配置进入vSRX
    juniper_junos_config:
      config_mode: "exclusive"
      load: ''set''
      lines: "{{vsrx_config}}"
      commit: yes
      comment: "Ticket No.12345:configure system parameter"
      confirmed: 10
      diff: yes
      dest_dir: junos_diff/
      provider:
        host: "{{junos_host}}"
        timeout: 120
    notify: 配置完毕,开始确认配置

  handlers:
    - name: 配置完毕,开始确认配置
      juniper_junos_config:
        commit_empty_changes: yes
        comment: "Ticket No. 12345:Confirm the change"
        provider:
          host: "{{junos_host}}"
          timeout: 120
6.运行剧本
ansibel-playbook config.yml
五、脚本参数讲解
1.when: check_result.diff_lines is defined #存在值,就输出show | compare,因为不加when,当遇到重复配置的情况,diff_lines是不存在的,此时ansible会报错,然后中止playbook
2.yes或no #输入yes,代表认可上述配置;输入no,代表上述配置有问题,选择手工中止playbook
3.vars_prompt
prompt #prompt参数类似于python里的input
name #变量名,将用户输入信息赋值给变量名confirm_result
4.fail #失败模块,执行的话,就结束
msg #打印msg内容
5. run_once: yes #仅仅运行一次
6. delegate_to: localhost #任务委派功能,指在本地localhost执行操作
7. notify #通知,当你执行某个task以后,你在task的末尾做一个通知,并附上一个名称或者内容
8. handlers #与tasks平级的功能区,handlers下的name名称与notify的名称相同,则激活handlers,如果有多个task任务同时呼叫一个handler,此handler也只执行一次
总结
以上是小编为你收集整理的ansible批量自动配置Juniper全部内容。
如果觉得小编网站内容还不错,欢迎将小编网站推荐给好友。
原文地址:https://www.cnblogs.com/lisenlin/p/11066012.html

ansible 002 连接被控端 inventory ansible.cfg ansible-adhoc ansible 原理

转:
ansible 002 连接被控端 inventory ansible.cfg ansible-adhoc ansible 原理
ssh 用普通用户连接被控端
配置主机清单 (/etc/hosts 域名解析为前提)
[root@workstation ansible]# cat hosts
servera
serverb
[root@workstation ansible]# pwd
/etc/ansible
[root@workstation ansible]#
建立免密
[root@workstation ansible]# ssh-keygen
使被控端创建用户
[root@workstation ansible]# ansible all -m shell -a ''useradd ansible'' -k
SSH password:
servera | CHANGED | rc=0 >>

serverb | CHANGED | rc=0 >>

[root@workstation ansible]# ansible all -m shell -a ''echo redhat | passwd --stdin ansible'' -k
SSH password:
serverb | CHANGED | rc=0 >>
Changing password for user ansible.
passwd: all authentication tokens updated successfully.
servera | CHANGED | rc=0 >>
Changing password for user ansible.
passwd: all authentication tokens updated successfully.
配置与 ansible 用户的免密
[root@workstation ansible]# ssh-copy-id ansible@servera
/usr/bin/ssh-copy-id: INFO: Source of key(s) to be installed: "/root/.ssh/id_rsa.pub"
/usr/bin/ssh-copy-id: INFO: attempting to log in with the new key(s), to filter out any that are already installed
/usr/bin/ssh-copy-id: INFO: 1 key(s) remain to be installed -- if you are prompted now it is to install the new keys
ansible@servera''s password:

Number of key(s) added: 1

Now try logging into the machine, with:   "ssh ''ansible@servera''"
and check to make sure that only the key(s) you wanted were added.

[root@workstation ansible]# ssh-copy-id ansible@serverb
/usr/bin/ssh-copy-id: INFO: Source of key(s) to be installed: "/root/.ssh/id_rsa.pub"
/usr/bin/ssh-copy-id: INFO: attempting to log in with the new key(s), to filter out any that are already installed
/usr/bin/ssh-copy-id: INFO: 1 key(s) remain to be installed -- if you are prompted now it is to install the new keys
ansible@serverb''s password:

Number of key(s) added: 1

Now try logging into the machine, with:   "ssh ''ansible@serverb''"
and check to make sure that only the key(s) you wanted were added.

[root@workstation ansible]#


[root@workstation ansible]# ansible all -m shell -a ''pwd'' -k -u ansible
SSH password:
servera | CHANGED | rc=0 >>
/home/ansible
serverb | CHANGED | rc=0 >>
/home/ansible
[root@workstation ansible]#
默认改为 ansible 用户连接

[root@workstation ansible]# ansible all -m shell -a ''pwd''
servera | CHANGED | rc=0 >>
/home/ansible
serverb | CHANGED | rc=0 >>
/home/ansible
[root@workstation ansible]#
设置被控端提权
[root@workstation ansible]# ansible all -m shell -a ''echo ansible ALL=(ALL) NOPASSWD: ALL > /etc/sudoers.d/ansible'' -u root -k
SSH password:
servera | CHANGED | rc=0 >>

serverb | CHANGED | rc=0 >>
ansible 这边并没有提权
[root@workstation ansible]# ansible all -m shell -a ''id''
servera | CHANGED | rc=0 >>
uid=1001(ansible) gid=1001(ansible) groups=1001(ansible) context=unconfined_u:unconfined_r:unconfined_t:s0-s0:c0.c1023
serverb | CHANGED | rc=0 >>
uid=1000(ansible) gid=1000(ansible) groups=1000(ansible) context=unconfined_u:unconfined_r:unconfined_t:s0-s0:c0.c1023
[root@workstation ansible]#
修改配置文件

成功提权
[root@workstation ansible]# ansible all -m shell -a ''id''
servera | CHANGED | rc=0 >>
uid=0(root) gid=0(root) groups=0(root) context=unconfined_u:unconfined_r:unconfined_t:s0-s0:c0.c1023
serverb | CHANGED | rc=0 >>
uid=0(root) gid=0(root) groups=0(root) context=unconfined_u:unconfined_r:unconfined_t:s0-s0:c0.c1023
[root@workstation ansible]#

[root@workstation ansible]# ansible all -m shell -a ''pwd''
servera | CHANGED | rc=0 >>
/home/ansible
serverb | CHANGED | rc=0 >>
/home/ansible
[root@workstation ansible]#
定义 inventory
列出当前选择的主机
[root@workstation ansible]# ansible servera --list-hosts
hosts (1):
    servera

[root@workstation ansible]# ansible servera,serverb --list-hosts
hosts (2):
    servera
    serverb


[root@workstation ansible]# ansible httpd,mysql --list-hosts
hosts (3):
    servera
    serverb
    abc
[root@workstation ansible]# cat hosts
[httpd]
servera
serverb

[mysql]
abc

[root@workstation ansible]#
这里hosts为ini格式和那个yum差不多
不想加入组的用户得写在第一排。

[root@workstation ansible]# ansible ungrouped --list-hosts
hosts (1):
    servere
[root@workstation ansible]# head -n3 hosts
servere
[httpd]
servera
[root@workstation ansible]#
servere不属于任何组
组包含组
[root@workstation ansible]# vi hosts
[root@workstation ansible]# ansible web --list-hosts
hosts (3):
    servera
    serverb
    abc
[root@workstation ansible]# cat hosts
servere
[httpd]
servera
serverb

[mysql]
abc

[web:children]
httpd
mysql    #那么这里就只能写组,不可以写主机
[root@workstation ansible]#

[web:children]
httpd
mysql
[web]
fox        #这样才可以添加fox主机
ansible选择了两边主机,ansible会自动去重。
支持通配符
组和主机都通配
[root@workstation ansible]# ansible ''server*'' --list-hosts
hosts (3):
    servere
    servera
    serverb
[root@workstation ansible]#
hosts 也可以连续定义

[root@workstation ansible]# ansible ''server*,!*server1'' --list-hosts
hosts (14):
    server2
    server3
    server4
    server5
    server6
    server7
    server8
    server9
    server10
    server11
    server12
    servere
    servera
    serverb
[root@workstation ansible]#
唯独不要 server1
[root@workstation ansible]# ansible ''httpd,&mysql'' --list-hosts
hosts (1):
    server10
[root@workstation ansible]# cat hosts
server[1:12]


servere
[httpd]
servera
serverb
server10
[mysql]
abc
server10
[web:children]
httpd
mysql
[root@workstation ansible]#
既属于 web 又属于 httpd
boston,londor,&prod,!lb
在 boston 与 londor 同时也在 prod 但是去除 lb
正则表达式

有 s 或 h 字母 尾巴为 example.com 的
没带 ^ 就不是开头为 s 或 h
另外指定新的主机清单。读新的 hosts
[root@workstation ansible]# echo  servera  > file
[root@workstation ansible]# ansible servera -i file --list-hosts
  hosts (1):
    servera
[root@workstation ansible]#
有关 ansible 常用参数
-m 指定模块
-a 指定模块参数
-u 指定被控端的连接用户 2
-k 密码验证,不指定就是秘钥验证
-i 指定主机清单 ansible servera -i file --list-hosts
--list-hosts 列出所选的主机

yaml 格式定义主机清单

比较完整的 yaml 写法

ini 格式转换 yaml

yaml 语法对程序更友好
配置文件
默认配置文件位置
[root@workstation ansible]# pwd
/etc/ansible
[root@workstation ansible]# ls
ansible.cfg  file  file.yaml  hosts  roles
[root@workstation ansible]#

配置文件有优先级读取顺序
ANSIBLE_CONFIG = /tmp/ansible.cfg
当前目录下的ansible.cfg  ./
家目录   ~/.ansible.cfg
/etc/ansible/ansible.cfg

更改运行主机清单的路径

ansible.cfg 的参数
inventory      = ./hosts
#library        = /usr/share/my_modules/
#module_utils   = /usr/share/my_module_utils/
#remote_tmp     = ~/.ansible/tmp
#local_tmp      = ~/.ansible/tmp
#plugin_filters_cfg = /etc/ansible/plugin_filters.yml
#forks          = 5
inventory      = ./hosts
#library        = /usr/share/my_modules/
#module_utils   = /usr/share/my_module_utils/
#remote_tmp     = ~/.ansible/tmp   被控端路径  py的临时运行目录的位置
#local_tmp      = ~/.ansible/tmp   主控端临时存储目录
#plugin_filters_cfg = /etc/ansible/plugin_filters.yml
#forks          = 5       并发数  一次性连5台,再连5台
#poll_interval  = 15      探测任务执行如何  每15秒探测
#ask_pass      = True    密码验证   -k 默认false
#remote_port    = 22    被控端,端口号
remote_user = ansible    远程主机用什么连
[privilege_escalation]
become=True          要提权
become_method=sudo
become_user=root     提权用户
become_ask_pass=False   不问提权密码
#host_key_checking = False     自动接受公钥  (好用)

log_path=/var/log/ansible.log   普通用户得改这个路径
普通用户写不了var/log
module_name = command  不指定模块默认为command模块
ad-hoc 指令
官方文档
https://docs.ansible.com/

搜索模块时搜索 builtin 内置模块
shell 模块
优点:功能强大
缺点:无法保证幂等性
ansible servera -m shell -a '' 命令''

来自官方文档的教诲 (狗头)
[root@workstation maosible]# ansible  servera -m shell -a ''chdir=/tmp pwd''
servera | CHANGED | rc=0 >>
/tmp
[root@workstation maosible]#

[root@workstation maosible]# ansible  servera -m shell -a ''creates=/tmp/file pwd''
servera | SUCCESS | rc=0 >>
skipped, since /tmp/file exists
[root@workstation maosible]#
文件存在,则不执行pwd

removes相反
command 模块为默认模块
ansible servera -a ''pwd''
command 不允许 > < | 之类。 他会当成字符串
raw 模块就是被削弱的 shell
script 模块
让脚本在被控端执行
这个脚本可以不需要执行权限,因为他会被解析成 py 文件,被控端通过执行 py 文件执行脚本
其他常用模块
authorized_keys 分发公钥
[root@workstation .ssh]# ansible-galaxy collection install ansible.posix -vvv
ansible-galaxy 2.9.11
config file = /etc/ansible/ansible.cfg
configured module search path = [''/root/.ansible/plugins/modules'', ''/usr/share/ansible/plugins/modules'']
ansible python module location = /usr/lib/python3.6/site-packages/ansible
executable location = /usr/bin/ansible-galaxy
python version = 3.6.8 (default, Mar 18 2021, 08:58:41) [GCC 8.4.1 20200928 (Red Hat 8.4.1-1)]
Using /etc/ansible/ansible.cfg as config file
Process install dependency map
Opened /root/.ansible/galaxy_token
Processing requirement collection ''ansible.posix''
Collection ''ansible.posix'' obtained from server default https://galaxy.ansible.com/api/
Starting collection install process
Installing ''ansible.posix:1.4.0'' to ''/root/.ansible/collections/ansible_collections/ansible/posix''
Downloading https://galaxy.ansible.com/download/ansible-posix-1.4.0.tar.gz to /root/.ansible/tmp/ansible-local-5179_oikgerz/tmpqxvizmuo
2.9 没有此内置模块
那么使用 galaxy 从网上下载
通过官方文档发现名字为 ansible.posix.authorized_key

[root@workstation modules]# ansible all -m ansible.posix.authorized_key -a ''user=root key="ssh-rsa AAAAB3NzaC1yc2EAAAADAQABAAABgQCkQdrj0fMPRQiC7f+1I4N23k/OdwAqt0ONpNDmChbD/ehrJ5lrEspinVtolwBdR5lKnhnWpb9iC29QlR4epd0EdLrId1wRwZ1pMteZuAwR7IlfCCzzSo2ND6gBl1KSIPV4aZhigspFC1JyGAuoB4HIjeZ9NI6w1XP+U/hoGNLjKZtEhPK+H5ijXpb9pVMPvCa0uLYta0qqIMSpIkLlNFUQ1hNd4g4b+aj2y+BzBG/+kYS/7+vDuiBw0GoZ18zmY0ueQjeafg00RNLM/qU90soo29T9tRPc67PozFw20RB8z4LH8Iwe3jzOzGEOWFQ0frJyOg8CgOwDoqMTk4oNjwx4HEOSjv9SsaWYQGZxOkJ5iVZ3MLQt1MkEzhJjibCTMIDlQQ+Dj16hFTMRmM7EXc4AHq1gwURqRv96e0pvmC7RIAFWiPd9IvSSmt4HJB/qGmQjCmvvy84FAGddbEiYGOH2YShzoppBVpxQEsCbHxvZQXJbpwb0uAvn22Pxd5AsH6M= root@workstation" state=present''
参考文档:https://docs.ansible.com/ansible/latest/collections/ansible/posix/authorized_key_module.html
可是 2.9 拥有 authorized_key
[root@workstation modules]# ansible all -m authorized_key -a ''user=root key="ssh-rsa AAAAB3NzaC1yc2EAAAADAQABAAABgQCkQdrj0fMPRQiC7f+1I4N23k/OdwAqt0ONpNDmChbD/ehrJ5lrEspinVtolwBdR5lKnhnWpb9iC29QlR4epd0EdLrId1wRwZ1pMteZuAwR7IlfCCzzSo2ND6gBl1KSIPV4aZhigspFC1JyGAuoB4HIjeZ9NI6w1XP+U/hoGNLjKZtEhPK+H5ijXpb9pVMPvCa0uLYta0qqIMSpIkLlNFUQ1hNd4g4b+aj2y+BzBG/+kYS/7+vDuiBw0GoZ18zmY0ueQjeafg00RNLM/qU90soo29T9tRPc67PozFw20RB8z4LH8Iwe3jzOzGEOWFQ0frJyOg8CgOwDoqMTk4oNjwx4HEOSjv9SsaWYQGZxOkJ5iVZ3MLQt1MkEzhJjibCTMIDlQQ+Dj16hFTMRmM7EXc4AHq1gwURqRv96e0pvmC7RIAFWiPd9IvSSmt4HJB/qGmQjCmvvy84FAGddbEiYGOH2YShzoppBVpxQEsCbHxvZQXJbpwb0uAvn22Pxd5AsH6M= root@workstation" state=present''
所以没必要去下载 ansible.posix.authorized_key
但是可以显示出参考文档的重要性
那么遇到问题,可以直接去寻找官方的英文文档,会更有效率。
以下为转载
https://cloud.tencent.com/developer/news/327468
ansible 原理
Ansible 是一个模型驱动的配置管理器,支持多节点发布、远程任务执行。默认使用 SSH 进行远程连接。无需在被管理节点上安装附加软件,可使用各种编程语言进行扩展。
一、Ansible 基本架构

上图为 ansible 的基本架构,从上图可以了解到其由以下部分组成:
核心:ansible
核心模块(Core Modules):这些都是 ansible 自带的模块
扩展模块(Custom Modules):如果核心模块不足以完成某种功能,可以添加扩展模块
插件(Plugins):完成模块功能的补充
剧本(Playbooks):ansible 的任务配置文件,将多个任务定义在剧本中,由 ansible 自动执行
连接插件(Connectior Plugins):ansible 基于连接插件连接到各个主机上,虽然 ansible 是使用 ssh 连接到各个主机的,但是它还支持其他的连接方法,所以需要有连接插件
主机群(Host Inventory):定义 ansible 管理的主机
二、Ansible 工作原理


以上是从网上找到的两张 ansible 工作原理图,两张图基本都是在架构图的基本上进行的拓展。从上面的图上可以了解到:
1、管理端支持 local 、ssh、zeromq 三种方式连接被管理端,默认使用基于 ssh 的连接---这部分对应基本架构图中的连接模块;
2、可以按应用类型等方式进行 Host Inventory(主机群)分类,管理节点通过各类模块实现相应的操作---单个模块,单条命令的批量执行,我们可以称之为 ad-hoc;
3、管理节点可以通过 playbooks 实现多个 task 的集合实现一类功能,如 web 服务的安装部署、数据库服务器的批量备份等。playbooks 我们可以简单的理解为,系统通过组合多条 ad-hoc 操作的配置文件 。
转:
ansible 002 连接被控端 inventory ansible.cfg ansible-adhoc ansible 原理
--Posted from Rpc
批量自动化部署nginx")
ansible(playbook)批量自动化部署nginx
上一篇介绍了使用playbook批量部署zabbix客户端,当时所有的任务全部都是写在一个playbook中,比较臃肿,且代码不可复用。这篇文章我们将介绍通过ansible的roles、include等模块实现批量安装Nginx。
以下为具体实现步骤:
1、目录结构:
[root@deploy playbook-test]# tree
.
├── Nginx.yml
└── roles
    └── Nginx

        ├── files
        │   ├── Nginx-1.8.0.tar.gz
        │   ├── Nginx.service
        │   ├── openssl-1.0.1h.tar.gz
        │   ├── pcre-8.12.tar.gz
        │   └── zlib-1.2.11.tar.gz
        ├── handlers
        │   └── main.yml
        ├── tasks
        │   ├── copy.yml
        │   ├── group.yml
        │   ├── install.yml
        │   ├── main.yml
        │   ├── service.yml
        │   ├── template.yml
        │   ├── unarchive.yml
        │   └── user.yml
        ├── templates
        │   ├── Nginx.conf.j2
        │   └── temp.conf.j2
        └── vars
            └── main.yml
2、代码内容:
cat Nginx.yml
[root@deploy playbook-test]# cat Nginx.yml
---
- hosts: web
  remote_user: root
  roles:
    - Nginx
cat tasks/group.yml
[root@deploy Nginx]# cat tasks/group.yml
---
- name: 创建Nginx组
  group:
    name: Nginx
    gid: 202
    system: yes
    state: present
cat tasks/user.yml
[root@deploy Nginx]# cat tasks/user.yml
---
- name: 创建Nginx用户
  user:
    name: Nginx
    uid: 202
    group: Nginx
    shell: /sbin/nologin
cat tasks/copy.yml
[root@deploy Nginx]# cat tasks/copy.yml
---
- name: 拷贝源码包
  copy:
    src: "{{ item.src }}"
    dest: "{{ item.dest }}"
  with_items:
    - { src: "Nginx-1.8.0.tar.gz", dest: "/tmp/Nginx-1.8.0.tar.gz" }
    - { src: "openssl-1.0.1h.tar.gz", dest: "/tmp/openssl-1.0.1h.tar.gz" }
    - { src: "pcre-8.12.tar.gz", dest: "/tmp/pcre-8.12.tar.gz" }
    - { src: "zlib-1.2.11.tar.gz", dest: "/tmp/zlib-1.2.11.tar.gz" }
cat tasks/unarchive.yml
---
- name: 解压源码包
  unarchive:
    src: "{{ item.src }}"
    dest: "{{ item.dest }}"
    remote_src: yes
  with_items:
    - { src: "/tmp/Nginx-1.8.0.tar.gz",dest: "/opt/" }
    - { src: "/tmp/openssl-1.0.1h.tar.gz",dest: "/opt/" }
    - { src: "/tmp/pcre-8.12.tar.gz",dest: "/opt/" }
    - { src: "/tmp/zlib-1.2.11.tar.gz",dest: "/opt/" }
cat tasks/install.yml
---
- name: Start Install Nginx
  shell: cd /opt/Nginx-1.8.0 && ./configure --prefix=/opt/Nginx --with-pcre=/opt/pcre-8.12 --with-openssl=/opt/openssl-1.0.1h --with-zlib=/opt/zlib-1.2.11 --with-http_stub_status_module --with-http_ssl_module --user=Nginx --group=Nginx && make && make install
cat tasks/template.yml
---
- name: 拷贝配置文件
  template:
    src: "{{ item.src }}"
    dest: "{{ item.dest }}"
  with_items:
    - { src: "Nginx.conf.j2",dest: "/opt/Nginx/conf/Nginx.conf" }
    #- { src: "temp.conf.j2",dest: "/opt/Nginx/vhosts/temp.conf" }
  notify:
    - restart Nginx
cat tasks/service.yml
---
- name: 拷贝启动脚本
  copy: src="Nginx.service" dest="/lib/systemd/system/Nginx.service"
cat tasks/main.yml
---
  - include: group.yml
  - include: user.yml
  - include: copy.yml
  - include: unarchive.yml
  - include: install.yml
  - include: template.yml
    tags: [conf]
  - include: service.yml
cat vars/main.yml
root@deploy Nginx]# cat vars/main.yml
---
ngxport: "8000"
server_name: "www.xxx.com"
root_dir: "/web"
cat Nginx.conf.j2
user  Nginx;
worker_processes  {{ ansible_processor_vcpus }};

#error_log  logs/error.log;
#error_log  logs/error.log  notice;
#error_log  logs/error.log  info;

#pid        logs/Nginx.pid;


events {
    worker_connections  2048;
}


http {
    include       mime.types;
    default_type  application/octet-stream;

    #log_format  main  '$remote_addr - $remote_user [$time_local] "$request" '
    #                  '$status $body_bytes_sent "$http_referer" '
    #                  '"$http_user_agent" "$http_x_forwarded_for"';

    #access_log  logs/access.log  main;

    sendfile        on;
    #tcp_nopush     on;

    #keepalive_timeout  0;
    keepalive_timeout  65;

    #gzip  on;

    server {
        listen       {{ ngxport }};
        server_name  localhost;

        #charset koi8-r;

        #access_log  logs/host.access.log  main;

        location / {
            root   html;
            index  index.html index.htm;
        }

        #error_page  404              /404.html;

        # redirect server error pages to the static page /50x.html
        #
        error_page   500 502 503 504  /50x.html;
        location = /50x.html {
            root   html;
        }

        # proxy the PHP scripts to Apache listening on 127.0.0.1:80
        #
        #location ~ \.PHP$ {
        #    proxy_pass   http://127.0.0.1;
        #}

        # pass the PHP scripts to FastCGI server listening on 127.0.0.1:9000
        #
        #location ~ \.PHP$ {
        #    root           html;
        #    fastcgi_pass   127.0.0.1:9000;
        #    fastcgi_index  index.PHP;
        #    fastcgi_param  SCRIPT_FILENAME  /scripts$fastcgi_script_name;
        #    include        fastcgi_params;
        #}

        # deny access to .htaccess files, if Apache's document root
        # concurs with Nginx's one
        #
        #location ~ /\.ht {
        #    deny  all;
        #}
    }


    # another virtual host using mix of IP-, name-, and port-based configuration
    #
    #server {
    #    listen       8000;
    #    listen       somename:8080;
    #    server_name  somename  alias  another.alias;

    #    location / {
    #        root   html;
    #        index  index.html index.htm;
    #    }
    #}


    # HTTPS server
    #
    #server {
    #    listen       443 ssl;
    #    server_name  localhost;

    #    ssl_certificate      cert.pem;
    #    ssl_certificate_key  cert.key;

    #    ssl_session_cache    shared:SSL:1m;
    #    ssl_session_timeout  5m;

    #    ssl_ciphers  HIGH:!aNULL:!MD5;
    #    ssl_prefer_server_ciphers  on;

    #    location / {
    #        root   html;
    #        index  index.html index.htm;
    #    }
    #}
include /opt/Nginx/vhosts/*.conf;
}
3、批量安装
[root@deploy playbook-test]# ansible-playbook Nginx.yml
[root@deploy playbook-test]# ansible-playbook Nginx.yml

PLAY [web] **************************************************************************************************************************************************

TASK [Gathering Facts] **************************************************************************************************************************************
ok: [192.168.131.15]
ok: [192.168.131.10]

TASK [Nginx : 创建Nginx组] *************************************************************************************************************************************
ok: [192.168.131.15]
ok: [192.168.131.10]

TASK [Nginx : 创建Nginx用户] ************************************************************************************************************************************
ok: [192.168.131.10]
ok: [192.168.131.15]

TASK [Nginx : 开始拷贝源码包] **************************************************************************************************************************************
changed: [192.168.131.10] => (item={u'dest': u'/tmp/Nginx-1.8.0.tar.gz', u'src': u'Nginx-1.8.0.tar.gz'})
changed: [192.168.131.15] => (item={u'dest': u'/tmp/Nginx-1.8.0.tar.gz', u'src': u'Nginx-1.8.0.tar.gz'})
changed: [192.168.131.15] => (item={u'dest': u'/tmp/openssl-1.0.1h.tar.gz', u'src': u'openssl-1.0.1h.tar.gz'})
changed: [192.168.131.10] => (item={u'dest': u'/tmp/openssl-1.0.1h.tar.gz', u'src': u'openssl-1.0.1h.tar.gz'})
changed: [192.168.131.15] => (item={u'dest': u'/tmp/pcre-8.12.tar.gz', u'src': u'pcre-8.12.tar.gz'})
changed: [192.168.131.10] => (item={u'dest': u'/tmp/pcre-8.12.tar.gz', u'src': u'pcre-8.12.tar.gz'})
changed: [192.168.131.15] => (item={u'dest': u'/tmp/zlib-1.2.11.tar.gz', u'src': u'zlib-1.2.11.tar.gz'})
changed: [192.168.131.10] => (item={u'dest': u'/tmp/zlib-1.2.11.tar.gz', u'src': u'zlib-1.2.11.tar.gz'})

TASK [Nginx : 开始解压源码包] **************************************************************************************************************************************
changed: [192.168.131.15] => (item={u'dest': u'/opt/', u'src': u'/tmp/Nginx-1.8.0.tar.gz'})
changed: [192.168.131.10] => (item={u'dest': u'/opt/', u'src': u'/tmp/Nginx-1.8.0.tar.gz'})
changed: [192.168.131.15] => (item={u'dest': u'/opt/', u'src': u'/tmp/openssl-1.0.1h.tar.gz'})
changed: [192.168.131.10] => (item={u'dest': u'/opt/', u'src': u'/tmp/openssl-1.0.1h.tar.gz'})
changed: [192.168.131.15] => (item={u'dest': u'/opt/', u'src': u'/tmp/pcre-8.12.tar.gz'})
changed: [192.168.131.10] => (item={u'dest': u'/opt/', u'src': u'/tmp/pcre-8.12.tar.gz'})
changed: [192.168.131.15] => (item={u'dest': u'/opt/', u'src': u'/tmp/zlib-1.2.11.tar.gz'})
changed: [192.168.131.10] => (item={u'dest': u'/opt/', u'src': u'/tmp/zlib-1.2.11.tar.gz'})

TASK [Nginx : Start Install Nginx] **************************************************************************************************************************
changed: [192.168.131.15]
changed: [192.168.131.10]

TASK [Nginx : 拷贝配置文件] ***************************************************************************************************************************************
changed: [192.168.131.10] => (item={u'dest': u'/opt/Nginx/conf/Nginx.conf', u'src': u'Nginx.conf.j2'})
changed: [192.168.131.15] => (item={u'dest': u'/opt/Nginx/conf/Nginx.conf', u'src': u'Nginx.conf.j2'})

TASK [Nginx : 开始拷贝源码包] **************************************************************************************************************************************
changed: [192.168.131.10]
changed: [192.168.131.15]

RUNNING HANDLER [Nginx : restart Nginx] *********************************************************************************************************************
changed: [192.168.131.10]
changed: [192.168.131.15]

PLAY RECAP **************************************************************************************************************************************************
192.168.131.10             : ok=9    changed=6    unreachable=0    Failed=0    skipped=0    rescued=0    ignored=0
192.168.131.15             : ok=9    changed=6    unreachable=0    Failed=0    skipped=0    rescued=0    ignored=0
4、验证客户端上Nginx是否安装成功并启动
[root@deploy playbook-test]# ansible web -m shell -a "ps -ef | grep Nginx|grep -v grep"
192.168.131.10 | CHANGED | rc=0 >>
root      71714      1  0 01:25 ?        00:00:00 Nginx: master process /opt/Nginx/sbin/Nginx
Nginx     71715  71714  0 01:25 ?        00:00:00 Nginx: worker process

192.168.131.15 | CHANGED | rc=0 >>
root      71654      1  0 01:25 ?        00:00:00 Nginx: master process /opt/Nginx/sbin/Nginx
Nginx     71655  71654  0 01:25 ?        00:00:00 Nginx: worker process
5、如果我们要增加Nginx站点,可写好对应的模板,将之前template.yml文件中的注释打开,然后推送到vhosts目录,重载Nginx配置文件即可生效。
cat temp.conf.j2
[root@deploy templates]# cat temp.conf.j2
server
{
listen 80;
server_name {{ server_name }};
index index.html index.PHP;
root {{ root_dir }};
}
重新下发Nginx配置配置文件,添加新的Nginx站点
[root@deploy playbook-test]# ansible-playbook Nginx.yml --tags=conf

PLAY [web] **************************************************************************************************************************************************

TASK [Gathering Facts] **************************************************************************************************************************************
ok: [192.168.131.15]
ok: [192.168.131.10]

TASK [Nginx : 拷贝配置文件] ***************************************************************************************************************************************
ok: [192.168.131.10] => (item={u'dest': u'/opt/Nginx/conf/Nginx.conf', u'src': u'Nginx.conf.j2'})
ok: [192.168.131.15] => (item={u'dest': u'/opt/Nginx/conf/Nginx.conf', u'src': u'Nginx.conf.j2'})
changed: [192.168.131.15] => (item={u'dest': u'/opt/Nginx/vhosts/temp.conf', u'src': u'temp.conf.j2'})
changed: [192.168.131.10] => (item={u'dest': u'/opt/Nginx/vhosts/temp.conf', u'src': u'temp.conf.j2'})

RUNNING HANDLER [Nginx : restart Nginx] *********************************************************************************************************************
changed: [192.168.131.10]
changed: [192.168.131.15]

PLAY RECAP **************************************************************************************************************************************************
192.168.131.10             : ok=3    changed=2    unreachable=0    Failed=0    skipped=0    rescued=0    ignored=0
192.168.131.15             : ok=3    changed=2    unreachable=0    Failed=0    skipped=0    rescued=0    ignored=0
测试:
[root@deploy playbook-test]# ansible web -m shell -a "netstat -antlp | grep 80"
192.168.131.15 | CHANGED | rc=0 >>
tcp        0      0 0.0.0.0:80              0.0.0.0:*               LISTEN      72534/Nginx: master
tcp        0      0 0.0.0.0:8000            0.0.0.0:*               LISTEN      72534/Nginx: master

192.168.131.10 | CHANGED | rc=0 >>
tcp        0      0 0.0.0.0:80              0.0.0.0:*               LISTEN      72596/Nginx: master
tcp        0      0 0.0.0.0:8000            0.0.0.0:*               LISTEN      72596/Nginx: master

批量自动化部署zabbix客户端")
ansible(playbook)批量自动化部署zabbix客户端
最近公司新上架了50台服务器,系统包括centos7.3和centos6.8,现在需要在这50台服务器中安装zabbix客户端,由于本人比较懒,所以就想到了自动化工具ansible。
具体是实现方法如下:
1、playbook代码如下:
[root@deploy playbook-test]# cat zabbix-agent.yml
- hosts: web
  remote_user: root
  gather_facts: yes

  vars:

     IPDD: "{{ ansible_default_ipv4[''address''] }}"

  tasks:
  - name: 开始拷贝源码包
    copy:
      #src: "/tmp/zabbix-2.2.23.tar.gz"
      #dest: "/tmp/zabbix-2.2.23.tar.gz"
      src: "{{ item.src }}"
      dest: "{{ item.dest }}"
    with_items:
      - { src: "/tmp/zabbix-2.2.23.tar.gz", dest: "/tmp/zabbix-2.2.23.tar.gz" }
      #- { src: "/tmp/zabbix-2.2.23.tar.gz", dest: "/tmp/zabbix-2.2.23.tar.gz" }
      #- { src: "/PATH/to/FILE", dest: "/tmp/zabbix-2.2.23.tar.gz" }

  - name: 开始解压源码包
    unarchive:
      src: "/tmp/zabbix-2.2.23.tar.gz"
      dest: "/tmp"
      copy: no

  - name: 创建zabbix组
    group:
      name: zabbix
      gid: 201
      system: yes
      state: present

  - name: 创建zabbix用户
    user:
      name: zabbix
      comment: Monitor User
      uid: 201
      group: zabbix
      shell: /sbin/nologin

  - name: 安装GCC-C++
    yum:
      name: gcc-c++
      state: latest

  - name: 开始安装zabbix客户端
    shell: cd /tmp/zabbix-2.2.23 && ./configure --sysconfdir=/etc/zabbix/ --sbindir=/usr/local/sbin/ --enable-agent && make && make install

  - name: 拷贝centos6启动脚本
    copy:
      src: "{{ item.src }}"
      dest: "{{ item.dest }}"
      mode: 0755
    with_items:
      - { src: "/tmp/zabbix-2.2.23/misc/init.d/fedora/core5/zabbix_agentd", dest: "/etc/init.d/zabbix_agentd" }
    when: ansible_distribution == ''CentOS'' and ansible_distribution_major_version == "6"

  - name: 拷贝centos7启动脚本
    copy:
      src: "{{ item.src }}"
      dest: "{{ item.dest }}"
      mode: 0644
    with_items:
      - { src: "/tmp/zabbix_agentd.service", dest: "/lib/systemd/system/zabbix_agentd.service" }
    when: ansible_distribution == ''CentOS'' and ansible_distribution_major_version == "7"

  - name: systemctl daemon-reload
    command: systemctl daemon-reload
    when: ansible_distribution == ''CentOS'' and ansible_distribution_major_version == "7"

  - name: 拷贝配置文件
    template:
      src: /tmp/zabbix_agentd.conf.j2
      dest: /etc/zabbix/zabbix_agentd.conf
    tags:
      - change-conf
    notify:
      - restart zabbix-agent

  handlers:
  - name: restart zabbix-agent
    service: name=zabbix_agentd state=restarted enabled=yes
2、准备源码包及相关配置文件
root@deploy tmp]# ll
total 15160
drwxr-xr-x 13 1039 1039     4096 Jul 30  2018 zabbix-2.2.23
-rw-r--r--  1 root root 15504361 Jul  4 01:28 zabbix-2.2.23.tar.gz
-rw-r--r--  1 root root     7465 Jul  6 01:48 zabbix_agentd.conf.j2
-rw-r--r--  1 root root      412 Jul  6 01:13 zabbix_agentd.service
[root@deploy tmp]# grep -Ev "^#|^$" /etc/ansible/hosts
[web]
192.168.131.10
192.168.131.15
192.168.131.129
[root@deploy tmp]# grep -Ev "^#|^$" zabbix_agentd.conf.j2
PidFile=/tmp/zabbix_agentd.pid
LogFile=/tmp/zabbix_agentd.log
Server=192.168.131.100
ListenPort=10023
ServerActive=192.168.131.100
Hostname={{ IPDD }}
Timeout=30
[root@deploy tmp]# cat zabbix_agentd.service
[Unit]
Description=Zabbix Agent
After=syslog.target
After=network.target

[Service]
Environment="CONFFILE=/etc/zabbix/zabbix_agentd.conf"
EnvironmentFile=-/etc/sysconfig/zabbix-agent
Type=forking
Restart=on-failure
PIDFile=/tmp/zabbix_agentd.pid
KillMode=control-group
ExecStart=/usr/local/sbin/zabbix_agentd -c $CONFFILE
ExecStop=/bin/kill -SIGTERM $MAINPID
RestartSec=10s

[Install]
WantedBy=multi-user.target
3、测试ansible主机与客户端通信是否正常(ansible主机需要和客户端主机做ssh互信)
[root@deploy playbook-test]# ansible web -m ping
192.168.131.15 | SUCCESS => {
    "ansible_facts": {
        "discovered_interpreter_python": "/usr/bin/python"
    },
    "changed": false,
    "ping": "pong"
}
192.168.131.10 | SUCCESS => {
    "ansible_facts": {
        "discovered_interpreter_python": "/usr/bin/python"
    },
    "changed": false,
    "ping": "pong"
}
192.168.131.129 | SUCCESS => {
    "ansible_facts": {
        "discovered_interpreter_python": "/usr/bin/python"
    },
    "changed": false,
    "ping": "pong"
}
4、执行剧本(批量部署)
[root@deploy playbook-test]# ansible-playbook zabbix-agent.yml


5、测试客户端机器zabbix-agent是否成功安装并启动
[root@deploy playbook-test]# ansible web -m shell -a "ps -ef |grep zabbix_agentd|grep -v grep"
192.168.131.10 | CHANGED | rc=0 >>
zabbix    26025      1  0 13:49 ?        00:00:00 /usr/local/sbin/zabbix_agentd -c /etc/zabbix/zabbix_agentd.conf
zabbix    26026  26025  0 13:49 ?        00:00:00 /usr/local/sbin/zabbix_agentd: collector [idle 1 sec]
zabbix    26027  26025  0 13:49 ?        00:00:00 /usr/local/sbin/zabbix_agentd: listener #1 [waiting for connection]
zabbix    26028  26025  0 13:49 ?        00:00:00 /usr/local/sbin/zabbix_agentd: listener #2 [waiting for connection]
zabbix    26029  26025  0 13:49 ?        00:00:00 /usr/local/sbin/zabbix_agentd: listener #3 [waiting for connection]
zabbix    26030  26025  0 13:49 ?        00:00:00 /usr/local/sbin/zabbix_agentd: active checks #1 [idle 1 sec]

192.168.131.15 | CHANGED | rc=0 >>
zabbix    25956      1  0 13:49 ?        00:00:00 /usr/local/sbin/zabbix_agentd -c /etc/zabbix/zabbix_agentd.conf
zabbix    25957  25956  0 13:49 ?        00:00:00 /usr/local/sbin/zabbix_agentd: collector [idle 1 sec]
zabbix    25958  25956  0 13:49 ?        00:00:00 /usr/local/sbin/zabbix_agentd: listener #1 [waiting for connection]
zabbix    25959  25956  0 13:49 ?        00:00:00 /usr/local/sbin/zabbix_agentd: listener #2 [waiting for connection]
zabbix    25960  25956  0 13:49 ?        00:00:00 /usr/local/sbin/zabbix_agentd: listener #3 [waiting for connection]
zabbix    25961  25956  0 13:49 ?        00:00:00 /usr/local/sbin/zabbix_agentd: active checks #1 [idle 1 sec]

192.168.131.129 | CHANGED | rc=0 >>
zabbix   11258     1  0 06:49 ?        00:00:00 /usr/local/sbin/zabbix_agentd
zabbix   11260 11258  0 06:49 ?        00:00:00 /usr/local/sbin/zabbix_agentd: collector [idle 1 sec]
zabbix   11261 11258  0 06:49 ?        00:00:00 /usr/local/sbin/zabbix_agentd: listener #1 [waiting for connection]
zabbix   11262 11258  0 06:49 ?        00:00:00 /usr/local/sbin/zabbix_agentd: listener #2 [waiting for connection]
zabbix   11263 11258  0 06:49 ?        00:00:00 /usr/local/sbin/zabbix_agentd: listener #3 [waiting for connection]
zabbix   11264 11258  0 06:49 ?        00:00:00 /usr/local/sbin/zabbix_agentd: active checks #1 [getting list of active checks][object Object]
结果显示在客户端机器上已经有zabbix_agentd的进程在运行。
6、如果需要变更配置内容,比如更改zabbix客户端的监听端口为10023,此时不需要将整个playbook都执行一遍可以在playbook相应的任务下加入tag,执行时使用“--tags”参数,指定要执行的playbook片段。
[root@deploy playbook-test]# grep -Ev "^#|^$" /tmp/zabbix_agentd.conf.j2
PidFile=/tmp/zabbix_agentd.pid
LogFile=/tmp/zabbix_agentd.log
Server=192.168.131.100
ListenPort=10023
ServerActive=192.168.131.100
Hostname={{ IPDD }}
Timeout=30
[root@deploy playbook-test]# ansible-playbook zabbix-agent.yml --tags change-conf
PLAY [web] **************************************************************************************************************************************************

TASK [Gathering Facts] **************************************************************************************************************************************
ok: [192.168.131.15]
ok: [192.168.131.10]
ok: [192.168.131.129]

TASK [拷贝配置文件] ***********************************************************************************************************************************************
changed: [192.168.131.15]
changed: [192.168.131.10]
changed: [192.168.131.129]

RUNNING HANDLER [restart zabbix-agent] **********************************************************************************************************************
changed: [192.168.131.15]
changed: [192.168.131.10]
changed: [192.168.131.129]

PLAY RECAP **************************************************************************************************************************************************
192.168.131.10             : ok=3    changed=2    unreachable=0    Failed=0    skipped=0    rescued=0    ignored=0
192.168.131.129            : ok=3    changed=2    unreachable=0    Failed=0    skipped=0    rescued=0    ignored=0
192.168.131.15             : ok=3    changed=2    unreachable=0    Failed=0    skipped=0    rescued=0    ignored=0[object Object]
结果显示配置文件已替换成功,并且跳过了其他步骤,只执行了拷贝配置文件的任务,配置文件改变,触发了重启zabbix agent的handler。
7、查看客户端监听的端口是否发生了变化
[root@deploy playbook-test]# ansible web -m shell -a "netstat -antlp | grep zabbix "
192.168.131.15 | CHANGED | rc=0 >>
tcp        0      0 0.0.0.0:10023           0.0.0.0:*               LISTEN      26358/zabbix_agentd

192.168.131.10 | CHANGED | rc=0 >>
tcp        0      0 0.0.0.0:10023           0.0.0.0:*               LISTEN      26427/zabbix_agentd

192.168.131.129 | CHANGED | rc=0 >>
tcp        0      0 0.0.0.0:10023               0.0.0.0:*                   LISTEN      11615/zabbix_agentd
ansible批量部署zabbix客户端到此结束,仅做记录,能力有限,存在很多不足,不喜勿喷。
后期更新通过ansible批量修改线上服务器用户密码。
总结
以上是小编为你收集整理的ansible(playbook)批量自动化部署zabbix客户端全部内容。
如果觉得小编网站内容还不错,欢迎将小编网站推荐给好友。
原文地址:https://blog.51cto.com/13777088/2417690

ansible之数据提取与Juniper实例演示
一、Ansible列表两种表达方式
基于YAML的列表
my_list:
    - a
    - b
    - c
    - d
基于Json格式的列表
{"my_list":[
    "a",
    "b",
    "c",
  ]
}
二、Ansible列表数据的提取方式
正向列表索引取值
每个列表里的元素,都存在位置,即索引号,可根据列表变量名[索引号]提取,如:my_list[2],取第3个元素,索引号从0开始反向列表索引取值
每个列表里的元素,都存在位置,即索引号,反向取值可根据列表变量名[-索引号]提取,如:my_list[-2],取倒数第2个元素,反向索引号从-1开始,即代表最后一个元素正反向切片取值
根据my_list[索引1:索引2],可取到索引1到索引2范围的元素,索引1不填则表示从索引0开始;索引2不填则默认取到最后一个元素
如:my_list=[''a'',''b'',''c'',''d'',''e'']
my_list[2:3]  #结果:[''c'',''d''],从第3个元素开始,到第4个元素结尾,不包含第4个元素
my_list[:2]    #结果:[''a'',''b'',''c''],从第1个元素开始,到第3个元素,不包含第3个元素
my_list[2:]    #结果:[''c'',''d'',''e''],从第3个元素开始,到最后一个元素,包含最后一个元素
my_list[2:-1]    #结果:[''c'',''d'',''e''],从第3个元素开始,到最后一个元素,不包含最后一个元素
三、Ansible字符串数据提取方式
字符串提取方法与上面列表一样
四、playbook两种方法输出dict字典内容
基于Jinja2格式输出
my_dict.key,    如my_dict={"a":''a1'',"b":"b1"}
my_dict.a      #输出a1值
基于Python格式输出
my_dict[key],    如my_dict={"a":''a1'',"b":"b1"}
my_dict["a"]    #输出值a1
五、案例
5.1 Juniper收集设备信息以及数据处理
 1.juniper初始化配置
2.ansible主控端:nano group_vars/junos.yaml
---
ansible_connection: local
ansible_network_os: junos
ansible_user: admin
ansible_ssh_pass: juniper123
3.ansible主控端:nano test_host文件
[junos]
junipervsrx junos_host=192.168.xx.xx
4.ansible主控端: nano 3_8_3_filter_junos_facts.yaml剧本
---
- name: get junos facts
hosts: junipervsrx
gather_facts: no
roles:
- Juniper.junos
tasks:
- name: get junos facts
juniper_junos_facts:
host: "{{junos_host}}"
register: facts_result
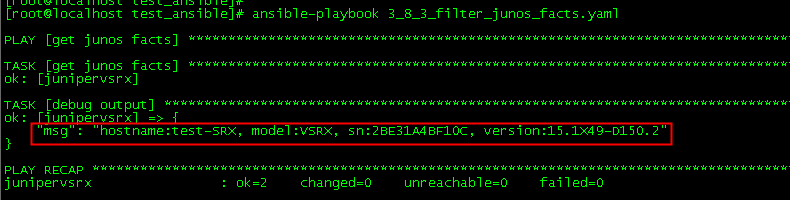
- name: debug output
debug:
msg: "hostname:{{ facts_result.ansible_facts.junos.hostname }},
model:{{ facts_result.ansible_facts.junos.model }},
sn:{{ facts_result.ansible_facts.junos.serialnumber }},
version:{{ facts_result.ansible_facts.junos.version }}"结果:


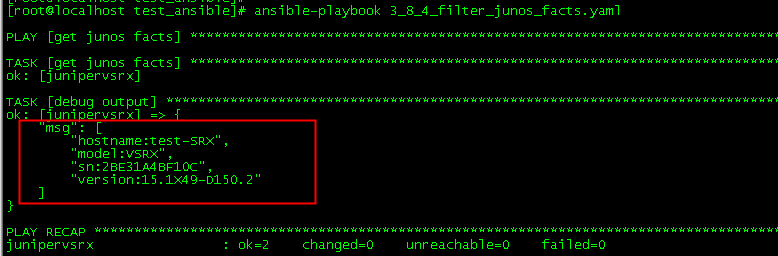
- name: debug output
     debug:
       msg:
       - "hostname:{{ facts_result.ansible_facts.junos.hostname }}"
       - "model:{{ facts_result.ansible_facts.junos.model }}"
       - "sn:{{ facts_result.ansible_facts.junos.serialnumber }}"
- "version:{{ facts_result.ansible_facts.junos.version }}"结果2:
5.2 Juniper路由表信息收集


juniper初始化配置:
1.root%界面下输入cli
2.root>界面下输入configure,进入配置模式
3.root#界面下输入如下配置
  delete system autoinstallation
  set system host-name test-SRX
  set system root-authentication plain-text-password回车  #设置root密码
  输入密码juniper123
  set system login user admin class super-user  #新增用户admin,并具有所有权限
  set system login user admin authentication plain-text-password
  输入密码juniper123
  set system services ssh root-login allow  #开启ssh服务
  set system services netconf ssh port 830  #开启netconf服务承载在ssh,端口830
  set interfaces fxp0 unit 0 family inet address 192.168.3.20/24  #配置带外管理口fxp0地址
commit #提交变更2.ansible主控端:nano group_vars/junos.yaml
---
ansible_connection: local
ansible_network_os: junos
ansible_user: admin
ansible_ssh_pass: juniper123
3.ansible主控端:nano test_host文件
[junos]
junipervsrx junos_host=192.168.xx.xx
4.ansible主控端: nano 3_8_3_filter_junos_facts.yaml剧本
---
- name: get junos routing table
  hosts: junos
  gather_facts: no
  roles:
    - Juniper.junos

  tasks:
    - name: get junos routes
      juniper_junos_command:
        commands:
          - "show route table inet.0"
        host: "{{junos_host}}"
      register: route_result

    - name: debug output
      debug:
        msg: "The subnet is {{route_result.stdout_lines[5][0:15]}},
             and the host route is: {{route_result.stdout_lines[7][0:16]}}"
关于ansible批量自动配置Juniper和ansible 批量配置ip的问题就给大家分享到这里,感谢你花时间阅读本站内容,更多关于ansible 002 连接被控端 inventory ansible.cfg ansible-adhoc ansible 原理、ansible(playbook)批量自动化部署nginx、ansible(playbook)批量自动化部署zabbix客户端、ansible之数据提取与Juniper实例演示等相关知识的信息别忘了在本站进行查找喔。
本文标签:


