本文将为您提供关于AntDesignVue照片墙a-upload的详细介绍,我们还将为您解释vue照片墙插件的相关知识,同时,我们还将为您提供关于ant-designvue的a-upload开发导入功
本文将为您提供关于Ant Design Vue照片墙a-upload的详细介绍,我们还将为您解释vue照片墙插件的相关知识,同时,我们还将为您提供关于ant -design vue的a-upload开发导入功能、Ant Design of Vue ——Upload 组件 —— 自定义上传行为、Ant Design Pro 使用更多 Ant Design of Vue 组件、Ant Design Pro的dva-loading的实用信息。
本文目录一览:- Ant Design Vue照片墙a-upload(vue照片墙插件)
- ant -design vue的a-upload开发导入功能
- Ant Design of Vue ——Upload 组件 —— 自定义上传行为
- Ant Design Pro 使用更多 Ant Design of Vue 组件
- Ant Design Pro的dva-loading
")
Ant Design Vue照片墙a-upload(vue照片墙插件)
<template>
    <div>
        {{ fileList }}

        <a-upload
            list-type="picture-card"
            v-model:file-list="fileList"
            @preview="handlePreview"
            @change="handleChange"
            :customrequest="customrequest"
        >
            <div v-if="fileList.length < 8">
                <plus-outlined />
                <div>Upload</div>
            </div>
        </a-upload>

        <!--
            回填
        -->
        <a-modal
            :visible="previewVisible"
            :footer="null"
            @cancel="handleCancel"
        >
            <img alt="example":src="previewImage" />
        </a-modal>

        <button @click="showWrite">回填</button>
    </div>
</template>
<script lang="ts">
import { PlusOutlined } from '@ant-design/icons-vue'
import { defineComponent,ref } from 'vue'

function getBase64(file: File) {
    return new Promise((resolve,reject) => {
        const reader = new FileReader()
        reader.readAsDataURL(file)
        reader.onload = () => resolve(reader.result)
        reader.onerror = error => reject(error)
    })
}

export default defineComponent({
    components: {
        PlusOutlined,},setup() {
        // 全屏预览状态
        const previewVisible = ref<boolean>(false)
        // 预览的照片
        const previewImage = ref<string | undefined>('')
        // 存放显示的图片数组集合
        const fileList: any = ref([])
        // 取消预览
        const handleCancel = () => {
            previewVisible.value = false
        }
        // 打开预览
        const handlePreview = async file => {
            if (!file.url && !file.preview) {
                file.preview = (await getBase64(file.originFileObj)) as string
            }
            previewImage.value = file.url || file.preview
            previewVisible.value = true
        }

        // customrequest 可以解决一个问题
        function customrequest(mess) {
            console.log(mess)
        }

        // 更改文件上传的的状态,将uploading状态更改为done完成状态哈
        function handleChange(mess) {
            mess.file.status = 'done'
        }

        // 模拟数据回填
        function showWrite() {
            fileList.value = [
                {
                    // uid: '-1',// name: 'image.png',// status: 'done',url: 'https://zos.alipayobjects.com/rmsportal/jkjgkEfvpUPVyRjUImniVslZfWPnJuuZ.png',{
                    // uid: '-2',]
        }
        return {
            previewVisible,previewImage,fileList,showWrite,handleCancel,handlePreview,customrequest,handleChange,}
    },})
</script>
<style>
/* you can make up upload button and sample style by using stylesheets */
.ant-upload-select-picture-card i {
    font-size: 32px;
    color: #999;
}

.ant-upload-select-picture-card .ant-upload-text {
    margin-top: 8px;
    color: #666;
}
</style>

ant -design vue的a-upload开发导入功能
前言
一个文件导入通常分为2部分:1.先上传文件给后台。2.后台返回的文件名称等数据通过导入接口成功导入。
涉及2个接口:上传、导入
本文设置了只能导入一个excel类型文件,不能多文件导入

上传代码
template部分:
这里限制了上传的时候,只显示.xlsx,.xls,.XLS,.XLSX类型文件
<a-upload :custom-request="handleUploadFile"
           name="file"
          :multiple="false"
          :headers="Uploadheaders"
          accept=".xlsx,.xls,.XLS,.XLSX"
          :file-list="fileList"
          :before-upload="beforeUpload"
          :remove="removeUpload">
          <a-button> <a-icon type="upload" /> 点击上传文件 </a-button>
</a-upload>
data部分:
fileList: [],
Uploadheaders: {
   ''Content-Type'': ''multiple/form-data''
},
methods部分:
//上传前的判断
beforeUpload (file, fileList) {
      console.log(file, fileList)
      if (fileList.length > 1) {//超过1个文件不上传
        return false
      }
    },
//自定义上传方法
    handleUploadFile (info) {
      this.fileList = [info.file]//设置一下,上传成功后会显示已上传的列表
      const form = new FormData()
      form.append(''file'', info.file)
      form.append(''contractName'', info.file.name)
      form.append(''description'', info.file.name)
      this.$http({
        url: ''这里是上传的url地址'',
        method: ''post'',
        headers: this.Uploadheaders,
        data: form
      }).then(res => {
        if (res.code == 200) {
          let data = {
            filename: res.filename,
            url: res.url
          }
          //上传成功后调用onSuccess,不然进度条会一直转圈
          info.onSuccess(data, info)
          //获取到上传后,后台返回的数据,给导入接口使用
          this.uploadedFile = data
        } else {
          //上传失败后调用onError方法,不然进度条会一直转圈
          info.onError(res)
        }
      }).catch((err) => {
        info.onError(err)
      })
    },
//删除
removeUpload () {
      this.fileList = []
    },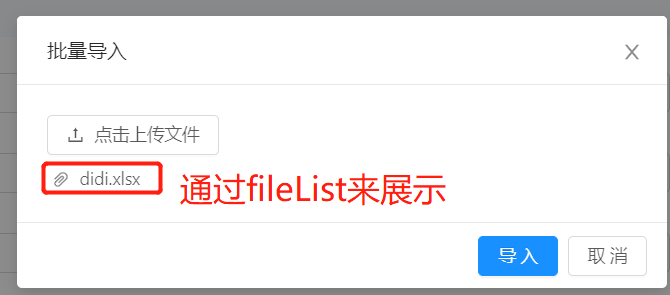
导入代码
上传成功后,后台给返回的数据已经存在了uploadedFile这里面,导入正常调用接口传入相关参数即可

Ant Design of Vue ——Upload 组件 —— 自定义上传行为

Ant Design Pro 使用更多 Ant Design of Vue 组件
- 因为 Ant Design Pro 是按需加载的,Ant Design of Vue 中的部分组件未默认引用,故需要手工添加到项目中。
- 这里以 Pagination 这个分页组件为例。首先在项目中找到文件 \src\core\lazy_lib\components_use.js
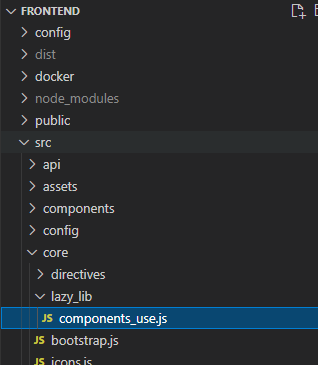
- 增加如下两个代码
import {
.....
// 增加
Pagination
} from ''ant-design-vue''
// 增加 Vue.use(Pagination) - 至此,页面中即可使用该组件

Ant Design Pro的dva-loading
loading为dva的插件,全局可用,它里面维护了一些布尔值,用于控制loading动画效果的显示与隐藏,通过@connect()来注入使用
官网介绍如下:
https://dvajs.com/

在AntD Pro里,官方示例了一些用法:
@connect(({ list, loading }) => ({
  list,
  loading: loading.models.list,
}))
class CardList extends PureComponent {

    ...

}
@connect(({ login, loading }) => ({
login,
submitting: loading.effects[''login/login''],
}))
class LoginPage extends Component {
...
}
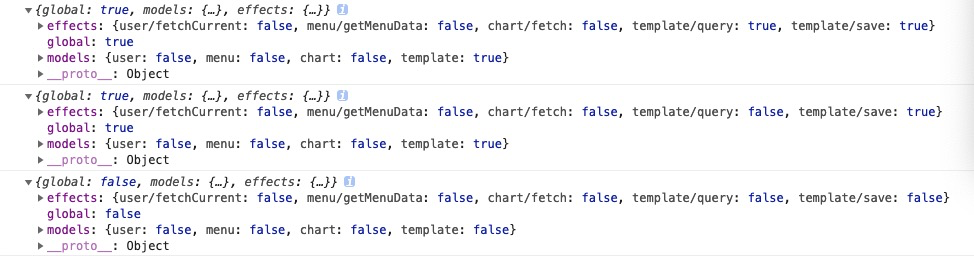
这里,展示了两种用法,在介绍之前,先打印整个loading出来看一看结构

这里解释一下用法:
当我们执行了dispatch({ type: ''query'', payload })后,这个叫做query的effects,以及包含这个effects的model,会被分别添加到loading的effects和models中,并受到监控,某effects获得结果,该effects的布尔值为false,只有该model所有的effects获得结果后,该model的布尔值为false,全局需要执行的effects均完毕,global才为false。(true:loading,false:loaded)
我连续执行两个dispatch,结果如下,请注意template的变化:
知道这些后,我们还要知道,Ant Design为我们提供了loading控制参数,例如Table的

有了这两件法宝,就可以放手loading,轻松做出一个体验不错的应用了,步骤一二三
@connect(({ template, loading }) => ({
  template,
  loading: loading,
}))

class Index extends Component {

 const tTableProps = {
      dataSource: list,
      loading: loading.effects[''template/query''],
    }

    ......

  return (
        <Table
            {...tableProps}
            columns={columns}
            simple
            rowKey={record => record.id}
            components={{
                body: { wrapper: CommonBody },
            }}
        />
    )

}
完。
原文出处:https://www.cnblogs.com/ww01/p/10412404.html
关于Ant Design Vue照片墙a-upload和vue照片墙插件的介绍现已完结,谢谢您的耐心阅读,如果想了解更多关于ant -design vue的a-upload开发导入功能、Ant Design of Vue ——Upload 组件 —— 自定义上传行为、Ant Design Pro 使用更多 Ant Design of Vue 组件、Ant Design Pro的dva-loading的相关知识,请在本站寻找。
本文标签:


