本文将带您了解关于Centos7编译安装Nginx的新内容,同时我们还将为您解释centos7编译安装lnmpphp5.6的相关知识,另外,我们还将为您提供关于CentOS6.0中编译安装Nginx、
本文将带您了解关于Centos7 编译安装 Nginx的新内容,同时我们还将为您解释centos7 编译安装lnmp php5.6的相关知识,另外,我们还将为您提供关于CentOS 6.0 中编译安装 Nginx、CentOS 7 编译安装 Nginx、centos 7 编译安装nginx --2、Centos 下编译安装 nginx的实用信息。
本文目录一览:- Centos7 编译安装 Nginx(centos7 编译安装lnmp php5.6)
- CentOS 6.0 中编译安装 Nginx
- CentOS 7 编译安装 Nginx
- centos 7 编译安装nginx --2
- Centos 下编译安装 nginx

Centos7 编译安装 Nginx(centos7 编译安装lnmp php5.6)
一、安装工具及依赖
yum -y install gcc gcc-c++ autoconf automake make
yum -y install zlib zlib-devel openssl openssl-devel pcre pcre-devel
这里很多依赖之前装 python3 时候装过,再试一遍也不会重复安装
二、下载及解压 nginx
wget http://nginx.org/download/nginx-1.12.2.tar.gztar –zxvf nginx-1.12.2.tar.gz进入解压后的文件夹
cd nginx-1.12.2/建立安装目录
vi /usr/local/nginx指定安装目录
./configure --prefix=/usr/local/nginx --with-http_stub_status_module --with-http_ssl_module --with-stream
#./configure --prefix=/usr/local/nginx
#带ssl  stub_status模块 添加strem模块 –with-stream,这样就能传输tcp协议了
#http_stub_status_module  状态监控
#http_ssl_module    配置https
#stream  配置tcp得转发
#http_gzip_static_module 压缩
#http_sub_module  替换请求
正常无错误后
#编译安装
make && make install安装成功后,会在./configure --prefix=/usr/local/nginx,指定的目录 /usr/local/nginx 创建 4 个 文件夹
#启动 nginx服务
/usr/local/nginx/sbin/nginx
#停止服务
/usr/local/nginx/sbin/nginx -s stop

#重启服务
/usr/local/nginx/sbin/nginx -s reload

#查看启动情况
ps -ef|grep nginx

#查看端口情况
netstat -ano|grep 80

#查看nginx版本
./sbin/nginx -V
三、配置防火墙
[root@localhost nginx-1.12.2]# firewall-cmd --zone=public --add-port=80/tcp --permanent
success

[root@localhost nginx-1.12.2]# firewall-cmd --reload
success
四、配置 nginx
打开配置文件
[root@localhost nginx-1.12.2]# vi /usr/local/nginx/conf/nginx.conf下面配置供参考
#user  nginx;
worker_processes  1;

#error_log  logs/error.log;
#error_log  logs/error.log  notice;
#error_log  logs/error.log  info;

#pid        logs/nginx.pid;


events {
    worker_connections  1024;
}

http {
    include       mime.types;
    default_type  application/octet-stream;

    log_format  main  ''$remote_addr - $remote_user [$time_local] "$request" ''
                      ''$status $body_bytes_sent "$http_referer" ''
                      ''"$http_user_agent" "$http_x_forwarded_for"'';

    #access_log  /var/log/nginx/access.log  main;

    sendfile        on;
    #tcp_nopush     on;

    keepalive_timeout  65;

    #gzip  on;
    gzip on; # 开启Gzip


    server {
        listen       80;
        server_name  localhost;

        location / {
            root   /opt/dist;
            index  index.html;
        }

    }
    server {
        listen       8000;
        server_name  localhost;

        location / {
            uwsgi_pass localhost:9090;
            include /usr/local/nginx/conf/uwsgi_params;
        }


    }

}
创建 nginx 启动命令脚本
vi /etc/init.d/nginx脚本内容
#! /bin/bash
# chkconfig: - 85 15
PATH=/usr/local/nginx
DESC="nginx daemon"
NAME=nginx
DAEMON=$PATH/sbin/$NAME
CONFIGFILE=$PATH/conf/$NAME.conf
PIDFILE=$PATH/logs/$NAME.pid
SCRIPTNAME=/etc/init.d/$NAME
set -e
[ -x "$DAEMON" ] || exit 0
do_start() {
$DAEMON -c $CONFIGFILE || echo -n "nginx already running"
}
do_stop() {
$DAEMON -s stop || echo -n "nginx not running"
}
do_reload() {
$DAEMON -s reload || echo -n "nginx can''t reload"
}
case "$1" in
start)
echo -n "Starting $DESC: $NAME"
do_start
echo "."
;;
stop)
echo -n "Stopping $DESC: $NAME"
do_stop
echo "."
;;
reload|graceful)
echo -n "Reloading $DESC configuration..."
do_reload
echo "."
;;
restart)
echo -n "Restarting $DESC: $NAME"
do_stop
do_start
echo "."
;;
*)
echo "Usage: $SCRIPTNAME {start|stop|reload|restart}" >&2
exit 3
;;
esac
exit 0
chmod a+x /etc/init.d/nginx #设置执行权限
chkconfig --add nginx #注册成服务
chkconfig nginx on #设置开机启动
或者
systemctl enable nginx启动 nginx
#启动nginx服务
service nginx start
#停止nginx服务
service nginx stop
#重启nginx服务
service nginx restart
#重新读取nginx配置(这个最常用, 不用停止nginx服务就能使修改的配置生效)
service nginx reload
大功告成,nginx 具体使用得单独深入学习,这里仅仅说明如何安装并且配置使用

CentOS 6.0 中编译安装 Nginx
环境
服务器:192.168.10.181
系统:CentOS 6.0
Nginx 版本:1.0.8
安装过程
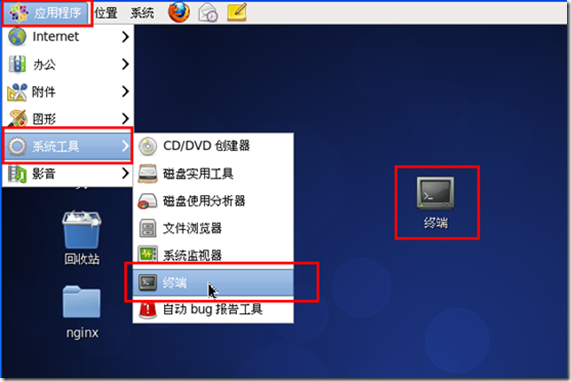
1、打开终端命令窗口(可以拖拽至桌面)

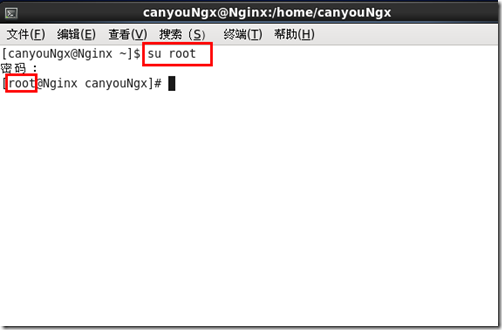
2、切换至 root 用户

3、安装 nginx 所依赖的包
[root@Nginx canyouNgx]# yum install gcc openssl-devel pcre-devel zlib-devel
4、创建 nginx 的用户和用户组
[root@Nginx canyouNgx]# groupadd nginx
[root@Nginx canyouNgx]# useradd nginx -g nginx
5、将 nginx 1.0.8 源码解压至桌面(下载地址 http://nginx.org/download/nginx-1.0.8.tar.gz)
[root@Nginx canyouNgx]# tar zxf nginx-1.0.8.tar.gz
[root@Nginx canyouNgx]# cd nginx-1.0.8/
6、编译安装前配置环境信息 (此处为一条命令语句)
[root@Nginx canyouNgx]# ./configure
--prefix=/usr \
--sbin-path=/usr/sbin/nginx \
--conf-path=/etc/nginx/nginx.conf \
--error-log-path=/var/log/nginx/error.log \
--pid-path=/var/run/nginx/nginx.pid \
--lock-path=/var/lock/nginx.lock \
--user=nginx \
--group=nginx \
--with-http_ssl_module \
--with-http_flv_module \
--with-http_gzip_static_module \
--with-http_stub_status_module \
--http-log-path=/var/log/nginx/access.log \
--http-client-body-temp-path=/var/tmp/nginx/client/ \
--http-proxy-temp-path=/var/tmp/nginx/proxy/ \
--http-fastcgi-temp-path=/var/tmp/nginx/fcgi/
7、编译安装
[root@Nginx canyouNgx]# make && make install
8、启动 nginx
[root@Nginx canyouNgx]# /usr/local/nginx/sbin/nginx
9、在浏览器中输入 http://localhost/ 测试安装成功

PS:
Centos 环境中有些时候需要手动添加 80 端口,外网才可以访问 Nginx

CentOS 7 编译安装 Nginx
CentOS 7 条件
教程中的步骤需要root用户权限。
1.安装所需环境
添加CentOS 7 Nginx yum资源库,打开终端,使用以下命令:
yum -y install gcc gcc-c++ autoconf pcre pcre-devel zlib zlib-devel openssl openssl-devel
2.安装Nginx
wget -c https://nginx.org/download/nginx-1.16.1.tar.gztar -zxvf nginx-1.16.1.tar.gzcd nginx-1.16.1./configure --with-http_ssl_modulemake && make installCentOS 7 开机启动Nginx
设置开机自动启动脚本
vi /lib/systemd/system/nginx.service
[Unit]
Description=The nginx HTTP and reverse proxy server
After=network.target

[Service]
Type=forking
PIDFile=/usr/local/nginx/nginx.pid
ExecStartPre=/usr/bin/rm -f /usr/local/nginx/nginx.pid
ExecStartPre=/usr/local/nginx/sbin/nginx -t
ExecStart=/usr/local/nginx/sbin/nginx
ExecStop=/usr/local/nginx/sbin/nginx -s quit
ExecReload=/bin/kill -s HUP $MAINPID
KillSignal=SIGQUIT
TimeoutStopSec=5
KillMode=process
PrivateTmp=true

[Install]
WantedBy=multi-user.target
修改权限
chmod +x /lib/systemd/system/nginx.service设置开机自启动
sudo systemctl enable nginx.service运行
systemctl start nginx.service启动并在浏览器查看,http://你服务器的ip
停止
systemctl stop nginx.service重新加载
systemctl restart nginx.service删除开机启动
systemctl disable nginx.service#TODO配置文件设置和添加功能
更多systemctl命令可查看《systemctl命令用法》
Nginx配置信息
网站文件存放默认目录
/usr/share/nginx/html
网站默认站点配置
/etc/nginx/conf.d/default.conf
自定义Nginx站点配置文件存放目录
/etc/nginx/conf.d/
Nginx全局配置
/etc/nginx/nginx.conf
在这里你可以改变设置用户运行Nginx守护程序进程一样,和工作进程的数量得到了Nginx正在运行,等等。
Linux查看公网IP
您可以运行以下命令来显示你的服务器的公共IP地址:
ip addr show eth0 | grep inet | awk ''{ print $2; }'' | sed ''s/\/.*$//''nginx优化
http://www.wjhsh.net/116970u-p-13686398.html
https://www.cnblogs.com/yueminghai/p/8657861.html
https://blog.csdn.net/u011957758/article/details/50959823
https://www.cnblogs.com/cheyunhua/p/10670070.html

centos 7 编译安装nginx --2
[1]在/etc/init.d/目录下编写脚本,名为Nginx,
如果运行有错误,主意:Nginx_config的路径,ngnx sbin目录修改正确
#!/bin/sh
#
## Nginx - this script starts and stops the Nginx daemon
# chkconfig:   - 85 15
# description:  Nginx is an HTTP(S) server, HTTP(S) reverse #               proxy and IMAP/POP3 proxy server
# processname: Nginx
# config:      /etc/Nginx/Nginx.conf
# config:      /etc/sysconfig/Nginx
# pidfile:     /var/run/Nginx.pid
# Source function library.
. /etc/rc.d/init.d/functions
# Source networking configuration.
. /etc/sysconfig/network
# Check that networking is up.
[ "$NETWORKING" = "no" ] && exit 0
#Nginx="/usr/sbin/Nginx"
Nginx="/usr/local/Nginx/sbin/Nginx"
prog=$(basename $Nginx)
Nginx_CONF_FILE=" /usr/local/Nginx/conf/Nginx.conf"
[ -f /etc/sysconfig/Nginx ] && . /etc/sysconfig/Nginx
lockfile=/var/lock/subsys/Nginx
make_dirs() {
   # make required directories
   user=`$Nginx -V 2>&1 | grep "configure arguments:.*--user=" | sed 's/[^*]*--user=\([^ ]*\).*/\1/g' -`
   if [ -n "$user" ]; then
      if [ -z "`grep $user /etc/passwd`" ]; then
         useradd -M -s /bin/nologin $user
      fi
      options=`$Nginx -V 2>&1 | grep 'configure arguments:'`
      for opt in $options; do
          if [ `echo $opt | grep '.*-temp-path'` ]; then
              value=`echo $opt | cut -d "=" -f 2`
              if [ ! -d "$value" ]; then
                  # echo "creating" $value
                  mkdir -p $value && chown -R $user $value
              fi
          fi
       done
    fi
}
start() {
    [ -x $Nginx ] || exit 5
    [ -f $Nginx_CONF_FILE ] || exit 6
    make_dirs
    echo -n $"Starting $prog: "
    daemon $Nginx -c $Nginx_CONF_FILE
    retval=$?
    echo
    [ $retval -eq 0 ] && touch $lockfile
    return $retval
}
stop() {
    echo -n $"Stopping $prog: "
    killproc $prog -QUIT
    retval=$?
    echo
    [ $retval -eq 0 ] && rm -f $lockfile
    return $retval
}
restart() {
    configtest || return $?
    stop
    sleep 1
    start
}
reload() {
    configtest || return $?
    echo -n $"Reloading $prog: "
    killproc $Nginx -HUP
    RETVAL=$?
    echo
}
force_reload() {
    restart
}
configtest() {
  $Nginx -t -c $Nginx_CONF_FILE
}
rh_status() {
    status $prog
}
rh_status_q() {
    rh_status >/dev/null 2>&1
}
case "$1" in
    start)
        rh_status_q && exit 0
        $1
        ;;
    stop)
        rh_status_q || exit 0
        $1
        ;;
    restart|configtest)
        $1
        ;;
    reload)
        rh_status_q || exit 7
        $1
        ;;
    force-reload)
        force_reload
        ;;
    status)
        rh_status
        ;;
    condrestart|try-restart)
        rh_status_q || exit 0
            ;;
    *)
        echo $"Usage: $0 {start|stop|status|restart|condrestart|try-restart|reload|force-reload|configtest}"
        exit 2
esac
[2]开启Nginx服务
chmod 755 /etc/init.d/Nginx
chkconfig --add Nginx

[3] Nginx启动,停止,无间隔重启
service Nginx start
service Nginx stop
service Nginx configtest
service Nginx reload

Centos 下编译安装 nginx
网上很多关于 linux 下源码安装 nginx 的教程了,这里就不多说了,下面给出一些帮助链接:
http://www.blogjava.net/cenly60/archive/2008/12/12/245965.html
http://wiki.nginx.org/InstallChs
关于 nginx,其实只要入了 nginx 的门,之后的事情就简单了!
今天关于Centos7 编译安装 Nginx和centos7 编译安装lnmp php5.6的介绍到此结束,谢谢您的阅读,有关CentOS 6.0 中编译安装 Nginx、CentOS 7 编译安装 Nginx、centos 7 编译安装nginx --2、Centos 下编译安装 nginx等更多相关知识的信息可以在本站进行查询。
本文标签:


