本文将介绍C#/NET定时器和Win32睡眠function都是不精确的的详细情况,特别是关于c#定时器触发的相关信息。我们将通过案例分析、数据研究等多种方式,帮助您更全面地了解这个主题,同时也将涉及
本文将介绍C#/NET定时器和Win32睡眠function都是不精确的的详细情况,特别是关于c#定时器触发的相关信息。我们将通过案例分析、数据研究等多种方式,帮助您更全面地了解这个主题,同时也将涉及一些关于Azure Function & AWS Function With C#、c# – MYSQL中不存在Canonical Function“EntityFunctions.TruncateTime”、com.sun.jna.win32.W32APIFunctionMapper的实例源码、CoProcessFunction 实战三部曲之三:定时器和侧输出的知识。
本文目录一览:- C#/NET定时器和Win32睡眠function都是不精确的(c#定时器触发)
- Azure Function & AWS Function With C#
- c# – MYSQL中不存在Canonical Function“EntityFunctions.TruncateTime”
- com.sun.jna.win32.W32APIFunctionMapper的实例源码
- CoProcessFunction 实战三部曲之三:定时器和侧输出
")
C#/NET定时器和Win32睡眠function都是不精确的(c#定时器触发)
对于下面的代码:
实际的间隔总是1014.01毫秒,而不是1000毫秒…
我也试过在C ++中使用System.Windows.Forms.Timer,System.Threading.Timer和WinAPI Sleep(int)函数,但是总是会增加14.01 ms。
Windows 8的系统时钟是确切的,但Windows API的.NET定时器和Sleep(int)函数都是不精确的。
如何在没有pipe理员权限的情况下初始化Windows套接字库
驱动器select框与Windows窗体中的图标
虚拟驱动器映射到程序
在两个窗体之间传递值
find“指定的模块找不到”
public partial class Form1 : Form { private long ticks; public Form1() { InitializeComponent(); } private void Form1_Load(object sender,EventArgs e) { System.Timers.Timer timer = new System.Timers.Timer(1000); // The actual interval is always 1014.01 ms ... // I've also tried to use System.Windows.Forms.Timer,System.Threading.Timer // and the WinAPI Sleep(int) function in C++,but the additional increase // of 14.01 ms always exists. timer.Elapsed += timer_Elapsed; timer.Start(); ticks = System.DateTime.Now.Ticks; } void timer_Elapsed(object sender,System.Timers.ElapsedEventArgs e) { textBox1.Text = Math.Round((e.SignalTime.Ticks - ticks) / 10000.0,2).ToString(); ticks = e.SignalTime.Ticks; } }
更新:
本地睡眠function(ReactOS):
// Call SleepEx with bAlertable = FALSE VOID WINAPI Kernel32.Sleep(IN DWORD dwMilliseconds) // Call NtDelayExecution with Alertable = bAlertable // and DelayInterval.QuadPart = dwMilliseconds * -10,000 DWORD WINAPI Kernel32.SleepEx(IN DWORD dwMilliseconds,IN BOOL bAlertable) // The syscall stub - call the kernel mode function NtDelayExecution directly NTSTATUS NTAPI Ntdll.NtDelayExecution(IN BOOLEAN Alertable,IN PLARGE_INTEGER DelayInterval) // Check for the access permissions of DelayInterval and then call KeDelayExecutionThread NTSYSCALLAPI NTSTATUS NTAPI Ntoskrnl.NtDelayExecution(IN BOOLEAN Alertable,IN PLARGE_INTEGER DelayInterval) // Core implement of the sleep/delay function NTKERNELAPI NTSTATUS NTAPI Ntoskrnl.KeDelayExecutionThread(IN KPROCESSOR_MODE WaitMode,IN BOOLEAN Alertable,IN PLARGE_INTEGER Interval OPTIONAL) { PKTIMER Timer; PKWAIT_BLOCK TimerBlock; PKTHREAD Thread = KeGetCurrentThread(); NTSTATUS WaitStatus; BOOLEAN Swappable; PLARGE_INTEGER OriginalDueTime; LARGE_INTEGER DueTime,NewDueTime,InterruptTime; ULONG Hand = 0; /* If this is a user-mode wait of 0 seconds,yield execution */ if (!(Interval->QuadPart) && (WaitMode != KernelMode)) { /* Make sure the wait isn't alertable or interrupting an APC */ if (!(Alertable) && !(Thread->ApcState.UserApcPending)) { /* Yield execution */ NtYieldExecution(); } } /* Setup the original time and timer/wait blocks */ OriginalDueTime = Interval; Timer = &Thread->Timer; TimerBlock = &Thread->WaitBlock[TIMER_WAIT_BLOCK]; /* Check if the lock is already held */ if (!Thread->WaitNext) goto WaitStart; /* Otherwise,we already have the lock,so initialize the wait */ Thread->WaitNext = FALSE; KxDelayThreadWait(); /* Start wait loop */ for (;;) { /* disable pre-emption */ Thread->Preempted = FALSE; /* Check if a kernel APC is pending and we're below APC_LEVEL */ if ((Thread->ApcState.KernelApcPending) && !(Thread->SpecialApcdisable) && (Thread->WaitIrql < APC_LEVEL)) { /* Unlock the dispatcher */ KiReleasedispatcherLock(Thread->WaitIrql); } else { /* Check if we have to bail out due to an alerted state */ WaitStatus = KiCheckAlertability(Thread,Alertable,WaitMode); if (WaitStatus != STATUS_WAIT_0) break; /* Check if the timer expired */ InterruptTime.QuadPart = KeQueryInterruptTime(); if ((ULONGLONG)InterruptTime.QuadPart >= Timer->DueTime.QuadPart) { /* It did,so we don't need to wait */ goto Nowait; } /* It didn't,so activate it */ Timer->Header.Inserted = TRUE; /* Handle Kernel Queues */ if (Thread->Queue) KiActivateWaiterQueue(Thread->Queue); /* Setup the wait information */ Thread->State = Waiting; /* Add the thread to the wait list */ KiAddThreadToWaitList(Thread,Swappable); /* Insert the timer and swap the thread */ ASSERT(Thread->WaitIrql <= disPATCH_LEVEL); KiSetThreadSwapBusy(Thread); KxInsertTimer(Timer,Hand); WaitStatus = (NTSTATUS)KiSwapThread(Thread,KeGetCurrentPrcb()); /* Check if were swapped ok */ if (WaitStatus != STATUS_KERNEL_APC) { /* This is a good thing */ if (WaitStatus == STATUS_TIMEOUT) WaitStatus = STATUS_SUCCESS; /* Return Status */ return WaitStatus; } /* Recalculate due times */ Interval = KiRecalculateDueTime(OriginalDueTime,&DueTime,&NewDueTime); } WaitStart: /* Setup a new wait */ Thread->WaitIrql = KeRaiseIrqlToSynchLevel(); KxDelayThreadWait(); KiAcquiredispatcherLockAtDpcLevel(); } /* We're done! */ KiReleasedispatcherLock(Thread->WaitIrql); return WaitStatus; Nowait: /* There was nothing to wait for. Did we have a wait interval? */ if (!Interval->QuadPart) { /* Unlock the dispatcher and do a yield */ KiReleasedispatcherLock(Thread->WaitIrql); return NtYieldExecution(); } /* Unlock the dispatcher and adjust the quantum for a no-wait */ KiReleasedispatcherLockFromDpcLevel(); KiAdjustQuantumThread(Thread); return STATUS_SUCCESS; } // Note that the Windows API Sleep(0) will also call NtYieldExecution(),refer to // the function Ntoskrnl.KeDelayExecutionThread above
.NET Sleep(1),Sleep(0),Yield()和empty语句的超时:
for (; ; ) { Stopwatch sw = Stopwatch.StartNew(); // Thread.Sleep(1); // between 36000 and 39000 // Thread.Sleep(0); // 2 or 3 Thread.Yield(); // 1 or 2 // empty statement // always 0 Console.WriteLine(sw.ElapsedTicks); sw.Restart(); }
秒表依赖于WinAPI函数QueryPerformanceCounter和QueryPerformanceFrequency:
static Stopwatch() { bool succeeded = SafeNativeMethods.QueryPerformanceFrequency(out Frequency); if(!succeeded) { IsHighResolution = false; Frequency = TicksPerSecond; tickFrequency = 1; } else { IsHighResolution = true; tickFrequency = TicksPerSecond; tickFrequency /= Frequency; } } public static long GetTimestamp() { if(IsHighResolution) { long timestamp = 0; SafeNativeMethods.QueryPerformanceCounter(out timestamp); return timestamp; } else { return DateTime.UtcNow.Ticks; } }
秒表是确切的,但既不DateTime.UtcNow.Ticks也不是Environment.TickCount是确切的:
// Stopwatch is extremely exact without Thread.Sleep,always 1000.00 ms // But the combination of Stopwatch + Thread.Sleep(1000) is inexact // Stopwatch is very exact with Thread.Sleep + a spin check,always 1000 ms thread = new Thread(() => { var setText = new Action<long>(t => textBox1.Text = Math.Round(t * 1000.0 / Stopwatch.Frequency,2).ToString()); var sw = Stopwatch.StartNew(); for (; ; ) { // In most cases 986 is exact enough,but very rarely it might produce // a "1001",so use 985 here Thread.Sleep(985); while (sw.ElapsedTicks < Stopwatch.Frequency) // Use Sleep(0) instead of Yield() or empty statement Thread.Sleep(0); // The actual interval is always 1000 ms instead of 1014.01 ms // The Invoke method must be used since Invokerequired is true Invoke(setText,sw.ElapsedTicks); sw.Restart(); } }); thread.Start(); // DateTime.UtcNow.Ticks and DateTime.Now.Ticks are both inexact with // Thread.Sleep + a spin check,still 1014.01 ms thread = new Thread(() => { var setText = new Action<long>(t => textBox1.Text = Math.Round((t - ticks) / 10000.0,2).ToString()); for (; ; ) { Thread.Sleep(985); while (DateTime.UtcNow.Ticks < ticks + 10000000) Thread.Sleep(0); var t = DateTime.UtcNow.Ticks; Invoke(setText,t); ticks = t; } }); thread.Start(); // Environment.TickCount is inexact with Thread.Sleep + a spin check,// still 1014 ms (int value) thread = new Thread(() => { var setText = new Action<int>(t => textBox1.Text = (t - msecs).ToString()); for (; ; ) { Thread.Sleep(985); while (Environment.TickCount < msecs + 1000) Thread.Sleep(0); var t = Environment.TickCount; Invoke(setText,t); msecs = t; } }); thread.Start(); private void Form1_FormClosed(object sender,FormClosedEventArgs e) { thread.Abort(); }
参考文献:
ReactOS的源代码
.NET 4.5 Update 1的官方参考资料来源
共享源CLI 2.0(用于本机function)
SwitchToThread / Thread.Yield与Thread.Sleep(0)与Thead.Sleep(1)
感谢大家的帮助!
允许Windows使用未经validation的发布者执行应用程序
Windbg可以显示线程名称吗?
运行具有最高权限的计划任务
Windows窗体.net框架中的位移控件
了解.NET应用程序内存大小
休眠会导致操作系统不安排线程,直到时间到了。 请注意,schedule!=运行。
调度只将线程添加到队列中,以便最终运行,但不总是立即运行。 例如,如果已经有一个线程正在运行,您仍然需要等待其时间片完成。 如果队列中有更高优先级的线程,那么它们也可以在它之前运行。
你永远不要指望Sleep()持续的时间恰好是你给它的时间量 – 至少只有这个时间量。
定时器的运行方式基本相同,但在等待排定时不要阻塞线程。
此外,您应该使用Environment.TickCount或Stopwatch来测量已用时间,而不是DateTime ,这受到系统时间更改的影响。
您可以调用timeBeginPeriod来加强计时器分辨率。 这也影响GetTickCount 。
请参阅为什么通过timeBeginPeriod增加定时器分辨率会影响功耗? 讨论为什么你可能不想这样做(当然不知道这是否会成为你关心的问题)。
为什么不使用秒表? 这是非常精确的MSDN秒表
如果您需要实时操作系统,则除了Windows桌面操作系统之外,您还需要查看其他位置。
例如: 实时操作系统列表
您的主要关键词是“多媒体定时器”。
您不应该依赖计时器/睡眠间隔进行时间敏感的计算 – 这绝不会是精确的。 您可以使用Ticks或其他高精度技术。 根据这个答案 ,在Windows 7上, Ticks分辨率是1ms。
在这里也可以看到更多的信息: 如何制作一个精确的小数点定时器?
Windows操作系统根本不是为这样的事情设计的。 这对任何支持上下文切换的操作系统都是一个小缺点。 如果您需要非常精确的时间安排,则需要使用嵌入式系统或设计用于执行此操作的操作系统。
有一些方法肯定会提高你想要产生的任何行为的时间精度,但最好是不可靠的。 在一天结束时,操作系统可以自由地强制上下文切换,这可能会随时延迟您的计时器。
维基百科有关于这个主题的更多信息: http : //en.wikipedia.org/wiki/Real-time_operating_system

Azure Function & AWS Function With C#
Using C# with Azure Functions
Two important prerequisites need to be met to build Azure Functions applications with C#:
- Have an active Microsoft Azure subscription. If you don’t have one already, you can create a free account.
- Get an Azure Storage account. If you don’t have this too, you can create a storage account by signing into the Azure portal.
As a C# developer, you are already familiar with the various tools for building your applications which include Visual Studio Code and Visual Studio IDE. Both tools help create applications with Azure Functions, depending on whichever one you are most comfortable with.
Let’s dig a little deeper into these two tools:

Visual Studio Code
Visual Studio Code is a lightweight but powerful code editor with different versions available for Windows, Linux, and MacOS.
To build apps for Azure functions, you will need to get Azure Tools for Visual Studio Code which will give you convenient commands through which you can access or create resources directly from the VS Code editor.
To set up Azure Tools, install the Azure Extension Pack by firing up your editor and navigating to the extension marketplace on the left side menu. The extension marketplace interface in VS Code should look like this:
When you are done with the setup of Azure for VS Code, login to Azure from the code editor by firing the Command Palette with the commands CTRL+Shift+P and typing “Azure: Login” in the text field that appears. Click the corresponding result that appears and a code will be generated by the editor with instructions on how to complete the process.
Another important extension if you will be developing in C# with VS Code is the C# for Visual Studio Code. As at the time of this writing, the extension supports basic debugging capabilities full details of which can be found here.
Visual Studio 2017 IDE
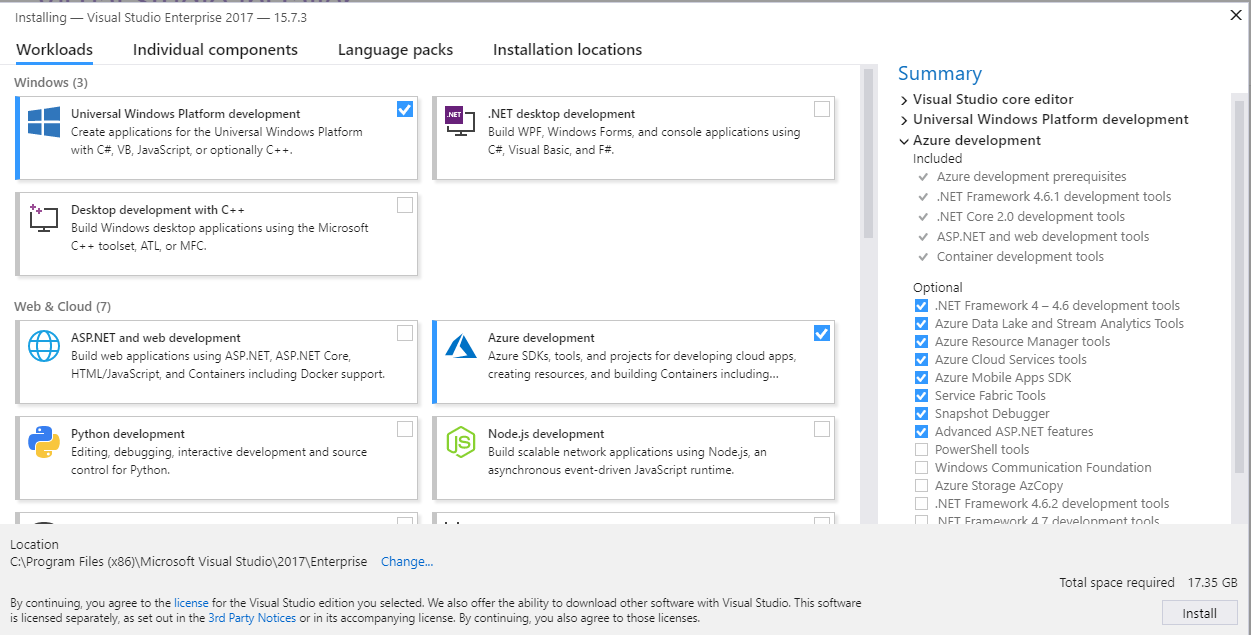
From version 15.5, Azure Development workload comes bundled with Azure Functions tools. This implies if you plan on installing the latest version of Visual Studio 2017, you need to include Azure Development workload in your installation process.
Your installation window should look like this:
Once installation is complete, sign in to your Microsoft account in Visual Studio and create a new Azure Functions project and you are good to go.
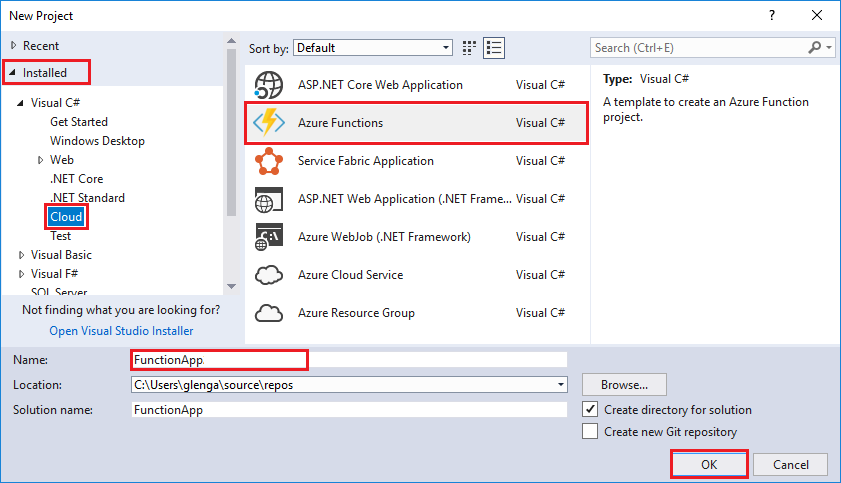
Image Source
Now that we’ve highlighted what you need to know if you want to build serverless functions in C# with Azure functions, let’s move over to discussing what you need to begin running serverless apps on the AWS Lambda serverless framework.

Using C# with AWS Lambda
AWS Lambda is the compute part of the AWS serverless architecture, but contains zero administration. It is one of the most popular options for serverless and though it was launched by AWS in 2014, support for the .NET Core 1.0 runtime was announced in 2016 and the .NET Core 2.0 runtime in 2018. At this point, it is important to note .NET Core is different from the .NET framework and here are a few reasons AWS chose .NET Core over the .NET framework:
- .NET Core is the new redesigned version of .NET that focuses on more modern applications and in particular, cloud-enabled applications which has significant benefits when writing Lambda functions
- .NET Core was designed with a modularized design which means you only get to include the part of .NET you will need when writing your Lambda functions. This leads to lesser memory usage and since Lambda charges you for memory usage, lesser memory demands by your functions will lead to lesser costs to you for using AWS Lambda.
- .NET Core is open-source and has been validated against Amazon Linux — the underlying platform for AWS Lambda making it very possible for AWS to respond to security issues that might arise with using it.
- Lastly and more importantly, with .NET Core, you can now write your C# code on any platform as opposed to earlier days with .NET where you could write C# code on only Windows environments
To begin building Lambda functions in C# with Visual Studio you will need to understand AWS Lambda has a laid-down pattern for authoring code for your Lambda function. This pattern includes the following concepts:
- Handler - the handler function is a function called by AWS Lambda to begin execution of your Lambda function. AWS Lambda passes any input data into this function as the first parameter and passes a context object as a second parameter.
- Context Object - is the second parameter passed into the handler function and it provides information through which your code interacts with AWS Lambda.
- Logging - a good logging system is an important component of a well-written function. AWS Lambda writes these logs to CloudWatch Logs.
- Exceptions
Now that we know the framework for writing for AWS Lambda, let’s see how all this work together.
Writing C# Code for AWS Lambda with Visual Studio
A few prerequisites are required to begin writing code for Lambda functions:
- Have an AWS account. If you don’t have one, you can create an AWS account here
- Download and Install Visual Studio IDE 2017.
Note: older versions of Visual Studio will require an additional installation of .NET Core for Windows
- Download and Install the AWS Toolkit for Visual Studio
Once you’ve installed all prerequisites, open Visual Studio and fill in the AWS credentials on the Getting Started with the AWS Toolkit for Visual Studio window displayed next to the Start Page tab. The credentials (Access Key and Secret Key) can be gotten by following the instructions outlined in the window
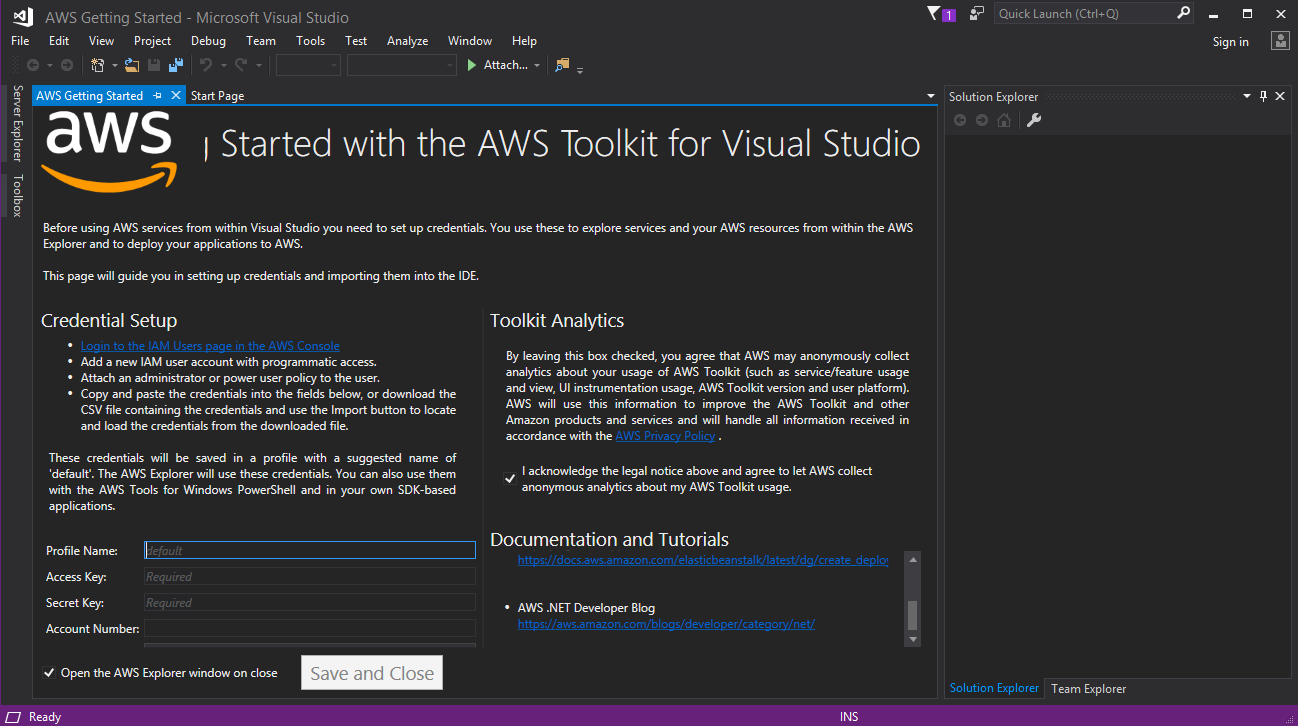
Image Source
With that all set, let’s move on to build our Lambda project.
Create a .NET Core Lambda Project
- Open Visual Studio IDE and go to File > New > Project
- On the Installed Pane, Click Visual C# and then AWS Lambda Project (.NET Core) as shown below:
- Fill out the project name with a name of your choice and click OK, leaving the defaults as they then move on to selecting the type of Lambda project you want to build.
- Click Finish to create the project and review the project code and structure.
- An important file created with your project is the aws-lambda-tools-defaults.json file where you set your function handler as well as other options. The contents of the file should look like this:
Publishing to AWS Lambda
The next step to running our code on AWS Lambda is to publish it. This is done after the code has been reviewed and you are convinced it is good to go. The following steps outline what you need to do to get your code published.
- On the right side, you can see the project. There in the Solution Explorer click Publish to AWS Lambda
- Next, fill in the Function Name in the Upload to AWS Lambda window that appears. You can give any preferred name to your function at this point. Once you are done, click Next.
- On the Advanced Function Details page, fill the Role Name section with a role associated with your AWS account. This is an important field to fill before we can proceed to the next stage of the upload process. Other sections include the VPC section (only useful if your function will be accessing resources on Amazon VPC) and the Environment section.
- Once your function begins uploading, a window is displayed showing the status of the upload after which a function view page is displayed where you can test your function and view logs respectively.
- The Invoke button begins testing the function while Log output displays output from the test. These logs are also saved into CloudWatch Logs in AWS where more details on the logs can be viewed.
Conclusion
Now, you have a quick peek into what you need to know to build and publish serverless applications with the powerful C# programming language. Though at Dashbird, we are more inclined towards AWS Lambda, there is nothing stopping you from exploring both the Microsoft Azure functions and AWS Lambda options in getting that serverless infrastructure for your applications.

c# – MYSQL中不存在Canonical Function“EntityFunctions.TruncateTime”
我正在尝试运行此查询:
DateTime DDate=DateTime.Today; //Today's date without Time
var v= db.measurements.Where(m => EntityFunctions.TruncateTime(m.InDate) == DDate);
它只返回那两个日期相等的对象,忽略时间部分.
但我收到:
{“FUNCTION [数据库] .TruncateTime不存在”}
堆栈跟踪:
at MysqL.Data.MysqLClient.MysqLStream.ReadPacket()
at MysqL.Data.MysqLClient.NativeDriver.GetResult(Int32& affectedRow,Int64& insertedId)
at MysqL.Data.MysqLClient.Driver.GetResult(Int32 statementId,Int32& affectedRows,Int64& insertedId)
at MysqL.Data.MysqLClient.Driver.NextResult(Int32 statementId,Boolean force)
at MysqL.Data.MysqLClient.MysqLDataReader.NextResult()
at MysqL.Data.MysqLClient.MysqLCommand.ExecuteReader(CommandBehavior behavior)
at MysqL.Data.Entity.EFMysqLCommand.ExecuteDbDataReader(CommandBehavior behavior)
at System.Data.Common.DbCommand.ExecuteReader(CommandBehavior behavior)
at System.Data.EntityClient.EntityCommandDeFinition.ExecuteStoreCommands(EntityCommand entityCommand,CommandBehavior behavior)
我正在使用:
> C#Visual Studio 2010
> EntityFramework 4数据库优先
> NetFramework 4
> MysqL Server 5.6
MysqL.Data和MysqL.Data.Entity的版本是6.6.5.0
TruncateTime is supported by MySQL.
Same thing happened to this person.
Create FUNCTION TruncateTime(dateValue DateTime) RETURNS date
return Date(dateValue);
它有效,但我不喜欢它.
这些人做了类似的事情:
Alternative to EntityFunctions.AddSeconds for MySQL
CurrentUtcDateTime does not exist – Entity Framework and MySql
所以现在我认为这可能是不必要的,我可以直接从数据库中调用它并仍然获取实体,如下所示:
var x = db.ExecuteStoreQuery
就这样.

com.sun.jna.win32.W32APIFunctionMapper的实例源码
WindowsShutdownManagerImpl() {
    // Use the Unicode versions of Win32 API calls
    Map<String,Object> m = new HashMap<>();
    m.put(OPTION_TYPE_MAPPER,W32APITypeMapper.UNICODE);
    m.put(OPTION_FUNCTION_MAPPER,W32APIFunctionMapper.UNICODE);
    options = Collections.unmodifiableMap(m);
}
/**
 * Returns the correct userDataFolder for the given application name.
 */
public static String defaultDirectory() {
    // default
    String folder = "." + File.separator;

    if (isMac()) {
        folder = System.getProperty("user.home") + File.separator + "Library" + File.separator
                 + "Application Support";
    } else if (isWindows()) {

        Map<String,Object> options = Maps.newHashMap();
        options.put(Library.OPTION_TYPE_MAPPER,W32APITypeMapper.UNICODE);
        options.put(Library.OPTION_FUNCTION_MAPPER,W32APIFunctionMapper.UNICODE);

        HWND hwndOwner   = null;
        int nFolder      = Shell32.CSIDL_LOCAL_APPDATA;
        HANDLE hToken    = null;
        int dwFlags      = Shell32.SHGFP_TYPE_CURRENT;
        char pszPath[]   = new char[Shell32.MAX_PATH];
        Shell32 instance = (Shell32) Native.loadLibrary("shell32",Shell32.class,options);
        int hResult      = instance.SHGetFolderPath(hwndOwner,nFolder,hToken,dwFlags,pszPath);
        if (Shell32.S_OK == hResult) {

            String path = new String(pszPath);
            int len     = path.indexOf('\0');
            folder      = path.substring(0,len);
        } else {
            System.err.println("Error: " + hResult);
        }
    }

    folder = folder + File.separator + "SpaceCubes" + File.separator;

    return folder;
}
WindowsShutdownManagerImpl() {
    // Use the Unicode versions of Win32 API calls
    Map<String,Object> m = new HashMap<String,Object>();
    m.put(OPTION_TYPE_MAPPER,W32APIFunctionMapper.UNICODE);
    options = Collections.unmodifiableMap(m);
}

CoProcessFunction 实战三部曲之三:定时器和侧输出
欢迎访问我的 GitHub
https://github.com/zq2599/blog_demos
内容:所有原创文章分类汇总及配套源码,涉及 Java、Docker、Kubernetes、DevOPS 等;
系列文章链接
- 基本功能
- 状态处理
- 定时器和侧输出
本篇概览
- 本文是《CoProcessFunction 实战三部曲》的终篇,主要内容是在 CoProcessFunction 中使用定时器和侧输出,对上一篇的功能进行增强;
- 回顾上一篇的功能:一号流收到 aaa 后保存在状态中,直到二号流收到 aaa,把两个 aaa 的值相加后输出到下游;
- 上述功能有个问题:二号流如果一直收不到 aaa,下游就一直没有 aaa 的输出,相当于进入一号流的 aaa 已经石沉大海了;
- 今天的实战就是修复上述问题:aaa 在一个流中出现后,10 秒之内如果出现在另一个流中,就像以前那样值相加,输出到下游,如果 10 秒内没有出现在另一个流,就流向侧输出,再将所有状态清理干净;
参考文章
- 理解状态:《深入了解 ProcessFunction 的状态操作 (Flink-1.10)》
- 理解定时器:《理解 ProcessFunction 的 Timer 逻辑》
梳理流程
- 为了编码的逻辑正确,咱们把正常和异常的流程先梳理清楚;
- 下图是正常流程:aaa 在一号流出现后,10 秒内又在二号流出现了,于是相加并流向下游:
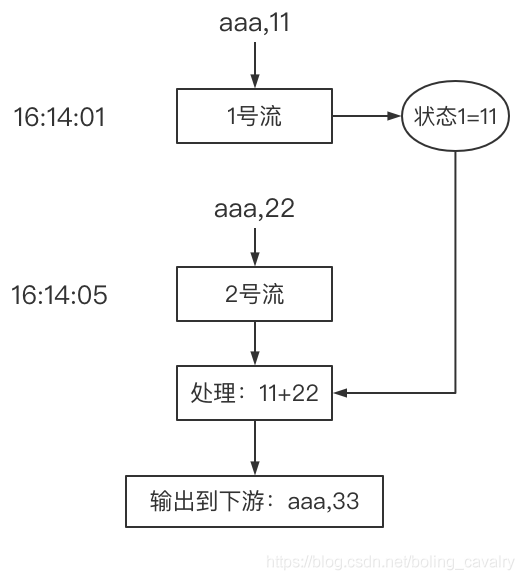
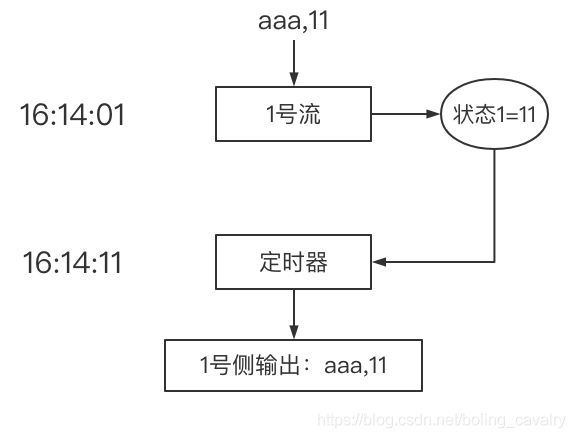
- 再来看异常的流程,如下图,一号流在 16:14:01 收到 aaa,但二号流一直没有收到 aaa,等到 10 秒后,也就是 16:14:11,定时器被触发,从状态 1 得知 10 秒前一号流收到过 aaa,于是将数据流向一号侧输出:
- 接下来编码实现上面的功能;
源码下载
如果您不想写代码,整个系列的源码可在 GitHub 下载到,地址和链接信息如下表所示 (https://github.com/zq2599/blog_demos):
| 名称 | 链接 | 备注 |
|---|---|---|
| 项目主页 | https://github.com/zq2599/blog_demos | 该项目在 GitHub 上的主页 |
| git 仓库地址 (https) | https://github.com/zq2599/blog_demos.git | 该项目源码的仓库地址,https 协议 |
| git 仓库地址 (ssh) | git@github.com:zq2599/blog_demos.git | 该项目源码的仓库地址,ssh 协议 |
这个 git 项目中有多个文件夹,本章的应用在 flinkstudy 文件夹下,如下图红框所示: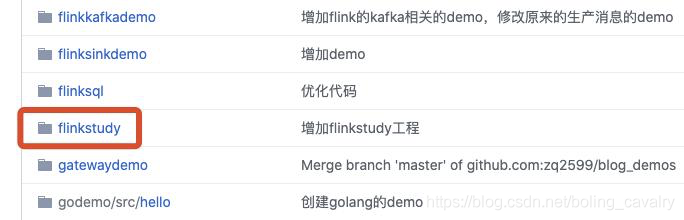
CoProcessFunction 的子类
前面的两篇实战中,CoProcessFunction 的子类都写成了匿名类,如下图红框:
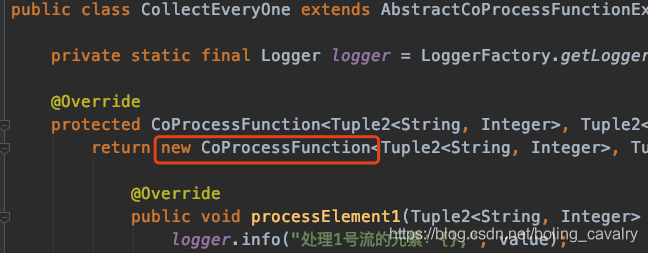
本文中,CoProcessFunction 子类会用到外部类的成员变量,因此不能再用匿名类了,新增 CoProcessFunction 的子类 ExecuteWithTimeoutCoProcessFunction.java,稍后会说明几个关键点:
package com.bolingcavalry.coprocessfunction;import com.bolingcavalry.Utils;import org.apache.flink.api.common.state.ValueState;import org.apache.flink.api.common.state.ValueStateDescriptor;import org.apache.flink.api.java.tuple.Tuple2;import org.apache.flink.configuration.Configuration;import org.apache.flink.streaming.api.functions.co.CoProcessFunction;import org.apache.flink.util.Collector;import org.apache.flink.util.OutputTag;import org.slf4j.Logger;import org.slf4j.LoggerFactory;/** * 实现双流业务逻辑的功能类 */public class ExecuteWithTimeoutCoProcessFunction extends CoProcessFunction<Tuple2<String, Integer>, Tuple2<String, Integer>, Tuple2<String, Integer>> { private static final Logger logger = LoggerFactory.getLogger(ExecuteWithTimeoutCoProcessFunction.class); /** * 等待时间 */ private static final long WAIT_TIME = 10000L; public ExecuteWithTimeoutCoProcessFunction(OutputTag<String> source1SideOutput, OutputTag<String> source2SideOutput) { super(); this.source1SideOutput = source1SideOutput; this.source2SideOutput = source2SideOutput; } private OutputTag<String> source1SideOutput; private OutputTag<String> source2SideOutput; // 某个key在processElement1中存入的状态 private ValueState<Integer> state1; // 某个key在processElement2中存入的状态 private ValueState<Integer> state2; // 如果创建了定时器,就在状态中保存定时器的key private ValueState<Long> timerState; // onTimer中拿不到当前key,只能提前保存在状态中(KeyedProcessFunction的OnTimerContext有API可以取到,但是CoProcessFunction的OnTimerContext却没有) private ValueState<String> currentKeyState; @Override public void open(Configuration parameters) throws Exception { // 初始化状态 state1 = getRuntimeContext().getState(new ValueStateDescriptor<>("myState1", Integer.class)); state2 = getRuntimeContext().getState(new ValueStateDescriptor<>("myState2", Integer.class)); timerState = getRuntimeContext().getState(new ValueStateDescriptor<>("timerState", Long.class)); currentKeyState = getRuntimeContext().getState(new ValueStateDescriptor<>("currentKeyState", String.class)); } /** * 所有状态都清理掉 */ private void clearAllState() { state1.clear(); state2.clear(); currentKeyState.clear(); timerState.clear(); } @Override public void processElement1(Tuple2<String, Integer> value, Context ctx, Collector<Tuple2<String, Integer>> out) throws Exception { logger.info("processElement1:处理元素1:{}", value); String key = value.f0; Integer value2 = state2.value(); // value2为空,就表示processElement2还没有处理或这个key, // 这时候就把value1保存起来 if(null==value2) { logger.info("processElement1:2号流还未收到过[{}],把1号流收到的值[{}]保存起来", key, value.f1); state1.update(value.f1); currentKeyState.update(key); // 开始10秒的定时器,10秒后会进入 long timerKey = ctx.timestamp() + WAIT_TIME; ctx.timerService().registerProcessingTimeTimer(timerKey); // 保存定时器的key timerState.update(timerKey); logger.info("processElement1:创建定时器[{}],等待2号流接收数据", Utils.time(timerKey)); } else { logger.info("processElement1:2号流收到过[{}],值是[{}],现在把两个值相加后输出", key, value2); // 输出一个新的元素到下游节点 out.collect(new Tuple2<>(key, value.f1 + value2)); // 删除定时器(这个定时器应该是processElement2创建的) long timerKey = timerState.value(); logger.info("processElement1:[{}]的新元素已输出到下游,删除定时器[{}]", key, Utils.time(timerKey)); ctx.timerService().deleteProcessingTimeTimer(timerKey); clearAllState(); } } @Override public void processElement2(Tuple2<String, Integer> value, Context ctx, Collector<Tuple2<String, Integer>> out) throws Exception { logger.info("processElement2:处理元素2:{}", value); String key = value.f0; Integer value1 = state1.value(); // value1为空,就表示processElement1还没有处理或这个key, // 这时候就把value2保存起来 if(null==value1) { logger.info("processElement2:1号流还未收到过[{}],把2号流收到的值[{}]保存起来", key, value.f1); state2.update(value.f1); currentKeyState.update(key); // 开始10秒的定时器,10秒后会进入 long timerKey = ctx.timestamp() + WAIT_TIME; ctx.timerService().registerProcessingTimeTimer(timerKey); // 保存定时器的key timerState.update(timerKey); logger.info("processElement2:创建定时器[{}],等待1号流接收数据", Utils.time(timerKey)); } else { logger.info("processElement2:1号流收到过[{}],值是[{}],现在把两个值相加后输出", key, value1); // 输出一个新的元素到下游节点 out.collect(new Tuple2<>(key, value.f1 + value1)); // 删除定时器(这个定时器应该是processElement1创建的) long timerKey = timerState.value(); logger.info("processElement2:[{}]的新元素已输出到下游,删除定时器[{}]", key, Utils.time(timerKey)); ctx.timerService().deleteProcessingTimeTimer(timerKey); clearAllState(); } } @Override public void onTimer(long timestamp, OnTimerContext ctx, Collector<Tuple2<String, Integer>> out) throws Exception { super.........关于C#/NET定时器和Win32睡眠function都是不精确的和c#定时器触发的问题我们已经讲解完毕,感谢您的阅读,如果还想了解更多关于Azure Function & AWS Function With C#、c# – MYSQL中不存在Canonical Function“EntityFunctions.TruncateTime”、com.sun.jna.win32.W32APIFunctionMapper的实例源码、CoProcessFunction 实战三部曲之三:定时器和侧输出等相关内容,可以在本站寻找。
本文标签:


