对于InstallingResinusingthe.debpackageonUbuntuandDebian感兴趣的读者,本文将会是一篇不错的选择,并为您提供关于2.2InstallingMySQLon
对于Installing Resin using the .deb package on Ubuntu and Debian感兴趣的读者,本文将会是一篇不错的选择,并为您提供关于2.2 Installing MySQL on Unix/Linux Using Generic Binaries、CentOS7 使用 Alien 将 RPM 从 DE 转换为 DEB 和 DEB 转换为 RPM 包、Debian 8 升级到 9 Debian 9 How to upgrade Debian 8 Jessie to Debian 9 Stretch、Debian 9 / Debian 10 / Ubuntu 18.04 / Ubuntu 18.10 快速开启 BBR 加速 或 关闭 BBR 加速的有用信息。
本文目录一览:- Installing Resin using the .deb package on Ubuntu and Debian
- 2.2 Installing MySQL on Unix/Linux Using Generic Binaries
- CentOS7 使用 Alien 将 RPM 从 DE 转换为 DEB 和 DEB 转换为 RPM 包
- Debian 8 升级到 9 Debian 9 How to upgrade Debian 8 Jessie to Debian 9 Stretch
- Debian 9 / Debian 10 / Ubuntu 18.04 / Ubuntu 18.10 快速开启 BBR 加速 或 关闭 BBR 加速

Installing Resin using the .deb package on Ubuntu and Debian
Installing Resin using the .deb package on Ubuntu and Debian
We provide a Debian packaged version of Resin that Debian and Ubuntu users can take advantage of. It performs all of the installation steps above for you and creates all the recommended server and content directories. Simply download from the Resin download page and install using dpkg.
Alternatively, you can add Caucho''s Debian repository to your system''s repositories to use automated update tools like Synaptic and apt-get. To do this, add the following line to your /etc/apt/sources.list
deb http://caucho.com/download/debian unstable multiverseAfter adding this line, update your local repository cache by running:
apt-get updateFinally, install Resin Professional using the following:
apt-get install resin-proIf you have a license file for Resin, save it in /usr/local/resin/licenses
Or install Resin Open Source with this command:
apt-get install resin
原文链接: http://blog.csdn.net/kimsoft/article/details/5676861

2.2 Installing MySQL on Unix/Linux Using Generic Binaries
2.2 Installing MySQL on Unix/Linux Using Generic Binaries
Oracle provides a set of binary distributions of MySQL. These include generic binary distributions in the form of compressed tar files (files with a .tar.gz extension) for a number of platforms, and binaries in platform-specific package formats for selected platforms.
This section covers the installation of MySQL from a compressed tar file binary distribution on Unix/Linux platforms. For other platform-specific binary package formats, see the other platform-specific sections in this manual. For example, for Windows distributions, see Section 2.3, “Installing MySQL on Microsoft Windows”. See Section 2.1.2, “How to Get MySQL” on how to obtain MySQL in different distribution formats.
MySQL compressed tar file binary distributions have names of the form mysql-, where VERSION-OS.tar.gzVERSION5.7.28), and OS indicates the type of operating system for which the distribution is intended (for example, pc-linux-i686 or winx64).
If you have previously installed MySQL using your operating system native package management system, such as Yum or APT, you may experience problems installing using a native binary. Make sure your previous MySQL installation has been removed entirely (using your package management system), and that any additional files, such as old versions of your data files, have also been removed. You should also check for configuration files such as /etc/my.cnf or the /etc/mysql directory and delete them.
For information about replacing third-party packages with official MySQL packages, see the related APT guide or Yum guide.
-
MySQL has a dependency on the
libaiolibrary. Data directory initialization and subsequent server startup steps will fail if this library is not installed locally. If necessary, install it using the appropriate package manager. For example, on Yum-based systems:shell> yum search libaio # search for info shell> yum install libaio # install library
Or, on APT-based systems:
shell> apt-cache search libaio # search for info
shell> apt-get install libaio1 # install library-
For MySQL 5.7.19 and later: Support for Non-Uniform Memory Access (NUMA) has been added to the generic Linux build, which has a dependency now on the
libnumalibrary; if the library has not been installed on your system, use you system''s package manager to search for and install it (see the last bullet for some sample commands).
To install a compressed tar file binary distribution, unpack it at the installation location you choose (typically /usr/local/mysql). This creates the directories shown in the following table.
Table 2.3 MySQL Installation Layout for Generic Unix/Linux Binary Package
| Directory | Contents of Directory |
|---|---|
bin |
mysqld server, client and utility programs |
docs |
MySQL manual in Info format |
man |
Unix manual pages |
include |
Include (header) files |
lib |
Libraries |
share |
Error messages, dictionary, and SQL for database installation |
support-files |
Miscellaneous support files |
SLES 11: as of MySQL 5.7.19, the Linux Generic tarball package format is EL6 instead of EL5. As a side effect, the MySQL client bin/mysql needs libtinfo.so.5.
A workaround is to create a symlink, such as ln -s libncurses.so.5.6 /lib64/libtinfo.so.5 on 64-bit systems or ln -s libncurses.so.5.6 /lib/libtinfo.so.5 on 32-bit systems.
Debug versions of the mysqld binary are available as mysqld-debug. To compile your own debug version of MySQL from a source distribution, use the appropriate configuration options to enable debugging support. See Section 2.9, “Installing MySQL from Source”.
To install and use a MySQL binary distribution, the command sequence looks like this:
shell> groupadd mysql
shell> useradd -r -g mysql -s /bin/false mysql
shell> cd /usr/local
shell> tar zxvf /path/to/mysql-VERSION-OS.tar.gz
shell> ln -s full-path-to-mysql-VERSION-OS mysql
shell> cd mysql
shell> mkdir mysql-files
shell> chown mysql:mysql mysql-files
shell> chmod 750 mysql-files
shell> bin/mysqld --initialize --user=mysql
shell> bin/mysql_ssl_rsa_setup
shell> bin/mysqld_safe --user=mysql &
# Next command is optional
shell> cp support-files/mysql.server /etc/init.d/mysql.serverThis procedure assumes that you have root (administrator) access to your system. Alternatively, you can prefix each command using the sudo (Linux) or pfexec (Solaris) command.
The mysql-files directory provides a convenient location to use as the value for the secure_file_priv system variable, which limits import and export operations to a specific directory. See Section 5.1.7, “Server System Variables”.
A more detailed version of the preceding description for installing a binary distribution follows.
Create a mysql User and Group
If your system does not already have a user and group to use for running mysqld, you may need to create them. The following commands add the mysql group and the mysql user. You might want to call the user and group something else instead of mysql. If so, substitute the appropriate name in the following instructions. The syntax for useradd and groupadd may differ slightly on different versions of Unix/Linux, or they may have different names such as adduser and addgroup.
shell> groupadd mysql
shell> useradd -r -g mysql -s /bin/false mysqlBecause the user is required only for ownership purposes, not login purposes, the useradd command uses the -r and -s /bin/false options to create a user that does not have login permissions to your server host. Omit these options if your useradd does not support them.
Obtain and Unpack the Distribution
Pick the directory under which you want to unpack the distribution and change location into it. The example here unpacks the distribution under /usr/local. The instructions, therefore, assume that you have permission to create files and directories in /usr/local. If that directory is protected, you must perform the installation as root.
shell> cd /usr/localObtain a distribution file using the instructions in Section 2.1.2, “How to Get MySQL”. For a given release, binary distributions for all platforms are built from the same MySQL source distribution.
Unpack the distribution, which creates the installation directory. tar can uncompress and unpack the distribution if it has z option support:
shell> tar zxvf /path/to/mysql-VERSION-OS.tar.gzThe tar command creates a directory named mysql-.VERSION-OS
To install MySQL from a compressed tar file binary distribution, your system must have GNU gunzip to uncompress the distribution and a reasonable tar to unpack it. If your tar program supports the z option, it can both uncompress and unpack the file.
GNU tar is known to work. The standard tar provided with some operating systems is not able to unpack the long file names in the MySQL distribution. You should download and install GNU tar, or if available, use a preinstalled version of GNU tar. Usually this is available as gnutar, gtar, or as tar within a GNU or Free Software directory, such as /usr/sfw/bin or /usr/local/bin. GNU tar is available from http://www.gnu.org/software/tar/.
If your tar does not have z option support, use gunzip to unpack the distribution and tar to unpack it. Replace the preceding tar command with the following alternative command to uncompress and extract the distribution:
shell> gunzip < /path/to/mysql-VERSION-OS.tar.gz | tar xvf -Next, create a symbolic link to the installation directory created by tar:
shell> ln -s full-path-to-mysql-VERSION-OS mysql
The ln command makes a symbolic link to the installation directory. This enables you to refer more easily to it as /usr/local/mysql. To avoid having to type the path name of client programs always when you are working with MySQL, you can add the /usr/local/mysql/bin directory to your PATH variable:
shell> export PATH=$PATH:/usr/local/mysql/bin
Perform Postinstallation Setup
The remainder of the installation process involves setting distribution ownership and access permissions, initializing the data directory, starting the MySQL server, and setting up the configuration file. For instructions, see Section 2.10, “Postinstallation Setup and Testing”.

CentOS7 使用 Alien 将 RPM 从 DE 转换为 DEB 和 DEB 转换为 RPM 包
我相信您已经知道,有很多方法可以在 Linux 中安装软件:使用您的发行版提供的软件包管理系统(aptitude,yum 或 zypper,举几个例子),从源代码编译(尽管有些这些天很少见,它是 Linux 早期唯一可用的方法,或者分别使用 dpkg 或 rpm 等低级工具和.deb 和.rpm 独立的预编译软件包。 
使用 Alien 将 RPM 转换为 DEB 和 DEB 转换为 RPM 包
在本文中,我们将向您介绍 alien,一种在不同 Linux 包格式之间进行转换的工具,使用.rpm 到.deb(反之亦然)是最常用的用法。
这个工具,即使它的作者不再维护它并在他的网站上说外星人总是可能保持实验状态,如果你需要某种类型的包但只能找到另一种包装格式的程序,它可以派上用场。
例如,当我为喷墨打印机寻找.deb 驱动程序时,外星人节省了我的一天,但却找不到 - 制造商只提供了一个.rpm 包。我安装了外星人,转换了包装,不久我就可以毫无问题地使用我的打印机了。
也就是说,我们必须澄清这个实用程序不应该用于替换重要的系统文件和库,因为它们在不同的发行版中设置不同。如果本文开头的建议安装方法不能满足所需程序的要求,请仅使用外星人作为最后的手段。
最后但并非最不重要的是,我们必须注意,尽管我们将在本文中使用 CentOS 和 Debian,但除了前两个发行版及其各自的系列之外,外星人也知道在 Slackware 甚至 Solaris 中工作。
第 1 步:安装外来和依赖项
要在 CentOS / RHEL 7 中安装外星人,您需要按顺序启用 EPEL 和 Nux Dextop(是的,它是 Dextop - 而不是桌面)存储库:
#yum install epel-release
#rpm --import http://li.nux.ro/download/nux/RPM-GPG-KEY-nux.ro

支持此存储库的最新版软件包目前为0.5(2015年8月10日发布)。您应该先检查http://li.nux.ro/download/nux/dextop/el7/x86_64/以查看是否有更新的版本,然后再继续:
#rpm -Uvh http://li.nux.ro/download/nux/dextop/el7/x86_64/nux-dextop-release-0-5.el7.nux.noarch.rpm
然后做,
#yum update && yum install alien
在 Fedora 中,您只需要运行最后一个命令。
在 Debian 和衍生品中,只需:
#aptitude安装外星人由于制作 rpm 包过程较为麻烦,此处使用 rpmrebuild 去将本机已安装好的 openvswitch 包进行重新打包,用于下次安装部署
# yum install rpmrebuild -y文件会生成于
第 2 步:从.deb 转换为.rpm 包
对于此测试,我们选择了 dateutils,它提供了一组日期和时间实用程序来处理大量的财务数据。我们将.deb 软件包下载到我们的 CentOS 7 盒子,将其转换为.rpm 并安装它:
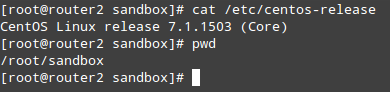
检查 CentOS 版本
#cat / etc / centos-release
#wget http://ftp.us.debian.org/debian/pool/main/d/dateutils/dateutils_0.3.1-1.1_amd64.deb
#alien --to-rpm --scripts dateutils_0.3.1-1.1_amd64.deb
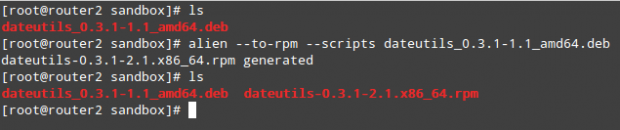
在 Linux 中将.deb 转换为.rpm 包
重要 :(请注意,默认情况下,alien 会增加目标包的版本次要编号。如果要覆盖此行为,请添加 - keep-version 标志)。
如果我们立即尝试安装软件包,我们将遇到一个小问题:

安装 RPM 包
要解决此问题,我们将启用 epel-testing 存储库并安装 rpmrebuild 实用程序以编辑要重建的程序包的设置:
#yum --enablerepo = epel-testing 安装 rpmrebuild
然后跑,

#rpmrebuild -pe dateutils-0.3.1-2.1.x86_64.rpm

这将打开您的默认文本编辑器。转到该%files部分并删除引用错误消息中提到的目录的行,然后保存文件并退出:
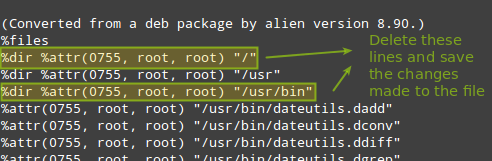
将.deb 转换为外星人版
当您退出该文件系统将提示您继续重建。如果你选择 Y.,则文件将重建到指定目录(不同于当前工作目录):
#rpmrebuild -pe dateutils-0.3.1-2.1.x86_64.rpm

构建 RPM 包
现在,您可以继续安装软件包并照常验证:
#rpm -Uvh /root/rpmbuild/RPMS/x86_64/dateutils-0.3.1-2.1.x86_64.rpm
#rpm -qa | grep dateutils

安装 Build RPM Package
最后,您可以列出 dateutils 中包含的各个工具,也可以检查各自的手册页:
#ls -l / usr / bin | grep dateutils
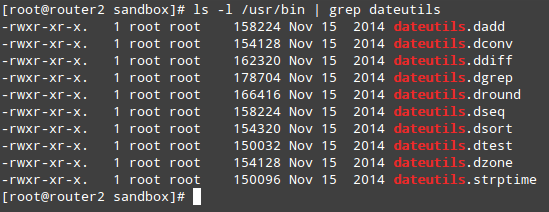
验证已安装的 RPM 包
第 3 步:从.rpm 转换为.deb 包
在本节中,我们将说明如何将.rpm 转换为.deb。在 32 位 Debian Wheezy 框中,让我们从 CentOS 6 操作系统下载 zsh shell 的.rpm 包存储库。请注意,默认情况下,Debian 和衍生产品中不提供此 shell。
#cat / etc / shells
#lsb_release -a | 尾巴-n 4
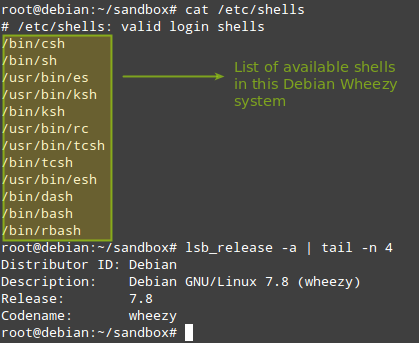
检查 Shell 和 Debian OS 版本
#wget http://mirror.centos.org/centos/6/os/i386/Packages/zsh-4.3.11-4.el6.centos.i686.rpm
#alien --to-deb --scripts zsh-4.3.11-4.el6.centos.i686.rpm
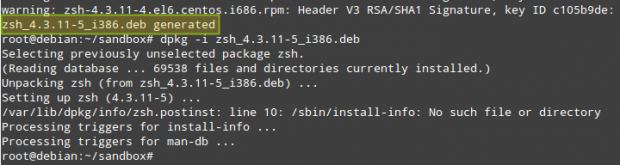
您可以放心地忽略有关丢失签名的消息:

将.rpm 转换为.deb 包
片刻之后,应该生成.deb 文件并准备安装:
#dpkg -i zsh_4.3.11-5_i386.deb
安装 RPM Converted Deb Package
安装后,您可以验证 zsh 是否已添加到有效 shell 列表中:
#cat / etc / shells
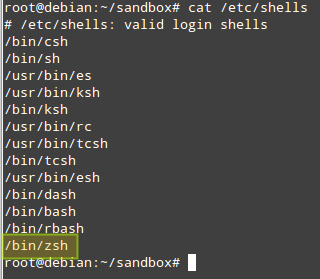
确认已安装的 Zsh 包
摘要
在本文中,我们已经解释了如何将.rpm 转换为.deb,反之亦然,以便在这些程序在存储库中不可用或作为可分发的源代码时,作为最后的手段安装软件包。你会想要为这篇文章添加书签,因为我们所有人都会在某个时候需要外星人。

Debian 8 升级到 9 Debian 9 How to upgrade Debian 8 Jessie to Debian 9 Stretch
How to upgrade Debian 8 Jessie to Debian 9 Stretch
-
- 1. Objective
- 2. What''s New
- 3. Preparations
- 4. Jessie Full Upgrade
- 5. Update Package Repository to Debian Stretch
- 6. Upgrade to Debian Stretch Simulation
- 7. Upgrade to Debian Stretch
Objective
This article explains a system upgrade procedure from Debian 8 Jessie Linux to Debian 9 Stretch.What''s New
Apart from the up to date Linux kernel, Stretch comes with a considerable amount of new and updated software as well as a number of packages had been rendered obsolete:This new release of Debian again comes with a lot more software than its predecessor jessie; the distribution includes over 15346 new packages, for a total of over 51687 packages. Most of the software in the distribution has been updated: over 29859 software packages (this is 57% of all packages in jessie). Also, a significant number of packages (over 6739, 13% of the packages in jessie) have for various reasons been removed from the distribution.
SOURCE: debian.org
Preparations
Given that the Debian is an extremely robust Linux distribution, combined with the fact that there is nothing certain in life, the chances are, that after the upgrade you may end up with a broken system. Therefore, it is necessary to point out that no system upgrade is bulletproof and you should discuss, prepare and possibly test any proper failover or recovery process prior the proposed system upgrade to Debian Stretch. The rule of thumb is, the less software installed on your system, the higher chance for a successful upgrade.The chances for a successful and fully functional upgrade are decreased by a number of 3rd-party packages installed on your current system. From this reason, remove any obsolete standard repository and 3rd-party software before you attempt the upgrade. The command which might be helpful here is:
# aptitude search ''~o''Perform a full backup of data and manual configuration files residing on your current system. For example, these may include but not limited to user home directories, databases, websites, etc. In case you run Debian Linux virtually take a snapshot just in case something goes wrong during the Stretch upgrade.
REFERENCE: debian.org
Jessie Full Upgrade
Before we move on with the upgrade, let''s fully upgrade our current Debian Jessie system:# apt-get update
# apt-get upgrade
# apt-get dist-upgrade# dpkg -C# apt-mark showholdOn Hold
will not be upgraded, which may cause inconsistencies after Stretch upgrade. Before you move to the next part, it is recommended to fix all issues produced by both above commands.
Update Package Repository to Debian Stretch
Now, that we have a current system fully upgraded, it is time to resynchronize the package index files with new Debian Stretch sources. This is done by editing/etc/apt/sources.list
file to include
Debian stretch package repository. First, make a backup the current
/etc/apt/sources.list:
# cp /etc/apt/sources.list /etc/apt/sources.list_backupapt edit-sources
or use your favourite text editor e.g.,
VIM
to modify a current
/etc/apt/sources.list
file to include stretch repositories. Simply update keyword
jessie
to
stretch.
Example:
deb https://mirrors.ustc.edu.cn/debian/ stretch main contrib non-free
deb-src https://mirrors.ustc.edu.cn/debian/ stretch main contrib non-free

deb https://mirrors.ustc.edu.cn/debian/ stretch-updates main contrib non-free
deb-src https://mirrors.ustc.edu.cn/debian/ stretch-updates main contrib non-free

deb https://mirrors.ustc.edu.cn/debian/ stretch-backports main contrib non-free
deb-src https://mirrors.ustc.edu.cn/debian/ stretch-backports main contrib non-free

deb https://mirrors.ustc.edu.cn/debian-security/ stretch/updates main contrib non-free
deb-src https://mirrors.ustc.edu.cn/debian-security/ stretch/updates main contrib non-freesed
command to automate this tedious task:
# sed -i ''s/jessie/stretch/g'' /etc/apt/sources.list/etc/apt/sources.list
file edit is completed, use
apt-get
command to update packages index:
# apt-get updateUpgrade to Debian Stretch Simulation
Before we hit the UPGRADE button, let''s useapt
command to see a preview of what we are facing. To do this execute
apt list --upgradable
command in order to get a quick survey of the number of packages to be installed, updated and removed without affecting the system.
# apt list --upgradableUpgrade to Debian Stretch
We have come to the most exciting part, which is the actual Jessie upgrade to Debian Stretch system. During the upgrade you may be asked:There are services installed on your system which need to be restarted when certain libraries, such as libpam, libc, and libssl, are upgraded. Since these restarts may cause interruptions of service for the system, you will normally be prompted on each upgrade for the list of services you wish to restart. You can choose this option to avoid being prompted; instead, all necessary restarts will be done for you automatically so you can avoid being asked questions on each library upgrade.The choice is about whether you wish the system to restart your services automatically during the system upgrade or you wish to do it manually or after the system is fully upgrade to Stretch. When ready, execute the bellow commands to commence the Debian Stretch upgrade process:
Restart services during package upgrades without asking?
# apt-get upgrade
# apt-get dist-upgrade
At this stage you should have your Jessie Debian Linux system fully upgraded to Debian Stretch. Follow, this guide to check your current Debian version. Once again check for obsolete packages so there are no surprises down the track:
# aptitude search ''~o''

Debian 9 / Debian 10 / Ubuntu 18.04 / Ubuntu 18.10 快速开启 BBR 加速 或 关闭 BBR 加速
如果使用的是 Debian 9、Debian 10、Ubuntu 18.04、Ubuntu 18.10 等内核高于 4.9 版本的系统,均可以使用此方法开启 BBR 加速,若你使用了 Ubuntu 19.04 的系统无需开启,系统默认就开启了。虽然 BBR 没有锐速那么暴力,但是兼容性和稳定性占优势,推荐大家使用。对与什么是 BBR 我就不详细说明了,这是一款由谷歌推出的 TCP 单边加速的拥塞控制算法。
开启 BBR
1. 修改 sysctl.conf 系统参数
echo "net.core.default_qdisc=fq" >> /etc/sysctl.conf
echo "net.ipv4.tcp_congestion_control=bbr" >> /etc/sysctl.conf
2. 保存并生效
sysctl -p得到返回值如下:(最后两行有就可以了)

3. 查看是否已开启 BBR
sysctl net.ipv4.tcp_available_congestion_control若得到返回值带有 bbr 则成功开启,如:

4. 检查 BBR 是否成功启动
lsmod | grep bbr如返回信息则表示已经成功开启:

如果不确定自己的系统是支持快速开启 bbr 可以查看使用下面的命令查看内核,只要 4.9 及以上版本均可直接开启:
uname -r
关闭 BBR
若想要关闭 bbr 加速也很简单,只需要将第二步的返回内容在 sysctl.conf 内删除或注释掉即可。
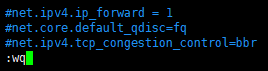
1. 修改配置文件
vi /etc/sysctl.conf进入配置文件,将添加的内容在最后,若找不到往下翻,按 i 键或 Insert 键开启编辑,注释或删除内容后,按 ESC 键退出编辑,键入
:wq保存并退出。
2. 保存配置
sysctl -p
3. 重启系统生效
reboot
3. 查看是否已关闭 BBR
sysctl net.ipv4.tcp_available_congestion_control
今天关于Installing Resin using the .deb package on Ubuntu and Debian的介绍到此结束,谢谢您的阅读,有关2.2 Installing MySQL on Unix/Linux Using Generic Binaries、CentOS7 使用 Alien 将 RPM 从 DE 转换为 DEB 和 DEB 转换为 RPM 包、Debian 8 升级到 9 Debian 9 How to upgrade Debian 8 Jessie to Debian 9 Stretch、Debian 9 / Debian 10 / Ubuntu 18.04 / Ubuntu 18.10 快速开启 BBR 加速 或 关闭 BBR 加速等更多相关知识的信息可以在本站进行查询。
本文标签:


