在本文中,我们将给您介绍关于InstallGPUTensorFlowFromSourcesw/Ubuntu16.04andCuda8.0的详细内容,此外,我们还将为您提供关于/etc/apt/sour
在本文中,我们将给您介绍关于Install GPU TensorFlow From Sources w/ Ubuntu 16.04 and Cuda 8.0的详细内容,此外,我们还将为您提供关于/etc/apt/sources.list 和 /etc/apt/sources.list.d、Azure ML Notebook:Tensorflow 未检测到 CUDA GPU、gpu 机器安装 nvidia-smi 和 python 的 tensorflow-gpu 模块、idea maven 下载源码出现:Cannot download sources Sources not found for: xxx的知识。
本文目录一览:- Install GPU TensorFlow From Sources w/ Ubuntu 16.04 and Cuda 8.0
- /etc/apt/sources.list 和 /etc/apt/sources.list.d
- Azure ML Notebook:Tensorflow 未检测到 CUDA GPU
- gpu 机器安装 nvidia-smi 和 python 的 tensorflow-gpu 模块
- idea maven 下载源码出现:Cannot download sources Sources not found for: xxx

Install GPU TensorFlow From Sources w/ Ubuntu 16.04 and Cuda 8.0
In this tutorial I will be going through the process of building the latest TensorFlow from sources for Ubuntu 16.04. TensorFlow Now supports using Cuda 8.0 & CuDNN 5.1 so you can use the pip’s from theirwebsitefor a much easier install. If you would like to install into a Anaconda environment the easiest method is to ‘conda install pip’ and just use the pip packages. If you prefer to build from sources using Ubuntu 14.04 pleasesee my other tutorial.
In order to use TensorFlow with GPU support you must have a Nvidia graphic card with a minimumcompute capabilityof 3.0.
Getting started I am going to assume you kNow some of thebasics of using a terminalin Linux.
Install required Packages
Open a terminal by pressing Ctrl + Alt + T
Paste each line one at a time (without the $) using Shift + Ctrl + V
$sudoapt-getinstallopenjdk-8-jdkgitpython-devpython3-devpython-numpypython3-numpybuild-essentialpython-pippython3-pippython-virtualenvswigpython-wheellibcurl3-dev
Update & Install Nvidia Drivers
You must also have the 367 (or later) NVidia drivers installed,this can easily be done from Ubuntu’s built in additional drivers after you update your driver packages.
$sudoadd-apt-repositoryppa:graphics-drivers/ppa
$sudoaptupdate
Once installed using additional drivers restart your computer. If you experience any troubles booting linux or logging in: try disabling fast & safe boot in your bios and modifying your grub boot options to enable nomodeset.
Install Nvidia Toolkit 8.0 & CudNN
Skip if not installing with GPU support
To install the Nvidia Toolkit download base installation .run file fromNvidiawebsite.MAKE SURE YOU SAY NO TO INSTALLING NVIDIA DRIVERS!Also make sure you select yes to creating a symbolic link to your cuda directory.
$cd~/Downloads#ordirectorytowhereyoudownloadedfile
$sudoshcuda_8.0.44_linux.run--override#holdstoskip
This will install cuda into:/usr/local/cuda
To install CudNN downloadcudNNv5.1 for Cuda 8.0 from Nvidia website and extract into/usr/local/cudavia:
$sudotar-xzvfcudnn-8.0-linux-x64-v5.1.tgz
$sudocpcuda/include/cudnn.h/usr/local/cuda/include
$sudocpcuda/lib64/libcudnn*/usr/local/cuda/lib64
$sudochmoda+r/usr/local/cuda/include/cudnn.h/usr/local/cuda/lib64/libcudnn*
Then update your bash file:
$gedit~/.bashrc
This will open yourbash filein a text editor which you will scroll to the bottom and add these lines:
exportLD_LIBRARY_PATH="$LD_LIBRARY_PATH:/usr/local/cuda/lib64:/usr/local/cuda/extras/CUPTI/lib64"
exportCUDA_HOME=/usr/local/cuda
Once you save and close the text file you can return to your original terminal and type this command to reload your .bashrc file:
$source~/.bashrc
Install Bazel
Instructions also onBazelwebsite
$echo"deb[arch=amd64]http://storage.googleapis.com/bazel-aptstablejdk1.8"|sudotee/etc/apt/sources.list.d/bazel.list$curlhttps://storage.googleapis.com/bazel-apt/doc/apt-key.pub.gpg|sudoapt-keyadd-
$sudoapt-getupdate
$sudoapt-getinstallbazel
$sudoapt-getupgradebazel
Clone TensorFlow
$cd~
$gitclonehttps://github.com/tensorflow/tensorflow
Configure TensorFlow Installation
$cd~/tensorflow
$./configure
Use defaults by pressing enter for all except:
Please specify the location of python. [Default is /usr/bin/python]:
For Python 2 use default or If you wish to build for Python 3 enter:
$/usr/bin/python3.5
Please input the desired Python library path to use. Default is [/usr/local/lib/python2.7/dist-packages]:
For Python 2 use default or If you wish to build for Python 3 enter:
$/usr/local/lib/python3.5/dist-packages
Unless you have a Radeon graphic card you can say no to OpenCL support. (has anyone tested this? ping me if so!)
Please specify the Cuda SDK version you want to use,e.g. 7.0. [Leave empty to use system default]:
$8.0
Please specify the Cudnn version you want to use. [Leave empty to use system default]:
$5
You can find the compute capability of your device at:https://developer.nvidia.com/cuda-gpus
If all was done correctly you should see:
INFO: All external dependencies fetched successfully.
Configuration finished
Build TensorFlow
Warning Resource Intensive I recommend having at least 8GB of computer memory.
If you want to build TensorFlow with GPU support enter:
$bazelbuild-copt--config=cuda//tensorflow/tools/pip_package:build_pip_package
Forcpu onlyenter:
$bazelbuild-copt//tensorflow/tools/pip_package:build_pip_package
Build & Install Pip Package
This will build the pip package required for installing TensorFlow in your /tmp/ folder
$bazel-bin/tensorflow/tools/pip_package/build_pip_package/tmp/tensorflow_pkg
To Install Using Python 3 (remove sudo if using a virtualenv)
$sudopip3install/tmp/tensorflow_pkg/tensorflow

#withnospacesaftertensorflowhittabbeforehittingentertofillinblanks
For Python 2 (remove sudo if using a virtualenv)
$sudopipinstall/tmp/tensorflow_pkg/tensorflow

#withnospacesaftertensorflowhittabbeforehittingentertofillinblanks
Test Your Installation
Close all your terminals and open a new terminal to test.
$python#orpython3
$importtensorflowastf
$sess=tf.InteractiveSession()
$sess.close()
TensorFlow also hasinstructionson how to do a basic test and a list of common installation problems.
There you have it,you should Now have TensorFlow installed on your computer. This tutorial was tested on a fresh install of Ubuntu 16.04 with a GeForce GTX 780 and a GTX 970m.
If you want to give your GPU a workout maybe try building a massive image classifier following thistutorial.
https://alliseesolutions.wordpress.com/2016/09/08/install-gpu-tensorflow-from-sources-w-ubuntu-16-04-and-cuda-8-0-rc/

/etc/apt/sources.list 和 /etc/apt/sources.list.d
转自:大数据云技术基础之Linux源:/etc/apt/sources.list文件
导读
1./etc/apt/sources.list的作用是什么?
2.为什么会产生 /etc/apt/sources.list.d?
3.deb http://cn.archive.ubuntu.com/ubuntu/ precise main restricted中precise main restricted该如何解析?
正文
一般源信息都存在这个文件中。但众多软件源都放在一个文件里实在有点乱,于是新版ubuntu也有了分类的方法:
目录 /etc/apt/sources.list.d/
在这个目录下,随便起名字, 只要以 list 为扩展名即可。比如google chrome 的源就放在了/etc/apt/sources.list.d/google-chrome.list 文件中。


>> cat google-chrome.list
deb http://dl.google.com/linux/chrome/deb/ stable mainsources.list 文件的解析:
deb http://cn.archive.ubuntu.com/ubuntu/ precise main restricted这句话到底怎么解释,对应着服务器上的什么目录呢?对应的是:
http://cn.archive.ubuntu.com/ubuntu/dists/precise/main
http://cn.archive.ubuntu.com/ubuntu/dists/precise/restricted
也就是说,解析规则是这样的 :
uri + "dists" + 版本信息 + 若干个分类
http://cn.archive.ubuntu.com/ubuntu/dists 这个目录下有若干目录,各个目录代表Ubuntu的版本
http://cn.archive.ubuntu.com/ubuntu/dists/precise/ 在precise这个版本目录下还有有若干目录,里面有

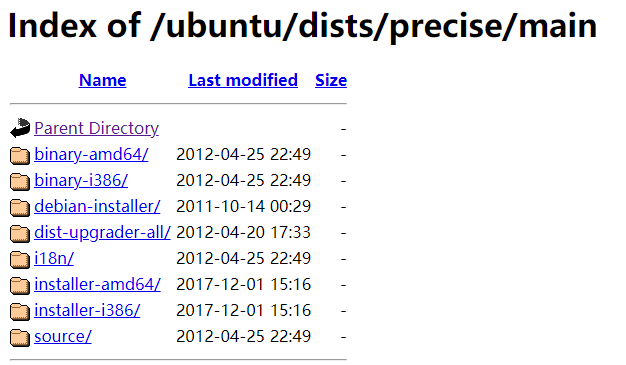
deb-src 会对应 source,deb 会对应 binary-xxx ,xxx就是arch,比如i386(32位)或是amd64(64位)。
比如想自己指定 arch,那就这么写:
deb [arch=amd64] http://cn.archive.ubuntu.com/ubuntu/ precise main restricted
则对应:
http://cn.archive.ubuntu.com/ubuntu/dists/precise/main/binary-amd64/
解析时会自动加上 "binary-"。另外这里坑爹的是,必须要加 [] ,不然就报错。
最后再罗嗦几句:
还是看 deb http://cn.archive.ubuntu.com/ubuntu/ precise main restricted
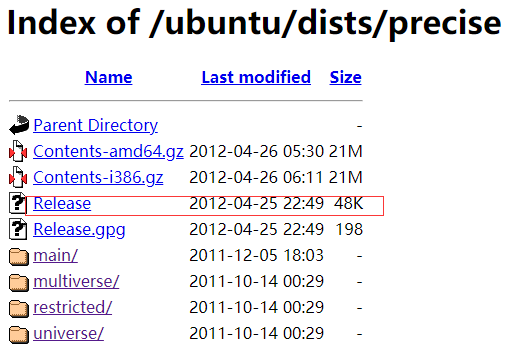
在 http://cn.archive.ubuntu.com/ubuntu/dists/precise 下应该存在 Release 文件,在这个文件中会有目录的详细信息
也就是说,你自己拼地址的时候,uri + version 要拼到一个有 Release 的目录,不然就会报错。
还有,Release文件如果和实际的目录结构不符(怪事年年有),那就要用前面说的 option 了,good lucky!
这个例子使用的是稳定的软件库。在实际中间,稳定的发行版本没有别的发行版本那么频繁地变化。所有最新的软件包都包含在Debian最新但尚不完善的不稳定(unstable)发行版本中。“不稳定”未必意味着软件包自身不稳定,而是整个发行版本的组成不稳定。每周更新的软件量一般超过100MB。
sources.list文件里的配置行按顺序逐行分析,所以从理论上说,您可以把unstable和testing行放在文件末尾,让stable(稳定)版本优先。这个方法的问题是,因为APT的依赖性延伸,一个不稳定的软件包会把它所依赖的所有软件包的不稳定更新版本都带进来。这些软件包接下来又可能会把自己所关联软件的不稳定版本再带进来,以此类推。一个老鼠坏了一锅汤,不要在您的生产系统上安装不稳定的软件包。
如果您必须把一个从unstable(不稳定)发行版本来的软件包加到您的生产环境中,正确的做法是使用一个“向后移植(backport)”的软件,即在稳定发布上重新编译它,让它同稳定的库链接。为了找到这些backport和其他细节,可检查位于www.apt-get.org的APT搜索引擎。在Norbert Tretkowski的站点www.backports.org上,能够找到许多向后移植的软件包(不只是给出链接)。在这个软件库中的向后移植软件包质量都很高,对外部的依赖性也最低。

Azure ML Notebook:Tensorflow 未检测到 CUDA GPU
如何解决Azure ML Notebook:Tensorflow 未检测到 CUDA GPU
我正在使用 Microsoft 的 Azure Notebooks 创建一个 ML 管道。我在使用 CUDA 和 Tensorflow 时遇到了很多麻烦,我似乎无法将它连接到 GPU。问题在于:
tf.test.gpu_device_name() 返回 ''''
即使所有其他指标似乎都表明存在 GPU 并且一切都已成功安装:
tf.test.is_built_with_cuda() 返回 true
!nvcc --version 返回
nvcc: NVIDIA (R) Cuda compiler drivercopyright (c) 2005-2019 NVIDIA CorporationBuilt on Sun_Jul_28_19:07:16_PDT_2019Cuda compilation tools,release 10.1,V10.1.243
!nvidia-smi 返回
Wed Jun 16 08:47:01 2021+-----------------------------------------------------------------------------+| NVIDIA-SMI 465.19.01 Driver Version: 465.19.01 CUDA Version: 11.3 ||-------------------------------+----------------------+----------------------+| GPU Name Persistence-M| Bus-Id disp.A | Volatile Uncorr. ECC || Fan Temp Perf Pwr:Usage/Cap| Memory-Usage | GPU-Util Compute M. || | | MIG M. ||===============================+======================+======================|| 0 NVIDIA Tesla K80 On | 00000001:00:00.0 Off | 0 || N/A 34C P8 34W / 149W | 0MiB / 11441MiB | 0% Default || | | N/A |+-------------------------------+----------------------+----------------------++-----------------------------------------------------------------------------+| Processes: || GPU GI CI PID Type Process name GPU Memory || ID ID Usage ||=============================================================================|| No running processes found |+-----------------------------------------------------------------------------+```
我使用的是 CUDA v 11.2 和 Tensorflow v 1.15.2。 我能够在 Colab 和 Paperspace 等其他云 GPU 服务提供商中轻松完成这项工作。
任何信息将不胜感激。
解决方法
根据Tensorflow 1.15.0的{{3}},兼容的CUDA版本是10。
由于它们之间不兼容,当您尝试使用 '''' 时,您会得到 tf.test.gpu_device_name()。
上述问题可以通过升级 Tensorflow 或根据测试的构建配置降级 CUDA 驱动程序来解决
Tensorflow

gpu 机器安装 nvidia-smi 和 python 的 tensorflow-gpu 模块
os: ubuntu14.04.4
python: 2.7.13
tensorflow-gpu: 1.4.1
cuda: 8.0.44-1
cudnn: cudnn-8.0-linux-x64-v6.0-tgz
1. 安装支持 gpu 设置的 tensorflow-gpu
pip install tensorflow-gpu==1.4.1 -i http://pypi.douban.com/simple --trusted-host pypi.douban.com
2. 安装 cuda
dpkg -i cuda-repo-ubuntu1404_10.0.130-1_amd64.deb
apt-key adv --fetch-keys http://developer.download.nvidia.com/compute/cuda/repos/ubuntu1404/x86_64/7fa2af80.pub
apt-get update
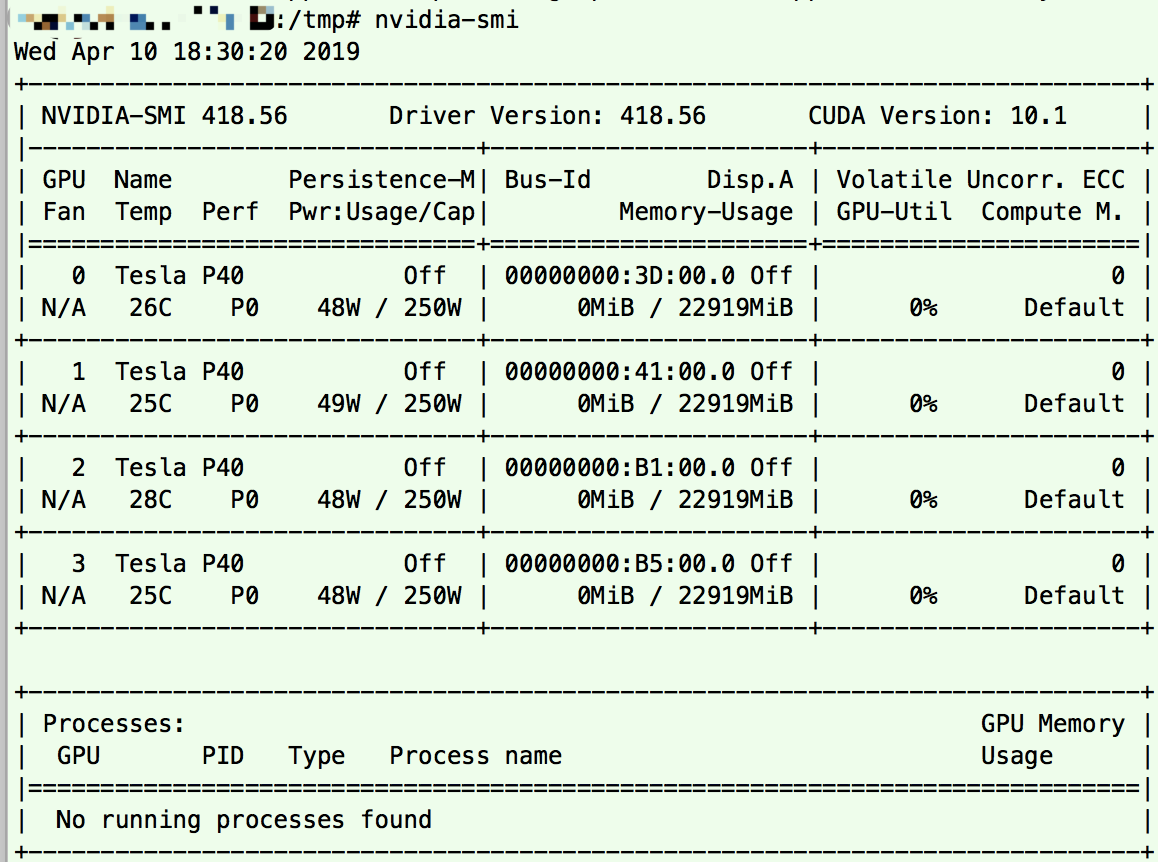
apt-get install cuda=8.0.44-1安装完 cuda,就有 nvidia-smi 命令可以在 shell 命令行查看 gpu 设备。因为 nvidia-418、nvidia-418-dev 这 2 个已经被当成依赖安装完成了。
当时因为碰到这个问题 https://devtalk.nvidia.com/default/topic/1048630/b/t/post/5322060/
解决思路来自 https://developer.nvidia.com/cuda-10.0-download-archive 选择操作系统、版本,下载 cuda-repo-ubuntu1404_10.0.130-1_amd64.deb。
3. 安装 cudnn
因为 libcudnn.so.6: cannot open shared object file: No such file or directory 这个报错
google 了一圈发现, 问题出在 TensorFlow 1.4-gpu 是基于 cuDNN6,需要的也就是 libcudnn.so.6 了。
解决方案:
到官网 https://developer.nvidia.com/cudnn 下载相应的 cudnn 库
tar xvzf cudnn-8.0-linux-x64-v6.0.tgz
cp -P cuda/include/cudnn.h /usr/local/cuda/include
cp -P cuda/lib64/libcudnn* /usr/local/cuda/lib64
chmod a+r /usr/local/cuda/include/cudnn.h /usr/local/cuda/lib64/libcudnn*
Now set Path variables
$ vim ~/.bashrc
翻到最底部加上:
export LD_LIBRARY_PATH="$LD_LIBRARY_PATH:/usr/local/cuda/lib64:/usr/local/cuda/extras/CUPTI/lib64"
export CUDA_HOME=/usr/local/cuda
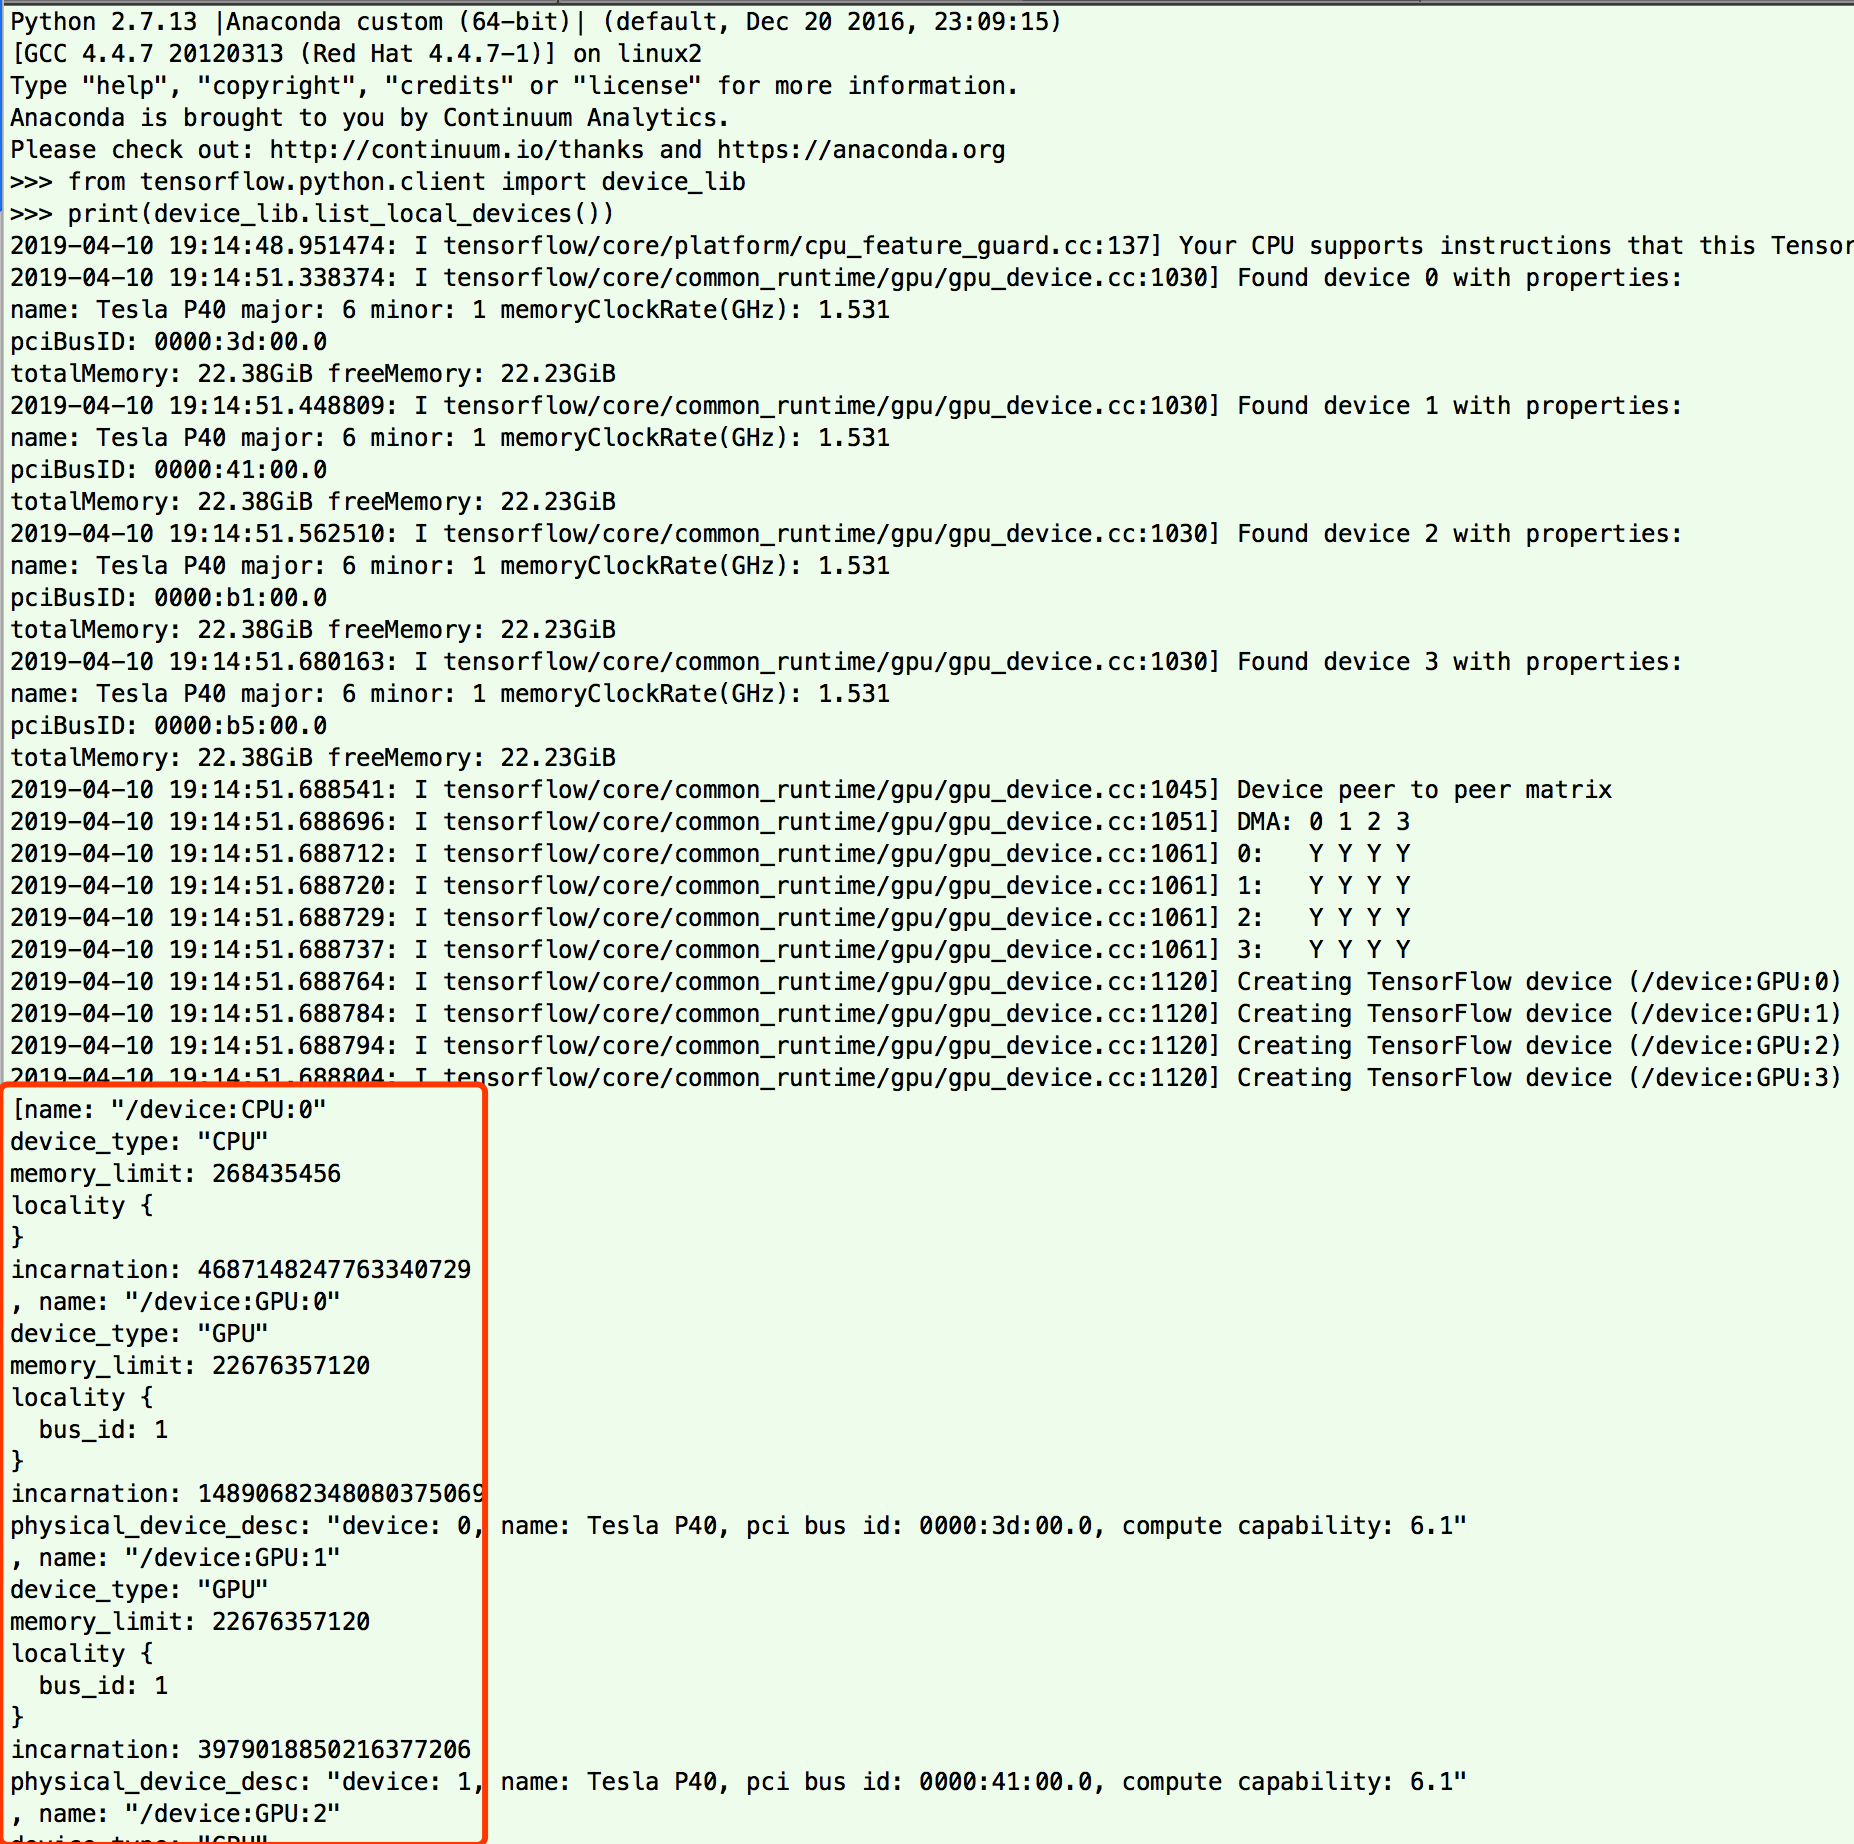
最后进去 python 命令行
from tensorflow.python.client import device_lib
print(device_lib.list_local_devices())
看看输出信息有没有显示 GPU 设备
另外如果 nvidia-smi 碰到以下报错,可以尝试重启 (反正我是这么解决的。。)
Failed to initialize NVML: Driver/library version mismatch

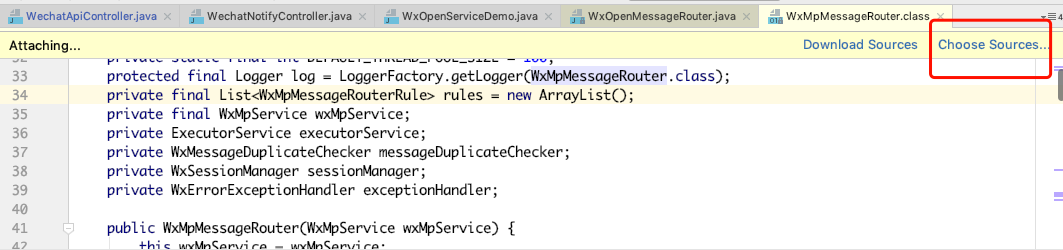
idea maven 下载源码出现:Cannot download sources Sources not found for: xxx
错误日志

解决方法:
在对应项目pom.xml所在目录下执行以下命令:
mvn dependency:resolve -Dclassifier=sources

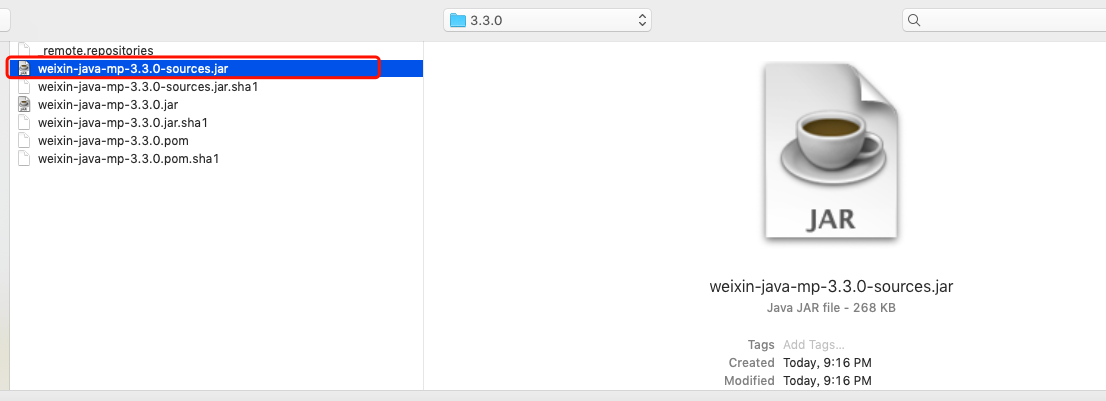
download完成后在idea反编译的class文件中选择下载的源码jar包:
关于Install GPU TensorFlow From Sources w/ Ubuntu 16.04 and Cuda 8.0的问题我们已经讲解完毕,感谢您的阅读,如果还想了解更多关于/etc/apt/sources.list 和 /etc/apt/sources.list.d、Azure ML Notebook:Tensorflow 未检测到 CUDA GPU、gpu 机器安装 nvidia-smi 和 python 的 tensorflow-gpu 模块、idea maven 下载源码出现:Cannot download sources Sources not found for: xxx等相关内容,可以在本站寻找。
本文标签:


