在本文中,我们将为您详细介绍创建安装源路径'/host_mnt/c/Users/xxx/redis.conf'时出错:mkdir/host_mnt/c/Users/xxx:权限被拒绝的相关知识,此外,
在本文中,我们将为您详细介绍创建安装源路径'/host_mnt/c/Users/xxx/redis.conf'时出错:mkdir / host_mnt / c / Users /xxx:权限被拒绝的相关知识,此外,我们还会提供一些关于13、hive 在启动 beeline 客户端时报错:User: xxx is not allowed to impersonate xxx、Android EditText手机号格式化输入XXX-XXXX-XXXX、C# Guid should contain 32 digits with 4 dashes (xxxxxxxx-xxxx-xxxx-xxxx-xxxxxxxxxxxx).、CentOS网卡显示为__tmpxxxxxxxx的有用信息。
本文目录一览:- 创建安装源路径'/host_mnt/c/Users/xxx/redis.conf'时出错:mkdir / host_mnt / c / Users /xxx:权限被拒绝
- 13、hive 在启动 beeline 客户端时报错:User: xxx is not allowed to impersonate xxx
- Android EditText手机号格式化输入XXX-XXXX-XXXX
- C# Guid should contain 32 digits with 4 dashes (xxxxxxxx-xxxx-xxxx-xxxx-xxxxxxxxxxxx).
- CentOS网卡显示为__tmpxxxxxxxx

创建安装源路径'/host_mnt/c/Users/xxx/redis.conf'时出错:mkdir / host_mnt / c / Users /xxx:权限被拒绝
我正在搜索与我的问题类似的问题,但尚未找到好的解决方案。我正在尝试建立我的环境。
我们必须设置的第一件事是portainer
docker run -d -p 9000:9000 portainer / portainer
然后我们尝试设置Redis
docker pull redis
启动
docker 容器 docker运行-d –name redis1 -v C:\ Users \ xxx \ docker \
redis.conf:/etc/redis.conf -p 6379:6379 redis:latest
但是接受这个:
C:\ Program Files \ Docker \ Docker \ Resources \ bin \
docker.exe:来自守护程序的错误响应:创建安装源路径’/host_mnt/c/Users/xxx/docker/redis.conf’时出错:mkdir
/ host_mnt / c /用户/ xxx:权限被拒绝。
我的设置信息
PS C:\> docker infoContainers: 3 Running: 1 Paused: 0 Stopped: 2Images: 3Server Version: 18.06.1-ceStorage Driver: overlay2 Backing Filesystem: extfs Supports d_type: true Native Overlay Diff: trueLogging Driver: json-fileCgroup Driver: cgroupfsPlugins: Volume: local Network: bridge host macvlan null overlay Log: awslogs fluentd gcplogs gelf journald json-file logentries splunk syslogSwarm: inactiveRuntimes: runcDefault Runtime: runcInit Binary: docker-initcontainerd version: 468a545b9edcd5932818eb9de8e72413e616e86erunc version: 69663f0bd4b60df09991c08812a60108003fa340init version: fec3683Security Options: seccomp Profile: defaultKernel Version: 4.9.93-linuxkit-aufsOperating System: Docker for WindowsOSType: linuxArchitecture: x86_64CPUs: 2Total Memory: 1.934GiBName: linuxkit-00155da11105ID: KNBR:IKUS:M4JG:3XNK:FAT6:UNJI:NIFE:HWUA:2KXY:ULVW:CIUW:E4THDocker Root Dir: /var/lib/dockerDebug Mode (client): falseDebug Mode (server): true File Descriptors: 28 Goroutines: 51 System Time: 2018-10-12T13:26:05.2128058Z EventsListeners: 1Registry: https://index.docker.io/v1/Labels:Experimental: falseInsecure Registries: 127.0.0.0/8Live Restore Enabled: false我已将共享权限授予我的计算机,我也是该计算机的管理员。我做错了什么?
答案1
小编典典我发现一种解决方法是创建一个新用户帐户,该帐户的用户名与您的AzureAD帐户相同,但没有AzureAD前缀。现在工作了!
https://tomssl.com/2018/01/11/sharing-your-c-drive-with-docker-for-windows-
when-using-azure-active-directory-azuread-
aad/

13、hive 在启动 beeline 客户端时报错:User: xxx is not allowed to impersonate xxx

转:
13、hive 在启动 beeline 客户端时报错:User: xxx is not allowed to impersonate xxx
-
背景
在启动完成 hive 服务:
hive --service metastore后启动 hive2 服务的过程中:
hive --service hiveserver2后启动 beeline 客户端时,
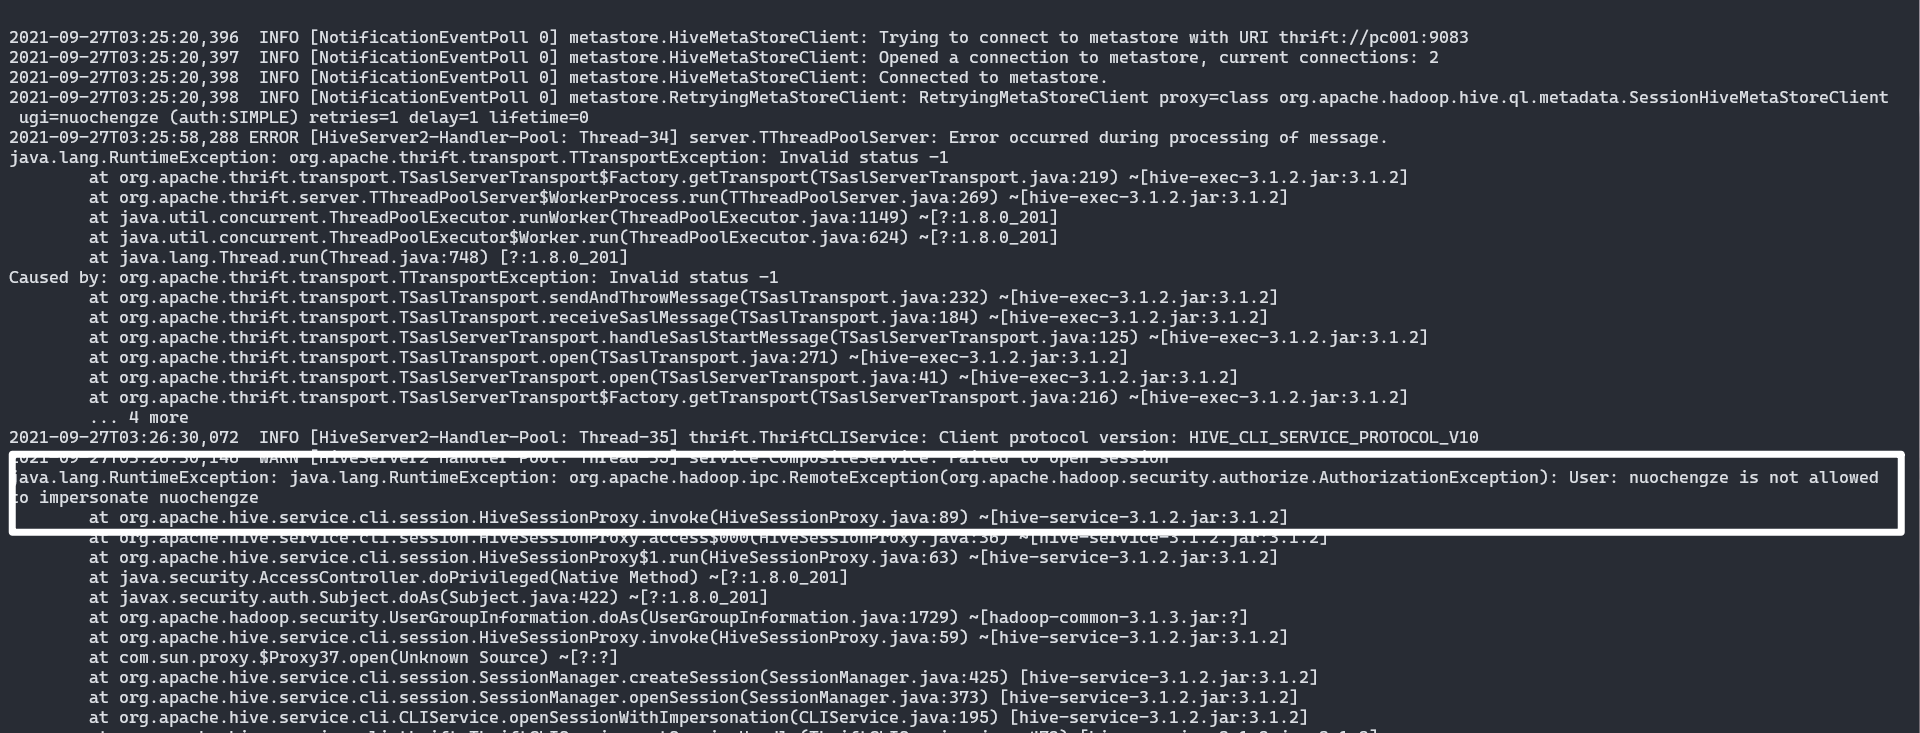
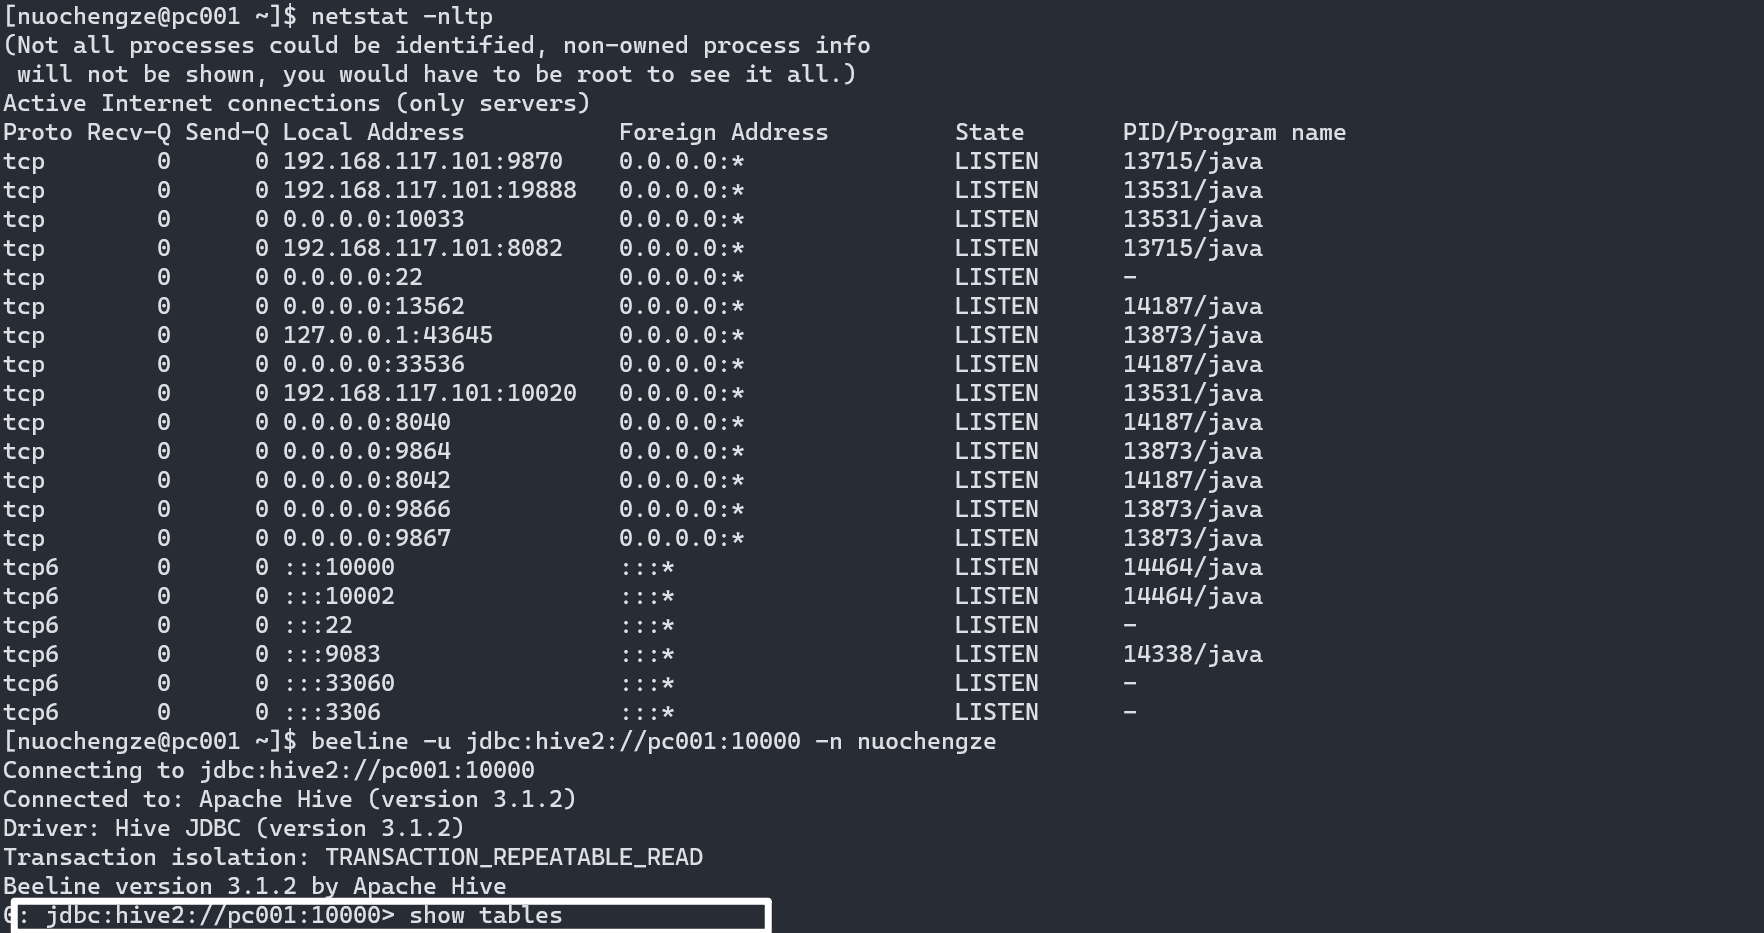
beeline -u jdbc:hive2://pc001:10000 -n nuochengze报错:
java.lang.RuntimeException: java.lang.RuntimeException: org.apache.hadoop.ipc.RemoteException(org.apache.hadoop.security.authorize.AuthorizationException): User: nuochengze is not allowed to impersonate nuochengze
-
分析
通过 hive 的 thrift 服务来实现跨语言访问 Hive 数据仓库,但是 hadoop 引入了一个安全伪装机制,使得 hadoop 不允许上层系统直接将实际用户传递到 hadoop 层,而是将实际用户传递给一个超级代理,由此代理在 hadoop 上执行操作,从而避免任意客户端随意操作 hadoop。
-
解决措施
在 hive-site.xml 中添加
       hive.server2.enable.doAs


       true
之后在 hadoop 的 core-site.xml 中添加
hadoop.proxyuser.yourusename.groups * hadoop.proxyuser.yourusename.hosts * -
效果
转:
13、hive 在启动 beeline 客户端时报错:User: xxx is not allowed to impersonate xxx
--Posted from Rpc

Android EditText手机号格式化输入XXX-XXXX-XXXX
先来效果图:

设置手机格式化操作只需要设置EditText的addTextChangedListener的监听,下面看代码
/*editText输入监听*/
        et_activity_up_login_phone.addTextChangedListener(new TextWatcher() {
            @Override
            public void beforeTextChanged(CharSequence charSequence, int i, int i1, int i2) {

            }

            @Override
            public void onTextChanged(CharSequence s, int start, int before, int count) {

                if (s == null || s.length() == 0) return;
                StringBuilder sb = new StringBuilder();
                for (int i = 0; i < s.length(); i++) {
                    if (i != 3 && i != 8 && s.charAt(i) == ''-'') {
                        continue;
                    } else {
                        sb.append(s.charAt(i));
                        if ((sb.length() == 4 || sb.length() == 9) && sb.charAt(sb.length() - 1) != ''-'') {
                            sb.insert(sb.length() - 1, ''-'');
                        }
                    }
                }
                if (!sb.toString().equals(s.toString())) {
                    int index = start + 1;
                    if (sb.charAt(start) == ''-'') {
                        if (before == 0) {
                            index++;
                        } else {
                            index--;
                        }
                    } else {
                        if (before == 1) {
                            index--;
                        }
                    }
                    et_activity_up_login_phone.setText(sb.toString());
                    et_activity_up_login_phone.setSelection(index);
                }
            }

            @Override
            public void afterTextChanged(Editable editable) {
                //获取没有-的手机号
                endPhone = et_activity_up_login_phone.getText().toString().replace("-", "");

                if (endPhone.length() == 11) {//如果最后的 号码为11位
                    //判断手机号是否正确
                    if (!Tool.isPhoneNum(endPhone)) {
                        Toast.makeText(UpLoginActivity.this, "请输入正确的手机号:" + endPhone, Toast.LENGTH_SHORT).show();
                    } else {
                        //改变获取验证码字体颜色
                        tv_activity_up_login_djs.setTextColor(Color.parseColor("#64aaff"));//高亮,可以点击
                        djsType = true;//设置验证码为可点击状态
                        tv_activity_up_login_djs.setClickable(true);
                    }
                }
            }
        });
    }
.")
C# Guid should contain 32 digits with 4 dashes (xxxxxxxx-xxxx-xxxx-xxxx-xxxxxxxxxxxx).
一、问题描述
在做C# 的 Guid 转换时,出现这个问题:Guid should contain 32 digits with 4 dashes (xxxxxxxx-xxxx-xxxx-xxxx-xxxxxxxxxxxx). 中文翻译是:guid应包含32位数字和4个破折号(XXXXXXXX-XXXX-XXXX-XXXX-XXXXXXXXXXX)。
二、解决方案
看我们转换的字符串是否满足这个条件:guid应包含32位数字和4个破折号(XXXXXXXX-XXXX-XXXX-XXXX-XXXXXXXXXXX),不满足修改满足即可!
三、案例
我在转换的时候,由于我需要转换的字符串,不满足guid的规则,才出现这个错误。
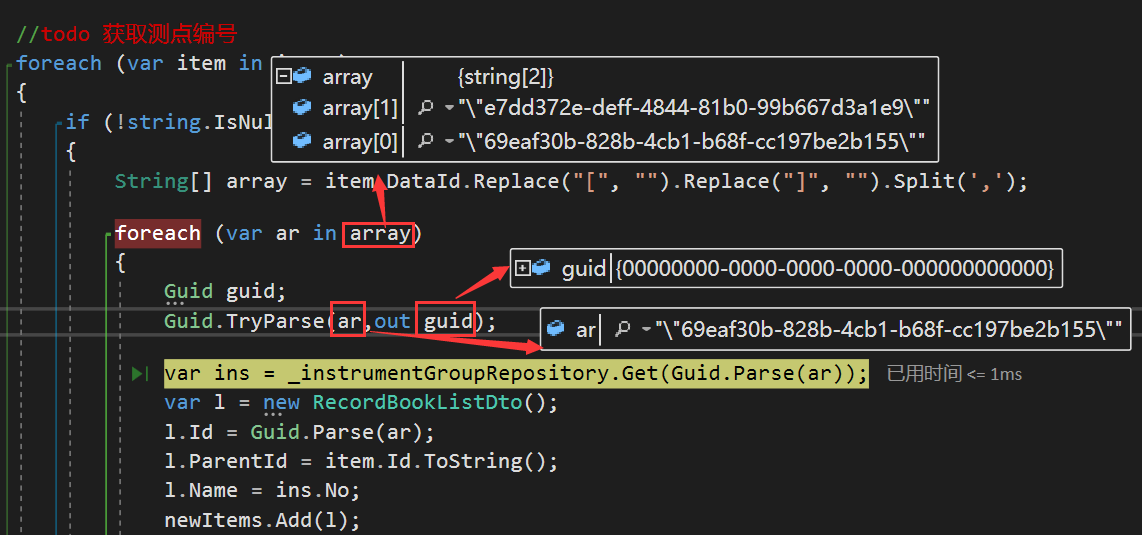
仔细观察,我需要转换的字符串,根本就不满足 guid 的特点,当我把 ar 中的 “ " ” 号去掉就可以了。
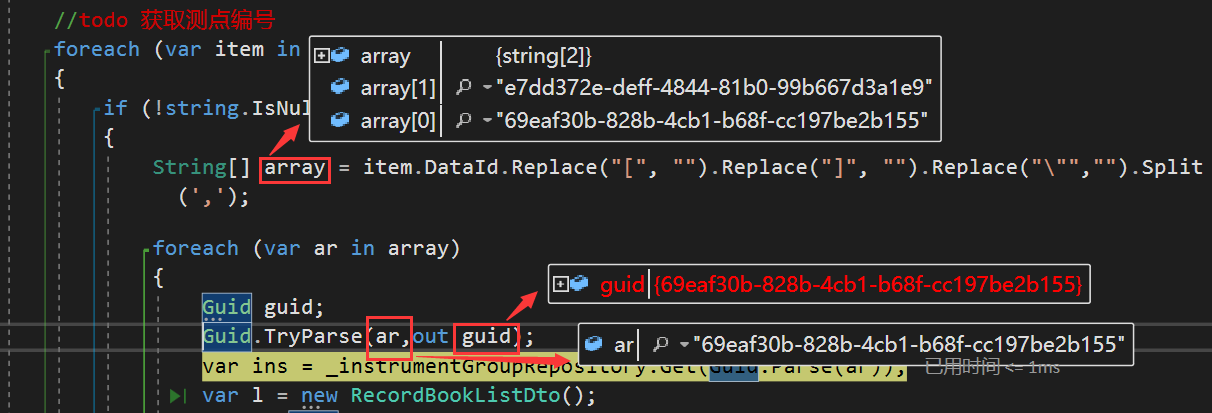
OK,转换完成!
---------------修改2019年05月09日---------------------
因为我的 DataId 本来就是一个Json 字符串,所以没有必要去使用 Replace() 、Split(),直接使用 JsonConvert 操作多好,所以我改为:
var items = JsonConvert.DeserializeObject<List<Guid>>(_recordBookRepository.Get(input.RecordBookId).DataId);让专业的方法,处理专业的事情,是否是最优解。
---------------修改2019年05月23日---------------------
判断 Guid 是否为空。
传入的参数:
/// <summary>
        /// id
        /// </summary>
        public Guid? StatGroupId { get; set; }
判断是否为空:
var boolStatGroup = input.StatGroupId.HasValue && input.StatGroupId != Guid.Empty;

CentOS网卡显示为__tmpxxxxxxxx
一台服务器做了2组端口绑定(bonding),其中一组bond总是不成功,发现少了eth0/eth5 两个网卡,后来通过ifconfig -a 发现多了两个__tmpxxx的网卡
ifconfig -a
__tmp1207132519 Link encap:Ethernet HWaddr E4:1F:13:F7:73:62
broADCAST MULTICAST MTU:1500 Metric:1
RX packets:57 errors:0 dropped:0 overruns:0 frame:0
TX packets:0 errors:0 dropped:0 overruns:0 carrier:0
collisions:0 txqueuelen:1000
RX bytes:3702 (3.6 KiB) TX bytes:0 (0.0 b)
Interrupt:217 Memory:94000000-94012800
__tmp1661989960 Link encap:Ethernet HWaddr 00:1B:21:B4:60:F2
broADCAST MULTICAST MTU:1500 Metric:1
RX packets:0 errors:0 dropped:0 overruns:0 frame:0
TX packets:0 errors:0 dropped:0 overruns:0 carrier:0
collisions:0 txqueuelen:1000
RX bytes:0 (0.0 b) TX bytes:0 (0.0 b)
Memory:d0080000-d0100000
经查询,这是一个bug,原因是MAC地址没有在配置文件中
DEVICE=eth0
BOOTPROTO=none
E4:1F:13:F7:73:62
ONBOOT=yes
MASTER=bond0
SLAVE=yes
添加如下:
HWADDR=00:1B:21:B4:60:F2
今天关于创建安装源路径'/host_mnt/c/Users/xxx/redis.conf'时出错:mkdir / host_mnt / c / Users /xxx:权限被拒绝的讲解已经结束,谢谢您的阅读,如果想了解更多关于13、hive 在启动 beeline 客户端时报错:User: xxx is not allowed to impersonate xxx、Android EditText手机号格式化输入XXX-XXXX-XXXX、C# Guid should contain 32 digits with 4 dashes (xxxxxxxx-xxxx-xxxx-xxxx-xxxxxxxxxxxx).、CentOS网卡显示为__tmpxxxxxxxx的相关知识,请在本站搜索。
本文标签:


