在这篇文章中,我们将为您详细介绍WebApp架构的内容,并且讨论关于webapp架构的相关问题。此外,我们还会涉及一些关于6.app架构基础、AndroidApplicationArchitectur
在这篇文章中,我们将为您详细介绍Web App架构的内容,并且讨论关于webapp架构的相关问题。此外,我们还会涉及一些关于6.app架构基础、Android Application Architecture 安卓APP架构[译]、Android APP架构思考、Apache web服务器(LAMP架构)的知识,以帮助您更全面地了解这个主题。
本文目录一览:- Web App架构(webapp架构)
- 6.app架构基础
- Android Application Architecture 安卓APP架构[译]
- Android APP架构思考
- Apache web服务器(LAMP架构)
")
Web App架构(webapp架构)
Web App 架构分为两种:一种是工程架构,一种是项目架构。
工程架构则主要有以下几个方面的内容:
1, 解放生产力,我们希望在开发项目的过程中把全部目光都放到书写业务代码上,不需要去考虑一些重复性的工作,如文件复制,浏览器刷新等内容。 这些重复性的劳动,我们希望构造工程帮我们解决掉。
2, 围绕枝术方案去搭建开发环境。开发webapp时,我们有很多技术方案可以选择,比如vue, react. 但是这些技术方案,它们都有各自特定的语法,如使用vue时,我们用.vue文件,使用react时我们用的是jsx , 而这些语法呢? 浏览器又都不支持。所以还要进行编译,编译成浏览器认识的js文件, 让它们能够在浏览器中运行。我们工程要解决的编译问题。
3, 保证项目质量。最基本的就是代码规范,每一个项目,每一个团队都会考虑定制一套代码规范。项目成员之间容易熟悉代码,看懂代码, 比如使用editor config, 其次就是提前发现我们代码中的bug , 如eslint配置. 最后就是代码提交,git commit 预处理, 代码中有错误,不能提交态码。
如果你用vue 或 react 开发过项目,你会发现,这不就是vue-cli或create-react-app 脚手架工具帮我们做的事情吗?确实是,但它们太通用了,有时候不满足我们特定项目的需求,所以还要进行修改,这就需要我们有工程架构的能力,需要学一下前端构建工具。说起前端构建工具,你可能听说过gulp, grunt, webpack 等,但现在应该是webpack的天下了,我们只要学习webpack 就可以了。
项目架构:考虑的是,业务代码如何分层, 更好地实现网页功能, 为将来项目的扩展性留有一定空间。
1, 技术选型。
要不要使用框架,使用哪一个框架? 这还是要根据需求的大小来决定的,平时我开发项目是使用的vue, 有一天接到一个需求是一个静态的宣传页面,附带有几个动态效果,相对简单一点,并且网上也有现成的实现方案,我就没有框架,直接Jq 就实现了,也挺快的。
对于框架来说,现在主要有三大框架,Angular, React, Vue,到底使用哪一个框架呢?其实,这三个框架从本质来说都一致了,都是组件化,虚拟DOM的思想,不同的只是三个框架的语法,三个框架各自编程的思想。所以具体使用哪个框架,就看你的熟练和掌握程度。
Angular 没有用过,不好评价,只是看过文章介绍,了解到它是一个大而全的框架,什么都给你提供好了,你不用选择用什么的问题。但是它的学习曲线比较陡峭,因为它首先用的就是TypeScript 语法,到现在,我也没有学习TypeScript.
React vue 都简单用过,相对于Angular的大而全,它们只是解决一个问题,就是视图层view。两者对比,Vue 简单一点。Vue 的语法简单, 它的模版和handlebars等模版语法很像,js 的书写,只要会ES5 完全没有问题。但React 就不一样了,它上来就是ES6 的class语法, 并且还发明了jsx 语法,在js中可以书写类html的语法,刚开始学的时候,也是比较难以入手, 学习React 之前,最好先学习,ES6 及 ES6+的语法。
React 和Vue 只解决视图的问题,那整个程序运行过程中的状态变化,要怎么处理? Vue 官方提供了vuex, React 官方并没有提供相应的状态管理,现有解决方案是Redux, 当然还有Mobx. 它们都是单向数据流的思想,只是实现方案不太一致。这种单向数据流的思想是最为重要的,确实和以前的开发大不一样,思想的的变化,确实需要时间,只能一点一点的去适应。相对而言,vuex 是相对好理解的,但我当时也花了1-2个月的时间才算是明白。Redux 则是函数式编程的思想,最主要的还有一个中间件的思想。Mobx也学了一点,但不知道它要实现的思想, 在项目中没有用过。
当涉及到单页应用的时候,vue 和React 都有相应的router, vue是vue-router, React则是React-router, 它们的不同点是vue-router使用的是配置文件,react-router 则是完全组件化的思想,但内部的思想都是一样的,学会一个,另外一个也就差不多了。
2, 整个项目文件的组织方式
在深入学习React 和Redux 一书中,它对此有过说明,对于组件化开发来说,按照功能角色进行组织比较合理,也就是把完成同一功能的代码放到一个目录下,这个目录包含实现该功能的各个角色的代码。在React中,不同的角色就是reducer, actions 和视图。拿TodoList 应用为例,它有两个功能就是TodoList 和Filter. 所以文件目录就可以如下组件
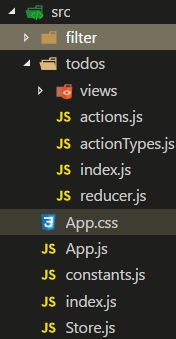
注意,每一个目录或功能模块下,都有一个index.js文件,它的主要作用是,把该模块下的所有角色都导入到该文件下,再统一导出,相当于给外界提供一个接口。当外界想使用这个功能模块时,只需要导入index.js 就可以了,我们模块内部的内容,它没有必要知道, 这样,即使我们模块内部做任何改动,只要保证index.js 暴露出去的接口不变,就没有任何问题。
不同的功能模块之间的依赖关系应该简单而清晰,也就是所谓的保持模块之间低耦合; 一个模块应该把它自己的功能封装好,让外界不要太依赖于自己内部的结构,这样不会因为内部的变化而影响外部模块的功能,这就是所谓高内聚。

6.app架构基础
【转载】作者:曾健生,公众号ID:appbackend
比目科技:http://click.bmob.cn/?sid=752c854d8a91772b828a
app架构,一个听起来高大尚的名字,很多小伙伴听到这个词语感觉很迷茫,不知道架构具体说的是啥?在q群里,"app后端应该怎么架构"这个问题被问了无数次。通过阅读本文,根据本人提出的一个通用的架构设计的框架,帮你踏入架构的大门!
在百度百科中,对架构的定义是:网站架构,一般认为是根据客户需求分析的结果,准确定位网站目标群体,设定网站整体架构,规划、设计网站栏目及其内容,制定网站开发流程及顺序,以最大限度地进行高效资源分配与管理的设计。
看到上面的解析,估计很多新手都会搞晕。
根据自己5年的互联网开发经验,为了帮助新手快速入门,特地提炼出一个通用的架构设计的框架:
1. 有什么业务
2. 遇到什么问题
3. 有什么可行的技术解决方案
掌握了以上架构设计的框架,有什么好处呢?
(1)不怕被别人的架构文章搞晕
当在网络上看到别人的架构分享时,套用这个架构的框架,问自己这3个问题:作者讲是在什么业务逻辑上,遇到哪些问题,采用了哪些技术解决方案。通过这个框架,能帮助你快速提炼出别人架构的核心点,掌握这个架构的精髓。
(2)能快速地整理合适的架构
当在设计app的架构时,根据架构的框架,可采用下面的4个点设计app架构:
1. 根据app的设计,梳理出app的业务流程,把每个业务流程列出来
2. 把每个业务流程中会遇到的问题整理出来
3. 根据整理出的问题,探讨可行的技术解决方案
4. 把3中的所有的技术解决方案有机融合,就是一个app的架构了。
另外,从对架构的框架上可看出,架构设计上的以下特点:
(1)架构是和业务紧密相关的
每个app都有独自的业务逻辑,遇到的问题也不会一样的,解决方案也不一样,因此架构也不尽相同。
经常在qq上被人问到:"app后端应该采用什么价格?"大哥,我不了解你的业务逻辑,不知道你会遇到哪些问题,怎么知道你需要使用哪些技术方案,架构根本无从谈起。
(2)架构的演变是由业务驱动
当app处于不同的发展阶段,架构上也需要做变化。
例如,验证用户的token,一开始没啥用户的时候,可能直接在用简单的sql查询语句就能搞定,但随着用户的增长,服务器的压力越来越大,查询速度越来越慢,可能就要迁移到nosql中验证。
但同时要考虑一个问题,如果初期架构上的不合理,到了后期,因为业务的发展需要改变架构是很困难.但是初期要弄一个好的架构,又可能耽误后端的研发进度,使整个app的上架时间推迟,这时又要面对巨大的资金和时间压力,具体怎么取使,要各位小伙伴认真考虑,马虎不得。
(3)架构不是为了炫耀技术
架构是为了满足业务的需求而设计的,技术人员不应过度设计,学了一堆最新最炫的技术,都把它放进架构,而不是根据实际的需求来做。
技术是为了满足业务而存在的,过度设计,不但延误了整个app的研发周期,也可能给运维带来了很多不必要的麻烦。
总结:
在app成长的过程中,后台的架构也需要不断成长。技术人员,也需要跟上这个成长的步伐。
![Android Application Architecture 安卓APP架构[译]](http://www.gvkun.com/zb_users/upload/2025/03/ac989702-90cc-4b21-8ef3-a54fe9b980f11741941520368.jpg "Android Application Architecture 安卓APP架构[译]")
Android Application Architecture 安卓APP架构[译]
序
本文介绍了文章作者从事了几年android应用的开发,经历2次架构变革,第一次集成了RxJava第二次集成了MVP,并将RxJava与MVP完美结合,实现了低耦合,代码简单,测试方便的架构。
其实我们在开发中也遇到过,Android入门门槛较低,如果前期对APP规划不清晰,Coder们对未来变化把握不准,技术架构经验不够强大,最终导致就是一个Activity几千行,里面写了大量的Private方法,拆成几个Fragment、封装出来几个类都是无法解决,结果就是看Activity难受的要死,纠结,看了不爽改也不是不改也不是,严重影响看的人的心情。并且怨天尤人这个是产品人员规划App不好,没有前瞻性,改来改去。。。
这篇文章就是使用新的结构解决该问题。
安卓APP架构
Android Application Architecture
Our journey from standard Activities and AsyncTasks to a modern MVP-based architecture powered by RxJava.
这篇文章主要目的是讲述如何将传统的Activities 与 AsyncTasks 模式向目前主流的MVP架构基础的响应式编程框架过度。

Different parts of a software codebase should be independent, yet perfectly work together like a well-oiled machine — photo by Chester Alvarez.
先畅享一下:~~~如果松耦合架构,分工明确,然后完美的组合在一起工作是一个很吊的事情。
(转个图片还要写明白谁拍的,版权意识真强)
The Android dev ecosystem moves very quickly. Every week new tools are created, libraries are updated, blog posts are written and talks are given. If you go on holiday for a month, by the time you come back there will be a new version of the support library and/or Play Services.
最近几年Android的生态链变化非常迅速,从底层的Android Api到应用层的各种开源的类库、工具更新非常迅速。一不留神就落后了。
I’ve been making Android apps with the ribot team for over three years. During this time, the architecture and technologies we’ve used to build Android apps have been continuously evolving. This article will take you through this journey by explaining our learnings, mistakes and the reasoning behind these architectural changes.
我在Ribot团队从事Android应用开发工作三年多,伴随着公司技术的不断创新,积累了很多经验、错误以及在技术选型背后的故事。
旧的应用架构
The old times
Back in 2012 our codebases used to follow a basic structure. We didn’t use any networking library and AsyncTasks were still our friends. The diagram below shows approximately how the architecture was.
2012年那个时候,我们的代码都是用的原生Android,没有使用任何的网络请求框架,而是基于AsyncTasks书写。
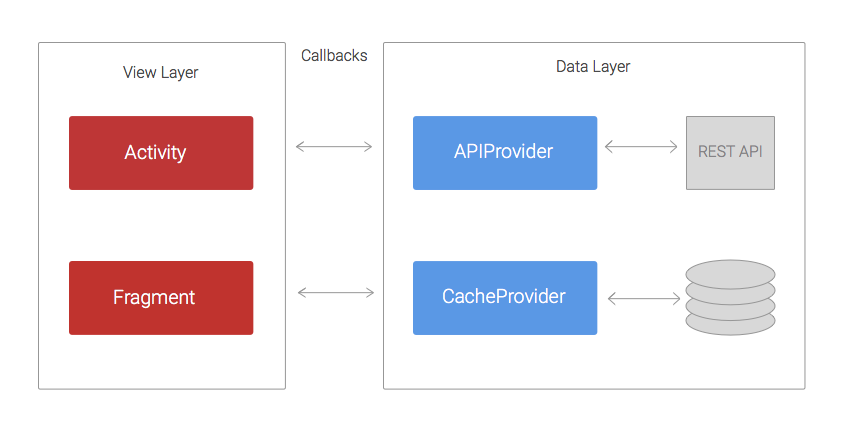 >The code was structured in two layers: the data layer that was in charge of retrieving/saving data from REST APIs and persistent data stores; and the view layer, whose responsibility was handling and displaying the data on the UI.
The APIProvider provides methods to enable Activities and Fragments to easily interact with the REST API. These methods use URLConnection and AsyncTasks to perform network calls in a separate thread and return the result to the Activities via callbacks.
代码分为两层,Data与View,Data层主要是用来从API获取数据,保存到持久化的db当中。View层主要就是把Data的数据显示到UI上。APIProvider提供方法出来,用于在Activity或者Fragment中方便的进行控制与交互。技术上将,使用URLConnection与AsyncTasks实现了一个异步的网络请求并将结果返回到调用的回调方法里面。
In a similar way, the CacheProvider contains methods that retrieve and store data from SharedPreferences or a SQLite database. It also uses callbacks to pass the result back to the Activities.
相同的原理CacheProvider提供一系列方法,将SharedPreferences或者SQLite的数据取出来,并且返回给到Activity
问题
The problems
The main issue with this approach was that the View layer had too many responsibilities. Imagine a simple common scenario where the application has to load a list of blog posts, cache them in a SQLite database and finally display them on a ListView. The Activity would have to do the following:
主要问题是View层有太多的累赘,以一个博客列表为例来讲述,比如博客需要显示一个ListView,从SQLite读取数据,Activity需要做到以下几点:
- Call a method loadPosts(callback) in the APIProvider
- Wait for the APIProvider success callback and then call savePosts(callback) in the CacheProvider.
- Wait for the CacheProvider success callback and then display the posts on the ListView.
- Separately handle the two potential errors callback from the APIProvider and CacheProvider.
- 执行APIProvider里面的loadPosts的方法,里面传入回调参数内容。
- 等待loadPosts执行成功后,执行回调里面的CacheProvider中的savePosts方法,savePosts也要传入回调参数。
- 等待savePosts执行成功后,执行回调里面的方法刷新ListView
- 分别书写代码处理2 3 两步的错误回调内容。
This is a very simple example. In a real case scenario the REST API will probably not return the data like the view needs it. Therefore, the Activity will have to somehow transform or filter the data before showing it. Another common case is when the loadPosts() method takes a parameter that needs to be fetched from somewhere else, for example an email address provided by the Play Services SDK. It’s likely that the SDK will return the email asynchronously using a callback, meaning that we now have three levels of nested callbacks. If we keep adding complexity, this approach will result into what is known as callback hell.
这还是一个比较简单的例子,在一些真实的场景中,远程的API可能没有返回程序的必须值,但是activity必须把数据处理完成之后才能显示结果。再一个例子就是如果loadPosts方法需要借助一些其他地方的返回参数时,类似用多线程去实现同步请求,为保证数据正常请求,意味着必须做一个三层的回调,如果再复杂一些,想理清楚这些回调就是很蛋疼的事情。
In summary:
Activities and Fragments become very large and difficult to maintain
Too many nested callbacks means the code is ugly and difficult to understand so painful to make changes or add new features.
Unit testing becomes challenging, if not impossible, because a lot of the logic lives within the Activities or Fragments that are arduous to unit test.
总之,回调多了之后,Activity与Fragment会乱的要死,并且一般人无法直视。
牛逼的新架构出来了
A new architecture driven by RxJava
We followed the previous approach for about two years. During that time, we made several improvements that slightly mitigated the problems described above. For example, we added several helper classes to reduce the code in Activities and Fragments and we started using Volley in the APIProvider. Despite these changes, our application code wasn’t yet test-friendly and the callback hell issue was still happening too often.
我们在蛋疼的架构中煎熬了2年,当然也尝试过很多方式,最终也只能是缓和一下乱的问题。我们在APIProvider使用了Volley,代替了AsyncHttpClient,但是其实是一个吊样。
It wasn’t until 2014 when we started reading about RxJava. After trying it on a few sample projects, we realised that this could finally be the solution to the nested callback problem. If you are not familiar with reactive programming you can read this introduction. In short, RxJava allows you to manage data via asynchronous streams and gives you many operators that you can apply to the stream in order to transform, filter or combine the data.
不到2014年我们就开始进行RxJava的预研,然后尝试了一批简单的项目,感觉RxJava的方式是解决我们嵌套回调的终极解决办法。简单的说,RxJava允许你通过异步流的方式管理你的数据,并且还可以通过操作符(Operators)对Observable对象的变换
Taking into account the pains we experienced in previous years, we started to think about how the architecture of a new app would look. So we came up with this.
我们用了几年的经验痛定思痛,搞了下面这么个东西,新的APP的架构图
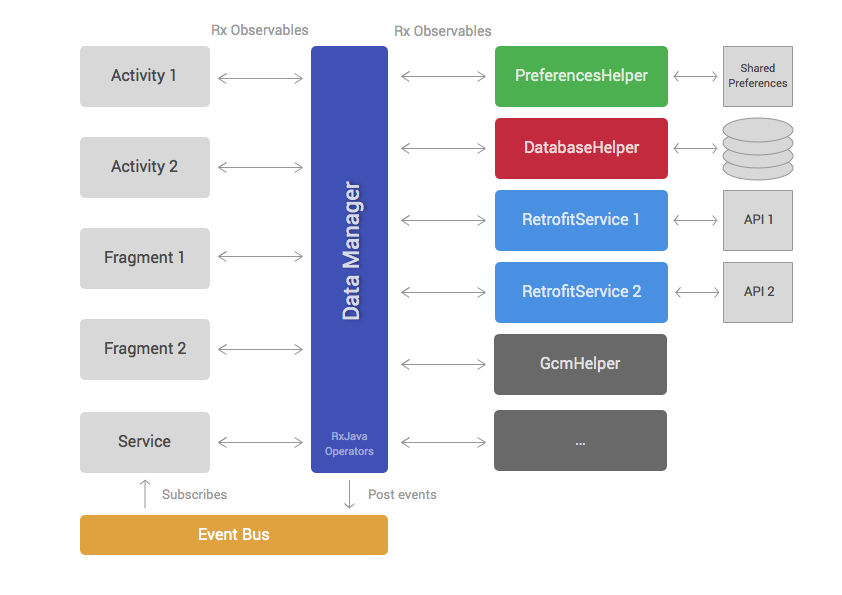
Similar to the first approach, this architecture can be separated into a data and view layer. The data layer contains the DataManager and a set of helpers. The view layer is formed by Android framework components like Fragments, Activities, ViewGroups, etc.
与第一种方法相似,这个架构也是分为Data层与View层,Data层包含DataManager与一堆Helper;View层是包含Fragments, Activities, ViewGroups等。
Helper classes (third column on diagram) have very specific responsibilities and implement them in a concise manner. For example, most projects have helpers for accessing REST APIs, reading data from databases or interacting with third party SDKs. Different applications will have a different number of helpers but the most common ones are:
Helper主要是集成第三方的类库,以便于在代码中几行代码就可以清晰的实现某个功能,比如请求API,访问数据库等,虽然不同的应用程序都有不同的类库,但是他们无非就是以下这些内容:
- PreferencesHelper: reads and saves data in SharedPreferences.
- DatabaseHelper: handles accessing SQLite databases.
- Retrofit services: perform calls to REST APIs. We started using Retrofit instead of Volley because it provides support for RxJava. It’s also nicer to use.
- 从SharedPreferences中读取或者写入数据
- 读写SQLite数据库
- 类似与square的Retrofit服务,也就是Http Client,我们用Restrofit替代了Volley因为他支持Rxjava,并且更吊。
Most of the public methods inside helper classes will return RxJava Observables.
The DataManager is the brain of the architecture. It extensively uses RxJava operators to combine, filter and transform data retrieved from helper classes. The aim of the DataManager is to reduce the amount of work that Activities and Fragments have to do by providing data that is ready to display and won’t usually need any transformation.
RxJava最核心的两个东西是Observables(被观察者,事件源)和Subscribers(观察者),在Helper类中的Public方法,一般都会返回一个RxJava的Observables;DataManager是整个架构的大脑,他大量的使用Rxjava的operators对Helper返回来的数据进行的整合过滤、二次处理。
The code below shows what a DataManager method would look like. This sample method works as follows:
下面用一个例子来说明DataManager是做什么的:
- Call the Retrofit service to load a list of blog posts from a REST API
- Save the posts in a local database for caching purposes using the DatabaseHelper.
- Filter the blog posts written today because those are the only ones the view layer wants to display.
- 调用Retrofit的服务,去请求一个博客列表的API
- 用DatabaseHelper保存这些数据到数据库
- 过滤出这些BLOG哪些是今天写的,然后显示到UI界面上。
Components in the view layer such as Activities or Fragments would simply call this method and subscribe to the returned Observable. Once the subscription finishes, the different Posts emitted by the Observable can be directly added to an Adapter in order to be displayed on a RecyclerView or similar.
Observables发出一系列事件,Subscribers(例如 Activities or Fragments)处理这些事件,可以直接将数据显示到一些可以回收、重用的View上面。
【BTW:如果一个Observerble没有任何的的Subscriber,那么这个Observable是不会发出任何事件的】
The last element of this architecture is the event bus. The event bus allows us to broadcast events that happen in the data layer, so that multiple components in the view layer can subscribe to these events. For example, a signOut() method in the DataManager can post an event when the Observable completes so that multiple Activities that are subscribed to this event can change their UI to show a signed out state.
这个架构的另外一个模块是event bus,event bus可以让我们在Data层发出广播(不是Android的Broadcast)然后不同的模块去注册并接收不同的广播事件
Why was this approach better?
RxJava Observables and operators remove the need for having nested callbacks.

为什么这个方式这么牛逼,是因为Observables与operators可以去掉那一堆必须的回调方法
The DataManager takes over responsibilities that were previously part of the view layer. Hence, it makes Activities and Fragments more lightweight.
Moving code from Activities and Fragments to the DataManager and helpers means that writing unit tests becomes easier.
DataManager替代了传统架构中很多代码,从而使得Activity与Fragment变得更加轻量级。并且使得单元测试变得更加简单。
Clear separation of responsibilities and having the DataManager as the only point of interaction with the data layer, makes this architecture test-friendly. Helper classes or the DataManager can be easily mocked.
DataManager成为了唯一的数据交互部分,这样清晰的架构使得更方便进行代码自测。
What problems did we still have?
For large and very complex projects the DataManager can become too bloated and difficult to maintain.
Although view layer components such as Activities and Fragments became more lightweight, they still have to handle a considerable amount of logic around managing RxJava subscriptions, analysing errors, etc.
我们还有什么问题?
- 如果对于非常庞大并且复杂的项目来说,DataManger也会变得非常臃肿并且难以维护。
- 尽管Activity与Fragment已经变得更加轻量级,但是对于错误异常的处理还是要在subscriptions的地方去书写。
一体化的MVP模式
Integrating Model View Presenter
In the past year, several architectural patterns such as MVP or MVVM have been gaining popularity within the Android community. After exploring these patterns on a sample project and article, we found that MVP could bring very valuable improvements to our existing approach. Because our current architecture was divided in two layers (view and data), adding MVP felt natural. We simply had to add a new layer of presenters and move part of the code from the view to presenters.
前几年开始,很多类似MVP与MVVM在Android的一些社区比较流行,经过研究之后,我们发现MVP模式是对我们目前的方案最有价值的改动。我们的两层架构View-Data与MVP的 Model-View架构天然融合,理念一致。我们只需要增加一个presenters层,然后把之前在view实现的代码移到上面就可以了。
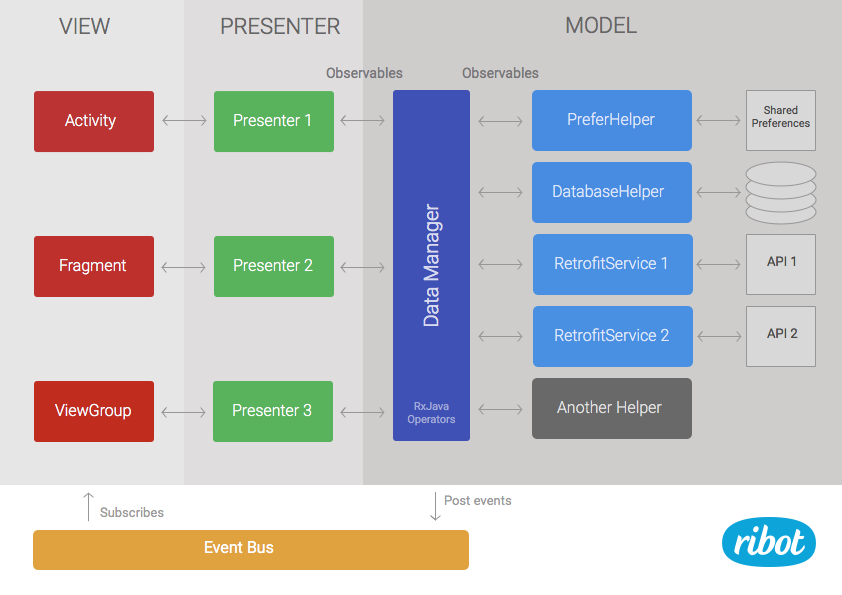
The data layer remains as it was but it’s now called model to be more consistent with the name of the pattern.
Presenters are in charge of loading data from the model and calling the right method in the view when the result is ready. They subscribe to Observables returned by the data manager. Therefore, they have to handle things like schedulers and subscriptions. Moreover, they can analyse error codes or apply extra operations to the data stream if needed. For example, if we need to filter some data and this same filter is not likely to be reused anywhere else, it may make more sense to implement it in the presenter rather than in the data manager.
之前的Data层就是现在的MVP中的Model,Presenter现在负责从Model中加载数据,加载完成后后再去调用左边的在Activity、ViewGroup中的方法。Presenters的subscribe去接收data manager中的Observables广播出来的数据。
举例说明,如果我们需要增加数据的过滤操作但是并不是所有地方都需要的那种,那就可以在presenter里面写这些代码,而不用写在公共的datamanager里面。
Below you can see what a public method in the presenter would look like. This code subscribes to the Observable returned by the dataManager.loadTodayPosts() method we defined in the previous section.
我们定义的dataManager.loadTodayPosts()会广播出数据给到对应的subscribes
The mMvpView is the view component that this presenter is assisting. Usually the MVP view is an instance of an Activity, Fragment or ViewGroup.
MVP的View并不是指的Android的View,而是一个界面组件的的实例,例如Activity, Fragment , ViewGroup 在注册presenter的时候,需要把自己当前的实例传递进去。
// Activity onCreate 中的代码段
if (presenter == null)
        presenter = new Presenter1();
        presenter.onTakeView(this);
Like the previous architecture, the view layer contains standard framework components like ViewGroups, Fragments or Activities. The main difference is that these components don’t subscribe directly to Observables. They instead implement an MvpView interface and provide a list of concise methods such as showError() or showProgressIndicator(). The view components are also in charge of handling user interactions such as click events and act accordingly by calling the right method in the presenter. For example, if we have a button that loads the list of posts, our Activity would call presenter.loadTodayPosts() from the onClick listener.
这个架构与上一个架构不同的是,ViewLayer 也就是Activity这些,不会直接去订阅接收Observables发出的这些事件。而是只在Activity实现几个简单的显示错误、显示进度的方法(用接口interface来规范统一),然后把当前实例以参数形式传递给到对应事件的Presenter,由Presenter去执行这些显示错误、显示进度的方法。
当然对于用户交互部分的按钮点击事件还是要在Activity中进行处理。
If you want to see a full working sample of this MVP-based architecture, you can check out our Android Boilerplate project on GitHub. You can also read more about it in the ribot’s architecture guidelines.
关于MVP的文章可以自行百度一下,MVP Android 关键词
Why is this approach better?
为什么这个又最吊
- Activities and Fragments become very lightweight. Their only responsibilities are to set up/update the UI and handle user events. Therefore, they become easier to maintain.
- We can now easily write unit tests for the presenters by mocking the view layer. Before, this code was part of the view layer so we couldn’t unit test it. The whole architecture becomes very test-friendly.
- If the data manager is becoming bloated, we can mitigate this problem by moving some code to the presenters.
- Activity与Fragment代码量大大降低,逻辑代码全部都丢给了Presenter,结果就是Activity只需要负责UI交互的按钮等代码。
- 对于Presenter可以写单独的单元测试代码,只需要对Presenter提供的方法测试即可
- 如果DataManager变得臃肿庞大了,我们可以分离这些代码到各自的Presenter中去。
What problems do we still have?
现在还有遗留什么问题Having a single data manager can still be an issue when the codebase becomes very large and complex. We haven’t reached the point where this is a real problem but we are aware that it could happen.
只有一个DataManager仍旧是一个问题,尤其是当代码项目比较庞大的时候,当然我们还没有到达这个庞大的地步,尽管我们知道这个将来某天会发生。
It’s important to mention that this is not the perfect architecture. In fact, it’d be naive to think there is a unique and perfect one that will solve all your problems forever. The Android ecosystem will keep evolving at a fast pace and we have to keep up by exploring, reading and experimenting so that we can find better ways to continue building excellent Android apps.
如果想有个完美的架构解决你所有问题是不可能的。TMD Android的整个生态圈变化太快,又TM的不标准,就导致我们不断的去探索探索。。。以致于去找到更吊的方法去做Android apps。
I hope you enjoyed this article and you found it useful. If so, don’t forget to click the recommend button. Also, I’d love to hear your thoughts about our latest approach.
希望读了之后对我们的最新解决方案能有些建议想法。
【本文翻译的目的是在闲暇时间,研究新技术,用通俗技术语言写给自己看,便于日后方便查阅为目】
原文:https://medium.com/ribot-labs/android-application-architecture-8b6e34acda65
MVP介绍:http://www.jcodecraeer.com/a/anzhuokaifa/androidkaifa/2015/0425/2782.html
RxAndroid:https://github.com/ReactiveX/RxAndroid
Eventbus:https://github.com/greenrobot/EventBus

Android APP架构思考
关于本文介绍的小架构我做了一个demo,地址如下:
https://github.com/xiaxvelian...
##########################正文开始了###############################
从2011年到现在,做了几年的Android应用与Android平台上Opengl es应用开发,下面是关于Android APP开发架构的一些思考:
构建框架的最终目的是增强项目代码的可读性 ,维护性 和方便测试 ,如果背离了这个初衷,为了使用而使用,最终是得不偿失的。
从根本上来讲,要解决上述的三个问题,核心思想无非两种:一个是分层 ,一个是模块化 。两个方法最终要实现的就是解耦,分层讲的是纵向层面上的解耦,模块化则是横向上的解耦。
在写Android APP相关代码时,如果“客户端只做数据展示,不做用户交互逻辑”这样的APP,基本Bug都很少。思考其原因,可能是这样的APP代码逻辑简单。
我们知道 代码越简单、易读,越不易出bug,但APP功能越来越复杂,代码量越来越多,好像随之代码也会越来越复杂。
一、那我们能不能设计一个,只做数据展示,不做用户交互的APP架构呢?

上边的截图,是关于 只做数据展示,不做用户交互的APP架构思考。
朋友们可能已经注意到,这是典型的MVC。
这里Model层来管理数据,并继承Observable,而每一个controller(Activity)均实现Observer。这样若某一个Activity需要获取某一种类型Model数据时,只要在其对应Model中注册观察者。
二、下边是关于上图的简单介绍:
- (1)、用户触发登录——>帐号密码请求服务器——>服务端返回登录数据——>登录model(登录model存登录用户数据)——>登录model通知“登录Controller”——>更新登录页面UI
——>登录model(登录model存登录用户数据)——>登录model通知“更新用户详情Controller”——>更新用户详情页面UI - (2)、这里model为被观察者,controller可根据需要在相应model进行观察者注册,这样model层中对应数据发生变化时,对应的controller便可收到页面更新的通知,完成页面更新。
三、那只做数据展示,不做用户交互又是怎么回事呢?
- (1)、这里通过Model把用户操作转化为数据更新( 用户操作——>Model——>回调所有的观察者Observer(controller)——>更新UI )
- (2) 、另一个好处是,可以用这套回调机制,替换Android中的广播来传递消息(单进程中)
所有数据的变化,均通知对应的数据Model,通过Model回调到对应的Activity,Activity再更新UI
四、目前这种小架构是可以满足一般业务量APP需求的,那随着业务量的增大,该如何设计APP框架呢?
以上的框架图是可以满足一般的Android APP业务需求的。但如果客户端功能越来越复杂,可按业务分为不同的功能模块,模块内部使用以上介绍的框架和通信方式。模块内部,采用观察者回调进行通信;模块之间采用广播(或者其他进程间通信方式)进行通信:

这里以广播举例:
- 1、主模块内部采用事件回调进行通信
- 2、主模块使用广播将事件传递给子模块
- 3、每个子模块内部采用事件回调进行通信
五、与MVP MVC的比较
在无用户UI操作介入时小架构MVC之间的关系如下

正好与MVP的不谋而合,MVP三者的关系如下:

关于MVP的文章,可参考Android MVC MVP MVVM
在用户UI操作介入后小架构MVC之间的关系如下

传统的MVC模型如下:

关于MVC的文章,可参考Android MVC MVP MVVM
PS: 由此可见,小框架与传统的MVC又也有所不同,算是MVC的一个变种,类似于MVP
")
Apache web服务器(LAMP架构)

apache介绍
1).世界上使用率最高的网站服务器,最高时可达70%;官方网站:apache.org 2).http 超文本协议 HTML 超文本标记语言 3).URL 统一资源定位符 http://www.sina.com.cn:80/admin/index.php http:// — ssl 安全套接字 www.sina.com.cn — 域名 :80 — 端口 http对应80端口,https对应443端口### /admin/index.php — 网址目录和文件名
4).LAMP安装说明 ①源码包安装 自定义 开发版本选择方便 效率高 生产环境 安全 稳定 开发环境 局域网(内网) ②二进制包安装 yum命令安装 官方版本比较低
Apache的三种工作模式
Apache 一共有3种稳定的 MPM 模式(多进程处理模块),它们分别是 prefork、worker、event。http-2.2版本的httpd默认的mpm工作模式为prefork,2.4版本的httpd默认是event工作模式。可以通过 httpd -V 来查看。 [root@ken ~]# httpd -V | grep -i "server mpm" Server MPM: Prefork</pre> 编译的时候,可以通过 configure 的参数来指定:
<pre>--with-mpm=prefork|worker|event</pre>
1、prefork 工作模式
(作用:用一个进程处理一个用户请求) Apache在启动之初,就预先fork一些子进程,然后等待请求进来。之所以这样做,是为了减少频繁创建和销毁进程的开销。每个子进程只有一个线程,在一个时间点内,只能处理一个请求。 优点:成熟稳定,兼容所有新老模块。同时,不需要担心线程安全的问题。 缺点:一个进程相对占用更多的系统资源,消耗更多的内存。而且,它并不擅长处理高并发请求。
2、worker 工作模式
(作用:一个进程生成多个线程,一个线程处理一个用户请求) 使用了多进程和多线程的混合模式。它也预先fork了几个子进程(数量比较少),然后每个子进程创建一些线程,同时包括一个监听线程。每个请求过来,会被分配到1个线程来服务。线程比起进程会更轻量,因为线程通常会共享父进程的内存空间,因此,内存的占用会减少一些。在高并发的场景下,因为比起prefork有更多的可用线程,表现会更优秀一些。 优点:占据更少的内存,高并发下表现更优秀。 缺点:必须考虑线程安全的问题。
3、event 工作模式
(用一个线程处理一个用户请求) 它和worker模式很像,最大的区别在于,它解决了keep-alive场景下,长期被占用的线程的资源浪费问题。event MPM中,会有一个专门的线程来管理这些keep-alive类型的线程,当有真实请求过来的时候,将请求传递给服务线程,执行完毕后,又允许它释放。这样增强了高并发场景下的请求处理能力。HTTP采用keepalive方式减少TCP连接数量,但是由于需要与服务器线程或进程进行绑定,导致一个繁忙的服务器会消耗完所有的线程。Event MPM是解决这个问题的一种新模型,它把服务进程从连接中分离出来。在服务器处理速度很快,同时具有非常高的点击率时,可用的线程数量就是关键的资源限 制,此时Event MPM方式是最有效的,但不能在HTTPS访问下工作。
apache基本信息
apache为企业中常用的web服务,用来提供http://(超文本传输协议) 主配置目录:/etc/httpd/conf 主配置文件:/etc/httpd/conf/http.conf 子配置目录:/etc/httpd/conf.d 子配置文件:/etc/httpd/conf.d/*.conf 默认发布目录:/var/www/html/ 默认发布文件:index.html 默认端口:80
服务器的返回状态值
(表示请求的是否成功等信息) 1xx:一般不用,就是一些描述信息 2xx:表示请求成功 200:ok,请求下载成功## 201:create ok,上传成功 3xx:表示请求的资源被重定向 301:moved permanently,永久重定向 302:Found,临时重定向 304:not modified,标识一个缓存的资源是否发生过更改## 4xx:请求失败,因为客户端原因导致失败 403:forbidden,表示客户端没有权限访问所请求的资源## 404:Not Found,表示客户端所请求的资源不存在## 405:Method Not Allowd:表示客户端所用的方法不被允许 5xx:请求失败,因为服务器端原因导致失败 500:Internal Server Error,服务器内部错误## 502:Bad Gateway,代理服务器从上游服务器获取到的是伪响应## 503:service unavailable,服务器暂时不可用
什么是LAMP
LAMP=Linux Apache Mysql/MariaDB PHP/Perl/Python 这些软件都是开源免费的软件,几个程序各自是独立的,经常为了达到我们需要的效果而协同工作,组成了我们常见的LAMP架构平台!LAMP是世界上最流行的组合,当然同时也有Nginx,也就是LNMP: LAMP 相对于 NGINX 来说较为安全,但是Nginx处理高并发Apache要强,NGINX 相对于 LAMP 来说安全较为差一点,同样的配制环境负载远远高于 LAMP 向国内的一些大公司,淘宝、新浪都在用这一些 NGINX,向那么大的公司网站需要用到服务器群用LAMP搭建环境成本远远大于NGINX。打个比方本来1000000W访问量需要 10台LAMP环境服务器才能完成,但是使用NGINX也许只需要5、6台这样一来对于这样的公司来说就大大的节约了成本。从网站的流量上来说,70%以上的访问流量是LAMP来提供的,LAMP是最强大的网站解决方案,在以前这句话没有错,但是在现在,这句话有待证实!!!因为在以后的过程中,会发现我们会使用的架构是Nginx和Apache结合使用:使用Nginx可以做集群等相关配置,可以和apache一起使用,有的会用apache去跑php,然后用nginx做反向代理,比如apache运行在8080端口,nginx在80端口,访问php文件时,反向代理到apache,静态页通过nginx处理。nginx支持高并发,apache对php的运行比较稳定。 常见的网页类型:htm,html,shtml,stm.php,asp,aspx,shtm,jsp等等Apache本事只处理静态页面,处理动态页面需要使用libphp5.so这个模块去工作,编译php也其实是将一个至关重要的模块打入到apache内部,然后apache收到php请求,将请求交给这个模块来处理!
LAMP的架构以及通信过程
LAMP的架构: LAMP是一个多C/S架构的平台,最初级为web客户端基于TCP/IP通过http协议发起传送,这个请求可能是动态的,也可能是静态的。 所以web服务器通过发起请求的后缀来判断,如果是静态的资源就由web服务器自行处理,然后将资源发给客户端。如果是动态这时web服务器会通过 CGI(Common Gateway interface)协议发起给php。 这里但是如果php是以模块形式与Web服务器联系。那么他们是通过内部共享内存的方式。如果是php单独的放置与一台服务器,那么他们是通过sockets套接字监听的方式通信(这又是一个C/S架构)。 这时php会相应的执行一段程序,如果在执行程序时,需要用到数据。那么php就会通过mysql协议发送给mysql服务器(也可以看作是一个C/S架构)。由mysql服务器处理,将数据供给php程序。
LAMP流程
1. 用户发送http请求到达httpd服务器 2. httpd解析url获取需要的资源的路径,通过内核空间读取硬盘资源,如是静态资源,则构建响应报文,发回给用户 3. 如果是动态资源,将资源地址发给php解析器,解析php程序文件,解析完毕将内容发回给httpd,httpd构建响应报文,发回给用户 4. 如果涉及到数据库操作,则利用php-mysql驱动,获取数据库数据,返回给PHP解析器。
A,M,P是怎么联动起来工作的呢
apache + php结合的方式大概几种
第一种:把php编译时直接编译成apache的模块、module模块化的方式进行工作(apahce默认的这种方式)。 第二种:CGI、通用网关接口、apache基于CGI跟hph通信 第三种:fastcgi、他也是一种协议、在这种模块下他们两个是这样结合的: 本来php是做为一个模块或都是php解析器运行的,不是监听在某个套接字上接收别人的请求的,而是让别人调用为一个进程使用的,可能是做为别人的子进程在运行,但是工作在fastcgi这种模块下的hph自行启用为一个服务进程, 他监听在某个套接字上,随时可以接受来自客户端的请求的,他也是有一个主进程的,为了可以响应多个用户的请求,他会启用多个子进程,这些子进程我们也可以称为工作进程, 他也是有空闲进程的,一但有客户请求他马上使用空闲的进程响应客户端的请求,将结果返回给前端的调用者,在php5.3.3版本之前他是没有这个能力了,只能工作在模块和CGI的方式下,而在5.3.3之后这个模块直接被收进php模块中,这种模块就叫php-fpm。 所以在以后编译php时,要想跟apache结合,就要编译成php-fpm,这是基于fastcgi工作的模式,并启动这服务进程,也就意味着他是通过套接字跟前端的调用者通信,既然基于套按字通信了,那么前端的web服务器和后面的php服务器完全可以工作在不同的主机上,实现了所谓的分层机制。 apache不会跟数据库打交道,他是个静态web服务器,跟数据库打交道的是应用程序,作为应用程序的源驱动能够基于某个API跟服务器之间建立会话,而后他会通过我们的mysql语句发送给数据库,数据库再将结果返回给应用程序,不是php进程,而是php进程中所执行的代码。
php + mysql的通信
PHP跟mysql怎么整合起来呢,php又怎么被httpd所调用呢 首先httpd并不具备解析代码的能力,他要依赖于php的解析器,接着php本身不依赖于mysql,他只是一个解析器,能执行代码就OK了,那他什么时候用到mysql呢,如果要在mysql中存数据时才用到mysql,只是当php中有运行mysql语句时才用到mysql。 php语言要想联系mysql,通常用到php的驱动,rpm包的叫php_mysql,php跟mysql没有一点关系,只有程序员在php中编写mysql语句时才连接mysql来执行sql语句的。基于php-mysql去连接mysql只使用一个函数mysql_connect();而mysql_connect()正是php-mysql提供的一个API,只要指明要连接的服务器即可。

LAMP相关网站
Apache=http://httpd.apache.org/ httpd主程序包 MySQL=http://dev.mysql.com/downloads/mysql/ mysql主程序包 PHP=http://php.net/downloads.php php主程序包 apr=http://apr.apache.org/ apr是httpd的依赖包 apr-util=http://apr.apache.org/ apr-util是httpd的第二个依赖包 apr和apr-util这个两个软件是对后端服务软件进行优化的, apr-util只是在apr的基础上提供了更多的数据结构和操作系统封装接口而已。 pcre 是httpd的第三个依赖包 http://pcre.org/ PCRE(Perl Compatible Regular Expressions中文含义:perl语言兼容正则表达式)是一个用C语言编写的正则表达式函数库,PCRE被广泛使用在许多开源软件之中,最著名的莫过于Apache HTTP服务器和PHP脚本语言、R脚本语言,此外,正如从其名字所能看到的,PCRE也是perl语言的缺省正则库。
为什么要编译安装
一般来说,我们软件的安装方式有yum(rpm),和源码编译两种方式,那么为什么我们需要源码编译安装一部分软件?选择源码编译安装软件有以下几个原因: 1:满足不同的运行平台,我们Linux发型版本众多,但是每个版本采用的软件或者内核版本都不一样,而我们的二进制包所依赖的环境不一定能够正常运行,所以大部分软件直接提供源码! 2:方便定制,满足不同的需求,很多时候我们所需要的软件都是可以定制的,我需要什么就安装什么,大多数二进制代码都是一键装全,所以自由度并不高! 3:方便运维、开发人员维护,我们的源码是可以打包二进制的,但是对于这个软件的打包都会有一份代价不小的额外工作,包括维护,所以如果是源码的话,软件产商会直接维护,但是如果是二进制的话,一般都是Linux发行商提供!
编译安装Apache
第一步:上传相关的软件包 [root@ken ~]# ls apr-1.5.2.tar.gz apr-util-1.5.4.tar.gz httpd-2.4.20.tar.gz
第二步:解压 [root@ken ~]# tar xf apr-1.5.2.tar.gz [root@ken ~]# tar xf apr-util-1.5.4.tar.gz [root@ken ~]# tar xf httpd-2.4.20.tar.gz
第三步:进入安排apr解压目录,进行编译 root@ken ~]# cd apr-1.5.2 [root@ken apr-1.5.2]# ./configure –prefix=/usr/local/apr
第四步:解决依赖
configure: error: no acceptable C compiler found in $PATH #提示缺少编译器 See `config.log’ for more details [root@ken apr-1.5.2]# yum install gcc -y
第五步:继续编译 [root@ken apr-1.5.2]# ./configure –prefix=/usr/local/apr
第六步:安装 [root@ken apr-1.5.2]# make && make install
编译安装apr-utils
第一步:进入并开始编译 [root@ken ~]# cd apr-util-1.5.4 [root@ken apr-util-1.5.4]# ls aprutil.dep buckets config.layout encoding libaprutil.mak NOTICE uri aprutil.dsp build configure export_vars.sh.in libaprutil.rc NWGNUmakefile xlate aprutil.dsw buildconf configure.in hooks LICENSE README xml aprutil.mak build.conf crypto include Makefile.in README.cmake apr-util.pc.in build-outputs.mk dbd ldap Makefile.win renames_pending apr-util.spec CHANGES dbm libaprutil.dep memcache strmatch apu-config.in CMakeLists.txt docs libaprutil.dsp misc test [root@ken apr-util-1.5.4]# ./configure –with-apr=/usr/local/apr –prefix=/usr/local/apr-util #需要制定apr位置
第二步:编译安装 [root@ken apr-util-1.5.4]# make && make install
- 编译http 第一步:进入解压文件并开始编译 [root@ken httpd-2.4.20]# ./configure –prefix=/usr/local/httpd2.4 –with-apr=/usr/local/apr –with-apr-util=/usr/local/apr-util –enable-cache –enable-deflate –enable-ssl –enable-rewrite –with-mpm=event
第二步:解决依赖 依赖一: configure: error: pcre-config for libpcre not found. PCRE is required and available from http://pcre.org/ #提示缺少pcre You have new mail in /var/spool/mail/root [root@ken httpd-2.4.20]# yum install pcre pcre-devel -y
依赖二: checking whether to enable mod_deflate… configure: error: mod_deflate has been requested but can not be built due to prerequisite failures [root@ken httpd-2.4.20]# yum install openssl openssl-devel -y
第三步:安装 [root@ken httpd-2.4.20]# make && make install 还有一步要安装HTTP
##编译安装的apache常用操作
在任何路径下执行apachectl: [root@ken bin]# cat /etc/profile.d/httpd.sh export PATH=/usr/local/httpd2.4/bin:$PATH [root@ken bin]# export /etc/profile.d/httpd.sh -bash: export: `/etc/profile.d/httpd.sh’: not a valid identifier [root@ken bin]# source /etc/profile.d/httpd.sh
验证操作: [root@ken bin]# ss -tnl State Recv-Q Send-Q Local Address:Port Peer Address:Port LISTEN 0 128 :111 : LISTEN 0 128 :80 : LISTEN 0 128 :22 : LISTEN 0 100 127.0.0.1:25 : LISTEN 0 128 :::111 ::: LISTEN 0 128 :::22 ::: LISTEN 0 100 ::1:25 ::: [root@ken bin]# cd [root@ken ~]# pwd /root [root@ken ~]# apachectl stop [root@ken ~]# ss -tnl State Recv-Q Send-Q Local Address:Port Peer Address:Port LISTEN 0 128 :111 : LISTEN 0 128 :22 : LISTEN 0 100 127.0.0.1:25 : LISTEN 0 128 :::111 ::: LISTEN 0 128 :::22 ::: LISTEN 0 100 ::1:25 :::*
apache配置文件详解
配置文件包括三部分: [root@justin ~]#vim /etc/httpd/conf/httpd.conf -n 33 :### Section 1: Global Environment 245 :### Section 2: ''Main'' server configuration 973 :### Section 3: Virtual Hosts [root@justin ~]# 1)Global Environment---全局环境配置,决定Apache服务器的全局参数 2)Main server configuration---主服务配置,相当于是Apache中的默认Web站点,如果我们的服务器中只有一个站点,那么就只需在这里配置就可以了。 3)Virtual Hosts---虚拟主机,虚拟主机不能与Main Server主服务器共存,当启用了虚拟主机之后,Main Server就不能使用了 -------------------------------------------------------------------------------- 1)Global Environment 44 ServerTokens OS 在出现错误页的时候是否显示服务器操作系统的名称,ServerTokens Prod为不显示 57 ServerRoot "/etc/httpd" 用于指定Apache的运行目录,服务启动之后自动将目录改变为当前目录,在后面使用到的所有相对路径都是想对这个目录下 65 PidFile run/httpd.pid录httpd守护进程的pid号码,这是系统识别一个进程的方法,系统中httpd进程可以有多个,但这个PID对应的进程是其他的父进程 70 Timeout 60 服务器与客户端断开的时间 76 KeepAlive Off是否持续连接(因为每次连接都得三次握手,如果是访问量不大,建议打开此项,如果网站访问量比较大关闭此项比较好),修改为:KeepAlive On 表示允许程序性联机 83 MaxKeepAliveRequests 100 表示一个连接的最大请求数 89 KeepAliveTimeout 15 断开连接前的时间 102 <IfModule prefork.c> 103 StartServers 8 104 MinSpareServers 5 105 MaxSpareServers 20 106 ServerLimit 256 107 MaxClients 256 108 MaxRequestsPerChild 4000 109 </IfModule> 系统默认的模块,表示为每个访问启动一个进程(即当有多个连接公用一个进程的时候,在同一时刻只能有一个获得服务)。StartServer开始服务时启动8个进程,最小空闲5个进程,最多空闲20个进程。MaxClient限制同一时刻客户端的最大连接请求数量超过的要进入等候队列。MaxRequestsPerChild每个进程生存期内允许服务的最大请求数量,0表示永不结束 118 <IfModule worker.c> 119 StartServers 4 120 MaxClients 300 121 MinSpareThreads 25 122 MaxSpareThreads 75 123 ThreadsPerChild 25 124 MaxRequestsPerChild 0 125 </IfModule> 为Apache配置线程访问,即每对WEB服务访问启动一个线程,这样对内存占用率比较小。ServerLimit服务器允许配置进程数的上限。ThreadLimit每个子进程可能配置的线程上限StartServers启动两个httpd进程,MaxClients同时最多能发起250个访问,超过的要进入队列等待,其大小有ServerLimit和ThreadsPerChild的乘积决定ThreadsPerChild每个子进程生存期间常驻执行线程数,子线程建立之后将不再增加MaxRequestsPerChild每个进程启动的最大线程数,如达到限制数时进程将结束,如置为0则子线程永不结束 136 Listen 80 监听的端口,如有多块网卡,默认监听所有网卡 123 150LoadModuleauth_basic_module modules/mod_auth_basic.so ...... 201 LoadModule version_module modules/mod_version.so 启动时加载的模块 221 Include conf.d/*.conf加载的配置文件 242 User apache 243 Group apache 启动服务后转换的身份,在启动服务时通常以root身份,然后转换身份,这样增加系统安全 2)Main server configuration262 ServerAdmin root@localhost管理员的邮箱276 #ServerName www.example.com:80默认是不需要指定的,服务器通过名字解析过程来获得自己的名字,但如果解析有问题(如反向解析不正确),或者没有DNS名字,也可以在这里指定IP地址,当这项不正确的时候服务器不能正常启动。前面启动Apache时候提示正在启动 httpd:httpd: apr_sockaddr_info_get() failed forjustin httpd: Could not reliably determine the server''s fully qualified domain name, using 127.0.0.1forServerName,解决方法就是启动该项把www.example.com:80修改为自己的域名或者直接修改为localhost1 285 UseCanonicalName Off如果客户端提供了主机名和端口,Apache将会使用客户端提供的这些信息来构建自引用URL。这些值与用于实现基于域名的虚拟主机的值相同,并且对于同样的客户端可用。CGI变量SERVER_NAME和SERVER_PORT也会由客户端提供的值来构建292 DocumentRoot "/var/www/html" 网页文件存放的目录 302 <Directory /> 303 Options FollowSymLinks 304 AllowOverride None 305 </Directory> 对根目录的一个权限的设置 317 <Directory "/var/www/html"> 331 Options Indexes FollowSymLinks 338 AllowOverride None 343 Order allow,deny 344 Allow from all 346 </Directory> 对/var/www/html目录的一个权限的设置,options中Indexes表示当网页不存在的时候允许索引显示目录中的文件,FollowSymLinks是否允许访问符号链接文件。有的选项有ExecCGI表是否使用CGI,如Options Includes ExecCGI FollowSymLinks表示允许服务器执行CGI及SSI,禁止列出目录。SymLinksOwnerMatch表示当符号链接的文件和目标文件为同一用户拥有时才允许访问。AllowOverrideNone表示不允许这个目录下的访问控制文件来改变这里的配置,这也意味着不用查看这个目录下的访问控制文件,修改为:AllowOverride All 表示允许.htaccess。Order对页面的访问控制顺序后面的一项是默认选项,如allow,deny则默认是deny,Allowfromall表示允许所有的用户,通过和上一项结合可以控制对网站的访问控制
360 <IfModule mod_userdir.c> 366 UserDir disabled 375 </IfModule>
是否允许用户访问其家目录,默认是不允许
381 #<Directory /home/*/public_html>
382 #    AllowOverride FileInfo AuthConfig Limit
383 #    Options
MultiViews Indexes SymLinksIfOwnerMatch IncludesNoExec
384 #    <Limit GET POST OPTIONS>
385 #        Order allow,deny
386 #        Allow from all
387 #    </Limit>
388 #    <LimitExcept GET POST OPTIONS>
389 #        Order deny,allow
390 #        Deny from all
391 #    </LimitExcept>
392 #</Directory> 如果允许访问用户的家目录中的网页文件,则取消以上
注释,并对其中进行修改
402 DirectoryIndex index.html index.html.var 指定所要访问的主页的默认
主页名字,默认首页文件名为index.html
409 AccessFileName .htaccess
定义每个目录下的访问控制文件名,缺省为.htaccess
415 <Files ~ "^\.ht">
416 Order allow,deny
417    Deny from all
418 Satisfy All
419 </Files> 控制不让web上的用户来查看.htpasswd和.htaccess这两个文件
425 TypesConfig /etc/mime.types用于设置保存有不同MIME类型数据的文件名
436 DefaultType text/plain默认的网页的类型
443 <IfModule mod_mime_magic.c>
444 #  MIMEMagicFile /usr/share/magic.mime
445    MIMEMagicFile conf/magic
446 </IfModule> 指定判断文件真实MIME类型功能的模块
456 HostnameLookups Off
当打开此项功能时,在记录日志的时候同时记录主机名,这需要服务器来反向解析域名,增加了服务器的负载,通常不建议开启
466 #EnableMMAP off是否允许内存映射:如果httpd在传送过程中需要读
取一个文件的内容,它是否可使用内存映射。如果为on表示如果操作系统
支持的话,将使用内存映射。在一些多核处理器的系统上,这可能会降低
性能,如果在挂载了NFS的DocumentRoot上如果开启此项功能,可能造
成因为分段而造成httpd崩溃
475 #EnableSendfile off这个指令控制httpd是否可以使用操作系统内核的
sendfile支持来将文件发送到客户端。默认情况下,当处理一个请求并不需
要访问文件内部的数据时(比如发送一个静态的文件内容),如果操作系统
支持,Apache将使用sendfile将文件内容直接发送到客户端而并不读取文
件 1
484 ErrorLog logs/error_log错误日志存放的位置
491 LogLevel warn
Apache日志的级别
497 LogFormat "%h %l %u %t \"%r\" %>s %b \"%{Referer}i\" \"%{User-Agent}i\"" combined
498 LogFormat "%h %l %u %t \"%r\" %>s %b" common
499 LogFormat "%{Referer}i -> %U" referer
500 LogFormat "%{User-agent}i" agent定义了日志的格式,并用不同的代
号表示
513 #CustomLog logs/access_log common
526 CustomLog logs/access_log combined
说明日志记录的位置,这里面使用了相对路径,所以ServerRoot需要指
出,日志位置就存放在/etc/httpd/logs
536 ServerSignature On定义当客户请求的网页不存在,或者错误的时候
是否提示apache的版本的一些信息
551 Alias /icons/ "/var/www/icons/" 定义一些不在DocumentRoot下的文
件,而可以将其映射到网页根目录中,这也是访问其他目录的一种方法,
但在声明的时候切记目录后面加”/”
553 <Directory "/var/www/icons">
554 Options Indexes MultiViews FollowSymLinks
555 AllowOverride None 556 Order allow,deny
557    Allow from all 558 </Directory> 定义对/var/www/icons/的权限,修
改为 Options MultiViews FollowSymLinks表示不在浏览器上显示树状目录
结构 563 <IfModule mod_dav_fs.c>
564    # Location of the WebDAV lock database.
565    DAVLockDB /var/lib/dav/lockdb 566 </IfModule> 对mod_dav_fs.c
模块儿的管理
576 ScriptAlias /cgi-bin/ "/var/www/cgi-bin/" 对CGI模块儿的的别名,与
Alias相似。
582 <Directory "/var/www/cgi-bin">
583 AllowOverride None
584 Options None
585 Order allow,deny
586    Allow from all
587 </Directory> 对/var/www/cgi-bin文件夹的管理,方法同上# Redirect
old-URI new-URLRedirect参数是用来重写URL的,当浏览器访问服务器
上的一个已经不存在的资源的时候,服务器返回给浏览器新的URL,告诉
浏览器从该URL中获取资源。这主要用于原来存在于服务器上的文档改变
位置之后,又需要能够使用老URL能访问到原网页
604 IndexOptions FancyIndexing VersionSort NameWidth=* HTMLTable Charset=UTF-8
611 AddIconByEncoding (CMP,/icons/compressed.gif) x-compress x-gzip...
669 IndexIgnore .??* *~ *# HEADER* README* RCS CVS *,v *,t当一个
HTTP请求的URL为一个目录的时候,服务器返回这个目录中的索引文
件,如果目录中不存在索引文件,并且服务器有许可显示目录文件列表的
时候,就会显示这个目录中的文件列表,为了使得这个文件列表能具有可
理解性,而不仅仅是一个简单的列表,就需要前这些参数。如果使用了
IndexOptionsFancyIndexing选项,可以让服务器针对不同的文件引用不同
的图标。如果没有就使用DefaultIcon定义缺省图标。同样,使用
AddDescription可以为不同类型的文档介入描述
709 AddLanguage ca .ca ......
734 AddLanguage zh-TW .zh-tw添加语言
743 LanguagePriority en ca cs da de el eo es et fr he hr it ja ko ltz nl nn no pl pt pt-BR ru sv zh-CN zh-TWApache支持的语言
759 AddDefaultCharset UTF-8 默认支持的语言
765 #AddType application/x-tar .tgz支持的应用如果想支持对php的解析添加这样一行
773 #AddEncoding x-compress .Z
774 #AddEncoding x-gzip .gz .tgz支持对以.Z和.gz.tgz结尾的文件
779 AddType application/x-compress .Z
780 AddType application/x-gzip .gz .tgz添加对上述两种文件的应用
796 #AddHandler cgi-script .cgi修改为:AddHandler cgi-script .cgi .pl 表示允许扩展名为.pl的CGI脚本运行
816 AddType text/html .shtml
817 AddOutputFilter INCLUDES .shtml
添加动态处理类型为server-parsed由服务器预先分析网页内的标记,将标记改为正确的HTML标识
833 #ErrorDocument 404 /missing.html当服务器出现404错误的时候,返回missing.html页面
855 Alias /error/ "/var/www/error/" 赋值别名
857 <IfModule mod_negotiation.c>
858 <IfModule mod_include.c>
859    <Directory "/var/www/error">
860 AllowOverride None
861 Options IncludesNoExec
862 AddOutputFilter Includes html
863        AddHandler type-map var
864 Order allow,deny
865        Allow from all
866 LanguagePriority en es de fr
867 ForceLanguagePriority Prefer Fallback
868    </Directory> 对/var/www/error网页的权限及操作
895 BrowserMatch "Mozilla/2" nokeepalive
896 BrowserMatch "MSIE 4\.0b2;" nokeepalive downgrade-1.0 force-response-1.0
897 BrowserMatch "RealPlayer 4\.0" force-response-1.0
898 BrowserMatch "Java/1\.0" force-response-1.0
899 BrowserMatch "JDK/1\.0" force-response-1.0 .....
设置特殊的参数,以保证对老版本浏览器的兼容,并支持新浏览器的特性 3)Virtual Hosts
990 #NameVirtualHost *:80 如果启用虚拟主机的话,必须将前面的注释去
掉,而且,第二部分的内容都可以出现在每个虚拟主机部分。
998 # VirtualHost example:
1003 #<VirtualHost *:80>
1004 #    ServerAdmin webmaster@www.linuxidc.com
1005 #    DocumentRoot /www/docs/www.linuxidc.com
1006 #    ServerName www.linuxidc.com
1007 #    ErrorLog logs/www.linuxidc.com-error_log
1008 #    CustomLog logs/www.linuxidc.com-access_log common
1009 #</VirtualHost>
IP/PV/UV
用来对网站的访问情况进行统计 ip:internet protocol,独立IP数表示我们的网站在一天之内被多少IP访问过(00-24),相同IP一天只能计为一次这种统计方式是不准确的,实际的访问人数的多于IP数的pv:Page View表示是的在一天之内某个页面被访问过多少次(每刷新一次,算一次访问)uv:uniq vistor,独立访客表示一个用户就是一个uv
计算ip pv方式
1. 在页面中插入一段js代码,实现统计 2. 分析日志 3. 使用第三方平台做统计
计算uv方式
1. 给每个客户端分配cookie,对cookie处理来实现统计 2. 根据客户端的特征信息(ip+浏览器类型+机器其他信息) 网站 IP(万) PV(万) 服务器数量(台) 58 250 3000 500 51cto.com 40 80-100 30 chinaunix 28 50-80 15 taobao 7-8000 5000-10000 10000
创建虚拟主机
利用虚拟主机功能,可以把一台处于运行状态的物理服务器分割成多个“虚拟的服务器”。Apache的虚拟主机功能是服务器基于用户请求的不同主机域名或端口号,实现提供多个网站同时为外部提供访问服务的技术,用户请求的资源不同,最终获取到的网页内容也各不相同。 该方案适合访问量少的公司实施。
基于端口号的虚拟主机
第一步:修改配置文件
[root@ken ~]# vim /etc/httpd/conf/httpd.conf <VirtualHost *:81> DOCUMENTROOT /var/www/ken1 DIRECTORYINDEX index.html </VirtualHost> <VirtualHost *:82> DOCUMENTROOT /var/www/ken2 DIRECTORYINDEX index.html </VirtualHost> Listen 80 Listen 81 Listen 82
第二步:创建网站根目录 [root@ken ~]# mkdir /var/www/ken{1,2}
第三步:创建网页首页文件 [root@ken ~]# echo “111” >> /var/www/ken1/index.html [root@ken ~]# echo “222” >> /var/www/ken2/index.html
第四步:重启apache [root@ken ~]# systemctl restart httpd
第五步:linux中访问 [root@ken ~]# curl 192.168.64.4:81 111 [root@ken ~]# curl 192.168.64.4:82 222
基于域名的虚拟主机
第一步:修改配置文件 [root@ken ~]# vim /etc/httpd/conf/httpd.conf <VirtualHost 192.168.64.4> DOCUMENTROOT /var/www/ken1 DIRECTORYINDEX index.html servername www.ken1.com </VirtualHost> <VirtualHost 192.168.64.4> DOCUMENTROOT /var/www/ken2 DIRECTORYINDEX index.html servername www.ken2.com </VirtualHost>
第二步:创建网站根目录 [root@ken ~]# mkdir /var/www/ken{1,2}
第三步:创建网页首页文件 [root@ken ~]# echo “111” >> /var/www/ken1/index.html [root@ken ~]# echo “222” >> /var/www/ken2/index.html
第四步:重启apache [root@ken ~]# systemctl restart httpd
第五步:解析域名 [root@ken www]# cat /etc/hosts 127.0.0.1 localhost localhost.localdomain localhost4 localhost4.localdomain4 ::1 localhost localhost.localdomain localhost6 localhost6.localdomain6 192.168.64.4 www.ken1.com www.ken2.com
第六步:linux中访问 [root@ken www]# curl www.ken1.com 111 [root@ken www]# curl www.ken2.com 222
第七步:window中访问 修改window hosts文件
apache定制错误页面
编辑配置文件,错误页面定制支持三种形式: 1. 普通文本 2. 本地跳转 3. 外部跳转 [root@ken-node2 ~]# vim /etc/httpd/conf/httpd.conf ... 327 # 328 # Customizable error responses come in three flavors: 329 # 1) plain text 2) local redirects 3) external redirects 330 # 331 # Some examples: 332 #ErrorDocument 500 "The server made a boo boo." 333 #ErrorDocument 404 /missing.html 334 #ErrorDocument 404 "/cgi-bin/missing_handler.pl" 335 #ErrorDocument 402 http://www.example.com/subscription_info.html ...
普通文本
第一步:取消332行处的注释,如果404错误就会输出后面的一句话至页面
第二步:修改完之后重启apache
<pre>[root@ken-node2 ~]# systemctl restart httpd</pre>
第三步:浏览器访问一个不存在的内容


本地跳转
第一步:编辑httpd配置文件
第二步:编写错误页面 [root@ken-node2 html]# echo "this is missing page" > missing.html [root@ken-node2 html]# ls missing.html</pre>
第三步:重启httpd [root@ken-node2 html]# systemctl restart httpd
第四步:浏览器测试

外部跳转
第一步: 编辑httpd配置文件 第二步:重启httpd [root@ken-node2 html]# systemctl restart httpd</pre>
第三步:浏览器访问 这个时候输入错误页面会直接跳转到我的博客


使用apache部署京东网站(静态网站)
第一步:关防火墙 [root@ken www]# systemctl stop firewalld [root@ken www]# setenforce 0
第二步:上传京东静态页面至网站根目录 [root@ken html]# rz [root@ken html]# ls jd.zip [root@ken html]# unzip jd.zip #需要yum install unzip -y 第三步:访问京东网页 略
##apache上线动态网站
第一步:需要先部署LAMP架构 [root@ken jd]# yum install httpd php php-mysql mariadb-server -y
第二步:启动apache和数据库 [root@ken jd]# systemctl restart httpd mariadb
第三步:上传安装包并解压 [root@ken html]# ls wordpress-3.3.1-zh_CN.zip [root@ken html]# unzip wordpress-3.3.1-zh_CN.zip
第四步:复制wordpress文件到本目录下 [root@ken html]# cp wordpress/* . -a [root@ken html]# ls index.php wordpress-3.3.1-zh_CN.zip wp-blog-header.php wp-cron.php wp-login.php wp-settings.php license.txt wp-activate.php wp-comments-post.php wp-includes wp-mail.php wp-signup.php readme.html wp-admin wp-config-sample.php wp-links-opml.php wp-pass.php wp-trackback.php wordpress wp-app.php wp-content wp-load.php wp-register.php xmlrpc.php
第五步:配置数据库文件 [root@ken html]# cp wp-config-sample.php wp-config.php [root@ken html]# vim wp-config.php /** WordPress 数据库的名称 / define(‘DB_NAME’, ‘ken’); /* MySQL 数据库用户名 / define(‘DB_USER’, ‘ken’); /* MySQL 数据库密码 */ define(‘DB_PASSWORD’, ‘123’);
第六步:配置数据库 [root@ken html]# mysql -uroot Welcome to the MariaDB monitor. Commands end with ; or \g. Your MariaDB connection id is 2 Server version: 5.5.56-MariaDB MariaDB Server Copyright (c) 2000, 2017, Oracle, MariaDB Corporation Ab and others. Type ‘help;’ or ‘\h’ for help. Type ‘\c’ to clear the current input statement. MariaDB [(none)]> create database ken; Query OK, 1 row affected (0.00 sec) MariaDB [(none)]> grant all on . to ken@’localhost’ identified by ‘123’; Query OK, 0 rows affected (0.01 sec) MariaDB [(none)]> exit Bye
第七步:访问网站 略
注意 数据库保存了那些信息 1.用户评论 2.保存了网页连接信息 3.保存了网页文章 4.保存了网页文章的分类信息 5.用户注册信息 6. 其他的一些组件信息
那些信息没被保存在数据库 图片 视频
yum一键安装LAMP架构
[root@ken ~]# yum install httpd mariadb-server php php-mysql -y</pre> php-mysql用于php与数据库的通信
基于LAMP架构上线博客系统(动态网站)
第一步:安装LAMP [root@ken ~]# yum install httpd mariadb-server php php-mysql -y</pre>
第二步:启动数据库并创建数据库 [root@ken ~]# mysql ... mysql> create database ken; #创建数据库ken Query OK, 1 row affected (0.00 sec) mysql> grant all on ken.* to ken@"localhost" identified by "123"; #创建用户ken,密码为123 Query OK, 0 rows affected (0.00 sec) mysql> flush privileges; #刷新授权表 Query OK, 0 rows affected (0.00 sec)
第三步:准备wordpress安装包 [root@ken ~]# cd /var/www/html [root@ken html]# rz z waiting to receive.** B0100000023be50 [root@ken html]# ls wordpress-3.3.1-zh_CN.zip [root@ken html]# yum install unzip -y [root@ken html]# unzip wordpress-3.3.1-zh_CN.zip [root@ken html]# ls wordpress wordpress-3.3.1-zh_CN.zip
第四步:配置wordpress [root@ken html]# cd wordpress [root@ken wordpress]# cp wp-config-sample.php wp-config.php [root@ken wordpress]# vim wp-config.php ... // ** MySQL 设置 - 具体信息来自您正在使用的主机 ** // /** WordPress 数据库的名称 / define(''DB_NAME'', ''ken''); #填写数据库名 /* MySQL 数据库用户名 / define(''DB_USER'', ''ken''); #填写数据库用户名 /* MySQL 数据库密码 / define(''DB_PASSWORD'', ''123''); #数据库密码 /* MySQL 主机 */ define(''DB_HOST'', ''localhost''); #主机名 ...
第五步:重启httpd服务 [root@ken ~]# systemctl restart httpd</pre>
第六步:浏览器测试 电脑浏览器输入IP/wordpress/index.php

输入用户名和密码

登录成功

今天关于Web App架构和webapp架构的讲解已经结束,谢谢您的阅读,如果想了解更多关于6.app架构基础、Android Application Architecture 安卓APP架构[译]、Android APP架构思考、Apache web服务器(LAMP架构)的相关知识,请在本站搜索。
本文标签:


