如果您想了解JavaWeb工程中url地址的写法的相关知识,那么本文是一篇不可错过的文章,我们将对javaweburl进行全面详尽的解释,并且为您提供关于ASP.NETMVC中URL地址传参的两种写法
如果您想了解JavaWeb工程中url地址的写法的相关知识,那么本文是一篇不可错过的文章,我们将对javaweb url进行全面详尽的解释,并且为您提供关于ASP.NET MVC中URL地址传参的两种写法、eclipse java工程改造为java web工程详解、eclipse--java工程转web工程 以及 java或java web工程转maven工程、eclipse使用maven快速构建一个javaweb工程的有价值的信息。
本文目录一览:- JavaWeb工程中url地址的写法(javaweb url)
- ASP.NET MVC中URL地址传参的两种写法
- eclipse java工程改造为java web工程详解
- eclipse--java工程转web工程 以及 java或java web工程转maven工程
- eclipse使用maven快速构建一个javaweb工程
")
JavaWeb工程中url地址的写法(javaweb url)
两种url地址:
1. "/"给服务器使用, 代表web工程根路径(webroot)
2. "/"给浏览器使用, 代表tomcat 目录下的webapps文件夹
注意:
1. 开发中一般不使用绝对地址
2. 开发中只要是写url地址, 都以/开头
举例:
 1 // servletcontext
 2 this.getServletContext().getRealPath("/image/apple.png"); // 服务器
 3
 4 // forward 转发
 5 this.getServletContext().getRequestDispatcher("/register.html"); // 服务器
 6
 7 // sendRedirect 重定向
 8 response.sendRedirect("/burgundyred/register.html"); // 浏览器
 9
10 // 页面超链接
11 <a href="/burgundyred/servlet/Demo.do">点击</a> // 浏览器
12 <a href="${pageContext.request.contextPath }/servlet/Demo.do">点击</a>
拓展: 使用//还是\\?
1. 读取url资源使用//
e.g. C:\\abd\\asd
2. 读取硬盘上的资源使用\\
e.g. http://

ASP.NET MVC中URL地址传参的两种写法
一、url地址传参的第一种写法
1.通过mvc中默认的url地址书写格式:控制器/方法名/参数

2.实例:http://localhost:39270/RequestDemo/Index/88,默认参数名为id所以名称为id。

如果使用其他名称,后台是无法读取的会报错


二、url地址传参的第二种写法
1.使用?加参数名=参数值的写法,如果有多个参数使用&来连接
http://localhost:39270/RequestDemo/Index?id=88&name=%E5%BC%A0%E4%B8%89

2.后台接收参数的方式

以上所述是小编给大家介绍的ASP.NET MVC中URL地址传参的两种写法,希望对大家有所帮助,如果大家有任何疑问请给我留言,小编会及时回复大家的。在此也非常感谢大家对网站的支持!
- asp.net中匹配URL网址的正则表达式
- ASP.NET MVC从控制器中获取URL值
- ASP.NET通过更改Url进行页面传值的实现代码
- ASP.NET Core中如何使用表达式树创建URL详解
- ASP.NET实现MVC中获取当前URL、controller及action的方法
- 在asp.net中获取当前页面的URL的方法(推荐)
- ASP.NET获取URL方法汇总
- ASP.NET实现URL映射的方法
- ASP.NET MVC对URL匹配操作

eclipse java工程改造为java web工程详解
这篇文章主要介绍了eclipse java工程改造为java web工程详解的相关资料,需要的朋友可以参考下
eclipse java工程改造为java web工程
前言:
公司有许多Java工程(其实是web功能的),我用eclipse ide工具,可是web工程才能加入server tomcat中发布,作为开发,我当然最关心的是可以debug,没有debug的日子真是折磨人啊,感觉每天都是被代码虐,这个时候总是让人产生“我不适合做开发”、“我智商是不是有问题”……等错觉,所以今天在新导入一个java工程的时候,顺便研究了一下怎么将一个java工程改为javaWeb工程。
下面记录了一下。
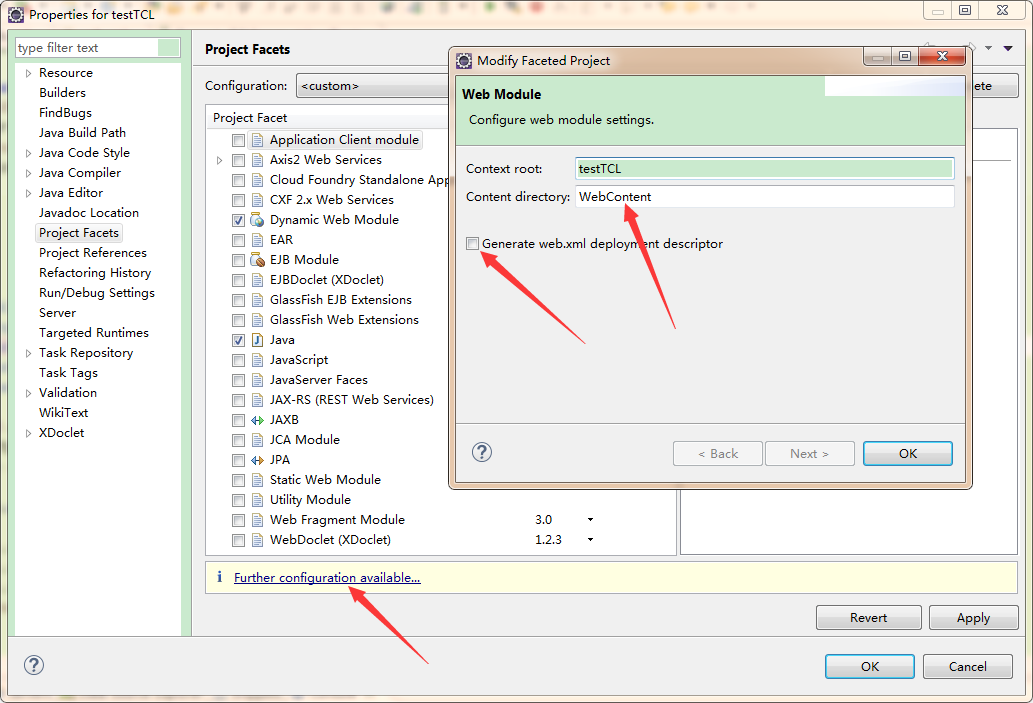
1.在eclipse中新建一个web工程,将.project文件打开
sdsorg.eclipse.wst.jsdt.core.javascriptValidatororg.eclipse.jdt.core.javabuilderorg.eclipse.wst.common.project.facet.core.builderorg.eclipse.wst.validation.validationbuilderorg.eclipse.jem.workbench.JavaEMFNatureorg.eclipse.wst.common.modulecore.ModuleCoreNatureorg.eclipse.wst.common.project.facet.core.natureorg.eclipse.jdt.core.javanatureorg.eclipse.wst.jsdt.core.jsNature
对比java工程和web新工程下面两个文件的内容,将不一样的地方进行修改。
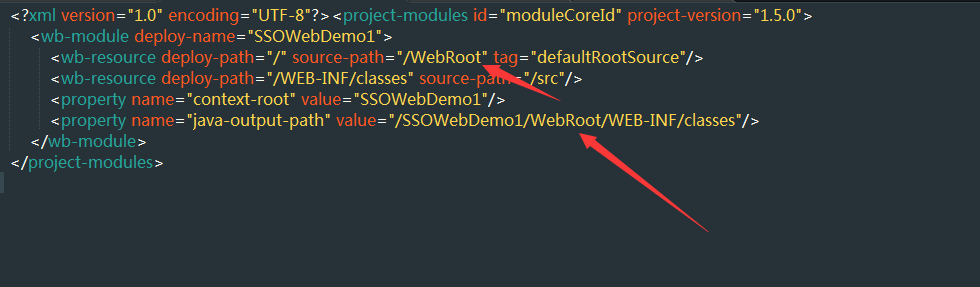
1.将.settings文件夹下面的文件进行对比,将不一样的拷贝进去,并将每个文件打开对比,修改正确
org.eclipse.wst.common.component org.eclipse.wst.common.project.facet.core.xml
主要是这两个文件中的内容,要对比修改。
3. 修改完之后刷新原来java工程,工程就会有web标志了,这时候我们再加入server web容器就可以了,debug 可以了,这是多么令人愉快的模式啊,Go
感谢阅读,希望能帮助到大家,谢谢大家对本站的支持!

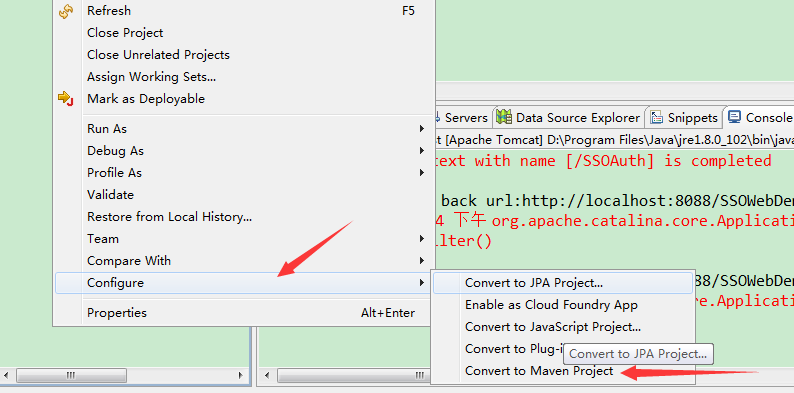
eclipse--java工程转web工程 以及 java或java web工程转maven工程

eclipse使用maven快速构建一个javaweb工程
1. eclipse导入一个maven工程
1.1 创建工程根目录 demo, 建立文件 demo/pom.xml,在 pom.xml 中增加如下内容
<project xmlns="http://maven.apache.org/POM/4.0.0"
	xmlns:xsi="http://www.w3.org/2001/XMLSchema-instance"
	xsi:schemaLocation="http://maven.apache.org/POM/4.0.0
	http://maven.apache.org/xsd/maven-4.0.0.xsd">

    <modelVersion>4.0.0</modelVersion>
    <groupId>kuangcaibao</groupId>
    <artifactId>demo</artifactId>
    <version>1.0</version>
    <packaging>war</packaging>

</project>
到这里其实我们就建立了一个空的maven项目。
packaging 标签中的内容为 war,作用当maven执行 package 操作的时候,打包成 war 格式。
1.2 将这个项目导入到 eclipse 中
File -> Import, 选择导入的工程类型为 Existing Maven Projects, 选择到我们的根目录,如下图

确定后工程导入成功。
1.3 编译项目
右键 demo 工程,执行 Run As -> maven install
这时会提示错误,因为打包 war 的时候,没有检查到 web.xml 文件的存在。同时自动在工程根目录下生成一些文件,如下图:

这里我们需要在 src/main/webapp/ 下增加 WEB-INF/web.xml 文件。再次编译项目,成功。
2. 将空的Maven项目改造成一个JavaWeb项目
在上面,已经加入了 web.xml 文件,现在我们需要在我们的工程中实现一个 servlet 类,提供服务。

可以看到有错误,这是因为没有引入 javax.servlet 类,我们在 pom.xml 中配置我们的依赖关系。增加如下内容:
<project xmlns="http://maven.apache.org/POM/4.0.0"
	xmlns:xsi="http://www.w3.org/2001/XMLSchema-instance"
	xsi:schemaLocation="http://maven.apache.org/POM/4.0.0
	http://maven.apache.org/xsd/maven-4.0.0.xsd">

    ...
     <dependencies>
     	<dependency>
     		<groupId>javax.servlet</groupId>
     		<artifactId>javax.servlet-api</artifactId>
     		<version>3.1.0</version>
     		<scope>provided</scope>
     	</dependency>
     </dependencies>
</project>
重新编译,错误消除。这时我们再实现 servlet 的服务,在 web.xml 路由控制中指定我们的路由。代码如下
// Hello.java

package kuangcaibao;

import java.io.IOException;
import javax.servlet.ServletException;
import javax.servlet.http.HttpServlet;
import javax.servlet.http.HttpServletRequest;
import javax.servlet.http.HttpServletResponse;

/**
 * Servlet implementation class Hello
 */
public class Hello extends HttpServlet {
	private static final long serialVersionUID = 1L;

    /**
     * Default constructor.
     */
    public Hello() {
        // TODO Auto-generated constructor stub
    }

	/**
	 * @see HttpServlet#doGet(HttpServletRequest request, HttpServletResponse response)
	 */
	protected void doGet(HttpServletRequest request, HttpServletResponse response) throws ServletException, IOException {
		// TODO Auto-generated method stub
		response.setContentType("text/html;charset=utf-8");
	    PrintWriter out = response.getWriter();
	    out.println("Hello world!");
	    out.close();
	}

}
<?xml version="1.0" encoding="UTF-8"?>
<web-app xmlns:xsi="http://www.w3.org/2001/XMLSchema-instance" xmlns="http://java.sun.com/xml/ns/javaee" xsi:schemaLocation="http://java.sun.com/xml/ns/javaee http://java.sun.com/xml/ns/javaee/web-app_2_5.xsd" version="2.5">
<display-name>test</display-name>
<welcome-file-list>
<welcome-file>index.html</welcome-file>
<welcome-file>index.htm</welcome-file>
<welcome-file>index.jsp</welcome-file>
<welcome-file>default.html</welcome-file>
<welcome-file>default.htm</welcome-file>
<welcome-file>default.jsp</welcome-file>
</welcome-file-list>
<servlet>
<servlet-name>hello</servlet-name>
<servlet-class>kuangcaibao.Hello</servlet-class>
</servlet>
<servlet-mapping>
<servlet-name>hello</servlet-name>
<url-pattern>/hw</url-pattern>
</servlet-mapping>
</web-app>3. 将工程放到Tomcat中运行
3.1 在eclipse中创建一个 Tomcat
3.2 运行工程
今天关于JavaWeb工程中url地址的写法和javaweb url的讲解已经结束,谢谢您的阅读,如果想了解更多关于ASP.NET MVC中URL地址传参的两种写法、eclipse java工程改造为java web工程详解、eclipse--java工程转web工程 以及 java或java web工程转maven工程、eclipse使用maven快速构建一个javaweb工程的相关知识,请在本站搜索。
本文标签:


