在本文中,我们将详细介绍怎么用Node.js实现WebSocket通信的各个方面,并为您提供关于nodejswebsocket的相关解答,同时,我们也将为您带来关于HTML5+NodeJs实现WebS
在本文中,我们将详细介绍怎么用Node.js实现WebSocket通信的各个方面,并为您提供关于nodejs websocket的相关解答,同时,我们也将为您带来关于HTML5+NodeJs实现WebSocket即时通讯的示例代码分享、js实现websocket实例、laraval+node.js实现websocket、node.js – WebSocket连接失败,使用nginx,nodejs和socket.io的有用知识。
本文目录一览:- 怎么用Node.js实现WebSocket通信(nodejs websocket)
- HTML5+NodeJs实现WebSocket即时通讯的示例代码分享
- js实现websocket实例
- laraval+node.js实现websocket
- node.js – WebSocket连接失败,使用nginx,nodejs和socket.io
")
怎么用Node.js实现WebSocket通信(nodejs websocket)
本篇内容介绍了“怎么用Node.js实现WebSocket通信”的有关知识,在实际案例的操作过程中,不少人都会遇到这样的困境,接下来就让小编带领大家学习一下如何处理这些情况吧!希望大家仔细阅读,能够学有所成!
node的依赖包
node中实现Websocket的依赖包有很多,websocket、ws均可,本文选取ws来实现,首先安装依赖
npm install ws
聊天室实例
假如A,B,C,D用户均通过客户端连接到Websocket服务,其中每个人发的消息都需要将其通过Websocket转发给其他人,此场景类似于服务端将A的消息广播给组内其他用户。
服务端实现
首先来看服务端程序,具体的工作流程分以下几步:
创建一个WebSocketServer的服务,同时监听8080端口的连接请求。
每当有新的客户端连接该WebSocket成功时,便将该连接push到连接池的数组中。
监听message事件,当该事件发生时,遍历连接池,以连接为单位将该消息转发到对应的客户端
监听close事件,当该事件发生时,将该连接移出连接池
服务端代码
var WebSocketServer = require('ws').Server,
  wss = new WebSocketServer({port: 8080});

// 连接池
var clients = [];

wss.on('connection', function(ws) {
  // 将该连接加入连接池
  clients.push(ws);
  ws.on('message', function(message) {
    // 广播消息
    clients.forEach(function(ws1){
      if(ws1 !== ws) {
        ws1.send(message);
      }
    })
  });

  ws.on('close', function(message) {
    // 连接关闭时,将其移出连接池
    clients = clients.filter(function(ws1){
      return ws1 !== ws
    })
  });
});
客户端实现
<html>
<input type="text" id="text">
<input type="button" onclick="sendMessage()" value="online">
<script>
  var ws = new WebSocket("ws://localhost:8080");

  ws.onopen = function (e) {
    console.log('Connection to server opened');
  }
  ws.onmessage = function(event) {
    console.log('Client received a message', event);
  };
  ws.onclose = function (e) {
    console.log('connection closed.');
  }
  function sendMessage() {
      ws.send(document.getElementById('text').value);
  }
</script>
</html>
如何发现用户?
通过上述的demo可以看到,WebSocket都是基于连接的,也就是说我们知道data是从那个connection发过来,但并不知道使用客户端的是李雷或者韩梅梅,这可如何是好?再想另一种场景,李雷只想给韩梅梅发消息,不想将消息广播给其他客户端,此时我们就需要在Server端能够标识用户身份和连接的对应关系。
于是,需要在客户端连接到WebSocket之后,紧接着再发一次请求,告诉Server我的user_id是多少,Server将此user_id与connection之间的关系存储在hashmap中,至此就建立了user_id与connection的对应关系。当需要发送消息给对应的客户端,从此hashmap中取出对应用户的connection信息,调用其send方法发出消息即可。
依赖包
npm install hashmap
服务端实现
var WebSocketServer = require('ws').Server, webSocketServer = new WebSocketServer({port: 8080});
var HashMap = require('hashmap');

// record the client
var userConnectionMap = new HashMap();
var connectNum = 0;

// connection
webSocketServer.on('connection', function(ws) {
  ++ connectNum;
  console.log('A client has connected. current connect num is : ' + connectNum);
  ws.on('message', function(message) {
    var objMessage = JSON.parse(message);
    var strType = objMessage['type'];

    switch(strType) {
      case 'online' :
        userConnectionMap.set(objMessage['from'], ws);
        break;
      default:
        var targetConnection = userConnectionMap.get(objMessage['to']);
        if (targetConnection) {
          targetConnection.send(message);
        }
    }
  });

  ws.on('close', function(message) {
    var objMessage = JSON.parse(message);
    userConnectionMap.remove(objMessage['from']);
  });
});
“怎么用Node.js实现WebSocket通信”的内容就介绍到这里了,感谢大家的阅读。如果想了解更多行业相关的知识可以关注小编网站,小编将为大家输出更多高质量的实用文章!

HTML5+NodeJs实现WebSocket即时通讯的示例代码分享
声明:本文为原创文章,如需转载,请注明来源waxes,谢谢!
最近都在学习HTML5,做canvas游戏之类的,发现HTML5中除了canvas这个强大的工具外,还有WebSocket也很值得注意。可以用来做双屏互动游戏,何为双屏互动游戏?就是通过移动端设备来控制PC端网页游戏。这样的话就要用到实时通讯了,而WebSocket无疑是最合适的。WebSocket相较于HTTP来说,有很多的优点,主要表现在WebSocket只建立一个TCP连接,可以主动推送数据到客户端,而且还有更轻量级的协议头,减少数据传送量。所以WebSocket暂时来说是实时通讯的最佳协议了。
至于服务器语言选择nodeJs,一是因为自己是做前端的,对javascript比较熟悉,相比于其他后台语言,自然会更喜欢nodeJs了,二是NodeJs本身事件驱动的方式很擅长与大量客户端保持高并发的连接。所以就选择NodeJs了。
服务器的实现很简单,先装一个nodeJs的模块,叫nodejs-websocket , 直接在nodeJs命令行中敲入:npm install nodejs-websocket回车就可以安装好了,然后就可以开始建立服务器了,因为有了nodejs-websocket模块,所以很多工作都不用我们自己做,直接调用别人封装好的方法就行了:
【服务端代码】,根据客户端传来的消息判断哪个是game1,哪个是game2,保存connection对象。
立即学习“前端免费学习笔记(深入)”;
var ws = require("nodejs-websocket");
console.log("开始建立连接...")var game1 = null,game2 = null ,
game1Ready = false , game2Ready = false;
var server = ws.createServer(function(conn){
    conn.on("text", function (str) {
        console.log("收到的信息为:"+str)
        if(str==="game1"){
            game1 = conn;
            game1Ready = true;
            conn.sendText("success");
        }        if(str==="game2"){
            game2 = conn;
            game2Ready = true;
        }        if(game1Ready&&game2Ready){
            game2.sendText(str);
        }

        conn.sendText(str)
    })
    conn.on("close", function (code, reason) {
        console.log("关闭连接")
    });
    conn.on("error", function (code, reason) {
        console.log("异常关闭")
    });
}).listen(8001)
console.log("WebSocket建立完毕")【game1代码】:通过点击获取三个框的内容,传到服务器
<!doctype html><html lang="en"><head>
<meta charset="UTF-8">
<title>Document</title>
<style>
.kuang{text-align: center;margin-top:200px;}
#mess{text-align: center}
.value{width: 200px;height:200px;border:1px solid;text-align: center;line-height: 200px;display: inline-block;}
</style></head><body>
<p id="mess">正在连接...</p>
<p>
<pid="value1">小明小明</p>
<pid="value2">大胸大胸</p>
<pid="value3">小张小张</p>
</p>
<script>
var mess = document.getElementById("mess");
if(window.WebSocket){
var ws = new WebSocket('ws://192.168.17.80:8001');
ws.onopen = function(e){
console.log("连接服务器成功");
ws.send("game1");
}
ws.onclose = function(e){
console.log("服务器关闭");
}
ws.onerror = function(){
console.log("连接出错");
}
ws.onmessage = function(e){
mess.innerHTML = "连接成功"
document.querySelector(".kuang").onclick = function(e){
var time = new Date();
ws.send(time + " game1点击了“" + e.target.innerHTML+"”");
}
}
} </script></body></html>【game2代码】:获取服务推送来的消息,并且显示
<!doctype html><html lang="en"><head>
<meta charset="UTF-8">
<title>Document</title>
<style>
.kuang{text-align: center;margin-top:200px;}
#mess{text-align: center}
</style></head><body>
<p id="mess"></p>
<script>
var mess = document.getElementById("mess");
if(window.WebSocket){
var ws = new WebSocket('ws://192.168.17.80:8001');
ws.onopen = function(e){
console.log("连接服务器成功");
ws.send("game2");
}
ws.onclose = function(e){
console.log("服务器关闭");
}
ws.onerror = function(){
console.log("连接出错");
}
ws.onmessage = function(e){
var time = new Date();
mess.innerHTML+=time+"的消息:"+e.data+"<br>"
}
} </script></body></html>运行截图: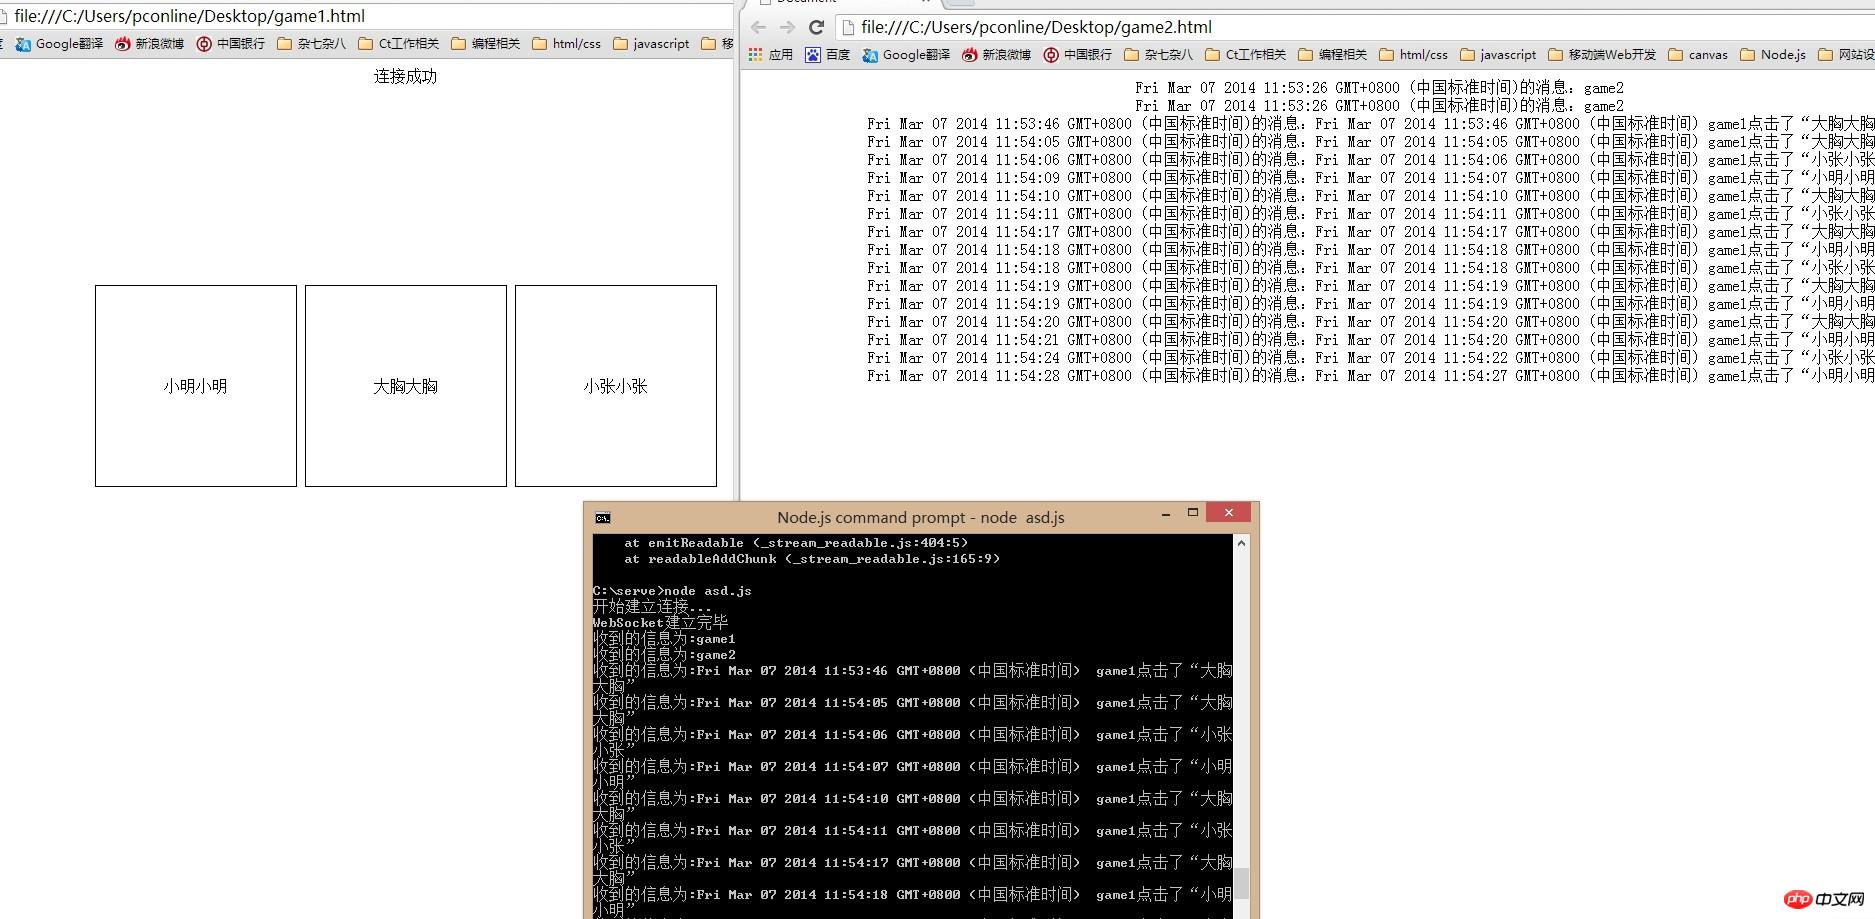
以上就是HTML5+NodeJs实现WebSocket即时通讯的示例代码分享的详细内容,更多请关注php中文网其它相关文章!

js实现websocket实例
<!-- websocket 接口 -->
<script type="text/javascript">
var websocket_url = ''ws://127.0.0.1:'' + "{$Think.config.prompt_service.ws_port}";
var admin_userid = "{$Think.const.UID}";
var socket_type = JSON.parse(''{$mginfo.socket_type|default=[]|json_encode}'');
</script>
<script src="__JS__/socket_notify.js?v=20191018"></script>
socket_notify.js
var ws_text = document.location.protocol == ''https:'' ? ''wss'' : ''ws'';
websocket_url = ws_text + ''://'' + window.location.host + ''/socket.io/'';
var socket = new WebSocket(websocket_url);

//连接成功时触发
socket.onopen = function() {
    console.log(''connected to server!'');
    // 登录
    socket.send(JSON.stringify({
        type: ''login'',
        uid: admin_userid,
    }));

    setInterval(function() {
        console.log(''Hello!'');
        socket.send(''Hello!'');
    }, 30000)
};
var socket_func = {};

//监听收到的消息
socket.onmessage = function(res) {
    let Sound      = false;
    let alerttitle = false;
    let alerttext  = false;
    let alertlocal = false;
    let content    = '''';
    let func       = '''';

    var data = JSON.parse(res.data);
    console.log(data);
    var type = data.type;
    try {
        content = JSON.parse(data.data);
    } catch (err) {
        content = data.data;
    }
    const alert_check = data.alert;

    switch (type) {
        case ''newCpOrder'':
            func       = type;
            Sound      = 1;
            alerttitle = ''新公司入款订单'';
            alerttext  = ''订单ID:'' + content.id;
            alertlocal = ''/cp_recharge/index.html'';
            break;
        case ''newAgentOrder'':
            func       = ''newTxOrder'';
            Sound      = 2;
            alerttitle = ''新代理出款订单'';
            alerttext  = ''订单ID:'' + content.id;
            alertlocal = ''/exchange/index.html'';
            break;

    }

    if (alert_check) {
        if ((!socket_type[type] || socket_type[type][''sound''] === 1) && Sound !== false) {
            playSound(Sound);
        }

        if ((!socket_type[type] || socket_type[type][''text''] === 1) && alerttitle !== false) {
            notify(alerttitle, alerttext, alertlocal);
        }
    }

    // 执行方法
    if (func) {
        try {
            socket_func[func](content);
        } catch (err) {
            console.log(''没有当前方法'' + func);
        }
    }
};

// 断开
socket.onclose = function(e) {
    console.log(''websocket 断开: '' + e.code + '' '' + e.reason + '' '' + e.wasClean)
    console.log(e);
}

var Notification = window.Notification || window.webkitNotification || window.mozNotification;
var stopSound = function() {};

// 播放声音
var playSound = function(type) {
    var audio_id = ''recharge_audio'';
    switch (type) {
        case 1:
            audio_id = ''recharge_audio'';
            break;
        case 2:
            audio_id = ''withdraw_audio'';
            break;
        case 3:
            audio_id = ''withdraw_audio'';
            break;
        case 4:
            audio_id = ''untreated_recharge'';
            break;
        case 5:
            audio_id = ''untreated_withdraw'';
            break;
        case 6:
            audio_id = ''large_recharge'';
            break;
        default:
    }

    var audio = document.getElementById(audio_id);
    audio.currentTime = 0;
    audio.play();
};

var notify = function() {};

// web 页面通知
if (Notification) {
    Notification.requestPermission().then(function(permission) {
        if (permission === ''granted'') {
            notify = function(title, content, url) {
                var options = {
                    body: content,
                };
                var instance = new Notification(title, options);
                instance.onshow = function() {
                    setTimeout(function() {
                        instance.close();
                    }, 18000);
                };
                instance.onclick = function() {
                    window.open(url);
                };
            };
            window.notify = notify;
        }
    });
}
Buy me a cup of coffee :)

laraval+node.js实现websocket
本文是使用laraval的event与node.js作为websocket服务器,与页面实现长连接;
基本知识
- Laravel Event
- Redis
- Socket.io
- Node.js
配置
-
Laravel 中使用 Redis 你需用通过 Composer 来安装 predis/predis 包文件。
-
Redis 在应用中的配置文件存储在 config/database.php,在这个文件中,你可以看到一个包含了 Redis 服务信息的 redis 数组:
''redis'' => [ ''cluster'' => false, ''default'' => [ ''host'' => ''127.0.0.1'', ''port'' => 6379, ''database'' => 0, ], ] -
Laravel Event
Laravel 通过广播事件来共享事件到的服务端和客户端的 JavaScript 框架。
所有的事件广播配置选项都被存储在 config/broadcasting.php 配置文件中。Laravel 附带了几种可用的驱动如 Pusher,Redis,和 Log,我们将使用 Redis 作为广播驱动,这里需要依赖 predis/predis 类库。
由于默认的广播驱动使用的是 pusher,所以我们需要在 .env 文件中设置 BROADCAST_DRIVER=redis。
下面是一个事件类的例子
<?php

namespace App\Events;

use Illuminate\Broadcasting\Channel;
use Illuminate\Queue\SerializesModels;
use Illuminate\Broadcasting\PrivateChannel;
use Illuminate\Broadcasting\PresenceChannel;
use Illuminate\Foundation\Events\Dispatchable;
use Illuminate\Broadcasting\InteractsWithSockets;
use Illuminate\Contracts\Broadcasting\ShouldBroadcast;

class MessageEvent implements ShouldBroadcast
{
    use Dispatchable, InteractsWithSockets, SerializesModels;

    public $messages;
    protected $channel;

    /**
     * Create a new event instance.
     *
     * @return void
     */
    public function __construct($channel, $messages)
    {
        $this->channel = $channel;
        $this->messages = $messages;
    }

    /**
     * Get the channels the event should broadcast on.
     *
     * @return Channel|array
     */
    public function broadcastOn()
    {
        return [$this->channel];
    }

    public function broadcastAs()
    {

        return ''OnPushMessage'';

    }


    public function broadcastWith()
    {

        return $this->messages;

    }

}
注意:
-
broadcastOn方法应返回一个数组,它表示所需广播的频道
-
broadcastAs返回的是一个字符串,它表示广播所触发的事件
-
broadcastWith 返回的是一个数组,它表示要给给定频道发布过去的数据
接下来是触发事件:
```
event(new MessageEvent(\$message->channel_id, $send_message));
```
这个操作会自动的触发事件的执行并将信息广播出去。该广播操作底层借助了 redis 的订阅和发布机制。RedisBroadcaster 会将事件中的允许公开访问的数据通过给定的频道发布出去。
Node.js 和 Socket.io
对于发布出去的信息,我们需要一个服务来对接,让其能对 redis 的发布能够进行订阅,并且能把信息以 WebSocket 协议转发出去,这里我们可以借用 Node.js 和 socket.io 来非常方便的构建这个服务:
let app = require(''http'').createServer((req, res) => {
    res.writeHead(200);
    res.end('''');
});
let io = require(''socket.io'')(app);

//redis可以配置
let Redis = require(''ioredis'');
var evn = ''test'';
if(evn == ''local''){
    var host = ''127.0.0.1'';
    var port = ''6379'';
    var password = null;
} else if(evn == ''test''){
    var host = ''186.5.562.2'';
    var port = ''6379'';
    var password = ''151554145'';
}

let redis = new Redis({
    ''host'':host,
    ''port'':port,
    ''password'':password
});

//存储用户
var userList = [];

app.listen(6001, () => console.log(''Server is running!''));

io.on(''connection'', (socket) => {

    socket.on(''login'', (user) => {

        if (userList[user.channel] === undefined) userList[user.channel] = [];

        if(user.openid.indexOf("admin") == -1){
            userList[user.channel].push(user.openid);
            io.emit(user.channel + '':UserChange'', userList[user.channel]);
            let userCount = countUser();
            io.emit(''user.count'', userCount);
        }

        console.log(''[L] openid:'' + user.openid + '' Login!'');

    });


    socket.on(''disconnect'', (res) => {

        let user = cookieToObject(socket.request.headers.cookie.split(''; ''));

        let openid = user[''openid''] + "";

        if(openid.indexOf("admin") == -1){
            let index = userList[user[''channel'']].indexOf(user[''openid''] + "");

            userList[user[''channel'']].splice(index, 1);

            io.emit(user.channel + '':UserChange'', userList[user.channel]);

            let userCount = countUser();

            io.emit(''user.count'', userCount);
        }

        console.log(''[L] openid:'' + user[''openid''] + '' Logout!'');

    });

    socket.on(''user.count'', () => {

        let userCount = countUser();

        io.emit(''user.count'', userCount);

    });

});


redis.psubscribe(''*'', (err, count) => {

});

redis.on(''pmessage'', (subscrbed, channel, message) => {
    message = JSON.parse(message);
    console.log(''[M]''.channel + '' Message :'' + message.event, message.data);
    io.emit(channel + '':'' + message.event, message.data);
});


function countUser() {

    let userCount = [];


    for (var i in userList) {
        userCount[i] = userList[i].length;

    }
    return userCount;
}

function cookieToObject(data) {

    let new_Object = [];

    for (let i in data) {

        data[i] = data[i].split(''='');

        new_Object[data[i][0]] = data[i][1];

    }

    return new_Object;

}
这里我们使用 Node.js 引入 socket.io 服务端并监听 6001 端口,借用 redis 的 psubscribe 指令使用通配符来快速的批量订阅,接着在消息触发时将消息通过 WebSocket 转发出去。
Socket.io 客户端
在 web 前端,我们需要引入 Socket.io 客户端开启与服务端 6001 端口的通讯,并订阅频道事件:
 $.cookie(''channel'', channel_id, {path: "/"});
 $.cookie(''openid'', user, {path: "/"});

 var socket = io('':6001'');
 socket.on(''connect'', function () {
      socket.emit(''login'', {channel: channel_id, openid: user});
  });
socket.on(channel_id + '':removeMessage'', function (res) {
      $(".message-list .message-item[data-id=''"+res.id + "'']").remove();
  });
最后在使用node在后台启动server.js
至此整个通讯闭环结束,开发流程看起来就是这样的:
- 在 Laravel 中构建一个支持广播通知的事件
- 设置需要进行广播的频道及事件名称
- 将广播设置为使用 redis 驱动
- 提供一个持续的服务用于订阅 redis 的发布,及将发布内容通过 WebSocket 协议推送到客户端 -客户端打开服务端 WebSocket 隧道,并对事件进行订阅,根据指定事件的推送进行响应

node.js – WebSocket连接失败,使用nginx,nodejs和socket.io
我尝试用Nginx设置nodejs.但是当客户端尝试连接它失败与…
WebSocket connection to 'ws://www.mydomain.com/socket.io/1/websocket/KUv5G...' Failed: Error during WebSocket handshake: 'Connection' header value is not 'Upgrade': keep-alive socket.io.js:2371
那么如何启用websocket通讯?
我当前的Nginx配置
  upstream mynodejsapp {
    server 127.0.0.1:3000 max_fails=0 fail_timeout=10s weight=1;
    ip_hash;
    keepalive 512;
  }
  server {
    listen 80;
    listen [::]:80 default_server ipv6only=on;
    index index.html;
    server_name mydomain.com www.mydomain.com;
    keepalive_timeout 10;
    gzip on;
    gzip_http_version 1.1;
    gzip_vary on;
    gzip_comp_level 6;
    gzip_proxied any;
    gzip_buffers 16 8k;
    gzip_disable "MSIE [1-6]\.(?!.*SV1)";
    location / {
      proxy_pass http://mynodejsapp;
      proxy_set_header X-Real-IP $remote_addr;
      proxy_set_header X-Forwarded-Proto $scheme;
      proxy_set_header X-Forwarded-For $proxy_add_x_forwarded_for;
      proxy_set_header Host $host;
      proxy_set_header X-Nginx-Proxy true;
      proxy_set_header Upgrade $http_upgrade;
      proxy_set_header Connection "Upgrade";
      proxy_cache_bypass $http_upgrade;
      proxy_http_version 1.1;
      proxy_redirect off;
      proxy_next_upstream error timeout http_500 http_502 http_503 http_504;
      proxy_connect_timeout 5s;
      proxy_read_timeout 20s;
      proxy_send_timeout 20s;
      proxy_buffers 8 32k;
      proxy_buffer_size 64k;
    }
    location ~ ^/(images/|img/|javascript/|js/|css/|stylesheets/|flash/|media/|static/|robots.txt|humans.txt|favicon.ico) {
      root /var/www/mynodejsapp;
      access_log off;
      expires 1h;
    }
    fastcgi_param   APPLICATION_ENV  production;
  }
第二,我的Nginx conf工作.你可以跟随我的conf.
server {
    listen       80;
    server_name jn.whattoc.com;

    location / {
      proxy_set_header X-Real-IP $remote_addr;
      proxy_set_header X-Forwarded-For $proxy_add_x_forwarded_for;
      proxy_set_header Host $http_host;
      proxy_set_header X-Nginx-Proxy true;

      proxy_pass http://127.0.0.1:4050/;
      proxy_redirect off;

              proxy_http_version 1.1;
        proxy_set_header Upgrade $http_upgrade;
        proxy_set_header Connection "upgrade";
    }
}
今天关于怎么用Node.js实现WebSocket通信和nodejs websocket的讲解已经结束,谢谢您的阅读,如果想了解更多关于HTML5+NodeJs实现WebSocket即时通讯的示例代码分享、js实现websocket实例、laraval+node.js实现websocket、node.js – WebSocket连接失败,使用nginx,nodejs和socket.io的相关知识,请在本站搜索。
本文标签:


