本文将介绍使用SpringBoot来加速Javaweb项目的开发的详细情况,特别是关于springboot启动加速的相关信息。我们将通过案例分析、数据研究等多种方式,帮助您更全面地了解这个主题,同时也
本文将介绍使用 Spring Boot 来加速 Java web 项目的开发的详细情况,特别是关于springboot启动加速的相关信息。我们将通过案例分析、数据研究等多种方式,帮助您更全面地了解这个主题,同时也将涉及一些关于Java Spring Boot - 项目“org.springframework.boot:spring-boot-starter-parent:2.5.0”未找到错误、Laravel 8 新功能:使用 schema:dump 来加速 Migration 和测试、redislimiter-spring-boot -- 一个优秀的分布式 spring boot/Spring Cloud API 限流框架、Spring Boot (三):Spring Boot 中的事件的使用 与 Spring Boot 启动流程 (Event 事件 和 Listeners 监听器)的知识。
本文目录一览:- 使用 Spring Boot 来加速 Java web 项目的开发(springboot启动加速)
- Java Spring Boot - 项目“org.springframework.boot:spring-boot-starter-parent:2.5.0”未找到错误
- Laravel 8 新功能:使用 schema:dump 来加速 Migration 和测试
- redislimiter-spring-boot -- 一个优秀的分布式 spring boot/Spring Cloud API 限流框架
- Spring Boot (三):Spring Boot 中的事件的使用 与 Spring Boot 启动流程 (Event 事件 和 Listeners 监听器)
")
使用 Spring Boot 来加速 Java web 项目的开发(springboot启动加速)
我想,现在企业级的Java web项目应该或多或少都会使用到Spring框架的。
回首我们以前使用Spring框架的时候,我们需要首先在(如果你使用Maven的话)pom文件中增加对相关的的依赖(使用gradle来构建的话基本也一样)然后新建Spring相关的xml文件,而且往往那些xml文件还不会少。然后继续使用tomcat或者jetty作为容器来运行这个工程。基本上每次创建一个新的项目都是这么一个流程,而我们有时候仅仅想快速的创建一个Spring web工程来测试一些东西,或者是希望能节省时间。
现在我们使用Spring Boot就可以快速的做到这些了。
我们先来看一个非常简单的使用Spring boot的例子吧:
我们创建一个Maven工程,假定工程名字为spring-boot,然后我们在pom.xml文件中加入依赖:
<dependency>
    <groupId>org.springframework.boot</groupId>
    <artifactId>spring-boot-starter-web</artifactId>
    <version>1.0.2.RELEASE</version>
</dependency>
2.  新建一个Controller来接受处理我们的请求:
import org.springframework.boot.SpringApplication;
import org.springframework.boot.autoconfigure.EnableAutoConfiguration;
import org.springframework.stereotype.Controller;
import org.springframework.web.bind.annotation.RequestMapping;
import org.springframework.web.bind.annotation.RequestMethod;
import org.springframework.web.bind.annotation.ResponseBody;

/**
 * Created by wenchao.ren on 2014/4/26.
 */
@Controller
@EnableAutoConfiguration
public class SimpleController {

    @RequestMapping(value ="/hello", method = RequestMethod.GET)
    @ResponseBody
    public String hello(){
        return "hello world";
    }

    public static void main(String[] args) {
        SpringApplication.run(SimpleController.class, args);
    }
}
相信大家已经看到了这个Controller有一个main方法,不要急,我们直接运行这个main方法:
 :: Spring Boot ::        (v1.0.2.RELEASE)

2014-04-26 22:54:40.985  INFO 7236 --- [           main] c.r.spring.boot.SimpleController         : Starting SimpleController on rollen with PID 7236 (D:\workspace\GitHub\SpringDemo\spring-boot\target\classes started by wenchao.ren in D:\workspace\GitHub\SpringDemo\spring-boot)
2014-04-26 22:54:41.008  INFO 7236 --- [           main] ationConfigEmbeddedWebApplicationContext : Refreshing org.springframework.boot.context.embedded.AnnotationConfigEmbeddedWebApplicationContext@50de0926: startup date [Sat Apr 26 22:54:41 CST 2014]; root of context hierarchy
2014-04-26 22:54:41.583  INFO 7236 --- [           main] .t.TomcatEmbeddedServletContainerFactory : Server initialized with port: 8080
2014-04-26 22:54:41.706  INFO 7236 --- [           main] o.apache.catalina.core.StandardService   : Starting service Tomcat
2014-04-26 22:54:41.706  INFO 7236 --- [           main] org.apache.catalina.core.StandardEngine  : Starting Servlet Engine: Apache Tomcat/7.0.52
2014-04-26 22:54:41.785  INFO 7236 --- [ost-startStop-1] o.a.c.c.C.[Tomcat].[localhost].[/]       : Initializing Spring embedded WebApplicationContext
2014-04-26 22:54:41.785  INFO 7236 --- [ost-startStop-1] o.s.web.context.ContextLoader            : Root WebApplicationContext: initialization completed in 779 ms
2014-04-26 22:54:42.055  INFO 7236 --- [ost-startStop-1] o.s.b.c.e.ServletRegistrationBean        : Mapping servlet: ''dispatcherServlet'' to [/]
2014-04-26 22:54:42.057  INFO 7236 --- [ost-startStop-1] o.s.b.c.embedded.FilterRegistrationBean  : Mapping filter: ''hiddenHttpMethodFilter'' to: [/*]
2014-04-26 22:54:42.289  INFO 7236 --- [           main] o.s.w.s.handler.SimpleUrlHandlerMapping  : Mapped URL path [/**/favicon.ico] onto handler of type [class org.springframework.web.servlet.resource.ResourceHttpRequestHandler]
2014-04-26 22:54:42.368  INFO 7236 --- [           main] s.w.s.m.m.a.RequestMappingHandlerMapping : Mapped "{[/hello],methods=[GET],params=[],headers=[],consumes=[],produces=[],custom=[]}" onto public java.lang.String com.rollenholt.spring.boot.SimpleController.hello()
2014-04-26 22:54:42.376  INFO 7236 --- [           main] o.s.w.s.handler.SimpleUrlHandlerMapping  : Mapped URL path [/webjars/**] onto handler of type [class org.springframework.web.servlet.resource.ResourceHttpRequestHandler]
2014-04-26 22:54:42.377  INFO 7236 --- [           main] o.s.w.s.handler.SimpleUrlHandlerMapping  : Mapped URL path [/**] onto handler of type [class org.springframework.web.servlet.resource.ResourceHttpRequestHandler]
2014-04-26 22:54:42.447  INFO 7236 --- [           main] o.s.j.e.a.AnnotationMBeanExporter        : Registering beans for JMX exposure on startup
2014-04-26 22:54:42.459  INFO 7236 --- [           main] s.b.c.e.t.TomcatEmbeddedServletContainer : Tomcat started on port(s): 8080/http
2014-04-26 22:54:42.460  INFO 7236 --- [           main] c.r.spring.boot.SimpleController         : Started SimpleController in 1.675 seconds (JVM running for 1.944)
2014-04-26 22:54:54.963  INFO 7236 --- [nio-8080-exec-1] o.a.c.c.C.[Tomcat].[localhost].[/]       : Initializing Spring FrameworkServlet ''dispatcherServlet''
2014-04-26 22:54:54.963  INFO 7236 --- [nio-8080-exec-1] o.s.web.servlet.DispatcherServlet        : FrameworkServlet ''dispatcherServlet'': initialization started
2014-04-26 22:54:54.971  INFO 7236 --- [nio-8080-exec-1] o.s.web.servlet.DispatcherServlet        : FrameworkServlet ''dispatcherServlet'': initialization completed in 8 ms
会产生上面的输出,查看日志可以发现默认使用的是tomcat,端口绑定在8080,现在让我们来访问:http://localhost:8080/hello
就可以看到我们代码中输出的字样:hello world了。
回首这个过程,是不是相比于以前快速了许多呢

参考资料:

1.  Spring Boot Reference Guide
Java Spring Boot - 项目“org.springframework.boot:spring-boot-starter-parent:2.5.0”未找到错误
如何解决Java Spring Boot - 项目“org.springframework.boot:spring-boot-starter-parent:2.5.0”未找到错误
我正在尝试开始使用 Spring Boot。我打算学习一个教程,这个教程把我带到了 Spring Initializr。我使用 Java 1.8 生成了一个 Maven 项目,以及只有 Spring Web 依赖项。然后,我尝试在 IntelliJ 社区版中打开它。
然而,在打开项目时,我注意到 pom 文件中有 9-10 个错误。我尝试了很多东西,但到目前为止没有任何效果。我是 Java 新手,所以我不知道这是 JDK 问题还是其他什么问题,但是在视频中,它对他来说是无缝的。我会附上截图。
当我在 CMD 中输入 java -version 时,我得到响应 java version "1.8.0_291" 以供参考。
以下是错误列表(截图无效):
-
未找到项目“org.springframework.boot:spring-boot-starter-parent:2.5.0”
-
依赖关系“org.springframework.boot:spring-boot-starter-web:”未找到
-
未找到插件“org.springframework.boot:spring-boot-maven-plugin:”
-
org.springframework.boot:spring-boot-starter-parent:pom:2.5.0 在之前的尝试中未能从 https://repo.maven.apache.org/maven2 转移。此故障已缓存在本地存储库中,并且在 Central 的更新间隔已过或强制更新之前不会重新尝试解决。原始错误:无法将工件 org.springframework.boot:spring-boot-starter-parent:pom:2.5.0 from/to central (https://repo.maven.apache.org/maven2): Transfer Failed for https://repo.maven.apache.org/maven2/org/springframework/boot/spring-boot-starter-parent/2.5.0/spring-boot-starter-parent-2.5.0.pom
这些错误中的每一个都出现了大约 3 次。这些错误是从新的 Spring Initializr 下载中生成的,因此您也可以自己通过网站获取完全相同的文件。
在此先感谢您!

Laravel 8 新功能:使用 schema:dump 来加速 Migration 和测试
Laravel 8 将于今年晚些时候发布一个新的 schema:dump 命令。 此命令对现有项目非常有用,因为它删除了不再需要的旧迁移并加快了测试和 CI process。 Taylor Otwell 在他的 pull request 中解释了此功能:
此 PR 增加了 php artisan schema:dump 命令,该命令使用 mysqldump 或 pgdump 将 schema 的当前状态转储到 database/schema/{connection}-schema.mysql 文件中。
当此文件存在并且 php artisan migration 或 php artisan migration:fresh 已运行并且尚未对数据库 z 执行任何迁移(迁移表为空)时,此架构文件将首先加载到数据库中,然后所有未完成的迁移将执行。 这意味着该 schema 文件通常仅在本地开发或 CI 测试期间有效使用。 在生产中,您通常已经具有过去运行的迁移,因此永远不会触发此 schema 文件。
运行 schema:dump 并且项目中存在 schema 转储文件后,您可以删除已将其迁移到生产环境的旧迁移文件。
此功能解决了两个问题:
- 它将清除 schema 文件夹中的旧迁移文件,这些文件在旧项目中可能会很大。
- 由于有了 schema 文件,测试的运行速度要快得多,并且 Laravel 不 需要在测试过程中执行所有迁移。
该命令在您的项目中将如下所示:
php artisan schema:dump

# 自动清理旧迁移文件
php artisan schema:dump --prune

# 指定数据库链接
php artisan schema:dump --database=pgsql
此功能已合并到 master 分支中,这意味着它将在 Laravel 8 中可用。要了解有关此功能的更多信息,最好的途径是 8.x Schema Dump 。
原文地址:https://laravel-news.com/schema-dump
译文地址:https://learnku.com/laravel/t/43497
更多学习内容请访问:
腾讯 T3-T4 标准精品 PHP 架构师教程目录大全,只要你看完保证薪资上升一个台阶(持续更新)

redislimiter-spring-boot -- 一个优秀的分布式 spring boot/Spring Cloud API 限流框架
redislimiter-spring-boot
一个优秀的分布式 spring boot/Spring Cloud API 限流框架,特别适合微服务架构.
快速开始
1. git clone https://github.com/tangaiyun/redislimiter-spring-boot.git 或 https://gitee.com/aiyuntang/redislimiter-spring-boot.git
2. cd redislimiter-spring-boot-starter
3. mvn clean install
4. 新建一个 Spring boot API 项目,具体参考 demo1 项目,要在项目依赖中加入
        <dependency>
            <groupId>com.tay</groupId>
            <artifactId>redislimiter-spring-boot-starter</artifactId>
            <version>0.0.1-SNAPSHOT</version>
        </dependency>
5. 修改项目 resources/application.yml 文件
server:
    port: 8888                                #端口
spring:
    application:
        name: demo1                           #应用名称必须要配置,不然无法启动
    redis-limiter:                            #限流器配置
        redis-host: 127.0.0.1                 #redis server ip
        check-action-timeout: 100             #访问检查动作最大执行时间(单位毫秒)
        enable-dynamical-conf: true           #开启动态限流配置
spring.application.name 必须配置
6. 新建一个 RestController 类
package com.tay.demo1;

import com.tay.redislimiter.RateLimiter;
import com.tay.redislimiter.dynamic.DynamicRateLimiter;
import org.springframework.web.bind.annotation.GetMapping;
import org.springframework.web.bind.annotation.RequestMapping;
import org.springframework.web.bind.annotation.RestController;

import java.util.concurrent.TimeUnit;


@RestController
@RequestMapping("/demo")
public class DemoController {

    @GetMapping("/test")
    //基于用户限流,独立用户每分钟最多2次访问,用户id在header中,key为userid
    //RateLimiter标签为静态配置,此类配置不可动态修改
    @RateLimiter(base = "#Headers[''userid'']", permits = 2, timeUnit = TimeUnit.MINUTES)
    public String test() {
        return "test!";
    }

    @GetMapping("/dynamictest")
    //基于来源ip限流,独立ip每分钟最多访问5次访问,来源ip位于header中,key为X-Real-IP
    //DynamicRateLimiter标签代表动态配置,此类配置可在运行时动态修改
    @DynamicRateLimiter(base = "#Headers[''X-Real-IP'']", permits = 5, timeUnit = TimeUnit.MINUTES)
    public String dynamicTest() {
        return "dynamictest!";
    }

}
7. 在本机安装 redis 并启动,强烈建议在本机安装 docker 环境,然后执行
sudo docker run -d -p 6379:6379 redis
就是这么爽气!
8. 运行 Demo1Application.java
9. 测试
通过postman或者restd访问url http://localhost:8888/demo/test 在header中指定userid=tom, 可以发现tom一分钟最多只能访问2次

通过postman或者restd访问url http://localhost:8888/demo/dynamictest 在header中指定X-Real-IP=127.0.0.1, 可以发现127.0.0.1一分钟最多只能访问5次
高阶教程
1. 配置项大全
spring:
    redis-limiter:
        redis-host: 127.0.0.1           # redis server IP                  默认值:127.0.0.1
        redis-port: 6379                # redis service 端口               默认值:6379
        redis-password: test            # redis 访问密码                   默认值:null
        redis-connection-timeout: 2000  # redis 连接超时时间               默认值:2000
        redis-pool-max-idle: 50         # redis 连接池最大空闲连接数        默认值:50
        redis-pool-min-idle: 10         # redis 连接池最小空闲连接数        默认值: 10
        redis-pool-max-wait-millis: -1 # 从连接池中获取连接最大等待时间     默认值: -1
        redis-pool-max-total: 200       # 连接池中最大连接数                默认值: 200
        redis-key-prefix: #RL           # 访问痕迹key值前缀                 默认值: #RL
        check-action-timeout: 100       # 访问检查动作最大执行时间(单位毫秒) 默认值: 100
        enable-dynamical-conf: true     # 是否开启动态配置                  默认值: false
        channel: #RLConfigChannel      # 配置变更事件发送channel名称        默认值: #RLConfigChannel
2 标签
@RateLimiter, @DynamicRateLimiter 是用户最经常使用到的。
2.1 标签说明 -- 整体说明
@RateLimiter @DynamicRateLimiter 这两个标签用法完全一致,他们都有 4 个属性 base、path、timeUnit、permits.
@Retention(RUNTIME)
@Target({ METHOD })
public @interface RateLimiter {

    String base() default "";

    String path() default "";

    TimeUnit timeUnit() default TimeUnit.SECONDS;

    int permits() default 10000;
}

@Retention(RUNTIME)
@Target({ METHOD })
public @interface DynamicRateLimiter {
    String base() default "";

    String path() default "";

    TimeUnit timeUnit() default TimeUnit.SECONDS;

    int permits() default 10000;
}
2.2 标签说明 -- base 参数 (Spel 表达式) 说明
标签都有一个属性 base,含义就是限流是 "基于 what" 来进行的,如果你不指定 base, 那么所有的请求都会聚合在一起统计,base 为一个 Spel 表达式。
@RateLimiter(base = "#Headers[''userid'']", permits = 2, timeUnit = TimeUnit.MINUTES)
@DynamicRateLimiter(base = "#Headers[''X-Real-IP'']", permits = 5, timeUnit = TimeUnit.MINUTES)
目前 base 表达式仅支持从 header 和 cookie 中取值,Headers 和 Cookies 就是两个 Map, 下面两种配置都是合法的。
"#Headers[''X-Real-IP'']"
"#Cookies[''userid'']"
2.3 标签使用 -- path 参数说明
path 如果不设置默认值是 "", 当 path 为"", 框架内部会把它改写为 request.getRequestURI (), 一般情况下框架默认行为就 OK 了。但在一种情况下你可能需要设置 path 参数,就是 RequestMapping 的 path 里面包含 Path Parameters 的情况,例如:
    @GetMapping("/user/{userid}")
    @DynamicRateLimiter(base = "#Headers[''X-Real-IP'']", path = "/user", permits = 5, timeUnit = TimeUnit.MINUTES)
    public User get(@PathVariable String userid) {
        User user ...

        return user;
    }
在这种情况下,我们一般不会基于 "/user/001" 这样统计,所有访问 "/user/001", "/user/002" 的请求都会聚合到 path "/user'' 上统计。
2.4 标签使用 -- timeUnit 参数说明
访问统计时间单位,以下 4 种都是有效的:
TimeUnit.SECONDS, TimeUnit.MINUTES, TimeUnit.HOURS, TimeUnit.DAYS
2.5 标签使用 -- permits 参数说明
单位时间内允许访问的次数
3. 动态配置
动态配置使用 @DynamicRateLimiter 标签,动态配置含义就是在运行时可以动态修改限流配置,这个是通过提供内置配置访问 Rest API 来实现的。
RestController
@RequestMapping("/limiterconfig")
@RequiredArgsConstructor
public final class LimiterConfigResource implements InitializingBean, ApplicationContextAware {
    ...

    @PutMapping
    public void update(@RequestBody LimiterConfig limiterConfig, HttpServletResponse response) throws IOException {
        if(applicationName.equals(limiterConfig.getApplicationName())) {
            publish(limiterConfig);
        }
        else {
            response.setStatus(HttpStatus.BAD_REQUEST.value());
            response.getWriter().print("Bad request for updating limiter configuration!");
        }
    }
    @GetMapping
    public LimiterConfig get(@RequestParam("controller") String controller, @RequestParam("method")String method) {
        String limiterConfigKey = controller + ":" + method;
        return redisLimiterConfigProcessor.get(limiterConfigKey);
    }

    @DeleteMapping
    public void delete(@RequestParam("controller") String controller, @RequestParam("method")String method) {
        LimiterConfig limiterConfig = new LimiterConfig();
        limiterConfig.setApplicationName(applicationName);
        limiterConfig.setControllerName(controller);
        limiterConfig.setMethodName(method);
        limiterConfig.setDeleted(true);
        publish(limiterConfig);
    }
目前提供了修改 (PUT), 查询 (GET), 删除 (DELETE) 三种操作。
对于 demo1 项目
我们可以通过 GET http://localhost:8888/limiterconfig?controller=DemoController&method=dynamicTest 来获取限流配置,返回值为
{
  "applicationName": "demo1",
  "controllerName": "DemoController",
  "methodName": "dynamicTest",
  "baseExp": "#Headers[''userid'']",
  "path": "",
  "timeUnit": "MINUTES",
  "permits": 5,
  "deleted": false
}
通过指定 Content-Type 为 application/json PUT http://localhost:8888/limiterconfig 来改动限流配置,发送内容如
{
  "applicationName": "demo1",
  "controllerName": "DemoController",
  "methodName": "dynamicTest",
  "baseExp": "#Headers[''userid'']",
  "path": "",
  "timeUnit": "MINUTES",
  "permits": 10,
  "deleted": false
}
通过 DELETE http://localhost:8888/limiterconfig?controller=DemoController&method=dynamicTest 可删除限流配置
:Spring Boot 中的事件的使用 与 Spring Boot 启动流程 (Event 事件 和 Listeners 监听器)")
Spring Boot (三):Spring Boot 中的事件的使用 与 Spring Boot 启动流程 (Event 事件 和 Listeners 监听器)
前言:在讲述内容之前 希望大家对设计模式有所了解 即使你学会了本片的内容 也不知道什么时候去使用 或者为什么要这样去用
观察者模式:
观察者模式是一种对象行为模式。它定义对象间的一种一对多的依赖关系,当一个对象的状态发生改变时,所有依赖于它的对象都得到通知并被自动更新。在观察者模式中,主体是通知的发布者,它发出通知时并不需要知道谁是它的观察者,可以有任意数目的观察者订阅并接收通知。观察者模式不仅被广泛应用于软件界面元素之间的交互,在业务对象之间的交互、权限管理等方面也有广泛的应用
观察者模式(Observer)完美的将观察者和被观察的对象分离开。举个例子,用户界面可以作为一个观察者,业务数据是被观察者,用户界面观察业务数据的变化,发现数据变化后,就显示在界面上。面向对象设计的一个原则是:系统中的每个类将重点放在某一个功能上,而不是其他方面。一个对象只做一件事情,并且将他做好。观察者模式在模块之间划定了清晰的界限,提高了应用程序的可维护性和重用性。
观察者设计模式定义了对象间的一种一对多的组合关系,以便一个对象的状态发生变化时,所有依赖于它的对象都得到通知并自动刷新。(以上源于百度)
已经熟悉设计模式的可以直接向下阅读 对不熟悉的 希望通过上述内容 你们可以有一定的了解 通俗点说 观察者模式 是设计框架的一种
当然我们的 Spring Boot 当然也不会放过这么好的设计模式 那么 Spring Boot 中又有哪些地方使用到了
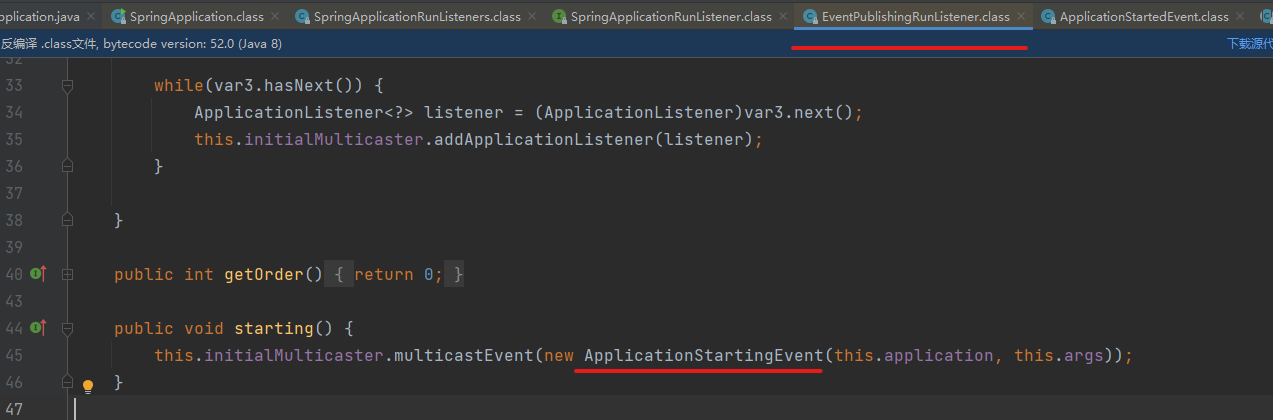
1.ApplicationStartingEvent
当应用启动还没有进行任何处理时,在对所有的监听器做初始化的时候发送的事件
public ConfigurableApplicationContext run(String... args) { //记录服务启动事件 StopWatch stopWatch = new StopWatch(); stopWatch.start(); ConfigurableApplicationContext context = null; Collection<SpringBootExceptionReporter> exceptionReporters = new ArrayList(); //开启awt的headless模式 //Headless模式是系统的一种配置模式。在系统可能缺少显示设备、键盘或鼠标这些外设的情况下可以使用该模式 this.configureHeadlessProperty(); //获取监听器列表 SpringApplicationRunListeners listeners = this.getRunListeners(args); 启动所有监听器 listeners.starting();................. }此时监听列表中只有一个监听事件为 EventPublishingRunListener
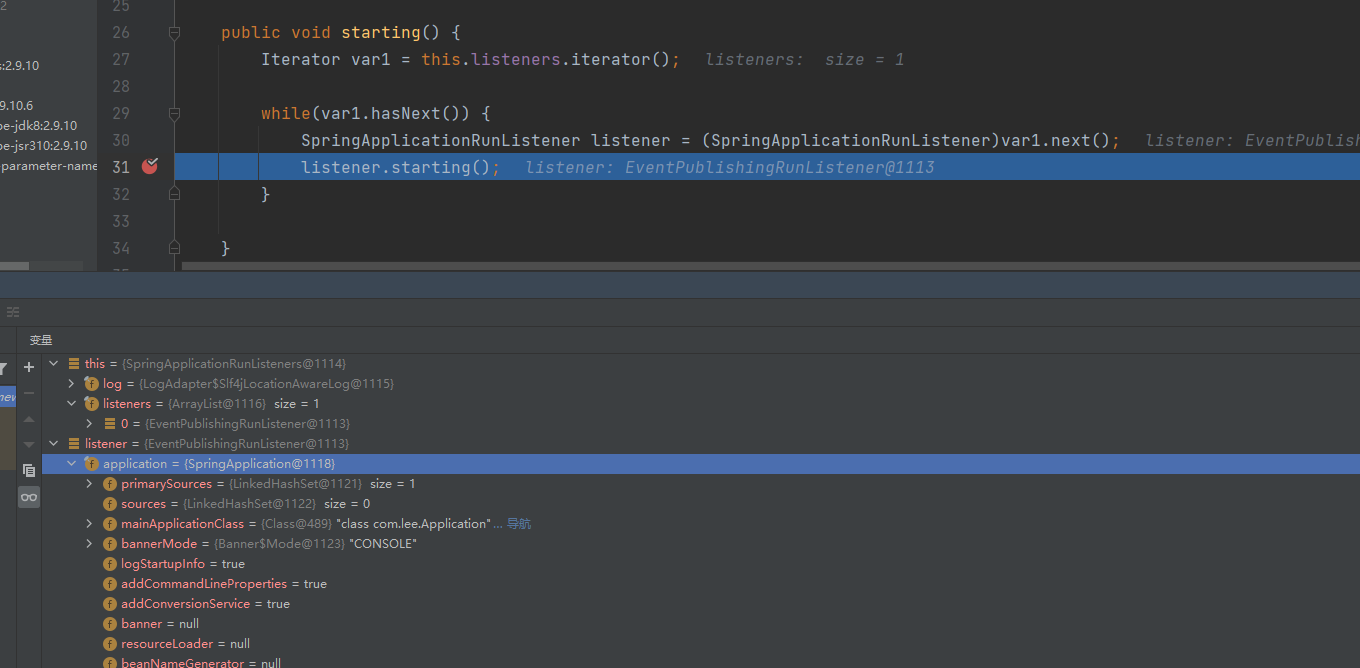
它的作用就是通知 Spring Boot 项目开始启动
2.ApplicationEnvironmentPreparedEvent
当已获取的了所有 Spring Context 上下文信息 但是此时还没有进行创建
此时 Spring Boot 开始启动 EventPublishingRunListener 会发送 ApplicationEnvironmentPreparedEvent 事件 告诉 Spring Boot 应用环境已经准备就绪 准备做后续处理 监听此事件的监听器是 ConfigFileApplicationListener
private void onApplicationEnvironmentPreparedEvent(ApplicationEnvironmentPreparedEvent event) { //获取环境 资源 加载器 List<EnvironmentPostProcessor> postProcessors = this.loadPostProcessors(); postProcessors.add(this); //对Order的大小进行排序 装载 AnnotationAwareOrderComparator.sort(postProcessors); //使用迭代器 根据顺序开始执行 环境 资源 的配置 Iterator var3 = postProcessors.iterator(); while(var3.hasNext()) { EnvironmentPostProcessor postProcessor = (EnvironmentPostProcessor)var3.next(); postProcessor.postProcessEnvironment(event.getEnvironment(), event.getSpringApplication()); } }3.ApplicationContextInitializedEvent
测试 Spring Context 上下文已经初始化完毕 但是此时上下文是的空的
开始向 Spring 上下文装填内容
public void contextPrepared(ConfigurableApplicationContext context) { //获取当前所有有关的上下文的监听器 Iterator var2 = this.listeners.iterator(); while(var2.hasNext()) { SpringApplicationRunListener listener = (SpringApplicationRunListener)var2.next(); //通知 listener.contextPrepared(context); } }private void prepareContext(ConfigurableApplicationContext context, ConfigurableEnvironment environment, SpringApplicationRunListeners listeners, ApplicationArguments applicationArguments, Banner printedBanner) { //向上下文中装填配置参数 //context.setEnvironment(environment); //向应用中装填上下文 this.postProcessApplicationContext(context); //进行初始化参数装填 this.applyInitializers(context); listeners.contextPrepared(context); if (this.logStartupInfo) { this..............今天关于使用 Spring Boot 来加速 Java web 项目的开发和springboot启动加速的分享就到这里,希望大家有所收获,若想了解更多关于Java Spring Boot - 项目“org.springframework.boot:spring-boot-starter-parent:2.5.0”未找到错误、Laravel 8 新功能:使用 schema:dump 来加速 Migration 和测试、redislimiter-spring-boot -- 一个优秀的分布式 spring boot/Spring Cloud API 限流框架、Spring Boot (三):Spring Boot 中的事件的使用 与 Spring Boot 启动流程 (Event 事件 和 Listeners 监听器)等相关知识,可以在本站进行查询。
本文标签:


