本文将分享springioc和aop整理的详细内容,并且还将对待完善进行详尽解释,此外,我们还将为大家带来关于2、Spring的IOC和AOP、AOP、IOC的概念及其在Spring中的使用(待续)、
本文将分享spring ioc 和aop 整理的详细内容,并且还将对待完善进行详尽解释,此外,我们还将为大家带来关于2、Spring的IOC和AOP、AOP、IOC的概念及其在Spring中的使用(待续)、apache 问题(待完善)、block的一些用法(待完善)的相关知识,希望对你有所帮助。
本文目录一览:- spring ioc 和aop 整理(待完善)(spring aop ioc di)
- 2、Spring的IOC和AOP
- AOP、IOC的概念及其在Spring中的使用(待续)
- apache 问题(待完善)
- block的一些用法(待完善)
(spring aop ioc di)")
spring ioc 和aop 整理(待完善)(spring aop ioc di)
一.spring ioc
从AbstractApplicationContext.refresh开始
public void refresh() throws BeansException, IllegalStateException {
        //加锁
        synchronized (this.startupShutdownMonitor) {
            //容器预先处理配置一些信息 启动时间、标记“已启动”状态、处理配置文件中的占位符
            prepareRefresh();

            //销毁原容器 是否允许bean覆盖和循环依赖 customizeBeanFactory
       //BeanDefination的解析注册在这个方法中发生,把xml里面的信息加载成一个个BeanDefination
            //解析配置文件里面的bean注册到beanfactory 没有初始化
        //把BeanDefination 放到了一个map里面  beanName-> beanDefinition 的 map
            ConfigurableListableBeanFactory beanFactory = obtainFreshBeanFactory();

        //设置类加载器 添加BeanPostProcessor 手动注册几个bean
        //预先处理
            prepareBeanFactory(beanFactory);

            try {
            //beanFactoryPostProcessor,Bean 如果实现了此接口,
                // 那么在容器初始化以后,Spring 会负责调用里面的 postProcessBeanFactory 方法
        //所以在bean加载注册之后,初始化之前可以做一些处理 可以通过BeanFactoryPostProcessor实现
        postProcessBeanFactory(beanFactory);

                //调用容器里面BeanFactoryPostProcessor 各个实现类的 postProcessBeanFactory(factory) 方法
                invokeBeanFactoryPostProcessors(beanFactory);

                // 注册 BeanPostProcessor 的实现类,和BeanFactoryPostProcessor不一样
                // 此接口两个方法: postProcessBeforeInitialization 和 postProcessAfterInitialization
                // 两个方法分别在 Bean 初始化之前和初始化之后得到执行。即在finishBeanFactoryInitialization里执行
        // aop即通过这个BeanPostProcessor来获取bean的代理对象,从而实现功能
                registerBeanPostProcessors(beanFactory);

                //初始化MessageSource
                initMessageSource();

                // Initialize event multicaster for this context.
                initApplicationEventMulticaster();

                // Initialize other special beans in specific context subclasses.
                onRefresh();

                // Check for listener beans and register them.
                registerListeners();

                //初始化所有的bean
                finishBeanFactoryInitialization(beanFactory);

                // Last step: publish corresponding event.
                finishRefresh();
            }

            catch (BeansException ex) {
                if (logger.isWarnEnabled()) {
                    logger.warn("Exception encountered during context initialization - " +
                            "cancelling refresh attempt: " + ex);
                }

                // Destroy already created singletons to avoid dangling resources.
                destroyBeans();

                // Reset ''active'' flag.
                cancelRefresh(ex);

                // Propagate exception to caller.
                throw ex;
            }

            finally {
                // Reset common introspection caches in Spring''s core, since we
                // might not ever need metadata for singleton beans anymore...
                resetCommonCaches();
            }
        }
    }
一、解析xml文件
解析xml 就是根据xml一步一步的解析
默认的节点走 parseDefaultElement
aop和其他特殊的走 delegate.parseCustomElement
protected void parseBeanDefinitions(Element root, BeanDefinitionParserDelegate delegate) {
        //判断是否是默认的命名空间,默认的命名空间是 http://www.springframework.org/schema/beans
        if (delegate.isDefaultNamespace(root)) {
       //获取所有的子节点,然后循环处理
            NodeList nl = root.getChildNodes();
            for (int i = 0; i < nl.getLength(); i++) {
                Node node = nl.item(i);
                if (node instanceof Element) {
                    Element ele = (Element) node;
                    if (delegate.isDefaultNamespace(ele)) {
                        parseDefaultElement(ele, delegate);
                    }
                    else {
                        delegate.parseCustomElement(ele);
                    }
                }
            }
        }
        else {
            delegate.parseCustomElement(root);
        }
    }
加载过程中loadBeanDefinitions方法如下,是依次加载configLocation的
protected void loadBeanDefinitions(XmlBeanDefinitionReader reader) throws IOException {
        String[] configLocations = this.getConfigLocations();
        if (configLocations != null) {
            String[] arr$ = configLocations;
            int len$ = configLocations.length;

            for(int i$ = 0; i$ < len$; ++i$) {
                String configLocation = arr$[i$];
                reader.loadBeanDefinitions(configLocation);
            }
        }

    }
这里分析下解析xml时,org.springframework.beans.factory.xml.NamespaceHandler 的获取过程
调用过程:
org.springframework.beans.factory.support.AbstractBeanDefinitionReader#loadBeanDefinitions(java.lang.String)

org.springframework.beans.factory.support.AbstractBeanDefinitionReader#loadBeanDefinitions(java.lang.String, java.util.Set<org.springframework.core.io.Resource>)


org.springframework.beans.factory.support.AbstractBeanDefinitionReader#loadBeanDefinitions(org.springframework.core.io.Resource...)

//这里也是依次加载resource的
org.springframework.beans.factory.support.BeanDefinitionReader#loadBeanDefinitions(org.springframework.core.io.Resource)

org.springframework.beans.factory.xml.XmlBeanDefinitionReader#loadBeanDefinitions(org.springframework.core.io.Resource)

org.springframework.beans.factory.xml.XmlBeanDefinitionReader#loadBeanDefinitions(org.springframework.core.io.support.EncodedResource)


org.springframework.beans.factory.xml.XmlBeanDefinitionReader#doLoadBeanDefinitions

//关注这个方法
org.springframework.beans.factory.xml.XmlBeanDefinitionReader#registerBeanDefinitions

   其中
     org.springframework.beans.factory.xml.XmlBeanDefinitionReader#createReaderContext
     org.springframework.beans.factory.xml.XmlBeanDefinitionReader#createDefaultNamespaceHandlerResolver

   这里创建了一个org.springframework.beans.factory.xml.XmlReaderContext 后面会有用


org.springframework.beans.factory.xml.DefaultBeanDefinitionDocumentReader#registerBeanDefinitions

org.springframework.beans.factory.xml.DefaultBeanDefinitionDocumentReader#doRegisterBeanDefinitions

//关注这个方法 里面有个readerContext
org.springframework.beans.factory.xml.DefaultBeanDefinitionDocumentReader#createDelegate


org.springframework.beans.factory.xml.DefaultBeanDefinitionDocumentReader#parseBeanDefinitions


在解析这一步时:
org.springframework.beans.factory.xml.BeanDefinitionParserDelegate#parseCustomElement(org.w3c.dom.Element, org.springframework.beans.factory.config.BeanDefinition)

//这里是关键
NamespaceHandler handler = this.readerContext.getNamespaceHandlerResolver().resolve(namespaceUri);
public NamespaceHandler resolve(String namespaceUri) {
		Map<String, Object> handlerMappings = getHandlerMappings();
		Object handlerOrClassName = handlerMappings.get(namespaceUri);
		if (handlerOrClassName == null) {
			return null;
		}
		else if (handlerOrClassName instanceof NamespaceHandler) {
			return (NamespaceHandler) handlerOrClassName;
		}
		else {
        //第一次会走这里生成handler
			String className = (String) handlerOrClassName;
			try {
				Class<?> handlerClass = ClassUtils.forName(className, this.classLoader);
				if (!NamespaceHandler.class.isAssignableFrom(handlerClass)) {
					throw new FatalBeanException("Class [" + className + "] for namespace [" + namespaceUri +
							"] does not implement the [" + NamespaceHandler.class.getName() + "] interface");
				}
				NamespaceHandler namespaceHandler = (NamespaceHandler) BeanUtils.instantiateClass(handlerClass);
				namespaceHandler.init();
				handlerMappings.put(namespaceUri, namespaceHandler);
				return namespaceHandler;
			}
			catch (ClassNotFoundException ex) {
				throw new FatalBeanException("NamespaceHandler class [" + className + "] for namespace [" +
						namespaceUri + "] not found", ex);
			}
			catch (LinkageError err) {
				throw new FatalBeanException("Invalid NamespaceHandler class [" + className + "] for namespace [" +
						namespaceUri + "]: problem with handler class file or dependent class", err);
			}
		}
	}
这样就可以通过xml文件里面的配置和spring.handlers文件来确定获取什么样的handler,例如dubbo
spring.handlers文件如下:

http\://code.alibabatech.com/schema/dubbo=com.alibaba.dubbo.config.spring.schema.DubboNamespaceHandler

xml配置文件:

http://code.alibabatech.com/schema/dubbo
http://code.alibabatech.com/schema/dubbo/dubbo.xsd
String namespaceUri = getNamespaceURI(ele);//通过这句代码获取这个节点对应的namespaceUri,从而获取对应的handler
即可确定解析dubbo节点时使用的是

com.alibaba.dubbo.config.spring.schema.DubboNamespaceHandler 这个类

通过这种方式 实现解析不同的配置使用不同的handler

例如:

<dubbo:reference id="sharkService" interface="com.koolearn.coach.shark.service.SharkService" timeout="2000"/> 就用 com.alibaba.dubbo.config.spring.schema.DubboNamespaceHandler

<context:component-scan base-package="com.koolearn.clazz.biz" />  就用  org.springframework.context.config.ContextNamespaceHandler

<aop:aspectj-autoproxy proxy-target-/> 就用 org.springframework.aop.config.AopNamespaceHandler
解析xml过程结束
二、实例化过程
实例化bean过程:
finishBeanFactoryInitialization
  ->beanFactory.preInstantiateSingletons()
    ->getBean
      ->doGetBean
        ->createBean
      ->doCreateBean
        createBeanInstance 创建bean的实例,但是没有注入属性
        populateBean 属性注入
        initializeBean 处理回调 在这一步会有BeanPostProcessor 回调 aop代理对象就是在这一步回调生成的
注:
getbean
initializeBean
->postProcessBeforeInitialization方法里面 bean 如果实现了ApplicationContextAware ApplicationContextAwareProcessor会调用setApplicationContext方法
->invokeInitMethods
如果是InitializingBean 调用afterPropertiesSet 方法
接着调用init-method方法
实现了InitializingBean接口后afterPropertiesSet会被调用
实现了ApplicationListener接口会在容器初始化的时候调用onApplicationEvent 方法 比如dubbo就是使用了此种方式实现了服务暴露
finishRefresh
->publishEvent
->publishEvent
->multicastEvent
->invokeListener
->doInvokeListener
->onApplicationEvent
if (this.earlyApplicationEvents != null) {
this.earlyApplicationEvents.add(applicationEvent);
} else {
this.getApplicationEventMulticaster().multicastEvent((ApplicationEvent)applicationEvent, eventType);
二.sprong aop
大概步骤
1.加载bean
加载xml文件,解析生成BeanDefinition,与一般的bean的解析方式不同具体在parseCustomElement方法上
解析时 用的是AopNamespaceHandler 里面有多个parser 是真正解析xml的时候使用的
2.获取bean
在getBean的时候返回一个代理对象(具体过程是在实例化的时候beanPostProcessor.postProcessBeforeInstantiation起作用返回一个代理对象),
里面有一个拦截器链,依次执行。最后执行target方法
public class AopNamespaceHandler extends NamespaceHandlerSupport {
    @Override
    public void init() {
        // In 2.0 XSD as well as in 2.1 XSD.
        registerBeanDefinitionParser("config", new ConfigBeanDefinitionParser());
        registerBeanDefinitionParser("aspectj-autoproxy", new AspectJAutoProxyBeanDefinitionParser());
        registerBeanDefinitionDecorator("scoped-proxy", new ScopedProxyBeanDefinitionDecorator());

        // Only in 2.0 XSD: moved to context namespace as of 2.1
        registerBeanDefinitionParser("spring-configured", new SpringConfiguredBeanDefinitionParser());
    }
}


加载容器,解析xml文件 调用parseCustomElement方法
 public BeanDefinition parseCustomElement(Element ele, BeanDefinition containingBd) {
        String namespaceUri = getNamespaceURI(ele);
    //此处的**handler为AopNamespaceHandler** 第一个节点应该是<aop:config>
        //readerContext 在org.springframework.beans.factory.xml.XmlBeanDefinitionReader#registerBeanDefinitions
        // resolve 初始化了handler  流程 第一次 resolve -> getHandlerMappings -> mergePropertiesIntoMap ->获得了一个object对象 -> instanceof NamespaceHandler 为false 从而走了反射,namespaceHandler.init()
        NamespaceHandler handler = this.readerContext.getNamespaceHandlerResolver().resolve(namespaceUri);
        if (handler == null) {
            error("Unable to locate Spring NamespaceHandler for XML schema namespace [" + namespaceUri + "]", ele);
            return null;
        }
        //进入该方法 根据不同的节点获取不同的parser
        return handler.parse(ele, new ParserContext(this.readerContext, this, containingBd));
    }

    public BeanDefinition parse(Element element, ParserContext parserContext) {
        return findParserForElement(element, parserContext).parse(element, parserContext);
    }

    ConfigBeanDefinitionParser类<aop:config> 这些操作就是解析aop相关的节点
    public BeanDefinition parse(Element element, ParserContext parserContext) {
        CompositeComponentDefinition compositeDef =
                new CompositeComponentDefinition(element.getTagName(), parserContext.extractSource(element));
        parserContext.pushContainingComponent(compositeDef);

        //生成AspectJAwareAdvisorAutoProxyCreator
        configureAutoProxyCreator(parserContext, element);
     //获取子节点,根据aop.xml文件中的配置,子节点为<aop:aspect>
        List<Element> childElts = DomUtils.getChildElements(element);
        for (Element elt: childElts) {
            String localName = parserContext.getDelegate().getLocalName(elt);
            if (POINTCUT.equals(localName)) {
            //pointcut
                parsePointcut(elt, parserContext);
            }
            else if (ADVISOR.equals(localName)) {
            //advisor
                parseAdvisor(elt, parserContext);
            }
            else if (ASPECT.equals(localName)) {
            //进入该方法,解析<aop:aspect>
                parseAspect(elt, parserContext);
            }
        }

        parserContext.popAndRegisterContainingComponent();
        return null;
    }
解析bean完成
生成代理对象
AbstractAutoProxyCreator ->AspectJAwareAdvisorAutoProxyCreator 其实是一个BeanPostProcessor 在 refesh方法 ->registerBeanPostProcessors里面注册,在解析aop 相关xml的时候生成
作用的位置是 getBean -> initializeBean -> 初始化bean -> applyBeanPostProcessorsAfterInitialization -> postProcessAfterInitialization
实例化时调用此方法
类:AbstractAutoProxyCreator
public Object postProcessBeforeInstantiation(Class<?> beanClass, String beanName) throws BeansException {
        Object cacheKey = getCacheKey(beanClass, beanName);

        if (!StringUtils.hasLength(beanName) || !this.targetSourcedBeans.contains(beanName)) {
            //advisedBeans用于存储不可代理的bean,如果包含直接返回
            if (this.advisedBeans.containsKey(cacheKey)) {
                return null;
            }
            //判断当前bean是否可以被代理,然后存入advisedBeans
            if (isInfrastructureClass(beanClass) || shouldSkip(beanClass, beanName)) {
                this.advisedBeans.put(cacheKey, Boolean.FALSE);
                return null;
            }
        }

        // Create proxy here if we have a custom TargetSource.
        // Suppresses unnecessary default instantiation of the target bean:
        // The TargetSource will handle target instances in a custom fashion.
        //获取封装当前bean的TargetSource对象,如果不存在,则直接退出当前方法,否则从TargetSource
               // 中获取当前bean对象,并且判断是否需要将切面逻辑应用在当前bean上。
        TargetSource targetSource = getCustomTargetSource(beanClass, beanName);
        if (targetSource != null) {
            if (StringUtils.hasLength(beanName)) {
                this.targetSourcedBeans.add(beanName);
            }
                        // 获取能够应用当前bean的切面逻辑
            Object[] specificInterceptors = getAdvicesAndAdvisorsForBean(beanClass, beanName, targetSource);
            Object proxy = createProxy(beanClass, beanName, specificInterceptors, targetSource);

                        // 对生成的代理对象进行缓存
            this.proxyTypes.put(cacheKey, proxy.getClass());
            //如果最终可以获得代理类,则返回代理类,直接执行实例化后置通知方法
            return proxy;
        }

        return null;
    }
返回代理对象
public Object postProcessAfterInitialization(Object bean, String beanName) throws BeansException {
        if (bean != null) {
            //缓存键:1.beanName不为空的话,使用beanName(FactoryBean会在见面加上"&")
            //2.如果beanName为空,使用Class对象作为缓存的key
            Object cacheKey = getCacheKey(bean.getClass(), beanName);
            if (!this.earlyProxyReferences.contains(cacheKey)) {
                //如果条件符合,则为bean生成代理对象
                return wrapIfNecessary(bean, beanName, cacheKey);
            }
        }
        return bean;
    }
生成代理对象代码如下:
 protected Object wrapIfNecessary(Object bean, String beanName, Object cacheKey) {
        //如果已经处理过(targetSourcedBeans存放已经增强过的bean)
        if (beanName != null && this.targetSourcedBeans.contains(beanName)) {
            return bean;
        }
        //advisedBeans的key为cacheKey,value为boolean类型,表示是否进行过代理
        //已经处理过的bean,不需要再次进行处理,节省时间
        if (Boolean.FALSE.equals(this.advisedBeans.get(cacheKey))) {
            return bean;
        }
        //是否是内部基础设置类Class || 配置了指定bean不需要代理,如果是的话,直接缓存。
        if (isInfrastructureClass(bean.getClass()) || shouldSkip(bean.getClass(), beanName)) {
            this.advisedBeans.put(cacheKey, Boolean.FALSE);
            return bean;
        }

        // 获取当前对象所有适用的Advisor.加入当前对象是orderController,那么找到所有切点是他的对应的@Aspect注解的类
        Object[] specificInterceptors = getAdvicesAndAdvisorsForBean(bean.getClass(), beanName, null);
        //如果获取的增强不为null,则为该bean创建代理(DO_NOT_PROXY=null)
        if (specificInterceptors != DO_NOT_PROXY) {
            this.advisedBeans.put(cacheKey, Boolean.TRUE);
                        //创建代理对象时候会用到是否进行JDK代理或者CGLIB代理
            Object proxy = createProxy(
                    bean.getClass(), beanName, specificInterceptors, new SingletonTargetSource(bean));
            this.proxyTypes.put(cacheKey, proxy.getClass());
            return proxy;
        }
        //标记该cacheKey已经被处理过
        this.advisedBeans.put(cacheKey, Boolean.FALSE);
        return bean;
    }


protected Object createProxy(Class<?> beanClass, @Nullable String beanName,
        @Nullable Object[] specificInterceptors, TargetSource targetSource) {

    if (this.beanFactory instanceof ConfigurableListableBeanFactory) {
        AutoProxyUtils.exposeTargetClass((ConfigurableListableBeanFactory) this.beanFactory, beanName, beanClass);
    }

    ProxyFactory proxyFactory = new ProxyFactory();
    //获取当前类中的属性
    proxyFactory.copyFrom(this);
    //检查proxyTargeClass设置以及preserveTargetClass属性
    //决定对于给定的bean是否应该使用targetClass而不是他的接口代理
    if (!proxyFactory.isProxyTargetClass()) {
        if (shouldProxyTargetClass(beanClass, beanName)) {
            proxyFactory.setProxyTargetClass(true);
        }
        else {
            //用来添加代理接口
            evaluateProxyInterfaces(beanClass, proxyFactory);
        }
    }

    Advisor[] advisors = buildAdvisors(beanName, specificInterceptors);
    //加入增强器
    proxyFactory.addAdvisors(advisors);
    //设置要代理的类
    proxyFactory.setTargetSource(targetSource);
    //定制代理
    customizeProxyFactory(proxyFactory);
    //用来控制代理工厂被设置后是否还允许修改通知,缺省值为false
    proxyFactory.setFrozen(this.freezeProxy);
    if (advisorsPreFiltered()) {
        proxyFactory.setPreFiltered(true);
    }

    return proxyFactory.getProxy(getProxyClassLoader());
}

public AopProxy createAopProxy(AdvisedSupport config) throws AopConfigException {
        if (config.isOptimize() || config.isProxyTargetClass() || hasNoUserSuppliedProxyInterfaces(config)) {
            Class<?> targetClass = config.getTargetClass();
            if (targetClass == null) {
                throw new AopConfigException("TargetSource cannot determine target class: " +
                        "Either an interface or a target is required for proxy creation.");
            }
            if (targetClass.isInterface() || Proxy.isProxyClass(targetClass)) {
                return new JdkDynamicAopProxy(config);
            }
            return new ObjenesisCglibAopProxy(config);
        }
        else {
            return new JdkDynamicAopProxy(config);
        }
    }
下面是使用jdk方式创建代理代码
public Object getProxy(ClassLoader classLoader) {
        if (logger.isDebugEnabled()) {
            logger.debug("Creating JDK dynamic proxy: target source is " + this.advised.getTargetSource());
        }
        // 取得代理对象的所有代理接口
        Class<?>[] proxiedInterfaces = AopProxyUtils.completeProxiedInterfaces(this.advised, true);
        findDefinedEqualsAndHashCodeMethods(proxiedInterfaces);
        // 使用JDK的Proxy类来生成代理对象
        return Proxy.newProxyInstance(classLoader, proxiedInterfaces, this);
    }

//类JdkDynamicAopProxy
public Object invoke(Object proxy, Method method, Object[] args) throws Throwable {
        MethodInvocation invocation;
        Object oldProxy = null;
        boolean setProxyContext = false;

        TargetSource targetSource = this.advised.targetSource;
        Class<?> targetClass = null;
        Object target = null;

        try {
            // 如果目标对象没有实现Object的equals方法
            if (!this.equalsDefined && AopUtils.isEqualsMethod(method)) {
                // The target does not implement the equals(Object) method itself.
                return equals(args[0]);
            }
            // 如果目标对象没有实现Object的hashCode方法
            else if (!this.hashCodeDefined && AopUtils.isHashCodeMethod(method)) {
                // The target does not implement the hashCode() method itself.
                return hashCode();
            }
            else if (method.getDeclaringClass() == DecoratingProxy.class) {
                // There is only getDecoratedClass() declared -> dispatch to proxy config.
                return AopProxyUtils.ultimateTargetClass(this.advised);
            }
            else if (!this.advised.opaque && method.getDeclaringClass().isInterface() &&
                    method.getDeclaringClass().isAssignableFrom(Advised.class)) {
                // Service invocations on ProxyConfig with the proxy config...
                return AopUtils.invokeJoinpointUsingReflection(this.advised, method, args);
            }

            Object retVal;

            if (this.advised.exposeProxy) {
                // Make invocation available if necessary.
                oldProxy = AopContext.setCurrentProxy(proxy);
                setProxyContext = true;
            }

            // May be null. Get as late as possible to minimize the time we "own" the target,
            // in case it comes from a pool.
            // 获取目标对象
            target = targetSource.getTarget();
            if (target != null) {
                targetClass = target.getClass();
            }

            // Get the interception chain for this method.
            // 获取拦截器链
            List<Object> chain = this.advised.getInterceptorsAndDynamicInterceptionAdvice(method, targetClass);

            // Check whether we have any advice. If we don''t, we can fallback on direct
            // reflective invocation of the target, and avoid creating a MethodInvocation.
            if (chain.isEmpty()) {
                // 如果拦截器为空,那么直接调用目标对象的目标方法 进入该方法
                // We can skip creating a MethodInvocation: just invoke the target directly
                // Note that the final invoker must be an InvokerInterceptor so we know it does
                // nothing but a reflective operation on the target, and no hot swapping or fancy proxying.
                Object[] argsToUse = AopProxyUtils.adaptArgumentsIfNecessary(method, args);
                retVal = AopUtils.invokeJoinpointUsingReflection(target, method, argsToUse);
            }
            else {
                // 否则,需要先调用拦截器然后再调用目标方法,通过构造一个ReflectiveMethodInvocation来实现
                // We need to create a method invocation...
                invocation = new ReflectiveMethodInvocation(proxy, target, method, args, targetClass, chain);
                // Proceed to the joinpoint through the interceptor chain.
                // 沿着拦截器链前行 进入该方法
                retVal = invocation.proceed();
            }

            // Massage return value if necessary.
            Class<?> returnType = method.getReturnType();
            if (retVal != null && retVal == target &&
                    returnType != Object.class && returnType.isInstance(proxy) &&
                    !RawTargetAccess.class.isAssignableFrom(method.getDeclaringClass())) {
                // Special case: it returned "this" and the return type of the method
                // is type-compatible. Note that we can''t help if the target sets
                // a reference to itself in another returned object.
                retVal = proxy;
            }
            else if (retVal == null && returnType != Void.TYPE && returnType.isPrimitive()) {
                throw new AopInvocationException(
                        "Null return value from advice does not match primitive return type for: " + method);
            }
            return retVal;
        }
        finally {
            if (target != null && !targetSource.isStatic()) {
                // Must have come from TargetSource.
                targetSource.releaseTarget(target);
            }
            if (setProxyContext) {
                // Restore old proxy.
                AopContext.setCurrentProxy(oldProxy);
            }
        }
    }

    public Object proceed() throws Throwable {
        //    We start with an index of -1 and increment early.
        // 从索引为-1的拦截器开始调用,按顺序递增,直到没有拦截器了,然后开始调用目标对象的方法
        if (this.currentInterceptorIndex == this.interceptorsAndDynamicMethodMatchers.size() - 1) {
            return invokeJoinpoint();
        }
        // 沿着定义好的拦截器链进行获取然后逐个处理
        Object interceptorOrInterceptionAdvice =
                this.interceptorsAndDynamicMethodMatchers.get(++this.currentInterceptorIndex);
        if (interceptorOrInterceptionAdvice instanceof InterceptorAndDynamicMethodMatcher) {
            // Evaluate dynamic method matcher here: static part will already have
            // been evaluated and found to match.
            // 这里是触发匹配判断的地方,如果和定义的pointcut匹配,那么这个advice将得到执行
            InterceptorAndDynamicMethodMatcher dm =
                    (InterceptorAndDynamicMethodMatcher) interceptorOrInterceptionAdvice;
            if (dm.methodMatcher.matches(this.method, this.targetClass, this.arguments)) {
                return dm.interceptor.invoke(this);
            }
            else {
                // Dynamic matching failed.
                // Skip this interceptor and invoke the next in the chain.
                return proceed();
            }
        }
        else {
            // It''s an interceptor, so we just invoke it: The pointcut will have
            // been evaluated statically before this object was constructed.
            // 如果是一个interceptor,那么直接调用这个interceptor的invoke方法 进入此方法来分析通知(拦截器)是如何起作用的
            return ((MethodInterceptor) interceptorOrInterceptionAdvice).invoke(this);
        }
    }

    //前置
    public Object invoke(MethodInvocation mi) throws Throwable {
        this.advice.before(mi.getMethod(), mi.getArguments(), mi.getThis() ); // 此处就是发生的切面增强行为
        return mi.proceed(); //递归调用proceed方法,然后进入下一个拦截器的处理
    }

    //后置
    public Object invoke(MethodInvocation mi) throws Throwable {
        try {
            return mi.proceed(); //递归调用proceed方法
        }
        finally {
            invokeAdviceMethod(getJoinPointMatch(), null, null); //此处就是发生切面增强行为的地方
        }
    }

2、Spring的IOC和AOP
IOC(Inversion of Control)
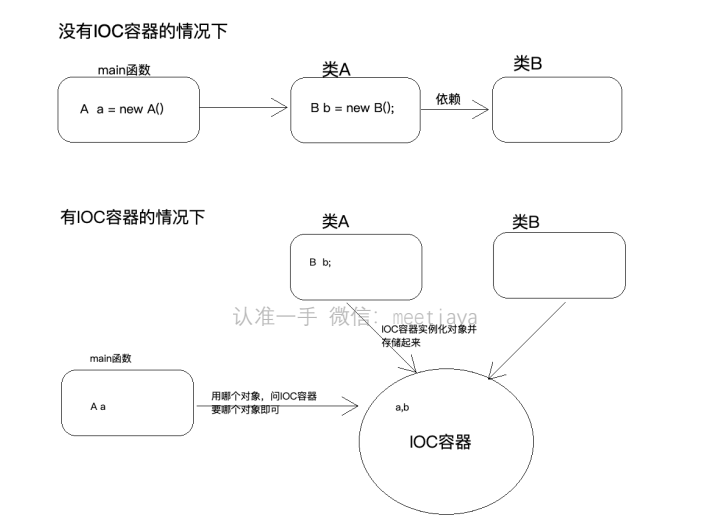
Ioc—Inversion of Control,即“控制反转”,不是什么技术,而是一种设计思想在Java开发中,Ioc意味着将你设计好的对象交给容器控制,而不是传统的在你的对象内部直接控制。描述的事情:Java开发领域对象的创建,管理的问题
描述的事情:Java开发领域对象的创建,管理的问题IoC思想下开发⽅式:我们不⽤⾃⼰去new对象了,⽽是由IoC容器(Spring框架)去帮助我们实例化对 象并且管理它,我们需要使⽤哪个对象,去问IoC容器要即可 我们丧失了⼀个权利(创建、管理对象的权利),得到了⼀个福利(不⽤考虑对象的创建、管理等⼀系列 事情)为什么叫做控制反转- 控制:指的是对象创建(实例化、管理)的权利
- 反转:控制权交给外部环境了(spring框架、IoC容器)
IoC能做什么
IoC 不是一种技术,只是一种思想,一个重要的面向对象编程的法则,它能指导我们如何设计出松耦合、更优良的程序。传统应用程序都是由我们在类内部主动创建依赖对象,从而导致类与类之间高耦合,难于测试;有了IoC容器后,把创建和查找依赖对象的控制权交给了容器,由容器进行注入组合对象,所以对象与对象之间是 松散耦合,这样也方便测试,利于功能复用,更重要的是使得程序的整个体系结构变得非常灵活。
IoC很好的体现了面向对象设计法则之一—— 好莱坞法则:“别找我们,我们找你”;即由IoC容器帮对象找相应的依赖对象并注入,而不是由对象主动去找。
分享Bromon的blog上对IoC与DI浅显易懂的讲解
IoC(控制反转)
首先想说说IoC(Inversion of Control,控制反转)。这是spring的核心,贯穿始终。所谓IoC,对于spring框架来说,就是由spring来负责控制对象的生命周期和对象间的关系。这是什么意思呢,举个简单的例子,我们是如何找女朋友的?常见的情况是,我们到处去看哪里有长得漂亮身材又好的mm,然后打听她们的兴趣爱好、qq号、电话号、ip号、iq号………,想办法认识她们,投其所好送其所要,然后嘿嘿……这个过程是复杂深奥的,我们必须自己设计和面对每个环节。传统的程序开发也是如此,在一个对象中,如果要使用另外的对象,就必须得到它(自己new一个,或者从JNDI中查询一个),使用完之后还要将对象销毁(比如Connection等),对象始终会和其他的接口或类藕合起来。
那么IoC是如何做的呢?有点像通过婚介找女朋友,在我和女朋友之间引入了一个第三者:婚姻介绍所。婚介管理了很多男男女女的资料,我可以向婚介提出一个列表,告诉它我想找个什么样的女朋友,比如长得像李嘉欣,身材像林熙雷,唱歌像周杰伦,速度像卡洛斯,技术像齐达内之类的,然后婚介就会按照我们的要求,提供一个mm,我们只需要去和她谈恋爱、结婚就行了。简单明了,如果婚介给我们的人选不符合要求,我们就会抛出异常。整个过程不再由我自己控制,而是有婚介这样一个类似容器的机构来控制。Spring所倡导的开发方式就是如此,所有的类都会在spring容器中登记,告诉spring你是个什么东西,你需要什么东西,然后spring会在系统运行到适当的时候,把你要的东西主动给你,同时也把你交给其他需要你的东西。所有的类的创建、销毁都由 spring来控制,也就是说控制对象生存周期的不再是引用它的对象,而是spring。对于某个具体的对象而言,以前是它控制其他对象,现在是所有对象都被spring控制,所以这叫控制反转。
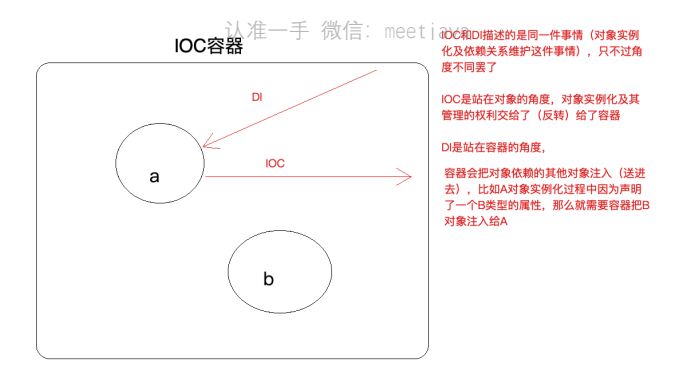
DI(依赖注入)
IoC的一个重点是在系统运行中,动态的向某个对象提供它所需要的其他对象。这一点是通过DI(Dependency Injection,依赖注入)来实现的。比如对象A需要操作数据库,以前我们总是要在A中自己编写代码来获得一个Connection对象,有了 spring我们就只需要告诉spring,A中需要一个Connection,至于这个Connection怎么构造,何时构造,A不需要知道。在系统运行时,spring会在适当的时候制造一个Connection,然后像打针一样,注射到A当中,这样就完成了对各个对象之间关系的控制。A需要依赖 Connection才能正常运行,而这个Connection是由spring注入到A中的,依赖注入的名字就这么来的。那么DI是如何实现的呢? Java 1.3之后一个重要特征是反射(reflection),它允许程序在运行的时候动态的生成对象、执行对象的方法、改变对象的属性,spring就是通过反射来实现注入的。
理解了IoC和DI的概念后,一切都将变得简单明了,剩下的工作只是在spring的框架中堆积木而已
IOC 和DI的区别
AOP
什么是AOP
-
AOP: Aspect oriented Programming 面向切面编程/面向方面编程
-
AOP是OOP的延续,从OOP说起
- OOP三大特征:封装、继承和多态
- oop是一种垂直继承体系
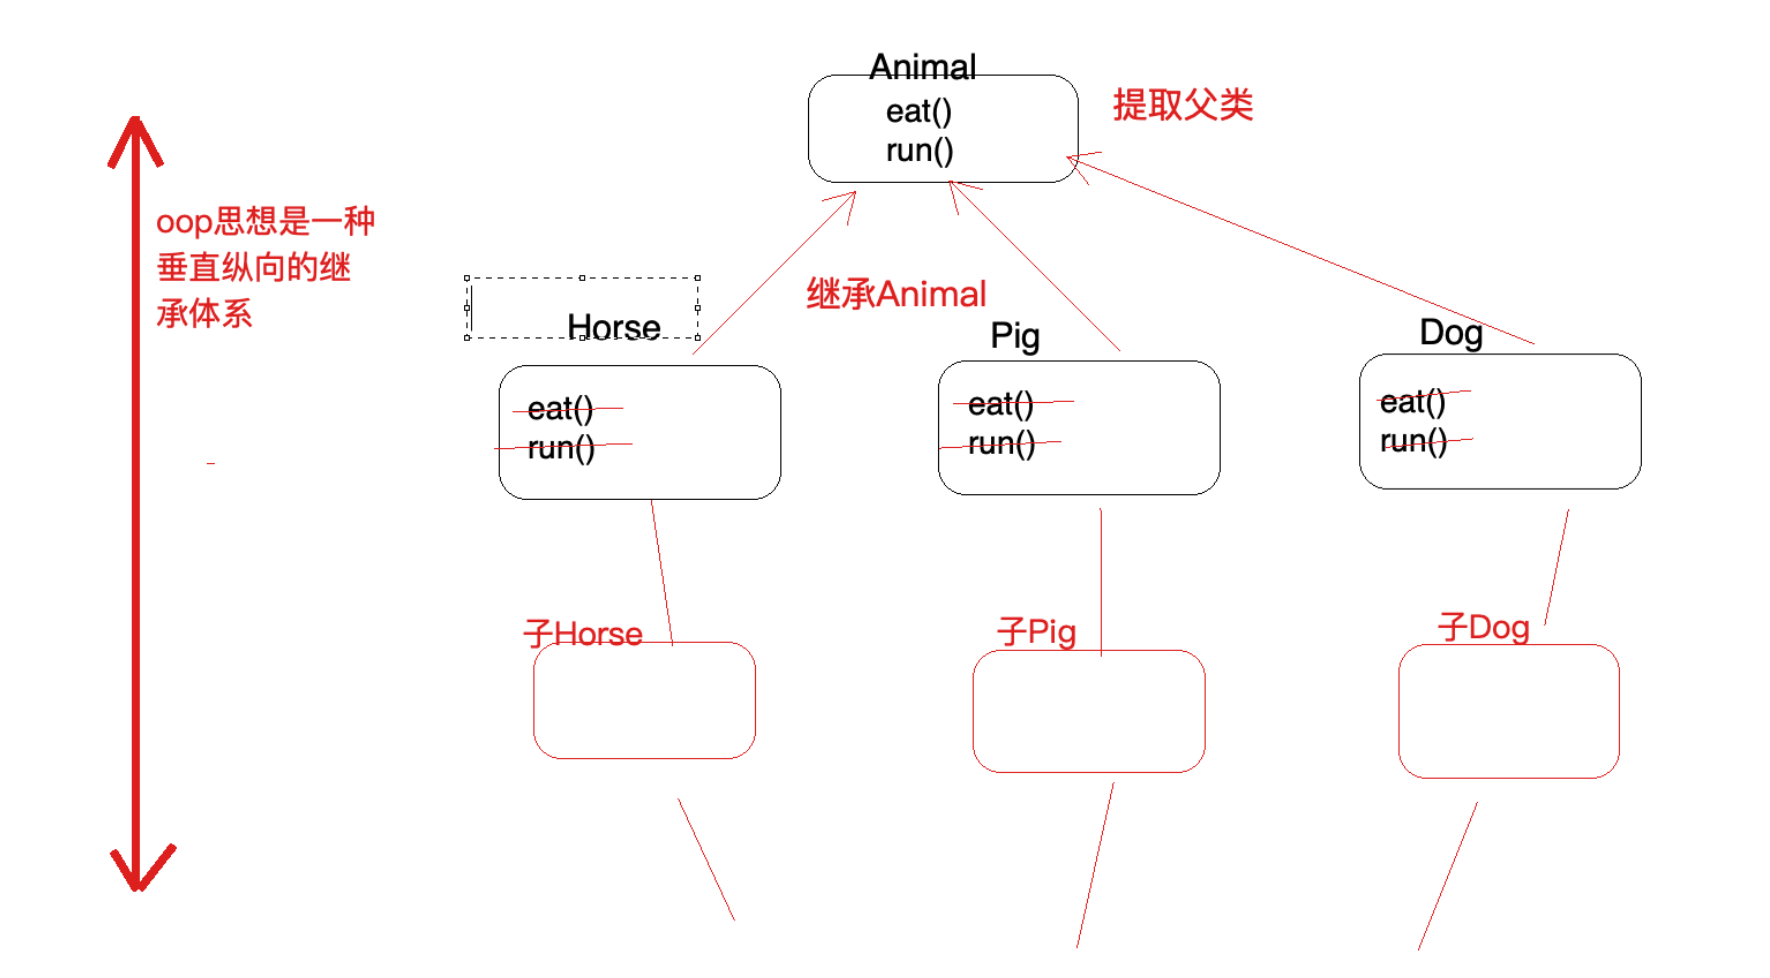
OOP编程思想可以解决大多数的代码重复问题,但是有一些情况是处理不了的,比如下面的在顶级父类 Animal中的多个方法中相同位置出现了重复代码,OOP就解决不了
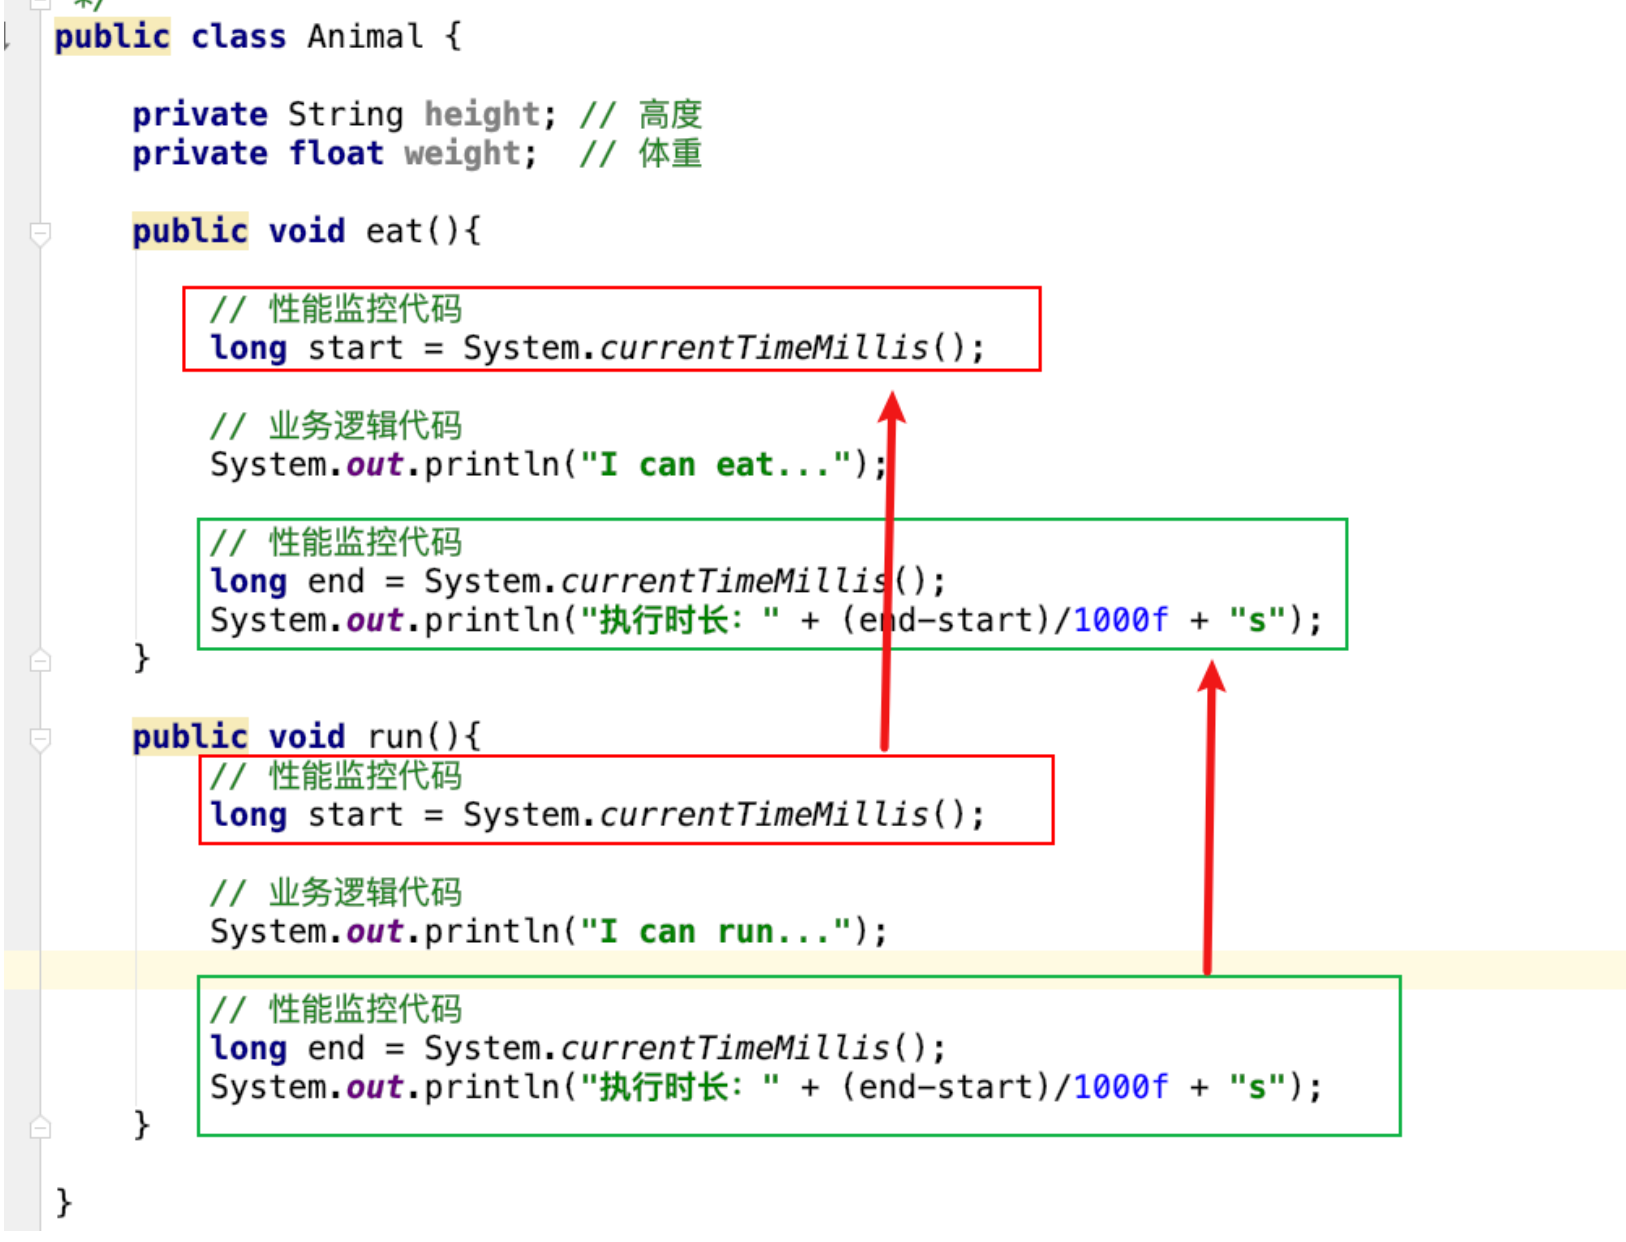
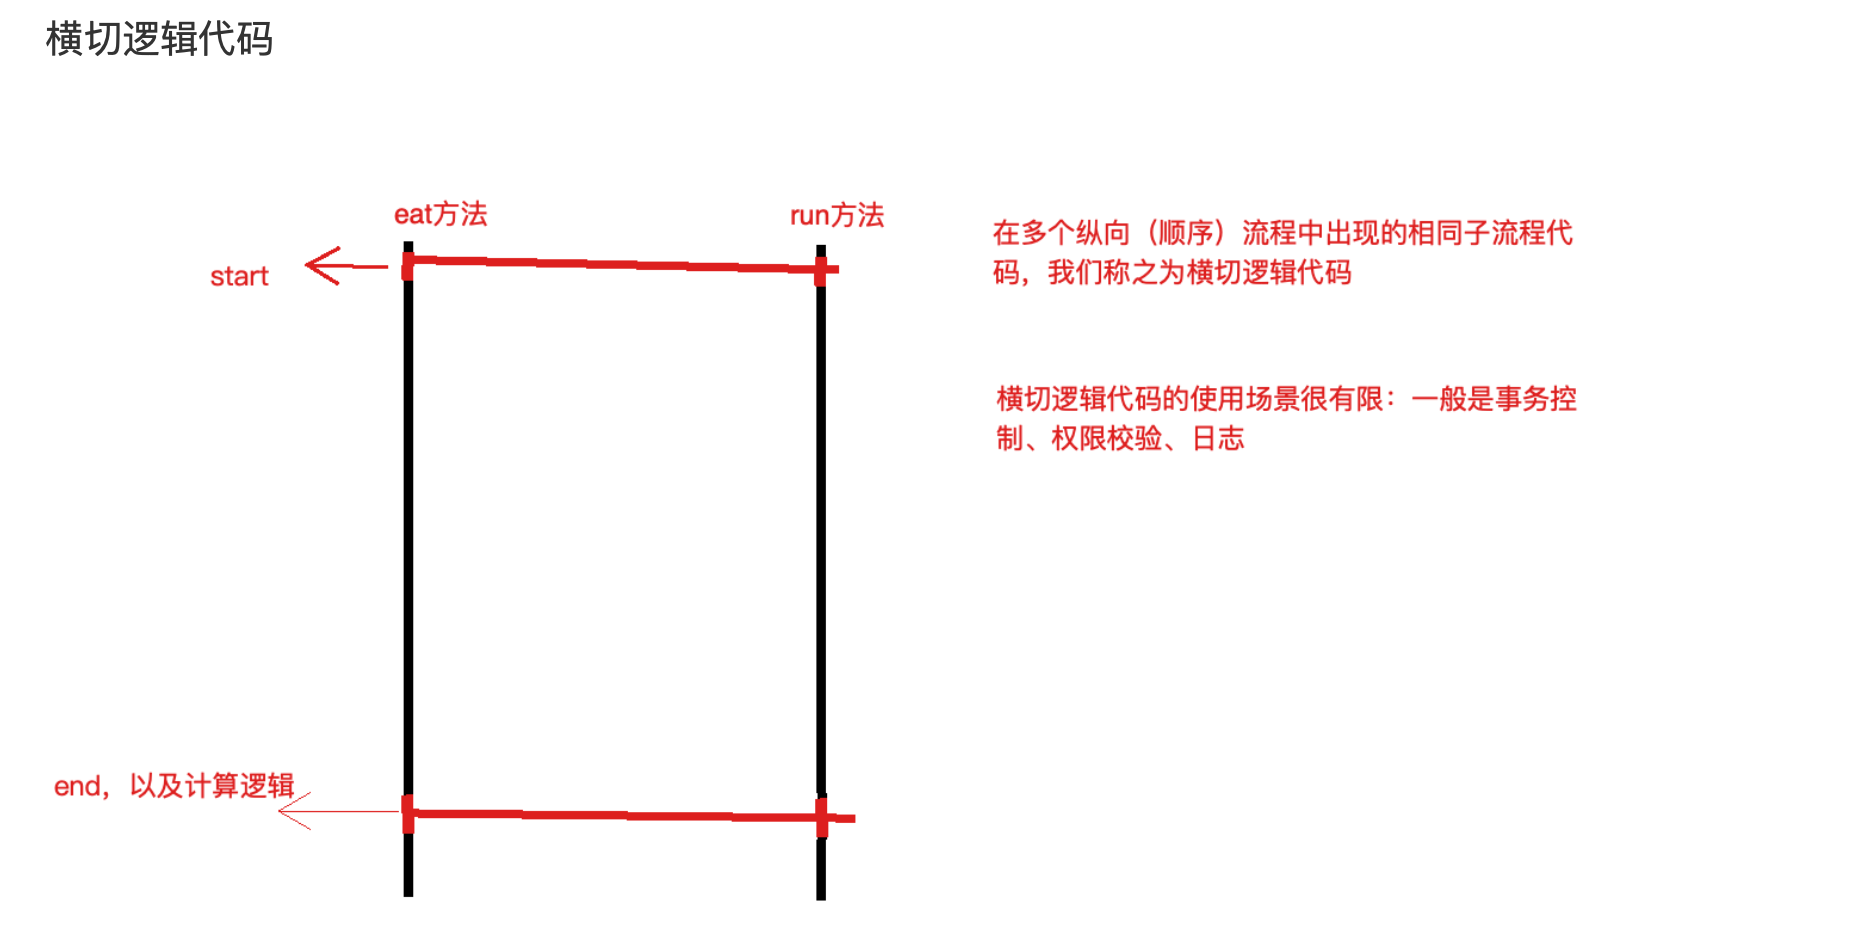
横切逻辑代码存在什么问题:
- 横切代码重复问题
- 横切逻辑代码和业务代码混杂在一起,代码臃肿,维护不方便
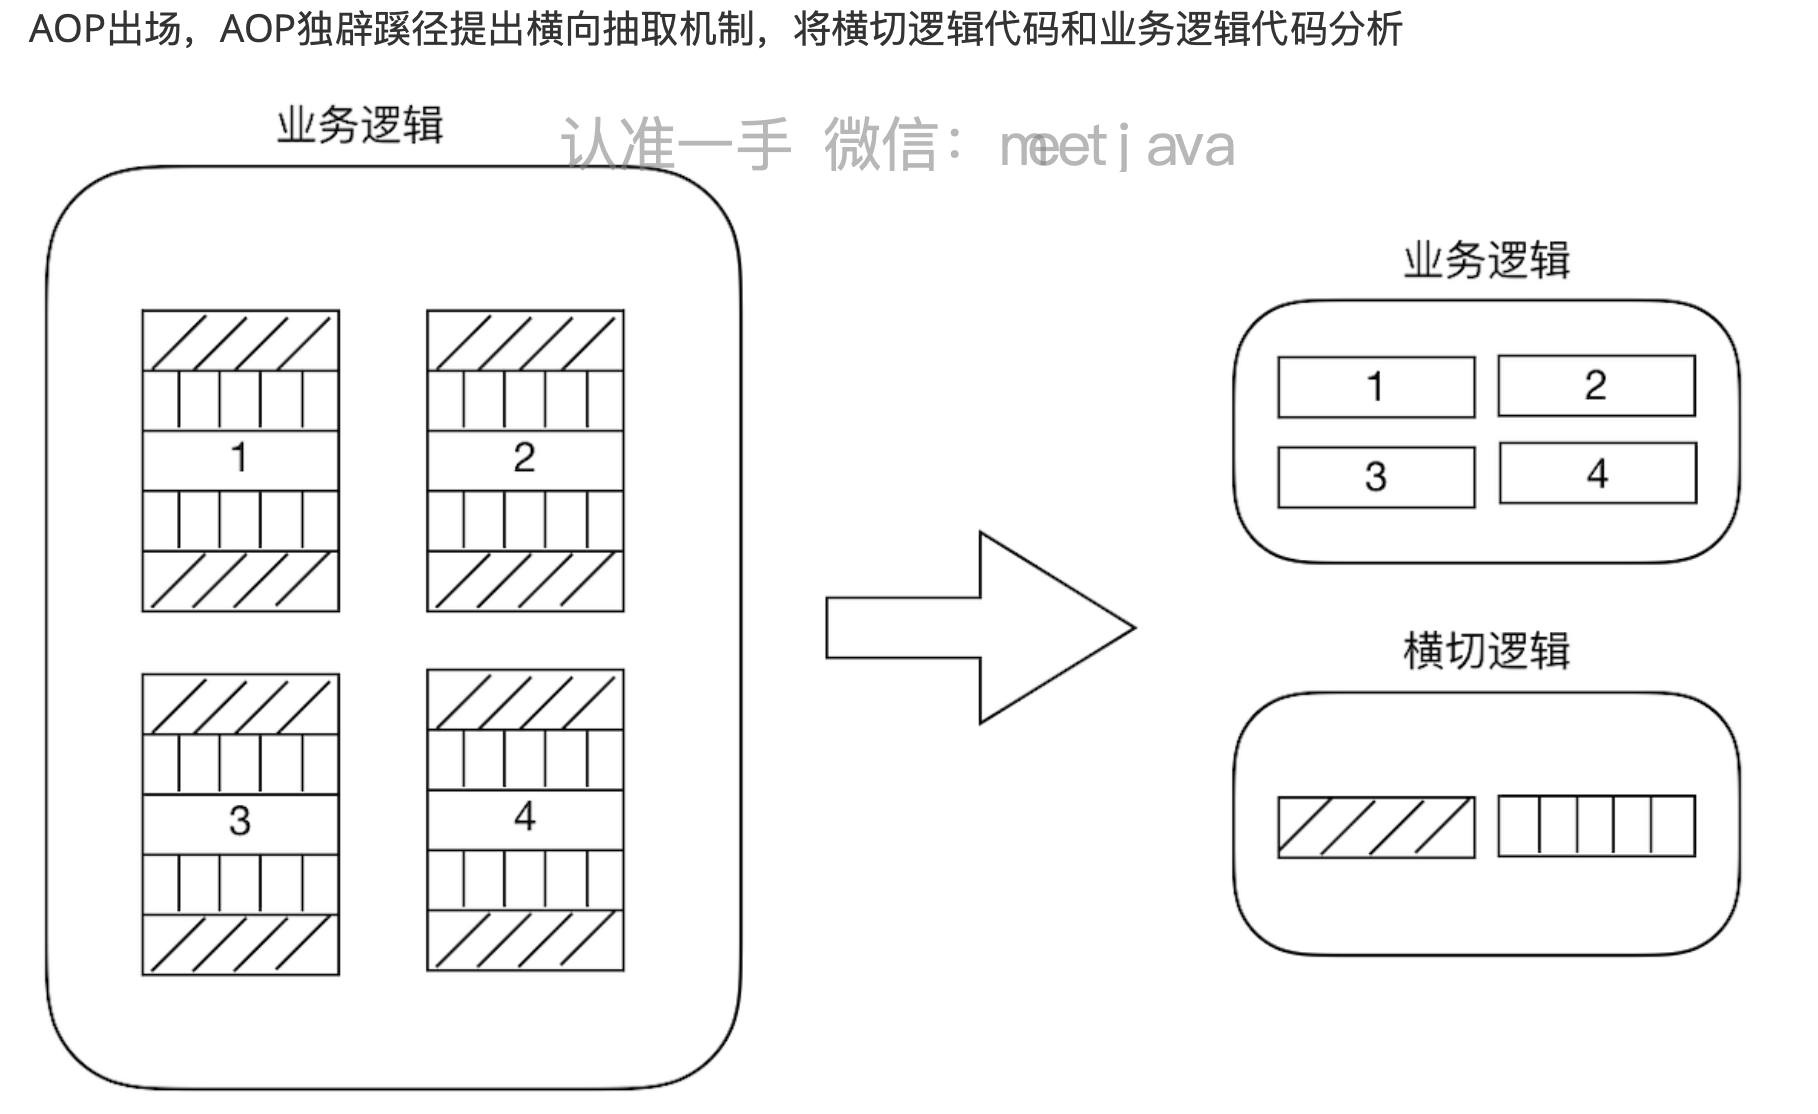
代码拆分容易,那么如何在不改变原有业务逻辑的情况下,悄无声息的把横切逻辑代码应用到原有的业
务逻辑中,达到和原来一样的效果,这个是比较难的
AOP在解决什么问题
在不改变原有业务逻辑情况下,增强横切逻辑代码,根本上解耦合,避免横切逻辑代码重复
为什么叫做面向切面编程
- 「切」:指的是横切逻辑,原有业务逻辑代码我们不能动,只能操作横切逻辑代码,所以面向横切逻辑
- 「面」:横切逻辑代码往往要影响的是很多个方法,每一个方法都如同一个点,多个点构成面,有一个
面的概念在里面
")
AOP、IOC的概念及其在Spring中的使用(待续)
AOP: 参考:http://www.cnblogs.com/powerdk/p/4150112.html
AOP(Aspect-Oriented Programming),面向切面编程,看着是跟OOP(面向对象编程)挺相近的,但实际上又有什么区别呢?OOP具有封装,继承,多态等东西来定义从上到下这种层次关系,但要想实现从左到右的关系的话就开始有点水土不服了,例如用户的权限控制,操作日志等,这些与我们要实现的核心功能不大有关系的东西散布在我们代码的周边,显示十分不好看。于是我们引入了AOP的模式。
这种在运行时,动态地将代码切入到类的指定方法、指定位置上的编程思想就是面向切面的编程。

我们通常在实现一个页面逻辑的时候,通常伴随着操作日志,安全监测,事务处理等几个逻辑,在实现逻辑的时候都要写一大堆这种代码。而AOP就是将这些与主体业务无关,但又有为业务提供服务的逻辑代码封装起来,降低模块之间的耦合度。如图所示中的圆柱体好比如我们的业务流程,aop代表的是那个横向的操作,俗称切面编程。或许上面的这些理论有点头疼,对于AOP我的大体理解是:将那些与业务核心不大相关的杂七杂八的东西独立开,每次实现了业务核心之前或之后,调用一下对应的方法。
**Spring AOP **
参考:http://www.tuicool.com/articles/QNny6r
IOC
参考:http://stamen.iteye.com/blog/1489223/
IOC(Inversion of Control), 控制反转,是一个重要的面向对象编程的法则来削减计算机程序的耦合问题,也是轻量级的Spring框架的核心。 控制反转一般分为两种类型,依赖注入(Dependency Injection,简称DI)和依赖查找(Dependency Lookup)。依赖注入应用比较广泛。
")
apache 问题(待完善)
- 问题1:Apache启动,403异常:You don''t have permission to access / on this server.
- Apache日志如下:
AH00529: /home/*****/.htaccess pc
fg_openfile: unable to check htaccess file, ensure it is readable and that ''/home/sinanbeta/'' is executable, referer
方法:确认文件夹目录权限,需给以目录 755 以上权限即可。
- Apache日志如下:Symbolic link not allowed or link target not accessible
方法:确认是否配置“Options FollowSymLinks”。
")
block的一些用法(待完善)
//block在使用的过程中会引起引用计数加 1 的问题,造成内存泄露(循环引用)的问题;

//当block中用到self,以及实例变量时,一般使用__block进行修饰,来避免引用计数+1 的问题;

//例如:

 __block FirstViewController * firstVC = self;

    firstVC.block = ^(NSString * text){

        firstVC.title = text;
    };

//block的声明以及调用的方式:

     //(1)声明的方式:返回值类型(^变量名)(形参的列表) 一般会给其进行一个重命名的操作:

         //typedef 返回值类型(^ 定义的别名)(形参列表);如:typedef int(^Block)(int,int);//将这种类型的block定义为Block;

     //(2)定义的方式:

        //第一种方式:返回值类型(^变量名)(形参列表) = ^(返回值类型 可以省略)(形参列表){ 代码设为功能的实现部分 };

         形如:int(^ block1) (int ,int) =  ^(int a ,int b){ return a * b;};


        //第二种方式:定义的别名的前提下:定义变量的方式:别名 变量名 =  ^(返回值类型 可以省略)(形参列表){ 代码设为功能的实现部分 };(分号不可省略)

        形如:Block block =  ^(UIColor *color){

                    self.view.backgroundColor = color;

               };
//block 的传值问题:

      (1)将声明写在要传值的类的.h文件中(一般声明成属性),调用在此文件的.m文件中(注意在调用时,被传值的页面是否创建,如没有,使用[被传值的界面  view]进行页面的创建,写在调用的前面);

      (2)将实现写在需要值得界面文件中;

       (3) 将block声明称属性(注意:要用copy修饰)(原因:block函数分布在桟区,当我们在其他的页面中调用时,

				有可能被系统释放,造成野指针的内存问题,使用copy将其复制到堆区,进行手动的管理,可以避免野指针访问的问题)

(以便在其他的界面中使用)与 调用(要传值的那个界面)今天关于spring ioc 和aop 整理和待完善的分享就到这里,希望大家有所收获,若想了解更多关于2、Spring的IOC和AOP、AOP、IOC的概念及其在Spring中的使用(待续)、apache 问题(待完善)、block的一些用法(待完善)等相关知识,可以在本站进行查询。
本文标签: