对于想了解使用docker部署filebeat和logstash的读者,本文将是一篇不可错过的文章,我们将详细介绍dockerfile部署项目,并且为您提供关于27.4logstash收集nginx日
对于想了解使用docker部署filebeat和logstash的读者,本文将是一篇不可错过的文章,我们将详细介绍dockerfile部署项目,并且为您提供关于27.4logstash 收集 nginx 日志、filebeat、Centos6搭建ELK - 02 安装使用Filebeat和Logstash、docker logstash log docker logs to elasticsearch、docker logstash 使用的有价值信息。
本文目录一览:- 使用docker部署filebeat和logstash(dockerfile部署项目)
- 27.4logstash 收集 nginx 日志、filebeat
- Centos6搭建ELK - 02 安装使用Filebeat和Logstash
- docker logstash log docker logs to elasticsearch
- docker logstash 使用
")
使用docker部署filebeat和logstash(dockerfile部署项目)
想用filebeat读取项目的日志,然后发送logstash。logstash官网有相关的教程,但是docker部署的教程都太简洁了。自己折腾了半天,踩了不少坑,总算是将logstash和filebeat用docker部署好了,这儿简单记录一下
部署logstash
1. 编写logstash配置文件logstasgh.conf
输入是从filebeat中获取的,输出配置的是一个http端
input {
    beats {
        port => "5044"
    }
}
# The filter part of this file is commented out to indicate that it is
# optional.
# filter {
#
# }
output {
     http {
         http_method => "post"
         url => "http://127.0.0.1/log"
         format => "json"
    }

    stdout { codec => rubydebug }
}
2. 获取logstash的docker镜像
docker pull docker.elastic.co/logstash/logstash:7.1.1
3. 通过dokcer启动logstash
docker run -p 5044:5044 --name logstash -d \
    -v /path/to/logstash.conf:/usr/share/logstash/pipeline/logstash.conf \
    docker.elastic.co/logstash/logstash:7.1.1
部署filebeat
1. 编写filebeat的配置文件filebeat.yml
filebeat.inputs:
- type: log
  paths:
    # 容器内的路径,可以不用修改,映射到这个路径就可以
    - /val/log/

  fields:
    # 额外添加的字段
    project-name: your_project_name

  # 需要排除和包括的行(正则表达式)
  exclude_lines: [''INFO'']

  include_lines: [''ERROR'']

  # 这个是用来处理异常产生多行数据时,将多行数据当作一条日志处理,根据自己的异常日志的格式做修改
  multiline.pattern: ''^\[''
  multiline.negate: true
  multiline.match: after

  ignore_older: 168h

  tail_files: true

output.logstash:
  hosts: ["127.0.0.1:5044"]
2. 获取filebeat的docker镜像
docker pull docker.elastic.co/beats/filebeat:7.1.1
3. 通过dokcer启动filebeat
docker run --name filebeat -d \
    -v /path/to/:/var/log/:ro \
    -v /path/to/filebeat.yml:/usr/share/filebeat/filebeat.yml \
    docker.elastic.co/beats/filebeat:7.1.1

27.4logstash 收集 nginx 日志、filebeat
logstash 收集 nginx 日志
使用 Beats 采集日志(filebeat)
logstash 收集 nginx 日志
1.
133 上(在 logstash 这台机器上加入这个配置文件)
编辑配置文件 vi /etc/logstash/conf.d/nginx.conf// 加入如下内容
input {
  file {
    path => "/tmp/elk_access.log"
    start_position => "beginning"
    type => "nginx"
  }
}
filter {
    grok {
        match => { "message" => "%{IPORHOST:http_host} %{IPORHOST:clientip} - %{USERNAME:remote_user} \[%{HTTPDATE:timestamp}\] \"(?:%{WORD:http_verb} %{NOTSPACE:http_request}(?: HTTP/%{NUMBER:http_version})?|%{DATA:raw_http_request})\" %{NUMBER:response} (?:%{NUMBER:bytes_read}|-) %{QS:referrer} %{QS:agent} %{QS:xforwardedfor} %{NUMBER:request_time:float}"}
    }
    geoip {
        source => "clientip"
    }
}
output {
    stdout { codec => rubydebug }
    elasticsearch {
        hosts => ["192.168.193.133:9200"]
	index => "nginx-test-%{+YYYY.MM.dd}"
  }

  }
input { #输入
file { #此处指定一个文件,把这个文件的内容,作为 logstash 的输入
path => "/tmp/elk_access.log" #指定这个文件的路径
start_position => "beginning" #指定这个文件从什么时候开始收集
type => "nginx" #自定义
}
}
filter { #这个是对这个日志对一个过滤(比如输出格式)。所以访问日志的格式也要定义,下面会编辑 nginx 日志的格式(第 3 步骤)
grok {
match => { "message" => "%{IPORHOST:http_host} %{IPORHOST:clientip} - %{USERNAME:remote_user}
}
geoip {
source => "clientip"
}
}
output { #输出
stdout { codec => rubydebug }
elasticsearch {
hosts => ["192.168.193.133:9200"]
index => "nginx-test-%{+YYYY.MM.dd}"
}
}
#(注意花括号)配置不对会找不到 nginx-test
2.
下面是配置代理。我们要产生日志,得去配置。配置之前要先检测一下,上面写的日志是否正确:
以下在 132 上操作
检测配置文件是否有错
cd /usr/share/logstash/bin
./logstash --path.settings /etc/logstash/ -f /etc/logstash/conf.d/nginx.conf --config.test_and_exit
yum install -y nginx #没有 nginx 要安装
vi /etc/nginx/conf.d/elk.conf// 写入如下内容 #写一个虚拟主机配置文件
server {


listen 80;

server_name elk.aming.com;


location / {

proxy_pass http://192.168.193.128:5601; #代理的目标

proxy_set_header Host $host;

proxy_set_header X-Real-IP $remote_addr;

proxy_set_header X-Forwarded-For $proxy_add_x_forwarded_for;

}

access_log /tmp/elk_access.log main2; #自动生成

}
3.
以下在 132 上操作
vim /etc/nginx/nginx.conf// 增加如下内容 #定义 nginx 的日志格式
log_format main2 ''$http_host $remote_addr - $remote_user [$time_local] "$request" ''
                      ''$status $body_bytes_sent "$http_referer" ''
                      ''"$http_user_agent" "$upstream_addr" $request_time'';
nginx -t #解释
/usr/local/nginx/sbin/nginx -t
/usr/local/nginx/sbin/nginx -s reload
nginx: the configuration file /etc/nginx/nginx.conf syntax is ok
nginx: configuration file /etc/nginx/nginx.conf test is successful
systemctl start nginx
绑定 hosts 192.168.193.132 elk.aming.com
浏览器访问,检查是否有日志产生
systemctl restart logstash
4.
128 上 curl ''192.168.193.128:9200/_cat/indices?v''
health status index                 uuid                   pri rep docs.count docs.deleted store.size pri.store.size
yellow open   .kibana               HUhL8JS6Sgqxr8mSq9UgoQ   1   1          2            0      7.2kb          7.2kb
yellow open   system-syslog-2019.06 fqLpMdxRTG2EAV5DC8eIMw   5   1        840            0    526.9kb        526.9kb
查看有没有日志
ls /tmp/elk_access.log
/tmp/elk_access.log
wc -l !$
wc -l /tmp/elk_access.log
0 /tmp/elk_access.log
cat !$
检查是否有 nginx-test 开头的索引生成
如果有,才能到 kibana 里去配置该索引
左侧点击 “Managerment”-> “Index Patterns”-> “Create Index Pattern”
Index pattern 这里写 nginx-test-* #支持统配,直接这样写就可以
之后点击左侧的 Discover
~~~~~~~~~~~~~~~~~~~~~~~~~~~~~~~~~~~~~~~~~~~~~~~~~~~~~~~~~~~~~~~~~~~~~~~~~~~~~~~~~~~~~~~~~~
使用 Beats 采集日志(filebeat)
beats 属于一个轻量的日志采集器。而 logstash 在启动的时候很慢,会消耗资源。那我们可以尝试着使用 beats 去采集日志。
beats 可以自定义我们想要的 beats
https://www.elastic.co/cn/products/beats
filebeat metricbeat packetbeat winlogbeat auditbeat heartbeat #filebeat 的成员组件(我们用到的是 filebeat,他是针对日志的)
可扩展,支持自定义构建
在 133 上执行
wget https://artifacts.elastic.co/downloads/beats/filebeat/filebeat-6.0.0-x86_64.rpm
rpm -ivh filebeat-6.0.0-x86_64.rpm #下载 rpm 包安装 filebeat
以下是在屏幕上的输出:
首先编辑配置文件
vim /etc/filebeat/filebeat.yml// 增加或者更改 #注意文件的格式,空格
filebeat.prospectors:
- input_type: log #定义 input 类型是 log(此处 type 前面的 input 字样,在新版本不会出现,需注意)
paths: #定义日志的路径
- /var/log/messages
output.console: #此处文件里可能没有 output.console:,需要添加这两行进去。但是添加完,要将 out.elasticsearch: 注释掉。如下图:
enable: true
/usr/share/filebeat/bin/filebeat -c /etc/filebeat/filebeat.yml// 可以在屏幕上看到对应的日志信息 #-c 指定配置文件,启动 filebeat
以下是以服务的角色出现:
再编辑配置文件
vim /etc/filebeat/filebeat.yml// 增加或者更改
filebeat.prospectors:
- input_type: log
paths:
- /var/log/messages #针对这个日志
output.elasticsearch: #注意此处跟上面有区分,就不是 output.console: 了
hosts: ["192.168.133.130:9200"] #如下图:
systemctl start filebeat
ps aux |grep filebeat
root      41834  0.2  0.5 299580  5632 ?        Ssl  16:54   0:00 /usr/share/filebeat/bin/filebeat -c /etc/filebeat/filebeat.yml -path.home /usr/share/filebeat -path.config /etc/filebeat -path.data /var/lib/filebeat -path.logs /var/log/filebeat
root      41916  0.1  0.0 112720   680 pts/0    D+   16:57   0:00 grep --color=auto filebeat
ls /var/log/filebeat/filebeat
/var/log/filebeat/filebeatless !$
2019-06-21T16:54:31+08:00 INFO Home path: [/usr/share/filebeat] Config path: [/etc/filebeat] Data path: [/var/lib/filebeat] Logs path: [/var/log/filebeat]
2019-06-21T16:54:31+08:00 INFO Beat UUID: 77c66cbe-be20-482b-8e31-4dc91e3390d2
2019-06-21T16:54:31+08:00 INFO Setup Beat: filebeat; Version: 6.0.0
2019-06-21T16:54:31+08:00 INFO Elasticsearch url: http://192.168.193.128:9200
2019-06-21T16:54:31+08:00 INFO Metrics logging every 30s
2019-06-21T16:54:31+08:00 INFO Beat name: axinlinux-03
2019-06-21T16:54:31+08:00 INFO filebeat start running.
2019-06-21T16:54:31+08:00 INFO No registry file found under: /var/lib/filebeat/registry. Creating a new registry file.
2019-06-21T16:54:31+08:00 INFO Loading registrar data from /var/lib/filebeat/registry
2019-06-21T16:54:31+08:00 INFO States Loaded from registrar: 0
2019-06-21T16:54:31+08:00 INFO Loading Prospectors: 1
2019-06-21T16:54:31+08:00 INFO Starting prospector of type: log; id: 13761481236662083215
2019-06-21T16:54:31+08:00 INFO Loading and starting Prospectors completed. Enabled prospectors: 1
2019-06-21T16:54:31+08:00 INFO Starting Registrar
2019-06-21T16:54:31+08:00 INFO Harvester started for file: /var/log/elasticsearch/aminglinux.log
2019-06-21T16:54:31+08:00 INFO Config reloader started
2019-06-21T16:54:31+08:00 INFO Loading of config files completed.
2019-06-21T16:54:40+08:00 INFO Connected to Elasticsearch version 6.8.0
2019-06-21T16:54:43+08:00 INFO Loading template for Elasticsearch version: 6.8.0
/var/log/filebeat/filebeat
curl ''192.168.193.128:9200/_cat/indices?v''
health status index                     uuid                   pri rep docs.count docs.deleted store.size pri.store.size
yellow open   system-syslog-2019.06     fqLpMdxRTG2EAV5DC8eIMw   5   1
yellow open   .kibana                   HUhL8JS6Sgqxr8mSq9UgoQ   1   1
yellow open   nginx-test-2019.06.21     MHZFKf9CTH-wY6YzgD6A7g   5   1
yellow open   filebeat-6.0.0-2019.06.21 y0O_XA9gQZ-kCvx_IguilQ   3   1
然后,可以在 kibana 上创建新的索引
~~~~~~~~~~~~~~~~~~~~~~~~~~~~~~~~~~~~~~~~~~~~~~~~~~~~~~~~~~~~~~~~~~~~~~~~~~~~~~~~~~~~~~~~~~
扩展部分
x-pack 收费,免费 http://www.jianshu.com/p/a49d93212eca
https://www.elastic.co/subscriptions
Elastic stack 演进 http://70data.net/1505.html
基于 kafka 和 elasticsearch,linkedin 构建实时日志分析系统 http://t.cn/RYffDoE
使用 redis http://blog.lishiming.net/?p=463
ELK+Filebeat+Kafka+ZooKeeper 构建海量日志分析平台 https://www.cnblogs.com/delgyd/p/elk.html
http://www.jianshu.com/p/d65aed756587

Centos6搭建ELK - 02 安装使用Filebeat和Logstash
安装Filebeat
官方文档:https://www.elastic.co/guide/...
curl -L -O https://artifacts.elastic.co/downloads/beats/filebeat/filebeat-7.13.3-x86_64.rpm
sudo rpm -vi filebeat-7.13.3-x86_64.rpm
配置文件路径
vim /etc/filebeat/filebeat.yml

filebeat.inputs: # filebeat input输入
- type: log    # 标准输入
  paths:
    - /xxx/*.log
  fields:
    from: xxx
  fields_under_root: true

output.logstash:
  hosts: ["127.0.0.1:5044"]
启动服务
service filebeat start查看日志
tail -f /var/log/filebeat/filebeat安装Logstash
官方文档:https://www.elastic.co/cn/dow...
vim /etc/yum.repos.d/logstash.repo

[logstash-7.x]
name=Elastic repository for 7.x packages
baseurl=https://artifacts.elastic.co/packages/7.x/yum
gpgcheck=1
gpgkey=https://artifacts.elastic.co/GPG-KEY-elasticsearch
enabled=1
autorefresh=1
type=rpm-md
安装
sudo yum install logstash
rpm -ql logstash #查看安装目录
ln -s /usr/share/logstash/bin/logstash /bin/ #创建软链接
测试
logstash -e ''input { stdin { } } output { stdout {} }'' #运行成功后输入任意内容测试配置文件
input {
  beats {
    port => 5044
  }
}
output {
  elasticsearch {
     hosts => ["127.0.0.1:9200"]
     index => "xxx_%{+YYYY.MM.dd}"
  }
}
启动
initctl start logstash
docker logstash log docker logs to elasticsearch
1. 下载 logstash 镜像
docker pull logstash
2. 下载 ElasticSearch 并设置远程可访问
vim elasticsearch/config/elasticsearch.yml
修改 network.host 为你本机的 IP 地址: 我这里是 192.168.1.43
运行 ES
3. 编写 logstash.conf 的配置文件
因为 docker 目前仅支持三种日志系统:syslog(Linux 标准中央日志系统)、GELF(Graylog 和 Logstash 支持的 Graylog 扩展日志格式)、Fluentd 以及在 1.9.0 版本支持的 AWS CloudWatch。Graylog、Logstash 和 Fluentd 是开源的日志管理工具。参考地址
【https://docs.docker.com/engine/admin/logging/log_tags/】
所以本文采用的 logstash 的 gelf 插件来实现。参考地址
【 https://www.elastic.co/guide/en/logstash/current/plugins-inputs-gelf.html】
(2) 配置文件内容如下:
vim logstash-filter.conf
input {
        gelf{}
    }

filter {
        grok {
            match => { "message" => "%{COMBINEDAPACHELOG}" }
            }

   date {
       match => [ "timestamp" , "dd/MMM/yyyy:HH:mm:ss Z" ]
       }

    geoip {
       source => "clientip"
    }
}

output {

       elasticsearch {
          hosts => ["192.168.1.43:9200"]
       }
          stdout { codec => rubydebug }

}
4. docker 运行 logstash
需要进入到 logstash-filter.conf 文件所在目录
docker run -i --name=logstash -v $PWD/logstash-filter.conf:/config-dir/logstash.conf logstash -f /config-dir/logstash.conf
5. 产生系统日志
docker run -i --log-driver=gelf --log-opt gelf-address=udp://$(docker inspect --format ''{{ .NetworkSettings.IPAddress }}'' logstash):12201 --log-opt tag="test" ubuntu /bin/sh -c "while true; do echo My Message \$RANDOM; sleep 1; done;"
标红 logstash 就是上面 docker logstash 运行时指定的容器的名称。可以随意更改。
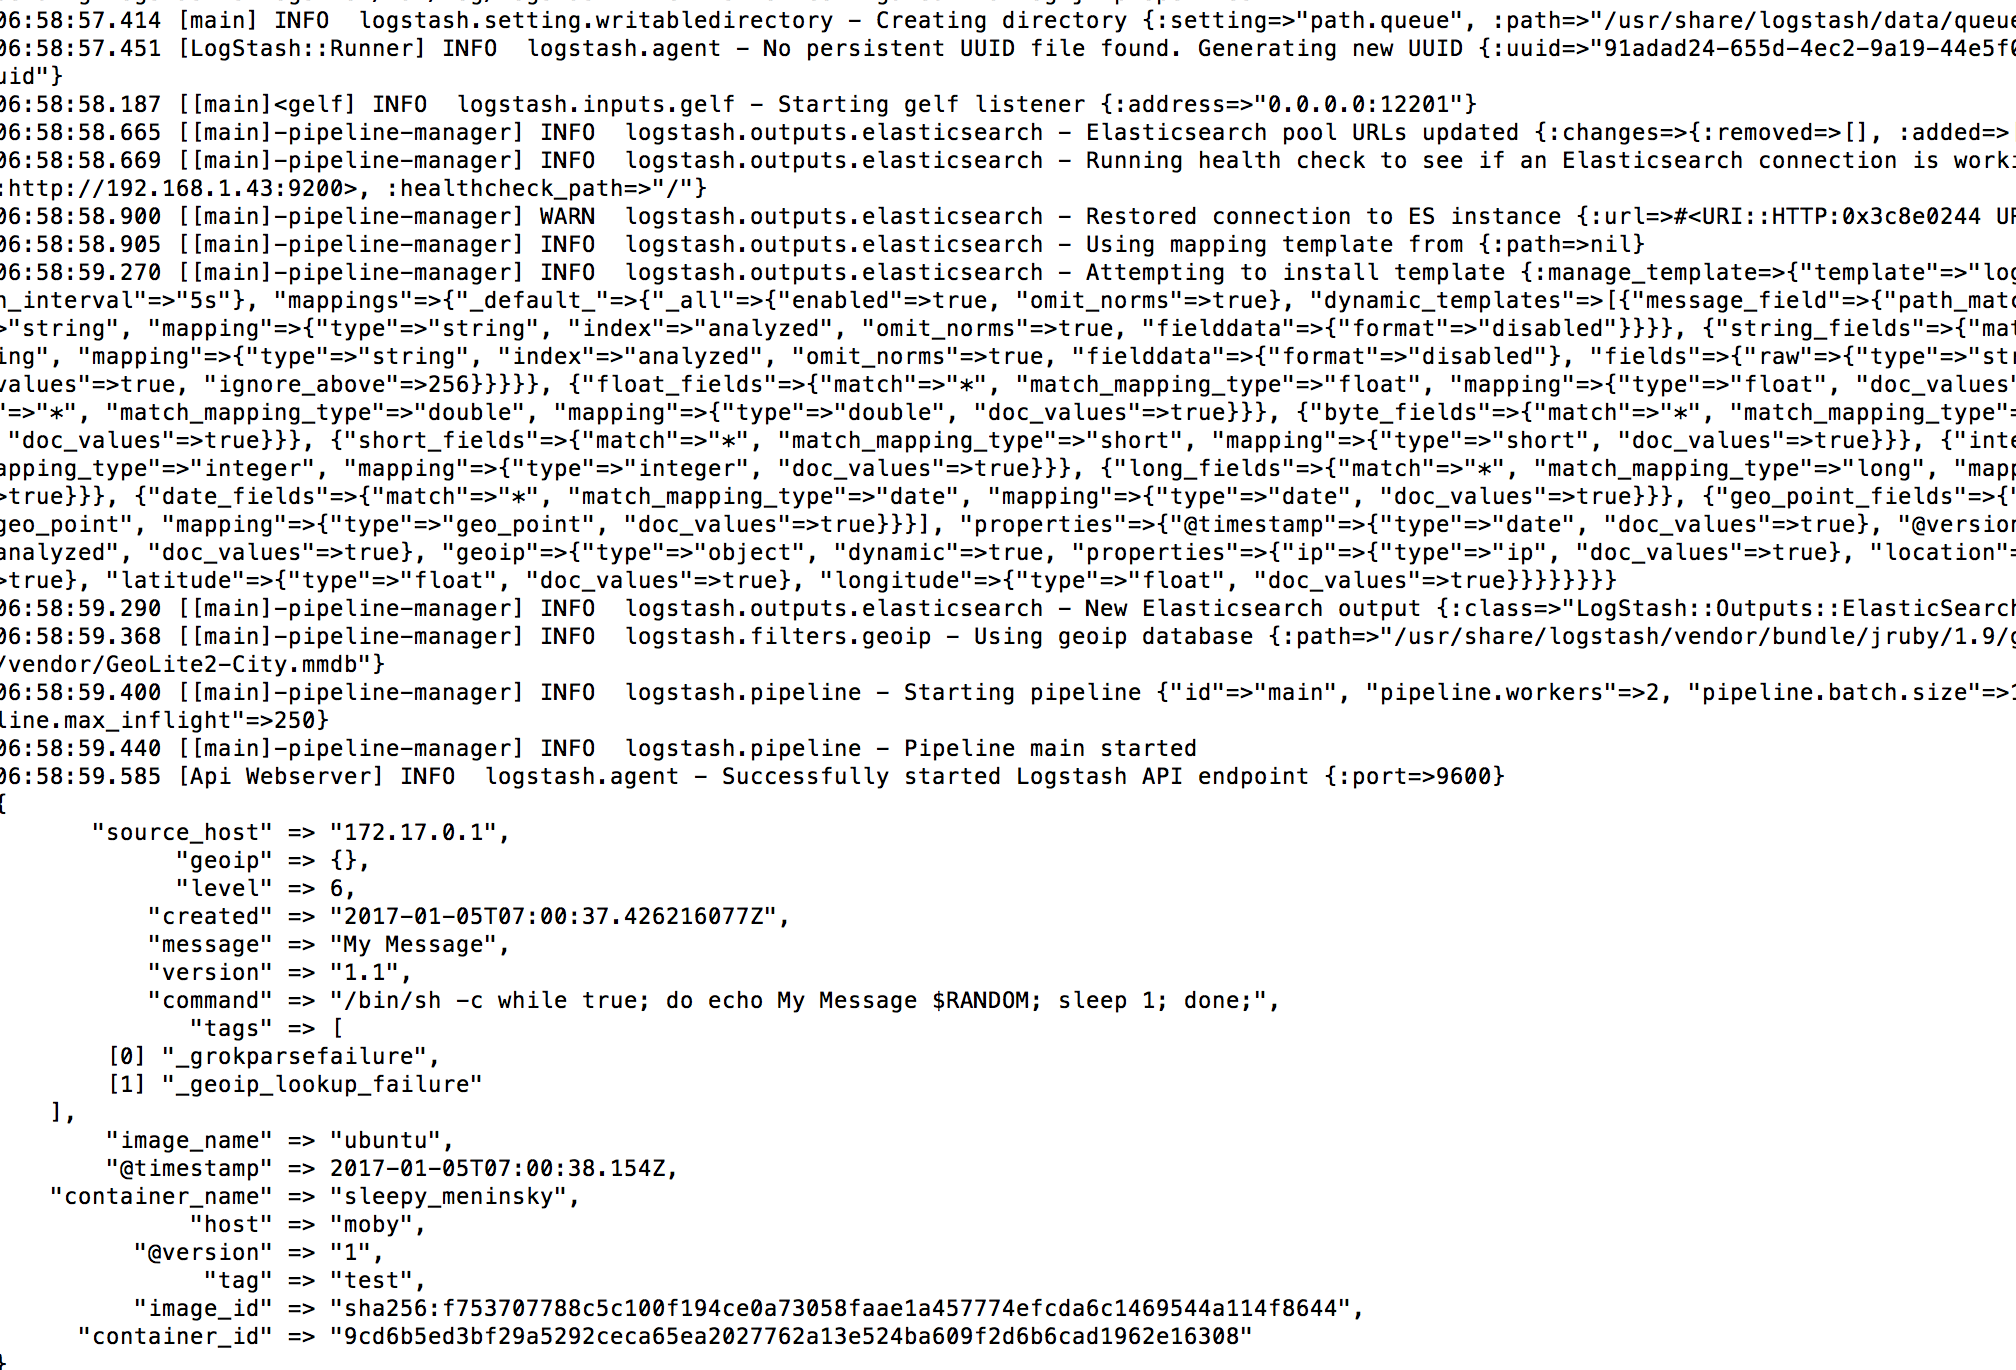
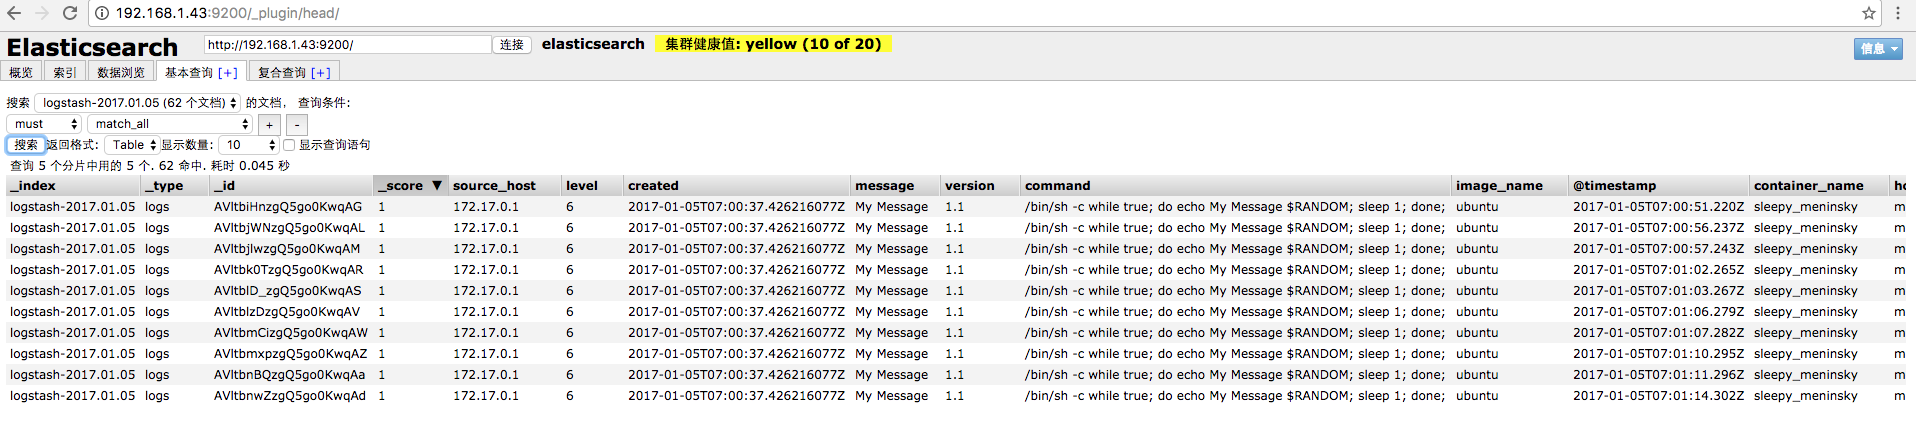
6. 结果
可以看到 logstash 打印的结果
可以查看 ES 里面的结果
如果大家觉得这篇文章对你有用,请随意打赏。

docker logstash 使用
安装插件 如 安装 logstash-input-jdbc
docker run -it --rm logstash:5.6.10 logstash-plugin install logstash-input-jdbc
以 配置文件方式(路径 /dir/config.conf)运行
docker run -it --rm logstash:5.6.10 -f /dir/config.conf -v /config/dir : /dir
我们今天的关于使用docker部署filebeat和logstash和dockerfile部署项目的分享就到这里,谢谢您的阅读,如果想了解更多关于27.4logstash 收集 nginx 日志、filebeat、Centos6搭建ELK - 02 安装使用Filebeat和Logstash、docker logstash log docker logs to elasticsearch、docker logstash 使用的相关信息,可以在本站进行搜索。
本文标签:


