对于想了解Installingscrapyfailingoncleaning的读者,本文将提供新的信息,并且为您提供关于(OK)CreatingmanuallyoneVMsfromanexisting
对于想了解Installing scrapy failing on cleaning的读者,本文将提供新的信息,并且为您提供关于(OK) Creating manually one VMs from an existing VDI file in CLI (VBoxManage) in Fedora 23、108.You are installing Oracle Database 11g on your server. During the installation Oracle Universal、Android Studio 错误 Application Installation Failed...INSTALL_FAILED_INVALID_APK…、Android Studio模拟器出错,提示Application Installation Failed, Installation failed with message Failed to...的有价值信息。
本文目录一览:- Installing scrapy failing on cleaning
- (OK) Creating manually one VMs from an existing VDI file in CLI (VBoxManage) in Fedora 23
- 108.You are installing Oracle Database 11g on your server. During the installation Oracle Universal
- Android Studio 错误 Application Installation Failed...INSTALL_FAILED_INVALID_APK…
- Android Studio模拟器出错,提示Application Installation Failed, Installation failed with message Failed to...

Installing scrapy failing on cleaning
我一直在尝试Scrapy使用pip进行安装,以获取本赛季的NBA日程安排和得分。一直在努力尝试在最近6个小时内安装它。我已经按照设置说明进行了逐字检查,但仍然无法使它正常工作。任何帮助将不胜感激。终端窗口输出如下。非常感谢!使用mac osx btw。
Requirement already satisfied (use --upgrade to upgrade): Scrapy in /Library/Frameworks/Python.framework/Versions/2.7/lib/python2.7/site-packages/Scrapy-0.22.2-py2.7.eggDownloading/unpacking Twisted>=10.0.0 (from Scrapy) Downloading Twisted-13.2.0.tar.bz2 (2.7MB): 2.7MB downloaded Running setup.py (path:/private/var/folders/22/642hcs8n6sx5xg59phv8rw2c0000gn/T/pip_build_andrew/Twisted/setup.py) egg_info for package TwistedDownloading/unpacking w3lib>=1.2 (from Scrapy) Downloading w3lib-1.5.tar.gz Running setup.py (path:/private/var/folders/22/642hcs8n6sx5xg59phv8rw2c0000gn/T/pip_build_andrew/w3lib/setup.py) egg_info for package w3libDownloading/unpacking queuelib (from Scrapy) Downloading queuelib-1.1.1.tar.gz Running setup.py (path:/private/var/folders/22/642hcs8n6sx5xg59phv8rw2c0000gn/T/pip_build_andrew/queuelib/setup.py) egg_info for package queuelibDownloading/unpacking lxml (from Scrapy) Downloading lxml-3.3.5.tar.gz (3.5MB): 3.5MB downloaded Running setup.py (path:/private/var/folders/22/642hcs8n6sx5xg59phv8rw2c0000gn/T/pip_build_andrew/lxml/setup.py) egg_info for package lxml /Library/Frameworks/Python.framework/Versions/2.7/lib/python2.7/distutils/dist.py:267: UserWarning: Unknown distribution option: ''bugtrack_url'' warnings.warn(msg) Building lxml version 3.3.5. Building without Cython. Using build configuration of libxslt 1.1.28 warning: no previously-included files found matching ''*.py''Requirement already satisfied (use --upgrade to upgrade): pyOpenSSL in /Library/Frameworks/Python.framework/Versions/2.7/lib/python2.7/site-packages/pyOpenSSL-0.14-py2.7.egg (from Scrapy)Requirement already satisfied (use --upgrade to upgrade): cssselect>=0.9 in /Library/Frameworks/Python.framework/Versions/2.7/lib/python2.7/site-packages/cssselect-0.9.1-py2.7.egg (from Scrapy)Requirement already satisfied (use --upgrade to upgrade): six>=1.5.2 in /Library/Frameworks/Python.framework/Versions/2.7/lib/python2.7/site-packages/six-1.6.1-py2.7.egg (from Scrapy)Downloading/unpacking zope.interface>=3.6.0 (from Twisted>=10.0.0->Scrapy) Downloading zope.interface-4.1.1.tar.gz (864kB): 864kB downloaded Running setup.py (path:/private/var/folders/22/642hcs8n6sx5xg59phv8rw2c0000gn/T/pip_build_andrew/zope.interface/setup.py) egg_info for package zope.interface warning: no previously-included files matching ''*.dll'' found anywhere in distribution warning: no previously-included files matching ''*.pyc'' found anywhere in distribution warning: no previously-included files matching ''*.pyo'' found anywhere in distribution warning: no previously-included files matching ''*.so'' found anywhere in distributionDownloading/unpacking cryptography>=0.2.1 (from pyOpenSSL->Scrapy) Downloading cryptography-0.3.tar.gz (208kB): 208kB downloaded答案1
小编典典首次安装加密:
brew install pkg-config libffiexport CFLAGS=-Qunused-argumentsexport CPPFLAGS=-Qunused-argumentsexport PKG_CONFIG_PATH=/usr/local/Cellar/libffi/3.0.13/lib/pkgconfig/pip install cryptography然后使用以下命令安装lxml:
xcode-select --install然后使用以下命令安装scrapy:
pip install Scrapy要么
easy_install Scrapy Creating manually one VMs from an existing VDI file in CLI (VBoxManage) in Fedora 23")
(OK) Creating manually one VMs from an existing VDI file in CLI (VBoxManage) in Fedora 23
VBoxManage list runningvms
VBoxManage guestproperty get android-x86_64-6.0-rc1-1 "/VirtualBox/GuestInfo/Net/0/V4/IP"
VBoxManage showvminfo android-x86_64-6.0-rc1-1 --details
VBoxManage guestproperty enumerate android-x86_64-6.0-rc1-1
VBoxManage guestproperty enumerate Winxp
(OK) Creating manually one VMs from an existing VDI file in CLI (VBoxManage) in Fedora 23
---------------------------------------------------------------------------------
//successful (natpf1, NAT Port Forwarding) OK OK OK
---------------------------------------------------------------------------------
getprop service.adb.ip
getprop service.adb.tcp.port
setprop service.adb.ip 192.168.56.3
setprop service.adb.tcp.port 5555
stop adbd
start adbd
tunctl -t tap_a_1
ip link set up dev tap_a_1
brctl addif br_a_1 tap_a_1
brctl addbr br_a_1
ip link set up dev br_a_1
ifconfig br_a_1 up
brctl addbr br_a_0
ip link set up dev br_a_0
ifconfig br_a_0 up
// bridged, --nic2 none --nic3 none --nic4 none, android-x86_64-6.0-rc1-0
VBoxManage createvm --name android-x86_64-6.0-rc1-0 --ostype Linux_64 --register; VBoxManage modifyvm android-x86_64-6.0-rc1-0 --memory 1024 --vram 128 --usb off --audio pulse --audiocontroller sb16 --acpi on --rtcuseutc off --boot1 disk --boot2 dvd --nic1 bridged --bridgeadapter1 br_a_1 --nic2 none --nic3 none --nic4 none; VBoxManage storagectl android-x86_64-6.0-rc1-0 --name "IDE Controller" --add ide --controller PIIX4; VBoxManage storageattach android-x86_64-6.0-rc1-0 --storagectl "IDE Controller" --port 0 --device 0 --type hdd --medium /run/media/root/158a840e-63fa-4544-b0b8-dc0d40c79241/virtualbox-os/android-x86_64-6.0-rc1-0.vdi; VBoxManage startvm android-x86_64-6.0-rc1-0;
tunctl -t tap_a_1
ip link set up dev tap_a_1
brctl addbr br_a_1
brctl addif br_a_1 tap_a_1
ip link set up dev br_a_1
ifconfig br_a_1 up
// bridged, --nic2 none --nic3 none --nic4 none, android-x86_64-6.0-rc1-1
VBoxManage createvm --name android-x86_64-6.0-rc1-1 --ostype Linux_64 --register; VBoxManage modifyvm android-x86_64-6.0-rc1-1 --memory 1024 --vram 128 --usb off --audio pulse --audiocontroller sb16 --acpi on --rtcuseutc off --boot1 disk --boot2 dvd --nic1 bridged --bridgeadapter1 br_a_1 --nic2 none --nic3 none --nic4 none; VBoxManage storagectl android-x86_64-6.0-rc1-1 --name "IDE Controller" --add ide --controller PIIX4; VBoxManage storageattach android-x86_64-6.0-rc1-1 --storagectl "IDE Controller" --port 0 --device 0 --type hdd --medium /run/media/root/158a840e-63fa-4544-b0b8-dc0d40c79241/virtualbox-os/android-x86_64-6.0-rc1-1.vdi; VBoxManage startvm android-x86_64-6.0-rc1-1;
// natpf1, --nic2 none --nic3 none --nic4 none
VBoxManage createvm --name android-x86_64-6.0-rc1-1 --ostype Linux_64 --register; VBoxManage modifyvm android-x86_64-6.0-rc1-1 --memory 1024 --vram 128 --usb off --audio pulse --audiocontroller sb16 --acpi on --rtcuseutc off --boot1 disk --boot2 dvd --nic2 none --nic3 none --nic4 none; VBoxManage modifyvm android-x86_64-6.0-rc1-1 --natpf1 adb,tcp,*,5555,*,5555; VBoxManage storagectl android-x86_64-6.0-rc1-1 --name "IDE Controller" --add ide --controller PIIX4; VBoxManage storageattach android-x86_64-6.0-rc1-1 --storagectl "IDE Controller" --port 0 --device 0 --type hdd --medium /run/media/root/158a840e-63fa-4544-b0b8-dc0d40c79241/virtualbox-os/android-x86_64-6.0-rc1-1.vdi; VBoxManage startvm android-x86_64-6.0-rc1-1;
// natpf1, --nic2 bridged --bridgeadapter2 br_a_1
VBoxManage createvm --name android-x86_64-6.0-rc1-1 --ostype Linux_64 --register; VBoxManage modifyvm android-x86_64-6.0-rc1-1 --memory 1024 --vram 128 --usb off --audio pulse --audiocontroller sb16 --acpi on --rtcuseutc off --boot1 disk --boot2 dvd --nic2 bridged --bridgeadapter2 br_a_1 --nic3 none --nic4 none; VBoxManage modifyvm android-x86_64-6.0-rc1-1 --natpf1 adb,tcp,*,5555,*,5555; VBoxManage storagectl android-x86_64-6.0-rc1-1 --name "IDE Controller" --add ide --controller PIIX4; VBoxManage storageattach android-x86_64-6.0-rc1-1 --storagectl "IDE Controller" --port 0 --device 0 --type hdd --medium /run/media/root/158a840e-63fa-4544-b0b8-dc0d40c79241/virtualbox-os/android-x86_64-6.0-rc1-1.vdi; VBoxManage startvm android-x86_64-6.0-rc1-1;
adb -s emulator-5554 shell
adb -s emulator-5554 shell ls /
// vboxnet0, --nic1 hostonly --nictype1 Am79C973 --hostonlyadapter1 vboxnet0
VBoxManage createvm --name android-x86_64-6.0-rc1-1 --ostype Linux_64 --register; VBoxManage modifyvm android-x86_64-6.0-rc1-1 --memory 1024 --vram 128 --usb off --audio pulse --audiocontroller sb16 --acpi on --rtcuseutc off --boot1 disk --boot2 dvd --nic1 hostonly --nictype1 Am79C973 --hostonlyadapter1 vboxnet0 --nic2 bridged --bridgeadapter2 br_a_1 --nic3 none --nic4 none; VBoxManage storagectl android-x86_64-6.0-rc1-1 --name "IDE Controller" --add ide --controller PIIX4; VBoxManage storageattach android-x86_64-6.0-rc1-1 --storagectl "IDE Controller" --port 0 --device 0 --type hdd --medium /run/media/root/158a840e-63fa-4544-b0b8-dc0d40c79241/virtualbox-os/android-x86_64-6.0-rc1-1.vdi; VBoxManage startvm android-x86_64-6.0-rc1-1;
tunctl -t tap_a_1
ip link set up dev tap_a_1
brctl addbr br_a_1
brctl addif br_a_1 tap_a_1
ip link set up dev br_a_1
ifconfig br_a_1 up
// vboxnet0, --nic1 hostonly --nictype1 Am79C973 --hostonlyadapter1 vboxnet0 --nic2 none --nic3 none --nic4 none;
VBoxManage createvm --name android-x86_64-6.0-rc1-1 --ostype Linux_64 --register; VBoxManage modifyvm android-x86_64-6.0-rc1-1 --memory 1024 --vram 128 --usb off --audio pulse --audiocontroller sb16 --acpi on --rtcuseutc off --boot1 disk --boot2 dvd --nic1 hostonly --nictype1 Am79C973 --hostonlyadapter1 vboxnet0 --nic2 none --nic3 none --nic4 none; VBoxManage storagectl android-x86_64-6.0-rc1-1 --name "IDE Controller" --add ide --controller PIIX4; VBoxManage storageattach android-x86_64-6.0-rc1-1 --storagectl "IDE Controller" --port 0 --device 0 --type hdd --medium /run/media/root/158a840e-63fa-4544-b0b8-dc0d40c79241/virtualbox-os/android-x86_64-6.0-rc1-1.vdi; VBoxManage startvm android-x86_64-6.0-rc1-1;
---------------------------------------
The following commands are not used
---------------------------------------
adb connect 127.0.0.1:5555;
adb devices
adb -s 127.0.0.1:5555 root
adb -s 127.0.0.1:5555 shell
adb disconnect 127.0.0.1:5555
adb connect 192.168.56.3 && adb -s 192.168.56.3 root
adb devices
adb -s 192.168.56.3 root
adb -s 192.168.56.4 shell
adb disconnect 192.168.56.3
stop adbd
start adbd
---------------------------------------
++++++++++++++++++++++++++++++++++++++++++++++++++++++++++++++
virtualbox nat port forwarding adb "device offline"
++++++++++++++++++++++++++++++++++++++++++++++++++++++++++++++
http://stackoverflow.com/questions/14993855/android-adb-device-offline-cant-issue-commands?rq=1
[root @localhost tools]# pwd
/opt/android-on-linux/android-sdk-linux/tools
[root @localhost tools]#
[root @localhost tools]# ./android update adb
adb has been updated. You must restart adb with the following commands
adb kill-server
adb start-server
adb version
[root @localhost tools]#
./android update adb
./android update sdk --no-ui
Run these commands
adb kill-server
android update sdk --no-ui
adb start-server
To verify that it worked, run ''adb version'' before and after the commands and make sure it is the latest. The reason for the adb kill-server command is that it it most likely running, and it can''t be updated while it is running, so you have to kill it first.
++++++++++++++++++++++++++++++++++++++++++++++++++++++++++++++
VBoxManage showvminfo "android-x86_64-6.0-rc1-1" | grep NIC
ifconfig br_a_1 down
brctl delif br_a_1 tap_a_1
brctl delbr br_a_1
ifconfig tap_a_1 down
tunctl -d tap_a_1
---------------------------------------------------------------------------------
---------------------------------------------------------------------------------
tunctl -t tap_a_1
ip link set up dev tap_a_1
brctl addbr br_a_1
brctl addif br_a_1 tap_a_1
ip link set up dev br_a_1
ifconfig br_a_1 up
//successful (hostonly, vboxnet0)
VBoxManage createvm --name android-x86_64-6.0-rc1-1 --ostype Linux_64 --register; VBoxManage modifyvm android-x86_64-6.0-rc1-1 --memory 1024 --vram 128 --usb off --audio pulse --audiocontroller sb16 --acpi on --rtcuseutc off --boot1 disk --boot2 dvd --nic1 hostonly --nictype1 Am79C973 --hostonlyadapter1 vboxnet0 --nic2 none --nic3 none --nic4 none; VBoxManage storagectl android-x86_64-6.0-rc1-1 --name "IDE Controller" --add ide --controller PIIX4; VBoxManage storageattach android-x86_64-6.0-rc1-1 --storagectl "IDE Controller" --port 0 --device 0 --type hdd --medium /run/media/root/158a840e-63fa-4544-b0b8-dc0d40c79241/virtualbox-os/android-x86_64-6.0-rc1-1.vdi; VBoxManage startvm android-x86_64-6.0-rc1-1;
//failed
VBoxManage createvm --name android-x86_64-6.0-rc1-1 --ostype Linux_64 --register; VBoxManage modifyvm android-x86_64-6.0-rc1-1 --memory 1024 --vram 128 --usb off --audio pulse --audiocontroller sb16 --acpi on --rtcuseutc off --boot1 disk --boot2 dvd --nic1 hostonly --nictype1 Am79C973 --hostonlyadapter1 vboxnet0 --nic2 bridged --bridgeadapter2 br_a_1 --nic3 none --nic4 none; VBoxManage storagectl android-x86_64-6.0-rc1-1 --name "IDE Controller" --add ide --controller PIIX4; VBoxManage storageattach android-x86_64-6.0-rc1-1 --storagectl "IDE Controller" --port 0 --device 0 --type hdd --medium /run/media/root/158a840e-63fa-4544-b0b8-dc0d40c79241/virtualbox-os/android-x86_64-6.0-rc1-1.vdi; VBoxManage startvm android-x86_64-6.0-rc1-1;
---------------------------------------------------------------------------------
route add -net 10.0.0.0 netmask 255.0.0.0 gw 192.168.1.1
route add -net 192.168.62.0 netmask 255.255.255.0 gw 192.168.1.1
route del -net 0.0.0.0 netmask 0.0.0.0
VBoxManage unregistervm android-x86_64-6.0-rc1-1
rm /root/VirtualBox\ VMs/android-x86_64-6.0-rc1-1 -rf
ifconfig br_a_1 down
brctl delif br_a_1 tap_a_1
brctl delbr br_a_1
ifconfig tap_a_1 down
tunctl -d tap_a_1
sleep 30; adb connect 192.168.56.101; sleep 1; adb -s 192.168.56.101:5555 root; sleep 1; adb connect 192.168.56.101; sleep 1; adb -s 192.168.56.101:5555 root; sleep 1; adb connect 192.168.56.101; adb -s 192.168.56.101:5555 shell mkdir -p /opt/android-on-linux/quagga/out/etc; adb -s 192.168.56.101:5555 shell cp /system/xbin/quagga/etc/zebra.conf /opt/android-on-linux/quagga/out/etc/; adb -s 192.168.56.101:5555 shell cp /system/xbin/quagga/etc/ospf6d.conf /opt/android-on-linux/quagga/out/etc/; adb -s 192.168.56.101:5555 shell /system/xbin/quagga/zebra -d; adb -s 192.168.56.101:5555 shell /system/xbin/quagga/ospf6d -d; adb -s 192.168.56.101:5555 shell ifconfig eth1 down; adb -s 192.168.56.101:5555 shell ifconfig eth1 192.168.26.1 netmask 255.255.255.0 up; adb -s 192.168.56.101:5555 shell ifconfig eth0 down

108.You are installing Oracle Database 11g on your server. During the installation Oracle Universal
108.You are installing Oracle Database 11g on your server. During the installation Oracle UniversalInstaller (OUI) prompts you to enter the path of the inventory directory and also prompts you to specify an
operating system group name. Which statement is true in this case?
A.The ORACLE_BASE parameter is not set.
B.The installation is being performed by the root user.
C.The operating system group that will be specified should have root user as its member.
D.The installation is being performed without the "Create Starter Database" option selected.
E.The operating system group that will be specified must have permission to write to the inventory directory.
答案:E
解析:
这里其实是在安装过程中,指定inventory目录的路径,并且指定操作系统用户组名
inventory这个目录,其实就是安装软件的时候存储一些安装的信息,它的主要作用就是安装和升级,它的路径是通过oraInst.loc文件指定的
指定的系统组对该目录必须有些的权限,因为安装的时候会往里面写,还有日志
A:ORACLE_BASE解释如下 ORACLE_BASE is the root of the Oracle Database directory tree. The Oracle Base directory is the top level directory that you can use to install the varIoUs oracle software products. You can use the same Oracle base directory for multiple installations. For example,/u01/app/oracle is an Oracle base directory created by the oracle user. B:错误,谁会在rott下安装数据库软件啊 C:错误,谁会把root放进去啊 D:错误,不知道这个说的是什么 E:正确

Android Studio 错误 Application Installation Failed...INSTALL_FAILED_INVALID_APK…
Android Studio 三个错误,归结为一个错误
1. 弹出窗口,错误如下
Application Installation Failed...INSTALL_FAILED_INVALID_APK...
WARNING: Uninstalling will remove the applation data:
Do you want to uninstall the existing applation?
2. Event Log,错误如下
Session ''app'': Error Installing APKs
3. Run,错误如下
Unknown failure (Failure - not installed for 0)
Error while Installing APKs
这三个错误可归结为一个,也调试了数小时,各种搜索。终于找到了办法:
在设置中可以解决:File-->Settings
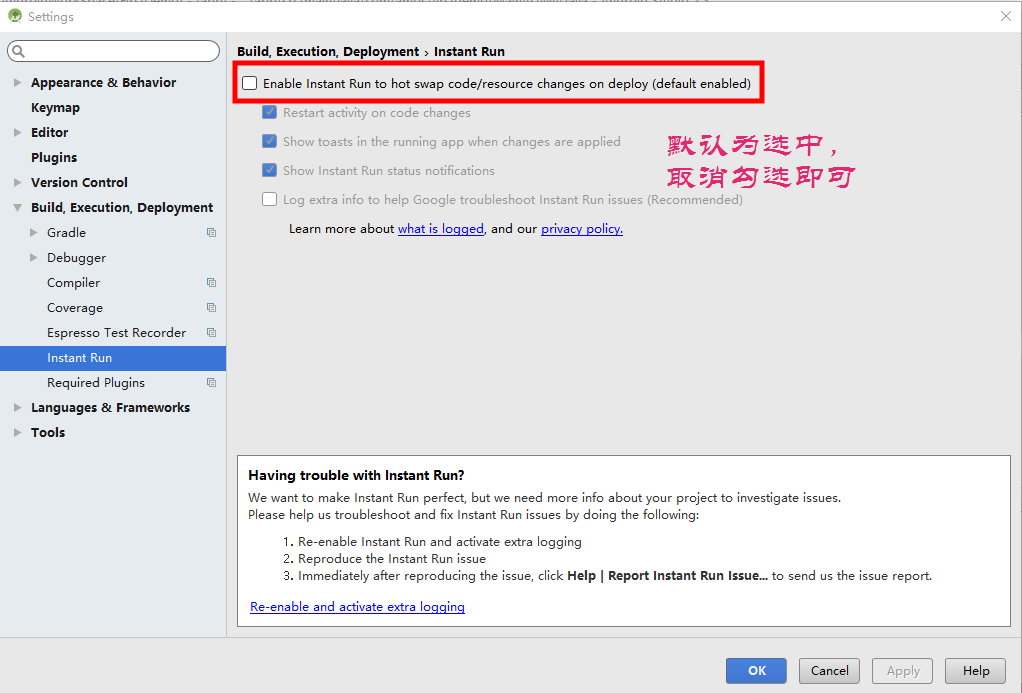

Android Studio模拟器出错,提示Application Installation Failed, Installation failed with message Failed to...
多次运行模拟机总会出现下面的错误,试了很多方法也是不行,什么操作菜单Build->Close project之类的。
错误翻译,了解了是什么错误再找怎么解决吧,我用的是Android Studio的模拟机,所以直接按下面操作就行了,如果用的是手机之类的再搜索其它办法吧。
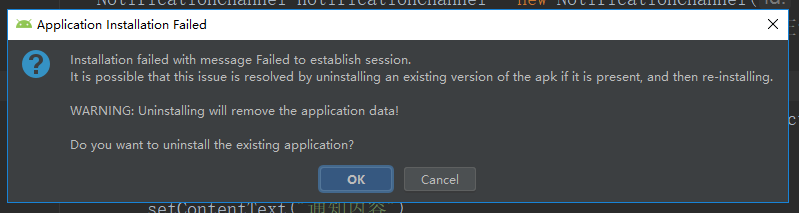
Application Installation Failed
Installation failed with message Failed to establish session.
It is possible that this issue is resolved by uninstalling an existing version of the apk if it is present, and then re-installing.
WARNING: Uninstalling will remove the application data!
Do you want to uninstall the existing application?
=========
应用程序安装失败
安装失败,消息未能建立会话。
如果存在apk的现有版本,则可以通过卸载该版本来解决此问题,然后重新安装。
警告:卸载将删除应用程序数据!
要卸载现有应用程序吗?
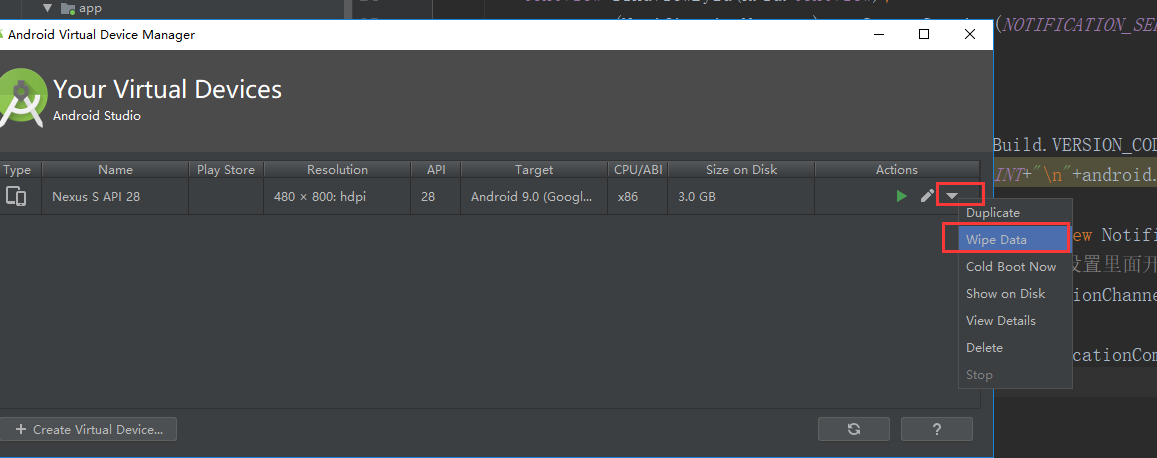
解决方法:在菜单“Tools->AVD Manager,在打开AVD界面用的模拟器后面点击”向下三角“,然后点击”Wipe Data"清除数据,然后就可以用了。

今天的关于Installing scrapy failing on cleaning的分享已经结束,谢谢您的关注,如果想了解更多关于(OK) Creating manually one VMs from an existing VDI file in CLI (VBoxManage) in Fedora 23、108.You are installing Oracle Database 11g on your server. During the installation Oracle Universal、Android Studio 错误 Application Installation Failed...INSTALL_FAILED_INVALID_APK…、Android Studio模拟器出错,提示Application Installation Failed, Installation failed with message Failed to...的相关知识,请在本站进行查询。
本文标签:


