本文将分享VSCode自动修改和保存代码风格==eslint+prettier的详细内容,并且还将对vscode怎么设置自动保存进行详尽解释,此外,我们还将为大家带来关于03.ElementUI源码学
本文将分享VS Code 自动修改和保存 代码风格 == eslint+prettier的详细内容,并且还将对vs code怎么设置自动保存进行详尽解释,此外,我们还将为大家带来关于03.ElementUI源码学习:代码风格检查和格式化配置(ESlint & Prettier)、ESLint + Prettier + husky + lint-staged 规范统一前端代码风格、eslint+prettier 的 VSCode配置项、ESLint与Prettier在vscode中如何进行代码自动格式化的相关知识,希望对你有所帮助。
本文目录一览:- VS Code 自动修改和保存 代码风格 == eslint+prettier(vs code怎么设置自动保存)
- 03.ElementUI源码学习:代码风格检查和格式化配置(ESlint & Prettier)
- ESLint + Prettier + husky + lint-staged 规范统一前端代码风格
- eslint+prettier 的 VSCode配置项
- ESLint与Prettier在vscode中如何进行代码自动格式化
")
VS Code 自动修改和保存 代码风格 == eslint+prettier(vs code怎么设置自动保存)
最近因为用到 VS Code,需要统一所有人的代码风格(前端语言 js/html/css 等,或者后端语言 go/python 等也可以这么用)。
所以参考了一些网络资料,记录下设置步骤,以便后续查阅。
Step 1: npm 命令窗口,安装需要的插件
cmd >> npm i -D prettier
# eslint-plugin-prettier 插件会调用 prettier 对你的代码风格进行检查,其原理是先使用 prettier 对你的代码进行格式化,
# 然后与格式化之前的代码进行对比,如果过出现了不一致,这个地方就会被 prettier 进行标记。
cmd >> npm i -D eslint-plugin-prettier
# eslint-config-prettier 可以关闭 eslint 可能与 prettier 发生冲突的代码格式化规则。
# 官方称 eslint-plugin-prettier 需要与 eslint-config-prettier 搭配食用才能获得最佳效果。
cmd >> npm i -D eslint-config-prettier
Step 2: 创建 react 项目
cmd >> cd H:\0_VSCode_Work
cmd >> create-react-app my-app-03
# 打开项目
cmd >> cd ./my-app-03
cmd >> code .
Step 3: 创建项目的.eslintignore 文件
# 文件路径 = MY-APP-03/.eslintignore

# 在 vs code 中手动创建文件后 ".eslintignore",输入如下文件内容。
/build/
/config/
/dist/
/*.js
/test/unit/coverage/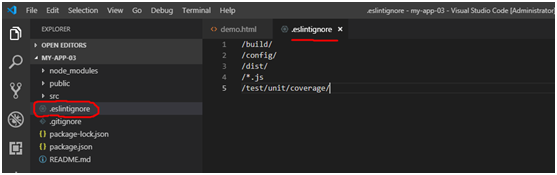
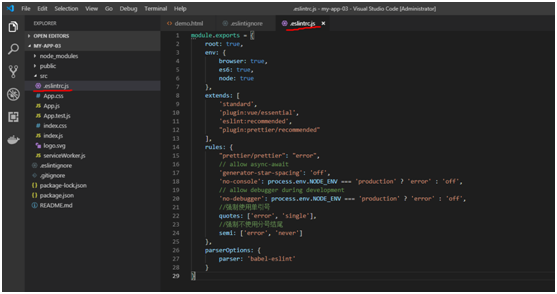
Step 4: 创建项目的.eslintrc.js 文件
# 文件路径 = MY-APP-03/src/.eslintrc.js
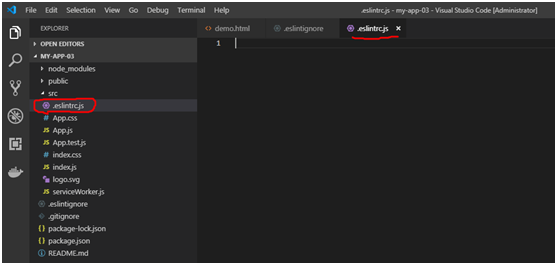
# 在 vs code 中手动创建文件后 ".eslintrc.js",输入如下文件内容。
module.exports = {
    root: true,
    env: {
        browser: true,
        es6: true,
        node: true
    },
    extends: [
        ''standard'',
        ''plugin:vue/essential'',
        ''eslint:recommended'',
        "plugin:prettier/recommended"
    ],
    rules: {
        "prettier/prettier": "error",
        // allow async-await
        ''generator-star-spacing'': ''off'',
        ''no-console'': process.env.NODE_ENV === ''production'' ? ''error'' : ''off'',
        // allow debugger during development
        ''no-debugger'': process.env.NODE_ENV === ''production'' ? ''error'' : ''off'',
        //强制使用单引号
        quotes: [''error'', ''single''],
        //强制不使用分号结尾
        semi: [''error'', ''never'']
    },
    parserOptions: {
        parser: ''babel-eslint''
    }
}
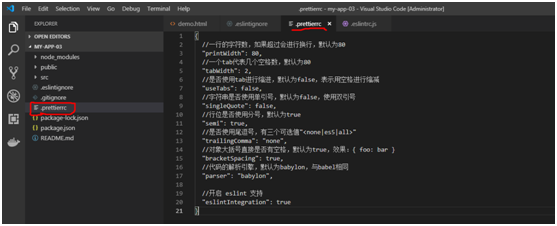
Step 5: 创建项目的.prettierrc 文件
# 文件路径 = MY-APP-03/.prettierrc
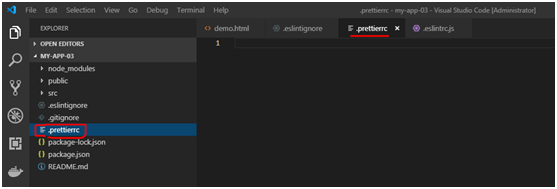
# 在 vs code 中手动创建文件后 ".prettierrc",输入如下文件内容。
{
  //一行的字符数,如果超过会进行换行,默认为80
  "printWidth": 80,
  //一个tab代表几个空格数,默认为80
  "tabWidth": 2,
  //是否使用tab进行缩进,默认为false,表示用空格进行缩减
  "useTabs": false,
  //字符串是否使用单引号,默认为false,使用双引号
  "singleQuote": false,
  //行位是否使用分号,默认为true
  "semi": true,
  //是否使用尾逗号,有三个可选值"<none|es5|all>"
  "trailingComma": "none",
  //对象大括号直接是否有空格,默认为true,效果:{ foo: bar }
  "bracketSpacing": true,
  //代码的解析引擎,默认为babylon,与babel相同
  "parser": "babylon",

  //开启 eslint 支持
  "eslintIntegration": true
}
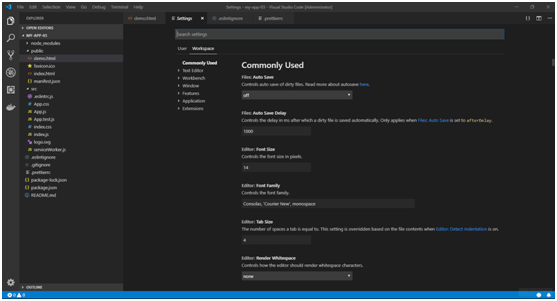
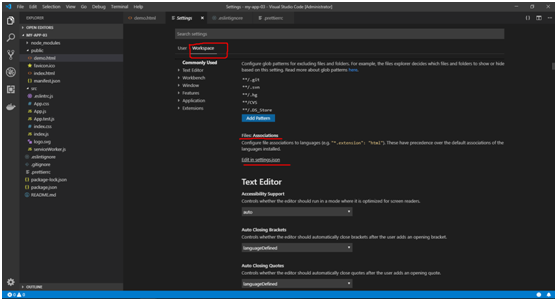
Step6 : 修改项目工作区设置文件.vscode/settings.json

# 单击 IDE 工具的左下角的齿轮,然后单击菜单 "Settings", 在弹出的面板 Settings 中,选择子面板 "Workspace",如下图
# 然后,找到参数 "Files:Associations",单击按钮 "Edit in setting.json"
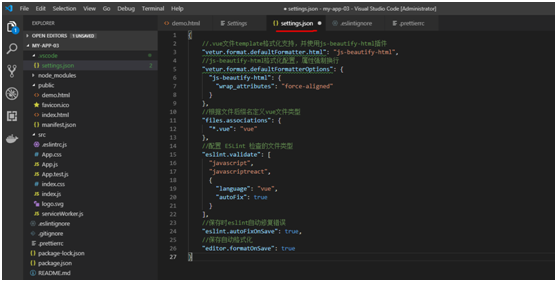
# 然后,在 settings.json 文件中,输入和保存如下内容。
{
    //.vue文件template格式化支持,并使用js-beautify-html插件
    "vetur.format.defaultFormatter.html": "js-beautify-html",
    //js-beautify-html格式化配置,属性强制换行
    "vetur.format.defaultFormatterOptions": {
      "js-beautify-html": {
        "wrap_attributes": "force-aligned"
      }
    },
    //根据文件后缀名定义vue文件类型
    "files.associations": {
      "*.vue": "vue"
    },
    //配置 ESLint 检查的文件类型
    "eslint.validate": [
      "javascript",
      "javascriptreact",
      {
        "language": "vue",
        "autoFix": true
      }
    ],
    //保存时eslint自动修复错误
    "eslint.autoFixOnSave": true,
    //保存自动格式化
    "editor.formatOnSave": true
}
或者,少设置一些参数,如下

最后,记得保存 settings.json 文件
Step7 : 最后,我们测试一下效果
# 首先,创建一个 demo.html 文件,如下
文件路径 = MY-APP-03/public/demo.html
<html>dafs
     <header>
demo
                </header>
                <body>
                    <div>乱写一气,----001
 </div>
                                     <div>乱写一气,----002
    </div>
                               </body>
   </html>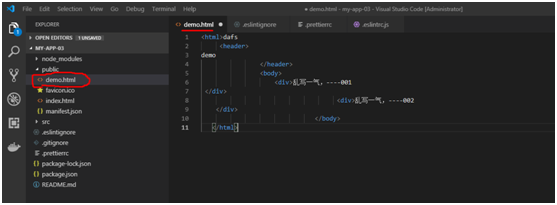
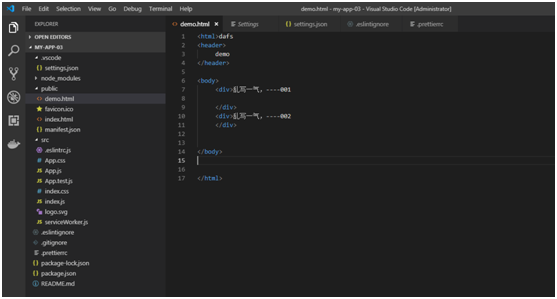
# 然后,我们单击 快捷键 "Ctrl+S" 或 菜单 "Fiel >> Save All", 则 IDE 工具自动将上面格式混乱的代码转化为风格整洁的代码,如下图所示
")
03.ElementUI源码学习:代码风格检查和格式化配置(ESlint & Prettier)
03.ElementUI源码学习:代码风格检查和格式化配置(ESlint & Prettier)
2021-04-17 01:51
Anduril
阅读(329)
评论(0)
编辑
收藏
 在团队协作中,为避免低级Bug、以及团队协作时不同代码风格对彼此造成的困扰与影响,会预先制定编码规范。使用 Lint工具和代码风格检测工具,则可以辅助编码规范执行,格式化代码,使样式与规则保持一致,有效控制代码质量,实现项目代码风格统一。
书接上文。在团队协作中,为避免低级Bug、以及团队协作时不同代码风格对彼此造成的困扰与影响,会预先制定编码规范。使用 Lint工具和代码风格检测工具,则可以辅助编码规范执行,格式化代码,使样式与规则保持一致,有效控制代码质量,实现项目代码风格统一。
在代码格式化方面, Prettier 和 ESLint 有重叠,但两者侧重点不同:ESLint 所能提供的格式化功能很有限;而 Prettier 在格式化代码方面具有更大优势。而 Prettier 被设计为易于与 ESLint 集成,所以在项目中使用两者,无需担心冲突。。
0x00.Prettier 概览配置文件
Prettier 支持几种格式的配置文件,优先级顺序如下:
- 在
package.json里创建一个prettier属性,在那里定义你的配置. - 使用
.prettierrc,可以使 JSON 也可以是 YAML。 - 使用
.prettierrc.json,.prettierrc.yml,.prettierrc.yaml,.prettierrc.json5去定义配置的结构. - 使用
.prettierrc.js,.prettierrc.cjs,prettier.config.js,prettier.config.cjs去定义配置的结构--必须使用module.exports暴露对象. - 使用
.prettierrc.toml去定义配置的结构.
.prettierignore
在根目录下加一个.prettierignore文件实现文件级别的忽略(语法同.gitignore)。
⭐ autocrlf解决跨系统diff问题
Windows 使用回车(CR)和换行(LF)两个字符来结束一行,而 macOS 和 Linux 只使用换行(LF)一个字符,会极大地扰乱跨平台协作。
Unix/Mac用户

Windows 用户

配置文件
ESLint 支持几种格式的配置文件:
- JavaScript - 使用
.eslintrc.js然后输出一个配置对象。 - YAML - 使用
.eslintrc.yaml或.eslintrc.yml去定义配置的结构。 - JSON - 使用
.eslintrc.json去定义配置的结构,ESLint 的 JSON 文件允许 JavaScript 风格的注释。 -
(弃用) - 使用。.eslintrc,可以使 JSON 也可以是 YAML - package.json - 在
package.json里创建一个eslintConfig属性,在那里定义你的配置。
如果同一个目录下有多个配置文件,ESLint 只会使用一个。优先级顺序如下:
.eslintrc.js.eslintrc.yaml.eslintrc.yml.eslintrc.json.eslintrcpackage.json
配置文件常用属性 root env parserOptions parser extends plugins rules 等功能配置如下:
root 属性
ESLint 会在所有父级目录里寻找配置文件,一直到根目录。一旦发现配置文件中有 "root": true,它就会停止在父级目录中寻找。
env 属性
使用 env 关键字指定想启用的环境,并设置它们为 true。环境并不是互斥的,所以可以同时定义多个。
更多可用的环境列表
parserOptions 属性
解析器选项使用 parserOptions 属性设置。可用的选项有:
-
ecmaVersion- 默认设置为 3,5(默认), 你可以使用 6、7、8、9 或 10 来指定你想要使用的 ECMAScript 版本。你也可以用使用年份命名的版本号指定为 2015(同 6),2016(同 7),或 2017(同 8)或 2018(同 9)或 2019 (same as 10) -
sourceType- 设置为 "script" (默认) 或 "module"(如果你的代码是 ECMAScript 模块)。 -
ecmaFeatures- 这是个对象,表示你想使用的额外的语言特性:-
globalReturn- 允许在全局作用域下使用 return 语句 -
impliedStrict- 启用全局 strict mode (如果 ecmaVersion 是 5 或更高) -
jsx- 启用 JSX -
experimentalObjectRestSpread- 启用实验性的 object rest/spread properties 支持。(重要:这是一个实验性的功能,在未来可能会有明显改变。 建议你写的规则 不要 依赖该功能,除非当它发生改变时你愿意承担维护成本。)
-
parser 属性
在配置文件中指定一个不同的解析器。在使用自定义解析器时,为了让 ESLint 在处理非 ECMAScript 5 特性时正常工作,配置属性 parserOptions 仍然是必须的。解析器会被传入 parserOptions,但是不一定会使用它们来决定功能特性的开关。
extends 属性
通过声明扩展配置、启用规则。
extends 的属性值可以是:
- 指定配置的字符串(配置文件的路径、可共享配置的名称、
eslint:recommended或eslint:all) - 字符串数组:每个配置继承它前面的配置
extends 属性值可以使用短名称,省略包名的前缀 eslint-config- 。

值为 "eslint:recommended" 的 extends 属性启用一系列核心规则,在 规则页面中被标记为✔️。
值为 "eslint:all" 的 extends 属性启用当前安装的 ESLint 中所有的核心规则,不推荐在产品中使用。
plugins 属性
插件是一个 npm 包,通常输出规则。一些插件也可以输出一个或多个命名的 配置(Configs) 。plugins 属性值可以使用短名称,省略包名的前缀 eslint-plugin- 。

插件打包配置
插件在 configs 键下指定打包的配置,且支持多配置。

示例插件名为 eslint-plugin-myPlugin,那么 myConfig 和 myOtherConfig 配置可以分别从 "plugin:myPlugin/myConfig" 和 "plugin:myPlugin/myOtherConfig" 扩展出来。
此时 extends 属性值由以下组成:
plugin: + 包名 (省略了前缀 myPlugin ) + / + 配置名称 (myConfig)

⭐ 在默认情况下,配置不会启用插件中的任何规则。必须在 plugins 数组中指定插件名,extends 数组中指定想使用的插件中的规则。任何插件中的规则必须带有插件名或其简写前缀。
官方文档 Configs in Plugins
rules 属性
rules 属性启用额外的规则、改变规则的级别和选项。
要改变一个规则设置,必须将规则 ID 设置为下列值之一:
- "off" 或 0 - 关闭规则
- "warn" 或 1 - 开启规则,使用警告级别的错误:warn (不会导致程序退出)
- "error" 或 2 - 开启规则,使用错误级别的错误:error (当被触发的时候,程序会退出)
.eslintignore
过在项目根目录创建一个 .eslintignore 文件告诉 ESLint 去忽略特定的文件和目录。.eslintignore 文件是一个纯文本文件,其中的每一行都是一个 glob 模式表明哪些路径应该忽略检测。
prettier 配置
在项目中安装 prettier 。

在根目录下创建 .prettierrc.js 配置文件 。

在根目录下创建 .prettierignore 文件 。

执行指令,格式化整个项目。

成功执行后,输出文件列表,被格式化的文件名称 白色高亮 。

eslint 配置
安装 eslint和相关插件 eslint-config-prettier eslint-plugin-prettier eslint-plugin-vue,让Prettier 和 ESLint更好的一起工作。
npm install --save-dev eslint

npm install --save-dev eslint-config-prettier eslint-plugin-prettier

npm install --save-dev eslint-plugin-vue
在根目录下创建 .eslintrc.js 配置文件 。
module.exports = {
  root: true,
  env: {
    node: true,
    browser: true,
  },
  parserOptions: {
    ecmaVersion: 6,
    sourceType: ''module'',
    ecmaFeatures: {
      jsx: true,
    },
  },
  extends: [''plugin:vue/essential'', ''eslint:recommended'', ''prettier''],
  plugins: [''vue'', ''prettier''],
  rules: {
    ''prettier/prettier'': ''error'',
    ''arrow-body-style'': ''off'',
    ''prefer-arrow-callback'': ''off'',
  },
}
ℹ️
eslint-config-prettier8.0.0 版本之后, 直接声明"prettier"就可以使用所有的插件。
8.0.0 更新日志https://github.com/prettier/eslint-config-prettier#special-rules
https://github.com/prettier/eslint-plugin-prettier#recommended-configuration
在根目录下创建 .eslintignore 文件 。

项目运行后,若文件格式不符合规范,编辑器窗口有提示出现

光标移到问题行,会显示问题类型,可以点击快速修复选项来修复问题。

最新目录结构

Github Repo
参考ESLint配置:https://cn.eslint.org/docs/user-guide/configuring
Prettier配置:https://prettier.io/docs/en/configuration.html
Git自定义配置:https://git-scm.com/book/zh/v2/自定义-Git-配置-Git
Glob模式简介: https://www.cnblogs.com/savorboard/p/glob.html
- 分类 0x02.FrontEnd
- 标签 element
总结
以上是小编为你收集整理的03.ElementUI源码学习:代码风格检查和格式化配置(ESlint & Prettier)全部内容。
如果觉得小编网站内容还不错,欢迎将小编网站推荐给好友。
原文地址:https://blog.51cto.com/u_13483473/2799139

ESLint + Prettier + husky + lint-staged 规范统一前端代码风格
写在前面:
- ESLint: Find and fix problems in your JavaScript code.
- Prettier: Prettier is an opinionated code formatter.
- Husky: Husky can prevent bad git commit, git push and more.
- Lint-staged: Run linters against staged git files and don''t let slip into your code base!
- EditorConfig: EditorConfig helps maintain consistent coding styles for multiple developers working on the same project across various editors and IDEs.
- Stylelint: A mighty, modern linter that helps you avoid errors and enforce conventions in your styles.
- 开发工具:VS Code、插件: Prettier,ESLint
- 开发框架:React V16+、React CLI
- 版本控制:Git
- 参考资料:
- git hooks
- eslint-plugin-react: React specific linting rules for ESLint
- Configuring Prettier Options
- VS Code Docs
- line endings: 配置 Git 处理行结束符
- eslint-plugin-react-hooks: React Hook 规则 ESLint 插件
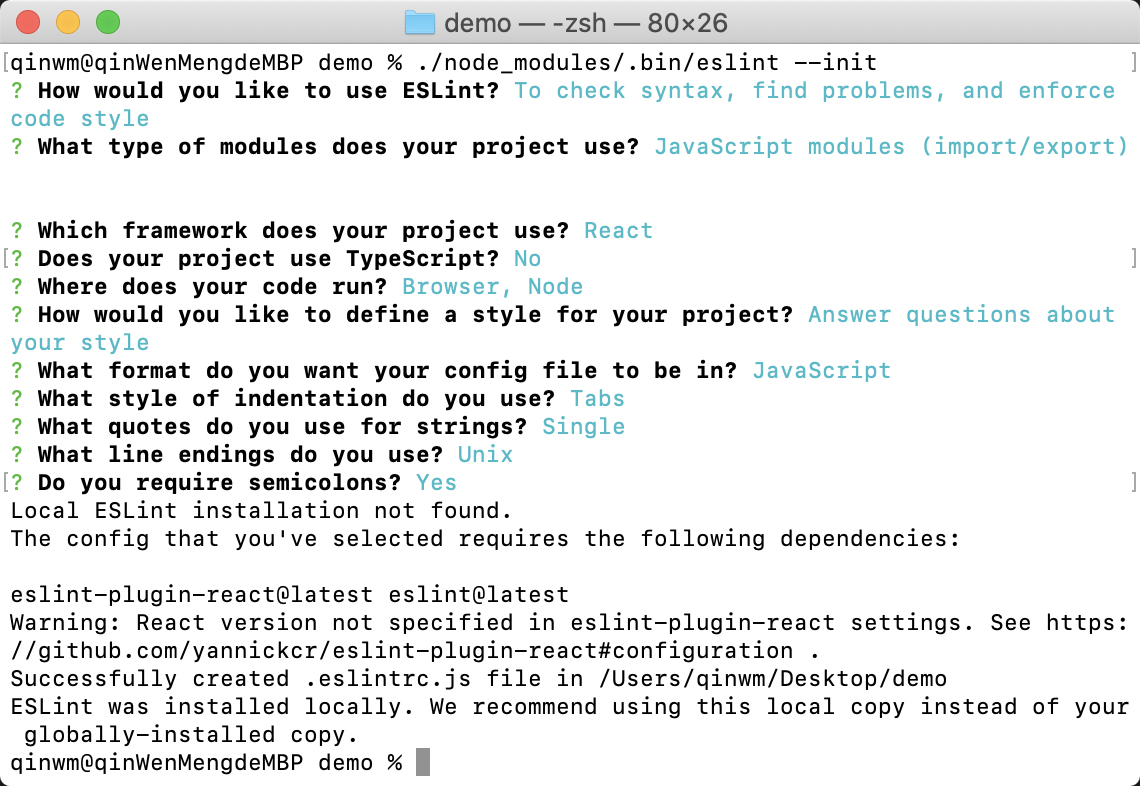
搭建项目:
npx create-react-app [your-project-name]
cd [your-project-name]
npm run eject
初始化 ESLint 配置文件:
./node_modules/.bin/eslint --init根据问题选择自己喜欢的配置(选错也没事,后面可以在配置文件里修改)完成以后会在项目根目录生成 .eslintrc.js 文件。
.eslintrc.js:
module.exports = {
  env: {
    browser: true,
    es6: true,
    node: true,
  },
  extends: ''eslint:recommended'',
  globals: {
    Atomics: ''readonly'',
    SharedArrayBuffer: ''readonly'',
    _: true,
  },
  parser: ''babel-eslint'', // 解决 实验性的 public class fields 语法 报错问题
  parserOptions: {
    ecmaFeatures: {
      jsx: true,
    },
    ecmaVersion: 2018,
    sourceType: ''module'',
  },
  plugins: [''react'', ''react-hooks''],
  rules: {
    ''react-hooks/rules-of-hooks'': ''error'', // 检查 Hook 的规则
    ''react-hooks/exhaustive-deps'': ''warn'', // 检查 effect 的依赖
    indent: [
      ''error'',
      2,
      {
        SwitchCase: 1,
      },
    ],
    // ''linebreak-style'': [''error'', ''unix''], // 换行符 Mac:''unix'' -> LF,win:''windows'' -> CRLF
    quotes: [''error'', ''single''],
    semi: [''error'', ''always''],
    ''multiline-ternary'': [''error'', ''always-multiline''], // 三目运算符换行
    ''react/jsx-uses-react'': ''error'', // Prevent React to be incorrectly marked as unused
    ''react/jsx-uses-vars'': ''error'', // Prevent variables used in JSX to be incorrectly marked as unused
    ''no-console'': ''off'',
  },
};
初始化 Prettier 配置:
在根目录下新建 .prettierrc.js 文件:
module.exports = {
  trailingComma: ''all'',
  printWidth: 80,
  tabWidth: 2,
  semi: true,
  singleQuote: true,
  jsxBracketSameLine: true,
  jsxSingleQuote: true,
  arrowParens: ''always'',
};
安装 Prettier、husky、lint-staged:
npm install --save-dev --save-exact prettier
npm install --save-dev husky
npm install --save-dev lint-staged注意:一定要使用 --save-dev 安装在 devDependencies 下。
初始化 lint-staged 配置:
npx mrm lint-staged完成后会在 package.json 中生成 husky 和 lint-staged 配置 (以下为手动修改后的配置):
"husky": {
    "hooks": {
      "pre-commit": "lint-staged"
    }
  },
  "lint-staged": {
    "*.{js,jsx,css,less,json,md}": [
      "prettier --write",
      "git add"
    ],
    "**/*.less": "stylelint --syntax less",
    "**/*.{js,jsx}": "npm run lint-staged:js"
  },
配置 stylelint:
npm install stylelint --save-dev在根目录下新建 .stylelintrc.js 文件:
可能会遇到以下报错:
Could not find "stylelint-config-standard". Do you need a `configBasedir`?解决方案:
查看:stylelint-config-standard
npm install stylelint-config-standard --save-dev
配置 package.json 中的脚本命令:
"scripts": {
    "lint": "npm run lint:js && npm run lint:style && npm run lint:prettier",
    "lint-staged": "lint-staged",
    "lint-staged:js": "eslint --ext .js,.jsx,.ts,.tsx ",
    "lint:fix": "eslint --fix --cache --ext .js,.jsx,.ts,.tsx --format=pretty ./src && npm run lint:style",
    "lint:js": "eslint --cache --ext .js,.jsx,.ts,.tsx --format=pretty ./src",
    "lint:prettier": "check-prettier lint",
    "lint:style": "stylelint --fix \"src/**/*.less\" --syntax less",
    "prettier": "prettier -c --write \"**/*\""
  },
VS Code 安装 Prettier、ESLint 插件 (不会的自行 Google)
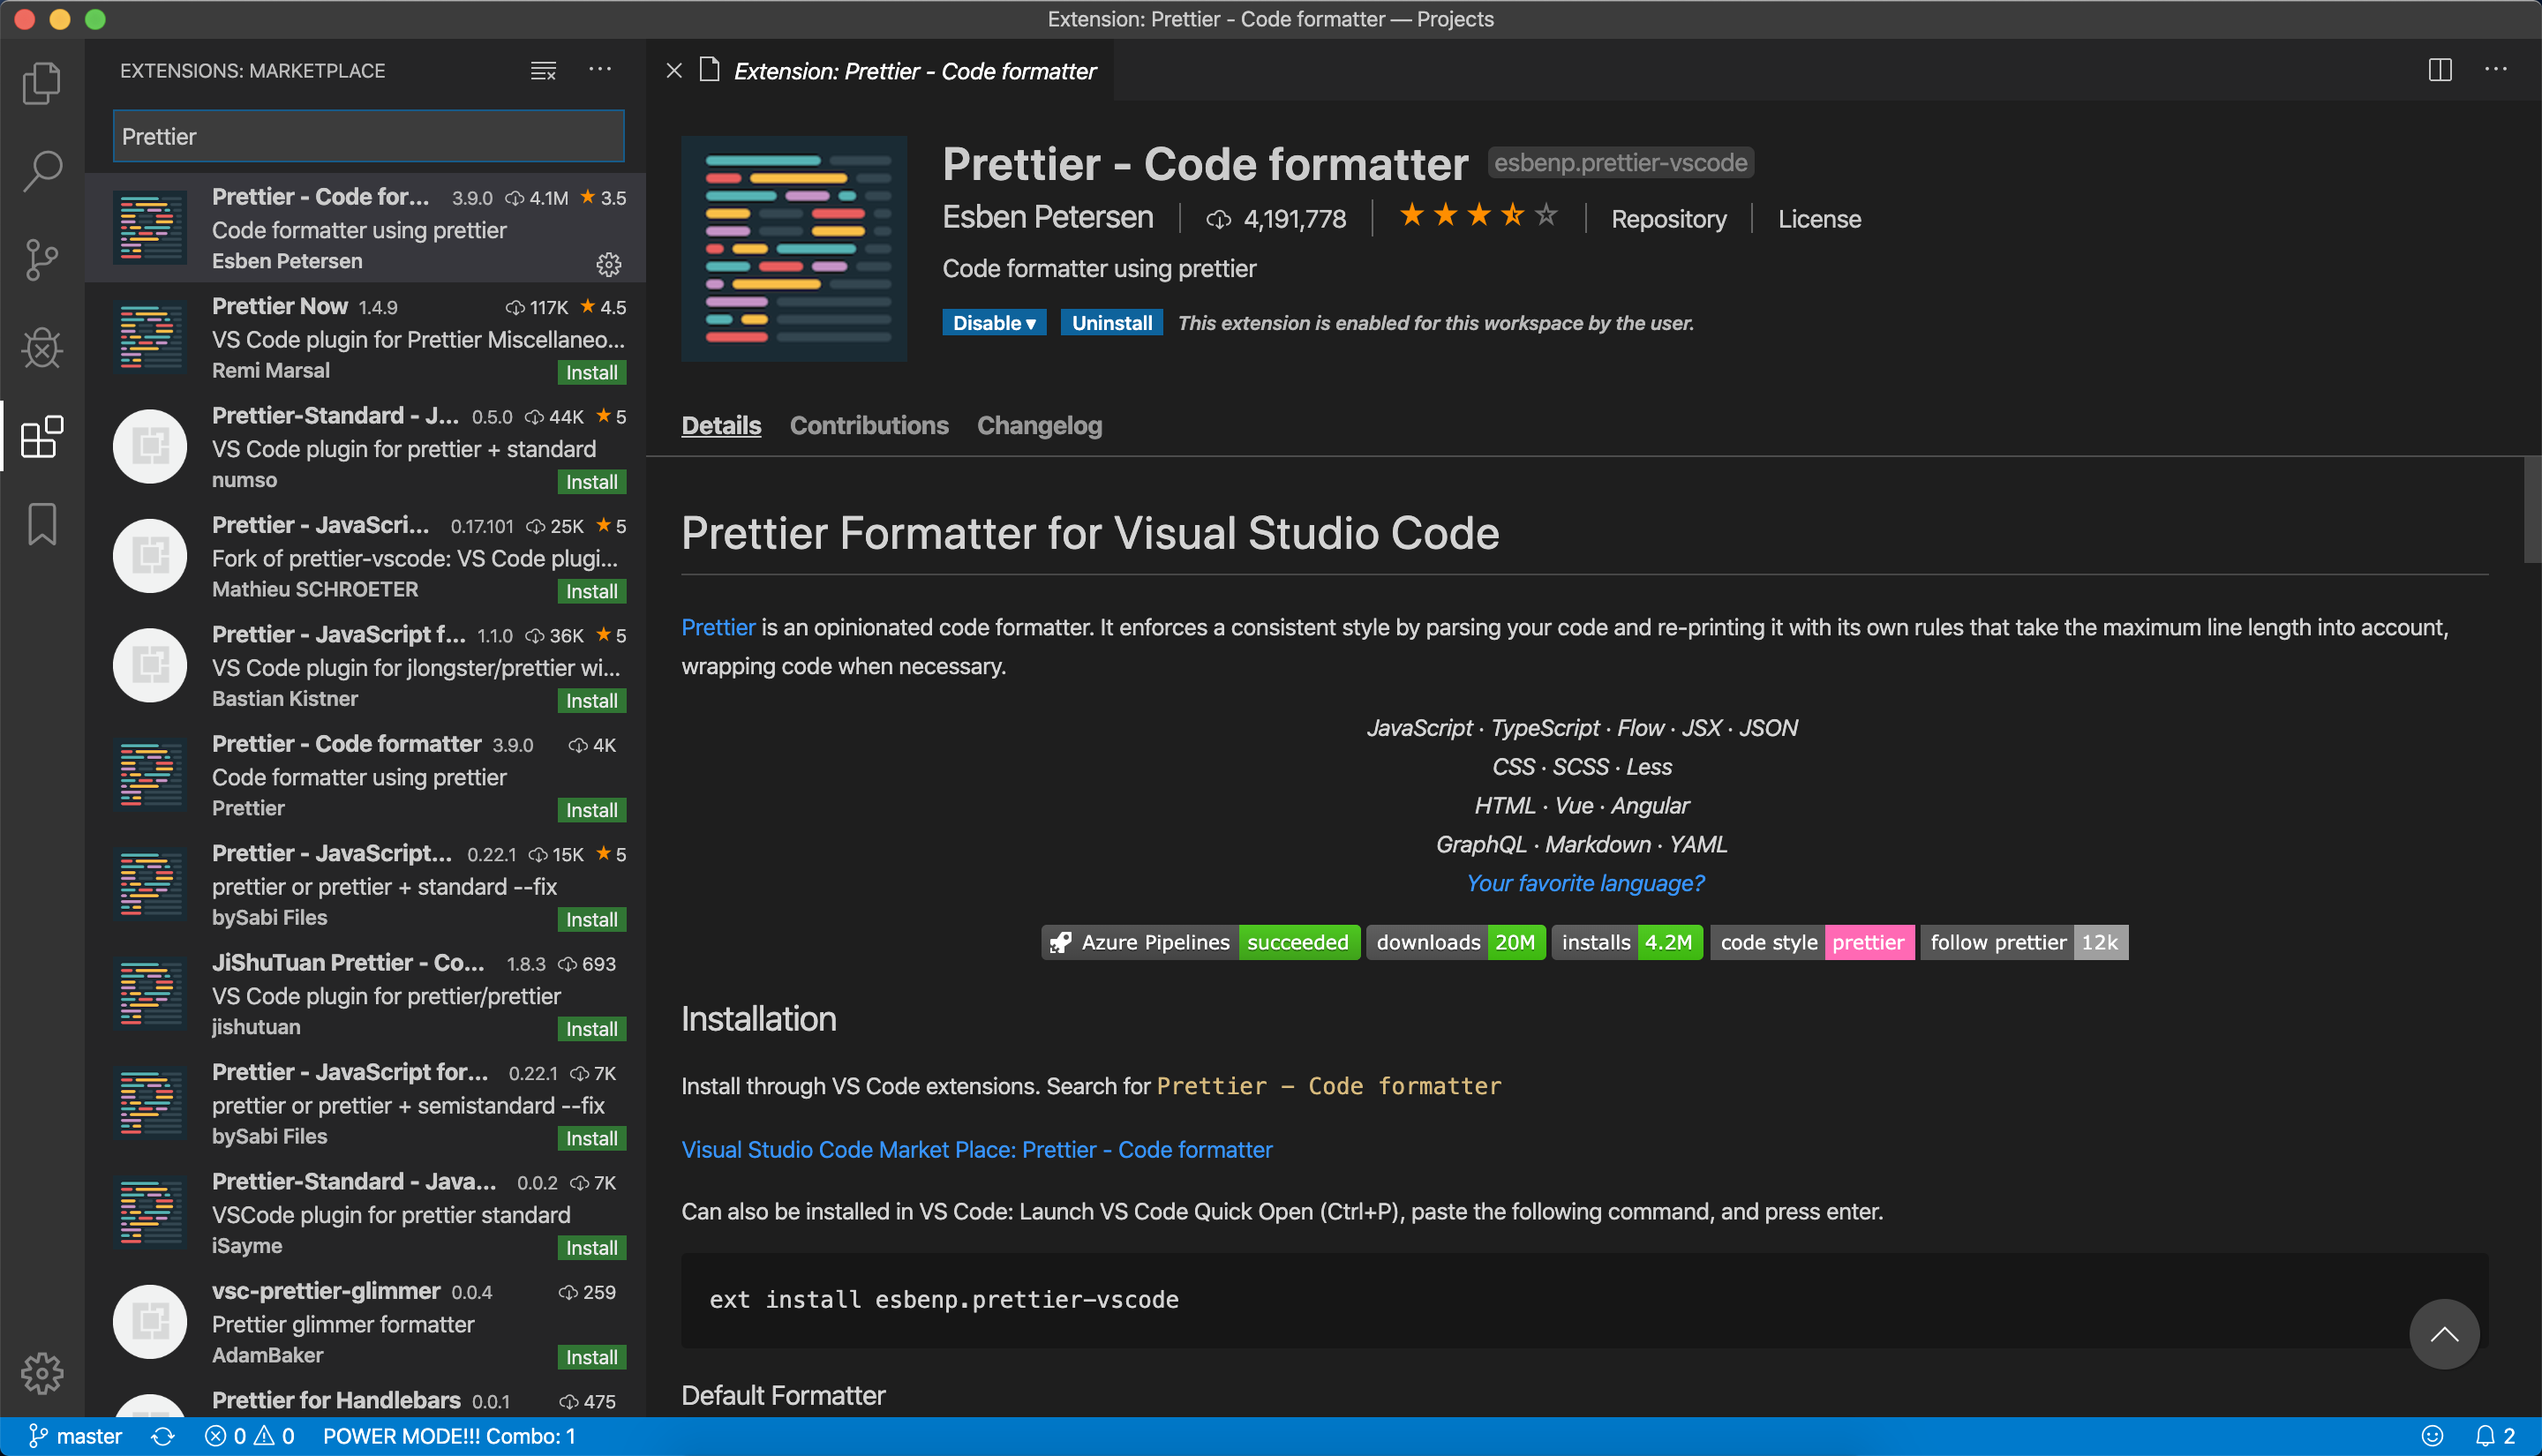

配置 VS Code 编辑器:
这里只示例配合 prettier 插件使用的配置,当保存文件的时候将自动格式化代码:
{
    "editor.defaultFormatter": "esbenp.prettier-vscode",
    "editor.formatOnSave": true,
}
创建可移植的自定义编辑器设置:
在根目录下新建 .editorconfig 文件,配置如下:
# http://editorconfig.org
root = true

[*]
indent_style = space
indent_size = 2
end_of_line = lf
charset = utf-8
trim_trailing_whitespace = true
insert_final_newline = true

[*.md]
trim_trailing_whitespace = false

[Makefile]
indent_style = tab
其他配置:
如果不需要 ‘行结束符’配置,则 把 .editorconfig 中的 end_of_line 和 .eslintrc.js 文件中 rules 下的 linebreak-style 注释掉。
在项目根目录新建 .gitattributes 文件,配置如下:
* text=auto
''linebreak-style'': [''error'', ''unix''], // 换行符。 Mac 使用 ''unix'' 对应 LF,Win 使用 ''windows'' 对应 CRLF
如果需要 ‘行结束符’ 配置,例如使用 LF 。则 .editorconfig 中配置 end_of_line = lf ,.eslintrc.js 中 rules 配置 linebreak-style: [''error'', ''unix'']
另外再给 VS Code 配置 "files.eol": "\n",最好再给 .gitattributes 添加配置 *.js text eol=lf *.jsx text eol=lf 等等,全部提交之后,把本地项目文件全删除,重新 clone。
.gitattributes 配置参考网上的。一般不用这个 行结束符 配置。
参考:line endings
写在最后:
以上配置均可在 写在最前 的链接中找到,可以根据自己的风格进行配置。

eslint+prettier 的 VSCode配置项
{
  "files.autoSave": "off",
  "editor.fontSize": 12,
  "terminal.integrated.rendererType": "dom",
  "eslint.autoFixOnSave": true,
  "eslint.validate": [
    "javascript",
    {
      "language": "html",
      "autoFix": true
    },
    {
      "language": "vue",
      "autoFix": true
    },
    {
      "language": "wpy",
      "autoFix": true
    }
  ]
}

ESLint与Prettier在vscode中如何进行代码自动格式化
这篇文章主要介绍“ESLint与Prettier在vscode中如何进行代码自动格式化”,在日常操作中,相信很多人在ESLint与Prettier在vscode中如何进行代码自动格式化问题上存在疑惑,小编查阅了各式资料,整理出简单好用的操作方法,希望对大家解答”ESLint与Prettier在vscode中如何进行代码自动格式化”的疑惑有所帮助!接下来,请跟着小编一起来学习吧!
ESLint介绍
ESLint的作用
ESLint的具体的用法以及原理等不在本文的介绍范围,可自行查询资料。
ESLint的作用应该大家都知道,它是一个检查代码质量与风格的工具,配置一套规则,就能检查出你代码中不符合规则的地方,部分问题支持自动修复;总结起来就两个功能:
-
代码质量检查
可以发现代码中存在的可能错误,如使用未声明变量、声明而未使用的变量、修改 const 变量、代码中使用debugger等等
-
代码格式化
可以用来统一团队的代码风格,比如加不加分号、使用
tab还是空格、字符串使用单引号 等等
如何在vscode中启用ESLint
vscode使用ESLint进行代码检查的条件:
-
首先,需要在vscode中安装
ESLint插件并启用,同时需要在vscode配置中开启eslint的检查。具体开启在用户级别的setting或者项目级别的
settings.json中进行如下设置:{
"eslint.enable": true, // 开启eslint检查
} -
其次,需要在当前项目根目录或者全局安装
eslint,另外eslint的规则配置项中的依赖也需要安装。若没有安装,则在vsconde的eslint控制台输出错误
-
最后,需要在项目根目录有配置文件
.eslintrc.js或者.eslintrc.json,或者在根项目的package.json中配置项eslintConfig中配置eslint的规则。若没有任何配置文件,则eslint控制台会输出错误
上面三个步骤缺一不可,都配置完后我们在vscode编辑中就能看到代码被eslint检查的结果
eslint根据设置值的规则检查两个问题:红色波浪线提示变量定义但未使用;黄色波浪线提示字符串必须使用单引号。对于这些错误,vscode编辑器将eslint的检查结果仅展示给开发者。
其实,vscode可以用eslint在文件保存时对部分的问题代码进行自动修复,如上图中的黄色波浪线部分,这需要在vscode配置eslint进行文件保存时自动格式化代码,具体是通过vscode的codeActionsOnSave.source.fixAll来设置,详情如下:
{
    "eslint.enable": true, // 开启eslint检查
    "editor.codeActionsOnSave": {
        // 使用eslint来fix,包括格式化会自动fix和代码质量检查会给出错误提示
        "source.fixAll.eslint": true
      }
}
修改后再次保存代码,部分不符合规则的代码自动格式化了
顺便提示下:
若设置
codeActionsOnSave.source.fixAll: true,表示使用所有提供的代码格式工具进行代码格式化,包括eslint,猛戳这里
Prettier介绍
Prettier的作用
Prettier的作用是对代码进行格式化,并不关注代码质量潜在问题的检查。
Prettier 自身的规范倾向于团队的代码风格的规范或统一,例如每行最大长度,单引号还是双引号,等号左右空格,使用tab还是空格等等。
除了js/ts外,它还支持对多种语言进行格式化,如vue、html、css、less、scss、json、jsx等等,是一个比较综合的代码格式化工具。
有了ESLint为啥还要用Prettier
介绍ESLint时说到它也有代码格式化的功能,为啥还需要用Prettier,引用这篇文章介绍了几个点:
ESLint安装和配置比较麻烦,而且 lint 的速度并不快Prettier并不只针对 JavaScript,它可以格式化各种流行语言Prettier的配置选项没那么眼花缭乱,比ESLint少很多,这在Prettier选项的哲学中说明精简的原因。
如何在vscode启用Prettier
在vscode中启用Prettier相对来说比较简单,并不需要在当前项目中安装Prettier,只需:
在vscode中安装
Prettier插件并启用,同时需要设置Prettier为对应的代码默认格式化,或者将其设置为指定语言的代码格式化。
在用户级别的settings.json中设置编辑器的默认代码格式化器:
{
   "editor.defaultFormatter": "esbenp.prettier-vscode"
}
登录后复制
或者为指定语音设置默认格式化器:
{
   "[javascript]" {
       "editor.defaultFormatter": "esbenp.prettier-vscode"
   }
}
登录后复制
上面虽然在vscode启用了Prettier,但是并没有在保存文件时进行代码格式化,要想实现自动保存代码进行代码格式化,需要:
vscode开启代码保存时进行格式化
将
Prettier作为默认的格式化工具,或者将Prettier设置为指定语言的格式化器是否设置需要
Prettier的配置文件(.prettierrc或.editorconfig),有两种情况:若配置
"prettier.requireConfig": false则不要求根目录下有配置文件,若有的话也会被感知到并以配置文件的内容为准,如下图是没有配置文件时的提示信息:若配置
"prettier.requireConfig": true则要求根目录下有Prettier的配置文件,它会覆盖Prettier扩展中的默认配置,如下图所示;否则保存时不会自动格式化。可以参考这里。
上面三个步骤的在vscode中的配置体现如下:
{
  "editor.formatOnSave": true, // 开启保存文件自动格式化代码
  "editor.defaultFormatter": "esbenp.prettier-vscode", // 默认的代码格式化工具
  "prettier.requireConfig": true // 需要Prettier的配置文件
}
登录后复制
再啰嗦一句:若设置需要配置文件,则必须要求根目录下有配置文件.prettierrc或.editorconfig中的一个或者两个同时存在,否则代码保存不会进行格式化。
可能你会对上面.editorconfig文件作为Prettier的配置文件感到疑惑,vscode的Prettier插件中有关配置文件有这样的一段描述,可以看出Prettier插件获取配置文件有一个优先级:.prettierrc > .editorconfig > vscode默认配置。
上面的前两者并不是说.prettierrc和.editorconfig同时存在时,后者的配置内容就被忽略,实际的表现:
.prettierrc和.editorconfig同时存在时,二者内容会进行合并,若配置项有冲突,这.prettierrc的优先级更高。
ESLint与Prettier的冲突
冲突的原因
ESLint和Prettier都可以进行代码格式化方面,若二者同时出现下面的情况就会出现冲突:
重叠的格式化规则不一致,二者重叠的配置规则可以参考这里。
-
vscode同时开启二者进行格式化
{
    "editor.formatOnSave": true,
    "editor.defaultFormatter": "esbenp.prettier-vscode",
    "prettier.requireConfig": true,
    "eslint.enable": true, // eslint开启
    "editor.codeActionsOnSave": {
       "source.fixAll.eslint": true // 代码保存使用eslint格式化
     }
}
满足上面的条件就会出现冲突
例如当前的项目中ESLint使用array-bracket-newline配置数组项不需要换行,而Prettier对其默认是按换行进行格式化,那么该规则就出现冲突
但是最终结果取决是谁最后一个进行格式化,从结果来看是Prettier是最后执行,它的格式化的结果为最终输出结果,原因:
Prettier的格式化耗时 >ESLint的格式化耗时
最终以Prettier的格式化结果来输出,但是这就与ESLint的规则冲突,vscode编辑器就会将ESLint结果给展示出来。
以和为贵:ESLint与Prettier和谐共处
鉴于Prettier在代码格式化方面的优劣:
优势:可以对多种语言进行代码格式化,不仅仅是javascript
劣势:不具备代码质量检查的能力
所以最佳方案是整合二者,取各方之长。但上一节分析了两者同时存在时冲突的原因,那么在二者共存的情况下解决思路就比较明确了,有两种方案:
二者重叠的格式化规则保持一致
二者共同作用的语言使用其中一种进行格式化
下面分别对这两种方案进行介绍。
二者重叠的格式化规则保持一致
前面提到,二者之所以出现冲突的条件之一是同时在vscode中开启:
{
    "editor.formatOnSave": true,
    "editor.defaultFormatter": "esbenp.prettier-vscode",
    "prettier.requireConfig": true,
    "eslint.enable": true,
    "editor.codeActionsOnSave": {
       "source.fixAll.eslint": true
     }
}
那么要搞清楚二者重叠的规则有哪些?重叠的规则有哪些是冲突的呢?好在社区有了答案可以参考这里,针对这种情况也给出了比较好的解决方案,具体来说:
在使用
ESLint作为代码的格式化工具时,关闭可能与Prettier有冲突的格式化规则,把Prettier当做一个linter规则。
主要是使用下面两个包:
eslint-config-prettier会关闭ESLint中有关代码格式化的配置,具体参考这里。eslint-plugin-prettier把Prettier配置成ESLint的一个插件,让其当做一个linter规则来运行,可参考其官网。
注意:
eslint-plugin-prettier需要项目安装Prettier依赖
这样,只需在项目根目录下的.eslintrc.js中配置如下:
{
  "extends": ["plugin:prettier/recommended"]
}而plugin:prettier/recommended帮我们做了如下事情:
{
  "extends": ["prettier"], // 使用eslinst-config-prettier中的配置项
  "plugins": ["prettier"], // 注册该prettier插件
  "rules": {
    "prettier/prettier": "error", // 在eslint中运行prettier,并启用该插件提供的规则
    "arrow-body-style": "off", // 关闭规则
    "prefer-arrow-callback": "off" // 关闭规则
  }
}这样配置后,ESLint进行格式化时就会忽略跟Prettier重叠的格式规则,这些交由Prettier来进行格式化,这样二者可以愉快地一起分工协作了。
二者共同作用的语言使用其中一种进行格式化
方案一让二者协同工作的思路在ESLint中关闭跟Prettier可能存在冲突的规则,但是并没有避免二者同时格式化,也就是说实际上二者都参与了代码的格式化,只是输出内容一致而已。
可以从vscode的用户settings.json配置文件可以看出:
"editor.formatOnSave": true和"editor.defaultFormatter": "esbenp.prettier-vscode"配置,告诉vscode在文件保存时都使用默认的Prettier来对代码格式化。
而editor.codeActionsOnSave.source.fixAll.eslint: true设置代码保存时使用ESLint来进行格式化。
因为方案一本质上执行了两次代码格式化,所以我们可以有另一种思考:只使用二者中的一个进行代码格式化。
我们知道,ESLint只对javascript、typescript以及javascrpitreact进行代码格式化,而对其他语言则无效,而Prettier是可以的,所以针对二者共同作用的语言,我们可以关闭文件保存时自动格式化,也就是关闭Prettier作为代码格式化工具,如下配置:
{
    "editor.formatOnSave": true,
    "editor.defaultFormatter": "esbenp.prettier-vscode",
    //针对共用的语言如JS、TS和JSX关闭文件保存自动格式化功能,通过eslint来做这件事
    "[javascript]": {
        "editor.formatOnSave": false
    },
    "[javascriptreact]": {
        "editor.formatOnSave": false
    },
    "[typescript]": {
        "editor.formatOnSave": false
    },
    "editor.codeActionsOnSave": { //告诉ESLint插件在保存时运行
        "source.fixAll.eslint": true
    }
}这样,在js、ts或者jsx的文件保存时,不会调用Prettier进行格式化,而是交由ESLint来完成,除此之前的语言则是使用Prettier来进行代码格式化。
补充:editor.formatOnSave vs editor.codeActionsOnSave
ESLint和Prettier存在冲突的一个原因,也在于vscode对文件保存时的配置操作有重合的地方,体现在formatOnSave和codeActionsOnSave上,二者都可以实现文件保存时格式代码,有重合的地方,对称有人在vscode社区提出是否可以删除一个:Merge/remove "editor.formatOnSave" and "editor.codeActionsOnSave->"source.fixAll""。
vscode并没有采纳删除或者合并的建议,其提供这两个的配置,其出发点是不一样的,下面是社区的一段描述:
But the main difference between codeActionsOnSave and formatOnSave remains that:
the latter (
formatOnSave) only formats code,while the former (
codeActionsOnSave) can run one or several commands on the code, commands which might not be related to formatting.
The following editor.codeActionsOnSave will always run Organize Imports followed by Fix All once organize imports finishes:
"editor.codeActionsOnSave": [
    "source.organizeImports",
    "source.fixAll"
]
到此,关于“ESLint与Prettier在vscode中如何进行代码自动格式化”的学习就结束了,希望能够解决大家的疑惑。理论与实践的搭配能更好的帮助大家学习,快去试试吧!若想继续学习更多相关知识,请继续关注小编网站,小编会继续努力为大家带来更多实用的文章!
今天关于VS Code 自动修改和保存 代码风格 == eslint+prettier和vs code怎么设置自动保存的分享就到这里,希望大家有所收获,若想了解更多关于03.ElementUI源码学习:代码风格检查和格式化配置(ESlint & Prettier)、ESLint + Prettier + husky + lint-staged 规范统一前端代码风格、eslint+prettier 的 VSCode配置项、ESLint与Prettier在vscode中如何进行代码自动格式化等相关知识,可以在本站进行查询。
本文标签:


![[转帖]Ubuntu 安装 Wine方法(ubuntu如何安装wine)](https://www.gvkun.com/zb_users/cache/thumbs/4c83df0e2303284d68480d1b1378581d-180-120-1.jpg)

