在这里,我们将给大家分享关于update_engine-FilesystemVerifierAction和PostinstallRunnerAction的知识,同时也会涉及到如何更有效地.MySQLN
在这里,我们将给大家分享关于update_engine-FilesystemVerifierAction和PostinstallRunnerAction的知识,同时也会涉及到如何更有效地.MySQLNonTransientConnectionException: Could not create connection to database server. Attempted reconnect 5 times. Giving up.、21、MVSNeRF: Fast Generalizable Radiance Field Reconstruction from Multi-View Stereo、ActiveMQ java.net.URISyntaxException: Illegal character in hostname 异常、activemq启动闪退/失败 (Illegal character in hostname at index 5: ws://****:61614?maximumConnections=100...的内容。
本文目录一览:- update_engine-FilesystemVerifierAction和PostinstallRunnerAction
- .MySQLNonTransientConnectionException: Could not create connection to database server. Attempted reconnect 5 times. Giving up.
- 21、MVSNeRF: Fast Generalizable Radiance Field Reconstruction from Multi-View Stereo
- ActiveMQ java.net.URISyntaxException: Illegal character in hostname 异常
- activemq启动闪退/失败 (Illegal character in hostname at index 5: ws://****:61614?maximumConnections=100...

update_engine-FilesystemVerifierAction和PostinstallRunnerAction
在介绍完了DownloadAction之后,还剩下FilesystemVerifierAction和PostinstallRunnerAction,下面开始对其进行分析。
FilesystemVerifierAction
在数据下载完成后,在DownloadAction中会切换到FilesystemVerifierAction
1 void DownloadAction::TransferComplete(HttpFetcher* fetcher, bool successful) {
2   if (writer_) {
3    ........
4   // Write the path to the output pipe if we''re successful.
5   if (code == ErrorCode::kSuccess && HasOutputPipe())
6     SetOutputObject(install_plan_);
7   processor_->ActionComplete(this, code);
8 }
最后的ActionComplete会开始执行FilesystemVerifierAction。
src/system/update_engine/payload_consumer/filesystem_verifer_action.cc
 1 void FilesystemVerifierAction::PerformAction() {
 2   // Will tell the ActionProcessor we''ve failed if we return.
 3   ScopedActionCompleter abort_action_completer(processor_, this);
 4
 5   if (!HasInputObject()) {
 6     LOG(ERROR) << "FilesystemVerifierAction missing input object.";
 7     return;
 8   }
 9   install_plan_ = GetInputObject();   //获取上一个Action传过来的install_plan_
10
11   if (install_plan_.partitions.empty()) {
12     LOG(INFO) << "No partitions to verify.";
13     if (HasOutputPipe())
14       SetOutputObject(install_plan_);
15     abort_action_completer.set_code(ErrorCode::kSuccess);
16     return;
17   }
18
19   StartPartitionHashing();      //开始计算分区的hash
20   abort_action_completer.set_should_complete(false);
21 }接着看StartPartitionHashing
 1 void FilesystemVerifierAction::StartPartitionHashing() {
 2   if (partition_index_ == install_plan_.partitions.size()) {       //判断是否验证到了最后一个分区
 3     Cleanup(ErrorCode::kSuccess);
 4     return;
 5   }
 6   InstallPlan::Partition& partition =
 7       install_plan_.partitions[partition_index_];
 8
 9   string part_path;
10   switch (verifier_step_) {                    //默认值是KVerifyTargetHash
11     case VerifierStep::kVerifySourceHash:
12       part_path = partition.source_path;
13       remaining_size_ = partition.source_size;
14       break;
15     case VerifierStep::kVerifyTargetHash:
16       part_path = partition.target_path;         //分区的路径
17       remaining_size_ = partition.target_size;   //大小
18       break;
19   }
20   LOG(INFO) << "Hashing partition " << partition_index_ << " ("
21             << partition.name << ") on device " << part_path;
22   if (part_path.empty())
23     return Cleanup(ErrorCode::kFilesystemVerifierError);
24
25   brillo::ErrorPtr error;
26   src_stream_ = brillo::FileStream::Open(             //打开对应的分区文件
27       base::FilePath(part_path),
28       brillo::Stream::AccessMode::READ,
29       brillo::FileStream::Disposition::OPEN_EXISTING,
30       &error);
31
32   if (!src_stream_) {
33     LOG(ERROR) << "Unable to open " << part_path << " for reading";
34     return Cleanup(ErrorCode::kFilesystemVerifierError);
35   }
36
37   buffer_.resize(kReadFileBufferSize);   //重置缓存区的大小
38   read_done_ = false;                    //未被读取完成
39   hasher_.reset(new HashCalculator());   //设置HashCalculator
40
41   // Start the first read.
42   ScheduleRead();               //开始读取
43 }
首先判断是否验证的分区的所有hash,如果验证完成了,调用CleanUp做最后的工作。
CleanUp
 1 void FilesystemVerifierAction::Cleanup(ErrorCode code) {
 2   src_stream_.reset();
 3   // This memory is not used anymore.
 4   buffer_.clear();
 5
 6   if (cancelled_)
 7     return;
 8   if (code == ErrorCode::kSuccess && HasOutputPipe())
 9     SetOutputObject(install_plan_);
10   processor_->ActionComplete(this, code);
11 }
可以看到主要就是清空缓存区,设置install_plan_,切换到下一个Action。如果没有验证完成,就获取要验证的分区路径和大小,这个大小只是要验证的大小,不一定是分区的真正大小。对于镜像文件而言1G的大小能被安装在2G的分区上。接下来调用ScheduleRead()开始进行验证。
ScheduleRead()
 1 void FilesystemVerifierAction::ScheduleRead() {
 2   size_t bytes_to_read = std::min(static_cast<int64_t>(buffer_.size()),
 3                                   remaining_size_);  //获取要读取数据的大小
 4   if (!bytes_to_read) {   //读取完成
 5     OnReadDoneCallback(0);
 6     return;
 7   }
 8
 9   bool read_async_ok = src_stream_->ReadAsync(
10     buffer_.data(),
11     bytes_to_read,
12     base::Bind(&FilesystemVerifierAction::OnReadDoneCallback,
13                base::Unretained(this)),
14     base::Bind(&FilesystemVerifierAction::OnReadErrorCallback,
15                base::Unretained(this)),
16     nullptr);  //开始读取
17
18   if (!read_async_ok) {
19     LOG(ERROR) << "Unable to schedule an asynchronous read from the stream.";
20     Cleanup(ErrorCode::kError);
21   }
22 }
获取读取数据的真实大小,开始读取数据。
 1 void FilesystemVerifierAction::OnReadDoneCallback(size_t bytes_read) {
 2   if (bytes_read == 0) {        //读取完成
 3     read_done_ = true;
 4   } else {
 5     remaining_size_ -= bytes_read;
 6     CHECK(!read_done_);
 7     if (!hasher_->Update(buffer_.data(), bytes_read)) {   //计算hash
 8       LOG(ERROR) << "Unable to update the hash.";
 9       Cleanup(ErrorCode::kError);
10       return;
11     }
12   }
13
14   // We either terminate the current partition or have more data to read.
15   if (cancelled_)
16     return Cleanup(ErrorCode::kError);
17
18   if (read_done_ || remaining_size_ == 0) {
19     if (remaining_size_ != 0) {
20       LOG(ERROR) << "Failed to read the remaining " << remaining_size_
21                  << " bytes from partition "
22                  << install_plan_.partitions[partition_index_].name;
23       return Cleanup(ErrorCode::kFilesystemVerifierError);
24     }
25     return FinishPartitionHashing();   //计算完成后
26   }
27   ScheduleRead();   //如果没有计算完成,继续计读取计算
28 }
在这个方法中会对读取的数据进行hash计算,每次计算其实都是基于前一次的计算结果来进行的,不然就会有太对的数据加载到内存中,导致内存不足。当计算完成后
 1 void FilesystemVerifierAction::FinishPartitionHashing() {
 2   if (!hasher_->Finalize()) {
 3     LOG(ERROR) << "Unable to finalize the hash.";
 4     return Cleanup(ErrorCode::kError);
 5   }
 6   InstallPlan::Partition& partition =
 7       install_plan_.partitions[partition_index_];
 8   LOG(INFO) << "Hash of " << partition.name << ": "
 9             << Base64Encode(hasher_->raw_hash());
10
11   switch (verifier_step_) {
12     case VerifierStep::kVerifyTargetHash:
13       if (partition.target_hash != hasher_->raw_hash()) {   //对保存的targethash和计算得到的hash进行一个比较
14         LOG(ERROR) << "New ''" << partition.name
15                    << "'' partition verification failed.";
16         if (partition.source_hash.empty()) {
17           // No need to verify source if it is a full payload.
18           return Cleanup(ErrorCode::kNewRootfsVerificationError);
19         }
20         // If we have not verified source partition yet, now that the target
21         // partition does not match, and it''s not a full payload, we need to
22         // switch to kVerifySourceHash step to check if it''s because the source
23         // partition does not match either.
24         verifier_step_ = VerifierStep::kVerifySourceHash;  //计算source hash
25       } else {
26         partition_index_++;   //计算下一个分区
27       }
28       break;
29     case VerifierStep::kVerifySourceHash:
30       if (partition.source_hash != hasher_->raw_hash()) {  //保存的source hash和计算得到的也不相同
31         LOG(ERROR) << "Old ''" << partition.name
32                    << "'' partition verification failed.";
33         LOG(ERROR) << "This is a server-side error due to mismatched delta"
34                    << " update image!";
35         LOG(ERROR) << "The delta I''ve been given contains a " << partition.name
36                    << " delta update that must be applied over a "
37                    << partition.name << " with a specific checksum, but the "
38                    << partition.name
39                    << " we''re starting with doesn''t have that checksum! This"
40                       " means that the delta I''ve been given doesn''t match my"
41                       " existing system. The "
42                    << partition.name << " partition I have has hash: "
43                    << Base64Encode(hasher_->raw_hash())
44                    << " but the update expected me to have "
45                    << Base64Encode(partition.source_hash) << " .";
46         LOG(INFO) << "To get the checksum of the " << partition.name
47                   << " partition run this command: dd if="
48                   << partition.source_path
49                   << " bs=1M count=" << partition.source_size
50                   << " iflag=count_bytes 2>/dev/null | openssl dgst -sha256 "
51                      "-binary | openssl base64";
52         LOG(INFO) << "To get the checksum of partitions in a bin file, "
53                   << "run: .../src/scripts/sha256_partitions.sh .../file.bin";
54         return Cleanup(ErrorCode::kDownloadStateInitializationError);
55       }
56       // The action will skip kVerifySourceHash step if target partition hash
57       // matches, if we are in this step, it means target hash does not match,
58       // and now that the source partition hash matches, we should set the error
59       // code to reflect the error in target partition.
60       // We only need to verify the source partition which the target hash does
61       // not match, the rest of the partitions don''t matter.
62       return Cleanup(ErrorCode::kNewRootfsVerificationError);
63   }
64   // Start hashing the next partition, if any.
65   hasher_.reset();   //重置hash计算器
66   buffer_.clear();  //清空缓存
67   src_stream_->CloseBlocking(nullptr);
68   StartPartitionHashing(); //接着计算
69 }
可见当一个分区的hash被计算出来的时候就会根据保存好的进行比较,如果target的hash不一致就会转向比较该分区的source hash,其实比较source hash主要就是为了确定错误的类型,只要target hash不一致,无论source hash是否一致都不会继续下一个分区的计算了。就这样一直到最后一个分区验证完后,执行最后一个Action,PostinstallRunnerAction。
PostinstallRunnerAction
PostinstallRunnerAction执行每个分区更新完后的postinstall script。但是在高通平台的,android8.0上无论是全包还是差分包升级并没有实质性的postinstall script。在PostinstallRunnerAction中仅仅是将target_slot标记为active状态。目前只分析于执行相关的代码。
src/system/update_engine/payload_consumer/postinstall_runner_action.cc
 1 void PostinstallRunnerAction::PerformAction() {
 2   CHECK(HasInputObject());
 3   install_plan_ = GetInputObject();   //获取install_plan_
 4
 5   if (install_plan_.powerwash_required) {    //是否需要进行数据的擦除
 6     if (hardware_->SchedulePowerwash()) {
 7       powerwash_scheduled_ = true;
 8     } else {
 9       return CompletePostinstall(ErrorCode::kPostinstallPowerwashError);
10     }
11   }
12
13   // Initialize all the partition weights.
14   partition_weight_.resize(install_plan_.partitions.size());  //初始化每个分区的权重
15   total_weight_ = 0;
16   for (size_t i = 0; i < install_plan_.partitions.size(); ++i) {
17     // TODO(deymo): This code sets the weight to all the postinstall commands,
18     // but we could remember how long they took in the past and use those
19     // values.
20     partition_weight_[i] = install_plan_.partitions[i].run_postinstall;
21     total_weight_ += partition_weight_[i];  //计算总的权重
22   }
23   accumulated_weight_ = 0;
24   ReportProgress(0);                      //更新进度
25
26   PerformPartitionPostinstall();          //开始真正的流程
27 }
来看PerformPartitionPostinstall()
 1 void PostinstallRunnerAction::PerformPartitionPostinstall() {
 2   if (install_plan_.download_url.empty()) {
 3     LOG(INFO) << "Skipping post-install during rollback";
 4     return CompletePostinstall(ErrorCode::kSuccess);
 5   }
 6
 7   // Skip all the partitions that don''t have a post-install step.
 8   while (current_partition_ < install_plan_.partitions.size() &&
 9          !install_plan_.partitions[current_partition_].run_postinstall) {   //run_postinstall为false
10     VLOG(1) << "Skipping post-install on partition "
11             << install_plan_.partitions[current_partition_].name;
12     current_partition_++;
13   }
14   if (current_partition_ == install_plan_.partitions.size())
15     return CompletePostinstall(ErrorCode::kSuccess);
16   ...................
17   ...................
18   ...................
19 }
在当前分析中run_postinstall为false,会跳过post-install。之后会直接执行CompletePostinstall(ErrorCode::kSuccess)
 1 void PostinstallRunnerAction::CompletePostinstall(ErrorCode error_code) {
 2   // We only attempt to mark the new slot as active if all the postinstall
 3   // steps succeeded.
 4   if (error_code == ErrorCode::kSuccess &&
 5       !boot_control_->SetActiveBootSlot(install_plan_.target_slot)) {   //设置target_slot为active
 6     error_code = ErrorCode::kPostinstallRunnerError;
 7   }
 8
 9   ScopedActionCompleter completer(processor_, this);
10   completer.set_code(error_code);
11
12   if (error_code != ErrorCode::kSuccess) {
13     LOG(ERROR) << "Postinstall action failed.";
14
15     // Undo any changes done to trigger Powerwash.
16     if (powerwash_scheduled_)
17       hardware_->CancelPowerwash();
18
19     return;
20   }
21
22   LOG(INFO) << "All post-install commands succeeded";
23   if (HasOutputPipe()) {                      //设置输出的install_plan
24     SetOutputObject(install_plan_);
25   }
26 }
最终将target_slot设置为active在重启之后就会从target_slot开始启动了。
分析到这里就算是对update_engine的核心过程有了个大概的了解,除了对升级的知识点的认识,还体会到了它的架构。不足之处就是还有很多的细节未涉及。

.MySQLNonTransientConnectionException: Could not create connection to database server. Attempted reconnect 5 times. Giving up.
com.mysql.jdbc.exceptions.jdbc4.MySQLNonTransientConnectionException: Could not create connection to database server. Attempted reconnect 5 times. Giving up.
	at sun.reflect.NativeConstructorAccessorImpl.newInstance0(Native Method)
	at sun.reflect.NativeConstructorAccessorImpl.newInstance(NativeConstructorAccessorImpl.java:62)
	at sun.reflect.DelegatingConstructorAccessorImpl.newInstance(DelegatingConstructorAccessorImpl.java:45)
	at java.lang.reflect.Constructor.newInstance(Constructor.java:408)
	at com.mysql.jdbc.Util.handleNewInstance(Util.java:411)
	at com.mysql.jdbc.Util.getInstance(Util.java:386)
	at com.mysql.jdbc.SQLError.createSQLException(SQLError.java:1015)
	at com.mysql.jdbc.SQLError.createSQLException(SQLError.java:989)
	at com.mysql.jdbc.SQLError.createSQLException(SQLError.java:975)
	at com.mysql.jdbc.SQLError.createSQLException(SQLError.java:920)
	at com.mysql.jdbc.ConnectionImpl.connectWithRetries(ConnectionImpl.java:2385)
	at com.mysql.jdbc.ConnectionImpl.createNewIO(ConnectionImpl.java:2306)
	at com.mysql.jdbc.ConnectionImpl.<init>(ConnectionImpl.java:834)
	at com.mysql.jdbc.JDBC4Connection.<init>(JDBC4Connection.java:47)
	at sun.reflect.GeneratedConstructorAccessor4.newInstance(Unknown Source)
	at sun.reflect.DelegatingConstructorAccessorImpl.newInstance(DelegatingConstructorAccessorImpl.java:45)
	at java.lang.reflect.Constructor.newInstance(Constructor.java:408)
	at com.mysql.jdbc.Util.handleNewInstance(Util.java:411)
	at com.mysql.jdbc.ConnectionImpl.getInstance(ConnectionImpl.java:416)
	at com.mysql.jdbc.NonRegisteringDriver.connect(NonRegisteringDriver.java:346)
	at com.mysql.jdbc.jdbc2.optional.MysqlDataSource.getConnection(MysqlDataSource.java:443)
	at com.mysql.jdbc.jdbc2.optional.MysqlDataSource.getConnection(MysqlDataSource.java:141)
	at com.mysql.jdbc.jdbc2.optional.MysqlDataSource.getConnection(MysqlDataSource.java:111)
	at cn.qjj.mysql.MySQLPool.getNewConnection(MySQLPool.java:72)
	at cn.qjj.mysql.MySQLPool.init(MySQLPool.java:63)
	at cn.qjj.mysql.MySQLPool.<init>(MySQLPool.java:32)
	at cn.qjj.mysql.MySQLPool.getInstance(MySQLPool.java:39)
	at cn.qjj.mysql.SqlUtils.<clinit>(SqlUtils.java:33)
	at cn.qjj.solr.MsgUtil.main(MsgUtil.java:31)
Caused by: com.mysql.jdbc.exceptions.jdbc4.MySQLNonTransientConnectionException: Data source rejected establishment of connection,  message from server: "Too many connections"
	at sun.reflect.NativeConstructorAccessorImpl.newInstance0(Native Method)
	at sun.reflect.NativeConstructorAccessorImpl.newInstance(NativeConstructorAccessorImpl.java:62)
	at sun.reflect.DelegatingConstructorAccessorImpl.newInstance(DelegatingConstructorAccessorImpl.java:45)
	at java.lang.reflect.Constructor.newInstance(Constructor.java:408)
	at com.mysql.jdbc.Util.handleNewInstance(Util.java:411)
	at com.mysql.jdbc.Util.getInstance(Util.java:386)
	at com.mysql.jdbc.SQLError.createSQLException(SQLError.java:1015)
	at com.mysql.jdbc.SQLError.createSQLException(SQLError.java:989)
	at com.mysql.jdbc.SQLError.createSQLException(SQLError.java:975)
	at com.mysql.jdbc.MysqlIO.doHandshake(MysqlIO.java:1112)
	at com.mysql.jdbc.ConnectionImpl.coreConnect(ConnectionImpl.java:2483)
	at com.mysql.jdbc.ConnectionImpl.connectWithRetries(ConnectionImpl.java:2324)
	... 18 more
java.lang.NullPointerException
	at java.util.concurrent.ConcurrentHashMap.putVal(ConcurrentHashMap.java:1011)
	at java.util.concurrent.ConcurrentHashMap.put(ConcurrentHashMap.java:1006)
	at cn.qjj.mysql.MySQLPool.init(MySQLPool.java:63)
	at cn.qjj.mysql.MySQLPool.<init>(MySQLPool.java:32)
	at cn.qjj.mysql.MySQLPool.getInstance(MySQLPool.java:39)
	at cn.qjj.mysql.SqlUtils.<clinit>(SqlUtils.java:33)
	at cn.qjj.solr.MsgUtil.main(MsgUtil.java:31)

21、MVSNeRF: Fast Generalizable Radiance Field Reconstruction from Multi-View Stereo
简介
主页:https://apchenstu.github.io/mvsnerf/
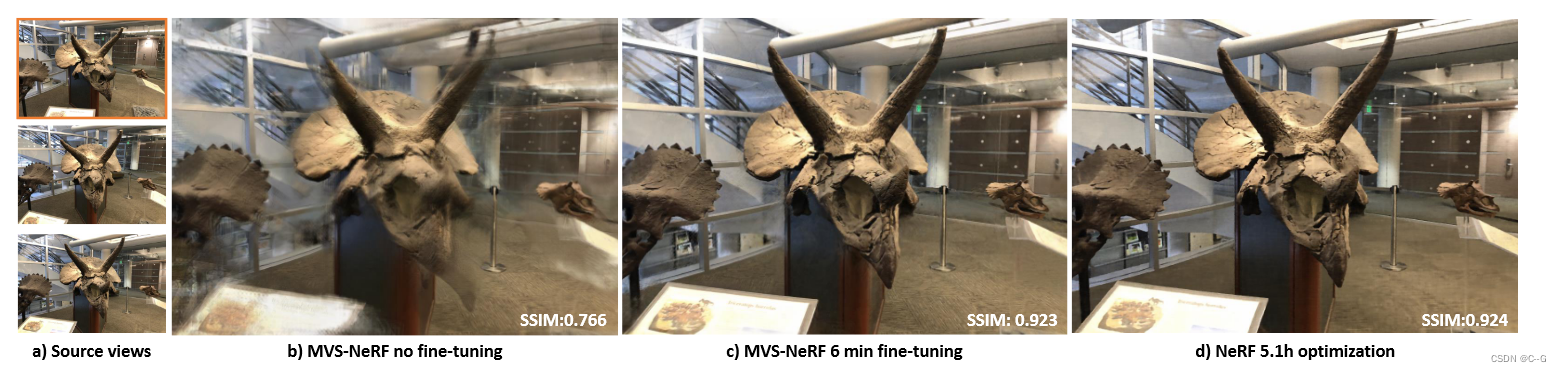
提出了一种新的神经渲染方法MVSNeRF,它可以有效地重建用于视图合成的神经辐射场。与先前关于神经辐射场的工作不同,这些工作考虑对密集捕获的图像进行逐场景优化,提出了一种通用的深度神经网络,该网络可以通过快速网络推理仅从三个附近的输入视图重建辐射场。利用plane-swept cost volumes(广泛用于multi-view stereo)进行几何感知场景推理,并将其与基于物理的体渲染相结合进行神经辐射场重建
Multi-view stereo
MVS是一个经典的计算机视觉问题,旨在使用从多个视点捕获的图像实现密集的几何结构重建dense geometry reconstruction
深度学习技术已被引入解决MVS问题。MVSNet 在参考视图的平面扫描成本体积上应用3D CNN进行深度估计,实现了优于经典传统方法的高质量3D重建
实现流程
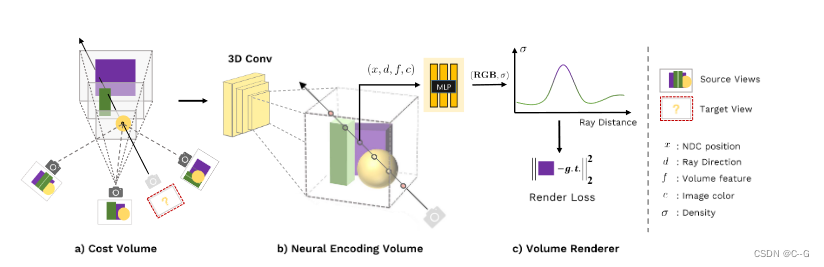
首先通过将二维图像特征扭曲到平面扫描上来构建一个cost volume(a)。然后,我们使用3D CNN来重建一个带有每个体素神经特征的neural encoding volume。我们使用MLP来回归任意位置的体积密度和RGB亮度,使用从encoding volume中插值的特征。这些体积特性被用于可微射线行进的最终渲染©。

x代表3d位置,d是视图方向,σ是x方向的体密度,r是x处的输出亮度(RGB颜色)取决于观察方向d,捕获图像Ii,新视角相机参数Φi
Cost Volume
将m个输入图像中的2D图像特征扭曲到参考视图的挫折面上的一个平面扫描体,在参考视图reference view(i = 1)构建了一个cost volume P,允许几何感知场景理解
Extracting image features
使用深度二维CNN T来提取各个输入视图的二维图像特征,从而有效地提取代表局部图像外观的二维神经特征,使用下采样卷积层将图像Ii(H x W x 3)卷积为特征图Fi(H/4 x W/4 x C),C为通道数

Warping feature maps
通过给定的相机的内外参数Φ = [K, R, t]进行同形扭曲

Hi(z)为视图i到深度z的参考视图的扭曲矩阵,K为本征矩阵,R和t是相机旋转矩阵和平移矩阵,所以特征图都进行如下变换

Fi,z 为深度z处的扭曲特征图,(u,v)为参考视图中的像素位置,在这里,使用参考视图中的归一化设备坐标 (NDC)来参数化(u,v,z)。
Cost volume
cost volumeP由D 扫描平面(sweeping planes)的扭曲特征图(warped feature maps)构造而成,利用基于方差的度量(variance-based metric)来计算成本(cost),对于以(u,v,z)为中心的P中的每个体素voxel,其成本特征向量cost feature vector由下式计算

Var计算M个视图的方差,这种基于方差的成本体对不同输入视图上的图像外观变化进行编码;这解释了由场景几何体和视图相关的着色效果shading effects引起的外观变化
Radiance field reconstruction
利用3D CNN B从原始2D image feature costs的cost volume P中重建neural encoding volume S;S由编码局部场景几何形状和外观的每个体素特征组成。MLP decoder A 用于从该编码体回归体渲染属
Neural encoding volume
训练一个深度3D CNN B,将构建的image-feature cost volume转换为新的C通道神经特征体积 S,其中特征空间由网络自身学习和发现,用于后续的体积属性回归

3D CNN B是一个具有下采样和上采样卷积层和跳跃连接的3D UNet,可以有效地推断和传播场景外观信息,从而产生有意义的场景编码体S,网络可以学习在每个体素的神经特征中编码有意义的场景几何和外观;这些特征随后被连续地内插和改变
Regressing volume properties

给定一个任意的3D位置x和一个观看方向d,我们使用MLP a从神经编码体积s回归相应的体积密度σ和视相关的亮度r
这里同时将原始图像Ii的像素颜色 c= [I(ui, vi)] ( (ui, vi)是在视图i上投影3D点x时的像素位置 )作为额外输入,由于2D特征提取的下采样,场景编码体具有相对低的分辨率;仅从这些信息中回归高频出现是具有挑战性的。因此,引入了原始图像像素数据
f = S(x)是在位置x处从volume S三线性内插的神经特征
x在参考视图的NDC空间中被参数化,而d由参考视图坐标处的单位向量表示。使用NDC空间可以有效地归一化跨不同数据源的场景比例,有助于良好的可推广性
对位置和方向向量(x和d)应用了位置编码
补充细节
在得到体密度和视点相关辐射后,后续于原始NeRF基本一致.
整个框架模拟了一个神经辐射场,从几个(三个)输入图像回归场景中的体积密度和视点相关辐射率。此外,一旦场景编码体积S被重建,与MLP解码器A结合的该体积可以被独立使用,而无需预先考虑2D和3D CNNs。它们可以被视为辐射场的独立神经表示,输出体属性,从而支持体渲染。
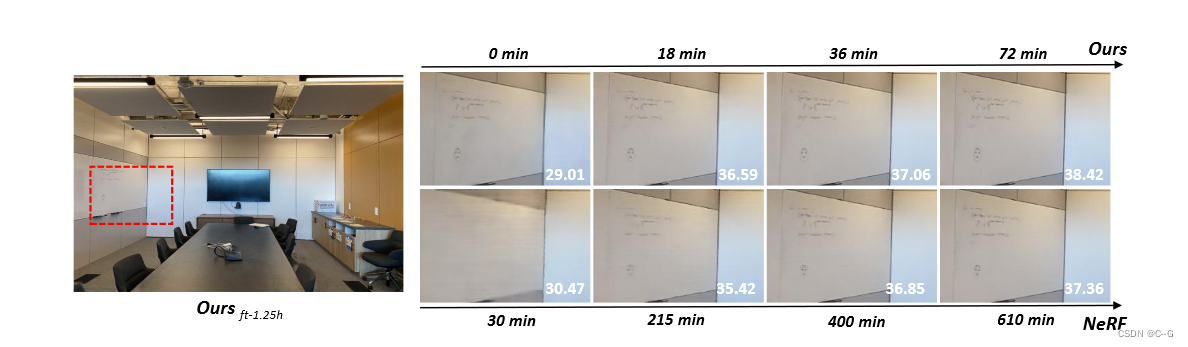
效果

ActiveMQ java.net.URISyntaxException: Illegal character in hostname 异常
http://zhangmingji.iteye.com/blog/2036812
上述异常是因为hostname不合法,解决办法:
编辑文件: /etc/sysconfig/network
修改: HOSTNAME=new-hostname.domainname(此次为别名)
修改:/etc/hosts 添加:IP hostname.domainname 机器名
重启linux机器:reboot
示例:
vim /etc/hosts
127.0.0.1 localhost
::1 localhost localhost.localdomain localhost6 localhost6.localdomain6
10.45.189.213 new-hostname.domainname Facade_01
~
vim /etc/sysconfig/network
NETWORKING_IPV6=no
PEERNTP=no
GATEWAY=120.76.79.247
~

activemq启动闪退/失败 (Illegal character in hostname at index 5: ws://****:61614?maximumConnections=100...
java.net.URISyntaxException: Illegal character in hostname at index 5: ws://****:61614?maximumConnections=1000&wireFormat.maxFrameSize=104857600
jvm 1 | at java.net.URI$Parser.fail(Unknown Source)[:1.8.0_121]
jvm 1 | at java.net.URI$Parser.parseHostname(Unknown Source)[:1.8.0_121]
jvm 1 | at java.net.URI$Parser.parseServer(Unknown Source)[:1.8.0_121]
jvm 1 | at java.net.URI$Parser.parseAuthority(Unknown Source)[:1.8.0_121]
jvm 1 | at java.net.URI$Parser.parseHierarchical(Unknown Source)[:1.8.0_121]
jvm 1 | at java.net.URI$Parser.parse(Unknown Source)[:1.8.0_121]
jvm 1 | at java.net.URI.<init>(Unknown Source)[:1.8.0_121]
jvm 1 | at org.apache.activemq.transport.WebTransportServerSupport.bind(WebTransportServerSupport.java:73)[activemq-http-5.15.4.jar:5.15.4]
jvm 1 | at org.apache.activemq.transport.ws.WSTransportServer.doStart(WSTransportServer.java:67)[activemq-http-5.15.4.jar:5.15.4]
jvm 1 | at org.apache.activemq.util.ServiceSupport.start(ServiceSupport.java:55)[activemq-client-5.15.4.jar:5.15.4]
jvm 1 | at org.apache.activemq.broker.TransportConnector.start(TransportConnector.java:251)[activemq-broker-5.15.4.jar:5.15.4]
jvm 1 | at org.apache.activemq.broker.BrokerService.startTransportConnector(BrokerService.java:2747)[activemq-broker-5.15.4.jar:5.15.4]
jvm 1 | at org.apache.activemq.broker.BrokerService.startAllConnectors(BrokerService.java:2640)[activemq-broker-5.15.4.jar:5.15.4]
jvm 1 | at org.apache.activemq.broker.BrokerService.doStartBroker(BrokerService.java:771)[activemq-broker-5.15.4.jar:5.15.4]
jvm 1 | at org.apache.activemq.broker.BrokerService.startBroker(BrokerService.java:733)[activemq-broker-5.15.4.jar:5.15.4]
jvm 1 | at org.apache.activemq.broker.BrokerService.start(BrokerService.java:636)[activemq-broker-5.15.4.jar:5.15.4]
jvm 1 | at org.apache.activemq.xbean.XBeanBrokerService.afterPropertiesSet(XBeanBrokerService.java:73)[activemq-spring-5.15.4.jar:5.15.4]
jvm 1 | at sun.reflect.NativeMethodAccessorImpl.invoke0(Native Method)[:1.8.0_121]
jvm 1 | at sun.reflect.NativeMethodAccessorImpl.invoke(Unknown Source)[:1.8.0_121]
jvm 1 | at sun.reflect.DelegatingMethodAccessorImpl.invoke(Unknown Source)[:1.8.0_121]
jvm 1 | at java.lang.reflect.Method.invoke(Unknown Source)[:1.8.0_121]
jvm 1 | at org.springframework.beans.factory.support.AbstractAutowireCapableBeanFactory.invokeCustomInitMethod(AbstractAutowireCapableBeanFactory.java:1763)[spring-beans-4.3.17.RELEASE.jar:4.3.17.RELEASE]
jvm 1 | at org.springframework.beans.factory.support.AbstractAutowireCapableBeanFactory.invokeInitMethods(AbstractAutowireCapableBeanFactory.java:1700)[spring-beans-4.3.17.RELEASE.jar:4.3.17.RELEASE]
jvm 1 | at org.springframework.beans.factory.support.AbstractAutowireCapableBeanFactory.initializeBean(AbstractAutowireCapableBeanFactory.java:1630)[spring-beans-4.3.17.RELEASE.jar:4.3.17.RELEASE]
jvm 1 | at org.springframework.beans.factory.support.AbstractAutowireCapableBeanFactory.doCreateBean(AbstractAutowireCapableBeanFactory.java:555)[spring-beans-4.3.17.RELEASE.jar:4.3.17.RELEASE]
jvm 1 | at org.springframework.beans.factory.support.AbstractAutowireCapableBeanFactory.createBean(AbstractAutowireCapableBeanFactory.java:483)[spring-beans-4.3.17.RELEASE.jar:4.3.17.RELEASE]
jvm 1 | at org.springframework.beans.factory.support.AbstractBeanFactory$1.getObject(AbstractBeanFactory.java:312)[spring-beans-4.3.17.RELEASE.jar:4.3.17.RELEASE]
jvm 1 | at org.springframework.beans.factory.support.DefaultSingletonBeanRegistry.getSingleton(DefaultSingletonBeanRegistry.java:230)[spring-beans-4.3.17.RELEASE.jar:4.3.17.RELEASE]
jvm 1 | at org.springframework.beans.factory.support.AbstractBeanFactory.doGetBean(AbstractBeanFactory.java:308)[spring-beans-4.3.17.RELEASE.jar:4.3.17.RELEASE]
jvm 1 | at org.springframework.beans.factory.support.AbstractBeanFactory.getBean(AbstractBeanFactory.java:197)[spring-beans-4.3.17.RELEASE.jar:4.3.17.RELEASE]
jvm 1 | at org.springframework.beans.factory.support.DefaultListableBeanFactory.preInstantiateSingletons(DefaultListableBeanFactory.java:761)[spring-beans-4.3.17.RELEASE.jar:4.3.17.RELEASE]
jvm 1 | at org.springframework.context.support.AbstractApplicationContext.finishBeanFactoryInitialization(AbstractApplicationContext.java:867)[spring-context-4.3.17.RELEASE.jar:4.3.17.RELEASE]
jvm 1 | at org.springframework.context.support.AbstractApplicationContext.refresh(AbstractApplicationContext.java:543)[spring-context-4.3.17.RELEASE.jar:4.3.17.RELEASE]
jvm 1 | at org.apache.xbean.spring.context.ResourceXmlApplicationContext.<init>(ResourceXmlApplicationContext.java:64)[xbean-spring-4.2.jar:4.2]
jvm 1 | at org.apache.xbean.spring.context.ResourceXmlApplicationContext.<init>(ResourceXmlApplicationContext.java:52)[xbean-spring-4.2.jar:4.2]
jvm 1 | at org.apache.activemq.xbean.XBeanBrokerFactory$1.<init>(XBeanBrokerFactory.java:104)[activemq-spring-5.15.4.jar:5.15.4]
jvm 1 | at org.apache.activemq.xbean.XBeanBrokerFactory.createApplicationContext(XBeanBrokerFactory.java:104)[activemq-spring-5.15.4.jar:5.15.4]
jvm 1 | at org.apache.activemq.xbean.XBeanBrokerFactory.createBroker(XBeanBrokerFactory.java:67)[activemq-spring-5.15.4.jar:5.15.4]
jvm 1 | at org.apache.activemq.broker.BrokerFactory.createBroker(BrokerFactory.java:71)[activemq-broker-5.15.4.jar:5.15.4]
jvm 1 | at org.apache.activemq.broker.BrokerFactory.createBroker(BrokerFactory.java:54)[activemq-broker-5.15.4.jar:5.15.4]
jvm 1 | at org.apache.activemq.console.command.StartCommand.runTask(StartCommand.java:87)[activemq-console-5.15.4.jar:5.15.4]
jvm 1 | at org.apache.activemq.console.command.AbstractCommand.execute(AbstractCommand.java:63)[activemq-console-5.15.4.jar:5.15.4]
jvm 1 | at org.apache.activemq.console.command.ShellCommand.runTask(ShellCommand.java:154)[activemq-console-5.15.4.jar:5.15.4]
jvm 1 | at org.apache.activemq.console.command.AbstractCommand.execute(AbstractCommand.java:63)[activemq-console-5.15.4.jar:5.15.4]
jvm 1 | at org.apache.activemq.console.command.ShellCommand.main(ShellCommand.java:104)[activemq-console-5.15.4.jar:5.15.4]
jvm 1 | at sun.reflect.NativeMethodAccessorImpl.invoke0(Native Method)[:1.8.0_121]
jvm 1 | at sun.reflect.NativeMethodAccessorImpl.invoke(Unknown Source)[:1.8.0_121]
jvm 1 | at sun.reflect.DelegatingMethodAccessorImpl.invoke(Unknown Source)[:1.8.0_121]
jvm 1 | at java.lang.reflect.Method.invoke(Unknown Source)[:1.8.0_121]
jvm 1 | at org.apache.activemq.console.Main.runTaskClass(Main.java:262)[activemq.jar:5.15.4]
jvm 1 | at org.apache.activemq.console.Main.main(Main.java:115)[activemq.jar:5.15.4]
jvm 1 | at sun.reflect.NativeMethodAccessorImpl.invoke0(Native Method)[:1.8.0_121]
jvm 1 | at sun.reflect.NativeMethodAccessorImpl.invoke(Unknown Source)[:1.8.0_121]
jvm 1 | at sun.reflect.DelegatingMethodAccessorImpl.invoke(Unknown Source)[:1.8.0_121]
jvm 1 | at java.lang.reflect.Method.invoke(Unknown Source)[:1.8.0_121]
jvm 1 | at org.tanukisoftware.wrapper.WrapperSimpleApp.run(WrapperSimpleApp.java:240)[wrapper.jar:3.2.3]
jvm 1 | at java.lang.Thread.run(Unknown Source)[:1.8.0_121]
解决办法如下:
修改 conf->activemq.xml 配置文件
把其中的
<transportConnectors>
<!-- DOS protection, limit concurrent connections to 1000 and frame size to 100MB -->
<transportConnector name="openwire" uri="tcp://0.0.0.0:61616?maximumConnections=1000&wireFormat.maxFrameSize=104857600"/>
<transportConnector name="amqp" uri="amqp://0.0.0.0:5672?maximumConnections=1000&wireFormat.maxFrameSize=104857600"/>
<transportConnector name="stomp" uri="stomp://0.0.0.0:61613?maximumConnections=1000&wireFormat.maxFrameSize=104857600"/>
<transportConnector name="mqtt" uri="mqtt://0.0.0.0:1883?maximumConnections=1000&wireFormat.maxFrameSize=104857600"/>
<transportConnector name="ws" uri="ws://0.0.0.0:61614?maximumConnections=1000&wireFormat.maxFrameSize=104857600"/>
</transportConnectors>
修改为
<transportConnectors>
<!-- DOS protection, limit concurrent connections to 1000 and frame size to 100MB -->
<transportConnector name="openwire" uri="tcp://127.0.0.1:61616?maximumConnections=1000&wireFormat.maxFrameSize=104857600"/>
<transportConnector name="amqp" uri="amqp://127.0.0.1:5672?maximumConnections=1000&wireFormat.maxFrameSize=104857600"/>
<transportConnector name="stomp" uri="stomp://127.0.0.1:61613?maximumConnections=1000&wireFormat.maxFrameSize=104857600"/>
<transportConnector name="mqtt" uri="mqtt://127.0.0.1:1883?maximumConnections=1000&wireFormat.maxFrameSize=104857600"/>
<transportConnector name="ws" uri="ws://127.0.0.1:61614?maximumConnections=1000&wireFormat.maxFrameSize=104857600"/>
</transportConnectors>即可,就是把这一大段xml里的0.0.0.0替换为127.0.0.1
注:亲测有效!!!
我们今天的关于update_engine-FilesystemVerifierAction和PostinstallRunnerAction的分享就到这里,谢谢您的阅读,如果想了解更多关于.MySQLNonTransientConnectionException: Could not create connection to database server. Attempted reconnect 5 times. Giving up.、21、MVSNeRF: Fast Generalizable Radiance Field Reconstruction from Multi-View Stereo、ActiveMQ java.net.URISyntaxException: Illegal character in hostname 异常、activemq启动闪退/失败 (Illegal character in hostname at index 5: ws://****:61614?maximumConnections=100...的相关信息,可以在本站进行搜索。
本文标签:


