想了解基于Springoauth2.0统一认证登录,返回自定义用户信息的新动态吗?本文将为您提供详细的信息,我们还将为您解答关于springoauth2的自定义认证的相关问题,此外,我们还将为您介绍关
想了解基于Spring oauth2.0统一认证登录,返回自定义用户信息的新动态吗?本文将为您提供详细的信息,我们还将为您解答关于spring oauth2的自定义认证的相关问题,此外,我们还将为您介绍关于(十三) 整合spring cloud云架构 - SSO单点登录之OAuth2.0 根据token获取用户信息(4)、(十四) 整合spring cloud云架构 - SSO单点登录之OAuth2.0 根据token获取用户信息(4)、Oauth2.0 基于 Spring Authorization Server 模块自定义统一返回对象、OAuth2.0协议专区-SpringCloud+zuul+oauth2 实现服务统一认证的新知识。
本文目录一览:- 基于Spring oauth2.0统一认证登录,返回自定义用户信息(spring oauth2的自定义认证)
- (十三) 整合spring cloud云架构 - SSO单点登录之OAuth2.0 根据token获取用户信息(4)
- (十四) 整合spring cloud云架构 - SSO单点登录之OAuth2.0 根据token获取用户信息(4)
- Oauth2.0 基于 Spring Authorization Server 模块自定义统一返回对象
- OAuth2.0协议专区-SpringCloud+zuul+oauth2 实现服务统一认证
")
基于Spring oauth2.0统一认证登录,返回自定义用户信息(spring oauth2的自定义认证)
先看源码是如何处理的:
package org.springframework.boot.autoconfigure.security.oauth2.resource;

import java.util.Collection;
import java.util.Collections;
import java.util.List;
import java.util.Map; import java.util.Set; import org.apache.commons.logging.Log; import org.apache.commons.logging.LogFactory; import org.springframework.security.authentication.UsernamePasswordAuthenticationToken; import org.springframework.security.core.AuthenticationException; import org.springframework.security.core.GrantedAuthority; import org.springframework.security.oauth2.client.OAuth2RestOperations; import org.springframework.security.oauth2.client.OAuth2RestTemplate; import org.springframework.security.oauth2.client.resource.BaseOAuth2ProtectedResourceDetails; import org.springframework.security.oauth2.common.DefaultOAuth2AccessToken; import org.springframework.security.oauth2.common.OAuth2AccessToken; import org.springframework.security.oauth2.common.exceptions.InvalidTokenException; import org.springframework.security.oauth2.provider.OAuth2Authentication; import org.springframework.security.oauth2.provider.OAuth2Request; import org.springframework.security.oauth2.provider.token.ResourceServerTokenServices; import org.springframework.util.Assert; public class UserInfoTokenServices implements ResourceServerTokenServices { protected final Log logger = LogFactory.getLog(this.getClass()); private final String userInfoEndpointUrl; private final String clientId; private OAuth2RestOperations restTemplate; private String tokenType = "Bearer"; private AuthoritiesExtractor authoritiesExtractor = new FixedAuthoritiesExtractor(); private PrincipalExtractor principalExtractor = new FixedPrincipalExtractor(); public UserInfoTokenServices(String userInfoEndpointUrl, String clientId) { this.userInfoEndpointUrl = userInfoEndpointUrl; this.clientId = clientId; } public void setTokenType(String tokenType) { this.tokenType = tokenType; } public void setRestTemplate(OAuth2RestOperations restTemplate) { this.restTemplate = restTemplate; } public void setAuthoritiesExtractor(AuthoritiesExtractor authoritiesExtractor) { Assert.notNull(authoritiesExtractor, "AuthoritiesExtractor must not be null"); this.authoritiesExtractor = authoritiesExtractor; } public void setPrincipalExtractor(PrincipalExtractor principalExtractor) { Assert.notNull(principalExtractor, "PrincipalExtractor must not be null"); this.principalExtractor = principalExtractor; } /** 根据access_token获取用户认证信息(根据access_token调用认证服务器) */ public OAuth2Authentication loadAuthentication(String accessToken) throws AuthenticationException, InvalidTokenException { //this.userInfoEndpointUrl application.peoperties中配置的 //获取用户信息的URL security.oauth2.resource.userInfoUri //accessToken 回去的access_token //以下为根据access_token和获取用户信息的URL(需要则认证服务器写专门的controller处理)获取用户信息 Map<String, Object> map = this.getMap(this.userInfoEndpointUrl, accessToken); if (map.containsKey("error")) { if (this.logger.isDebugEnabled()) { this.logger.debug("userinfo returned error: " + map.get("error")); } throw new InvalidTokenException(accessToken); } else { return this.extractAuthentication(map); } } /** 提取用户认证信息 */ private OAuth2Authentication extractAuthentication(Map<String, Object> map) { Object principal = this.getPrincipal(map); List<GrantedAuthority> authorities = this.authoritiesExtractor.extractAuthorities(map); OAuth2Request request = new OAuth2Request((Map)null, this.clientId, (Collection)null, true, (Set)null, (Set)null, (String)null, (Set)null, (Map)null); //将提取的值principal作为构造函数参数 UsernamePasswordAuthenticationToken token = new UsernamePasswordAuthenticationToken(principal, "N/A", authorities); token.setDetails(map); return new OAuth2Authentication(request, token); } /** 从map中提取最终在UsernamePasswordAuthenticationToken构造函数中封装的值 */ protected Object getPrincipal(Map<String, Object> map) { Object principal = this.principalExtractor.extractPrincipal(map); return principal == null ? "unknown" : principal; } public OAuth2AccessToken readAccessToken(String accessToken) { throw new UnsupportedOperationException("Not supported: read access token"); } /** 调用认证服务器,获取用户信息 */ private Map<String, Object> getMap(String path, String accessToken) { if (this.logger.isDebugEnabled()) { this.logger.debug("Getting user info from: " + path); } try { OAuth2RestOperations restTemplate = this.restTemplate; if (restTemplate == null) { BaseOAuth2ProtectedResourceDetails resource = new BaseOAuth2ProtectedResourceDetails(); resource.setClientId(this.clientId); restTemplate = new OAuth2RestTemplate(resource); } OAuth2AccessToken existingToken = ((OAuth2RestOperations)restTemplate).getOAuth2ClientContext().getAccessToken(); if (existingToken == null || !accessToken.equals(existingToken.getValue())) { DefaultOAuth2AccessToken token = new DefaultOAuth2AccessToken(accessToken); token.setTokenType(this.tokenType); ((OAuth2RestOperations)restTemplate).getOAuth2ClientContext().setAccessToken(token); } //通过restTemplate返回用户信息 return (Map)((OAuth2RestOperations)restTemplate).getForEntity(path, Map.class, new Object[0]).getBody(); } catch (Exception var6) { this.logger.warn("Could not fetch user details: " + var6.getClass() + ", " + var6.getMessage()); return Collections.singletonMap("error", "Could not fetch user details"); } } }
/**
最终在map中提取的是什么信息,封装在principal中
注意:以下只会返回一个合适的值,即使你认证服务返回在多的信息,最终都无法在客户端显示
*/
public class FixedPrincipalExtractor implements PrincipalExtractor { // private static final String[] PRINCIPAL_KEYS = new String[] { "user", "username", "userid", "user_id", "login", "id", "name" }; @Override public Object extractPrincipal(Map<String, Object> map) { //提取只会返回一个合适的值,最终封装在principal中 //主要还是看认证服务器返回用户信息的接口是否返回如上数组定义的字段信息,如果没有可能会返回null for (String key : PRINCIPAL_KEYS) { if (map.containsKey(key)) { return map.get(key); } } return null; } }解决方案
只需要将源码中的以下代码,替换为自己想要返回的参数
 protected Object getPrincipal(Map<String, Object> map) {
        Object principal = this.principalExtractor.extractPrincipal(map); return principal == null ? "unknown" : principal; }
自己实现的代码
   protected Object getPrincipal(Map<String, Object> map) {

        CustomPrincipal customPrincipal = new CustomPrincipal(); customPrincipal.setEmail((String) map.get("email")); customPrincipal.setAccount((String) map.get("account")); customPrincipal.setName((String) map.get("name")); customPrincipal.setPhone((String) map.get("phone")); //and so on.. return customPrincipal; /* Object principal = this.principalExtractor.extractPrincipal(map); return (principal == null ? "unknown" : principal); */ }
import com.alibaba.fastjson.JSONObject;
/**
* @author Created by niugang on 2019/1/18/20:19
*/
public class CustomPrincipal { public CustomPrincipal() { } private String email; private String name; private String account; private String phone; //Getters and Setters public String getEmail() { return email; } public void setEmail(String email) { this.email = email; } public String getName() { return name; } public void setName(String name) { this.name = name; } public String getAccount() { return account; } public void setAccount(String account) { this.account = account; } public String getPhone() { return phone; } public void setPhone(String phone) { this.phone = phone; } /** * 因为在principal.getName()返回的参数是字符串类型的,所以为了好处理我们需要用json用格式化一下 * @return String */ @Override public String toString() { JSONObject jsonObject = new JSONObject(); jsonObject.put("email", this.email); jsonObject.put("name", this.name); jsonObject.put("account", this.account); jsonObject.put("phone", this.phone); return jsonObject.toString(); } }前端获取用户新 ,注意这块中的是freemarker,采坑点好久没有写freemarker一直认为springboot默认 freemarker后缀为.html,结果一直不能返回到视图,最终看了源码默认后缀为.ftl
- 总结:对于我们平常写代码,一丁点小知识点都不能忽略
前后调用接口获取需要显示的用户信息
<script type="text/javascript">

    $.get("/getUserInfo", function (data) { if (data) { $("#account").html(data.account); $("#email").html(data.email); $("#name").html(data.name); $("#phone").html(data.phone); } }); </script>
后台返回用户信息接口
    /**
     * @param principal 存在登录成功后的信息
     * @return Object
     */
    @RequestMapping({"/getUserInfo"}) @ResponseBody public Object user(Principal principal) { if (principal != null) { //重写之后 principal.getName()存放是 CustomPrincipal toString形式的数据 String jsonObject = principal.getName(); if (jsonObject != null) { CustomPrincipal customPrincipal = JSON.parseObject(jsonObject, CustomPrincipal.class); return customPrincipal; } } return new Object(); }
注意:以上并非全部代码,只是重点核心代码,额外的配置参考
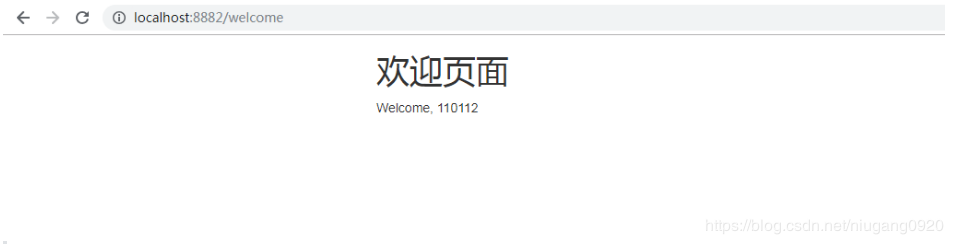
以前显示:
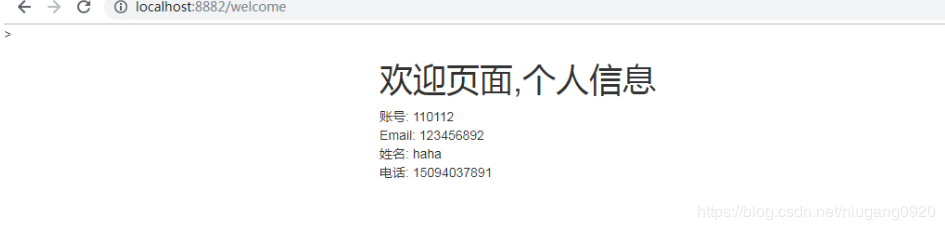
优化后:
https://gitee.com/niugangxy/springcloudAction
https://stackoverflow.com/questions/35056169/how-to-get-custom-user-info-from-oauth2-authorization-server-user-endpoint/35092561
微信公众号
 整合spring cloud云架构 - SSO单点登录之OAuth2.0 根据token获取用户信息(4)")
(十三) 整合spring cloud云架构 - SSO单点登录之OAuth2.0 根据token获取用户信息(4)
上一篇我根据框架中OAuth2.0的使用总结,画了SSO单点登录之OAuth2.0 登出流程,今天我们看一下根据用户token获取yoghurt信息的流程:
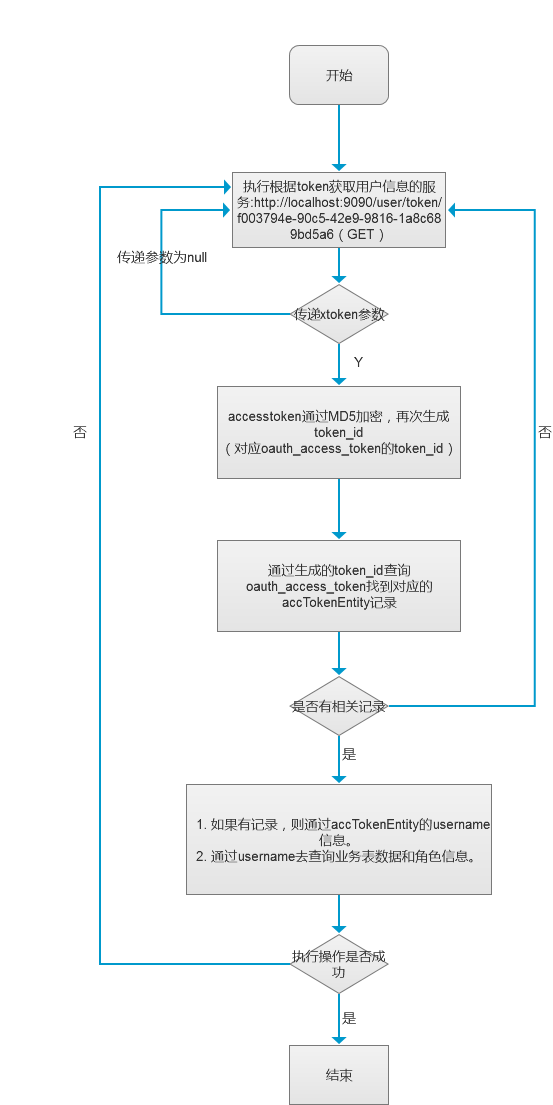
/**
	 * 根据token获取用户信息
	 * @param accessToken
	 * @return
	 * @throws Exception
	 */
	@RequestMapping(value = "/user/token/{accesstoken}", method = RequestMethod.GET)
	public ResponseVO getUserByToken(@PathVariable(value = "accessToken", required = true) String accessToken,@RequestHeader(value = "userId", required = true) Long userId) throws Exception {
		if(StringUtils.isEmpty(accessToken)){
			return UserResponseCode.buildEnumResponseVO(UserResponseCode.RESPONSE_CODE_REQ_CANNOT_EMPTY, null);
		}

		OauthAccessToken oauthAccessToken = userMgrService.getOauthAccessToken(accessToken);
		if(null == oauthAccessToken){
			return UserResponseCode.buildEnumResponseVO(UserResponseCode.RESPONSE_CODE_OAUTH_ACCESSTOKEN_EMPTY, null);
		}

		String userName = oauthAccessToken.getUserName();
		if (StringUtils.isEmpty(userName)) {
			return UserResponseCode.buildEnumResponseVO(UserResponseCode.RESPONSE_CODE_OAUTH_ACCESSTOKEN_EMPTY, null);
		}

		return this.getUser(userName);
	}

        @RequestMapping(path = "/user/get/{userName}", method = RequestMethod.GET)
	public ResponseVO getUser(@PathVariable(value = "userName") String userName) {
		Map<String, Object> returnData = null;
		try {
			User user = userMgrService.getUserByName(userName);
			if (null != user) {
				returnData = new HashMap<String, Object>();
				returnData.put("user", user);
				return UserResponseCode.buildEnumResponseVO(UserResponseCode.RESPONSE_CODE_SUCCESS, returnData);
			}
			return UserResponseCode.buildEnumResponseVO(UserResponseCode.RESPONSE_CODE_SYSTEM_ERROR, null);
		} catch (Exception e) {
			return UserResponseCode.buildEnumResponseVO(UserResponseCode.RESPONSE_CODE_SYSTEM_ERROR, null);
		}

	}
我这里只是简单写了一些登出的代码,我们会在后面的文章中详细贴出所有代码供大家参考,而且会从创建数据库,到执行操作的每一个流程记录下来。
从现在开始,我这边会将近期研发的spring cloud微服务云架构的搭建过程和精髓记录下来,帮助更多有兴趣研发spring cloud框架的朋友,大家来一起探讨spring cloud架构的搭建过程及如何运用于企业项目。
 整合spring cloud云架构 - SSO单点登录之OAuth2.0 根据token获取用户信息(4)")
(十四) 整合spring cloud云架构 - SSO单点登录之OAuth2.0 根据token获取用户信息(4)
上一篇我根据框架中OAuth2.0的使用总结,画了SSO单点登录之OAuth2.0 登出流程,今天我们看一下根据用户token获取yoghurt信息的流程:

       /**
	 * 根据token获取用户信息
	 * @param accessToken
	 * @return
	 * @throws Exception
	 */
	@RequestMapping(value = "/user/token/{accesstoken}", method = RequestMethod.GET)
	public ResponseVO getUserByToken(@PathVariable(value = "accessToken", required = true) String accessToken,@RequestHeader(value = "userId", required = true) Long userId) throws Exception {
		if(StringUtils.isEmpty(accessToken)){
			return UserResponseCode.buildEnumResponseVO(UserResponseCode.RESPONSE_CODE_REQ_CANNOT_EMPTY, null);
		}

		OauthAccessToken oauthAccessToken = userMgrService.getOauthAccessToken(accessToken);
		if(null == oauthAccessToken){
			return UserResponseCode.buildEnumResponseVO(UserResponseCode.RESPONSE_CODE_OAUTH_ACCESSTOKEN_EMPTY, null);
		}

		String userName = oauthAccessToken.getUserName();
		if (StringUtils.isEmpty(userName)) {
			return UserResponseCode.buildEnumResponseVO(UserResponseCode.RESPONSE_CODE_OAUTH_ACCESSTOKEN_EMPTY, null);
		}

		return this.getUser(userName);
	}

        @RequestMapping(path = "/user/get/{userName}", method = RequestMethod.GET)
	public ResponseVO getUser(@PathVariable(value = "userName") String userName) {
		Map<String, Object> returnData = null;
		try {
			User user = userMgrService.getUserByName(userName);
			if (null != user) {
				returnData = new HashMap<String, Object>();
				returnData.put("user", user);
				return UserResponseCode.buildEnumResponseVO(UserResponseCode.RESPONSE_CODE_SUCCESS, returnData);
			}
			return UserResponseCode.buildEnumResponseVO(UserResponseCode.RESPONSE_CODE_SYSTEM_ERROR, null);
		} catch (Exception e) {
			return UserResponseCode.buildEnumResponseVO(UserResponseCode.RESPONSE_CODE_SYSTEM_ERROR, null);
		}

	}
我这里只是简单写了一些登出的代码,我们会在后面的文章中详细贴出所有代码供大家参考,而且会从创建数据库,到执行操作的每一个流程记录下来。
从现在开始,我这边会将近期研发的spring cloud微服务云架构的搭建过程和精髓记录下来,帮助更多有兴趣研发spring cloud框架的朋友,大家来一起探讨spring cloud架构的搭建过程及如何运用于企业项目。
资料和源码来源

Oauth2.0 基于 Spring Authorization Server 模块自定义统一返回对象
介绍
处理 oauth2.0 请求返回结果
- 错误信息处理 AuthenticationFailureHandler
- 成功信息处理 AuthenticationSuccessHandler
基于项目:Spring Authorization Server
1. maven 项目依赖
spring-authorization-server v0.2.2
2. 定义失败信息返回处理
@Slf4j
public class CustomAuthenticationFailureHandler implements AuthenticationFailureHandler {
  private final HttpMessageConverter<Object> responseConverter = new MappingJackson2HttpMessageConverter();

  @Override
  public void onAuthenticationFailure(HttpServletRequest request, HttpServletResponse response, AuthenticationException exception) throws IOException, ServletException {
    log.warn("custom authentication failure: ", exception);

    OAuth2Error error = ((OAuth2AuthenticationException) exception).getError();
    ServletServerHttpResponse httpResponse = new ServletServerHttpResponse(response);
    httpResponse.setStatusCode(HttpStatus.OK);

    R<OAuth2Error> result = R.fail(ResultCode.PARAM_VALID_ERROR);
    result.setData(error);
    responseConverter.write(result, null, httpResponse);
  }
}
3. 定义成果信息返回处理
@Slf4j
public class CustomAuthenticationSuccessHandler implements AuthenticationSuccessHandler {
  private final HttpMessageConverter<Object> accessTokenHttpResponseConverter = new MappingJackson2HttpMessageConverter();

  @Override
  public void onAuthenticationSuccess(HttpServletRequest request, HttpServletResponse response, Authentication authentication) throws IOException, ServletException {
    OAuth2AccessTokenAuthenticationToken accessTokenAuthentication =
        (OAuth2AccessTokenAuthenticationToken) authentication;

    OAuth2AccessToken accessToken = accessTokenAuthentication.getAccessToken();
    OAuth2RefreshToken refreshToken = accessTokenAuthentication.getRefreshToken();
    Map<String, Object> additionalParameters = accessTokenAuthentication.getAdditionalParameters();

    OAuth2AccessTokenResponse.Builder builder =
        OAuth2AccessTokenResponse.withToken(accessToken.getTokenValue())
            .tokenType(accessToken.getTokenType())
            .scopes(accessToken.getScopes());
    if (accessToken.getIssuedAt() != null && accessToken.getExpiresAt() != null) {
      builder.expiresIn(ChronoUnit.SECONDS.between(accessToken.getIssuedAt(), accessToken.getExpiresAt()));
    }
    if (refreshToken != null) {
      builder.refreshToken(refreshToken.getTokenValue());
    }
    if (!CollectionUtils.isEmpty(additionalParameters)) {
      builder.additionalParameters(additionalParameters);
    }
    OAuth2AccessTokenResponse accessTokenResponse = builder.build();
    ServletServerHttpResponse httpResponse = new ServletServerHttpResponse(response);
    //custom R
    R<OAuth2AccessTokenResponse> result = R.data(accessTokenResponse);
    this.accessTokenHttpResponseConverter.write(result, null, httpResponse);
  }
}
4. 配置自定处理类
 SecurityFilterChain defaultSecurityFilterChain(HttpSecurity http) throws Exception {
    OAuth2AuthorizationServerConfigurer<HttpSecurity> authorizationServerConfigurer = new OAuth2AuthorizationServerConfigurer<>();
    authorizationServerConfigurer.tokenEndpoint(endpointConfigurer -> {
       // 配置处理错误返回
      endpointConfigurer.errorResponseHandler(authenticationFailureHandler());
      endpointConfigurer.accessTokenResponseHandler(authenticationSuccessHandler());
    });
    RequestMatcher endpointsMatcher = authorizationServerConfigurer.getEndpointsMatcher();

    http
        .requestMatcher(endpointsMatcher)
        .authorizeRequests(
            authorizeRequests -> {
              try {
                authorizeRequests.antMatchers("/resources").permitAll()
                    .and()
                    .authorizeRequests().anyRequest().authenticated()
                ;
              } catch (Exception e) {
                log.error("===>Default security filter fail: ", e);
              }
            })
        .formLogin(withDefaults())
        .csrf(csrf -> csrf.ignoringRequestMatchers(endpointsMatcher))
        .apply(authorizationServerConfigurer);
    ;
    return http.build();
  }
curl --location --request POST ''http://127.0.0.1:9000/uc/oauth2/token?scope=server1&grant_type=client_credentials'' \
--header ''Authorization: Basic ODAwMDAwMDAxMzpzZWNyZXQ=''
{
    "code": "400",
    "success": false,
    "data": {
        "errorCode": "invalid_scope",
        "description": null,
        "uri": null
    },
    "msg": "参数校验失败"
}
5. 项目完整地址
Oauth2.0 基于 Spring Authorization Server 模块自定义统一返回对象 Github 地址
Oauth2.0 基于 Spring Authorization Server 模块自定义统一返回对象 Gitee 地址

OAuth2.0协议专区-SpringCloud+zuul+oauth2 实现服务统一认证
第一种配置方式:zuul只负责转发,流控等(不负责认证)
1.介绍
(1) eureka服务发现,各服务配置就不发了,只看关于认证这块;
2 配置认证服务器
(1)添加依赖(oauth已经包含了security)
<dependency>
   <groupId>org.springframework.cloud</groupId>
   <artifactId>spring-cloud-starter-oauth2</artifactId>
</dependency>
(2)配置认证
@Configuration
public class MyConfig {

    //设置用户信息处理类,这里为了测试使用密码123,用户名随意
    @Component
    public static class MyUserDetailsService implements UserDetailsService {

     @Autowired
        private PasswordEncoder passwordEncoder;

        @Override
        public UserDetails loadUserByUsername(String username) throws UsernameNotFoundException {
            return new User(username, passwordEncoder.encode("123"),
                    AuthorityUtils.commaSeparatedStringToAuthorityList("ROLE_USER"));
        }
    }

    //认证服务器
    @EnableAuthorizationServer
    @Configuration
    public static class Authorization extends AuthorizationServerConfigurerAdapter {

        @Autowired
        AuthenticationManager authenticationManager;
        @Autowired
        BCryptPasswordEncoder bCryptPasswordEncoder;
        @Autowired
        MyUserDetailsService myUserDetailsService;

        //为了测试客户端与凭证存储在内存(生产应该用数据库来存储,oauth有标准数据库模板)
        @Override
        public void configure(ClientDetailsServiceConfigurer clients) throws Exception {
            clients.inMemory()
                    .withClient("client") // client_id
                    .secret(bCryptPasswordEncoder.encode("123")) // client_secret
                    .authorizedGrantTypes("authorization_code", "password") // 该client允许的授权类型
                    .scopes("app"); // 允许的授权范围
        }

        //authenticationManager配合password模式使用,tokenstore生产可用redis
        @Override
        public void configure(AuthorizationServerEndpointsConfigurer endpoints) throws Exception {
            endpoints.authenticationManager(authenticationManager)
                    .tokenStore(new InMemoryTokenStore())
                    .userDetailsService(myUserDetailsService);
        }

        //配置token状态查询
        @Override
        public void configure(AuthorizationServerSecurityConfigurer security) throws Exception {
            security.tokenKeyAccess("permitAll()");
            security.checkTokenAccess("isAuthenticated()");
        }
    }

    //认证服务器需配合Security使用
    @Configuration
    public static class SecurityConfig extends WebSecurityConfigurerAdapter {

     @Bean
        @Override
        public AuthenticationManager authenticationManagerBean() throws Exception {
            return super.authenticationManagerBean();
        }

        @Bean
        public BCryptPasswordEncoder passwordEncoder() {
            return new BCryptPasswordEncoder();
        }

        //这里只验证是否带有token的失败返回authenticationEntryPoint
        @Override
        protected void configure(HttpSecurity http) throws Exception {
              http.httpBasic().and()
                    .csrf().disable()
                    .exceptionHandling()
                    .authenticationEntryPoint((req, resp, exception) -> {
                        resp.setContentType(MediaType.APPLICATION_JSON_UTF8_VALUE);
                        resp.getWriter().write(new ObjectMapper().writeValueAsString(new HashMap() {{
                            put("status", 0);
                            put("error", "没有权限");
                        }}));
                    }).and()
             .authorizeRequests().anyRequest().authenticated();
        }
    }

    //配置资源处理器,为了其他客户端访问该登陆用户信息等
    @Configuration
    @EnableResourceServer
    public class ResourceServerConfiguration extends ResourceServerConfigurerAdapter {
        @Override
        public void configure(HttpSecurity http) throws Exception {
            http.csrf().disable().exceptionHandling().authenticationEntryPoint((req, resp, exception) -> {
                resp.setContentType(MediaType.APPLICATION_JSON_UTF8_VALUE);
                resp.getWriter().write(new ObjectMapper().writeValueAsString(new HashMap() {{
                    put("status", 0);
                    put("error", "没有权限");
                }}));
            }).and().authorizeRequests().anyRequest().authenticated();
        }
    }
}
(3)提供客户信息
@RestController
public class ResourceWeb {

    @GetMapping("/member")
    public Principal user(Principal member) {
        //获取当前用户信息
        return member;
    }
}
(4)流程
这里用的是密码方式,一般用于本地服务自身资源的调用;
(client,secret)代表客户端账号密码,在该测试中,这个客户端其实就表示本地的服务.如果是第三方,则申请到账号密码后,可以在得到用户授权后进行资源调用;
(username,password)就是本服务的用户主体了,所有客户端获取资源都需要本地用户的登陆成功授权后方可获取,所以用到了security的登陆策略;
3.配置资源服务器(本地资源)
(1)同样添加oauth依赖
(2)配置远程认证服务:
security:
  oauth2:
    resource:
      user-info-uri: http://localhost:8082/member
      prefer-token-info: false
@Configuration
public class MyConfig {

    //配置资源服务器
    @Configuration
    @EnableResourceServer
    public class ResourceServerConfiguration extends ResourceServerConfigurerAdapter {
        @Override
        public void configure(HttpSecurity http) throws Exception {
            http.csrf().disable().httpBasic().disable().exceptionHandling().authenticationEntryPoint((req, resp, exception) -> {
                resp.setContentType(MediaType.APPLICATION_JSON_UTF8_VALUE);
                resp.getWriter().write(new ObjectMapper().writeValueAsString(new HashMap() {{
                    put("status", 0);
                    put("error", "没有权限");
                }}));
            })
            .and().authorizeRequests().antMatchers("/noauth").permitAll()
            .and().authorizeRequests().anyRequest().authenticated();
        }
    }
}
4.配置zuul
zuul:
  #routes:
  #  MECHANT:
  #    service-id: MECHANT
  #    path: /mechant/**
  strip-prefix: true    #当为false时,请求地址->MECHANT->http://localhost:8081/api/mechant/ping,返回404
  prefix: /api          #请求前缀
  sensitive-headers:   #此处不写则无法携带header;如果客户端在发请求是带了X-ABC,那么X-ABC不会传递给下游服务
  #ignoredHeaders: X-ABC    #如果客户端在发请求是带了X-ABC,那么X-ABC依然会传递给下游服务。但是如果下游服务再转发就会被过滤
5.测试
(1)申请token(使用zuul访问)


(2)使用token(使用zuul访问)

我们今天的关于基于Spring oauth2.0统一认证登录,返回自定义用户信息和spring oauth2的自定义认证的分享已经告一段落,感谢您的关注,如果您想了解更多关于(十三) 整合spring cloud云架构 - SSO单点登录之OAuth2.0 根据token获取用户信息(4)、(十四) 整合spring cloud云架构 - SSO单点登录之OAuth2.0 根据token获取用户信息(4)、Oauth2.0 基于 Spring Authorization Server 模块自定义统一返回对象、OAuth2.0协议专区-SpringCloud+zuul+oauth2 实现服务统一认证的相关信息,请在本站查询。
本文标签:


