对于ReactNative:了解相机第三方库react-native-camera的使用感兴趣的读者,本文将提供您所需要的所有信息,我们将详细讲解reactnativecameraroll,并且为您提
对于ReactNative: 了解相机第三方库 react-native-camera 的使用感兴趣的读者,本文将提供您所需要的所有信息,我们将详细讲解react native cameraroll,并且为您提供关于RactNative---react-native-storage使用、React Native -19.React Native Timer定时器的使用、React Native App第三方库、React Native 基于react-native-camera实现扫码功能的宝贵知识。
本文目录一览:- ReactNative: 了解相机第三方库 react-native-camera 的使用(react native cameraroll)
- RactNative---react-native-storage使用
- React Native -19.React Native Timer定时器的使用
- React Native App第三方库
- React Native 基于react-native-camera实现扫码功能
")
ReactNative: 了解相机第三方库 react-native-camera 的使用(react native cameraroll)
一、简介
在前一篇文章中,初步介绍了 RN 提供的关于相机功能 CameraRoll 的使用了。很多时候,这种最基础的 API 有时很难满足功能需求,此时,如果不想重复造轮子,我们可以选择一个完善好用的第三库。react-native-camera 就是一个非常不错的关于相机功能的第三方库,使用这个框架基本能满足大多数的需求,现在来简单研究一下。
二、安装
1、同样地道理,使用之前得先安装,还是采用 npm 安装吧。如下:
//安装react-native-camera
npm install react-native-camera@latest --save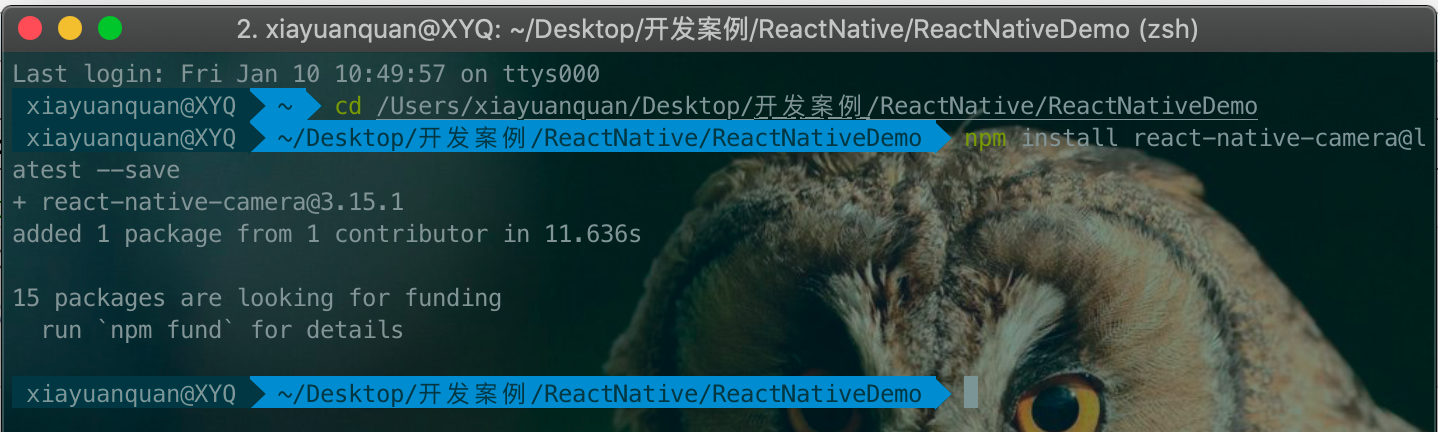
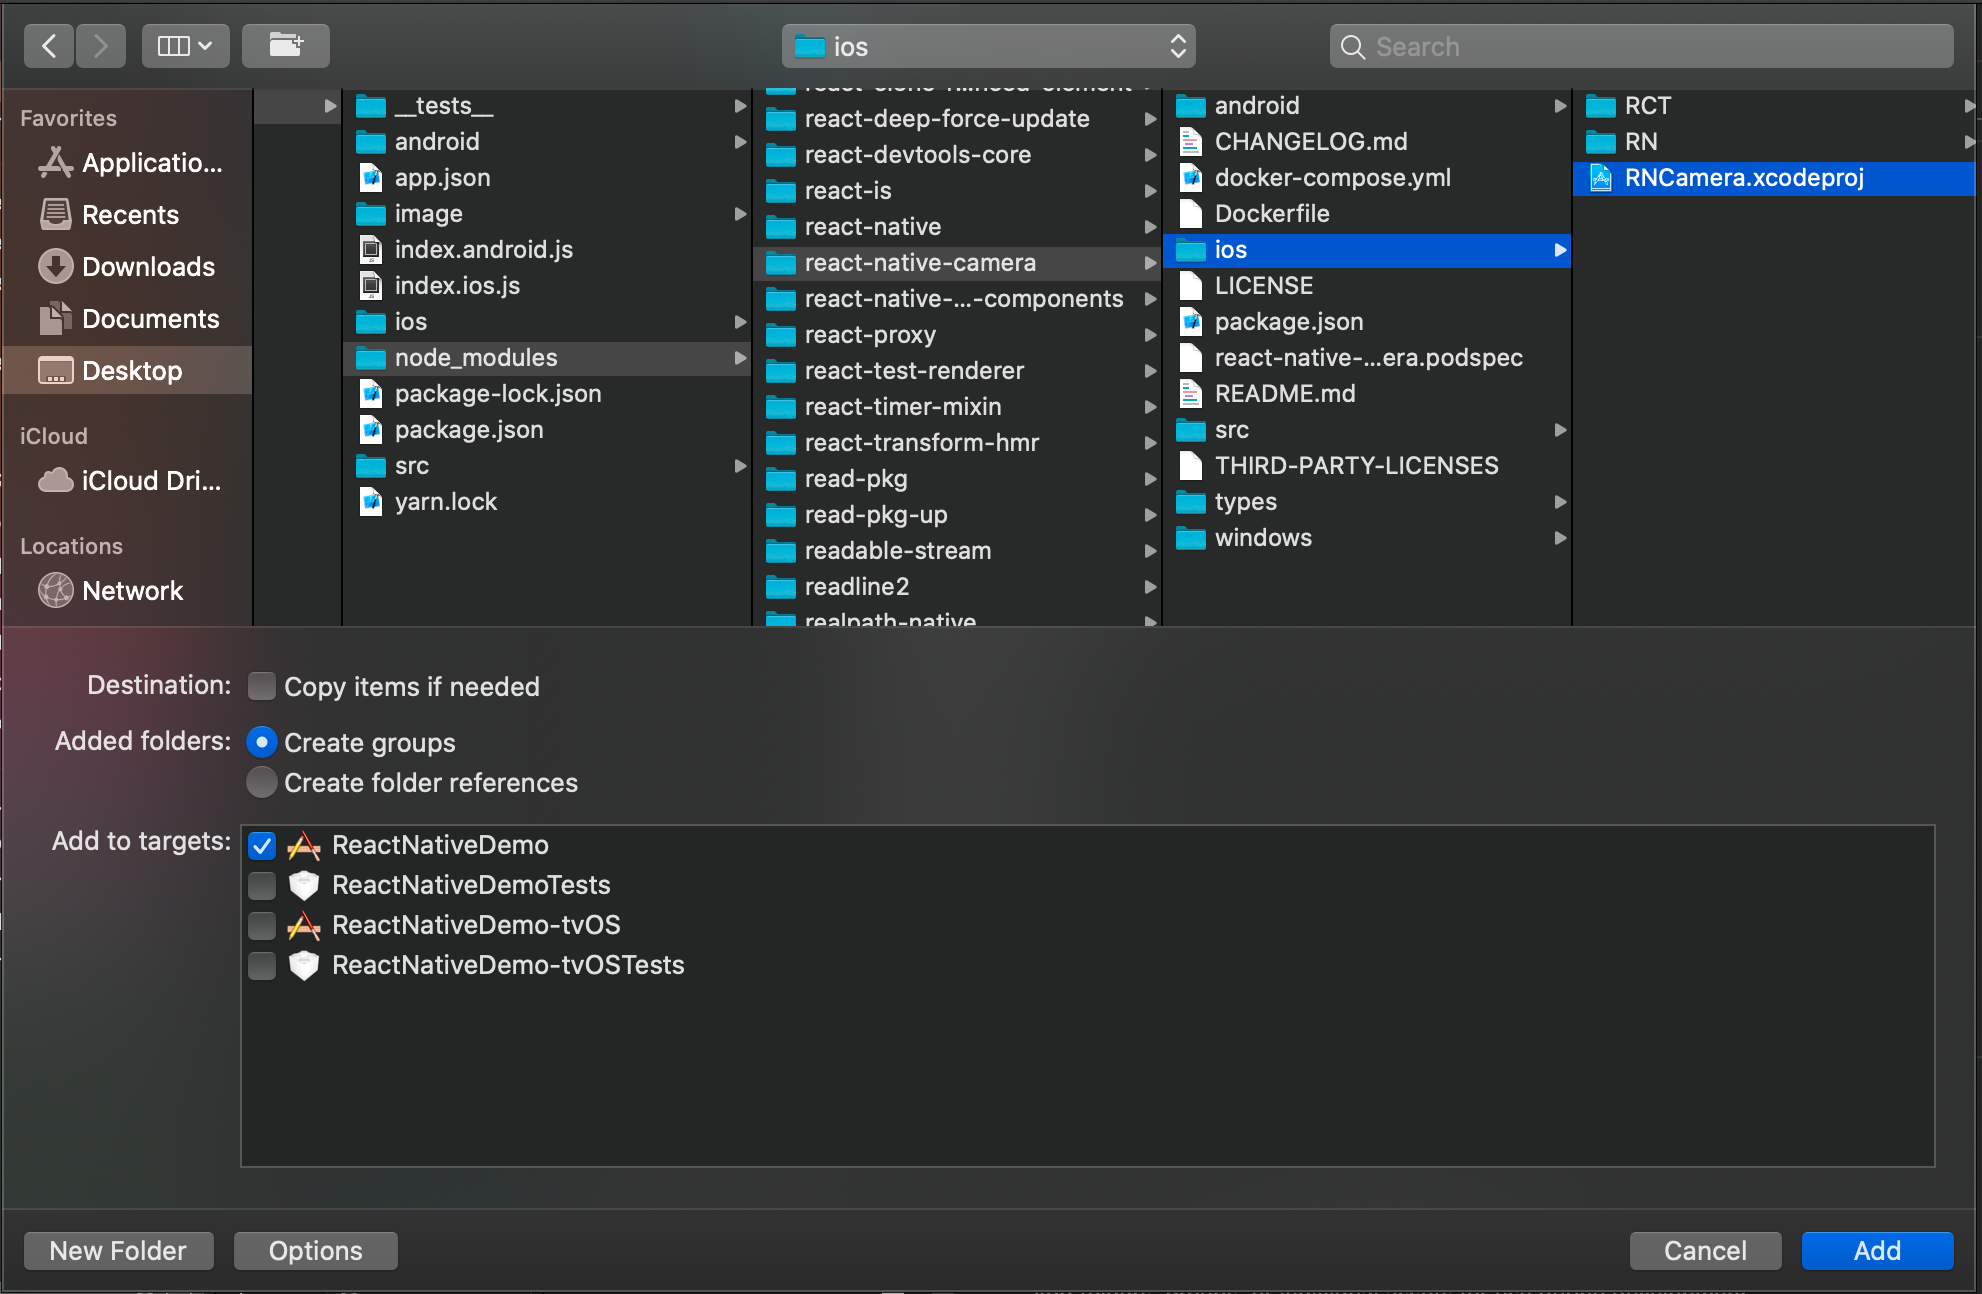
2、安装完成之后,需要添加工程,进行编译配置。执行完了这些步骤后,就完成了第三方库的添加了。
(1) 打开 xcode,找到 Libraries 文件,添加安装的 react-native-camera 目录下的 RNCamera.xcodeproj 工程
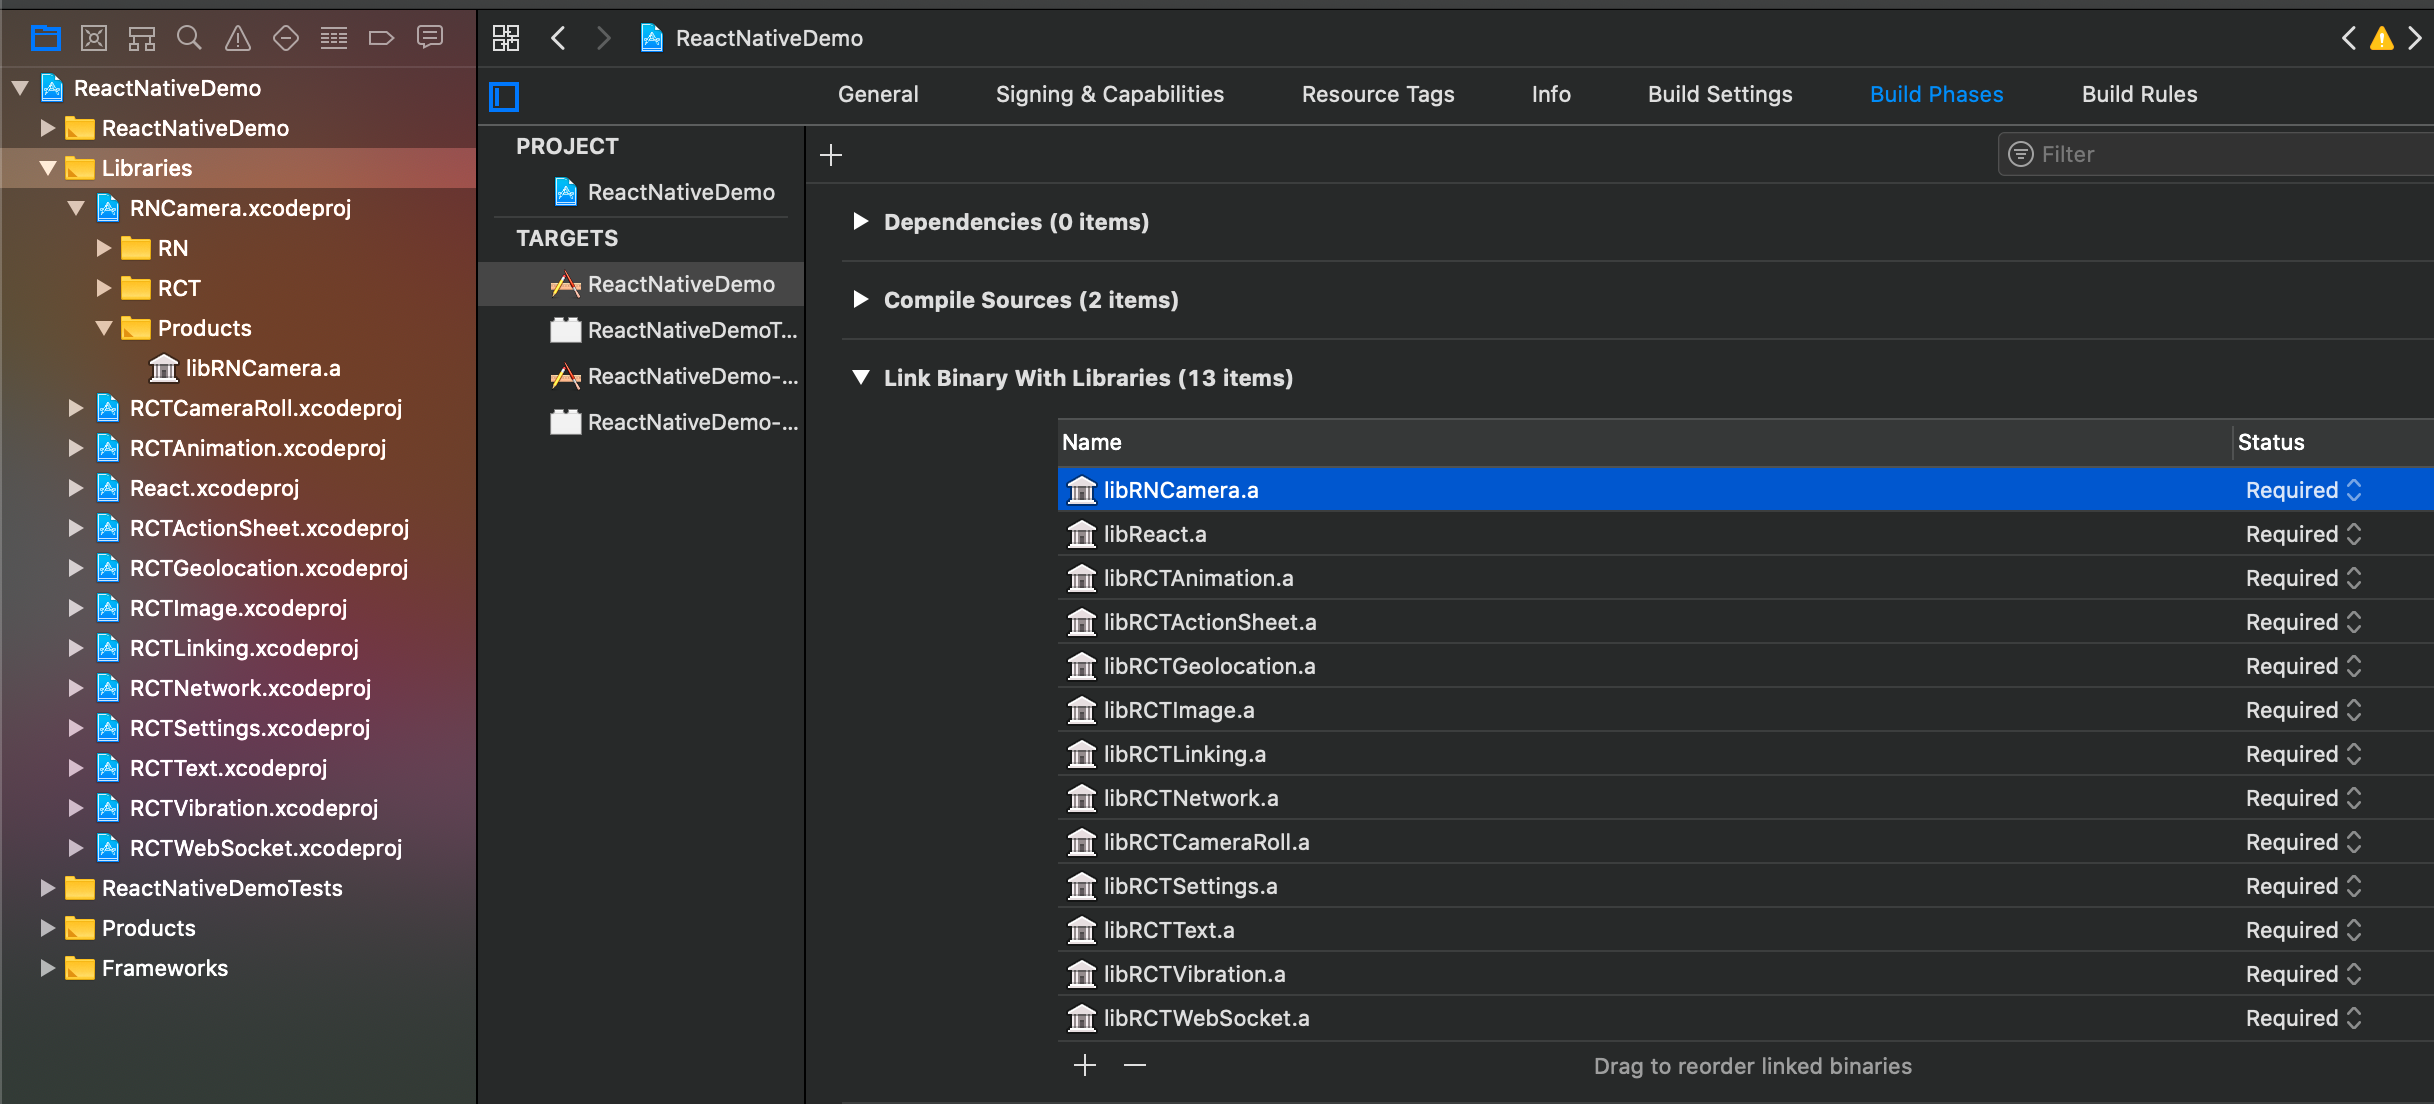
(2) 添加 libRNCamera.a 静态库
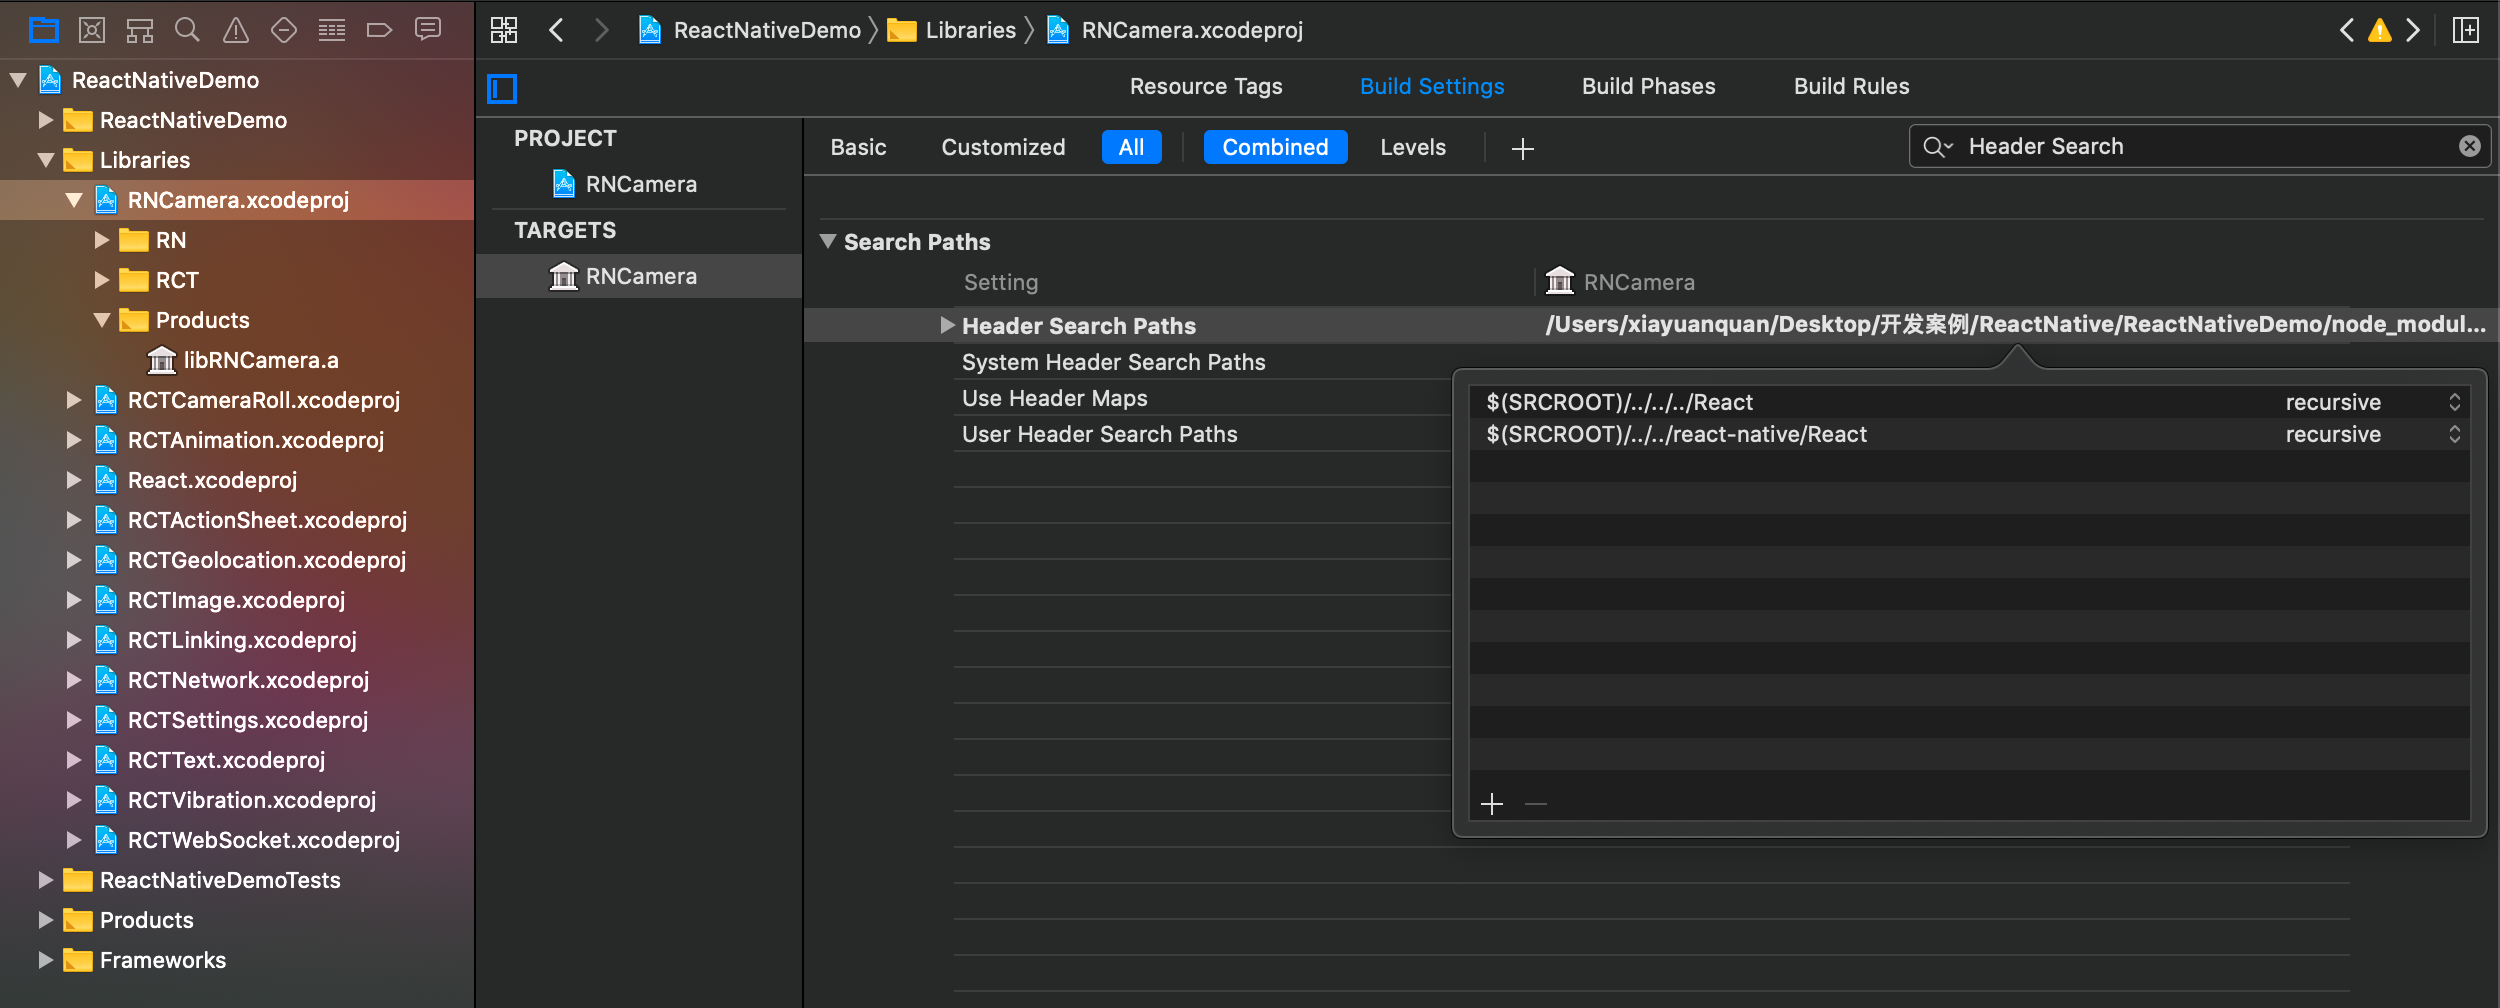
(3) 找到并选中添加的 RNCamera.xcodeproj 工程,配置 Build Settings 选项卡中的 Header Search Paths 路径
三、API
1、类 RNCamera 的定义如下:包含静态常量和函数
//类RNCamera
//继承RNCameraProps属性和ViewProperties属性
export class RNCamera extends Component<RNCameraProps & ViewProperties> {

  //静态常量(属性),只读,不可修改
  static Constants: Constants;

  _cameraRef: null | NativeMethodsMixinStatic;
  _cameraHandle: ReturnType<typeof findNodeHandle>;

  //异步拍照
  //参数 TakePictureOptions:表示的一下拍照时相机的配置选项
  //返回值 Promise: 异步函数,TakePictureResponse为拍照的响应
  takePictureAsync(options?: TakePictureOptions): Promise<TakePictureResponse>;

  //异步录制
  //参数 RecordOptions:表示的一下录制时相机的配置选项
  //返回值 Promise: 异步函数,RecordResponse为录制的响应
  recordAsync(options?: RecordOptions): Promise<RecordResponse>;

  //刷新认证状态
  //返回值 Promise: 异步函数,void无结果
  refreshAuthorizationStatus(): Promise<void>;

  //停止录制
  stopRecording(): void;

  //暂停预览
  pausePreview(): void;

  //恢复预览
  resumePreview(): void;

  //获取可用的图片的尺寸
  //返回值 Promise: 异步函数,字符串结果
  getAvailablePictureSizes(): Promise<string[]>;

  /** Android only */
  //是否支持异步比率
  getSupportedRatiosAsync(): Promise<string[]>;

  /** iOS only */
  //是否正在录制
  isRecording(): Promise<boolean>;
}
2、关于 RNCameraProps、Constants、TakePictureOptions、TakePictureResponse、RecordOptions、RecordResponse 这些对象的定义,分别如下:
RNCameraProps:相机的配置属性
export interface RNCameraProps {
  children?: ReactNode | FaCC;

  autoFocus?: keyof AutoFocus;
  autoFocusPointOfInterest?: Point;
  /* iOS only */
  onSubjectAreaChanged?: (event: { nativeEvent: { prevPoint: { x: number; y: number; } } }) => void;
  type?: keyof CameraType;
  flashMode?: keyof FlashMode;
  notAuthorizedView?: JSX.Element;
  pendingAuthorizationView?: JSX.Element;
  useCamera2Api?: boolean;
  exposure?: number;
  whiteBalance?: keyof WhiteBalance;
  captureAudio?: boolean;

  onCameraReady?(): void;
  onStatusChange?(event: {
    cameraStatus: keyof CameraStatus;
    recordAudioPermissionStatus: keyof RecordAudioPermissionStatus;
  }): void;
  onMountError?(error: { message: string }): void;

  /** iOS only */
  onAudioInterrupted?(): void;
  onAudioConnected?(): void;

  /** Value: float from 0 to 1.0 */
  zoom?: number;
  /** iOS only. float from 0 to any. Locks the max zoom value to the provided value
    A value <= 1 will use the camera''s max zoom, while a value > 1
    will use that value as the max available zoom
  **/
  maxZoom?: number;
  /** Value: float from 0 to 1.0 */
  focusDepth?: number;

  // -- BARCODE PROPS
  barCodeTypes?: Array<keyof BarCodeType>;
  googleVisionBarcodeType?: Constants[''GoogleVisionBarcodeDetection''][''BarcodeType''];
  googleVisionBarcodeMode?: Constants[''GoogleVisionBarcodeDetection''][''BarcodeMode''];
  onBarCodeRead?(event: {
    data: string;
    rawData?: string;
    type: keyof BarCodeType;
    /**
     * @description For Android use `{ width: number, height: number, origin: Array<Point<string>> }`
     * @description For iOS use `{ origin: Point<string>, size: Size<string> }`
     */
    bounds: { width: number, height: number, origin: Array<Point<string>> } | { origin: Point<string>; size: Size<string> };
  }): void;

  onGoogleVisionBarcodesDetected?(event: {
    barcodes: Barcode[];
  }): void;

  // -- FACE DETECTION PROPS

  onFacesDetected?(response: { faces: Face[] }): void;
  onFaceDetectionError?(response: { isOperational: boolean }): void;
  faceDetectionMode?: keyof FaceDetectionMode;
  faceDetectionLandmarks?: keyof FaceDetectionLandmarks;
  faceDetectionClassifications?: keyof FaceDetectionClassifications;
  trackingEnabled?: boolean;

  onTextRecognized?(response: { textBlocks: TrackedTextFeature[] }): void;
  // -- ANDROID ONLY PROPS
  /** Android only */
  ratio?: string;
  /** Android only - Deprecated */
  permissionDialogTitle?: string;
  /** Android only - Deprecated */
  permissionDialogMessage?: string;
  /** Android only */
  playSoundOnCapture?: boolean;

  androidCameraPermissionOptions?: {
    title: string;
    message: string;
    buttonPositive?: string;
    buttonNegative?: string;
    buttonNeutral?: string;
  } | null;

  androidRecordAudioPermissionOptions?: {
    title: string;
    message: string;
    buttonPositive?: string;
    buttonNegative?: string;
    buttonNeutral?: string;
  } | null;

  // -- IOS ONLY PROPS
  defaultVideoQuality?: keyof VideoQuality;
  /* if true, audio session will not be released on component unmount */
  keepAudioSession?: boolean;
}
Constants:相机的静态常量属性,都是只读的
export interface Constants {
  CameraStatus: CameraStatus;
  AutoFocus: AutoFocus;
  FlashMode: FlashMode;
  VideoCodec: VideoCodec;
  Type: CameraType;
  WhiteBalance: WhiteBalance;
  VideoQuality: VideoQuality;
  BarCodeType: BarCodeType;
  FaceDetection: {
    Classifications: FaceDetectionClassifications;
    Landmarks: FaceDetectionLandmarks;
    Mode: FaceDetectionMode;
  };
  GoogleVisionBarcodeDetection: {
    BarcodeType: GoogleVisionBarcodeType;
    BarcodeMode: GoogleVisionBarcodeMode;
  };
  Orientation: {
    auto: ''auto'';
    landscapeLeft: ''landscapeLeft'';
    landscapeRight: ''landscapeRight'';
    portrait: ''portrait'';
    portraitUpsideDown: ''portraitUpsideDown'';
  };
}
TakePictureOptions:拍照时的配置选项
interface TakePictureOptions {
  quality?: number;
  orientation?: keyof Orientation | OrientationNumber;
  base64?: boolean;
  exif?: boolean;
  width?: number;
  mirrorImage?: boolean;
  doNotSave?: boolean;
  pauseAfterCapture?: boolean;
  writeExif?: boolean | { [name: string]: any };

  /** Android only */
  fixOrientation?: boolean;

  /** iOS only */
  forceUpOrientation?: boolean;
}
TakePictureResponse:拍照后的响应结果
export interface TakePictureResponse {
  width: number;
  height: number;
  uri: string;
  base64?: string;
  exif?: { [name: string]: any };
  pictureOrientation: number;
  deviceOrientation: number;
}
RecordOptions:录制时的配置选项
interface RecordOptions {
  quality?: keyof VideoQuality;
  orientation?: keyof Orientation | OrientationNumber;
  maxDuration?: number;
  maxFileSize?: number;
  mute?: boolean;
  mirrorVideo?: boolean;
  path?: string;
  videoBitrate?: number;

  /** iOS only */
  codec?: keyof VideoCodec | VideoCodec[keyof VideoCodec];
}
RecordResponse:录制后的响应结果
export interface RecordResponse {
  /** Path to the video saved on your app''s cache directory. */
  uri: string;
  videoOrientation: number;
  deviceOrientation: number;
  isRecordingInterrupted: boolean;
  /** iOS only */
  codec: VideoCodec[keyof VideoCodec];
}
3、更多的介绍请查看完整文件,如下:


// Type definitions for react-native-camera 1.0
// Definitions by: Felipe Constantino <https://github.com/fconstant>
//                 Trent Jones <https://github.com/FizzBuzz791>
// If you modify this file, put your GitHub info here as well (for easy contacting purposes)

/*
 * Author notes:
 * I''ve tried to find a easy tool to convert from Flow to Typescript definition files (.d.ts).
 * So we woudn''t have to do it manually... Sadly, I haven''t found it.
 *
 * If you are seeing this from the future, please, send us your cutting-edge technology :) (if it exists)
 */
import { Component, ReactNode } from ''react'';
import { NativeMethodsMixinStatic, ViewProperties, findNodeHandle } from ''react-native'';

type Orientation = Readonly<{
  auto: any;
  landscapeLeft: any;
  landscapeRight: any;
  portrait: any;
  portraitUpsideDown: any;
}>;
type OrientationNumber = 1 | 2 | 3 | 4;
type AutoFocus = Readonly<{ on: any; off: any }>;
type FlashMode = Readonly<{ on: any; off: any; torch: any; auto: any }>;
type CameraType = Readonly<{ front: any; back: any }>;
type WhiteBalance = Readonly<{
  sunny: any;
  cloudy: any;
  shadow: any;
  incandescent: any;
  fluorescent: any;
  auto: any;
}>;
type BarCodeType = Readonly<{
  aztec: any;
  code128: any;
  code39: any;
  code39mod43: any;
  code93: any;
  ean13: any;
  ean8: any;
  pdf417: any;
  qr: any;
  upc_e: any;
  interleaved2of5: any;
  itf14: any;
  datamatrix: any;
}>;
type VideoQuality = Readonly<{
  ''2160p'': any;
  ''1080p'': any;
  ''720p'': any;
  ''480p'': any;
  ''4:3'': any;
  /** iOS Only. Android not supported. */
  ''288p'': any;
}>;
type VideoCodec = Readonly<{
  H264: symbol;
  JPEG: symbol;
  HVEC: symbol;
  AppleProRes422: symbol;
  AppleProRes4444: symbol;
}>;

type FaceDetectionClassifications = Readonly<{ all: any; none: any }>;
type FaceDetectionLandmarks = Readonly<{ all: any; none: any }>;
type FaceDetectionMode = Readonly<{ fast: any; accurate: any }>;
type GoogleVisionBarcodeType = Readonly<{
  CODE_128: any;
  CODE_39: any;
  CODABAR: any;
  DATA_MATRIX: any;
  EAN_13: any;
  EAN_8: any;
  ITF: any;
  QR_CODE: any;
  UPC_A: any;
  UPC_E: any;
  PDF417: any;
  AZTEC: any;
  ALL: any;
}>;
type GoogleVisionBarcodeMode = Readonly<{ NORMAL: any; ALTERNATE: any; INVERTED: any }>;

// FaCC (Function as Child Components)
type Self<T> = { [P in keyof T]: P };
type CameraStatus = Readonly<Self<{ READY: any; PENDING_AUTHORIZATION: any; NOT_AUTHORIZED: any }>>;
type RecordAudioPermissionStatus = Readonly<
  Self<{
    AUTHORIZED: ''AUTHORIZED'';
    PENDING_AUTHORIZATION: ''PENDING_AUTHORIZATION'';
    NOT_AUTHORIZED: ''NOT_AUTHORIZED'';
  }>
>;
type FaCC = (
  params: {
    camera: RNCamera;
    status: keyof CameraStatus;
    recordAudioPermissionStatus: keyof RecordAudioPermissionStatus;
  },
) => JSX.Element;

export interface Constants {
  CameraStatus: CameraStatus;
  AutoFocus: AutoFocus;
  FlashMode: FlashMode;
  VideoCodec: VideoCodec;
  Type: CameraType;
  WhiteBalance: WhiteBalance;
  VideoQuality: VideoQuality;
  BarCodeType: BarCodeType;
  FaceDetection: {
    Classifications: FaceDetectionClassifications;
    Landmarks: FaceDetectionLandmarks;
    Mode: FaceDetectionMode;
  };
  GoogleVisionBarcodeDetection: {
    BarcodeType: GoogleVisionBarcodeType;
    BarcodeMode: GoogleVisionBarcodeMode;
  };
  Orientation: {
    auto: ''auto'';
    landscapeLeft: ''landscapeLeft'';
    landscapeRight: ''landscapeRight'';
    portrait: ''portrait'';
    portraitUpsideDown: ''portraitUpsideDown'';
  };
}

export interface RNCameraProps {
  children?: ReactNode | FaCC;

  autoFocus?: keyof AutoFocus;
  autoFocusPointOfInterest?: Point;
  /* iOS only */
  onSubjectAreaChanged?: (event: { nativeEvent: { prevPoint: { x: number; y: number; } } }) => void;
  type?: keyof CameraType;
  flashMode?: keyof FlashMode;
  notAuthorizedView?: JSX.Element;
  pendingAuthorizationView?: JSX.Element;
  useCamera2Api?: boolean;
  exposure?: number;
  whiteBalance?: keyof WhiteBalance;
  captureAudio?: boolean;

  onCameraReady?(): void;
  onStatusChange?(event: {
    cameraStatus: keyof CameraStatus;
    recordAudioPermissionStatus: keyof RecordAudioPermissionStatus;
  }): void;
  onMountError?(error: { message: string }): void;

  /** iOS only */
  onAudioInterrupted?(): void;
  onAudioConnected?(): void;

  /** Value: float from 0 to 1.0 */
  zoom?: number;
  /** iOS only. float from 0 to any. Locks the max zoom value to the provided value
    A value <= 1 will use the camera''s max zoom, while a value > 1
    will use that value as the max available zoom
  **/
  maxZoom?: number;
  /** Value: float from 0 to 1.0 */
  focusDepth?: number;

  // -- BARCODE PROPS
  barCodeTypes?: Array<keyof BarCodeType>;
  googleVisionBarcodeType?: Constants[''GoogleVisionBarcodeDetection''][''BarcodeType''];
  googleVisionBarcodeMode?: Constants[''GoogleVisionBarcodeDetection''][''BarcodeMode''];
  onBarCodeRead?(event: {
    data: string;
    rawData?: string;
    type: keyof BarCodeType;
    /**
     * @description For Android use `{ width: number, height: number, origin: Array<Point<string>> }`
     * @description For iOS use `{ origin: Point<string>, size: Size<string> }`
     */
    bounds: { width: number, height: number, origin: Array<Point<string>> } | { origin: Point<string>; size: Size<string> };
  }): void;

  onGoogleVisionBarcodesDetected?(event: {
    barcodes: Barcode[];
  }): void;

  // -- FACE DETECTION PROPS

  onFacesDetected?(response: { faces: Face[] }): void;
  onFaceDetectionError?(response: { isOperational: boolean }): void;
  faceDetectionMode?: keyof FaceDetectionMode;
  faceDetectionLandmarks?: keyof FaceDetectionLandmarks;
  faceDetectionClassifications?: keyof FaceDetectionClassifications;
  trackingEnabled?: boolean;

  onTextRecognized?(response: { textBlocks: TrackedTextFeature[] }): void;
  // -- ANDROID ONLY PROPS
  /** Android only */
  ratio?: string;
  /** Android only - Deprecated */
  permissionDialogTitle?: string;
  /** Android only - Deprecated */
  permissionDialogMessage?: string;
  /** Android only */
  playSoundOnCapture?: boolean;

  androidCameraPermissionOptions?: {
    title: string;
    message: string;
    buttonPositive?: string;
    buttonNegative?: string;
    buttonNeutral?: string;
  } | null;

  androidRecordAudioPermissionOptions?: {
    title: string;
    message: string;
    buttonPositive?: string;
    buttonNegative?: string;
    buttonNeutral?: string;
  } | null;

  // -- IOS ONLY PROPS
  defaultVideoQuality?: keyof VideoQuality;
  /* if true, audio session will not be released on component unmount */
  keepAudioSession?: boolean;
}

interface Point<T = number> {
  x: T;
  y: T;
}

interface Size<T = number> {
  width: T;
  height: T;
}

export interface Barcode {
  bounds: {
    size: Size;
    origin: Point;
  };
  data: string;
  dataRaw: string;
  type: BarcodeType;
  format?: string;
  addresses?: {
    addressesType?: "UNKNOWN" | "Work" | "Home";
    addressLines?: string[];
  }[];
  emails?: Email[];
  phones?: Phone[];
  urls?: string[];
  name?: {
    firstName?: string;
    lastName?: string;
    middleName?: string;
    prefix?:string;
    pronounciation?:string;
    suffix?:string;
    formattedName?: string;
  };
  phone?: Phone;
  organization?: string;
  latitude?: number;
  longitude?: number;
  ssid?: string;
  password?: string;
  encryptionType?: string;
  title?: string;
  url?: string;
  firstName?: string;
  middleName?: string;
  lastName?: string;
  gender?: string;
  addressCity?: string;
  addressState?: string;
  addressStreet?: string;
  addressZip?: string;
  birthDate?: string;
  documentType?: string;
  licenseNumber?: string;
  expiryDate?: string;
  issuingDate?: string;
  issuingCountry?: string;
  eventDescription?: string;
  location?: string;
  organizer?: string;
  status?: string;
  summary?: string;
  start?: string;
  end?: string;
  email?: Email;
  phoneNumber?: string;
  message?: string;
}

export type BarcodeType =
  |"EMAIL"
  |"PHONE"
  |"CALENDAR_EVENT"
  |"DRIVER_LICENSE"
  |"GEO"
  |"SMS"
  |"CONTACT_INFO"
  |"WIFI"
  |"TEXT"
  |"ISBN"
  |"PRODUCT"
  |"URL"

export interface Email {
  address?: string;
  body?: string;
  subject?: string;
  emailType?: "UNKNOWN" | "Work" | "Home";
}

export interface Phone {
  number?: string;
  phoneType?: "UNKNOWN" | "Work" | "Home" | "Fax" | "Mobile";
}

export interface Face {
  faceID?: number;
  bounds: {
    size: Size;
    origin: Point;
  };
  smilingProbability?: number;
  leftEarPosition?: Point;
  rightEarPosition?: Point;
  leftEyePosition?: Point;
  leftEyeOpenProbability?: number;
  rightEyePosition?: Point;
  rightEyeOpenProbability?: number;
  leftCheekPosition?: Point;
  rightCheekPosition?: Point;
  leftMouthPosition?: Point;
  mouthPosition?: Point;
  rightMouthPosition?: Point;
  bottomMouthPosition?: Point;
  noseBasePosition?: Point;
  yawAngle?: number;
  rollAngle?: number;
}

export interface TrackedTextFeature {
  type: ''block'' | ''line'' | ''element'';
  bounds: {
    size: Size;
    origin: Point;
  };
  value: string;
  components: TrackedTextFeature[];
}

interface TakePictureOptions {
  quality?: number;
  orientation?: keyof Orientation | OrientationNumber;
  base64?: boolean;
  exif?: boolean;
  width?: number;
  mirrorImage?: boolean;
  doNotSave?: boolean;
  pauseAfterCapture?: boolean;
  writeExif?: boolean | { [name: string]: any };

  /** Android only */
  fixOrientation?: boolean;

  /** iOS only */
  forceUpOrientation?: boolean;
}

export interface TakePictureResponse {
  width: number;
  height: number;
  uri: string;
  base64?: string;
  exif?: { [name: string]: any };
  pictureOrientation: number;
  deviceOrientation: number;
}

interface RecordOptions {
  quality?: keyof VideoQuality;
  orientation?: keyof Orientation | OrientationNumber;
  maxDuration?: number;
  maxFileSize?: number;
  mute?: boolean;
  mirrorVideo?: boolean;
  path?: string;
  videoBitrate?: number;

  /** iOS only */
  codec?: keyof VideoCodec | VideoCodec[keyof VideoCodec];
}

export interface RecordResponse {
  /** Path to the video saved on your app''s cache directory. */
  uri: string;
  videoOrientation: number;
  deviceOrientation: number;
  isRecordingInterrupted: boolean;
  /** iOS only */
  codec: VideoCodec[keyof VideoCodec];
}

export class RNCamera extends Component<RNCameraProps & ViewProperties> {
  static Constants: Constants;

  _cameraRef: null | NativeMethodsMixinStatic;
  _cameraHandle: ReturnType<typeof findNodeHandle>;

  takePictureAsync(options?: TakePictureOptions): Promise<TakePictureResponse>;
  recordAsync(options?: RecordOptions): Promise<RecordResponse>;
  refreshAuthorizationStatus(): Promise<void>;
  stopRecording(): void;
  pausePreview(): void;
  resumePreview(): void;
  getAvailablePictureSizes(): Promise<string[]>;

  /** Android only */
  getSupportedRatiosAsync(): Promise<string[]>;

  /** iOS only */
  isRecording(): Promise<boolean>;
}

interface DetectionOptions {
  mode?: keyof FaceDetectionMode;
  detectLandmarks?: keyof FaceDetectionLandmarks;
  runClassifications?: keyof FaceDetectionClassifications;
}

export class FaceDetector {
  private constructor();
  static Constants: Constants[''FaceDetection''];
  static detectFacesAsync(uri: string, options?: DetectionOptions): Promise<Face[]>;
}

// -- DEPRECATED CONTENT BELOW

/**
 * @deprecated As of 1.0.0 release, RCTCamera is deprecated. Please use RNCamera for the latest fixes and improvements.
 */
export default class RCTCamera extends Component<any> {
  static constants: any;
}
四、使用
实现一个摄像头切换、扫描二维码功能。(模拟器无法调起相机)请使用真机测试。
切记要添加授权字段:Privacy - Camera Usage Description、Privacy - Microphone Usage Description。代码示例如下:
/**
 * Sample React Native App
 * https://github.com/facebook/react-native
 * @flow
 */

import React, { Component } from ''react'';

import {
    AppRegistry,
    StyleSheet,
    Text,
    TouchableHighlight
} from ''react-native'';

import {RNCamera, TakePictureResponse} from ''react-native-camera'';

export default class ReactNativeDemo extends Component {

    //设置当前摄像头为后置摄像头
    state = { cameraType: RNCamera.Constants.Type.back };

    //扫描二维码
    _onBarCodeRead(e){
        //data: string;
        //rawData?: string;
        //type: keyof BarCodeType;
        //bounds:
          //For iOS use `{ origin: Point<string>, size: Size<string> }`
          //For Android use `{ width: number, height: number, origin: Array<Point<string>> }`
        console.log(e)
    }

    //切换摄像头方向     undefined is not an object (evaluating ''state.cameraType'')
    _switchCamera(){
        this.setState({
            cameraType: (this.state.cameraType === RNCamera.Constants.Type.back) ?
                RNCamera.Constants.Type.front : RNCamera.Constants.Type.back
        })
        // let state = this.state;
        // state.cameraType = (state.cameraType === RNCamera.Constants.Type.back) ?
        //     RNCamera.Constants.Type.front : RNCamera.Constants.Type.back;
        // this.setState(state);
    }

    //拍摄照片
    _takePicture(){
        this.refs.camera.takePictureAsync().then( (response) => {
            console.log("response.uri:"+response.uri)
        }).catch((error => {
            console.log("error:"+error)
        }))
    }

    render() {
        return (
            <RNCamera
                ref="camera"
                style={styles.container}
                onBarCodeRead={this._onBarCodeRead.bind(this)}
                type={this.state.cameraType}
            >
                <TouchableHighlight onPress={this._switchCamera.bind(this)}>
                    <Text style={styles.switch}>Switch Camera</Text>
                </TouchableHighlight>

                <TouchableHighlight onPress={this._takePicture.bind(this)}>
                    <Text style={styles.picture}>Take Picture</Text>
                </TouchableHighlight>
            </RNCamera>
        );
    }
}

const styles = StyleSheet.create({
    container: {
        flex: 1,
        justifyContent: ''center'',
        alignItems: ''center'',
        backgroundColor: ''transparent''
    },
    switch: {
        marginTop: 30,
        textAlign: ''center'',
        fontSize: 30,
        color: ''red''
    },
    picture: {
        marginTop: 30,
        textAlign: ''center'',
        fontSize: 30,
        color: ''red''
    }
});

AppRegistry.registerComponent(''ReactNativeDemo'', () => ReactNativeDemo);
模拟器运行出现,无法启动相机如下

真机运行出现,对相机和麦克风进行授权后,示例如下
拍照时的打印日至如下:
2020-01-11 10:52:23.940 [info][tid:com.facebook.react.JavaScript] response.uri:file:///var/mobile/Containers/Data/Application/F36A8D1A-2F96-4E24-B2D8-9755AD1FF488/Library/Caches/Camera/F4B30B4E-69C5-4D61-B2AE-99426AED52F2.jpg
RactNative---react-native-storage使用
这是一个本地持久存储的封装,可以同时支持react-native(AsyncStorage)和浏览器(localStorage)。ES6语法,promise异步读取,使用jest进行了完整的单元测试。
安装
npm install react-native-storage --save
React Native开发
无需配置直接使用(但要求0.13或更高版本)。
导入
import Storage from 'react-native-storage';
请勿使用require(‘react-native-storage’)语法,否则在react native 0.16之后的版本中会报错.
初始化
import { AsyncStorage } from 'react-native';
var storage = new Storage({
 // 最大容量,默认值1000条数据循环存储
size: 1000,// 存储引擎:对于RN使用AsyncStorage,对于web使
 用window.localStorage
  // 如果不指定则数据只会保存在内存中,重启后即丢失
  storageBackend: AsyncStorage,// 数据过期时间,默认一整天(1000 * 3600 * 24 毫秒),设为null则永不过期
  defaultExpires: 1000 * 3600 * 24,// 读写时在内存中缓存数据。默认启用。
  enableCache: true,// 如果storage中没有相应数据,或数据已过期,
  // 则会调用相应的sync方法,无缝返回最新数据。
  // sync方法的具体说明会在后文提到
  // 你可以在构造函数这里就写好sync的方法
  // 或是写到另一个文件里,这里require引入
  // 或是在任何时候,直接对storage.sync进行赋值修改
  sync: require('./sync')  // 这个sync文件是要你自己写的
})
// 最好在全局范围内创建一个(且只有一个)storage实例,方便直接调用
// 对于web
// window.storage = storage;
// 对于react native
// global.storage = storage;
// 这样,在此**之后**的任意位置即可以直接调用storage
// 注意:全局变量一定是先声明,后使用
// 如果你在某处调用storage报错未定义
// 请检查global.storage = storage语句是否确实已经执行过了
不了解全局变量的使用?请点这里 https://github.com/sunnylqm/react-native-storage/issues/29
保存、读取和删除
// 使用key来保存数据。这些数据一般是全局独有的,常常需要调用的。
  // 除非你手动移除,这些数据会被永久保存,而且默认不会过期。
  storage.save({
    key: 'loginState',// 注意:请不要在key中使用_下划线符号!
    data: {
      from: 'some other site',userid: 'some userid',token: 'some token'
    },// 如果不指定过期时间,则会使用defaultExpires参数
    // 如果设为null,则永不过期
    expires: 1000 * 3600
  });

  // 读取
  storage.load({
    key: 'loginState',// autoSync(默认为true)意味着在没有找到数据或数据过期时自动调用相应的sync方法
    autoSync: true,// syncInBackground(默认为true)意味着如果数据过期,
    // 在调用sync方法的同时先返回已经过期的数据。
    // 设置为false的话,则始终强制返回sync方法提供的最新数据(当然会需要更多等待时间)。
    syncInBackground: true,// 你还可以给sync方法传递额外的参数
    syncParams: {
      extraFetchOptions: {
        // 各种参数
      },someFlag: true,},}).then(ret => {
    // 如果找到数据,则在then方法中返回
    // 注意:这是异步返回的结果(不了解异步请自行搜索学习)
    // 你只能在then这个方法内继续处理ret数据
    // 而不能在then以外处理
    // 也没有办法“变成”同步返回
    // 你也可以使用“看似”同步的async/await语法

    console.log(ret.userid);
    this.setState({ user: ret });
  }).catch(err => {
    //如果没有找到数据且没有sync方法,
    //或者有其他异常,则在catch中返回
    console.warn(err.message);
    switch (err.name) {
        case 'NotFoundError':
            // Todo;
            break;
        case 'ExpiredError':
            // Todo
            break;
    }
  })
  // 使用key和id来保存数据,一般是保存同类别(key)的大量数据。
  // 所有这些"key-id"数据共有一个保存上限(无论是否相同key)
  // 即在初始化storage时传入的size参数。
  // 在默认上限参数下,第1001个数据会覆盖第1个数据。
  // 覆盖之后,再读取第1个数据,会返回catch或是相应的sync方法。
  var userA = {
    name: 'A',age: 20,tags: [
      'geek','nerd','otaku'
    ]
  };

  storage.save({
    key: 'user',// 注意:请不要在key中使用_下划线符号!
    id: '1001',// 注意:请不要在id中使用_下划线符号!
    data: userA,expires: 1000 * 60
  });

  //load 读取
  storage.load({
    key: 'user',id: '1001'
  }).then(ret => {
    // 如果找到数据,则在then方法中返回
    console.log(ret.userid);
  }).catch(err => {
    // 如果没有找到数据且没有sync方法,
    // 或者有其他异常,则在catch中返回
    console.warn(err.message);
    switch (err.name) {
        case 'NotFoundError':
            // Todo;
            break;
        case 'ExpiredError':
            // Todo
            break;
    }
  })

// --------------------------------------------------

// 获取某个key下的所有id
storage.getIdsForKey('user').then(ids => {
    console.log(ids);
});

// 获取某个key下的所有数据
storage.getAllDataForKey('user').then(users => {
    console.log(users);
});

// !! 清除某个key下的所有数据
storage.clearMapForKey('user');

// --------------------------------------------------

// 删除单个数据
storage.remove({
    key: 'lastPage'
});
storage.remove({
    key: 'user',id: '1001'
});

// !! 清空map,移除所有"key-id"数据(但会保留只有key的数据)
storage.clearMap();
同步远程数据(刷新)
storage.sync = {
    // sync方法的名字必须和所存数据的key完全相同
    // 方法接受的参数为一整个object,所有参数从object中解构取出
    // 这里可以使用promise。或是使用普通回调函数,但需要调用resolve或reject。
    user(params){
      let { id,resolve,reject,syncParams: { extraFetchOptions,someFlag } } = params;
      fetch('user/',{
        method: 'GET',body: 'id=' + id,...extraFetchOptions,}).then(response => {
        return response.json();
      }).then(json => {
        //console.log(json);
        if(json && json.user){
          storage.save({
            key: 'user',id,data: json.user
          });

          if (someFlag) {
            // 根据syncParams中的额外参数做对应处理
          }

          // 成功则调用resolve
          resolve && resolve(json.user);
        }
        else{
          // 失败则调用reject
          reject && reject(new Error('data parse error'));
        }
      }).catch(err => {
        console.warn(err);
        reject && reject(err);
      });
    }
  }

有了上面这个sync方法,以后再调用storage.load时,如果本地并没有存储相应的user,那么会自动触发storage.sync.user去远程取回数据并无缝返回。

  storage.load({
    key: 'user',id: '1002'
  }).then(...)
 ``` 读取批量数据 ```// 使用和load方法一样的参数读取批量数据,但是参数是以数组的方式提供。
// 会在需要时分别调用相应的sync方法,最后统一返回一个有序数组。
storage.getBatchData([
    { key: 'loginState' },{ key: 'checkPoint',syncInBackground: false },{ key: 'balance' },{ key: 'user',id: '1009' }
])
.then(results => {
  results.forEach( result => {
    console.log(result);
  })
})

//根据key和一个id数组来读取批量数据
storage.getBatchDataWithIds({
  key: 'user',ids: ['1001','1002','1003']
})
.then( ... ).
这两个方法除了参数形式不同,还有个值得注意的差异。getBatchData会在数据缺失时挨个调用不同的sync方法(因为key不同)。但是getBatchDataWithIds却会把缺失的数据统计起来,将它们的id收集到一个数组中,然后一次传递给对应的sync方法(避免挨个查询导致同时发起大量请求),所以你需要在服务端实现通过数组来查询返回,还要注意对应的sync方法的参数处理(因为id参数可能是一个字符串,也可能是一个数组的字符串)。

React Native -19.React Native Timer定时器的使用
React Native -19.React Native Timer定时器的使用
背景:React Native Version:0.3.1
语法 ES6
Step1:介绍
RN的定时器就是一个创建方法。并没有像iOS一样的NSTimer类
根据官方提供的文档,定时器有四种形式: • setTimeout,clearTimeout
• setInterval,clearInterval
• setImmediate,clearImmediate
• requestAnimationFrame,cancelAnimationFrame
- 见名思义:set和request方法是创建。clear是清除,清除必须有.
Step1:使用
setTimeout(function,time)
function:触发的方法
time:延迟时间 毫秒
效果:延迟time时间后执行function,setInterval(function,time)
function:触发的方法
time:延迟时间 毫秒
效果:间隔time时间后执行functionsetImmediate(function,time)
function:触发的方法
time:延迟时间 毫秒
效果:间隔time时间后(立即)执行function,setImmediate此方法会在js代码块之行结束后执行,就在就要发送批量相应数据到原生之前,如过再方法中又掉用了此方法,他会立即呗掉用。而不会再掉用之前等待原生代码
以上这句话从官网文档翻译过来,等待以后实际验证。
Step2:实战
import React,{Component} from 'react';
import {AppRegistry,StyleSheet,ActivityIndicator} from 'react-native';

class hello extends Component {
  constructor(props:any){
    super(props);
    var timer1=null;
    var timer2=null;
    var timer3=null;
    this.state = {
      animating: true,};
  }

  componentDidMount(){
    this.timer1 = setInterval(
      ()=>{
        this._consolelogshow();
      },2000,);

    this.timer2 = setTimeout(
      ()=>{console.log('setTimeout22222222'); },1000,);

    this.timer3 = setImmediate(
      ()=>{console.log('setImmediate333333');},3000,);
  }

  componentwillUnmount() {
    // 如果存在this.timer,则使用clearTimeout清空。
    // 如果你使用多个timer,那么用多个变量,或者用个数组来保存引用,然后逐个clear
    this.timer1 && clearInterval(this.timer1);
    this.timer2 && clearTimeout(this.timer2);
    this.timer3 && clearImmediate(this.timer3);

  }

  _consolelogshow(){
    console.log('把一个定时器的引用挂在this上11111');
  }

  render(){
    return(
      <ActivityIndicator
        animating={this.state.animating}
        style={[styles.centerting,{height:80}]}
        size="large"/>
    )
  }
}


 var styles = StyleSheet.create({
   centering: {
    alignItems: 'center',justifyContent: 'center',padding: 8,}
 });

AppRegistry.registerComponent('hello',()=>hello);
Step3:实战解读
- componentDidMount 在生命周期组件加载成功后的方法里创建三个定时器。
- constructor 方法中声明三个定时器变量,方便全局掉用
- componentwillUnmount 在生命周期组件将要移除的方法里清除定时器。避免crash

React Native App第三方库
lottie-react-native动画库github以及官网
可以用于页面加载时的动画
import React, {FC} from "react";
import {SafeAreaView, ScrollView, Text} from "react-native";
import Lottie from ''lottie-react-native'';


interface Props {

}

const LottieReactNative: FC<Props> = () => {
    const animationRef = React.useRef<Lottie | null>(null);

    React.useEffect(() => {

    }, []);

    return <SafeAreaView>
        <ScrollView>
            <Lottie source={require(''./animation.json'')} autoPlay loop style={{width: 100}}/>
        </ScrollView>
    </SafeAreaView>;
};

export default LottieReactNative;
react-icomoon轻量图标
import React from "react";
import {SafeAreaView, ScrollView} from "react-native";
import IcoMoon, {iconList} from "react-icomoon";
const iconSet = require(''./selection.json'');
import { Svg, Path } from ''react-native-svg'';

const ReactIcoMoon = () => {
    React.useEffect(() => {

    }, []);
    return <SafeAreaView>
        <ScrollView>
            <IcoMoon
                native
                iconSet={iconSet}
                SvgComponent={Svg}
                PathComponent={Path}
                icon="heart"
                size={30}
                style={{ margin: 50, color: ''#f40'' }}
            />
        </ScrollView>
    </SafeAreaView>;
};

export default ReactIcoMoon;
react-native-calendars日历
import React from "react";
import {SafeAreaView, ScrollView} from "react-native";
import {Calendar, LocaleConfig} from ''react-native-calendars'';

LocaleConfig[''locales''][''''] = {
    monthNames: [''一月'', ''二月'', ''三月'', ''四月'', ''五月'', ''六月'', ''七月'', ''八月'', ''九月'', ''十月'', ''十一月'', ''十二月''],
    monthNamesShort: [''一月'', ''二月'', ''三月'', ''四月'', ''五月'', ''六月'', ''七月'', ''八月'', ''九月'', ''十月'', ''十一月'', ''十二月''],
    dayNames: [''周一'', ''周二'', ''周三'', ''周四'', ''周五'', ''周六'', ''周天''],
    dayNamesShort: [''周一'', ''周二'', ''周三'', ''周四'', ''周五'', ''周六'', ''周天''],
    amDesignator: ''上午'',
    pmDesignator: ''下午''
}
const ReactNativeCalendars = () => {
    const [selected, setSelected] = React.useState('''');
    React.useEffect(() => {

    }, []);
    return <SafeAreaView>
        <ScrollView>
            <Calendar
                onDayPress={(day) => {
                    setSelected(day.dateString);
                }}
                style={{height: 350}}
                markedDates={{
                    [selected]: {selected: true, disableTouchEvent: true, selectedDotColor: ''orange''}
                }}
            />
        </ScrollView>
    </SafeAreaView>;
};

export default ReactNativeCalendars;
react-native-drawer抽屉
<Drawer
     type="displace"
     ref={drawerRef}
     acceptDoubleTap={true}
     captureGestures={false}
     tweenDuration={100}
     panThreshold={0.08}
     onOpen={() => setOpen(true)}
     onClose={() => setOpen(false)}
     openDrawerOffset={() => 90}
     panOpenMask={0.2}
     open={open}
     negotiatePan={true}
     content={<ScrollView style={styles.container}>
         <ReactNativeCalendars onSelect={(date) => {
             drawerRef.current!.close();
             setDate(date);
         }}/>
     </ScrollView>}
     styles={{drawer: styles.drawer, main: styles.main}}
     tweenHandler={(ratio) => ({
         main: {opacity: (2 - ratio) / 2}
     })}
 >
     <ScrollView style={[styles.container, {backgroundColor: ''#FFF'',}]}>
         <Text onPress={() => drawerRef.current!.open()}>{date || ''选择日期''}</Text>
     </ScrollView>
</Drawer>
react-native-textinput-effects漂亮的输入框
import React from "react";
import {SafeAreaView, ScrollView} from "react-native";
import {Fumi} from ''react-native-textinput-effects'';
import FontAwesomeIcon from ''react-native-vector-icons/FontAwesome'';


const ReactNativeTextInputEffects = () => {
    const [value, setValue] = React.useState('''');
    React.useEffect(() => {

    }, []);
    return <SafeAreaView>
        <ScrollView>
            <Fumi
                style={{backgroundColor: ''#f9f5ed''}}
                label="账号"
                iconClass={FontAwesomeIcon}
                iconName="university"
                iconColor="#f95a25"
                iconSize={20}
                iconWidth={40}
                inputPadding={16}
                onChangeText={setValue}
                value={value}
                keyboardType="number-pad"
                blurOnSubmit={true}
            />
        </ScrollView>
    </SafeAreaView>;
};

export default ReactNativeTextInputEffects;
react-native-lightbox查看图片(这个库有点老复制下来重写)
import React, {FC} from "react";
import {
    View,
    ViewStyle,
    Animated,
    Easing,
    Dimensions,
    Platform,
    StyleSheet,
    StatusBar,
    Modal,
    TouchableOpacity,
    Text, TouchableWithoutFeedback, Image
} from "react-native";


const WINDOW_HEIGHT = Dimensions.get(''window'').height;
const WINDOW_WIDTH = Dimensions.get(''window'').width;
const isIOS = Platform.OS === ''ios'';

export interface ImageLightBoxProps {
    style?: ViewStyle;
    uri: string;
}

const styles = StyleSheet.create({
    background: {
        position: ''absolute'',
        top: 0,
        left: 0,
        width: WINDOW_WIDTH,
        height: WINDOW_HEIGHT,
        backgroundColor: ''#000''
    },
    open: {
        position: ''absolute'',
        flex: 1,
        justifyContent: ''center'',
        backgroundColor: ''transparent'',
    },
    header: {
        position: ''absolute'',
        top: 0,
        left: 0,
        width: WINDOW_WIDTH,
        backgroundColor: ''transparent'',
    },
    closeButton: {
        fontSize: 35,
        color: ''white'',
        lineHeight: 40,
        width: 40,
        textAlign: ''center'',
        shadowOffset: {
            width: 0,
            height: 0,
        },
        shadowRadius: 1.5,
        shadowColor: ''black'',
        shadowOpacity: 0.8,
    },
});

const springConfig = {
    tension: 1,
    friction: 100,
    useNativeDriver: false
}
const ImageLightBox: FC<ImageLightBoxProps> = (props) => {
    const rootRef = React.useRef<Image>();
    const animatedLayoutOpacity = React.useRef(new Animated.Value(1));
    const animatedOpenValue = React.useRef(new Animated.Value(0));
    const [origin, setOrigin] = React.useState({x: 0, y: 0, width: 0, height: 0});
    const [isOpen, setIsOpen] = React.useState(false);
    const [target, setTarget] = React.useState({x: 0, y: 0, opacity: 1});
    const [imageStyle, setImageStyle] = React.useState<{ height?: number | string; width?: number | string }>({});

    React.useEffect(() => {
        Image.getSize(props.uri, (w, h) => {
            if (props.style) {
                const {height, width} = props.style;
                if (height && !width) {
                    setImageStyle({width: height * w / h, height});
                } else if (!height && width) {
                    setImageStyle({width, height: width * h / w});
                } else if (height && width) {
                    setImageStyle({width, height});
                } else {
                    setImageStyle({height: h, width: w})
                }
            }
        });
    }, [props.uri]);

    const open = () => {
        rootRef.current!.measure((ox, oy, width, height, px, py) => {
            if (isIOS) {
                StatusBar.setHidden(true, ''fade'');
            }
            setIsOpen(true);
            setTarget({x: 0, y: 0, opacity: 1});
            // 获取图片的位置并隐身
            setOrigin({width, height, x: px, y: py});
            Animated.parallel([
                setOpacity(0),
                setOpenValue(1)
            ]).start();
        });
    }

    const close = () => {
        if (isIOS) {
            StatusBar.setHidden(false, ''fade'');
        }
        setOpenValue(0).start(() => {
            setOpacity(1).start(() => {
                setIsOpen(false);
            });
        });
    }

    const setOpenValue = (value) => {
        return Animated.spring(animatedOpenValue.current, {
            toValue: value,
            ...springConfig
        });
    }
    const setOpacity = (value: number) => {
        return Animated.timing(animatedLayoutOpacity.current, {
            useNativeDriver: true,
            easing: Easing.linear,
            duration: 100,
            toValue: value
        });
    }

    const opacityStyle = {
        opacity: animatedOpenValue.current.interpolate({inputRange: [0, 1], outputRange: [0, target.opacity]})
    }
    const openStyle = [styles.open, {
        left: animatedOpenValue.current.interpolate({
            inputRange: [0, 1],
            outputRange: [origin.x || 0, target.x || 0],
        }),
        top: animatedOpenValue.current.interpolate({
            inputRange: [0, 1],
            outputRange: [origin.y || 0, target.y || 0],
        }),
        width: animatedOpenValue.current.interpolate({
            inputRange: [0, 1],
            outputRange: [origin.width || 0, WINDOW_WIDTH],
        }),
        height: animatedOpenValue.current.interpolate({
            inputRange: [0, 1],
            outputRange: [origin.height || 0, WINDOW_HEIGHT],
        })
    }];

    return <React.Fragment>
        <TouchableWithoutFeedback onPress={open}>
            <View ref={rootRef} style={imageStyle}>
                <Animated.Image
                    style={[props.style, imageStyle, {opacity: animatedLayoutOpacity.current}]}
                    resizeMode="contain"
                    source={{uri: props.uri}}
                />
            </View>
        </TouchableWithoutFeedback>
        <Modal visible={isOpen} transparent={true} onRequestClose={close}>
            <Animated.View style={[styles.background, opacityStyle]}/>
            <Animated.View style={[openStyle]}>
                <Image
                    source={{uri: props.uri}}
                    resizeMode="contain"
                    style={{flex: 1}}
                />
            </Animated.View>
            <Animated.View style={[styles.header, opacityStyle]}>
                <TouchableOpacity onPress={close}>
                    <Text style={styles.closeButton}>×</Text>
                </TouchableOpacity>
            </Animated.View>
        </Modal>
    </React.Fragment>;
};

export default ImageLightBox;
import React from "react";
import {SafeAreaView, ScrollView, View} from "react-native";
import ImageLightBox from "../../components/ImageLightBox";
const ReactNativeLightBox = () => {
React.useEffect(() => {
}, []);
return <SafeAreaView>
<ScrollView style={{paddingTop: 100}}>
<View style={{flexDirection: "row", justifyContent: "space-between"}}>
<ImageLightBox
uri="https://xxx.jpeg"
style={{height: 40}}
/>
<ImageLightBox
uri="https://xxx.jpeg"
style={{height: 100}}
/>
<ImageLightBox
uri="https://xxx.jpeg"
style={{height: 200}}
/>
</View>
</ScrollView>
</SafeAreaView>;
};
export default ReactNativeLightBox;
react-native-action-button浮动折叠菜单
import React from "react";
import {SafeAreaView, ScrollView, StyleSheet} from "react-native";
import ActionButton from ''react-native-action-button'';
import Icon from ''react-native-vector-icons/Ionicons'';


const ReactNativeActionButton = () => {
    React.useEffect(() => {

    }, []);
    return <SafeAreaView style={{flex: 1, backgroundColor: ''#f3f3f3''}}>
        <ScrollView>

        </ScrollView>
        <ActionButton buttonColor="rgba(231,76,60,1)">
            <ActionButton.Item buttonColor=''#9b59b6'' title="新任务" onPress={() => {}}>
                <Icon name="md-create" style={styles.actionButtonIcon} />
            </ActionButton.Item>
            <ActionButton.Item buttonColor=''#3498db'' title="新消息" onPress={() => {}}>
                <Icon name="md-notifications-off" style={styles.actionButtonIcon} />
            </ActionButton.Item>
            <ActionButton.Item buttonColor=''#1abc9c'' title="新问题" onPress={() => {}}>
                <Icon name="md-done-all" style={styles.actionButtonIcon} />
            </ActionButton.Item>
        </ActionButton>
    </SafeAreaView>;
};

const styles = StyleSheet.create({
    actionButtonIcon: {
        fontSize: 20,
        height: 22,
        color: ''white'',
    },
});

export default ReactNativeActionButton;
react-native-masonry砖块格子类似小红书
这个库的里的ListView不能用了,需要替换成deprecated-react-native-listview,顺便把查看图片也加了进去,建议用最新的FlatList去重写
import React from "react";
import {SafeAreaView} from "react-native";
import Masonry from "../../components/Masonry";

const ReactNativeMasonry = () => {
    React.useEffect(() => {

    }, []);
    return <SafeAreaView style={{flex: 1}}>
        <Masonry
            columns={2}
            bricks={[
                {uri: ''https://xxx''},
                {uri: ''https://xxx''},
                {uri: ''https://xxx''},
                {uri: ''https://xxx''},
                {uri: ''https://xxx''},
                {uri: ''https://xxx''},
                {uri: ''https://xxx''},
                {uri: ''https://xxx''},
                {uri: ''https://xxx''},
            ]}
        />
    </SafeAreaView>;
};

export default ReactNativeMasonry;
react-native-looped-carousel反复的轮播(图片)
和react-native-swiper和react-native-carousel差不多。
图片浏览的轮播用react-native-image-carousel可以放大缩小
react-native-fading-slides轮播幻灯片没什么用
import React, {FC} from "react";
import {View, Image} from "react-native";
import Carousel from ''react-native-looped-carousel'';

interface Props {
    images?: { uri: string }[];
    currentPage?: number;
    onAnimateNextPage?: (page: number) => void;
}

const Images: FC<Props> = (props) => {
    const [size, setSize] = React.useState<{ width?: number, height?: number }>({});
    React.useEffect(() => {

    }, []);
    return <View style={{width: ''100%'', height: ''100%''}} onLayout={(e) => {
        const layout = e[''nativeEvent''].layout;
        setSize({width: layout.width, height: layout.height});
    }}>
        <Carousel
            currentPage={props.currentPage}
            pageInfo={true}
            style={{...size}}
            autoplay={false}
            pageInfoBackgroundColor="rgba(255,255,255,0.5)"
            onAnimateNextPage={props.onAnimateNextPage}>
            {props.images!.map((i, index) => {
                return <View style={[size]} key={index}>
                    <Image
                        source={{uri: i.uri}}
                        resizeMode="contain"
                        style={{flex: 1, }}
                    />
                </View>
            })}
        </Carousel>
    </View>;
};

Images.defaultProps = {
    images: [],
    currentPage: 0,
}
export default Images;
react-native-svg-charts图表
import React from "react";
import {SafeAreaView, ScrollView, View} from "react-native";
import {
    AreaChart,
    Grid,
    StackedAreaChart,
    BarChart,
    LineChart,
    PieChart,
    ProgressCircle,
    YAxis,
    XAxis
} from ''react-native-svg-charts'';
import * as shape from ''d3-shape''

const ReactNativeSvgCharts = () => {
    React.useEffect(() => {

    }, []);
    return <SafeAreaView style={{flex: 1}}>
        <ScrollView>
            <AreaChart
                style={{height: 200}}
                data={[50, 10, 40, 95, -4, -24, 85, 91, 35, 53, -53, 24, 50, -20, -80]}
                contentInset={{top: 30, bottom: 30}}
                curve={shape.curveNatural}
                svg={{fill: ''rgba(134, 65, 244, 0.8)''}}
            >
                <Grid/>
            </AreaChart>
            <StackedAreaChart
                style={{height: 200, paddingVertical: 16}}
                data={[
                    {
                        month: new Date(2015, 0, 1),
                        apples: 3840,
                        bananas: 1920,
                        cherries: 960,
                        dates: 400,
                    },
                    {
                        month: new Date(2015, 1, 1),
                        apples: 1600,
                        bananas: 1440,
                        cherries: 960,
                        dates: 400,
                    },
                    {
                        month: new Date(2015, 2, 1),
                        apples: 640,
                        bananas: 960,
                        cherries: 3640,
                        dates: 400,
                    },
                    {
                        month: new Date(2015, 3, 1),
                        apples: 3320,
                        bananas: 480,
                        cherries: 640,
                        dates: 400,
                    },
                ]}
                keys={[''apples'', ''bananas'', ''cherries'', ''dates'']}
                colors={[''#8800cc'', ''#aa00ff'', ''#cc66ff'', ''#eeccff'']}
                curve={shape.curveNatural}
                showGrid={false}
                svgs={[
                    {onPress: () => console.log(''apples'')},
                    {onPress: () => console.log(''bananas'')},
                    {onPress: () => console.log(''cherries'')},
                    {onPress: () => console.log(''dates'')},
                ]}
            />
            <BarChart
                style={{height: 200}}
                data={[50, 10, 40, 95, -4, -24, null, 85, undefined, 0, 35, 53, -53, 24, 50, -20, -80]}
                svg={{fill: ''rgb(134, 65, 244)''}}
                contentInset={{top: 30, bottom: 30}}
            >
                <Grid/>
            </BarChart>

            <LineChart
                style={{height: 200}}
                data={[50, 10, 40, 95, -4, -24, 85, 91, 35, 53, -53, 24, 50, -20, -80]}
                svg={{stroke: ''rgb(134, 65, 244)''}}
                contentInset={{top: 20, bottom: 20}}
            >
                <Grid/>
            </LineChart>

            <PieChart
                style={{height: 200}}
                data={
                    [50, 10, 40, 95, -4, -24, 85, 91, 35, 53, -53, 24, 50, -20, -80].filter((value) => value > 0)
                        .map((value, index) => ({
                            value,
                            svg: {
                                fill: (''#'' + ((Math.random() * 0xffffff) << 0).toString(16) + ''000000'').slice(0, 7),
                                onPress: () => console.log(''press'', index),
                            },
                            key: `pie-${index}`,
                        }))
                }
            />

            <ProgressCircle
                style={{height: 200}}
                progress={0.7}
                progressColor={''rgb(134, 65, 244)''}
            />

            <View style={{height: 200, flexDirection: ''row''}}>
                <YAxis
                    data={[50, 10, 40, 95, -4, -24, 85, 91, 35, 53, -53, 24, 50, -20, -80]}
                    contentInset={{top: 20, bottom: 20}}
                    svg={{
                        fill: ''grey'',
                        fontSize: 10,
                    }}
                    numberOfTicks={10}
                    formatLabel={(value) => `${value}ºC`}
                />
                <LineChart
                    style={{flex: 1, marginLeft: 16}}
                    data={[50, 10, 40, 95, -4, -24, 85, 91, 35, 53, -53, 24, 50, -20, -80]}
                    svg={{stroke: ''rgb(134, 65, 244)''}}
                    contentInset={{top: 20, bottom: 20}}
                >
                    <Grid/>
                </LineChart>
            </View>

            <View style={{height: 200, padding: 20}}>
                <LineChart
                    style={{flex: 1}}
                    data={[50, 10, 40, 95, -4, -24, 85, 91, 35, 53, -53, 24, 50, -20, -80]}
                    gridMin={0}
                    contentInset={{top: 10, bottom: 10}}
                    svg={{stroke: ''rgb(134, 65, 244)''}}
                >
                    <Grid/>
                </LineChart>
                <XAxis
                    style={{marginHorizontal: -10}}
                    data={[50, 10, 40, 95, -4, -24, 85, 91, 35, 53, -53, 24, 50, -20, -80]}
                    formatLabel={(value, index) => index}
                    contentInset={{left: 10, right: 10}}
                    svg={{fontSize: 10, fill: ''black''}}
                />
            </View>
        </ScrollView>
    </SafeAreaView>;
};

export default ReactNativeSvgCharts;
react-native-progress-bar进度条
import React, {FC} from "react";
import {StyleSheet, Animated, Easing, View, ViewStyle} from "react-native";


interface Props {
    initialProgress?: number;
    progress: number;
    easing?: (value: number) => number;
    easingDuration?: number;
    backgroundStyle?: ViewStyle;
    style?: ViewStyle;
    fillStyle?: ViewStyle;
}

const ProgressBar: FC<Props> = (props) => {
    const progressRef = React.useRef(new Animated.Value(props.initialProgress || 0));

    React.useEffect(() => {
        update();
    }, [props.progress]);

    const update = () => {
        Animated.timing(progressRef.current, {
            useNativeDriver: false,
            easing: props.easing!,
            duration: props.easingDuration!,
            toValue: props.progress
        }).start();
    };


    React.useEffect(() => {

    }, []);

    return <View style={[styles.background, props.backgroundStyle, props.style]}>
        <Animated.View style={[styles.fill, props.fillStyle, {
            width: progressRef.current.interpolate({
                inputRange: [0, 1],
                outputRange: [0, 1 * (props.style!.width || 0)],
            })
        }]}/>
    </View>;
};

const styles = StyleSheet.create({
    background: {
        backgroundColor: ''#bbbbbb'',
        height: 5,
        overflow: ''hidden''
    },
    fill: {
        backgroundColor: ''#3b5998'',
        height: 5
    }
});

ProgressBar.defaultProps = {
    initialProgress: 0,
    easingDuration: 500,
    easing: Easing.inOut(Easing.ease),
    backgroundStyle: {},
    style: {},
    fillStyle: {}
}

export default ProgressBar;
<ProgressBar
fillStyle={{}}
backgroundStyle={{backgroundColor: ''#cccccc'', borderRadius: 2}}
style={{marginTop: 10, width: 300}}
progress={progress}
/>
react-native-gesture-password手势密码
import React from "react";
import {SafeAreaView, ScrollView} from "react-native";
import GesturePassword from "react-native-gesture-password";


const ReactNativeGesturePassword = () => {
    const [status, setStatus] = React.useState(''normal'');
    const [message, setMessage] = React.useState(''请输入密码'');
    const refPassword = React.useRef<GesturePassword>();

    React.useEffect(() => {

    }, []);

    const onStart = () => {

    }

    const onEnd = (password: string) => {
        refPassword.current!.resetActive();
    }
    return <SafeAreaView>
        <GesturePassword
            ref={(e) => refPassword.current = e}
            status={status}
            message={message}
            onStart={() => onStart()}
            onEnd={(password) => onEnd(password)}
            innerCircle={true}
            outerCircle={true}
        />
    </SafeAreaView>;
};

export default ReactNativeGesturePassword;
github
持续更新...


React Native 基于react-native-camera实现扫码功能
组件库文档: https://github.com/react-nati...
安装
npm install react-native-camera --savereact-native link react-native-camera
使用最新的稳定版,将你的package.json这样配置:
"react-native-camera": "git+https://git@github.com/react-native-community/react-native-camera";
配置(IOS)
如果上一步的link显示成功,则xcode里的配置基本完成,如果失败,可以手动配置;
手动配置
1.你已经完成 npm install react-native-camera --save;
- 在XCode中,在项目导航器中右键单击
Libraries➜Add Files to [your project's name]; - 转到
node_modules➜ react-native-camera并添加RNCamera.xcodeproj; - 展开
RNCamera.xcodeproj➜ Products文件夹; - 在XCode中,在项目导航器中选择您的项目。添加
libRNCamera.a到您的项目Build Phases➜Link Binary With Libraries;
- 点击
RNCamera.xcodeproj项目导航器并转到Build Settings选项卡。确保“All”开启(而不是'Basic')。在该Search Paths部分中,查找Header Search Paths并确保它包含两者$(SRCROOT)/../../react-native/React并将它们$(SRCROOT)/../../../React标记为recursive。
使用
只需import { RNCamera } from react-native-camera 模块中 取出<RNCamera/>标签。
引用标签:
<RNCamera
         ref={ref => {
             this.camera = ref;
         }}
         style={styles.preview}
         type={RNCamera.Constants.Type.back}
         flashMode={RNCamera.Constants.FlashMode.on}
         onBarCodeRead={this.onBarCodeRead}
         >
</RNCamera>
属性
autoFocus
值:(RNCamera.Constants.AutoFocus.on默认)或RNCamera.Constants.AutoFocus.off
使用该autoFocus属性指定相机的自动对焦设置。RNCamera.Constants.AutoFocus.on将其打开,RNCamera.Constants.AutoFocus.off将其关闭。
flashMode
指定相机的闪光模式
值:(RNCamera.Constants.FlashMode.off默认)RNCamera.Constants.FlashMode.on;
onBarCodeRead
检测到条形码时,将调用指定的方法;
事件包含data(条形码中的数据)和type(检测到的条形码类型)
绘制扫码界面
代码:
render() {
       return (
           <View style={styles.container}>
               <RNCamera
                   ref={ref => {
                       this.camera = ref;
                   }}
                   style={styles.preview}
                   type={RNCamera.Constants.Type.back}
                   flashMode={RNCamera.Constants.FlashMode.on}
                   onBarCodeRead={this.onBarCodeRead}
               >
                   <View style={styles.rectangleContainer}>
                       <View style={styles.rectangle}/>
                       <Animated.View style={[
                           styles.border,{transform: [{translateY: this.state.moveAnim}]}]}/>
                       <Text style={styles.rectangleText}>将二维码放入框内,即可自动扫描</Text>
                   </View>
                   </RNCamera>
           </View>
       );
   }
在 Camera 组件中绘制一个绿色的正方形 View,随后就是绘制绿色方框中滚动的线。使用 RN 中的 Animated 组件来实现动画效果。 首先在 componentDidMount 函数中初始化动画函数。
componentDidMount() {
    this.startAnimation();
}

startAnimation = () => {
    this.state.moveAnim.setValue(0);
    Animated.timing(
        this.state.moveAnim,{
            tovalue: -200,duration: 1500,easing: Easing.linear
        }
    ).start(() => this.startAnimation());
};
并且记得在构造函数中初始化 state:
constructor(props) {
    super(props);
    this.state = {
        moveAnim: new Animated.Value(0)
    };
}
通过 onBarCodeRead 函数来处理扫描结果:
//  识别二维码
    onBarCodeRead = (result) => {
        const { navigate } = this.props.navigation;
               const {data} = result; //只要拿到data就可以了
               //路由跳转到webView页面;
            navigate('Sale',{
                url: data
            })
    };
完整版示例:
class ScanScreen extends Component {
    constructor(props) {
        super(props);
        this.state = {
            moveAnim: new Animated.Value(0)
        };
    }

    componentDidMount() {
        this.startAnimation();
    }

    startAnimation = () => {
        this.state.moveAnim.setValue(0);
        Animated.timing(
            this.state.moveAnim,{
                tovalue: -200,easing: Easing.linear
            }
        ).start(() => this.startAnimation());
    };
    //  识别二维码
    onBarCodeRead = (result) => {
        const { navigate } = this.props.navigation;
               const {data} = result;
            navigate('Sale',{
                url: data
            })
    };

    render() {
        return (
            <View style={styles.container}>
                <RNCamera
                    ref={ref => {
                        this.camera = ref;
                    }}
                    style={styles.preview}
                    type={RNCamera.Constants.Type.back}
                    flashMode={RNCamera.Constants.FlashMode.on}
                    onBarCodeRead={this.onBarCodeRead}
                >
                    <View style={styles.rectangleContainer}>
                        <View style={styles.rectangle}/>
                        <Animated.View style={[
                            styles.border,{transform: [{translateY: this.state.moveAnim}]}]}/>
                        <Text style={styles.rectangleText}>将二维码放入框内,即可自动扫描</Text>
                    </View>
                    </RNCamera>
            </View>
        );
    }
}

export default ScanScreen;

const styles = StyleSheet.create({
    container: {
        flex: 1,flexDirection: 'row'
    },preview: {
        flex: 1,justifyContent: 'flex-end',alignItems: 'center'
    },rectangleContainer: {
        flex: 1,alignItems: 'center',justifyContent: 'center',backgroundColor: 'transparent'
    },rectangle: {
        height: 200,width: 200,borderWidth: 1,borderColor: '#00FF00',rectangleText: {
        flex: 0,color: '#fff',marginTop: 10
    },border: {
        flex: 0,height: 2,backgroundColor: '#00FF00',}
});今天关于ReactNative: 了解相机第三方库 react-native-camera 的使用和react native cameraroll的分享就到这里,希望大家有所收获,若想了解更多关于RactNative---react-native-storage使用、React Native -19.React Native Timer定时器的使用、React Native App第三方库、React Native 基于react-native-camera实现扫码功能等相关知识,可以在本站进行查询。
本文标签:


