如果您对androidbuilderror感兴趣,那么这篇文章一定是您不可错过的。我们将详细讲解androidbuilderror的各种细节,此外还有关于(OK)交叉编译hello.cforandro
如果您对android build error感兴趣,那么这篇文章一定是您不可错过的。我们将详细讲解android build error的各种细节,此外还有关于(OK) 交叉编译hello.c for android (--sysroot),不使用Android.mk和ndk-build、android build,android通讯录开发实例、Android Error:Execution failed for task '':app:preDebugAndroidTestBuild''. > Conflict wi...、Android Error:Unable to find method ''com.android.build.gradle.api.BaseVariant.getOutputs()Lja...的实用技巧。
本文目录一览:- android build error
- (OK) 交叉编译hello.c for android (--sysroot),不使用Android.mk和ndk-build
- android build,android通讯录开发实例
- Android Error:Execution failed for task '':app:preDebugAndroidTestBuild''. > Conflict wi...
- Android Error:Unable to find method ''com.android.build.gradle.api.BaseVariant.getOutputs()Lja...

android build error
error message: sdk/platforms/android-8/tools/aapt": java.io.IOException: error=2, No such file or directory
solve:
The problem seemed to be that the Android executables requires 32 bit libraries that are not available in Ubuntu 64 by default. To solve this I downloaded the execellent getlibs application which is a utility for automatically resolving dependencies for 32-bit programs on a 64 bit system. So I went into platforms/android-1.6/tools in the Android SDK installation folder and executed:
getlibs aapt
which installed and upgraded the following libraries:
The following NEW packages will be installed:
  ia32-libs lib32asound2 lib32gcc1 lib32ncurses5 lib32stdc++6 lib32z1
  libc6-i386
The following packages will be upgraded:
  libc6 libc6-dev
After this was done I went back into Eclipse, did a project clean and refresh and after that I was able to start the Android emulator successfully. Hopefully this may help someone who''s in the same situation.
REF:http://blog.jayway.com/2009/10/21/getting-android-sdk-working-on-ubuntu-64/
 交叉编译hello.c for android (--sysroot),不使用Android.mk和ndk-build")
(OK) 交叉编译hello.c for android (--sysroot),不使用Android.mk和ndk-build
# export PATH=$PATH:/opt/android-on-linux/android-ndk-r8e/toolchains/arm-linux-androideabi-4.7/prebuilt/linux-x86_64/bin/# arm-linux-androideabi-gcc --sysroot=/opt/android-on-linux/android-ndk-r8e/platforms/android-14/arch-arm/ hello.c -o hello
# adb push hello /data/
# adb shell
执行命令:
chmod 700 /data/hello
/data/hello
+++++++++++++++++++++++++++++++++
# adb push hello /data/data/www/cgi-bin
宿主机浏览器:
http://192.168.0.101:8000/cgi-bin/hello
如果成功的话, 可以看到浏览器上 Hello world!
++++++++++++++++++++++++++++++++++++++++++++++++
[root@localhost 桌面]# gedit readdisk.c
#include <stdio.h>
    #include <fcntl.h>

    int main()
    {
        unsigned char buf[512];
        int fd = open("/dev/blk/mmcblk1", O_RDWR);

        printf("文件描述符%d", fd);
        if (fd < 0) {        // printf("%d\n",errno);
            return 0;
        }
        int num;
        num = read(fd, buf, 512);
        printf("读取字数%d", num);
        printf("\n");
        int i, j;
        for (i = 0; i < 32; i++) {
            for (j = 0; j < 16; j++)
                printf("%02X ", buf[i * 16 + j]);
            printf("\n");
        }
        printf("\n");
        close(fd);
        return 0;
    }
[root@localhost 桌面]# arm-linux-androideabi-gcc --sysroot=/opt/android-on-linux/android-ndk-r8e/platforms/android-14/arch-arm/ readdisk.c -o readdisk
++++++++++++++++++++++++++++++++++++
root@kltexx:/data # ./readdisk
error: only position independent executables (PIE) are supported.
[root@localhost 桌面]# arm-linux-androideabi-gcc --sysroot=/opt/android-on-linux/android-ndk-r8e/platforms/android-14/arch-arm/ -pie -fPIE readdisk.c -o readdisk

android build,android通讯录开发实例
45.# MTK, Infinity, 20090720 {
46.wifi.interface=wlan0
47.# MTK, Infinity, 20090720 }
48.# MTK, mtk03034, 20101210 {
49.ro.mediatek.wlan.wsc=1
50.# MTK, mtk03034 20101210}
51.# MTK, mtk03034, 20110318 {
52.ro.mediatek.wlan.p2p=1
53.# # MTK, mtk03034 20110318}
54.# MTK, mtk03034, 20101210 {
55.mediatek.wlan.ctia=0
56.# MTK, mtk03034 20101210}
57.#
58.# MTK, TeChien { #MTK芯片的增强定义,有关相机和音频处理,乱改后果自负
59.ro.media.enc.hprof.file.format=3gp
60.ro.media.enc.hprof.codec.vid=m4v
61.ro.media.enc.hprof.vid.width=720
62.ro.media.enc.hprof.vid.height=480
63.ro.media.enc.hprof.vid.fps=30
64.ro.media.enc.hprof.vid.bps=3400000
65.ro.media.enc.hprof.codec.aud=amrnb
66.ro.media.enc.hprof.aud.bps=12200
67.ro.media.enc.hprof.aud.ch=1
68.ro.media.enc.hprof.aud.hz=8000
69.ro.media.enc.mprof.file.format=3gp
70.ro.media.enc.mprof.codec.vid=m4v
71.ro.media.enc.mprof.vid.width=352
72.ro.media.enc.mprof.vid.height=288
73.ro.media.enc.mprof.vid.fps=30
74.ro.media.enc.mprof.vid.bps=990000
75.ro.media.enc.mprof.codec.aud=amrnb
76.ro.media.enc.mprof.aud.bps=12200
77.ro.media.enc.mprof.aud.ch=1
78.ro.media.enc.mprof.aud.hz=8000
79.ro.media.enc.lprof.file.format=3gp
80.ro.media.enc.lprof.codec.vid=h263
81.ro.media.enc.lprof.vid.width=176
82.ro.media.enc.lprof.vid.height=144
83.ro.media.enc.lprof.vid.fps=30
84.ro.media.enc.lprof.vid.bps=384000
85.ro.media.enc.lprof.codec.aud=amrnb
86.ro.media.enc.lprof.aud.bps=12200
87.ro.media.enc.lprof.aud.ch=1
88.ro.media.enc.lprof.aud.hz=8000
89.# MTK, TeChien }
90.wifi.tethering.interface=ap0
91.wifi.direct.interface=p2p0
92.ro.opengles.version=131072
93.#
94.# ADDITIONAL_BUILD_PROPERTIES
95.# 以下是附加属性定义,可以修改,进行优化
96.bird.updatezip.code=BIRD
97.bird.updatezip.code=BIRD
98.bird.updatezip.code=BIRD
99.bird.updatezip.code=BIRD
100.bird.updatezip.code=BIRD
101.bird.updatezip.code=BIRD
102.bird.updatezip.code=BIRD
103.ro.sf.hwrotation=0 #自动转屏
104.launcherplus.allappsgrid=2d
105.curlockscreen=2 #开机启动时显示的锁屏画面,注意这个不是平时的锁屏画面
106.ril.current.share_modem=2
107.ro.mediatek.gemini_support=true
108.birdsenselauncherg11=true
109.curlockscreen=6 #锁屏默认画面的选择,用1至9数字选择,论坛内有高手已经把详细说明给出
110.bird_input_method_by_language=true
111.ro.config.notification_sound=OnTheHunt.ogg #默认通知铃声
112.ro.config.alarm_alert=Alarm_Classic.ogg #默认闹钟铃声
113.persist.sys.timezone=Asia/Shanghai #强制时区,此处为亚洲上海时间
114.ro.config.ringtone=CaribbeanIce.ogg #默认响铃铃声
115.launcher2.allappsgrid=3d_20
116.media.stagefright.enable-player=false
117.media.stagefright.enable-Meta=false
118.media.stagefright.enable-scan=false
119.media.stagefright.enable-http=false
120.ro.setupwizard.mode=disABLED #默认开机时使用设置向导,此处为关闭
121.net.bt.name=Android #蓝牙网络中显示的名称,可以修改
总结
可以看出,笔者的工作学习模式便是由以下 「六个要点」 组成:
❝ 多层次的工作/学习计划 + 番茄工作法 + 定额工作法 + 批处理 + 多任务并行 + 图层工作法❞
希望大家能将这些要点融入自己的工作学习当中,我相信一定会工作与学习地更富有成效。
下面是我学习用到的一些书籍学习导图,以及系统的学习资料。每一个知识点,都有对应的导图,学习的资料,视频,面试题目。
**如:我需要学习 **Flutter的知识。(大家可以参考我的学习方法)
点击这里了解更多即可领取!
- Flutter 的思维导图(无论学习什么,有学习路线都会事半功倍)

- Flutter进阶学习全套手册

- Flutter进阶学习全套视频

都会事半功倍)**
[外链图片转存中…(img-bW0NlAcR-1643942856169)]
- Flutter进阶学习全套手册
[外链图片转存中…(img-bmXMwyLw-1643942856170)]
- Flutter进阶学习全套视频
[外链图片转存中…(img-x6dcKsuD-1643942856171)]
大概就上面这几个步骤,这样学习不仅高效,而且能系统的学习新的知识。

Android Error:Execution failed for task '':app:preDebugAndroidTestBuild''. > Conflict wi...
错误内容:
Error:Execution failed for task '':app:preDebugAndroidTestBuild''.
> Conflict with dependency ''com.android.support:support-annotations'' in project '':app''. Resolved versions for app (26.1.0) and test app (27.1.1) differ. See https://d.android.com/r/tools/test-apk-dependency-conflicts.html for details.
我们寻找External Libraries中的27.1.1版本,删掉就行了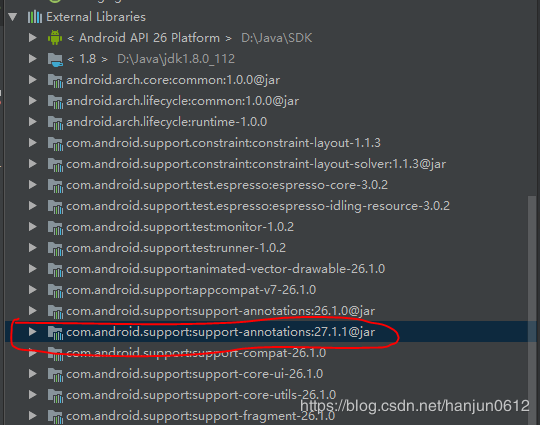
最后在build.gradle中添加如下代码
androidTestCompile(''com.android.support:support-annotations:26.1.0'') {
        force = true
    }
Lja...")
Android Error:Unable to find method ''com.android.build.gradle.api.BaseVariant.getOutputs()Lja...
问题:Error:Unable to find method ''com.android.build.gradle.api.BaseVariant.getOutputs () Ljava/util/List;''.
Possible causes for this unexpected error include:<ul><li>Gradle''s dependency cache may be corrupt (this sometimes occurs after a network connection timeout.)
<a href="syncProject">Re-download dependencies and sync project (requires network)</a></li><li>The state of a Gradle build process (daemon) may be corrupt. Stopping all Gradle daemons may solve this problem.
<a href="stopGradleDaemons">Stop Gradle build processes (requires restart)</a></li><li>Your project may be using a third-party plugin which is not compatible with the other plugins in the project or the version of Gradle requested by the project.</li></ul>In the case of corrupt Gradle processes, you can also try closing the IDE and then killing all Java processes.
build.gradle 如下:
buildscript {
repositories {
jcenter()
google()
}
dependencies {
classpath ''com.android.tools.build:gradle:3.0.0''
classpath ''com.jakewharton:butterknife-gradle-plugin:8.4.0''
// NOTE: Do not place your application dependencies here; they belong
// in the individual module build.gradle files
}
}
查阅了很久发现其实是 Android Studio3.0 与 butterknife 的冲突,github 上面已经有了这个问题 issue,JakeWharton 大神也给了相关解释,暂时的解决方法是降至 8.4 的版本。
关于android build error的介绍现已完结,谢谢您的耐心阅读,如果想了解更多关于(OK) 交叉编译hello.c for android (--sysroot),不使用Android.mk和ndk-build、android build,android通讯录开发实例、Android Error:Execution failed for task '':app:preDebugAndroidTestBuild''. > Conflict wi...、Android Error:Unable to find method ''com.android.build.gradle.api.BaseVariant.getOutputs()Lja...的相关知识,请在本站寻找。
本文标签:


