对于Redis(2):群集搭建感兴趣的读者,本文将提供您所需要的所有信息,我们将详细讲解redis集群搭建和使用,并且为您提供关于ElasticSearch群集搭建介绍,实现高可用、java代码中操作
对于Redis(2):群集搭建感兴趣的读者,本文将提供您所需要的所有信息,我们将详细讲解redis集群搭建和使用,并且为您提供关于ElasticSearch群集搭建介绍,实现高可用、java代码中操作Redis:单机redis、集群redis(spring+redis集成)、linux 下搭建 redis 并解决无法连接 redis 的问题、MGR群集搭建的宝贵知识。
本文目录一览:- Redis(2):群集搭建(redis集群搭建和使用)
- ElasticSearch群集搭建介绍,实现高可用
- java代码中操作Redis:单机redis、集群redis(spring+redis集成)
- linux 下搭建 redis 并解决无法连接 redis 的问题
- MGR群集搭建
:群集搭建(redis集群搭建和使用)")
Redis(2):群集搭建(redis集群搭建和使用)
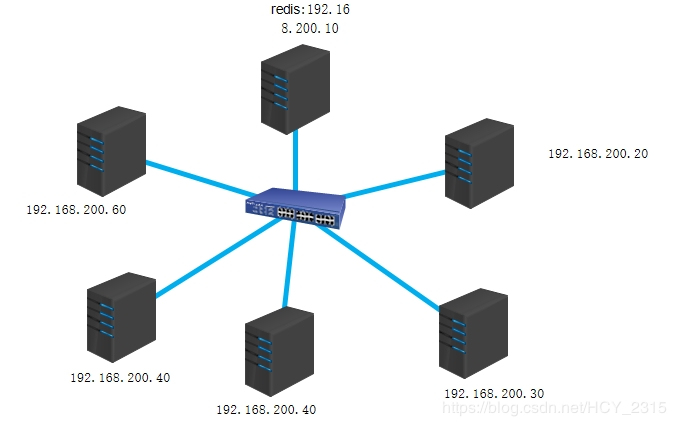
搭建集群至少需要3主3从6台服务器或进程,否则你会遇到如下错误:
Creating cluster
*** ERROR: Invalid configuration for cluster creation.
*** Redis Cluster requires at least 3 master nodes.
*** This is not possible with 4 nodes and 4 replicas per node.
*** At least 15 nodes are required.
redis安装请点击:
redis的安装介绍
一.配置redis故障转移群集。
1.安装redis的依赖关系。
1)安装ruby
[root@redis /]# yum -y install ruby rubygems
2)使用gem加载redis-gem程序
[root@redis /]# mv /usr/src/redis-3.2.0.gem /usr/local/redis-3.2.9/src/
[root@redis /]# cd /usr/local/redis-3.2.9/src/
[root@redis src]# gem install redis --version 3.2.9
2.配置redis群集。
1)修改主节点的redis配置文件支持redis群集功能。
[root@redis /]# vim /etc/redis/6379.conf
62 bind 192.168.200.10		监听的IP地址
  85 port 6379					监听的端口号
 129 daemonize yes				开启守护进程
 723 cluster-enabled yes		开启群集功能
 732 cluster-config-file nodes-6379.conf	群集配置文件
 732 cluster-config-file nodes-6379.conf	群集超时时间
 818 cluster-require-full-coverage yes		禁用群集日志
2)将redis群集节点的数据清空。
[root@redis /]# redis-server /etc/redis/6379.conf
[root@redis /]# redis-cli -h 192.168.200.10 -p 6379
192.168.200.10:6379> FLUSHALL 清空数据
3)将配置文件传输到其他redis,并修改监听IP地址。
[root@redis /]# scp /etc/redis/6379.conf root@192.168.200.20:/etc/redis/
4)创建群集添加群集节点。
[root@redis /]# /usr/local/redis-3.2.9/src/redis-trib.rb create --replicas 1 192.168.200.10:6379 192.168.200.20:6379 192.168.200.30:6379 192.168.200.40:6379 192.168.200.50:6379 192.168.200.60:6379
5)查看群集节点。
[root@redis /]# /usr/local/redis-3.2.9/src/redis-trib.rb check 192.168.200.10:6379
6)登录到指定的redis。
[root@redis /]# redis-cli -h 192.168.200.10 -p 6379 -c(-c:激活集群模式)

ElasticSearch群集搭建介绍,实现高可用
ElasticSearch简介:
ElasticSearch 是一个分布式、高扩展、高实时的搜索与数据分析引擎。它能很方便的使大量数据具有搜索、分析和探索的能力。充分利用ElasticSearch的水平伸缩性,能使数据在生产环境变得更有价值。ElasticSearch 的实现原理主要分为以下几个步骤,首先用户将数据提交到Elastic Search 数据库中,再通过分词控制器去将对应的语句分词,将其权重和分词结果一并存入数据,当用户搜索数据时候,再根据权重将结果排名,打分,再将返回结果呈现给用户。
ElasticSearch可以做什么:
Elasticsearch可以用于搜索各种文档。它提供可扩展的搜索,具有接近实时的搜索,并支持多租户。”Elasticsearch是分布式的,这意味着索引可以被分成分片,每个分片可以有0个或多个副本。每个节点托管一个或多个分片,并充当协调器将操作委托给正确的分片。再平衡和路由是自动完成的。“相关数据通常存储在同一个索引中,该索引由一个或多个主分片和零个或多个复制分片组成。一旦创建了索引,就不能更改主分片的数量。
ElasticSearch成功案例:
1) 2013年初,GitHub抛弃了Solr,采取ElasticSearch 来做PB级的搜索。 “GitHub使用ElasticSearch搜索20TB的数据,包括13亿文件和1300亿行代码”。
2)维基百科:启动以elasticsearch为基础的核心搜索架构。
3)SoundCloud:“SoundCloud使用ElasticSearch为1.8亿用户提供即时而精准的音乐搜索服务”。
4)百度:百度目前广泛使用ElasticSearch作为文本数据分析,采集百度所有服务器上的各类指标数据及用户自定义数据,通过对各种数据进行多维分析展示,辅助定位分析实例异常或业务层面异常。目前覆盖百度内部20多个业务线(包括casio、云分析、网盟、预测、文库、直达号、钱包、风控等),单集群最大100台机器,200个ES节点,每天导入30TB+数据。
Elasticsearch的特点:
1)可以作为一个大型分布式集群(数百台服务器)技术,处理PB级数据,服务大公司;也可以运行在单机上,服务小公司
2)Elasticsearch不是什么新技术,主要是将全文检索、数据分析以及分布式技术,合并在了一起,才形成了独一无二的ES;lucene(全文检索),商用的数据分析软件(也是有的),分布式数据库(mycat)
3)对用户而言,是开箱即用的,非常简单,作为中小型的应用,直接3分钟部署一下ES,就可以作为生产环境的系统来使用了,数据量不大,操作不是太复杂
4)数据库的功能面对很多领域是不够用的(事务,还有各种联机事务型的操作);特殊的功能,比如全文检索,同义词处理,相关度排名,复杂数据分析,海量数据的近实时处理;
好了,介绍了这么多进入正题,首先是环境准备:
1)>=jdk1.7(ES版本不同,对jdk的版本要求也不一样)
2)下载Elasticsearch包,直接在ES官网下载,ES最近几年特别活跃,版本更新频次也比较高
3)准备三台服务器
服务器名称 IP地址
node-1 192.168.86.130
node-2 192.168.86.131
node-3 192.168.86.132
4)编辑elasticsearch.yml文件,文件在安装包/config/目录下
http.cors.enabled: true http.cors.allow-origin: "*" node.master: true node.data: true cluster.name: ESTest ###保证三台服务器节点集群名称相同 node.name: node-1 ###每个节点名称不一样,其他两台为node-2,node-3 network.host: 192.168.86.130 ###实际服务器的ip地址 discovery.zen.ping.unicast.hosts: ["192.168.86.130", "192.168.86.131","192.168.86.132"] ###多个服务集群ip discovery.zen.minimum_master_nodes:1
5)其他几台服务器只需修改node.name和network.host属性
6)分别启动每台服务器上的ES
7)在地址栏输入http://192.168.86.130/_cat/nodes?pretty验证群集是否启动,带“*”证明是master节点,否则是slave节点
是不是ES的群集搭建非常简单,那是因为ES在背后为我们做了很多事情,有人可能会问,其中某台服务挂掉了怎么办:
(1)ES会自动选举新的master;
(2)ES在群集中会有多副本,异地备份能力;
(3)故障恢复,数据恢复能力
下一篇将会给大家分享,如何通过NBI大数据可视化工具连接Elasticsearch服务,通过写SQL的方式分析ES中的数据。
")
java代码中操作Redis:单机redis、集群redis(spring+redis集成)
一、准备
- 关于redis的一些安装,可以查看我的几篇文章自行安装:Redis目录。
- 一个web项目,我这边一直用的一个github项目是:https://github.com/gubaijin/buildmavenweb
- 导入java的Redis客户端依赖包Jedis:
<dependency>
            <groupId>redis.clients</groupId>
            <artifactId>jedis</artifactId>
            <version>2.9.0</version>
        </dependency>
二、单机Redis
- 简单单机用代码测试:
Jedis jedis = new Jedis("localhost"); jedis.set("foo", "bar"); String value = jedis.get("foo"); - 跟spring集成,大家可以直接点击查看:J2ee项目从0搭建(十一):在项目中集成Redis,用于数据的存储或者缓存
三、代码中连接redis集群
//使用jedis在代码中连接redis集群,因为是集群,可以自动发现,也同样只要一个地址就行了
        Set<HostAndPort> jedisClusterNodes = new HashSet<HostAndPort>();
        //Jedis Cluster will attempt to discover cluster nodes automatically
        jedisClusterNodes.add(new HostAndPort("192.168.240.142", 6379));
        JedisCluster jc = new JedisCluster(jedisClusterNodes);
        jc.set("foo", "bar");
        String value = jc.get("foo");
        System.out.println(value);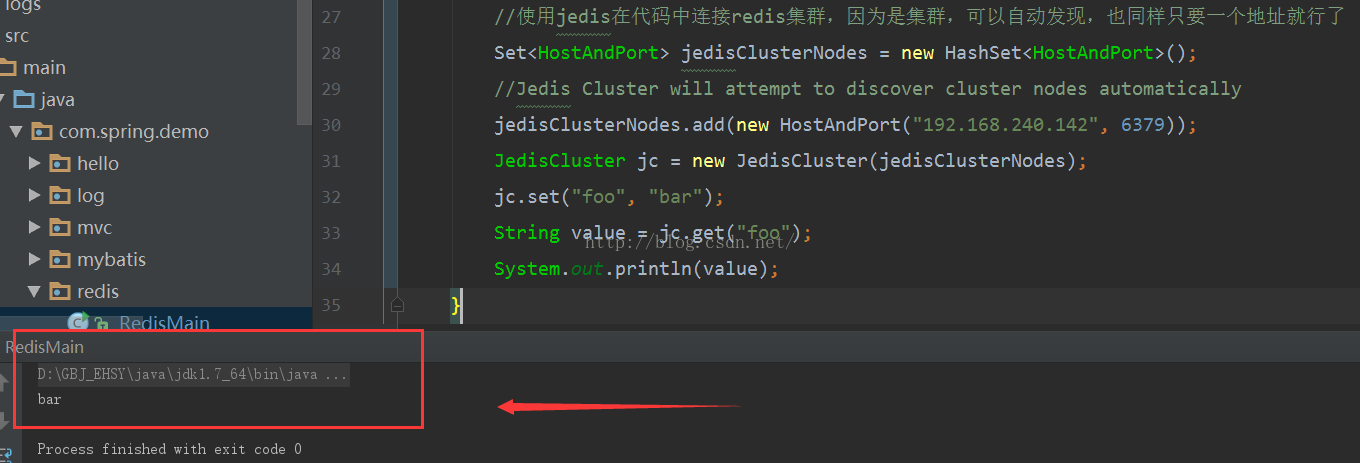
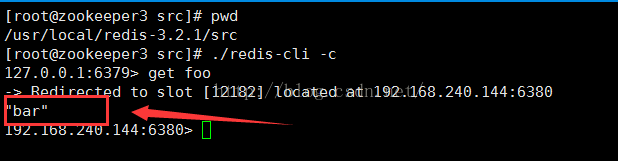
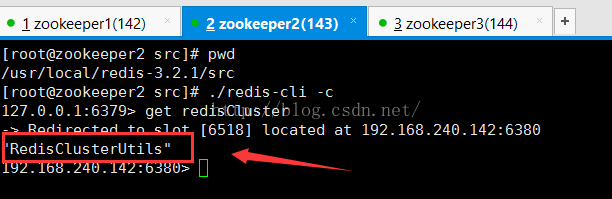
用redis客户端到redis集群中查看验证,存入时我们连接的是142,此时我们在144上进行验证:
四、spring-data-redis连接redis集群
因为实际中我们不可能每次使用的时候都去new一下,然后连接,所以这边推荐使用spring集成redis,并且使用较新的包(版本较低的可能不支持redis集群)。
- 导入jedis包后,还要导入spring-data-redis:
<dependency> <groupId>org.springframework.data</groupId> <artifactId>spring-data-redis</artifactId> <version>1.7.2.RELEASE</version> </dependency> - 创建一个redisCluster.properties:
#redis setting redis.host1=192.168.240.142 redis.port1=6379 #jedis setting jedis.maxIdle=6 jedis.minEvictableIdleTimeMillis=300000 jedis.numTestsPerEvictionRun=3 jedis.timeBetweenEvictionRunsMillis=60000 - 创建一个spring-redisCluster.xml:
<?xml version="1.0" encoding="UTF-8"?> <beans xmlns="http://www.springframework.org/schema/beans" xmlns:xsi="http://www.w3.org/2001/XMLSchema-instance" xmlns:context="http://www.springframework.org/schema/context" xmlns:mvc="http://www.springframework.org/schema/mvc" xsi:schemaLocation="http://www.springframework.org/schema/mvc http://www.springframework.org/schema/mvc/spring-mvc-4.0.xsd http://www.springframework.org/schema/beans http://www.springframework.org/schema/beans/spring-beans.xsd http://www.springframework.org/schema/context http://www.springframework.org/schema/context/spring-context.xsd" default-lazy-init="true"> <context:component-scan base-package="com.spring.demo.redis" /> <!-- 引入redis配置文件 --> <context:property-placeholder location="classpath:redisCluster.properties" /> <!-- 连接池配置 --> <bean id="jedisPoolConfig"> <!-- 连接池中最大空闲的连接数 --> <property name="maxIdle" value="${jedis.maxIdle}"></property> <!-- 连接空闲的最小时间,达到此值后空闲连接将可能会被移除。负值(-1)表示不移除. --> <property name="minEvictableIdleTimeMillis" value="${jedis.minEvictableIdleTimeMillis}"></property> <!-- 对于“空闲链接”检测线程而言,每次检测的链接资源的个数。默认为3 --> <property name="numTestsPerEvictionRun" value="${jedis.numTestsPerEvictionRun}"></property> <!-- “空闲链接”检测线程,检测的周期,毫秒数。如果为负值,表示不运行“检测线程”。默认为-1. --> <property name="timeBetweenEvictionRunsMillis" value="${jedis.timeBetweenEvictionRunsMillis}"></property> </bean> <!-- 集群配置 --> <bean id="jedisCluster"> <constructor-arg> <set> <bean> <constructor-arg name="host" value="${redis.host1}"/> <constructor-arg name="port" value="${redis.port1}"/> </bean> </set> </constructor-arg> <constructor-arg name="poolConfig" ref="jedisPoolConfig"/> </bean> </beans> - 新建一个 RedisClusterUtils.class用来存放一些统一的redis集群操作:
package com.spring.demo.redis; import org.springframework.beans.factory.annotation.Autowired; import org.springframework.stereotype.Component; import redis.clients.jedis.JedisCluster; import java.util.List; @Component public class RedisClusterUtils { @Autowired private JedisCluster jedisCluster; /** * 得到指定key值的value * @param key */ public Object get(String key){ return jedisCluster.get(key); } /** * 保存指定key值的value * @param key * @param value */ public void set(String key, String value){ jedisCluster.set(key, value); } /** * 保存指定key值的value * @param key * @param list */ public void set(String key, List<String> list){ jedisCluster.rpush(key, (String[]) list.toArray()); } /** * 删除指定key的value * @param key */ public void del(String key){ jedisCluster.del(key); } } - 代码运行验证:
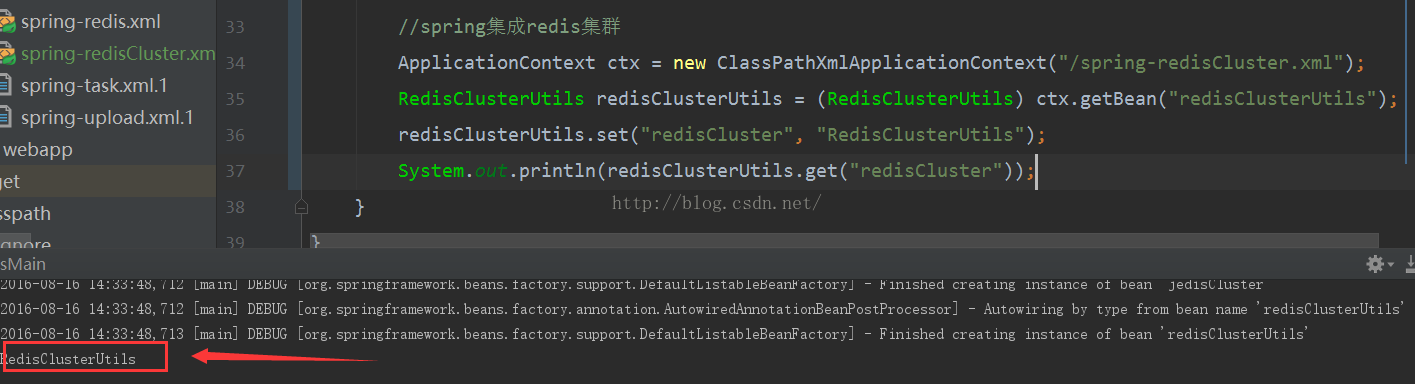
//spring集成redis集群 ApplicationContext ctx = new ClassPathXmlApplicationContext("/spring-redisCluster.xml"); RedisClusterUtils redisClusterUtils = (RedisClusterUtils) ctx.getBean("redisClusterUtils"); redisClusterUtils.set("redisCluster", "RedisClusterUtils"); System.out.println(redisClusterUtils.get("redisCluster")); - 客户端命令行连接集群验证,这次我们选择143进行验证
五、资料地址:
- 点赞 6
- 收藏
- 分享
-
- 文章举报


linux 下搭建 redis 并解决无法连接 redis 的问题
。
首先是搭建 redis,这个比较简单。
1、检查安装依赖程序
yum install gcc-c++
yum install -y tcl
yum install wget
2、获取安装文件
wget http://download.redis.io/releases/
这里面有很多版本,自己选择需要的下载
3、解压文件
自己新建一个目录将 redis 解压到里面
tar -zxvf redis-3.2.01.tar.gz
mv redis-3.2.01 /usr/local/redis
4、进入目录
cd /usr/local/redis
5、编译安装
make
make install
6、设置配置文件路径
mkdir -p /etc/redis
cp redis.conf/etc/redis
7、修改配置文件
redis.conf 是 redis 的配置文件,redis.conf 在 redis 源码目录。
注意修改 port 作为 redis 进程的端口,port 默认 6379。如果需要搭建 redis 集群,千万别忘了修改端口号。
redis 有两种启动方式,直接运行 bin/redis-server 将以前端模式启动,前端模式启动的缺点是 ssh 命令窗口关闭则 redis-server 程序结束,不推荐使用此方法。如下图:
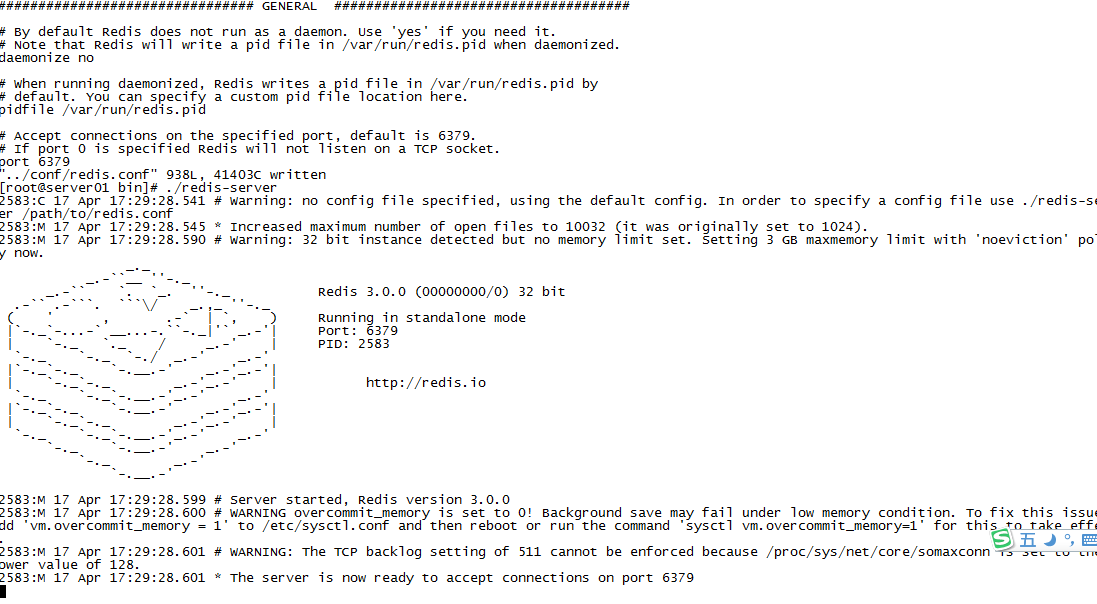
后端模式启动
修改 redis.conf 配置文件, daemonize yes 以后端模式启动。推荐!
打开 redis.conf, 使用命令 :/daemonize 快速查找到 daemonize 然后修改。
vi /etc/redis/redis.conf
仅修改: daemonize yes (no-->yes)
8、启动
/usr/local/bin/redis-server /etc/redis/redis.conf
9、查看启动
ps -ef | grep redis
10、使用客户端
redis-cli
>set name david
OK
>get name
"david"
11. 关闭客户端
redis-cli shutdown
12、开机启动配置
echo "/usr/local/bin/redis-server /etc/redis/redis.conf &" >> /etc/rc.local
开机启动要配置在 rc.local 中,而 /etc/profile 文件,要有用户登录了,才会被执行。
13、设置密码
因为这是给局域网内的很多人使用,所以设置一个访问密码很有必要。
修改 redis.conf 文件配置
使用命令 :/requirepass 快速查找到 # requirepass foobared 然后去掉注释,这个 foobared 改为自己的密码。然后 wq 保存。
14、重启 redis
sudo service redis restart 这个时候尝试登录 redis,发现可以登上,但是执行具体命令是提示操作不允许
- redis-cli -h 127.0.0.1 -p 6379
- redis 127.0.0.1:6379>
- redis 127.0.0.1:6379> keys *
- (error) ERR operation not permitted
尝试用密码登录并执行具体的命令看到可以成功执行
- redis-cli -h 127.0.0.1 -p 6379 -a password
- redis 127.0.0.1:6379> keys *
- 1) "myset"
- 2) "mysortset"
- redis 127.0.0.1:6379> select 1
- OK
如果是自己在本机上使用现在已经可以了,因为我这是局域网内提供给大家使用的所以还需要最后的配置。
当时修改开发的配置文件后,启动项目报错。
org.springframework.data.redis.RedisConnectionFailureException: Cannot get Jedis connection; nested exception is redis.clients.jedis.exceptions.JedisConnectionException: Could not get a resource from the pool
at org.springframework.data.redis.connection.jedis.JedisConnectionFactory.fetchJedisConnector(JedisConnectionFactory.java:162) ~[spring-data-redis-1.5.0.RELEASE.jar:1.5.0.RELEASE]
at org.springframework.data.redis.connection.jedis.JedisConnectionFactory.getConnection(JedisConnectionFactory.java:251) ~[spring-data-redis-1.5.0.RELEASE.jar:1.5.0.RELEASE]
at org.springframework.data.redis.connection.jedis.JedisConnectionFactory.getConnection(JedisConnectionFactory.java:58) ~[spring-data-redis-1.5.0.RELEASE.jar:1.5.0.RELEASE]
at org.springframework.data.redis.core.RedisConnectionUtils.doGetConnection(RedisConnectionUtils.java:128) ~[spring-data-redis-1.5.0.RELEASE.jar:1.5.0.RELEASE]
打开 cmd 然后使用 telnet ip 端口 来 ping 配置的 redis(要保证 redis 已启动),发现无法 ping 通。
这是因为在 redis.conf 中有个配置 bind 127.0.0.1 这个是默认只有本机访问,把这个注释掉就好了,注释以后查看 redis 进程就变为下面这样:
[root@localhost redis]# ps -ef | grep redis
root 5655 1 0 11:40 ? 00:00:23 ./redis-server *:6379
root 21184 18040 0 17:33 pts/1 00:00:00 grep --color=auto redis
这个 * 号就表示允许其它用户访问了。然后在用打开本机的 cmd 使用 telnet ip 端口 就能 ping 通了。
以上是全部内容,不足之处欢迎指出,互相交流才有进步!

MGR群集搭建
环境
| IP地址 | 主机名 | 数据库 | 端口号 | Server_ID | 操作系统 |
|---|---|---|---|---|---|
| 192.168.144.10 | apenglinux-001.cn | MysqL5.7.26 | 3306 | 100 | CentOS7.5 |
| 192.168.144.20 | apenglinux-002.cn | MysqL5.7.26 | 3306 | 101 | CentOS7.5 |
| 192.168.144.30 | apenglinux-003.cn | MysqL5.7.26 | 3306 | 102 | CentOS7.5 |
single master 模式
- 三台机作ip与主机名的映射关系
vim /etc/hosts   -- 加入以下内容
192.168.144.10 apenglinux-001.cn
192.168.144.20 apenglinux-002.cn
192.168.144.30 apenglinux-003.cn
-
单主master主机为apenglinux-001.cn
vim /etc/my.cnf      -- 加入以下内容
server_id=100
gtid_mode=on
enforce_gtid_consistency=on
transaction_write_set_extraction=XXHASH64
log_bin=apenglinux
binlog_checksum=none
binlog_format=row
log_slave_updates=on
master_info_repository=table
relay_log_info_repository=table
loose_group_replication_group_name=‘70546c9a-5a52-46a4-84ee-141ca4359966‘
loose_group_replication_local_address=‘apenglinux-001.cn:10001‘
loose_group_replication_start_on_boot=off
loose_group_replication_group_seeds=‘apenglinux-001.cn:10001,apenglinux-002.cn:10002,apenglinux-003.cn:10003‘
loose_group_replication_group_bootstrap_group=off
- 重启MysqLd
- 连接MysqL,到(apenglinux-001.cn)MysqL里的操作如下
MysqL> set sql_log_bin=off;
MysqL> grant replication slave on *.* to [email protected]‘192.168.144.%‘ identified by ‘123456‘;
MysqL> flush privileges;
MysqL> set sql_log_bin=on;
MysqL> change master to master_user=‘repl‘,master_password=‘123456‘ for channel ‘group_replication_recovery‘;
MysqL> install plugin group_replication soname ‘group_replication.so‘;
MysqL> set global group_replication_bootstrap_group=on;
MysqL> start group_replication;
MysqL> set global group_replication_bootstrap_group=off;
MysqL> select * from performance_schema.replication_group_members;     -- 以下是查询到的内容
+---------------------------+--------------------------------------+-------------------+-------------+--------------+
| CHANNEL_NAME              | MEMBER_ID                            | MEMBER_HOST       | MEMBER_PORT | MEMBER_STATE |
+---------------------------+--------------------------------------+-------------------+-------------+--------------+
| group_replication_applier | 8ea873c2-8f71-11e9-bbb4-000c298347f1 | apenglinux-001.cn |        3306 | ONLINE       |
+---------------------------+--------------------------------------+-------------------+-------------+--------------+
-
从服务器(apenglinux-002.cn)的配置
vim /etc/my.cnf    --  跟 apenglinux-001.cn一样的配置,只需要修改以下两行
server_id=101
loose_group_replication_local_address=‘apenglinux-002.cn:10002‘
重启MysqLd
连接msyql,到MysqL里的操作如下
MysqL> set sql_log_bin=off;
MysqL> grant replication slave on *.* to [email protected]‘192.168.144.%‘ identified by ‘123456‘;
MysqL> flush privileges;
MysqL> set sql_log_bin=on;
MysqL> change master to master_user=‘repl‘,master_password=‘123456‘ for channel ‘group_replication_recovery‘;
MysqL>  install plugin group_replication soname ‘group_replication.so‘;
MysqL> set global group_replication_allow_local_disjoint_gtids_join=on;
MysqL> start group_replication;
MysqL> select * from performance_schema.replication_group_members;
+---------------------------+--------------------------------------+-------------------+-------------+--------------+
| CHANNEL_NAME              | MEMBER_ID                            | MEMBER_HOST       | MEMBER_PORT | MEMBER_STATE |
+---------------------------+--------------------------------------+-------------------+-------------+--------------+
| group_replication_applier | 8ea873c2-8f71-11e9-bbb4-000c298347f1 | apenglinux-001.cn |        3306 | ONLINE       |
| group_replication_applier | a049b503-8f72-11e9-ba4b-000c2906c8f7 | apenglinux-002.cn |        3306 | ONLINE       |
+---------------------------+--------------------------------------+-------------------+-------------+--------------+
- 从服务器apenglinux-003.cn的配置(与apenglinux-002.cn一样的配置),下面是要修改的
vim /etc/my.cnf
server_id=102
loose_group_replication_local_address=‘apenglinux-003.cn:10003‘

MysqL> select * from performance_schema.replication_group_members;
+---------------------------+--------------------------------------+-------------------+-------------+--------------+
| CHANNEL_NAME              | MEMBER_ID                            | MEMBER_HOST       | MEMBER_PORT | MEMBER_STATE |
+---------------------------+--------------------------------------+-------------------+-------------+--------------+
| group_replication_applier | 8ea873c2-8f71-11e9-bbb4-000c298347f1 | apenglinux-001.cn |        3306 | ONLINE       |
| group_replication_applier | a049b503-8f72-11e9-ba4b-000c2906c8f7 | apenglinux-002.cn |        3306 | ONLINE       |
| group_replication_applier | d9fd5ea2-8f73-11e9-8f3b-000c29096feb | apenglinux-003.cn |        3306 | ONLINE       |
+---------------------------+--------------------------------------+-------------------+-------------+--------------+
- 查看单主模式的主节点(所有的节点都可以查看)
MysqL> show global status like ‘%primary%‘;
+----------------------------------+--------------------------------------+
| Variable_name                    | Value                                |
+----------------------------------+--------------------------------------+
| group_replication_primary_member | 8ea873c2-8f71-11e9-bbb4-000c298347f1 |
+----------------------------------+--------------------------------------+
MGR的多主模式
在 apenglinux-001.cn主机上的设置:
停止MGR,关掉单主模式,开启多主模式,开启引导组,开启mgr,关闭引导组
MysqL> stop group_replication;
MysqL> set global group_replication_single_primary_mode=off;
MysqL> set global group_replication_enforce_update_everywhere_checks=on;
MysqL> set global group_replication_bootstrap_group=on;
MysqL> start group_replication;
MysqL> set global group_replication_bootstrap_group=off;
在apenglinux-002.cn,apenglinux-003.cn上的设置:
停止mgr,允许写入,加入组,关掉单主模式,开启多主模式,开启mgr
MysqL> stop group_replication;
MysqL> set global read_only=off,super_read_only=off;
MysqL> set global group_replication_allow_local_disjoint_gtids_join=on;
MysqL> set global group_replication_single_primary_mode=off;
MysqL> set global group_replication_enforce_update_everywhere_checks=on;
MysqL> start group_replication;
查看成员信息
MysqL> select * from performance_schema.replication_group_members;
+---------------------------+--------------------------------------+-------------------+-------------+--------------+
| CHANNEL_NAME              | MEMBER_ID                            | MEMBER_HOST       | MEMBER_PORT | MEMBER_STATE |
+---------------------------+--------------------------------------+-------------------+-------------+--------------+
| group_replication_applier | 8ea873c2-8f71-11e9-bbb4-000c298347f1 | apenglinux-001.cn |        3306 | ONLINE       |
| group_replication_applier | a049b503-8f72-11e9-ba4b-000c2906c8f7 | apenglinux-002.cn |        3306 | ONLINE       |
| group_replication_applier | d9fd5ea2-8f73-11e9-8f3b-000c29096feb | apenglinux-003.cn |        3306 | ONLINE       |
+---------------------------+--------------------------------------+-------------------+-------------+--------------+
我们今天的关于Redis(2):群集搭建和redis集群搭建和使用的分享已经告一段落,感谢您的关注,如果您想了解更多关于ElasticSearch群集搭建介绍,实现高可用、java代码中操作Redis:单机redis、集群redis(spring+redis集成)、linux 下搭建 redis 并解决无法连接 redis 的问题、MGR群集搭建的相关信息,请在本站查询。
本文标签:


