如果您想了解两小时入门SpringBoot学习的相关知识,那么本文是一篇不可错过的文章,我们将对进阶进行全面详尽的解释,并且为您提供关于(入门SpringBoot)SpringBoot发送邮件(十一)
如果您想了解两小时入门SpringBoot学习的相关知识,那么本文是一篇不可错过的文章,我们将对进阶进行全面详尽的解释,并且为您提供关于(入门SpringBoot)SpringBoot发送邮件(十一)、(入门SpringBoot)SpringBoot结合redis(四)、(入门SpringBoot)SpringBoot结合定时任务task(十)、Spring Boot学习(二)搭建一个简易的Spring Boot工程的有价值的信息。
本文目录一览:- 两小时入门SpringBoot学习(进阶)(初学springboot)
- (入门SpringBoot)SpringBoot发送邮件(十一)
- (入门SpringBoot)SpringBoot结合redis(四)
- (入门SpringBoot)SpringBoot结合定时任务task(十)
- Spring Boot学习(二)搭建一个简易的Spring Boot工程
(初学springboot)")
两小时入门SpringBoot学习(进阶)(初学springboot)
本篇笔记中主要介绍了以下几个内容:1、使用@Valid注解进行表单验证;2、使用AOP来处理请求;3、统一异常处理;4、之前是使用postman进行测试,现在介绍如何使用单元测试。注意本篇笔记使用了前面一篇《2小时入门Springboot》的红包项目代码。(阅读本篇文章,最好有AOP基础,否则比较吃力)
首先回忆起前面创建单个红包时的create方法:
@PostMapping("/luckymoneys")
public Luckymoney create(@RequestParam("sender")String sender,
                             @RequestParam("money")BigDecimal money){
        Luckymoney luckymoney = new Luckymoney();
        luckymoney.setSender(sender);
        luckymoney.setMoney(money);
        return luckymoneyRepository.save(luckymoney);
    }
现在假设红包不止这么几个属性,还有发送时间,接收时间等,那么还使用@RequestParam注解的方式其实是非常复杂的,此时你完全可以传入一个红包对象,这里面的属性可以直接从传入的红包对象中获取?你可能就要问了我们怎么传入红包对象?
我们知道SpringBoot是SpringMVC的升级版,而SpringMVC可以将表单的字段与Controller方法参数中对象的属性进行映射,前提是两者的名称和类型一致。比如表单中传入sender=xiaobai&money=100,方法参数中的Luckymoney对象也恰好有String sender与BigDecimal money属性,SpringMVC将完成字段 --> 对象属性的映射并将数据绑定到Luckymoney对象的对应属性上。SpringMVC将我们输入字段的类型、名称与方法参数中Luckymoney对象中的属性一一对比,如果吻合将会自动映射过去并封装成对象,如果某些字段和对象的属性不能匹配,那么封装成的对象中该属性为null。
所以该方法其实也可以修改为这样:
   @PostMapping("/luckymoneys")
    public Luckymoney create(Luckymoney luckymoney){
        return luckymoneyRepository.save(luckymoney);
    }
@Valid注解
现在有一个需求需要控制红包的金额,要求单个红包最大只能200元,最小就是1元,当金额不在1-200之间会有红包金额太小或者太大的提示。
此时需要在Luckymoney实体类上使用@Min和@Max注解进行说明,还需要使用value属性来指定判断条件,以及不满足所设定条件时的信息提示message。
@Min(value = 1,message = "红包金额太小")
@Max(value = 200,message = "红包金额太大")
private BigDecimal money;  //红包金额
然后回到LuckymoneyController类的create方法中,使用@Valid注解用于标识对哪个对象进行验证,还需要传入一个BindingResult对象,这里对象就是验证结果,然后可以根据验证结果中是否包含错误信息来书写业务逻辑,以及将错误信息输出提示等:
@PostMapping("/luckymoneys")
public Luckymoney create(@Valid Luckymoney luckymoney, BindingResult bindingResult){
        //判断是否验证通过
        if(bindingResult.hasErrors()){
            //不通过,停止对象创建
            System.out.println(bindingResult.getFieldError().getDefaultMessage());
            return null;
        }
        return luckymoneyRepository.save(luckymoney);
    }
启动项目,在Postman中输入http://localhost:8081/luckymoney/luckymoneys,并新建测试属性sender和money,看看money为0.1和300时,IDEA是否会输出前面所设置的错误信息,测试发现没有问题。
AOP
AOP是一种编程范式,与语言无关,是一种程序设计思想。AOP(Aspect Oriented Programming)面向切面编程,注意不仅仅是java才有;OOP(Object Oriented Programming)面向对象编程;POP(Procedure Oriented Programming)面向过程编程。
面向过程和面向对象只是换个角度看世界,换个姿势处理问题。面向对象关注的是将需求功能垂直划分为不同的且相对独立的,它会封装成良好的类,并且让它们有属于自己的行为和属性 。而AOP面向切面编程则恰恰相反,利用一种横切技术,将面向对象所构建的类的庞大体系进行水平切割,并且将那些影响到多个类的公共行为封装成可以重用的模块,这个模块就称之为切面,所以AOP编程就称之为面向切面编程。AOP的关键思想就是将通用逻辑从业务逻辑中分离出来。
接下来以处理请求并且打印日志这个例子为说明进行介绍AOP和OOP这两种思想是怎样从水平和垂直进行划分的:

这两个都是非常简单的场景,其实这些可以进行拆分,如下图中圈出的信息,其实都是处理请求记录请求,以及记录回复,所以这两部分其实是可以作为切面提取出来,这样就将通用逻辑从业务逻辑中分离出来了。

接下来以记录每一个http请求为例,介绍如何在spring中集成AOP,且让它来统一处理日志。可能说记录每一个http请求有些困惑,这样以实现登录页面访问限制为例来介绍可能更具体一些,也就是说某些页面只有用户登录以后才能查看,否则无法进行查看。按照以往的思路就是在每一个方法上添加登录验证,也就是判断用户是否登录,登录可以访问,否则就跳转到登录页面,其实这个需要在每一个方法上添加,这样会导致业务代码和通用代码混合。
如果你有一个想法就是在每一个controller中定义一个无参的构造方法,在构造方法中进行判断,这种想法是可以的,但是你忘了spring在启动的时候就将这些类给实例化了,当你在进行http访问的时候,不会再次执行这个无参的构造方法,所以这种方式也是不可行的。
其实怎么解决这个问题?用AOP啊,因为它的关键思想就是将通用逻辑从业务逻辑中分离出来。
第一步,在pom.xml中添加依赖:
        <!--添加aop依赖-->
        <dependency>
            <groupId>org.springframework.boot</groupId>
            <artifactId>spring-boot-starter-aop</artifactId>
        </dependency>
第二步,注意按照以往的套路都是在启动类上添加一个注解,但是aop不需要,因此这一步可以忽略。
第三步,新建aspect包,接着在里面定义httpAspect类:
package com.envy.luckymoney.aspect;

import org.aspectj.lang.annotation.After;
import org.aspectj.lang.annotation.Aspect;
import org.aspectj.lang.annotation.Before;
import org.springframework.stereotype.Component;

@Aspect
@Component
public class HttpAspect {

    //在controller方法中的list方法执行前执行
    @Before("execution(* com.envy.luckymoney.controller.LuckymoneyController.list(..))")
    public void beforeLog(){
        System.out.println("前置通知");
    }

    //在controller方法中的findById方法执行后执行
    @After("execution(* com.envy.luckymoney.controller.LuckymoneyController.findById(..))")
    public void afterLog(){
        System.out.println("最终通知");
    }
}
上面就是AOP当中最常用的前置通知和最终通知。前置通知在拦截方法前面执行,最终通知在拦截方法后执行后(不论是否有异常)执行。现在你发现两个代码中都存在重复的"execution(* com.envy.luckymoney.controller.LuckymoneyController代码,此时你想能不能去掉重复的啊?答案是当然可以的,往下看:
@Aspect
@Component
public class HttpAspect {
    @Pointcut("execution(* com.envy.luckymoney.controller.LuckymoneyController.*(..))")
    public void log(){}

    //在controller方法中的list方法执行前执行
    @Before("log()")
    public void beforeLog(){
        System.out.println("前置通知");
    }

    //在controller方法中的findById方法执行后(不论是否有异常)执行
    @After("log()")
    public void afterLog(){
        System.out.println("最终通知");
    }
}
先使用@Pointcut注解来表示切入点,然后只需在通知上直接调用这个方法即可。你看到了在各个方法中我们都是使用syso标准输出方式,其实还可以使用Log输出,它是springboot自带的测试类(注意使用org.slf4j类中的Logger ):
private static final Logger logger = LoggerFactory.getLogger(HttpAspect.class);
logger.info("日志输出信息");
我们知道既然是记录http请求,那么肯定是在该方法执行前记录,也就是使用到前置通知,我们主要获取http请求中的url、method、ip、类方法、参数:
    //在controller方法中的list方法执行前执行
    @Before("log()")
    public void beforeLog(JoinPoint joinPoint){
        logger.info("前置通知");
        //用于获取请求中的url、method、ip、类方法、参数

        ServletRequestAttributes servletRequestAttributes = (ServletRequestAttributes) RequestContextHolder.getRequestAttributes();
        HttpServletRequest request = (HttpServletRequest) servletRequestAttributes.getRequest();

        //获取url
        logger.info("url={}",request.getRequestURL());
        //获取method
        logger.info("method={}",request.getMethod());
        //获取IP
        logger.info("ip={}",request.getRemoteAddr());
        //获取类方法
        logger.info("class_method={}",joinPoint.getSignature().getDeclaringTypeName()+"."+joinPoint.getSignature().getName());
        //获取参数
        logger.info("args={}",joinPoint.getArgs());
    }
然后运行项目,Postman中输入http://localhost:8081/luckymoney/luckymoney/3,就可以看到控制台有信息输出了:
前置通知
url=http://localhost:8081/luckymoney/luckymoney/3
method=GET
ip=0:0:0:0:0:0:0:1
class_method=com.envy.luckymoney.controller.LuckymoneyController.findById
args=3
最终通知
注意当你在浏览器中设置的访问是localhost,那么对应的IP就是0:0:0:0:0:0:0:1,如果是127.0.0.1就是127.0.0.1。
现在你又有一个问题了,既然获取到了http请求,那么是不是也能获取response回应呢?是的,的确可以,不过此时需要使用到@AfterReturning注解,也就是后置通知。它可以定义方法的返回值作为参数,也可以传入JointPoint对象。
 @AfterReturning(pointcut="log()",returning = "rtobject")
    public void afterReturnLog(Object rtobject){
        logger.info("后置通知");
        logger.info("response={}",rtobject);
    }
我们知道它最后肯定是返回Luckymoney对象,因此需要在Luckymoney实体类中添加toString方法用于输出,最终控制台输出以下信息:
后置通知
response=Luckymoney{id=3, money=120.00, sender=''小红'', receiver=''小思''}
请注意前置通知也会执行和输出,不过这里就省略了。
统一异常处理
异常,我们也称之为意外或者例外,它本质上就是程序上的错误。那么统一异常处理又是什么?为什么需要进行统一异常处理呢?通过一个需求来进行验证。
假设现在我们需要通过微信红包的金额来判断某人与某人的亲密关系(仅仅是案例需要,没有任何科学依据,请不要相信,否则后果自负),条件是这样的:如果红包金额大于1元同时小于88元,说明关系一般;金额大于等于88元,又小于166元,说明关系不错;大于或等于166元,说明关系亲密。是不是很简单?那就发一个红包试试呗。在Postman中使用http://localhost:8081/luckymoney/luckymoneys链接,让小天发300元红包,运行你会发现控制台出错了,因为money验证不通过,我们前面设置了money在1-200元之间,在create方法中对红包这个对象进行了验证,如果不满足条件就会报错返回null,而你刚才在后置通知中又调用了rtobject.toString方法,进而引发了空指针异常:
 @PostMapping("/luckymoneys")
    public Luckymoney create(@Valid Luckymoney luckymoney, BindingResult bindingResult){
        //判断是否验证通过
        if(bindingResult.hasErrors()){
            //不通过,停止对象创建
            System.out.println(bindingResult.getFieldError().getDefaultMessage());
            return null;
        }
        return luckymoneyRepository.save(luckymoney);
    }
但是当你将create方法中的Luckymoney修改为Object,并且希望将错误显示在浏览器上,此时代码修改为:
    /**
     * 创建单个红包(发红包)(统一异常处理示例)
     * **/
    @PostMapping("/luckymoneys")
    public Object create(@Valid Luckymoney luckymoney, BindingResult bindingResult){
        //判断是否验证通过
        if(bindingResult.hasErrors()){
            //不通过,停止对象创建,并将错误信息显示到浏览器上面
            return bindingResult.getFieldError().getDefaultMessage();
        }
        return luckymoneyRepository.save(luckymoney);
    }
然后再来运行一下项目,依旧是发送300元的红包,你会看到错误信息已经出现在浏览器页面上了:“红包金额太大”。
那现在问题来了,红包金额在1-200之间页面返回的是Json对象,而大于200或者小于1元返回的就是“红包金额太大”(“红包金额太小”)这六个字,这让前端人员该如何应对?我们希望成功和出现异常返回类似的json格式,例如:
{
  "code": "1",
  "msg": "红包金额太大(太小)",
  "data": null
}

{
  "code": "0",
  "msg": "成功",
  "data": {
    "id": 20,
    "sender": "小东",
    "money": 300,
    "receiver": null
  }
}
为了完成这个任务,其实就是返回一个Object,而这个对象具有三个属性code、msg和data,那就在domain包下面新建Result.java文件,里面的代码为:
/**
 * http请求返回的最外层对象
 * **/
public class Result<T> {

    //状态码
    private Integer code;

    //提示信息
    private String msg;

    //具体的数据
    private T data;

//getter和setter方法
}
然后修改LuckymoneyController类中的create方法为:
@PostMapping("/luckymoneys")
    public Object create(@Valid Luckymoney luckymoney, BindingResult bindingResult){
        Result result= new Result();
        //判断是否验证通过
        if(bindingResult.hasErrors()){
            //不通过,停止对象创建,并将错误信息显示到浏览器上面
            result.setCode(1);
            result.setMsg(bindingResult.getFieldError().getDefaultMessage());
            return result;
        }
        result.setCode(0);
        result.setMsg("成功");
        result.setData(luckymoneyRepository.save(luckymoney));
        return result;
    }
运行项目,在Postman中使用http://localhost:8081/luckymoney/luckymoneys链接,让小天发300和100元红包,你会发现输出的格式都统一了:
{
  "code": "",
  "msg": "",
  "data": {}
}
但是细心的你发现LuckymoneyController类中的create方法里面存在大量的重复代码,所以需要进行优化,切记代码优化一定是边写边优化,不要等到以后,因为那样你可能会忘记了。新建util包,并在里面新建ResultUtil.java类:
public class ResultUtil {
    private static Result result = new Result();

    //成功,且返回状态码和数据
    public static Result success(Integer code,Object object){
        result.setCode(code);
        result.setMsg("成功");
        result.setData(object);
        return result;
    }

    //成功,只返回状态码
    public static Result success(Integer code){
        return success(code,null);
    }

    //失败,且返回状态码和提示
    public static Result error(Integer code,String msg){
        result.setCode(code);
        result.setMsg(msg);
        result.setData(null);
        return result;
    }
}
然后修改LuckymoneyController类中的create方法为:
    @PostMapping("/luckymoneys")
    public Object create(@Valid Luckymoney luckymoney, BindingResult bindingResult){
        //判断是否验证通过
        if(bindingResult.hasErrors()){
            //不通过,停止对象创建,并将错误信息显示到浏览器上面
            return ResultUtil.error(1,bindingResult.getFieldError().getDefaultMessage());
        }
        return ResultUtil.success(0,luckymoneyRepository.save(luckymoney));
    }
言归正传,异常处理统一之后,现在开始进行需求的功能实现:如果红包金额大于1元同时小于88元,说明关系一般;金额大于等于88元,又小于166元,说明关系不错;大于或等于166元,说明关系亲密。
第一步,在LuckymoneyService类中书写业务逻辑。这里有一个问题就是前面定义的Result的msg属性应该怎样设置?我们这里有三种情况,所以msg应该有三种情况:关系一般、关系不错、关系亲密。我们可以获取红包的金额,然后根据红包的金额大小进行判断,然后返回不同的标志如A、B、C等,然后在Controller中根据标志的不同来设置Result的msg属性,这的确是一种可行的方案,但是假设情况很多,那么标志就复杂难看了,所以需要另一种方式。这里考虑使用exception,把每种情况作为exception抛出去:
    public void getMoney(Integer id) throws Exception{
        Optional<Luckymoney> optional= luckymoneyRepository.findById(id);
        if(optional.isPresent()){
            Luckymoney luckymoney = optional.get();
            BigDecimal money = luckymoney.getMoney();
            if(money.intValue()>=1&&money.intValue()<88){
                //说明关系一般
                throw new Exception("关系一般");
            }else if(money.intValue()>=88&&money.intValue()<166){
                //说明关系不错
                throw new Exception("关系不错");
            }else{
                //说明关系亲密
                throw new Exception("关系亲密");
            }
        }
    }
第二步,在LuckymoneyController中新建一个获取获取红包金额的方法getMoney,然后调用service中的方法(注意这个getMoney方法业务要将异常抛出去,不去捕获,因为我们需要在页面显示异常的message):
   //获取红包金额
    @GetMapping("/luckymoneys/getmoney/{id}")
    public void getMoney(@PathVariable("id")Integer id) throws Exception {
        luckymoneyService.getMoney(id);
    }
运行项目,在Postman中使用http://localhost:8081/luckymoney/luckymoneys/getmoney/15链接,你会发现异常信息确实输出来了:
{
    "timestamp": "2018-04-10T07:05:04.857+0000",
    "status": 500,
    "error": "Internal Server Error",
    "message": "关系一般",
    "path": "/luckymoney/luckymoneys/getmoney/15"
}
但是这样又不是和我们Result三个属性保持一致了,破坏了我们之前预想的格式。怎么解决这个问题呢?此时我们可以将这个message提取出来然后对其进行封装为Result,最后将其返回给浏览器。新建handle包,并在里面新建ExceptionHandle类,这个类用于处理之前的异常:
@ControllerAdvice
public class ExceptionHandle {
    /**
     * ExceptionHandle用于处理异常
     * **/

    @ExceptionHandler(value = Exception.class)
    @ResponseBody
    public Result handle(Exception exception){
        return ResultUtil.error(1,exception.getMessage());
    }
}
这样通过使用@ControllerAdvice这样用于增强的Controller的注解,这里使用了它的全局异常处理功能,且配合@ExceptionHandler(value = Exception.class)来实现实现全局异常处理,只需要定义类,并添加该注解即可。@ExceptionHandler注解用来指明异常的处理类型,即如果这里指定为NullpointerException,则数组越界异常就不会进到这个方法中来,具体的使用后续文章会进行介绍。
重新运行项目,在Postman中使用http://localhost:8081/luckymoney/luckymoneys/getmoney/15链接,你会发现信息终于按照之前的设想显示出来了:
{
    "code": 1,
    "msg": "关系一般",
    "data": null
}
但是现在还有一个问题就是这里设置的code都是1,这肯定是不好的,因为我们希望通过code状态码来判断具体是什么问题。这个Exception对象中只能传一个message,不能再传code,这时候应该怎样操作呢?聪明的你可能想到了,既然这个Exception不能再传code,但是我们可以自己写一个可以传code的Exception啊,对就是这样。新建exception包,并在里面新建LuckymoneyException类,这个类用于处理之前的异常并且可以支持code传参(注意此时我们需要继承RuntimeException类,而不是Exception类,因为spring框架仅仅对RuntimeException才会进行事务回滚):
public class LuckymoneyException extends RuntimeException {
    private Integer code;

    public LuckymoneyException(Integer code,String message) {
        super(message);
        this.code = code;
    }

    public Integer getCode() {
        return code;
    }

    public void setCode(Integer code) {
        this.code = code;
    }
}
然后修改LuckymoneyService类中的getMoney方法,修改抛出现在自定义的LuckymoneyException异常:
public void getMoney(Integer id) throws Exception{
        Optional<Luckymoney> optional= luckymoneyRepository.findById(id);
        if(optional.isPresent()){
            Luckymoney luckymoney = optional.get();
            BigDecimal money = luckymoney.getMoney();
            if(money.intValue()>=1&&money.intValue()<88){
                //说明关系一般,code为100
                throw new LuckymoneyException(100,"关系一般");
            }else if(money.intValue()>=88&&money.intValue()<166){
                //说明关系不错,code为101
                throw new LuckymoneyException(101,"关系不错");
            }else{
                //说明关系亲密,code为102
                throw new LuckymoneyException(102,"关系亲密");
            }
        }
    }
还没完,还需要修改ExceptionHandle类,因为现在需要处理的异常是自定义的LuckymoneyException异常:
@ControllerAdvice
public class ExceptionHandle {
    /**
     * ExceptionHandle用于处理异常
     * **/

    private static final Logger logger = LoggerFactory.getLogger(ExceptionHandle.class);

    @ExceptionHandler(value = LuckymoneyException.class)
    @ResponseBody
    public Result handle(Exception exception){
        if(exception instanceof LuckymoneyException){
            LuckymoneyException luckymoneyException = (LuckymoneyException) exception;
            return ResultUtil.error(luckymoneyException.getCode(),luckymoneyException.getMessage());
        }else{
            logger.error("系统异常:{}=",exception);
            return ResultUtil.error(-1,"未知错误");
        }
    }
}
然后对之前的异常进行细化,如果异常是自定义的LuckymoneyException实例,那么强制转换并调用对应的方法,如果不是那就暂且定义为未知错误,并通过日志信息输出。
你现在可能还有一个问题就是现在哪里还有系统异常,你还记得在LuckymoneyController类中的create方法中,我们对提交的表单进行验证,不通过返回的是1,注意了这里我们就可以认为是系统异常,因为它不是我们需要的异常,因此将create方法修改为:
    @PostMapping("/luckymoneys")
    public Object create(@Valid Luckymoney luckymoney, BindingResult bindingResult){
        //判断是否验证通过
        if(bindingResult.hasErrors()){
            //不通过,停止对象创建,并将错误信息显示到浏览器上面
            return null;
        }
        return ResultUtil.success(0,luckymoneyRepository.save(luckymoney));
    }
这样返回一个null,还记得前面的后置通知吗?我们设置的是所有方法都进行拦截,因此当你创建一个金额大于200的红包时,它会报null错误,而后置通知是方法无论是否异常都会执行,既然你都返回一个null,你还调用它的toString方法,那么肯定会引起空指针异常,因此此时我们这个系统未知错误就显示了。
  @AfterReturning(pointcut="log()",returning = "rtobject")
    public void afterReturnLog(Object rtobject){
        logger.info("后置通知");
        logger.info("response={}",rtobject.toString());
    }
现在异常似乎已经统一处理的较为完美了,但是code和message管理却非常混乱,比较好的做法就是弄一个枚举类。新建enums包,并在里面新建LuckymoneyEnum枚举类,这个类用于管理code和message:
package com.envy.luckymoney.enums;

//枚举类,用于管理code和message
public enum LuckmoneyEnum {
    UNKNOWN_ERROR(-1,"未知错误"),
    SUCCESS(0,"成功"),
    RELATIONSHIP_NORMAL(100,"关系一般"),
    RELATIONSHIP_GOOD(101,"关系不错"),
    RELATIONSHIP_BEAUTIFUL(102,"关系亲密"),
    ;

    private Integer code;

    private String message;

    LuckmoneyEnum(Integer code, String message) {
        this.code = code;
        this.message = message;
    }

    public Integer getCode() {
        return code;
    }

    public String getMessage() {
        return message;
    }
}
既然使用了枚举类,那么首先需要修改LuckymoneyException这个自定义异常类的代码为:
package com.envy.luckymoney.exception;

import com.envy.luckymoney.enums.LuckmoneyEnum;

public class LuckymoneyException extends RuntimeException {
    private Integer code;

    public LuckymoneyException(LuckmoneyEnum luckmoneyEnum) {
        super(luckmoneyEnum.getMessage());
        this.code = luckmoneyEnum.getCode();
    }

    public Integer getCode() {
        return code;
    }

    public void setCode(Integer code) {
        this.code = code;
    }
}
接着修改LuckymoneyService中的getMoney方法为:
public void getMoney(Integer id) throws Exception{
        Optional<Luckymoney> optional= luckymoneyRepository.findById(id);
        if(optional.isPresent()){
            Luckymoney luckymoney = optional.get();
            BigDecimal money = luckymoney.getMoney();
            if(money.intValue()>=1&&money.intValue()<88){
                //说明关系一般,code为100
                throw new LuckymoneyException(LuckmoneyEnum.RELATIONSHIP_NORMAL);
            }else if(money.intValue()>=88&&money.intValue()<166){
                //说明关系不错,code为101
                throw new LuckymoneyException(LuckmoneyEnum.RELATIONSHIP_GOOD);
            }else{
                //说明关系亲密,code为102
                throw new LuckymoneyException(LuckmoneyEnum.RELATIONSHIP_BEAUTIFUL);
            }
        }
    }
当然还有其他使用到code和message的地方,都需要修改这里就不一一而足了。
单元测试
Service测试
本次就介绍如何对Service和API进行介绍。测试Service时,新建一个通过id来查询某一个红包的信息,也就是下面的方法(注意在LuckymoneyService类中):
    //通过id来查询红包信息
    public Luckymoney findById(Integer id){
        return luckymoneyRepository.findById(id).orElse(null);
    }
在test文件夹下与LuckymoneyApplicationTests类同级目录下,新建一个测试类LuckymoneyServiceTest,里面的代码如下:
package com.envy.luckymoney;

import com.envy.luckymoney.domain.Luckymoney;
import com.envy.luckymoney.service.LuckymoneyService;
import org.junit.Assert;
import org.junit.Test;
import org.junit.runner.RunWith;
import org.springframework.beans.factory.annotation.Autowired;
import org.springframework.boot.test.context.SpringBootTest;
import org.springframework.test.context.junit4.SpringRunner;

import java.math.BigDecimal;

@RunWith(SpringRunner.class)
@SpringBootTest
public class LuckymoneyServiceTest {

    @Autowired
    private LuckymoneyService luckymoneyService;

    @Test
    public void findByIdTest(){
        Luckymoney luckymoney = luckymoneyService.findById(20);
        Assert.assertEquals(new BigDecimal("100.00"),luckymoney.getMoney());
    }
}
@RunWith(SpringRunner.class)注解表示使用了Spring的SpringRunner,以便在测试开始的时候自动创建Spring的应用上下文。其他的想创建spring容器的话,就得在web.xml配置classloader。 @RunWith注解就可以直接使用spring容器。底层使用了Junit测试工具。如果你仅仅使用了@Test注解,那么它不会启动spring容器。@SpringBootTest注解表示这个项目在springboot容器中运行,将会启动springboot工程。
运行findByIdTest测试方法,发现测试通过。不知道你发现没有这种测试方式的代码几乎和你在Service中写的代码一模一样,所以可以考虑有没有什么便捷的方式可以进行测试?答案是没有的,但是IDEA给我们提供了便捷的测试方式。在Service中,将鼠标放在需要测试的方法上,右键选择出现的GOTO,然后按照图示进行操作:


看到没有,通过使用IDEA就可以少些代码,它就给你提供了一个测试方法,你只需要在里面书写测试逻辑即可。
API测试
其实所谓的API测试就是Controller测试,以获取所有红包信息为例,也就是下面的方法(注意在LuckymoneyController类中):
@GetMapping("/luckymoneys")
    public List<Luckymoney> list(){
        return luckymoneyRepository.findAll();
    }
按照上面的测试方法,先使用IDEA来创建测试方法:
package com.envy.luckymoney.controller;

import org.junit.Test;
import org.junit.runner.RunWith;
import org.springframework.beans.factory.annotation.Autowired;
import org.springframework.boot.test.context.SpringBootTest;
import org.springframework.test.context.junit4.SpringRunner;

import javax.swing.*;

import static org.junit.Assert.*;

@RunWith(SpringRunner.class)
@SpringBootTest
public class LuckymoneyControllerTest {

    @Autowired
    private LuckymoneyController luckymoneyController;

    @Test
    public void list() {
        luckymoneyController.list();
    }
}
运行项目,发现测试没有问题,你以为这是在测试API吗?拜托这和url没有一点关系,所以并不是这样测试。正确的测试代码如下:
package com.envy.luckymoney.controller;

import org.junit.Test;
import org.junit.runner.RunWith;
import org.springframework.beans.factory.annotation.Autowired;
import org.springframework.boot.test.autoconfigure.web.servlet.AutoConfigureMockMvc;
import org.springframework.boot.test.context.SpringBootTest;
import org.springframework.test.context.junit4.SpringRunner;
import org.springframework.test.web.servlet.MockMvc;
import org.springframework.test.web.servlet.request.MockMvcRequestBuilders;
import org.springframework.test.web.servlet.result.MockMvcResultMatchers;

import javax.swing.*;

import static org.junit.Assert.*;

@RunWith(SpringRunner.class)
@SpringBootTest
@AutoConfigureMockMvc
public class LuckymoneyControllerTest {

    @Autowired
    private MockMvc mvc;

    @Test
    public void list() throws Exception {
       mvc.perform(MockMvcRequestBuilders.get("/luckymoneys")).andExpect(MockMvcResultMatchers.status().isOk());
    }
}
在这里我们使用到了@AutoConfigureMockMvc注解,该注解将会自动配置mockMvc的单元测试。因为@SpringBootTest注解默认不会启动服务器。.get()就是指使用get方法进行测试,andExcept()里面可以填写期望的信息,诸如类似的还有andReturn()等。
获取更多技术文章和信息,请关注我的个人微信公众号:余思博客,欢迎大家前来围观和玩耍:

SpringBoot发送邮件(十一)")
(入门SpringBoot)SpringBoot发送邮件(十一)
SpringBoot配置邮件服务:
1.引入jar
<!-- 邮件 -->
<dependency>
<groupId>org.springframework.boot</groupId>
<artifactId>spring-boot-starter-mail</artifactId>
</dependency>
2.配置资源文件,邮箱参数:
#邮件:邮件服务器
spring.mail.host=smtp.163.com
#发件人邮箱
spring.mail.username=xxx@163.com
#授权码:
spring.mail.password=abc123
#编码:
spring.mail.default-encoding=UTF-8
3.准备发送邮件方法:
service层读取配置文件参数,注入JavaMailSender
@Value("${spring.mail.username}")
private String sender; //读取配置文件中的参数
@Autowired
private JavaMailSender mailSender; //自动注入的Bean
/**
* 发送普通文本:
* @param to 发送人:
* @param subject 发送标题:
* @param context 发送内容:
*/
@Override
public void sendSimpleMail(String to, String subject, String context) {
SimpleMailMessage message = new SimpleMailMessage();
message.setFrom(sender);
message.setTo(to);
message.setSubject(subject);
message.setText(context);
mailSender.send(message);
}
/**
* 发送html:
* @param to 发送人:
* @param subject 发送标题:
* @param context 发送内容:
*/
@Override
public void sendSimpleMailHTML(String to, String subject, String context) {
MimeMessage message = null;
try {
message = mailSender.createMimeMessage();
MimeMessageHelper helper = new MimeMessageHelper(message, true);
helper.setFrom(sender);
helper.setTo(to);
helper.setSubject("标题:发送Html内容");
StringBuffer sb = new StringBuffer();
sb.append("<h1>大标题-h1</h1>")
.append("<pcolor:#F00''>红色字</p>")
.append("<ptext-align:right''>右对齐</p>");
helper.setText(sb.toString(), true);
} catch (Exception e) {
e.printStackTrace();
}
mailSender.send(message);
}
推荐学习网址:https://github.com/ityouknow/awesome-spring-boot
SpringBoot结合redis(四)")
(入门SpringBoot)SpringBoot结合redis(四)
SpringBoot整合redis:
1.引入jar
<!-- 引入redis依赖 -->
<dependency>
<groupId>org.springframework.boot</groupId>
<artifactId>spring-boot-starter-data-redis</artifactId>
<!-- 排除redis默认客户端lettuce -->
<exclusions>
<exclusion>
<groupId>io.lettuce</groupId>
<artifactId>lettuce-core</artifactId>
</exclusion>
</exclusions>
</dependency>
<!-- 引入redis客户端驱动jedis -->
<dependency>
<groupId>redis.clients</groupId>
<artifactId>jedis</artifactId>
</dependency>
2.设定资源文件:
#Redis的配置:
#Redis数据库索引(默认是0)
spring.redis.database=1
# Redis服务器地址:
spring.redis.host=localhost
# Redis服务器连接端口
spring.redis.port=6379
# Redis服务器连接密码(默认为空)
spring.redis.password=123456
# redis连接池最大连接数(使用负值表示没有限制)
spring.redis.jedis.pool.max-active=1000
# 连接池最大阻塞等待时间(使用负值表示没有限制)
spring.redis.jedis.pool.max-wait=2000ms
# 连接池最大空闲数量:
spring.redis.jedis.pool.max-idle=10
# 连接池最小空闲时间:
spring.redis.jedis.pool.min-idle=5
# 连接超时时间(毫秒)
spring.redis.timeout=10000ms
3.在Controller使用:
@Autowired
private RedisUtil redisUtil;
附带一个RedisUtil
package com.account.demo.config;
import org.springframework.beans.factory.annotation.Autowired;
import org.springframework.data.redis.core.StringRedisTemplate;
import org.springframework.stereotype.Component;
import org.springframework.data.redis.connection.DataType;
import org.springframework.data.redis.core.Cursor;
import org.springframework.data.redis.core.ScanOptions;
import org.springframework.data.redis.core.StringRedisTemplate;
import org.springframework.data.redis.core.ZSetOperations.TypedTuple;
import java.util.Collection;
import java.util.Date;
import java.util.List;
import java.util.Map;
import java.util.Map.Entry;
import java.util.Set;
import java.util.concurrent.TimeUnit;
/**
* Redis工具类
*
* @author WangFan
* @date 2018-02-24 下午03:09:50
* @version 1.1 (GitHub文档: https://github.com/whvcse/RedisUtil )
*/
@Component
public class RedisUtil {
@Autowired
private StringRedisTemplate redisTemplate;
/** -------------------key相关操作--------------------- */
/**
* 删除key
*
* @param key
*/
public void delete(String key) {
redisTemplate.delete(key);
}
/**
* 批量删除key
*
* @param keys
*/
public void delete(Collection<String> keys) {
redisTemplate.delete(keys);
}
/**
* 序列化key
*
* @param key
* @return
*/
public byte[] dump(String key) {
return redisTemplate.dump(key);
}
/**
* 是否存在key
*
* @param key
* @return
*/
public Boolean hasKey(String key) {
return redisTemplate.hasKey(key);
}
/**
* 设置过期时间
*
* @param key
* @param timeout
* @param unit
* @return
*/
public Boolean expire(String key, long timeout, TimeUnit unit) {
return redisTemplate.expire(key, timeout, unit);
}
/**
* 设置过期时间
*
* @param key
* @param date
* @return
*/
public Boolean expireAt(String key, Date date) {
return redisTemplate.expireAt(key, date);
}
/**
* 查找匹配的key
*
* @param pattern
* @return
*/
public Set<String> keys(String pattern) {
return redisTemplate.keys(pattern);
}
/**
* 将当前数据库的 key 移动到给定的数据库 db 当中
*
* @param key
* @param dbIndex
* @return
*/
public Boolean move(String key, int dbIndex) {
return redisTemplate.move(key, dbIndex);
}
/**
* 移除 key 的过期时间,key 将持久保持
*
* @param key
* @return
*/
public Boolean persist(String key) {
return redisTemplate.persist(key);
}
/**
* 返回 key 的剩余的过期时间
*
* @param key
* @param unit
* @return
*/
public Long getExpire(String key, TimeUnit unit) {
return redisTemplate.getExpire(key, unit);
}
/**
* 返回 key 的剩余的过期时间
*
* @param key
* @return
*/
public Long getExpire(String key) {
return redisTemplate.getExpire(key);
}
/**
* 从当前数据库中随机返回一个 key
*
* @return
*/
public String randomKey() {
return redisTemplate.randomKey();
}
/**
* 修改 key 的名称
*
* @param oldKey
* @param newKey
*/
public void rename(String oldKey, String newKey) {
redisTemplate.rename(oldKey, newKey);
}
/**
* 仅当 newkey 不存在时,将 oldKey 改名为 newkey
*
* @param oldKey
* @param newKey
* @return
*/
public Boolean renameIfAbsent(String oldKey, String newKey) {
return redisTemplate.renameIfAbsent(oldKey, newKey);
}
/**
* 返回 key 所储存的值的类型
*
* @param key
* @return
*/
public DataType type(String key) {
return redisTemplate.type(key);
}
/** -------------------string相关操作--------------------- */
/**
* 设置指定 key 的值
*
* @param key
* @param value
*/
public void set(String key, String value) {
redisTemplate.opsForValue().set(key, value);
}
/**
* 获取指定 key 的值
*
* @param key
* @return
*/
public String get(String key) {
return redisTemplate.opsForValue().get(key);
}
/**
* 返回 key 中字符串值的子字符
*
* @param key
* @param start
* @param end
* @return
*/
public String getRange(String key, long start, long end) {
return redisTemplate.opsForValue().get(key, start, end);
}
/**
* 将给定 key 的值设为 value ,并返回 key 的旧值(old value)
*
* @param key
* @param value
* @return
*/
public String getAndSet(String key, String value) {
return redisTemplate.opsForValue().getAndSet(key, value);
}
/**
* 对 key 所储存的字符串值,获取指定偏移量上的位(bit)
*
* @param key
* @param offset
* @return
*/
public Boolean getBit(String key, long offset) {
return redisTemplate.opsForValue().getBit(key, offset);
}
/**
* 批量获取
*
* @param keys
* @return
*/
public List<String> multiGet(Collection<String> keys) {
return redisTemplate.opsForValue().multiGet(keys);
}
/**
* 设置ASCII码, 字符串''a''的ASCII码是97, 转为二进制是''01100001'', 此方法是将二进制第offset位值变为value
*
* @param key
* @param postion 位置
* @param value 值,true为1, false为0
* @return
*/
public boolean setBit(String key, long offset, boolean value) {
return redisTemplate.opsForValue().setBit(key, offset, value);
}
/**
* 将值 value 关联到 key ,并将 key 的过期时间设为 timeout
*
* @param key
* @param value
* @param timeout 过期时间
* @param unit 时间单位, 天:TimeUnit.DAYS 小时:TimeUnit.HOURS 分钟:TimeUnit.MINUTES
* 秒:TimeUnit.SECONDS 毫秒:TimeUnit.MILLISECONDS
*/
public void setEx(String key, String value, long timeout, TimeUnit unit) {
redisTemplate.opsForValue().set(key, value, timeout, unit);
}
/**
* 只有在 key 不存在时设置 key 的值
*
* @param key
* @param value
* @return 之前已经存在返回false, 不存在返回true
*/
public boolean setIfAbsent(String key, String value) {
return redisTemplate.opsForValue().setIfAbsent(key, value);
}
/**
* 用 value 参数覆写给定 key 所储存的字符串值,从偏移量 offset 开始
*
* @param key
* @param value
* @param offset 从指定位置开始覆写
*/
public void setRange(String key, String value, long offset) {
redisTemplate.opsForValue().set(key, value, offset);
}
/**
* 获取字符串的长度
*
* @param key
* @return
*/
public Long size(String key) {
return redisTemplate.opsForValue().size(key);
}
/**
* 批量添加
*
* @param maps
*/
public void multiSet(Map<String, String> maps) {
redisTemplate.opsForValue().multiSet(maps);
}
/**
* 同时设置一个或多个 key-value 对,当且仅当所有给定 key 都不存在
*
* @param maps
* @return 之前已经存在返回false, 不存在返回true
*/
public boolean multiSetIfAbsent(Map<String, String> maps) {
return redisTemplate.opsForValue().multiSetIfAbsent(maps);
}
/**
* 增加(自增长), 负数则为自减
*
* @param key
* @param value
* @return
*/
public Long incrBy(String key, long increment) {
return redisTemplate.opsForValue().increment(key, increment);
}
/**
* @param key
* @param value
* @return
*/
public Double incrByFloat(String key, double increment) {
return redisTemplate.opsForValue().increment(key, increment);
}
/**
* 追加到末尾
*
* @param key
* @param value
* @return
*/
public Integer append(String key, String value) {
return redisTemplate.opsForValue().append(key, value);
}
/** -------------------hash相关操作------------------------- */
/**
* 获取存储在哈希表中指定字段的值
*
* @param key
* @param field
* @return
*/
public Object hGet(String key, String field) {
return redisTemplate.opsForHash().get(key, field);
}
/**
* 获取所有给定字段的值
*
* @param key
* @return
*/
public Map<Object, Object> hGetAll(String key) {
return redisTemplate.opsForHash().entries(key);
}
/**
* 获取所有给定字段的值
*
* @param key
* @param fields
* @return
*/
public List<Object> hMultiGet(String key, Collection<Object> fields) {
return redisTemplate.opsForHash().multiGet(key, fields);
}
public void hPut(String key, String hashKey, String value) {
redisTemplate.opsForHash().put(key, hashKey, value);
}
public void hPutAll(String key, Map<String, String> maps) {
redisTemplate.opsForHash().putAll(key, maps);
}
/**
* 仅当hashKey不存在时才设置
*
* @param key
* @param hashKey
* @param value
* @return
*/
public Boolean hPutIfAbsent(String key, String hashKey, String value) {
return redisTemplate.opsForHash().putIfAbsent(key, hashKey, value);
}
/**
* 删除一个或多个哈希表字段
*
* @param key
* @param fields
* @return
*/
public Long hDelete(String key, Object... fields) {
return redisTemplate.opsForHash().delete(key, fields);
}
/**
* 查看哈希表 key 中,指定的字段是否存在
*
* @param key
* @param field
* @return
*/
public boolean hExists(String key, String field) {
return redisTemplate.opsForHash().hasKey(key, field);
}
/**
* 为哈希表 key 中的指定字段的整数值加上增量 increment
*
* @param key
* @param field
* @param increment
* @return
*/
public Long hIncrBy(String key, Object field, long increment) {
return redisTemplate.opsForHash().increment(key, field, increment);
}
/**
* 为哈希表 key 中的指定字段的整数值加上增量 increment
*
* @param key
* @param field
* @param delta
* @return
*/
public Double hIncrByFloat(String key, Object field, double delta) {
return redisTemplate.opsForHash().increment(key, field, delta);
}
/**
* 获取所有哈希表中的字段
*
* @param key
* @return
*/
public Set<Object> hKeys(String key) {
return redisTemplate.opsForHash().keys(key);
}
/**
* 获取哈希表中字段的数量
*
* @param key
* @return
*/
public Long hSize(String key) {
return redisTemplate.opsForHash().size(key);
}
/**
* 获取哈希表中所有值
*
* @param key
* @return
*/
public List<Object> hValues(String key) {
return redisTemplate.opsForHash().values(key);
}
/**
* 迭代哈希表中的键值对
*
* @param key
* @param options
* @return
*/
public Cursor<Entry<Object, Object>> hScan(String key, ScanOptions options) {
return redisTemplate.opsForHash().scan(key, options);
}
/** ------------------------list相关操作---------------------------- */
/**
* 通过索引获取列表中的元素
*
* @param key
* @param index
* @return
*/
public String lIndex(String key, long index) {
return redisTemplate.opsForList().index(key, index);
}
/**
* 获取列表指定范围内的元素
*
* @param key
* @param start 开始位置, 0是开始位置
* @param end 结束位置, -1返回所有
* @return
*/
public List<String> lRange(String key, long start, long end) {
return redisTemplate.opsForList().range(key, start, end);
}
/**
* 存储在list头部
*
* @param key
* @param value
* @return
*/
public Long lLeftPush(String key, String value) {
return redisTemplate.opsForList().leftPush(key, value);
}
/**
* @param key
* @param value
* @return
*/
public Long lLeftPushAll(String key, String... value) {
return redisTemplate.opsForList().leftPushAll(key, value);
}
/**
* @param key
* @param value
* @return
*/
public Long lLeftPushAll(String key, Collection<String> value) {
return redisTemplate.opsForList().leftPushAll(key, value);
}
/**
* 当list存在的时候才加入
*
* @param key
* @param value
* @return
*/
public Long lLeftPushIfPresent(String key, String value) {
return redisTemplate.opsForList().leftPushIfPresent(key, value);
}
/**
* 如果pivot存在,再pivot前面添加
*
* @param key
* @param pivot
* @param value
* @return
*/
public Long lLeftPush(String key, String pivot, String value) {
return redisTemplate.opsForList().leftPush(key, pivot, value);
}
/**
* @param key
* @param value
* @return
*/
public Long lRightPush(String key, String value) {
return redisTemplate.opsForList().rightPush(key, value);
}
/**
* @param key
* @param value
* @return
*/
public Long lRightPushAll(String key, String... value) {
return redisTemplate.opsForList().rightPushAll(key, value);
}
/**
* @param key
* @param value
* @return
*/
public Long lRightPushAll(String key, Collection<String> value) {
return redisTemplate.opsForList().rightPushAll(key, value);
}
/**
* 为已存在的列表添加值
*
* @param key
* @param value
* @return
*/
public Long lRightPushIfPresent(String key, String value) {
return redisTemplate.opsForList().rightPushIfPresent(key, value);
}
/**
* 在pivot元素的右边添加值
*
* @param key
* @param pivot
* @param value
* @return
*/
public Long lRightPush(String key, String pivot, String value) {
return redisTemplate.opsForList().rightPush(key, pivot, value);
}
/**
* 通过索引设置列表元素的值
*
* @param key
* @param index 位置
* @param value
*/
public void lSet(String key, long index, String value) {
redisTemplate.opsForList().set(key, index, value);
}
/**
* 移出并获取列表的第一个元素
*
* @param key
* @return 删除的元素
*/
public String lLeftPop(String key) {
return redisTemplate.opsForList().leftPop(key);
}
/**
* 移出并获取列表的第一个元素, 如果列表没有元素会阻塞列表直到等待超时或发现可弹出元素为止
*
* @param key
* @param timeout 等待时间
* @param unit 时间单位
* @return
*/
public String lBLeftPop(String key, long timeout, TimeUnit unit) {
return redisTemplate.opsForList().leftPop(key, timeout, unit);
}
/**
* 移除并获取列表最后一个元素
*
* @param key
* @return 删除的元素
*/
public String lRightPop(String key) {
return redisTemplate.opsForList().rightPop(key);
}
/**
* 移出并获取列表的最后一个元素, 如果列表没有元素会阻塞列表直到等待超时或发现可弹出元素为止
*
* @param key
* @param timeout 等待时间
* @param unit 时间单位
* @return
*/
public String lBRightPop(String key, long timeout, TimeUnit unit) {
return redisTemplate.opsForList().rightPop(key, timeout, unit);
}
/**
* 移除列表的最后一个元素,并将该元素添加到另一个列表并返回
*
* @param sourceKey
* @param destinationKey
* @return
*/
public String lRightPopAndLeftPush(String sourceKey, String destinationKey) {
return redisTemplate.opsForList().rightPopAndLeftPush(sourceKey,
destinationKey);
}
/**
* 从列表中弹出一个值,将弹出的元素插入到另外一个列表中并返回它; 如果列表没有元素会阻塞列表直到等待超时或发现可弹出元素为止
*
* @param sourceKey
* @param destinationKey
* @param timeout
* @param unit
* @return
*/
public String lBRightPopAndLeftPush(String sourceKey, String destinationKey,
long timeout, TimeUnit unit) {
return redisTemplate.opsForList().rightPopAndLeftPush(sourceKey,
destinationKey, timeout, unit);
}
/**
* 删除集合中值等于value得元素
*
* @param key
* @param index index=0, 删除所有值等于value的元素; index>0, 从头部开始删除第一个值等于value的元素;
* index<0, 从尾部开始删除第一个值等于value的元素;
* @param value
* @return
*/
public Long lRemove(String key, long index, String value) {
return redisTemplate.opsForList().remove(key, index, value);
}
/**
* 裁剪list
*
* @param key
* @param start
* @param end
*/
public void lTrim(String key, long start, long end) {
redisTemplate.opsForList().trim(key, start, end);
}
/**
* 获取列表长度
*
* @param key
* @return
*/
public Long lLen(String key) {
return redisTemplate.opsForList().size(key);
}
/** --------------------set相关操作-------------------------- */
/**
* set添加元素
*
* @param key
* @param values
* @return
*/
public Long sAdd(String key, String... values) {
return redisTemplate.opsForSet().add(key, values);
}
/**
* set移除元素
*
* @param key
* @param values
* @return
*/
public Long sRemove(String key, Object... values) {
return redisTemplate.opsForSet().remove(key, values);
}
/**
* 移除并返回集合的一个随机元素
*
* @param key
* @return
*/
public String sPop(String key) {
return redisTemplate.opsForSet().pop(key);
}
/**
* 将元素value从一个集合移到另一个集合
*
* @param key
* @param value
* @param destKey
* @return
*/
public Boolean sMove(String key, String value, String destKey) {
return redisTemplate.opsForSet().move(key, value, destKey);
}
/**
* 获取集合的大小
*
* @param key
* @return
*/
public Long sSize(String key) {
return redisTemplate.opsForSet().size(key);
}
/**
* 判断集合是否包含value
*
* @param key
* @param value
* @return
*/
public Boolean sIsMember(String key, Object value) {
return redisTemplate.opsForSet().isMember(key, value);
}
/**
* 获取两个集合的交集
*
* @param key
* @param otherKey
* @return
*/
public Set<String> sIntersect(String key, String otherKey) {
return redisTemplate.opsForSet().intersect(key, otherKey);
}
/**
* 获取key集合与多个集合的交集
*
* @param key
* @param otherKeys
* @return
*/
public Set<String> sIntersect(String key, Collection<String> otherKeys) {
return redisTemplate.opsForSet().intersect(key, otherKeys);
}
/**
* key集合与otherKey集合的交集存储到destKey集合中
*
* @param key
* @param otherKey
* @param destKey
* @return
*/
public Long sIntersectAndStore(String key, String otherKey, String destKey) {
return redisTemplate.opsForSet().intersectAndStore(key, otherKey,
destKey);
}
/**
* key集合与多个集合的交集存储到destKey集合中
*
* @param key
* @param otherKeys
* @param destKey
* @return
*/
public Long sIntersectAndStore(String key, Collection<String> otherKeys,
String destKey) {
return redisTemplate.opsForSet().intersectAndStore(key, otherKeys,
destKey);
}
/**
* 获取两个集合的并集
*
* @param key
* @param otherKeys
* @return
*/
public Set<String> sUnion(String key, String otherKeys) {
return redisTemplate.opsForSet().union(key, otherKeys);
}
/**
* 获取key集合与多个集合的并集
*
* @param key
* @param otherKeys
* @return
*/
public Set<String> sUnion(String key, Collection<String> otherKeys) {
return redisTemplate.opsForSet().union(key, otherKeys);
}
/**
* key集合与otherKey集合的并集存储到destKey中
*
* @param key
* @param otherKey
* @param destKey
* @return
*/
public Long sUnionAndStore(String key, String otherKey, String destKey) {
return redisTemplate.opsForSet().unionAndStore(key, otherKey, destKey);
}
/**
* key集合与多个集合的并集存储到destKey中
*
* @param key
* @param otherKeys
* @param destKey
* @return
*/
public Long sUnionAndStore(String key, Collection<String> otherKeys,
String destKey) {
return redisTemplate.opsForSet().unionAndStore(key, otherKeys, destKey);
}
/**
* 获取两个集合的差集
*
* @param key
* @param otherKey
* @return
*/
public Set<String> sDifference(String key, String otherKey) {
return redisTemplate.opsForSet().difference(key, otherKey);
}
/**
* 获取key集合与多个集合的差集
*
* @param key
* @param otherKeys
* @return
*/
public Set<String> sDifference(String key, Collection<String> otherKeys) {
return redisTemplate.opsForSet().difference(key, otherKeys);
}
/**
* key集合与otherKey集合的差集存储到destKey中
*
* @param key
* @param otherKey
* @param destKey
* @return
*/
public Long sDifference(String key, String otherKey, String destKey) {
return redisTemplate.opsForSet().differenceAndStore(key, otherKey,
destKey);
}
/**
* key集合与多个集合的差集存储到destKey中
*
* @param key
* @param otherKeys
* @param destKey
* @return
*/
public Long sDifference(String key, Collection<String> otherKeys,
String destKey) {
return redisTemplate.opsForSet().differenceAndStore(key, otherKeys,
destKey);
}
/**
* 获取集合所有元素
*
* @param key
* @param otherKeys
* @param destKey
* @return
*/
public Set<String> setMembers(String key) {
return redisTemplate.opsForSet().members(key);
}
/**
* 随机获取集合中的一个元素
*
* @param key
* @return
*/
public String sRandomMember(String key) {
return redisTemplate.opsForSet().randomMember(key);
}
/**
* 随机获取集合中count个元素
*
* @param key
* @param count
* @return
*/
public List<String> sRandomMembers(String key, long count) {
return redisTemplate.opsForSet().randomMembers(key, count);
}
/**
* 随机获取集合中count个元素并且去除重复的
*
* @param key
* @param count
* @return
*/
public Set<String> sDistinctRandomMembers(String key, long count) {
return redisTemplate.opsForSet().distinctRandomMembers(key, count);
}
/**
* @param key
* @param options
* @return
*/
public Cursor<String> sScan(String key, ScanOptions options) {
return redisTemplate.opsForSet().scan(key, options);
}
/**------------------zSet相关操作--------------------------------*/
/**
* 添加元素,有序集合是按照元素的score值由小到大排列
*
* @param key
* @param value
* @param score
* @return
*/
public Boolean zAdd(String key, String value, double score) {
return redisTemplate.opsForZSet().add(key, value, score);
}
/**
* @param key
* @param values
* @return
*/
public Long zAdd(String key, Set<TypedTuple<String>> values) {
return redisTemplate.opsForZSet().add(key, values);
}
/**
* @param key
* @param values
* @return
*/
public Long zRemove(String key, Object... values) {
return redisTemplate.opsForZSet().remove(key, values);
}
/**
* 增加元素的score值,并返回增加后的值
*
* @param key
* @param value
* @param delta
* @return
*/
public Double zIncrementScore(String key, String value, double delta) {
return redisTemplate.opsForZSet().incrementScore(key, value, delta);
}
/**
* 返回元素在集合的排名,有序集合是按照元素的score值由小到大排列
*
* @param key
* @param value
* @return 0表示第一位
*/
public Long zRank(String key, Object value) {
return redisTemplate.opsForZSet().rank(key, value);
}
/**
* 返回元素在集合的排名,按元素的score值由大到小排列
*
* @param key
* @param value
* @return
*/
public Long zReverseRank(String key, Object value) {
return redisTemplate.opsForZSet().reverseRank(key, value);
}
/**
* 获取集合的元素, 从小到大排序
*
* @param key
* @param start 开始位置
* @param end 结束位置, -1查询所有
* @return
*/
public Set<String> zRange(String key, long start, long end) {
return redisTemplate.opsForZSet().range(key, start, end);
}
/**
* 获取集合元素, 并且把score值也获取
*
* @param key
* @param start
* @param end
* @return
*/
public Set<TypedTuple<String>> zRangeWithScores(String key, long start,
long end) {
return redisTemplate.opsForZSet().rangeWithScores(key, start, end);
}
/**
* 根据Score值查询集合元素
*
* @param key
* @param min 最小值
* @param max 最大值
* @return
*/
public Set<String> zRangeByScore(String key, double min, double max) {
return redisTemplate.opsForZSet().rangeByScore(key, min, max);
}
/**
* 根据Score值查询集合元素, 从小到大排序
*
* @param key
* @param min 最小值
* @param max 最大值
* @return
*/
public Set<TypedTuple<String>> zRangeByScoreWithScores(String key,
double min, double max) {
return redisTemplate.opsForZSet().rangeByScoreWithScores(key, min, max);
}
/**
* @param key
* @param min
* @param max
* @param start
* @param end
* @return
*/
public Set<TypedTuple<String>> zRangeByScoreWithScores(String key,
double min, double max, long start, long end) {
return redisTemplate.opsForZSet().rangeByScoreWithScores(key, min, max,
start, end);
}
/**
* 获取集合的元素, 从大到小排序
*
* @param key
* @param start
* @param end
* @return
*/
public Set<String> zReverseRange(String key, long start, long end) {
return redisTemplate.opsForZSet().reverseRange(key, start, end);
}
/**
* 获取集合的元素, 从大到小排序, 并返回score值
*
* @param key
* @param start
* @param end
* @return
*/
public Set<TypedTuple<String>> zReverseRangeWithScores(String key,
long start, long end) {
return redisTemplate.opsForZSet().reverseRangeWithScores(key, start,
end);
}
/**
* 根据Score值查询集合元素, 从大到小排序
*
* @param key
* @param min
* @param max
* @return
*/
public Set<String> zReverseRangeByScore(String key, double min,
double max) {
return redisTemplate.opsForZSet().reverseRangeByScore(key, min, max);
}
/**
* 根据Score值查询集合元素, 从大到小排序
*
* @param key
* @param min
* @param max
* @return
*/
public Set<TypedTuple<String>> zReverseRangeByScoreWithScores(
String key, double min, double max) {
return redisTemplate.opsForZSet().reverseRangeByScoreWithScores(key,
min, max);
}
/**
* @param key
* @param min
* @param max
* @param start
* @param end
* @return
*/
public Set<String> zReverseRangeByScore(String key, double min,
double max, long start, long end) {
return redisTemplate.opsForZSet().reverseRangeByScore(key, min, max,
start, end);
}
/**
* 根据score值获取集合元素数量
*
* @param key
* @param min
* @param max
* @return
*/
public Long zCount(String key, double min, double max) {
return redisTemplate.opsForZSet().count(key, min, max);
}
/**
* 获取集合大小
*
* @param key
* @return
*/
public Long zSize(String key) {
return redisTemplate.opsForZSet().size(key);
}
/**
* 获取集合大小
*
* @param key
* @return
*/
public Long zZCard(String key) {
return redisTemplate.opsForZSet().zCard(key);
}
/**
* 获取集合中value元素的score值
*
* @param key
* @param value
* @return
*/
public Double zScore(String key, Object value) {
return redisTemplate.opsForZSet().score(key, value);
}
/**
* 移除指定索引位置的成员
*
* @param key
* @param start
* @param end
* @return
*/
public Long zRemoveRange(String key, long start, long end) {
return redisTemplate.opsForZSet().removeRange(key, start, end);
}
/**
* 根据指定的score值的范围来移除成员
*
* @param key
* @param min
* @param max
* @return
*/
public Long zRemoveRangeByScore(String key, double min, double max) {
return redisTemplate.opsForZSet().removeRangeByScore(key, min, max);
}
/**
* 获取key和otherKey的并集并存储在destKey中
*
* @param key
* @param otherKey
* @param destKey
* @return
*/
public Long zUnionAndStore(String key, String otherKey, String destKey) {
return redisTemplate.opsForZSet().unionAndStore(key, otherKey, destKey);
}
/**
* @param key
* @param otherKeys
* @param destKey
* @return
*/
public Long zUnionAndStore(String key, Collection<String> otherKeys,
String destKey) {
return redisTemplate.opsForZSet()
.unionAndStore(key, otherKeys, destKey);
}
/**
* 交集
*
* @param key
* @param otherKey
* @param destKey
* @return
*/
public Long zIntersectAndStore(String key, String otherKey,
String destKey) {
return redisTemplate.opsForZSet().intersectAndStore(key, otherKey,
destKey);
}
/**
* 交集
*
* @param key
* @param otherKeys
* @param destKey
* @return
*/
public Long zIntersectAndStore(String key, Collection<String> otherKeys,
String destKey) {
return redisTemplate.opsForZSet().intersectAndStore(key, otherKeys,
destKey);
}
/**
* @param key
* @param options
* @return
*/
public Cursor<TypedTuple<String>> zScan(String key, ScanOptions options) {
return redisTemplate.opsForZSet().scan(key, options);
}
}
SpringBoot结合定时任务task(十)")
(入门SpringBoot)SpringBoot结合定时任务task(十)
SpringBoot整合定时任务task
- 使用注解EnableScheduling在启动类上.
- 定义@Component作为组件被容器扫描.
- 表达式生成地址:http://cron.qqe2.com
下面是例子:
1. //开启定时任务:
@EnableScheduling
public class DemoApplication {
2./**
* 定时任务:
*/
@Component
public class TestTask {
private static final SimpleDateFormat dataFormat = new SimpleDateFormat("HH:mm:ss");
//定义每3秒执行任务:
@Scheduled(fixedRate = 3000)
public void reportCurrentTime(){
System.out.println("现在时间:" + dataFormat.format(new Date()));
}
}
3.启动就完事了.
提示: 定时任务可以用cron表达式:@Scheduled(cron = "")
搭建一个简易的Spring Boot工程")
Spring Boot学习(二)搭建一个简易的Spring Boot工程
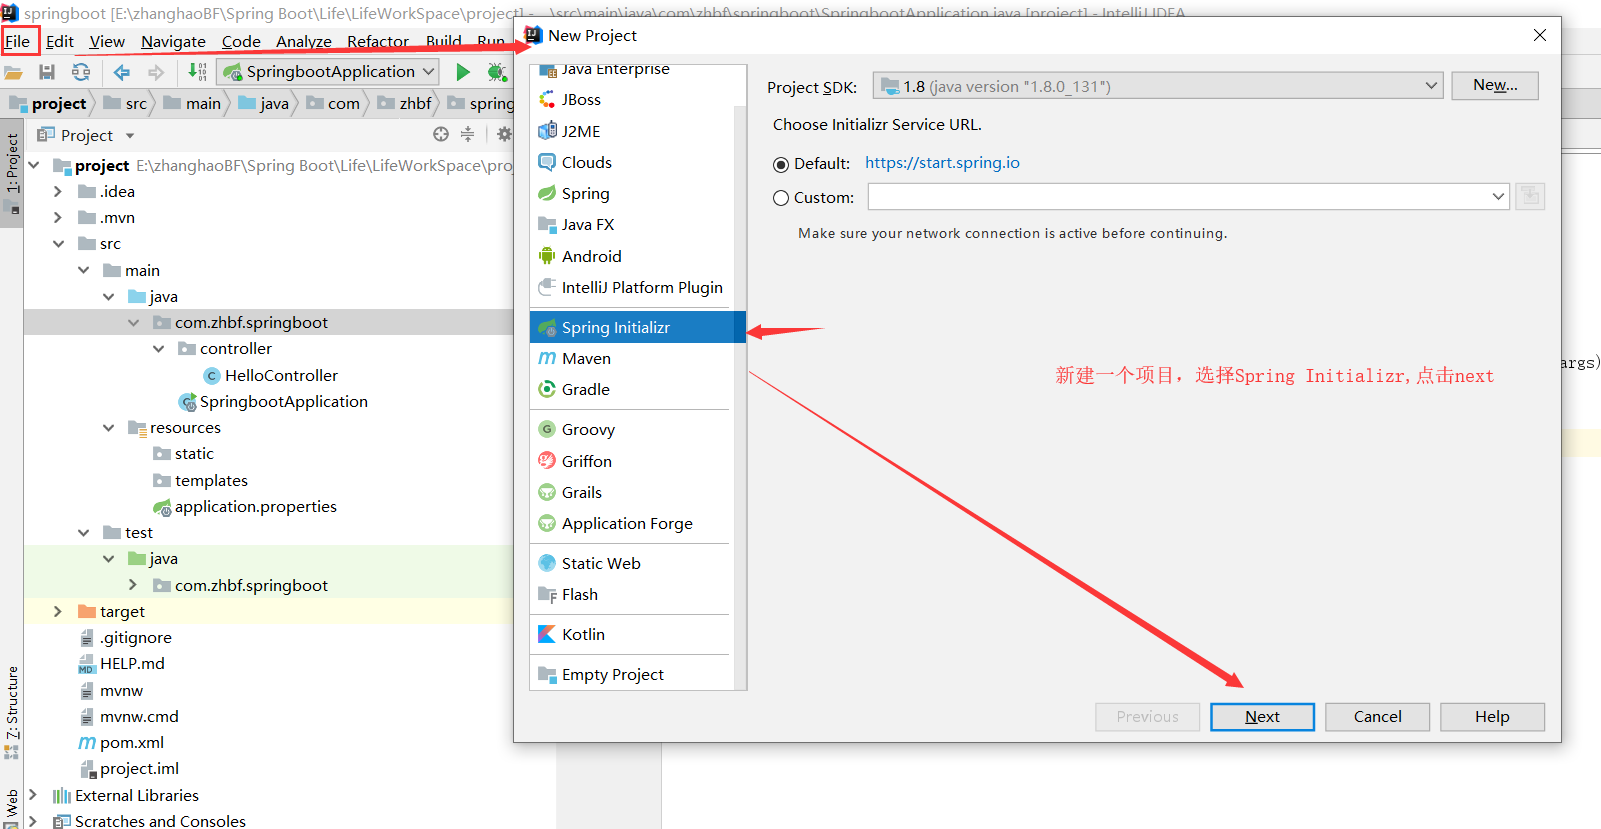
第一步:新建项目
新建一个SpringBoot工程
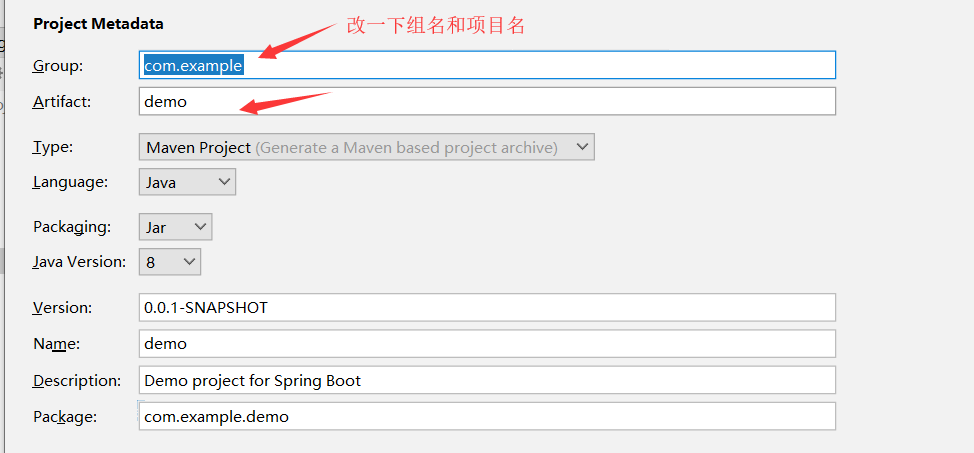
修改项目信息
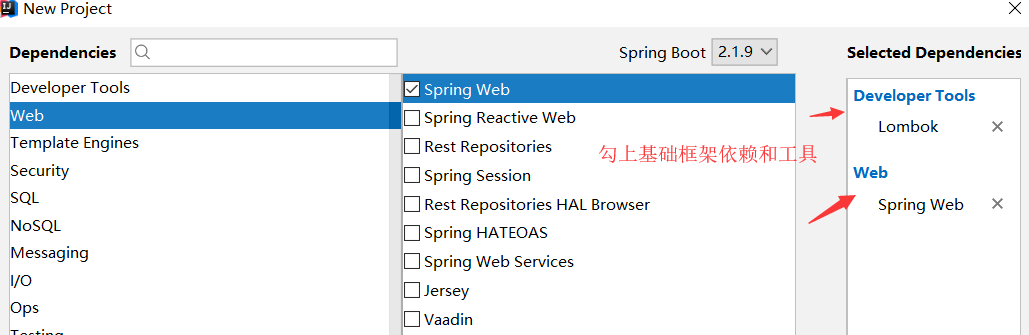
勾选项目依赖和工具
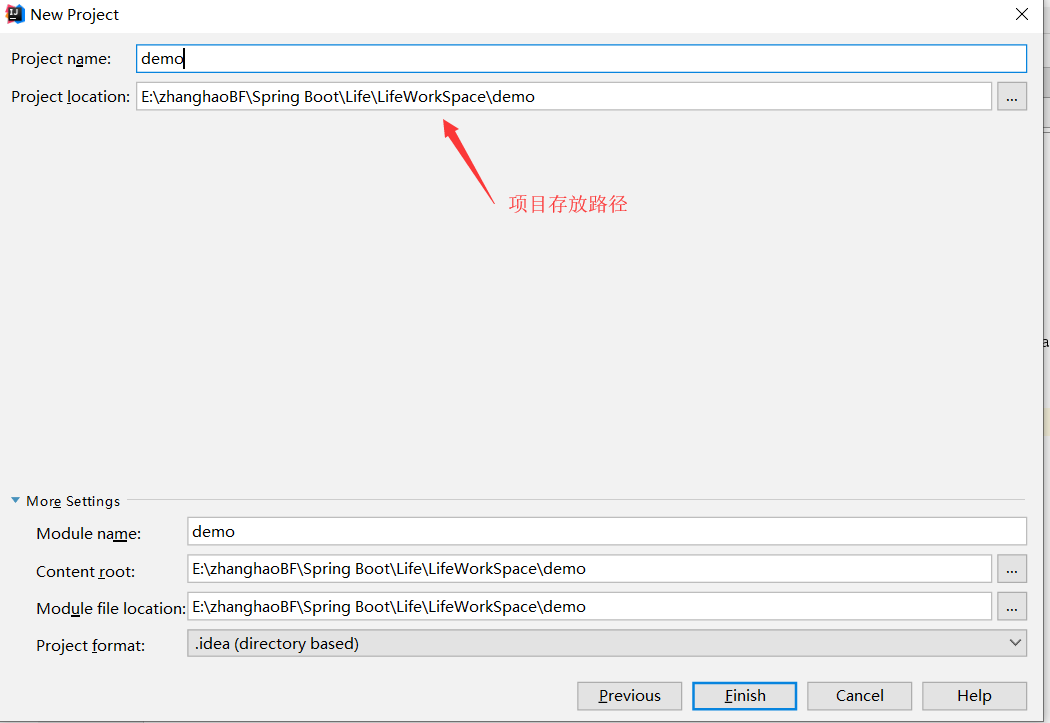
选择好项目的位置,点击【Finish】
第二步:项目结构分析
新建好项目之后的结构如下图所示,少了很多配置文件:

简单分析下都有啥玩意:
- SpringbootApplication: 一个带有 main() 方法的类,用于启动应用程序
- SpringbootApplicationTests:一个空的 Junit 测试了,它加载了一个使用 Spring Boot 字典配置功能的 Spring 应用程序上下文
- application.properties:一个空的 properties 文件,可以根据需要添加配置属性
- pom.xml: Maven 构建说明文件
第三步:第一个程序试运行
新建一个【HelloController】,并启动 Spring Boot来查看类运行的结果
import org.springframework.web.bind.annotation.RequestMapping;
import org.springframework.web.bind.annotation.RestController;

/**
 * 测试控制器
 * PS:@RestController 注解: 该注解是 @Controller 和 @ResponseBody 注解的合体版
 */
@RestController
public class TestController {

    @RequestMapping("/test")
    public String hello() {
        return "第一个程序试运行成功!";
    }
}
回到 SpringbootApplication 这个类中,然后右键点击运行:
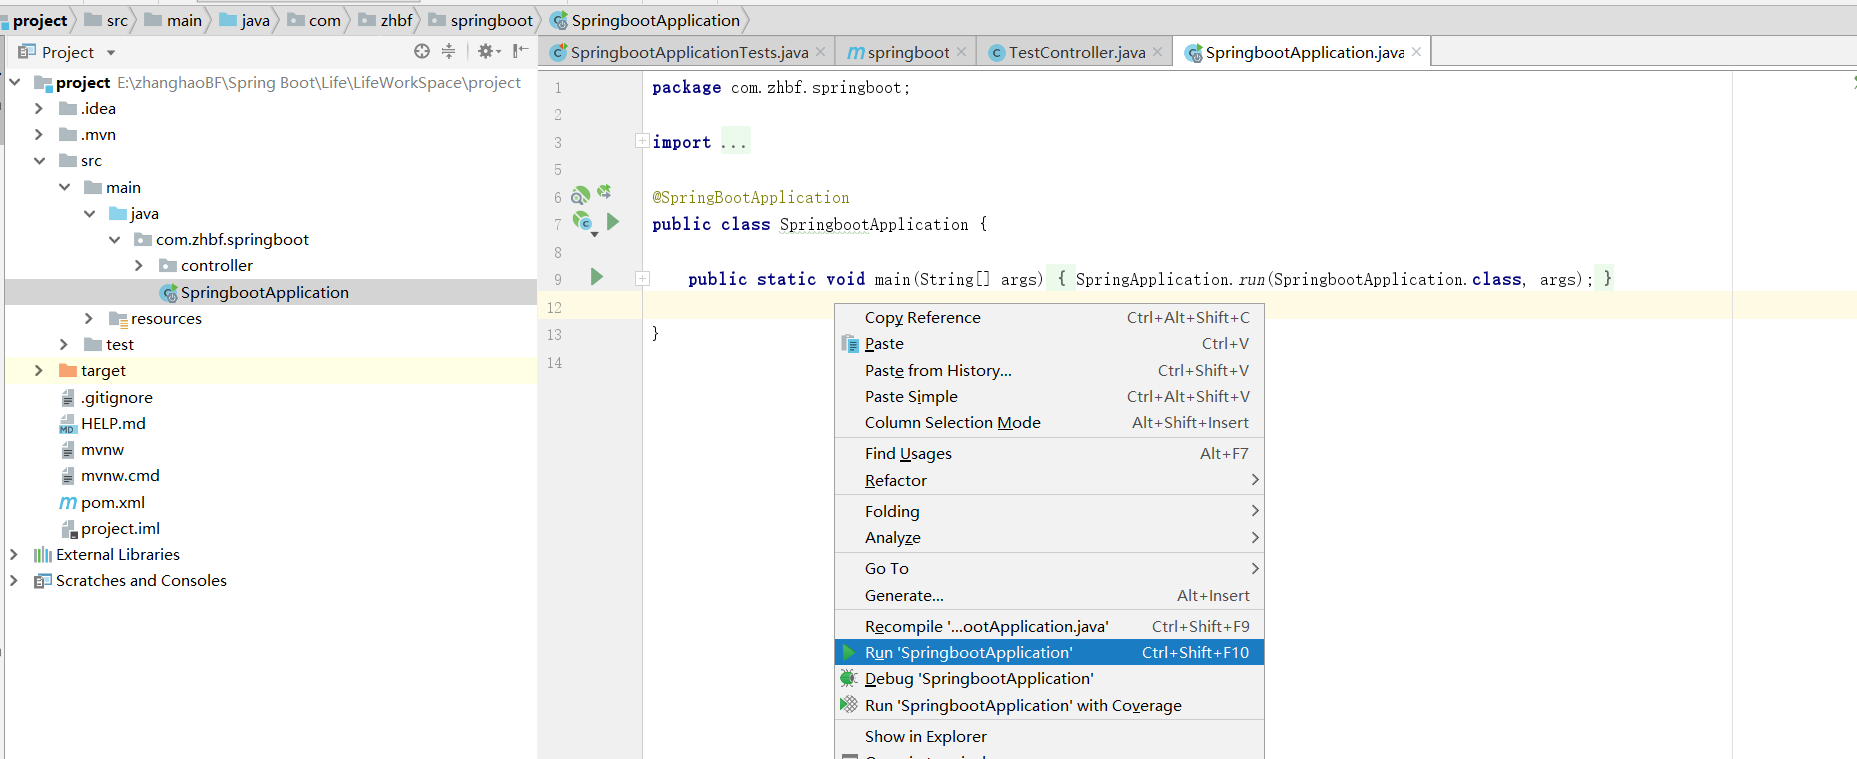
运行成功的界面:
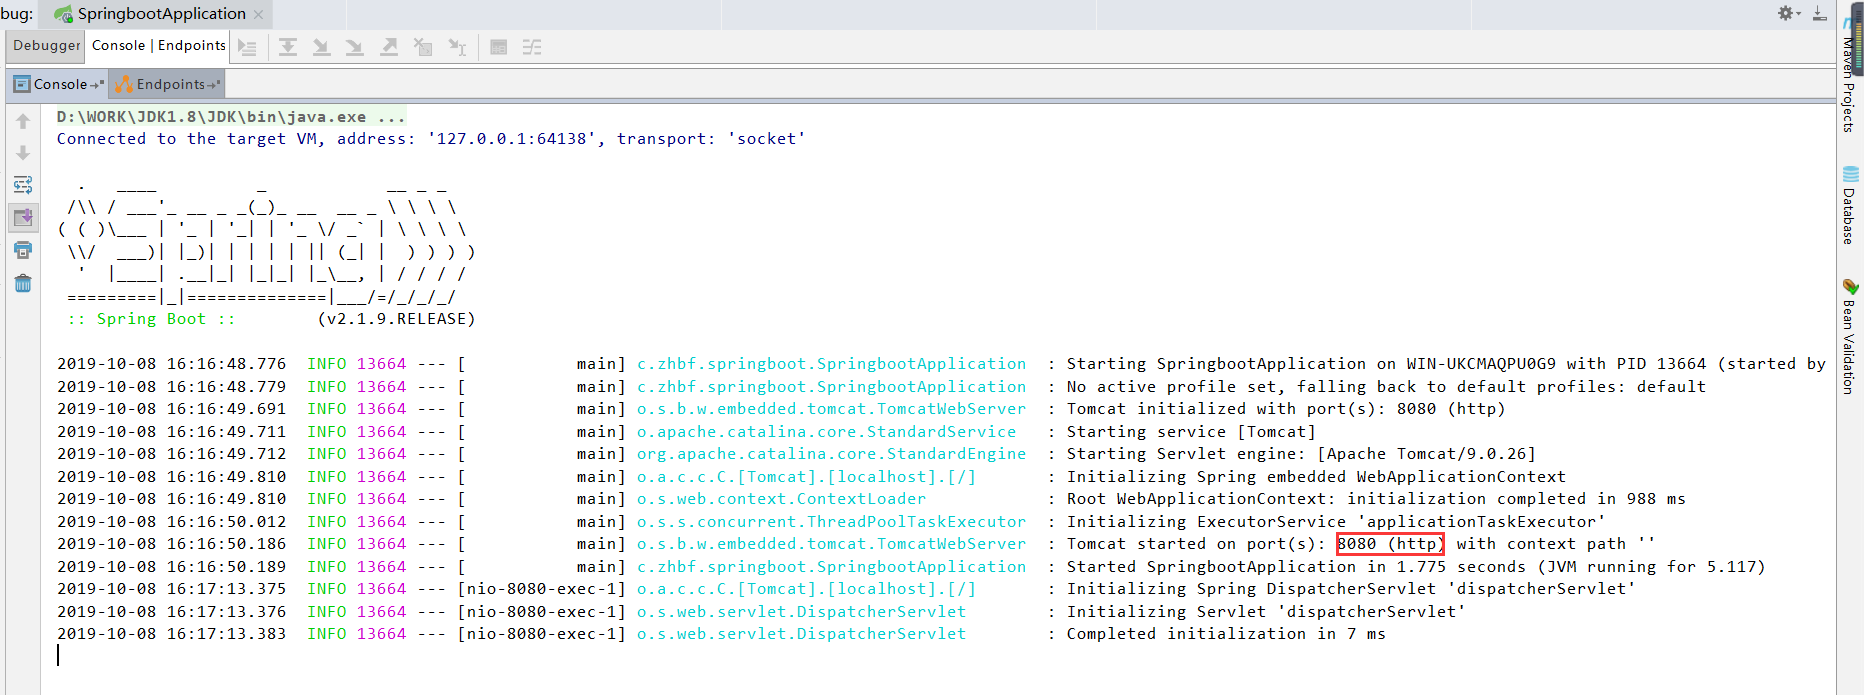
可以看到我们的 Tomcat 运行在 8080 端口,我们来访问 “/test” 地址试一下:
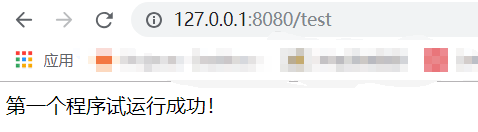
可以看到页面成功显示出我们返回的信息。
参考资料:
- Spring Boot【快速入门】(特此感谢!)
我们今天的关于两小时入门SpringBoot学习和进阶的分享就到这里,谢谢您的阅读,如果想了解更多关于(入门SpringBoot)SpringBoot发送邮件(十一)、(入门SpringBoot)SpringBoot结合redis(四)、(入门SpringBoot)SpringBoot结合定时任务task(十)、Spring Boot学习(二)搭建一个简易的Spring Boot工程的相关信息,可以在本站进行搜索。
本文标签:


