想了解使用Prometheus监控dockercompose方式部署的ES的新动态吗?本文将为您提供详细的信息,我们还将为您解答关于prometheus监控docker容器的相关问题,此外,我们还将为
想了解使用 Prometheus 监控 docker compose 方式部署的 ES的新动态吗?本文将为您提供详细的信息,我们还将为您解答关于prometheus监控docker 容器的相关问题,此外,我们还将为您介绍关于cockroachdb docker-compose 本地集群运行以及prometheus监控、Docker Compose 部署 Nexus3 时的 docker-compose,yml 代码、Docker 环境下使用 prometheus + grafana 监听 postgresql、Docker 监控(1):prometheus+cadviso+grafana 实现对 docker 容器和宿主机进行监控的新知识。
本文目录一览:- 使用 Prometheus 监控 docker compose 方式部署的 ES(prometheus监控docker 容器)
- cockroachdb docker-compose 本地集群运行以及prometheus监控
- Docker Compose 部署 Nexus3 时的 docker-compose,yml 代码
- Docker 环境下使用 prometheus + grafana 监听 postgresql
- Docker 监控(1):prometheus+cadviso+grafana 实现对 docker 容器和宿主机进行监控
")
使用 Prometheus 监控 docker compose 方式部署的 ES(prometheus监控docker 容器)
需求
收集 ES 的指标,并进行展示和告警;
现状
- ES 通过 docker compose 安装
- 所在环境的 K8S 集群有 Prometheus 和 AlertManager 及 Grafana
方案
复用现有的监控体系,通过: Prometheus 监控 ES.

具体实现为:
采集端 elasticsearch_exporter
可以监控的指标为:
| Name | Type | Cardinality | Help |
|---|---|---|---|
| elasticsearch_breakers_estimated_size_bytes | gauge | 4 | Estimated size in bytes of breaker |
| elasticsearch_breakers_limit_size_bytes | gauge | 4 | Limit size in bytes for breaker |
| elasticsearch_breakers_tripped | counter | 4 | tripped for breaker |
| elasticsearch_cluster_health_active_primary_shards | gauge | 1 | The number of primary shards in your cluster. This is an aggregate total across all indices. |
| elasticsearch_cluster_health_active_shards | gauge | 1 | Aggregate total of all shards across all indices, which includes replica shards. |
| elasticsearch_cluster_health_delayed_unassigned_shards | gauge | 1 | Shards delayed to reduce reallocation overhead |
| elasticsearch_cluster_health_initializing_shards | gauge | 1 | Count of shards that are being freshly created. |
| elasticsearch_cluster_health_number_of_data_nodes | gauge | 1 | Number of data nodes in the cluster. |
| elasticsearch_cluster_health_number_of_in_flight_fetch | gauge | 1 | The number of ongoing shard info requests. |
| elasticsearch_cluster_health_number_of_nodes | gauge | 1 | Number of nodes in the cluster. |
...
可以直接在 github 上找到完整的
展示端 基于 Grafana
️ Reference:
ElasticSearch dashboard for Grafana | Grafana Labs

告警指标 基于 prometheus alertmanager
️ Reference:
ElasticSearch:https://awesome-prometheus-alerts.grep.to/rules.html#elasticsearch-1
实施步骤
以下为手动实施步骤
Docker Compose
docker pull quay.io/prometheuscommunity/elasticsearch-exporter:v1.3.0
docker-compose.yml 示例:
Warning:
exporter 在每次刮削时都会从 ElasticSearch 集群中获取信息,因此过短的刮削间隔会给 ES 主节点带来负载,特别是当你使用
--es.all和--es.indices运行时。我们建议你测量获取/_nodes/stats和/_all/_stats对你的 ES 集群来说需要多长时间,以确定你的刮削间隔是否太短。
原 ES 的 docker-copmose.yml 示例如下:
version: ''3''
services:
  elasticsearch:
    image: elasticsearch-plugins:6.8.18
    ...
    ports:
      - 9200:9200
      - 9300:9300
    restart: always
增加了 elasticsearch_exporter 的 yaml 如下:
version: ''3''
services:
  elasticsearch:
    image: elasticsearch-plugins:6.8.18
    ...
    ports:
      - 9200:9200
      - 9300:9300
    restart: always
  elasticsearch_exporter:
      image: quay.io/prometheuscommunity/elasticsearch-exporter:v1.3.0
      command:
      - ''--es.uri=http://elasticsearch:9200''
      - ''--es.all''
      - ''--es.indices''
      - ''--es.indices_settings''
      - ''--es.indices_mappings''
      - ''--es.shards''
      - ''--es.snapshots''
      - ''--es.timeout=30s''
      restart: always
      ports:
      - "9114:9114"
Prometheus 配置调整
prometheus 配置
Prometheus 增加静态抓取配置:
scrape_configs:
  - job_name: "es"
    static_configs:
      - targets: ["x.x.x.x:9114"]
说明:
x.x.x.x 为 ES Exporter IP, 因为 ES Exporter 通过 docker compose 和 ES 部署在同一台机器,所以这个 IP 也是 ES 的 IP.
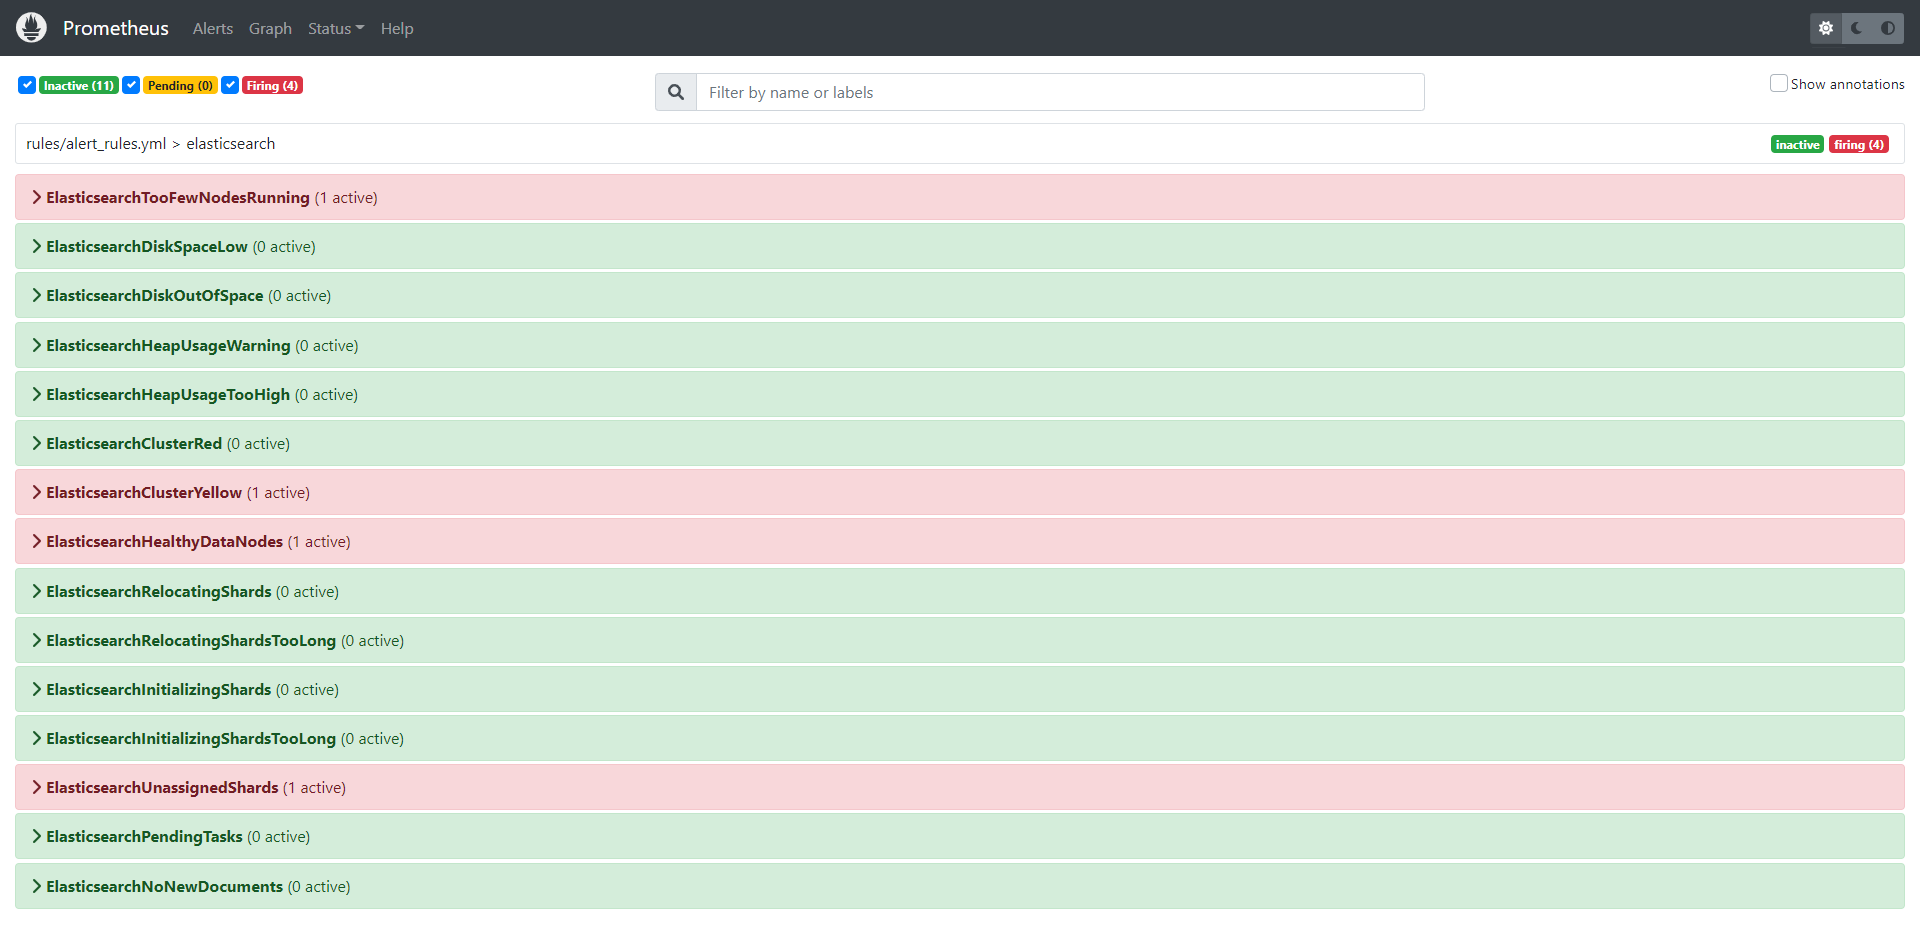
Prometheus Rules
增加 ES 相关的 Prometheus Rules:
groups:
  - name: elasticsearch
    rules:
      - record: elasticsearch_filesystem_data_used_percent
        expr: 100 * (elasticsearch_filesystem_data_size_bytes - elasticsearch_filesystem_data_free_bytes)
          / elasticsearch_filesystem_data_size_bytes
      - record: elasticsearch_filesystem_data_free_percent
        expr: 100 - elasticsearch_filesystem_data_used_percent
      - alert: ElasticsearchTooFewNodesRunning
        expr: elasticsearch_cluster_health_number_of_nodes < 3
        for: 0m
        labels:
          severity: critical
        annotations:
          description: "Missing node in Elasticsearch cluster\n  VALUE = {{ $value }}\n  LABELS = {{ $labels }}"
          summary: ElasticSearch running on less than 3 nodes(instance {{ $labels.instance }}, node {{$labels.node}})
      - alert: ElasticsearchDiskSpaceLow
        expr: elasticsearch_filesystem_data_free_percent < 20
        for: 2m
        labels:
          severity: warning
        annotations:
          summary: Elasticsearch disk space low (instance {{ $labels.instance }}, node {{$labels.node}})
          description: "The disk usage is over 80%\n  VALUE = {{ $value }}\n  LABELS = {{ $labels }}"
      - alert: ElasticsearchDiskOutOfSpace
        expr: elasticsearch_filesystem_data_free_percent < 10
        for: 0m
        labels:
          severity: critical
        annotations:
          summary: Elasticsearch disk out of space (instance {{ $labels.instance }}, node {{$labels.node}})
          description: "The disk usage is over 90%\n  VALUE = {{ $value }}\n  LABELS = {{ $labels }}"
      - alert: ElasticsearchHeapUsageWarning
        expr: (elasticsearch_jvm_memory_used_bytes{area="heap"} / elasticsearch_jvm_memory_max_bytes{area="heap"}) * 100 > 80
        for: 2m
        labels:
          severity: warning
        annotations:
          summary: Elasticsearch Heap Usage warning (instance {{ $labels.instance }}, node {{$labels.node}})
          description: "The heap usage is over 80%\n  VALUE = {{ $value }}\n  LABELS = {{ $labels }}"
      - alert: ElasticsearchHeapUsageTooHigh
        expr: (elasticsearch_jvm_memory_used_bytes{area="heap"} / elasticsearch_jvm_memory_max_bytes{area="heap"}) * 100 > 90
        for: 2m
        labels:
          severity: critical
        annotations:
          summary: Elasticsearch Heap Usage Too High (instance {{ $labels.instance }}, node {{$labels.node}})
          description: "The heap usage is over 90%\n  VALUE = {{ $value }}\n  LABELS = {{ $labels }}"
      - alert: ElasticsearchClusterRed
        expr: elasticsearch_cluster_health_status{color="red"} == 1
        for: 0m
        labels:
          severity: critical
        annotations:
          summary: Elasticsearch Cluster Red (instance {{ $labels.instance }}, node {{$labels.node}})
          description: "Elastic Cluster Red status\n  VALUE = {{ $value }}\n  LABELS = {{ $labels }}"
      - alert: ElasticsearchClusterYellow
        expr: elasticsearch_cluster_health_status{color="yellow"} == 1
        for: 0m
        labels:
          severity: warning
        annotations:
          summary: Elasticsearch Cluster Yellow (instance {{ $labels.instance }}, node {{$labels.node}})
          description: "Elastic Cluster Yellow status\n  VALUE = {{ $value }}\n  LABELS = {{ $labels }}"
      - alert: ElasticsearchHealthyDataNodes
        expr: elasticsearch_cluster_health_number_of_data_nodes < 3
        for: 0m
        labels:
          severity: critical
        annotations:
          summary: Elasticsearch Healthy Data Nodes (instance {{ $labels.instance }}, node {{$labels.node}})
          description: "Missing data node in Elasticsearch cluster\n  VALUE = {{ $value }}\n  LABELS = {{ $labels }}"
      - alert: ElasticsearchRelocatingShards
        expr: elasticsearch_cluster_health_relocating_shards > 0
        for: 0m
        labels:
          severity: info
        annotations:
          summary: Elasticsearch relocating shards (instance {{ $labels.instance }}, node {{$labels.node}})
          description: "Elasticsearch is relocating shards\n  VALUE = {{ $value }}\n  LABELS = {{ $labels }}"
      - alert: ElasticsearchRelocatingShardsTooLong
        expr: elasticsearch_cluster_health_relocating_shards > 0
        for: 15m
        labels:
          severity: warning
        annotations:
          summary: Elasticsearch relocating shards too long (instance {{ $labels.instance }}, node {{$labels.node}})
          description: "Elasticsearch has been relocating shards for 15min\n  VALUE = {{ $value }}\n  LABELS = {{ $labels }}"
      - alert: ElasticsearchInitializingShards
        expr: elasticsearch_cluster_health_initializing_shards > 0
        for: 0m
        labels:
          severity: info
        annotations:
          summary: Elasticsearch initializing shards (instance {{ $labels.instance }}, node {{$labels.node}})
          description: "Elasticsearch is initializing shards\n  VALUE = {{ $value }}\n  LABELS = {{ $labels }}"
      - alert: ElasticsearchInitializingShardsTooLong
        expr: elasticsearch_cluster_health_initializing_shards > 0
        for: 15m
        labels:
          severity: warning
        annotations:
          summary: Elasticsearch initializing shards too long (instance {{ $labels.instance }}, node {{$labels.node}})
          description: "Elasticsearch has been initializing shards for 15 min\n  VALUE = {{ $value }}\n  LABELS = {{ $labels }}"
      - alert: ElasticsearchUnassignedShards
        expr: elasticsearch_cluster_health_unassigned_shards > 0
        for: 0m
        labels:
          severity: critical
        annotations:
          summary: Elasticsearch unassigned shards (instance {{ $labels.instance }}, node {{$labels.node}})
          description: "Elasticsearch has unassigned shards\n  VALUE = {{ $value }}\n  LABELS = {{ $labels }}"
      - alert: ElasticsearchPendingTasks
        expr: elasticsearch_cluster_health_number_of_pending_tasks > 0
        for: 15m
        labels:
          severity: warning
        annotations:
          summary: Elasticsearch pending tasks (instance {{ $labels.instance }}, node {{$labels.node}})
          description: "Elasticsearch has pending tasks. Cluster works slowly.\n  VALUE = {{ $value }}\n  LABELS = {{ $labels }}"
      - alert: ElasticsearchNoNewDocuments
        expr: increase(elasticsearch_indices_docs{es_data_node="true"}[10m]) < 1
        for: 0m
        labels:
          severity: warning
        annotations:
          summary: Elasticsearch no new documents (instance {{ $labels.instance }}, node {{$labels.node}})
          description: "No new documents for 10 min!\n  VALUE = {{ $value }}\n  LABELS = {{ $labels }}"
并重启生效.
Warning:
ElasticsearchTooFewNodesRunning告警的条件是 es 集群的 node 少于 3 个,对于单节点 ES 会误报,所以按需开启 rule 或按需屏蔽 (slience).ElasticsearchHealthyDataNodes告警同上.
AlertManager 告警规则及收件人配置
按需调整,示例如下:
''global'':
  ''smtp_smarthost'': ''''
  ''smtp_from'': ''''
  ''smtp_require_tls'': false
  ''resolve_timeout'': ''5m''
''receivers'':
  - ''name'': ''es-email''
    ''email_configs'':
      - ''to'': ''sfw@example.com,sdfwef@example.com''
        ''send_resolved'': true
''route'':
  ''group_by'':
    - ''job''
  ''group_interval'': ''5m''
  ''group_wait'': ''30s''
  ''routes'':
    - ''receiver'': ''es-email''
      ''match'':
        ''job'': ''es''
并重启生效.
Grafana 配置
导入 json 格式的 Grafana Dashboard:
{
    "__inputs": [],
    "__requires": [
        {
            "type": "grafana",
            "id": "grafana",
            "name": "Grafana",
            "version": "5.4.0"
        },
        {
            "type": "panel",
            "id": "graph",
            "name": "Graph",
            "version": "5.0.0"
        },
        {
            "type": "datasource",
            "id": "prometheus",
            "name": "Prometheus",
            "version": "5.0.0"
        },
        {
            "type": "panel",
            "id": "singlestat",
            "name": "Singlestat",
            "version": "5.0.0"
        }
    ],
...
可以直接在 Grafana 上找到完整的
️ 参考文档
- prometheus-community/elasticsearch_exporter: Elasticsearch stats exporter for Prometheus (github.com)
- ElasticSearch dashboard for Grafana | Grafana Labs
- Awesome Prometheus alerts | Collection of alerting rules (grep.to)
三人行,必有我师;知识共享,天下为公. 本文由东风微鸣技术博客 EWhisper.cn 编写.

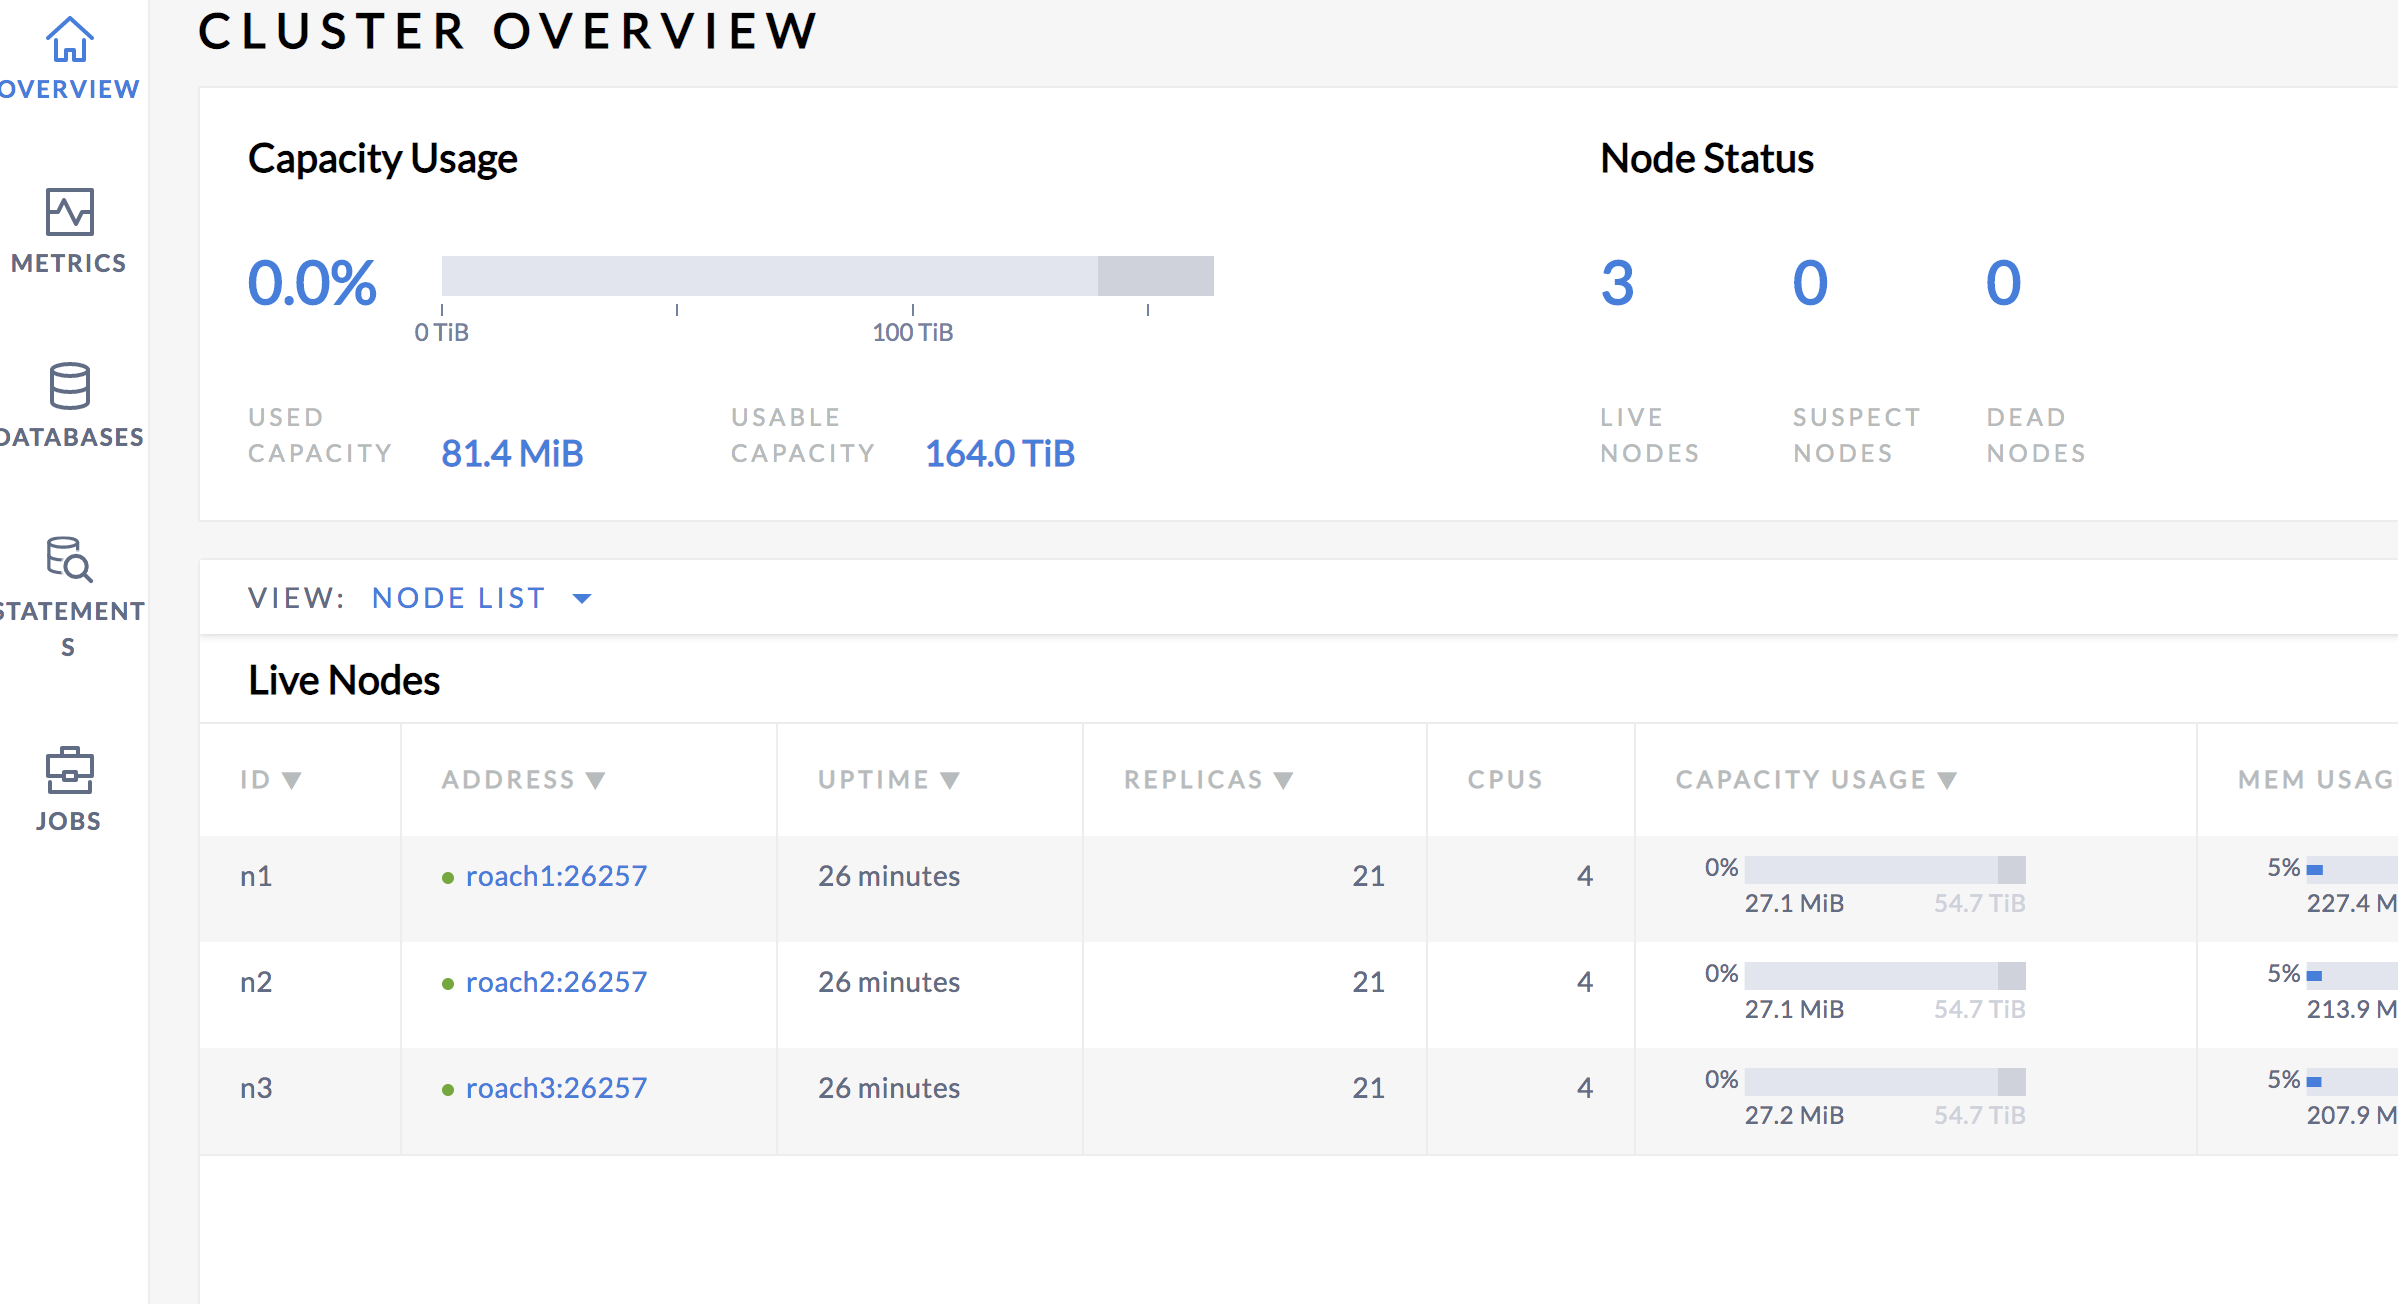
cockroachdb docker-compose 本地集群运行以及prometheus监控
cockroachdb 官方提供的是一个直接使用docker 运行的方式,但是使用docker-compose 会比较方便,可以快速搭建一个集群
同时官方也提供了prometheus 的metrics,我们可以快速的通过grafana 提供一个dashboard
docker-compose 运行
- docker-compose 文件
version: "3"services: grafana: image: grafana/grafana ports: - "3000:3000" alert: image: prom/alertmanager ports: - "9093:9093" prometheus: image: prom/prometheus volumes: - "./rules:/rules" - "./prometheus.yml:/etc/prometheus/prometheus.yml" ports: - "9090:9090" roach1: image: cockroachdb/cockroach:v19.1.5 hostname: roach1 command: start --insecure volumes: - "./data1:/cockroach/cockroach-data" ports: - "26257:26257" - "8081:8080" roach2: image: cockroachdb/cockroach:v19.1.5 hostname: roach2 command: start --insecure --join=roach1 volumes: - "./data2:/cockroach/cockroach-data" ports: - "26258:26257" - "8082:8080" roach3: image: cockroachdb/cockroach:v19.1.5 hostname: roach3 command: start --insecure --join=roach1 volumes: - "./data3:/cockroach/cockroach-data" ports: - "26259:26257" - "8083:8080"- 说明
上述集成了prometheus、alertmanager 以及grafana,集群的搭建很简单
alertmanager 以及grafana dashboard
官方已经提供好了alertmanager 的rule同时也给我们提供了grafana dashboard 的json 文件
参考https://www.cockroachlabs.com/docs/stable/monitor-cockroachdb-with-prometheus.html
prometheus.yml:
# Prometheus configuration for cockroach clusters.# Requires prometheus 2.X## Run with:# $ prometheus -config.file=prometheus.ymlglobal: scrape_interval: 10s evaluation_interval: 10srule_files:- "/rules/alerts.rules.yml"- "/rules/aggregation.rules.yml"# Alert manager running on the same host:alerting: alertmanagers: - path_prefix: "/alertmanager/" static_configs: - targets: - alert:9093scrape_configs: - job_name: ''cockroachdb'' metrics_path: ''/_status/vars'' # Insecure mode: scheme: ''http'' tls_config: insecure_skip_verify: true static_configs: - targets: [''roach1:8080'',''roach2:8080'',''roach3:8080''] labels: cluster: ''my-cockroachdb-cluster''grafana dashboard json 文件可以参考官方文档,或者github 项目
运行效果

参考资料
https://www.cockroachlabs.com/docs/stable/monitor-cockroachdb-with-prometheus.html
https://github.com/rongfengliang/cockroachdb-docker-compose-local-cluster

Docker Compose 部署 Nexus3 时的 docker-compose,yml 代码
场景
Docker-Compose 简介与 Ubuntu Server 上安装 Compose:
https://blog.csdn.net/BADAO_LIUMANG_QIZHI/article/details/100902301
Docker Compose 基本使用 - 使用 Compose 启动 Tomcat 为例:
https://blog.csdn.net/BADAO_LIUMANG_QIZHI/article/details/100904080
Docker Compose 部署项目到容器 - 基于 Tomcat 和 mysql 的商城项目 (附源码和 sql 下载):
https://blog.csdn.net/BADAO_LIUMANG_QIZHI/article/details/100941366
在上面实现基本的 Compose 的操作的基础上,实现使用 Docker Compose 搭建 Nexus3。
注:
博客:
https://blog.csdn.net/badao_liumang_qizhi
关注公众号
霸道的程序猿
获取编程相关电子书、教程推送与免费下载。
实现
version: ''3''
services:
  nexus:
    restart: always
    image: sonatype/nexus3
    container_name: nexus3
    ports:
      - 8081:8081
    volumes:
      - /usr/local/docker/nexus/nexus-data:/nexus-data

Docker 环境下使用 prometheus + grafana 监听 postgresql
效果图

环境准备
准备好 docker 环境,包括 docker-compose。这里直接使用已制作好的 docker-compose 配置文件。
$ mkdir docker-composes
$ git clone https://github.com/docker-composes/postgres.git
$ git clone https://github.com/docker-composes/grafana.git
$ git clone https://github.com/docker-composes/prometheus.git
注:下文操作皆从 docker-composes 目录出发。
容器配置
postgres exporter 配置
vim postgres/exporter/docker-compose.yml
将 postgres 数据库连接信息设置为 DATA_SOURCE_NAME 环境变量。如果是同网络下容器,以容器名称作为 host,如此处使用同网络(local-net)下容器 postgres-singleton。
DATA_SOURCE_NAME=postgresql://root:123456@postgres-singleton:5432/postgres?sslmode=disableprometheus.yml
vim prometheus/singleton/config/prometheus.yml
在 scrape_configs 作用域下添加:
  # Postgres
  - job_name: ''postgres''
    static_configs:
      - targets: [''postgres-exporter-singleton:9187'']
        labels:
          instance: ''postgres-01''
          platform: ''ec2''
启动容器
$ docker network create local-net
$ cd grafana && docker-compose up -d
$ cd prometheus/signleton && docker-compose up -d
$ cd postgres/signleton && docker-compose up -d
$ cd postgres/expoter && docker-compose up -d
配置 grafana
访问 http://localhost:3000。
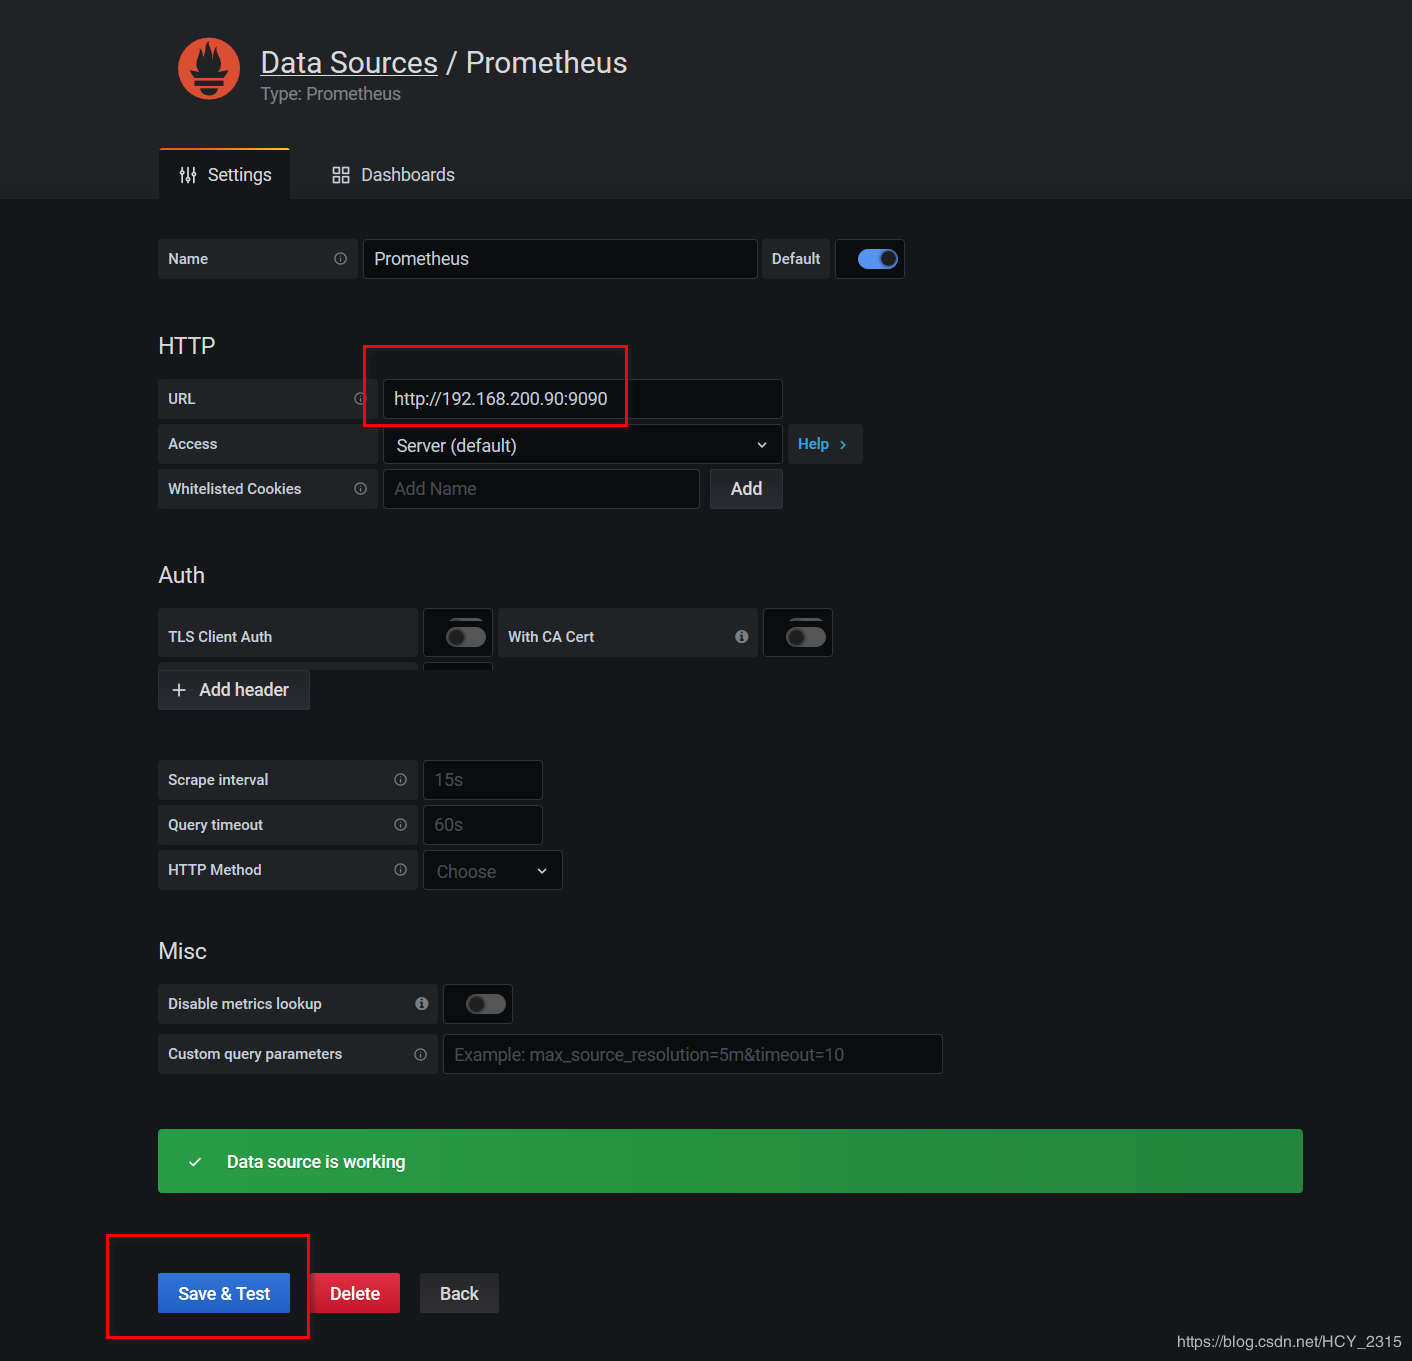
配置数据源
在 Configuration -> Data Sources 页面添加数据源(Add data source):

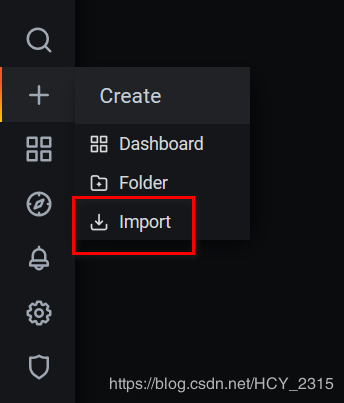
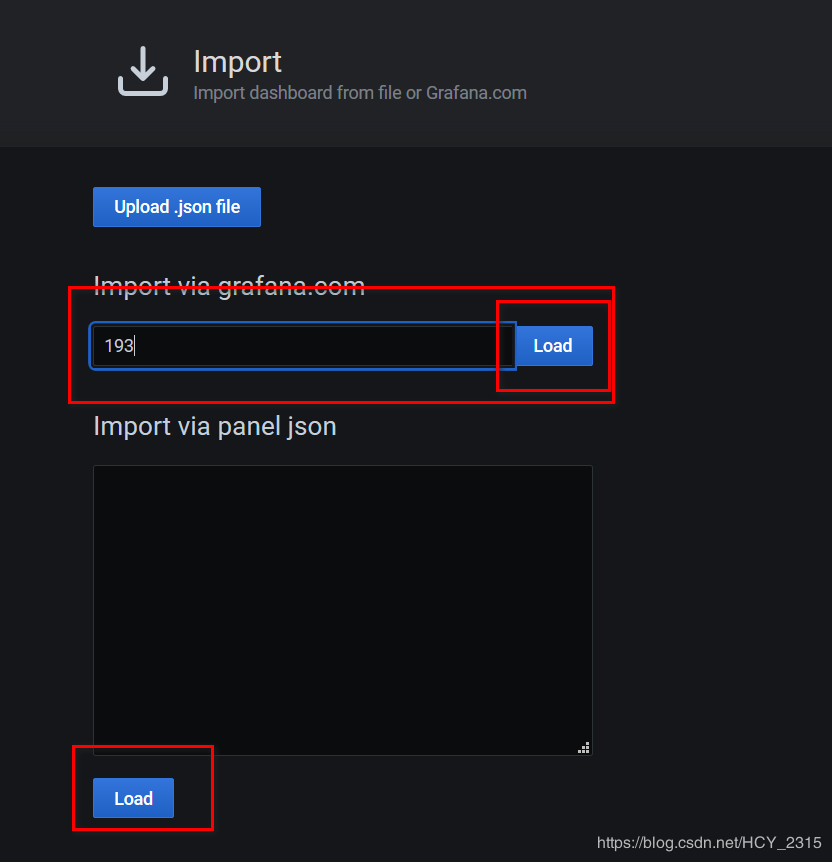
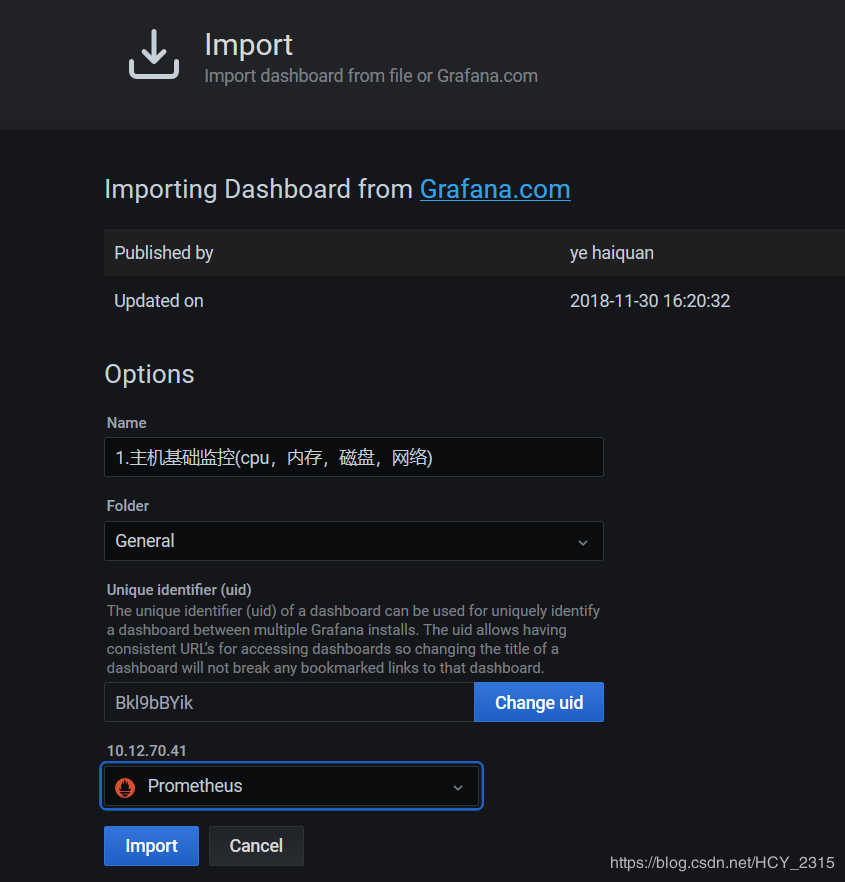
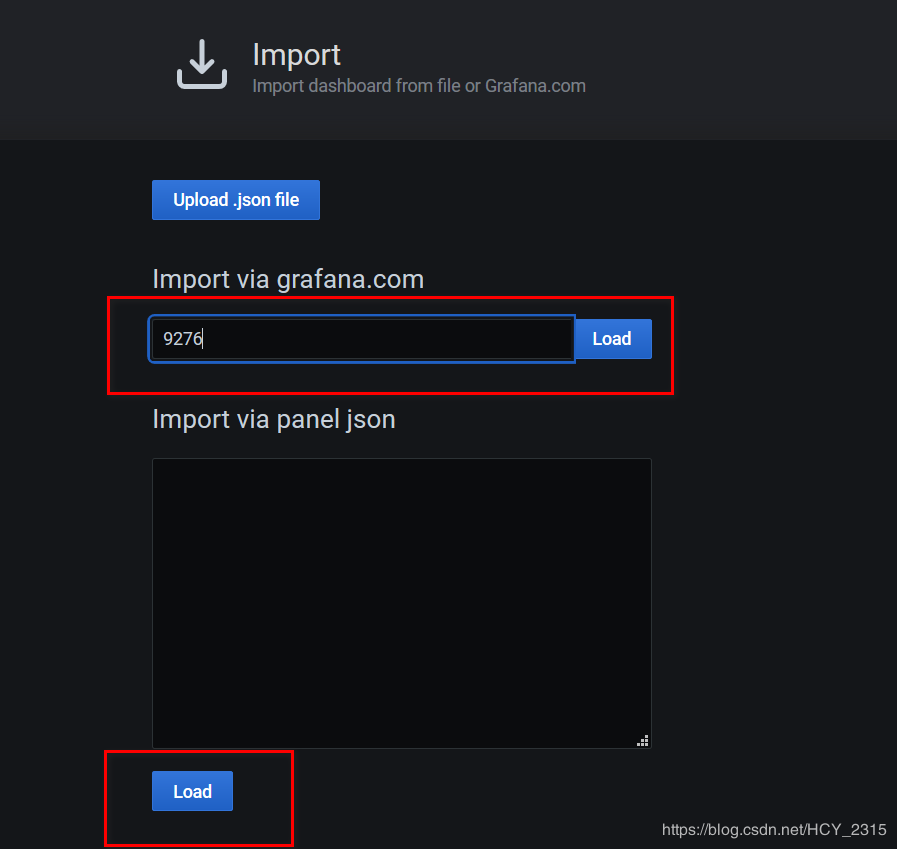
导入 Dashboard
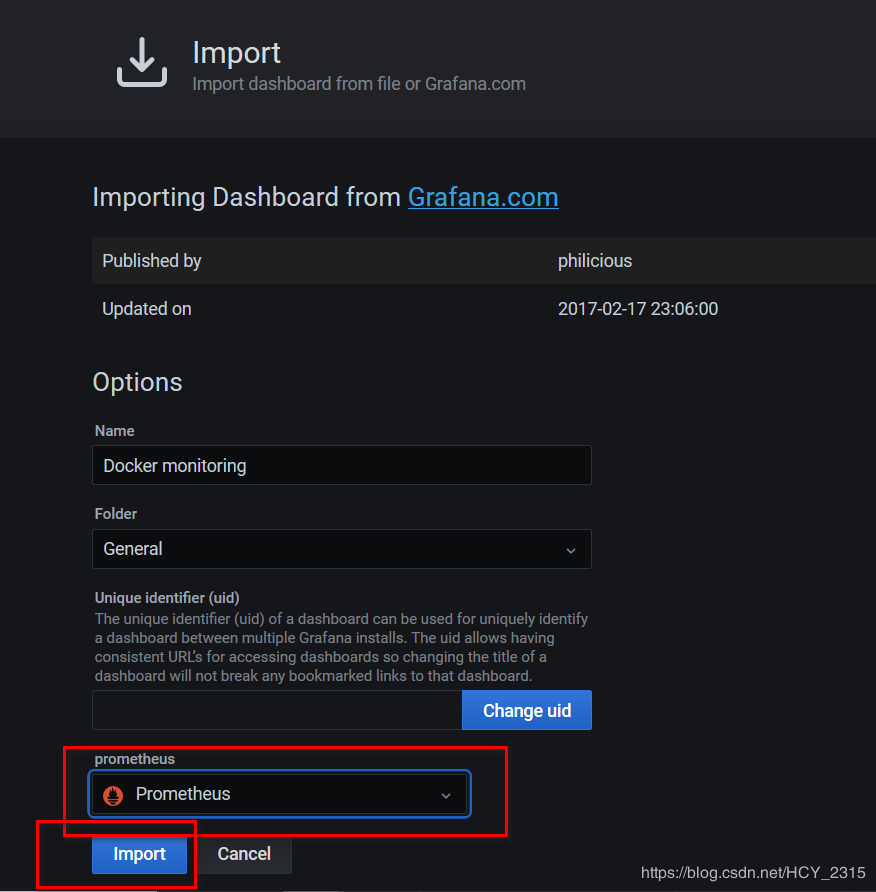
复制 Dashboard ID: 9628,导入:


导入成功,即可打开 dashboard 查看效果。
结语
- 理解 docker 容器间的网络连接。
- 理解 docker-compose.yml 中配置文件挂载。
- 耐心配置 grafana。
跑通之后可以研究下各项指标的查询,以及 grafana 的统计函数,将会受益匪浅。
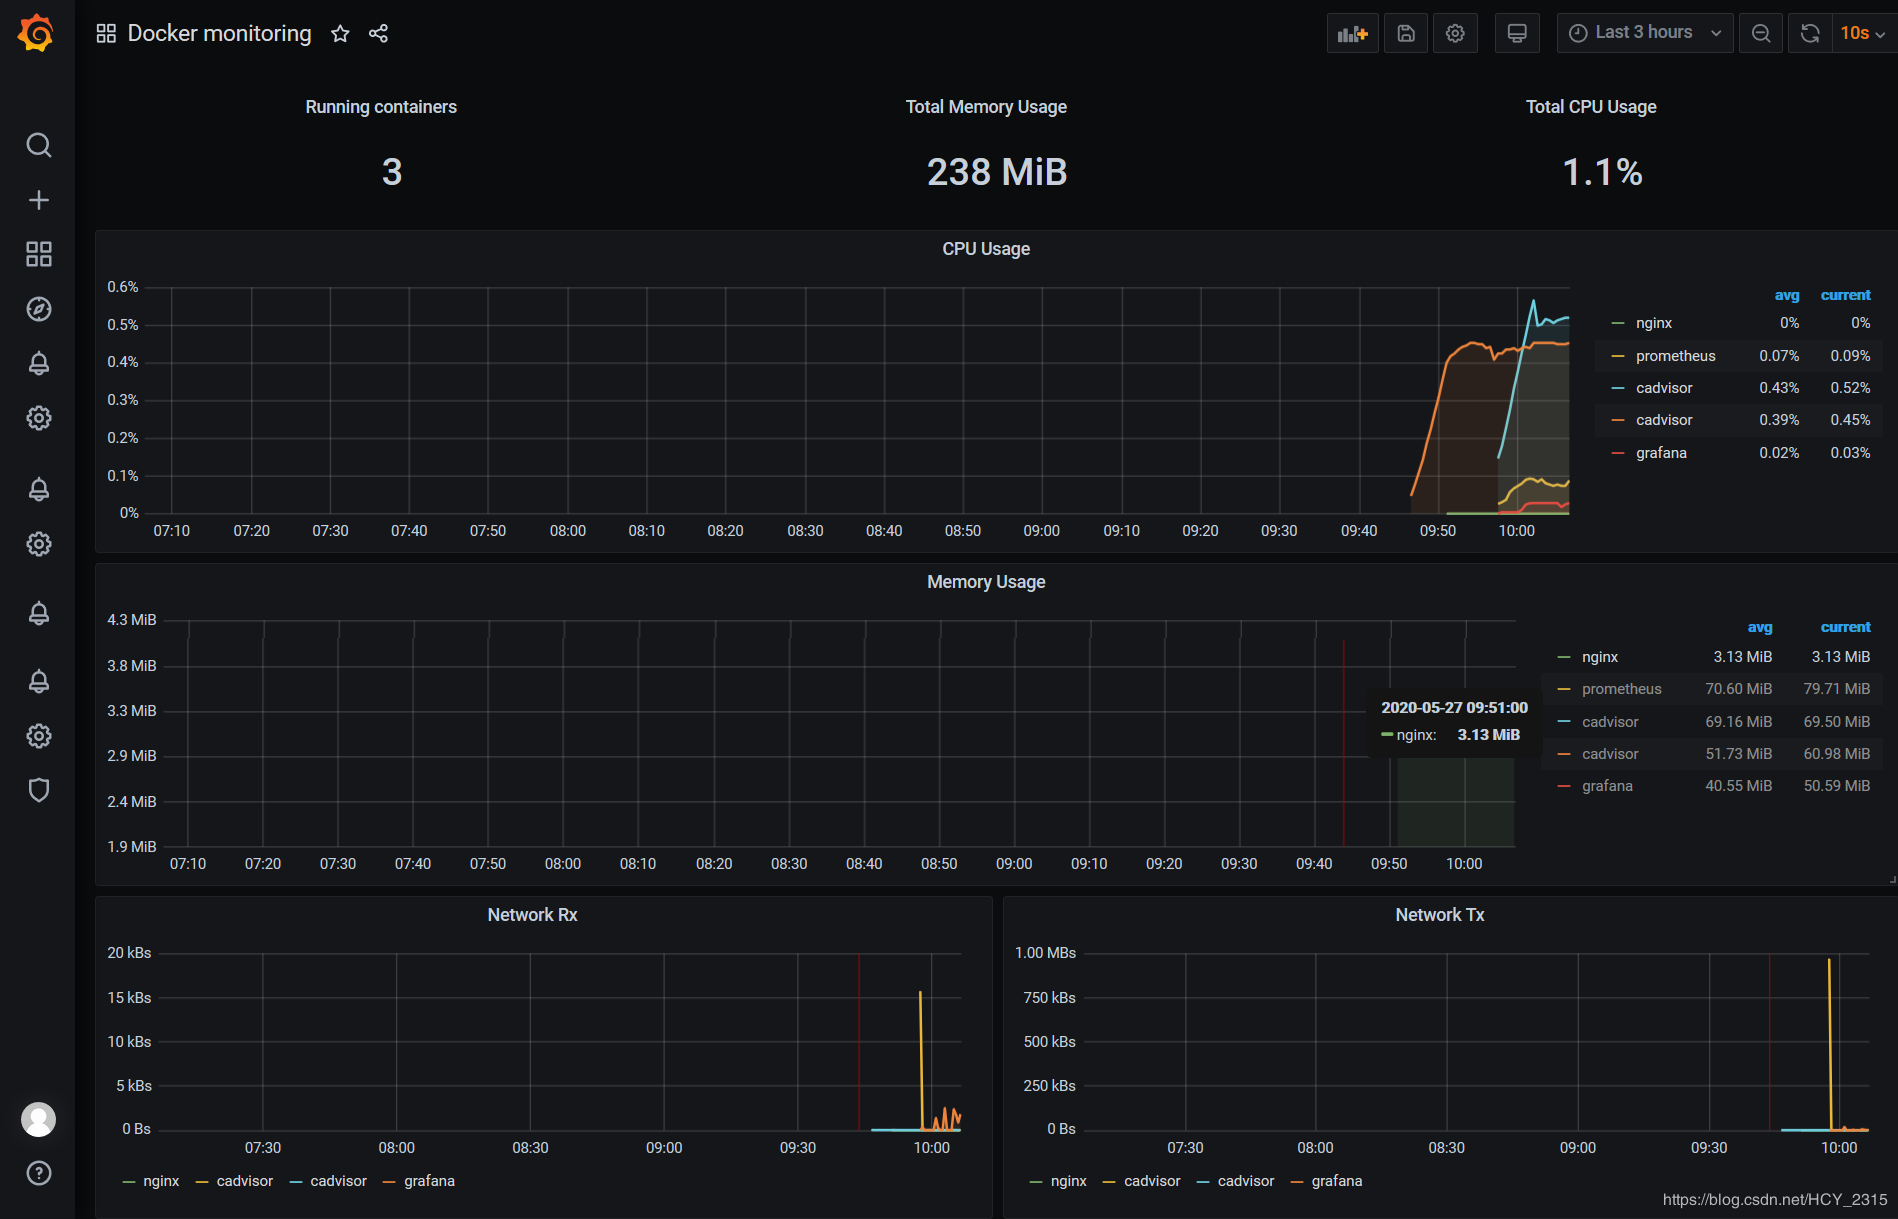
:prometheus+cadviso+grafana 实现对 docker 容器和宿主机进行监控")
Docker 监控(1):prometheus+cadviso+grafana 实现对 docker 容器和宿主机进行监控
Prometheus 特点:
	1)多维数据模型:由度量名称和键值对标识的时间序列数据(TSDB:存储临时数据还行)
	2)promSQL:一种灵活的查询语言,可以利用多维数据完成复杂的查询
	3)不依赖分布式存储,单个服务器节点可直接工作
	4)基于HTTP的pull方式采集时间序列数据
	5)推送时间序列数据通过PushGateway组件支持
	6)通过服务发现或者静态配置发现目标
	7)多种图形模式及仪表盘支持(grafana)
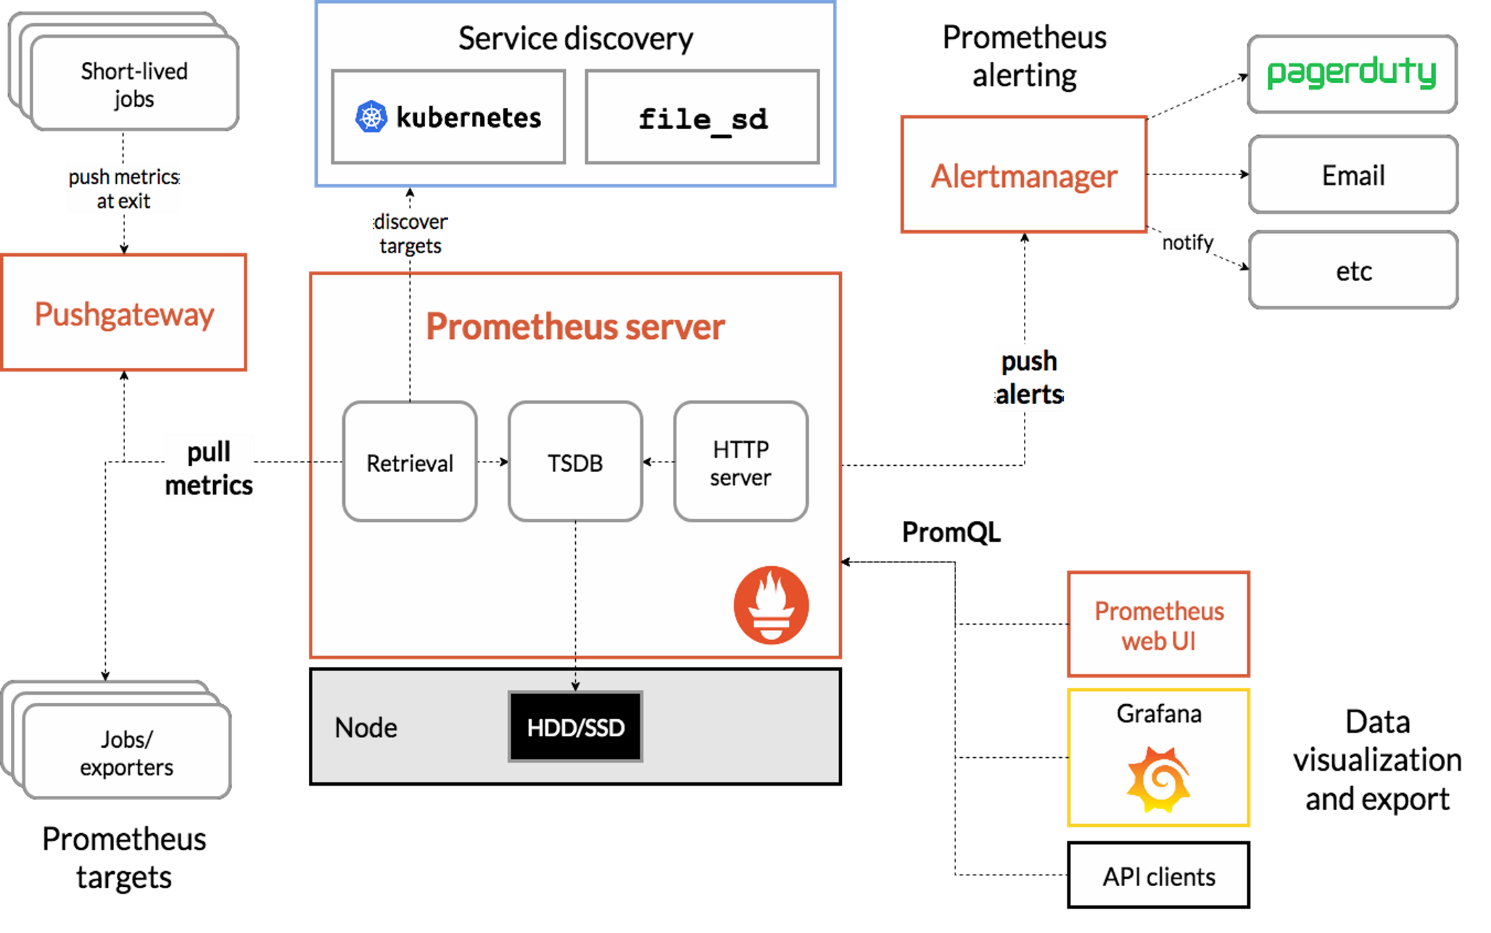
各个组件的作用:
Prometheus Server	收集指标和存储时间序列数据,并提供查询接口
ClientLibrary	客户端库
Push Gateway	短期存储指标数据,主要用于临时性的任务
Exports	采集已有的第三方服务监控指标并暴露metrics
Altertmanager	告警
Web UI	简单的web控制台
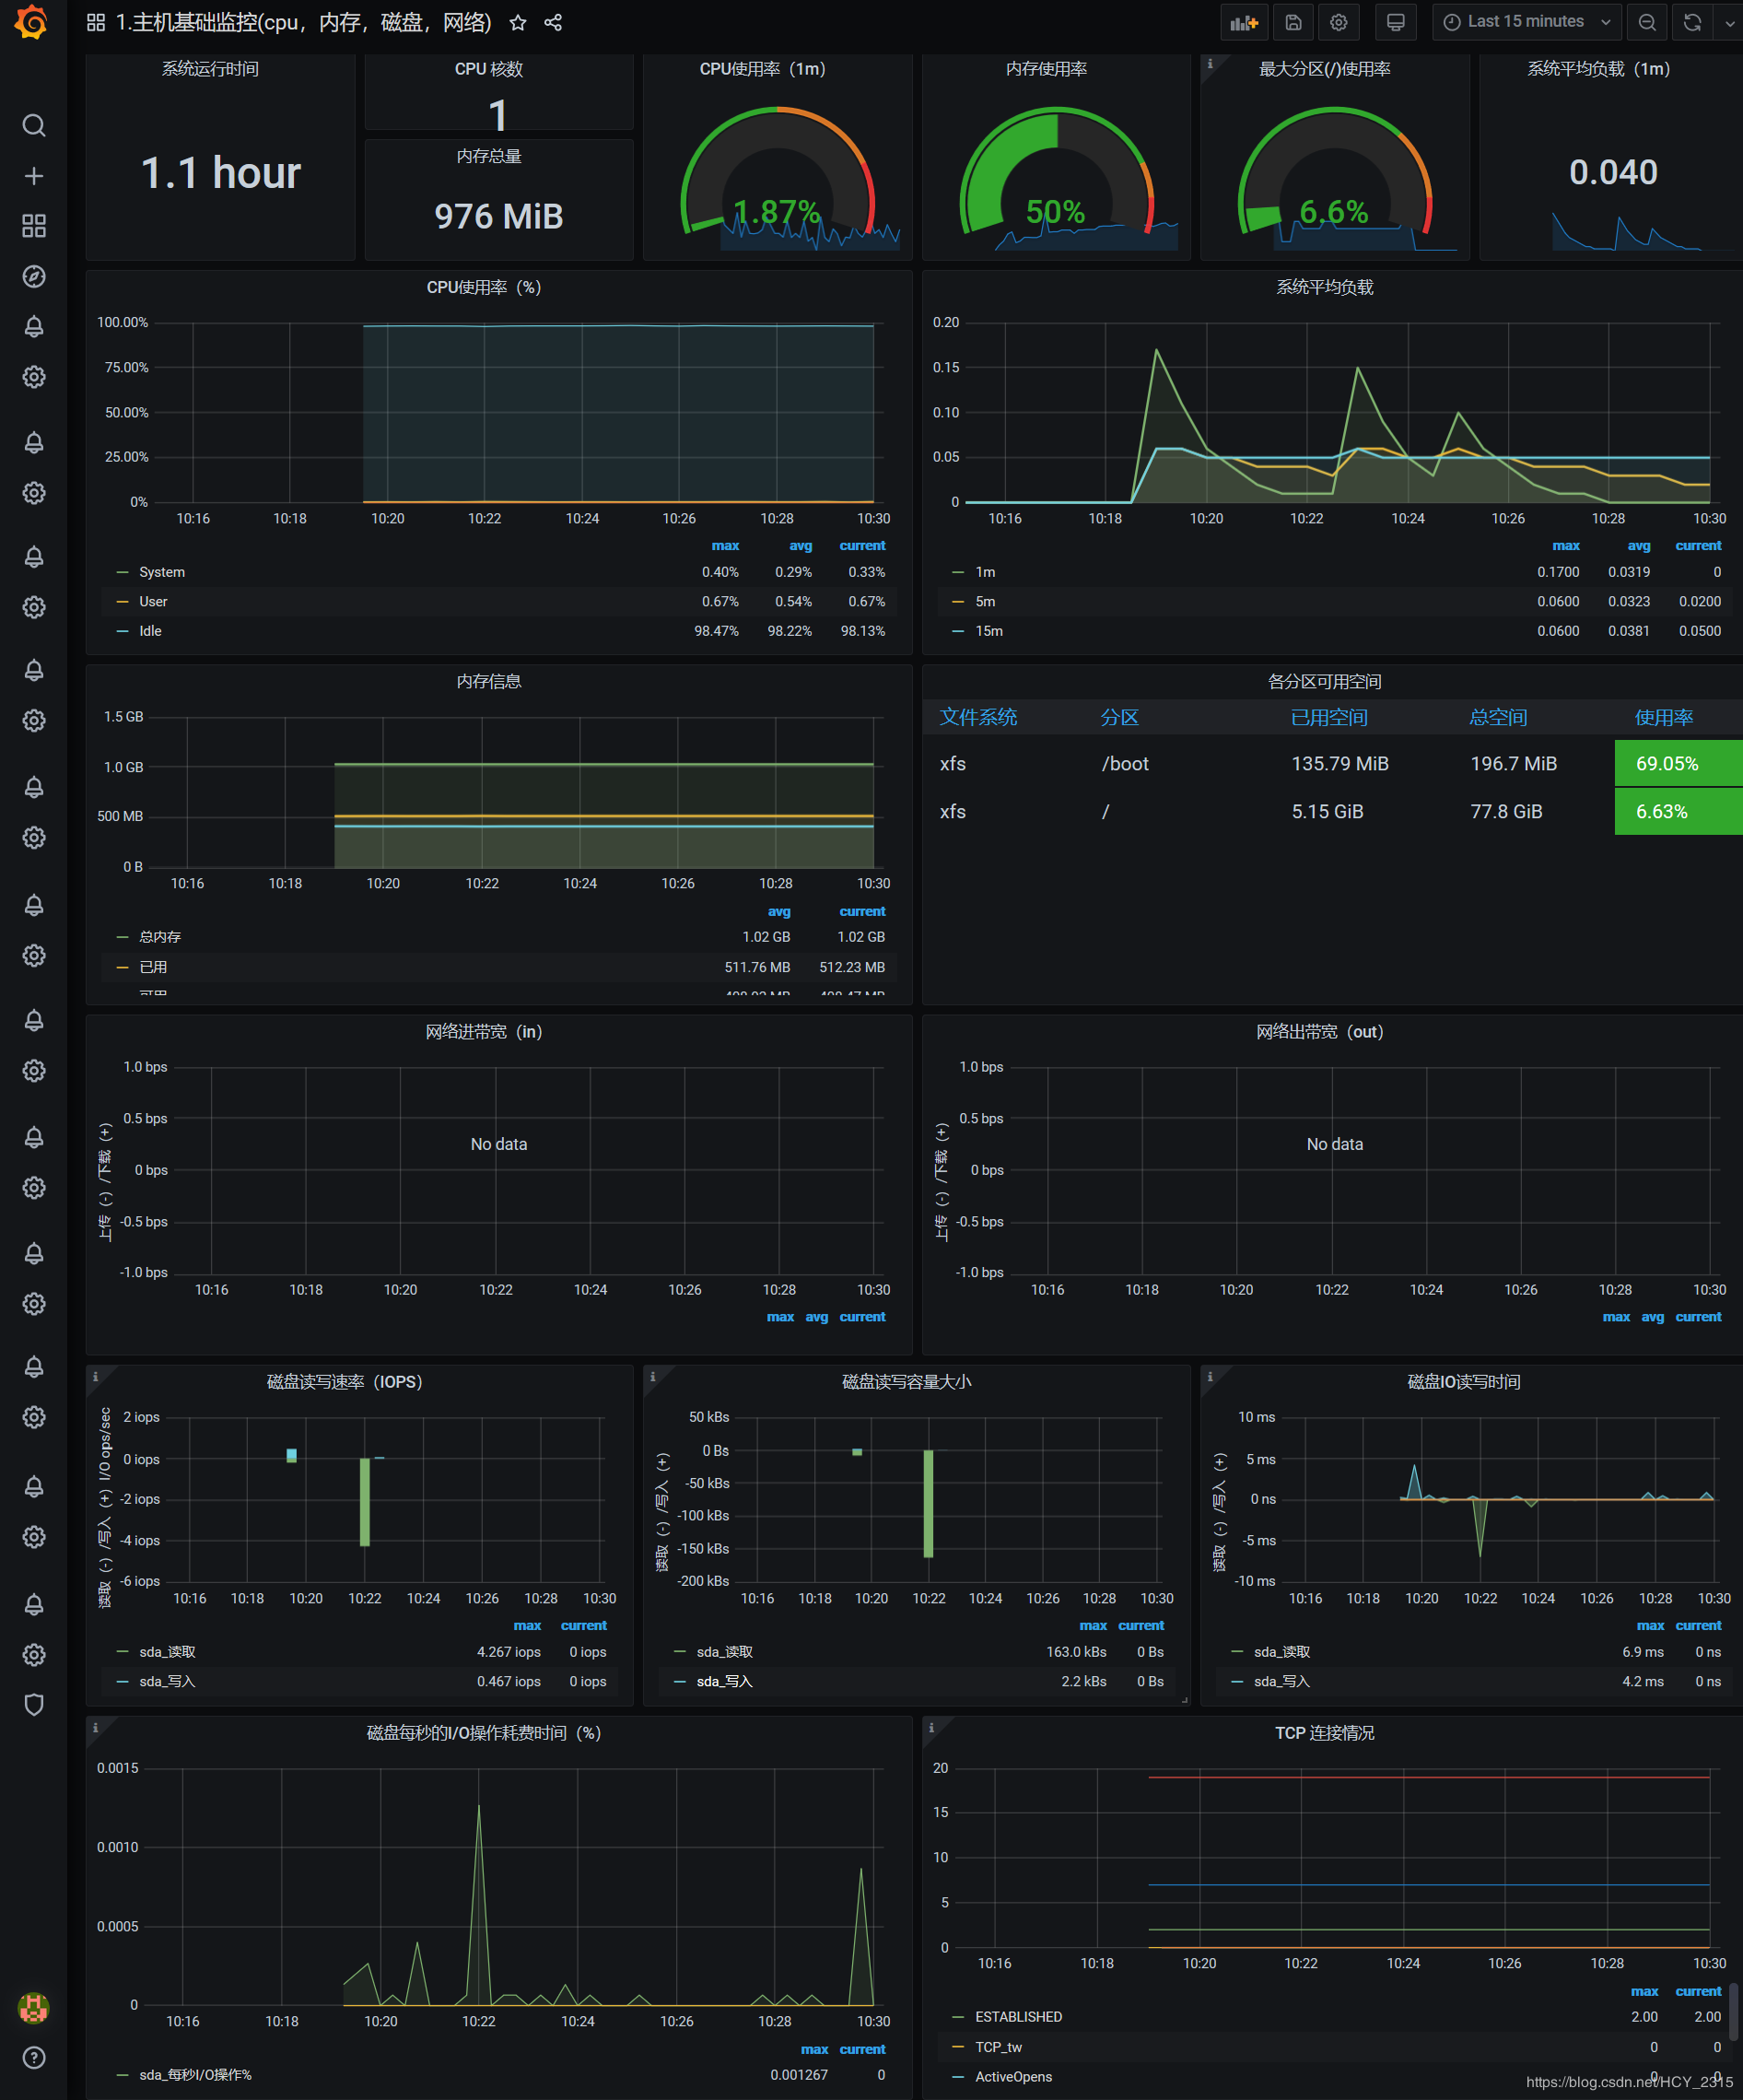
最终展示:(官网找的最新模板,在导入模板中替换就行了)
一、安装 prometheus
Docker部署:https://prometheus.io/docs/prometheus/latest/installation/
1、将配置文件放入/tmp中,并生成服务端
[root@prometheus ~]# mv prometheus.yml /tmp/
[root@prometheus ~]# docker run -d --name=prometheus -p 9090:9090 -v /tmp/prometheus.yml:/etc/prometheus/prometheus.yml prom/prometheus
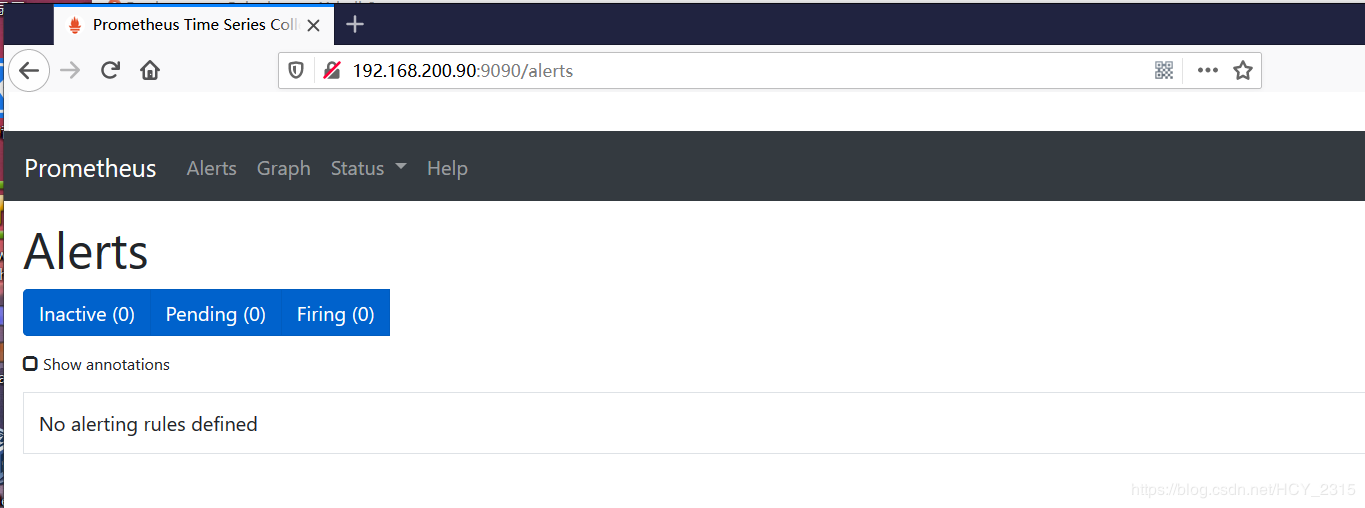
2、使用网页查看能正常访问
http://192.168.200.90:9090
二、配置监控 (cadvisor)
cadvisor部署:https://github.com/google/cadvisor
1、生成容器监控(在需要监控的docker宿主机中进行配置)
docker run -d \
--volume=/:/rootfs:ro \
--volume=/var/run:/var/run:ro \
--volume=/sys:/sys:ro \
--volume=/var/lib/docker/:/var/lib/docker:ro \
--volume=/dev/disk/:/dev/disk:ro \
--publish=8080:8080 \
--detach=true \
--name=cadvisor \
google/cadvisor:latest
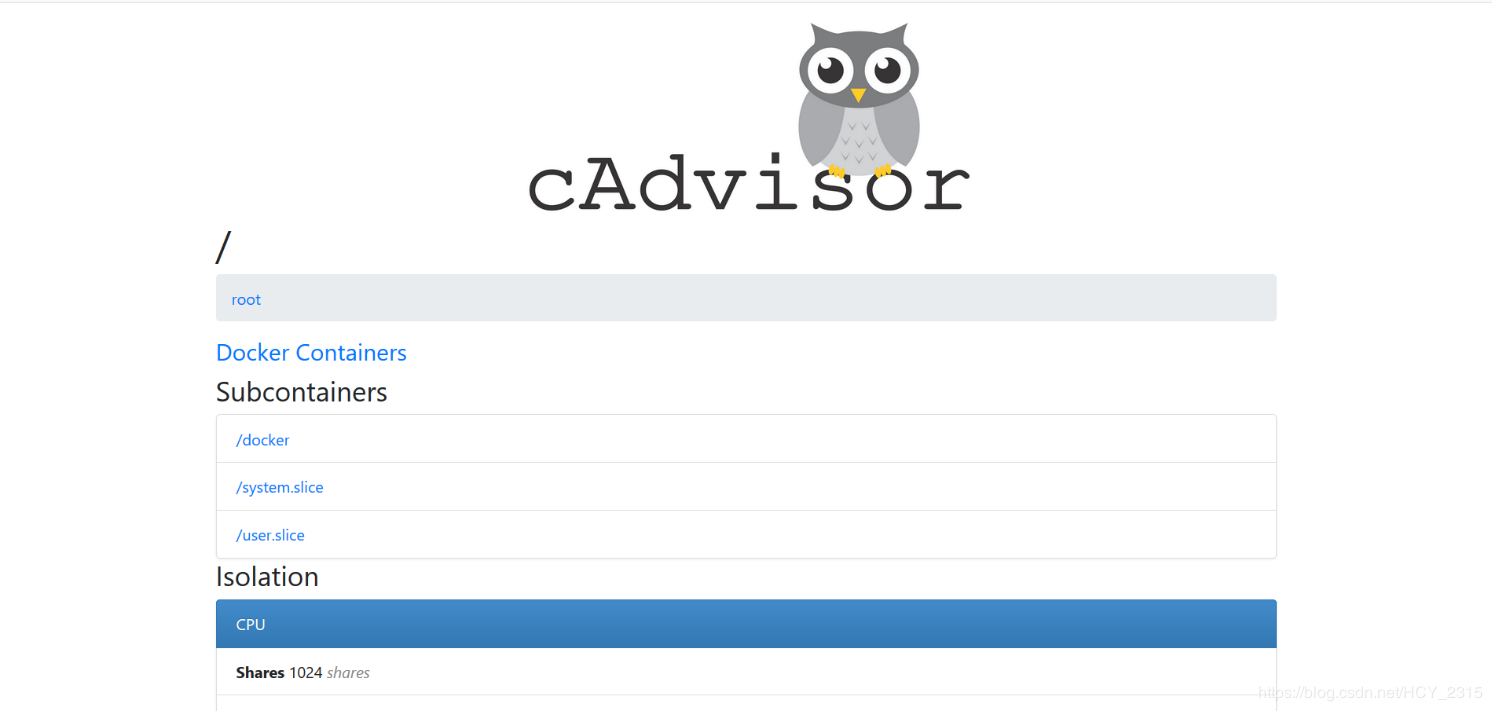
2、使用网页查看能正常访问
http://192.168.200.80:8080
三、部署 granafa
granafa模板地址:https://grafana.com/grafana/dashboards
	1、生成granafa容器(可在任何docker宿主机中运行,我这里在prometheus服务器服务器中运行的)
		[root@prometheus ~]# docker run -d --name=grafana -p 3000:3000 grafana/grafana
	2、监控docker
		1)修改prometheus.yml文件监控容器
			[root@prometheus ~]# vim /tmp/prometheus.yml
			  - job_name: ''prometheus''    #默认的名字,

			  - job_name: "prometheus-docker"	 	#添加,名字不要和默认的一致
			    static_configs:						#添加
			    - targets: [''192.168.200.90:8080'']	#添加

			  - job_name: "docker01"				#添加
			    static_configs:						#添加
			    - targets: [''192.168.200.80:8080'']	#添加
			[root@prometheus ~]# docker restart prometheus 		#更新配置文件
		2)随便生成一个测试容器
			[root@docker01 ~]# docker run --name nginx -d nginx
3)查看 prometheus 是否监控到数据
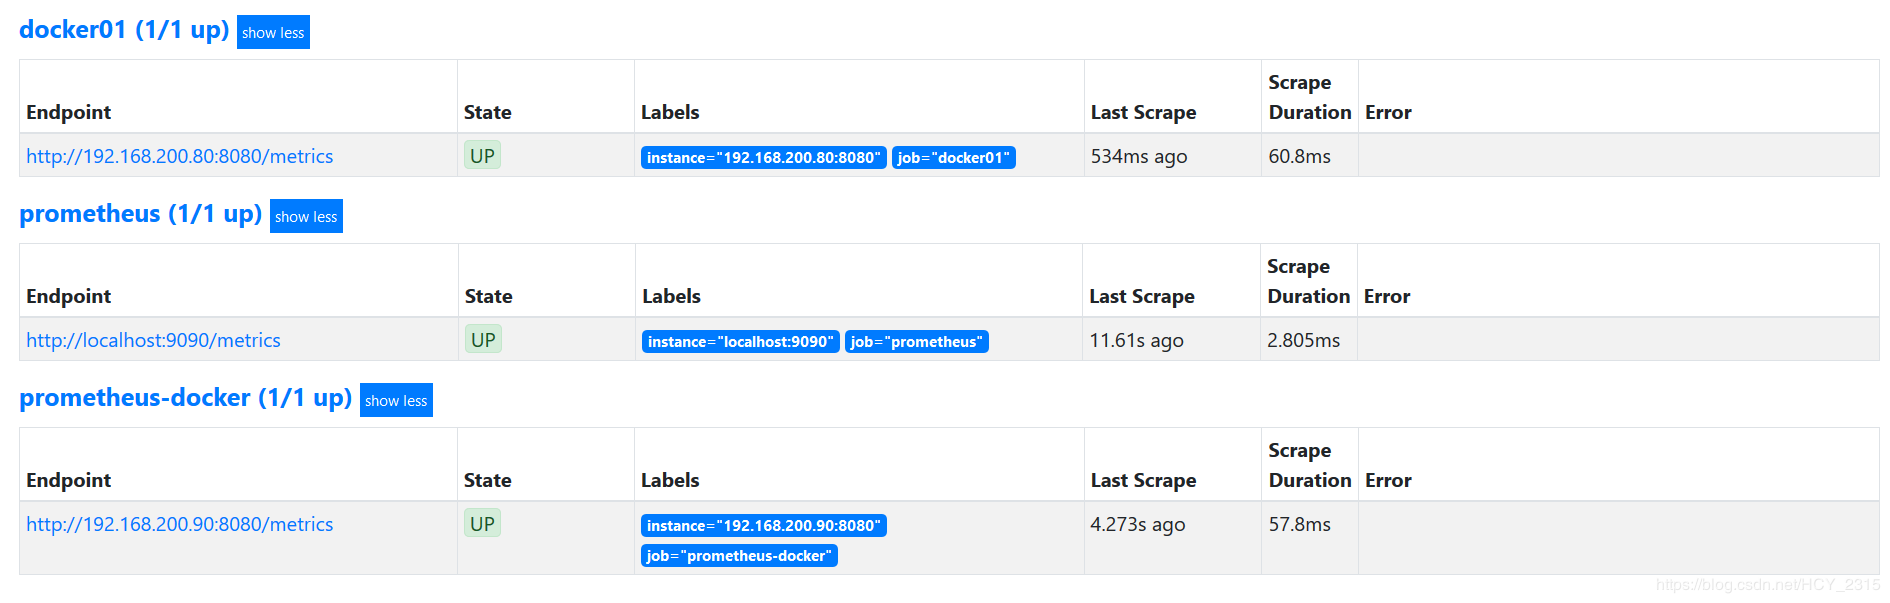
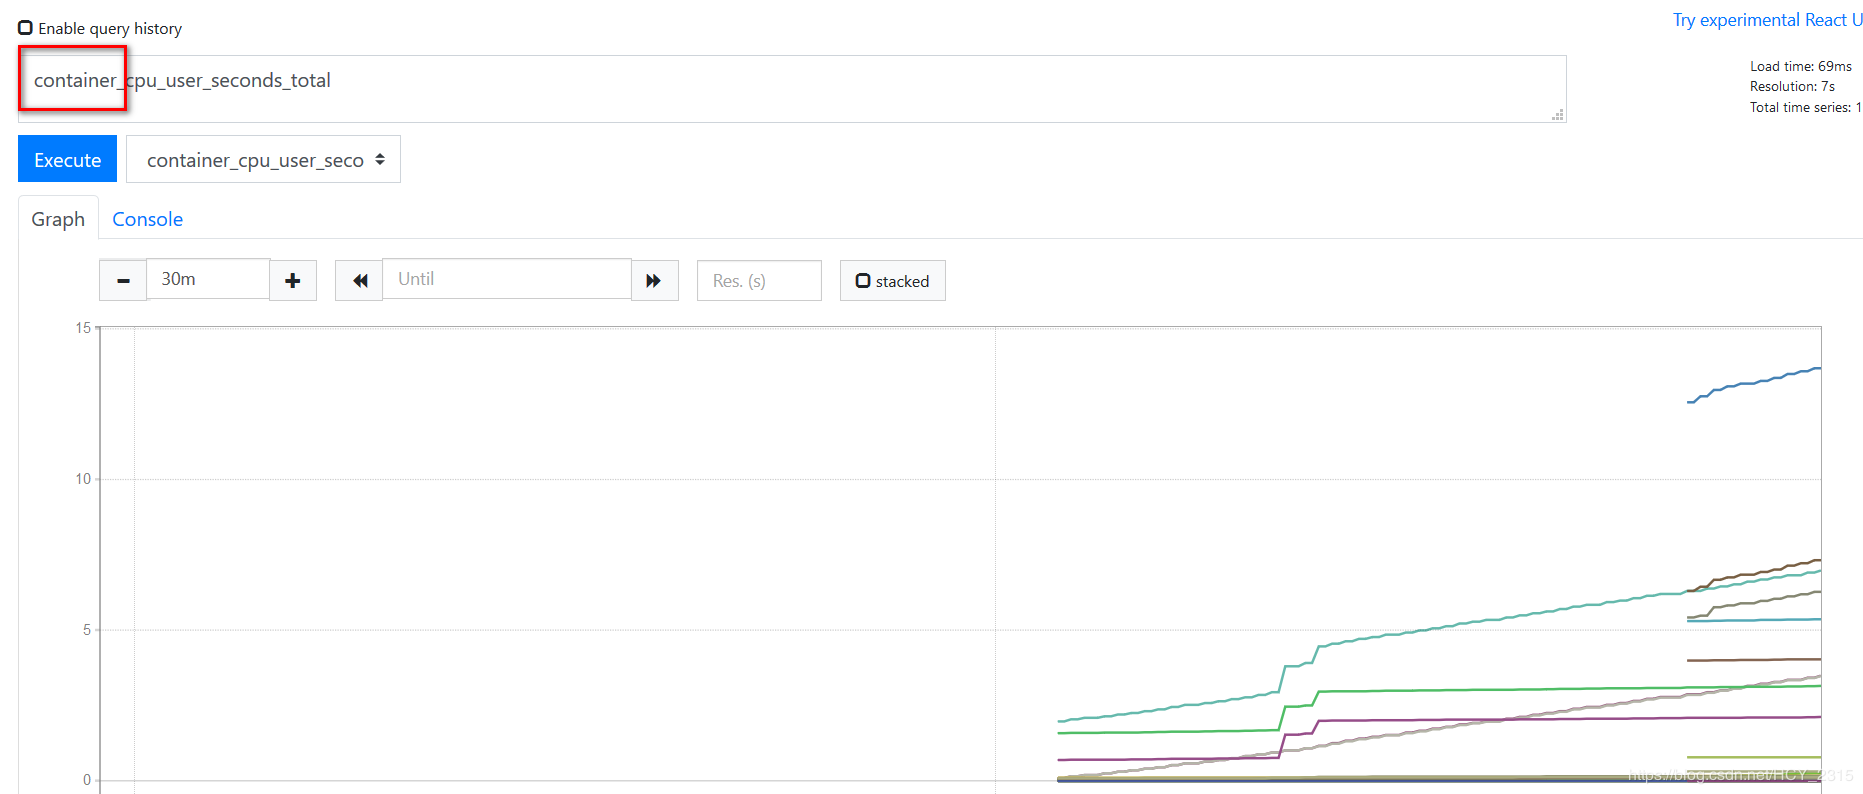
4)配置 granafa 导入 prometheus
5)添加模板
6)查看生成的图像
3、监控docker宿主机
		1)修改prometheus.yml文件监控容器,并加载配置文件
			[root@prometheus ~]# vim /tmp/prometheus.yml
			  - job_name: "Linux"
			    static_configs:
			    - targets: [''192.168.200.80:9100'']
			[root@prometheus ~]# docker restart prometheus
		2)下载客户端监控端
			[root@docker01 ~]# wget https://github.com/prometheus/node_exporter/releases/download/v0.17.0/node_exporter-0.17.0.linux-amd64.tar.gz
		3)解压tar包
			[root@docker01 ~]# tar xzvf ./node_exporter-0.17.0.linux-amd64.tar.gz -C /usr/local/
			[root@docker01 ~]# cd /usr/local/
			[root@docker01 local]# mv ./node_exporter-0.17.0.linux-amd64/ ./node_exporter
		4)生成系统文件
			[root@docker01 node_exporter]# vim ./node_exporter.sh

				#!/bin/bash

				cat <<EOF >/usr/lib/systemd/system/node_exporter.service
				[Unit]
				Description=https://prometheus.io

				[Service]
				Restart=on-failure
				ExecStart=/usr/local/node_exporter/node_exporter

				[Install]
				WantedBy=multi-user.target
				EOF

				systemctl daemon-reload
				systemctl enable node_exporter
				systemctl restart node_exporter
			[root@docker01 node_exporter]# sh ./node_exporter.sh
		5)查看服务是否启动
			[root@docker01 node_exporter]# ps -aux | grep node
				root      43063  0.1  1.1 113740 11772 ?        Ssl  10:18   0:00 /usr/local/node_exporter/node_exporter
			[root@docker01 node_exporter]# netstat -anptu | grep node
				tcp6       0      0 :::9100                 :::*                    LISTEN      43063/node_exporter
6)查看 promenadetheus 采集的数据

7)导入模板
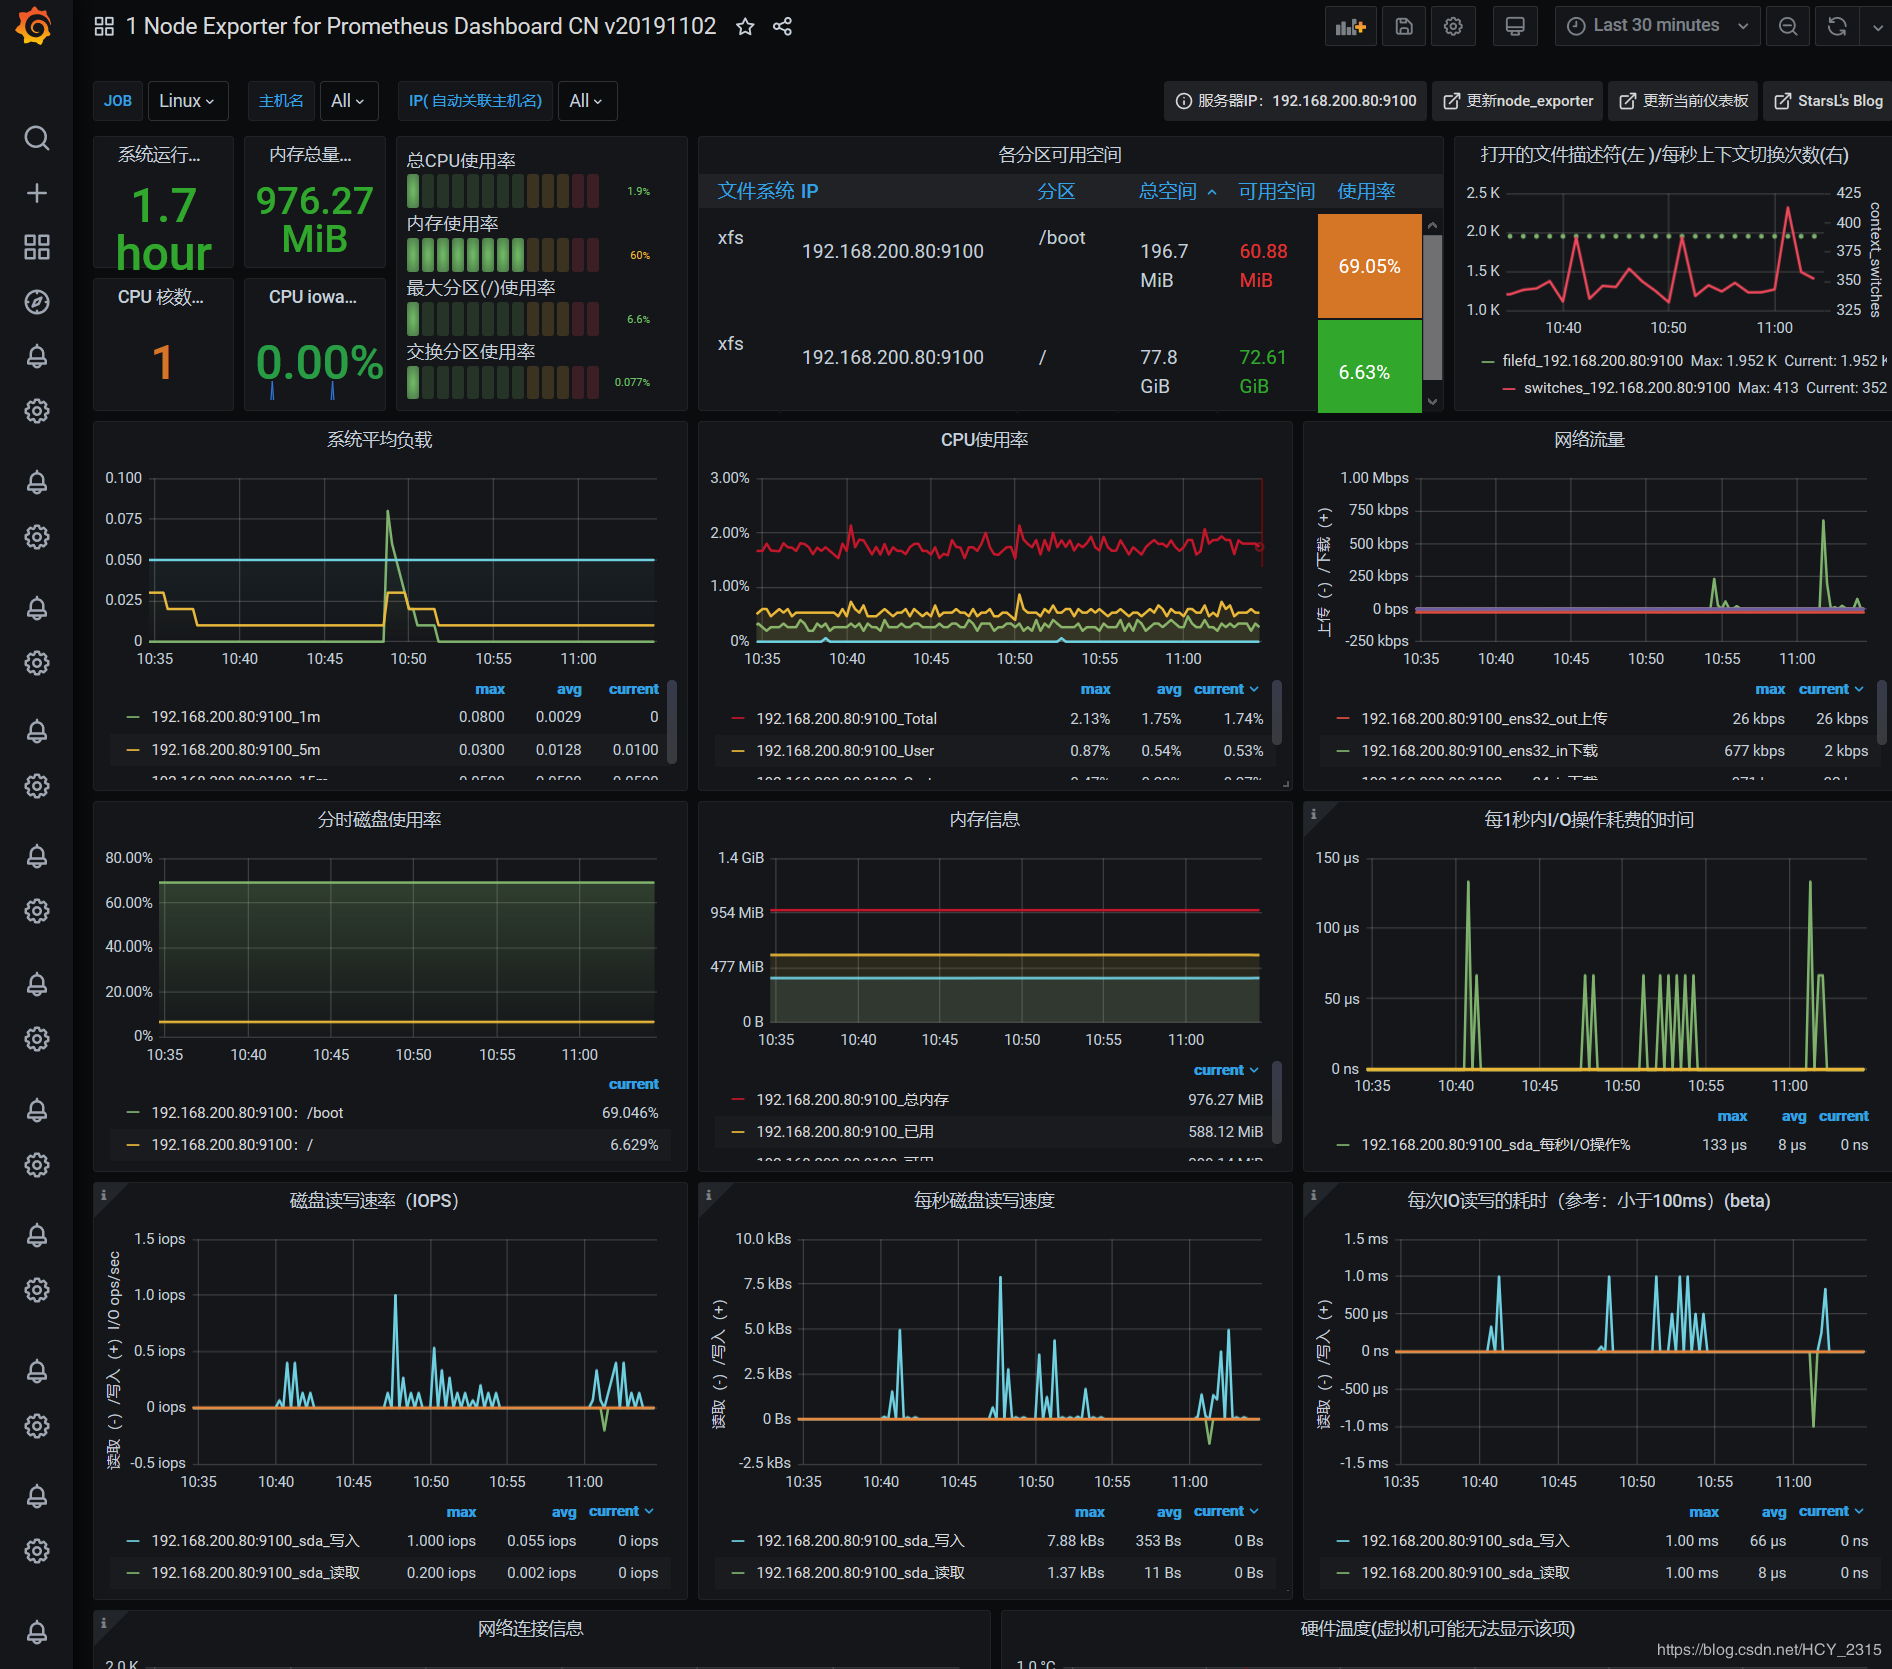
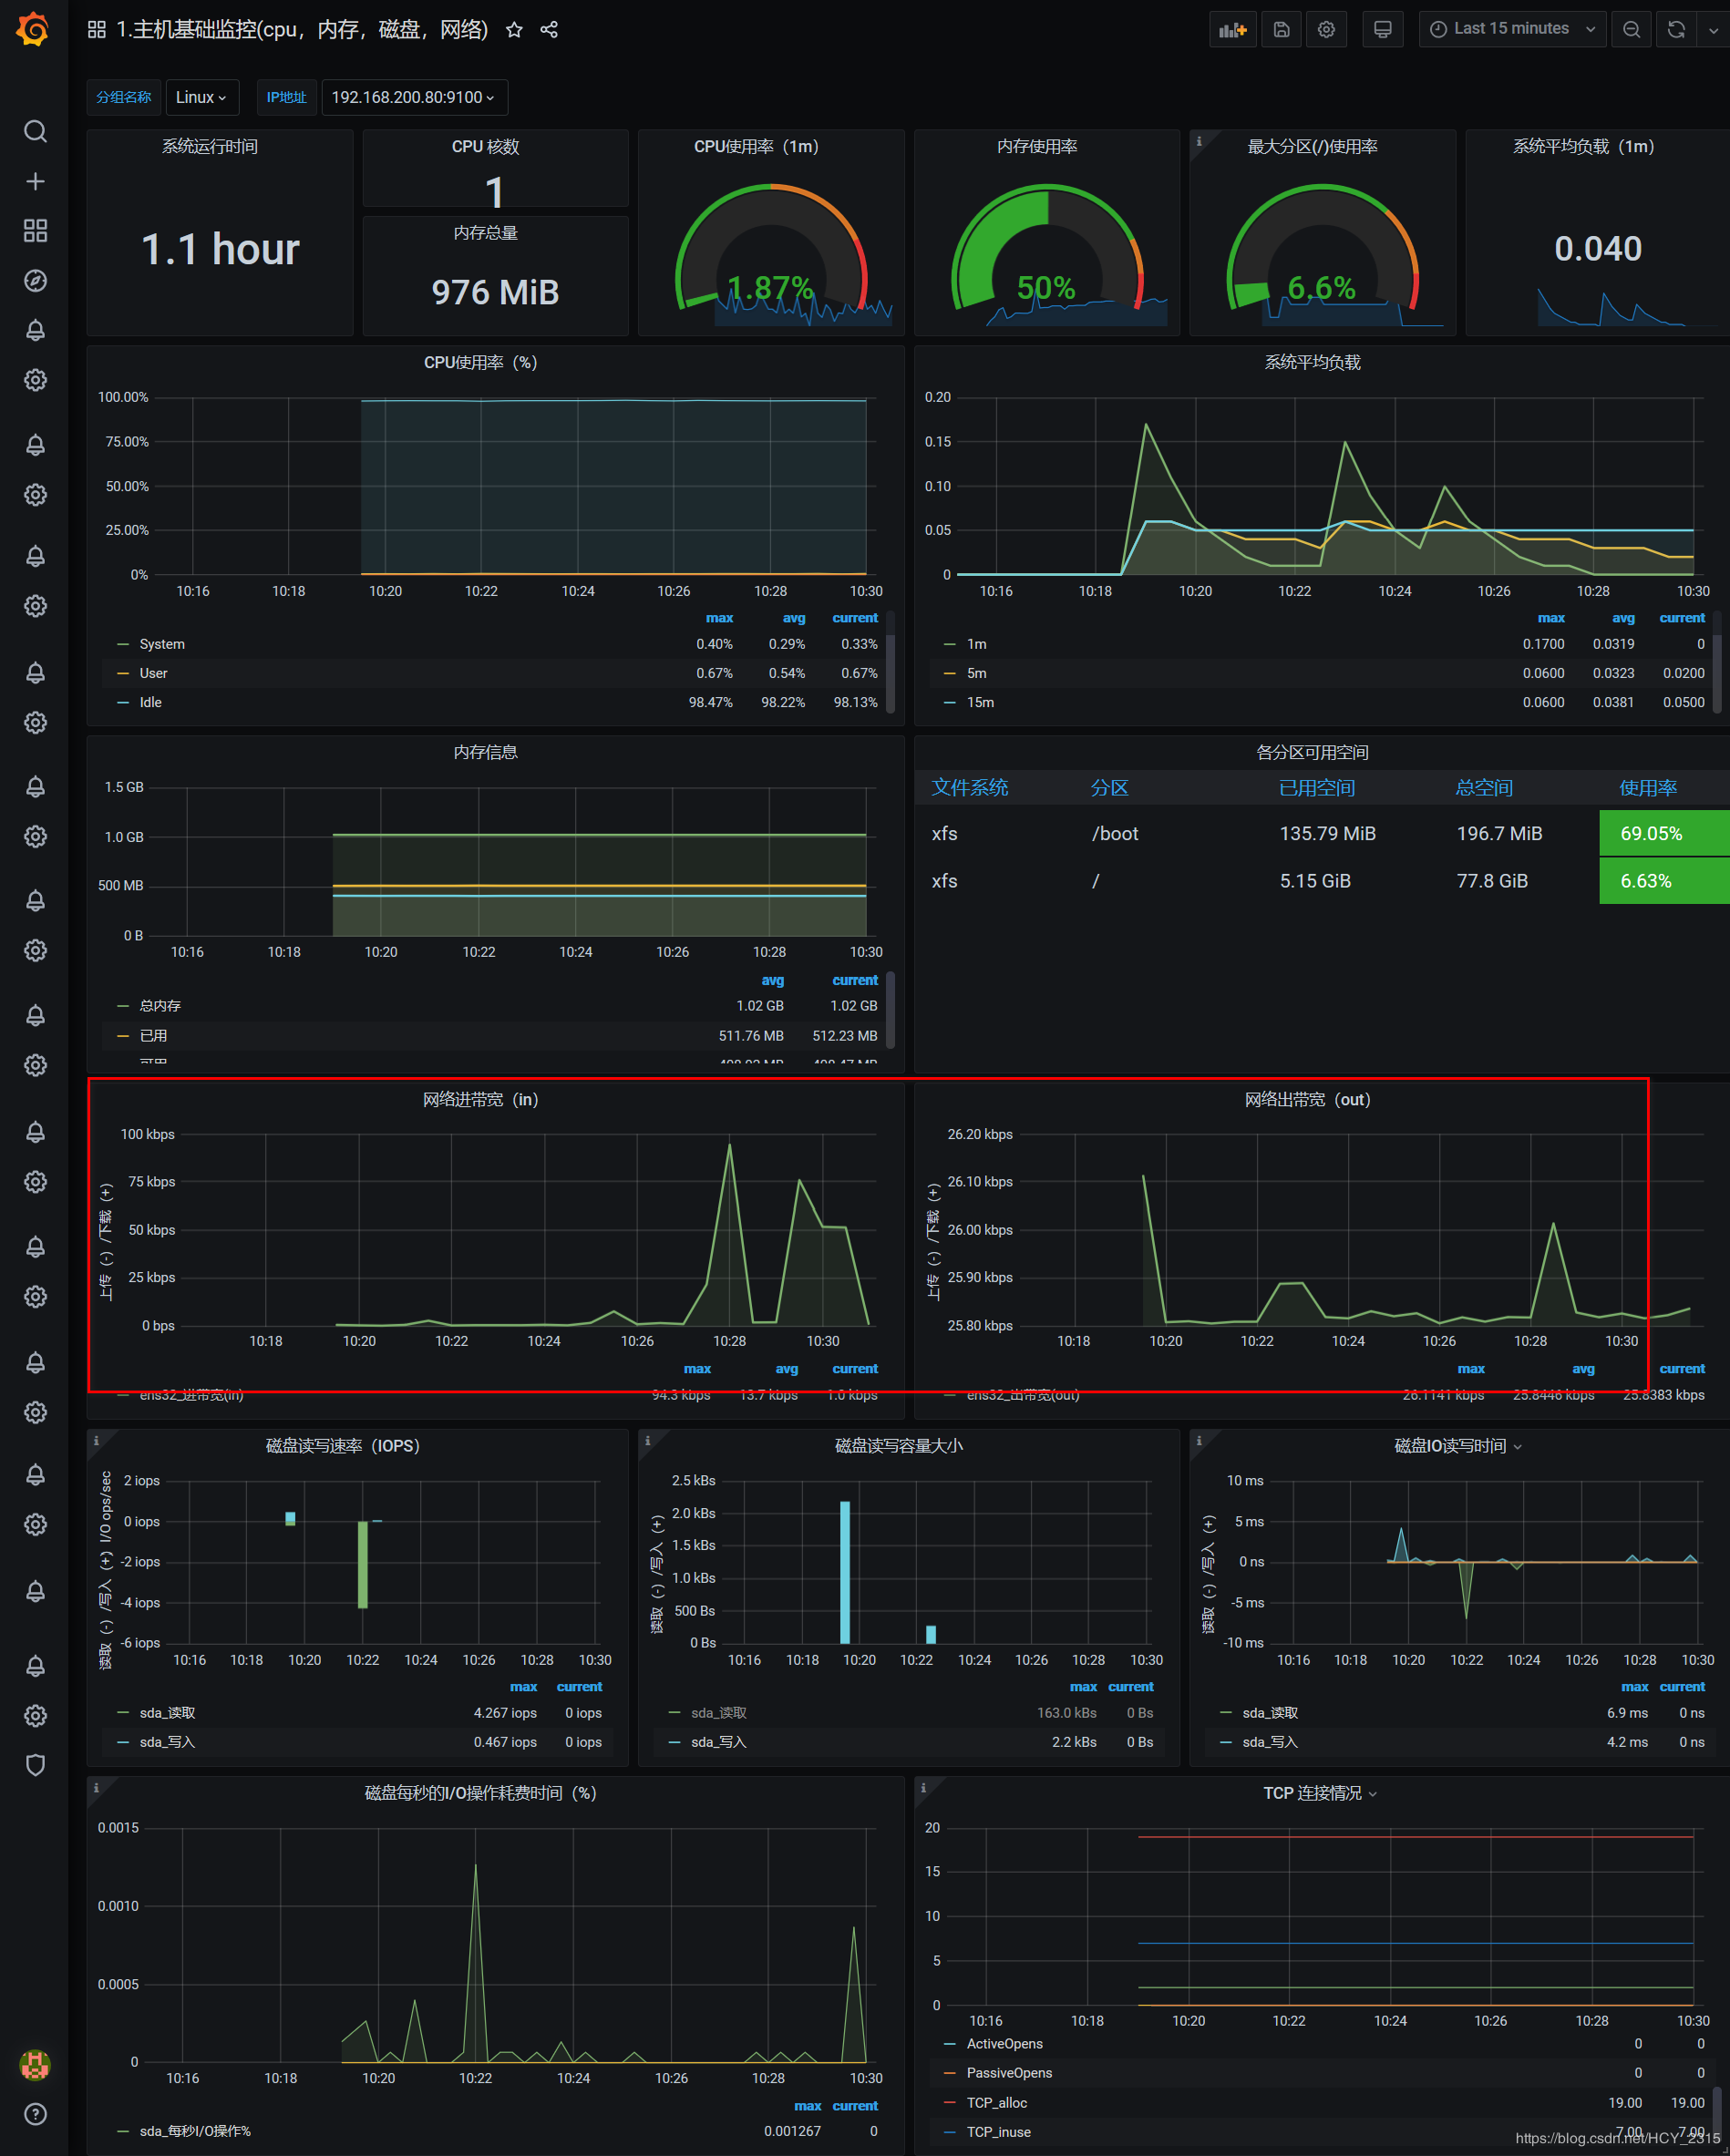
8)查看图像
9)解决图像中网络无数据的现象
修改为 ens32 (linux 主机的真实网卡)
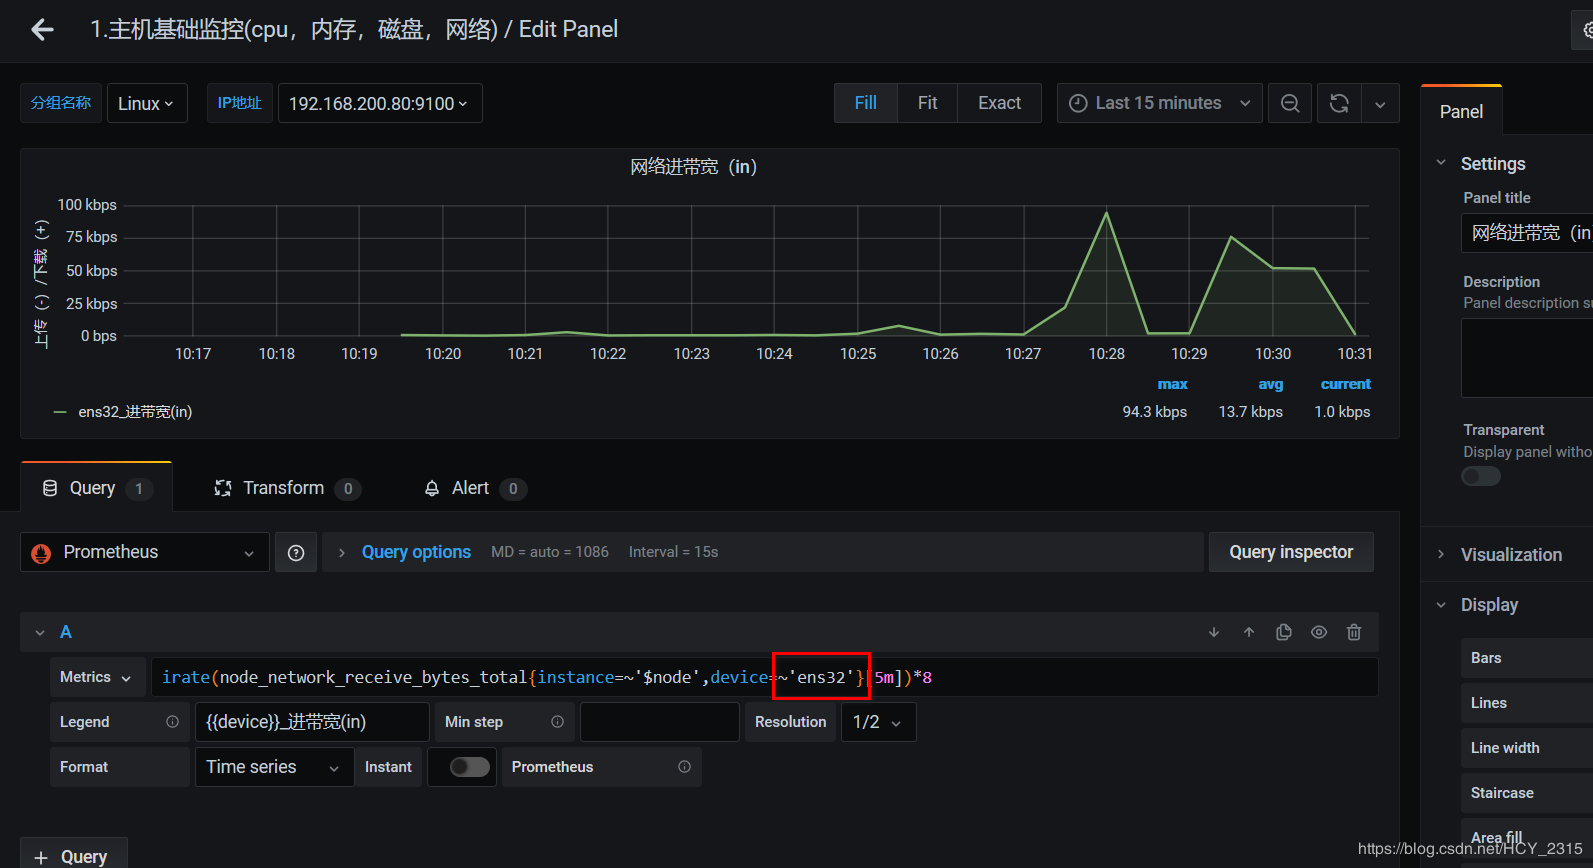
#查看图像
今天关于使用 Prometheus 监控 docker compose 方式部署的 ES和prometheus监控docker 容器的讲解已经结束,谢谢您的阅读,如果想了解更多关于cockroachdb docker-compose 本地集群运行以及prometheus监控、Docker Compose 部署 Nexus3 时的 docker-compose,yml 代码、Docker 环境下使用 prometheus + grafana 监听 postgresql、Docker 监控(1):prometheus+cadviso+grafana 实现对 docker 容器和宿主机进行监控的相关知识,请在本站搜索。
本文标签:


