这篇文章主要围绕tensorflowlite之生成tflite模型文件和tensorflow模型转tflite展开,旨在为您提供一份详细的参考资料。我们将全面介绍tensorflowlite之生成tf
这篇文章主要围绕tensorflow lite 之生成 tflite 模型文件和tensorflow模型转tflite展开,旨在为您提供一份详细的参考资料。我们将全面介绍tensorflow lite 之生成 tflite 模型文件的优缺点,解答tensorflow模型转tflite的相关问题,同时也会为您带来AI 赋能边缘计算:在 Kuiper 中运行 TensorFlow Lite 模型、android NDK 神经网络 API—— 是给 tensorflow lite 调用的底层 API,应用开发者使用 tensorflow lite 即可、bazel 编译 tensorflow 生成 libtensorflow_inference.so 和 libandroid_tensorflow_inference_java.jar、github/tensorflow/tensorflow/contrib/slim/的实用方法。
本文目录一览:- tensorflow lite 之生成 tflite 模型文件(tensorflow模型转tflite)
- AI 赋能边缘计算:在 Kuiper 中运行 TensorFlow Lite 模型
- android NDK 神经网络 API—— 是给 tensorflow lite 调用的底层 API,应用开发者使用 tensorflow lite 即可
- bazel 编译 tensorflow 生成 libtensorflow_inference.so 和 libandroid_tensorflow_inference_java.jar
- github/tensorflow/tensorflow/contrib/slim/
")
tensorflow lite 之生成 tflite 模型文件(tensorflow模型转tflite)
下载最新的的 tensorflow 源码。
1. 配置 tflite 文件转换所需环境
安装 bazel 编译工具
https://docs.bazel.build/versions/master/install.html
bazel build 出现问题:
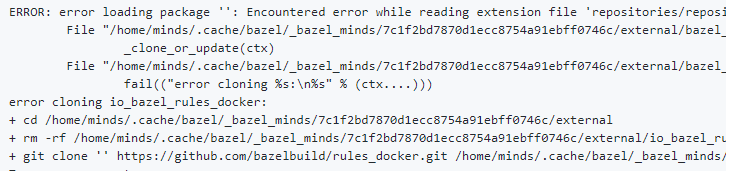
图片来自 https://github.com/tensorflow/tensorflow/issues/29053
解决方法:
在 WORKSPACE 中加入:
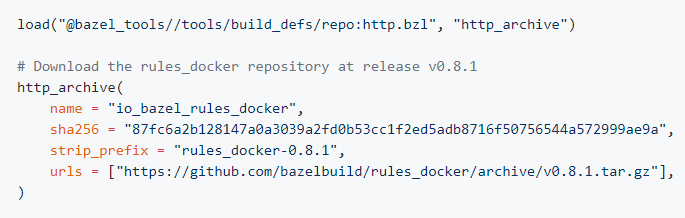
图片来自 https://github.com/bazelbuild/rules_docker
利用 bazel 编译转换 tflite 所需的工具:
cd tensorflow-master/
bazel build tensorflow/python/tools:freeze_graph
bazel build tensorflow/lite/toco:toco
bazel build tensorflow/tools/graph_transforms:summarize_graph
2 tensorflow 模型固化,将 tensorflow 模型和计算图上变量的之合二为一。
利用 freeze_graph 工具,生成 tflite_graph.pb 文件(frozen 的 GraphDef 文件)
cd /models-master/research/
python object_detection/export_tflite_ssd_graph.py
--pipeline_config_path=pipeline.config 路径
--trained_checkpoint_prefix=model.ckpt 保存的模型文件路径
--output_directory=model_graph 生成文件的路径
--add_postprocessing_op=true
注:生成文件夹 model_graph: 存放着 tflite_graph.pb 和 tflite_graph.pbtxt 文件
3 通过 tf 的 summarize_graph 函数可视化冻结图节点的输入输出信息
cd /tensorflow-master/
bazel-bin/tensorflow/tools/graph_transforms/summarize_graph
--in_graph=tflite_graph.pb 文件 frozen.pb 的路径
4 通过 toco 工具生成 tflite 文件
cd /tensorfolw_master/tensorflow/lite/toco
浮点型文件:
toco --graph_def_file=$path/tflite_graph.pb 文件 frozen.pb 的路径
--input_format=TENSORFLOW_GRAPHDEF
--output_file=model.tflite 存放生成文件的路径
--inference_type=FLOAT
--input_type=FLOAT
--input_arrays=normalized_input_image_tensor # 根据第 3 步的结果修改
--input_shapes=1,300,300,3 # 根据第 3 步的结果修改
--output_arrays=''TFLite_Detection_PostProcess'',''TFLite_Detection_PostProcess:1'', ''TFLite_Detection_PostProcess:2'', ''TFLite_Detection_PostProcess:3'' #根据第 3 步的结果修改
--allow_custom_ops
量化型文件:
toco --graph_def_file=$path/tflite_graph.pb 文件 frozen.pb 的路径
--input_format=TENSORFLOW_GRAPHDEF
--output_file=model_quantized.tflite 存放生成文件的路径
--inference_type=QUANTIZED_UINT8
--input_shapes=1,300,300,3 # 根据第 3 步的结果修改
--input_arrays=normalized_input_image_tensor # 根据第 3 步的结果修改
--output_arrays=''TFLite_Detection_PostProcess'',''TFLite_Detection_PostProcess:1'', ''TFLite_Detection_PostProcess:2'', ''TFLite_Detection_PostProcess:3'' #根据第 3 步的结果修改
--mean_values=128
--std_dev_values=127
--default_ranges_min=0
--default_ranges_max=6
--allow_custom_ops

AI 赋能边缘计算:在 Kuiper 中运行 TensorFlow Lite 模型
EMQ X Kuiper 是一款边缘轻量级物联网数据分析/流软件,可在各种资源受限的物联网设备上运行。
TensorFlow Lite 是一组帮助开发人员在移动端、嵌入式和物联网设备上运行 TensorFlow 模型的工具,它使得设备上的机器学习预测具有低延迟和较小的二进制容量。
通过集成 Kuiper 和 TensorFlow Lite,用户可以通过包含预先构建的 TensorFlow 模型的 AI 分析流中的数据。 在本教程中,我们将引导您构建一个 kuiper 插件,通过预先训练的图像识别 TensorFlow 模型,标记边缘设备生成的流图片(二进制数据)。
条件准备
如需运行 TensorFlow Lite 解释器,我们需要一个经过训练的模型。本篇教程将不介绍如何训练和涵盖这个模型,您可以通过查看 tflite converter 了解详情。我们既可以训练一个新的模型,也可以在线选择一个。在本教程中,我们将使用 mattn/go tflite 的 label image 模型。该 repo 为 tflite C API 创建了 golang 绑定。我们还将使用它来实现我们的插件。
开发插件
为了集成 Kuiper 和 TensorFlow Lite,我们将开发一个定制的 Kuiper 函数插件,供 Kuiper 规则使用。例如,我们将创建 LabelImage 函数,其输入是表示图像的二进制类型数据,输出是表示图像标签的字符串。例如,如果输入图像中有孔雀,LabelImage(col) 将输出“孔雀”。
要开发函数插件,我们需要:
- 创建插件 go 文件。例如,在 kuiper 源代码中,创建 plugins/functions/labelImage/labelImage.go 文件。
- 创建一个实现 api.函数接口 的 struct。
- 导出 struct。
实现的关键是 Exec 函数。伪代码如下:
func (f *labelImage) Exec(args []interface{}, ctx api.FunctionContext) (interface{}, bool) {

    //... 初始化和验证

    // 解码输入图像
    img, _, err := image.Decode(bytes.NewReader(arg[0]))
    if err != nil {
      return err, false
    }
    var outerErr error
    f.once.Do(func() {
      // 加载标签、tflite模型并初始化tflite解释器
    })

        // 对输入图像运行解释器
        // 返回可能性最大的标签
         return result, true
}
此外还需要注意插件的导出。该函数是无状态的,因此我们将仅导出一个 struct 实例。所有使用此函数的规则都会共享一个实例,以避免创建实例和加载模型的开销。模型和标签路径将在实例化时指定。
var LabelImage = labelImage{
    modelPath: "labelImage/mobilenet_quant_v1_224.tflite",
    labelPath: "labelImage/labels.txt",
}
查阅 本教程 以获得创建 Kuiper 插件的详细步骤。请参阅 labelImage.go 以获取完整的源代码。
构建并安装插件
要使用该插件,我们需要在运行 Kuiper 的环境中对其进行构建,然后将其安装在 Kuiper 中。
通过预构建的 zip 安装
如果使用基于 debian 的带有 1.1.1 或 1.1.1-slim标签的 Kuiper docker 镜像,我们可以安装预构建的 labelImage插件。例如,要在 docker image emqx/kuiper:1.1.2-slim 中安装 Kuiper 1.1.2 插件,则预构建的 zip 文件位于 https://www.emqx.io/downloads...。按如下所示运行 rest命令以进行安装。
POST http://{{kuiperHost:kuiperRestPort}}/plugins/functions
Content-Type: application/json

{"name":"labelImage", "file": "https://www.emqx.io/downloads/kuiper-plugins/v1.1.2/debian/functions/labelImage_amd64.zip"}
手动构建
如果您不使用官方的 Kuiper docker 镜像运行 Kuiper,由于 golang 插件的限制,预构建的 labelImage 插件将不适用。您需要手动构建插件。手动创建插件 zip 文件有3个步骤:
- 构建 TensorFlowLite C API。
- 构建 labelImage 插件。
- 将插件与安装脚本打包在一起。
构建 TensorFlowLite C API
有一个来自 tensorflow repo 的关于构建C API的非常简单的 说明 。 我们将在本节中逐步详细展开。 请注意,该插件仅针对 TensorFlow v2.2.0-rc3 进行测试,因此我们将以此版本为基础进行构建。 以 ubuntu 为例,以下是构建步骤:
- 安装 Python 3.
- 将 requirements.txt 复制到您指定位置。 安装所需的 python 库:
pip3 install -r requirements.txt。 requirements 来自相应 TensorFlow 版本的tensorflow/tensorflow/tools/pip_package/setup.py。 - 安装 TensorFlow 的构建工具 Bazel。
- 克隆 tesorflow repo,通过
git checkout v2.2.0-rc3 -b mybranch命令切换到所需的分支。 生成目标 .so 文件,输出将位于 ./bazel-bin 中。 将两个 so 文件复制到 tensorflow/lib 文件夹中。
$ cd $tensorflowSrc
$ bazel build --config monolithic -c opt //tensorflow/lite:libtensorflowlite.so
$ bazel build --config monolithic -c opt //tensorflow/lite/c:libtensorflowlite_c.so
$ mkdir lib
$ cp bazel-bin/tensorflow/lite/libtensorflowlite.so lib
$ cp bazel-bin/tensorflow/lite/c/libtensorflowlite_c.so lib
安装 so 文件。
- 更新 ldconfig 文件
sudo vi / etc / ld.so.conf.d / tflite.conf。 - 将路径
{{tensorflowPath}}/lib添加到 tflite.conf,然后保存并退出。 - 运行 ldconfig:
sudo ldconfig。 - 检查安装结果:
ldconfig -p | grep libtensorflow。 确保列出了两个so文件。
- 更新 ldconfig 文件
构建 labelImage 插件
确保已克隆 Kuiper github repo。 插件源文件位于 plugins/functions/labelImage/labelImage.go 中。 在构建插件之前,导出 tensorflow repo 和构建库的路径。
$ cd {{kuiperRepoPath}}
$ export CGO_CFLAGS=-I/root/tensorflow
$ export CGO_LDFLAGS=-L/root/tensorflow/lib
$ go build -trimpath --buildmode=plugin -o plugins/functions/LabelImage.so plugins/functions/labelImage/*.go
通过这些命令,插件将构建到 plugins/functions/LabelImage.so 中。出于开发目的,您可以重新启动 Kuiper 以自动加载此插件并进行测试。测试完成后,我们应该将其打包为一个 zip 文件,该文件可供 Kuiper 插件安装API 使用,以便可以在其他计算机(例如生产环境)中使用。
打包插件
将 plugins/functions/labelImage 目录中的所有文件和目录与构建的 LabelImage.so 一起打包到一个 zip 文件中。 zip文件的文件结构应类似于:
etc
- labels.txt
- mobilenet_quant_v1_224.tflite
lib
- libtensorflowlite.so
- libtensorflowlite_c.so
- install.sh
- LabelImage.so
- tflite.conf
将打包的插件安装到目标系统,如 通过预构建 zip 安装 所示。
运行插件
插件安装后,我们就可以在规则中使用它了。 我们将创建一个规则用于接收来自 mqtt 主题的图像字节数据,并通过 tflite 模型标记该图像。
定义流
通过 Kuiper rest API 定义流。 我们创建一个名为 tfdemo 的流,其格式为二进制,主题为 tfdemo。
POST http://{{host}}/streams
Content-Type: application/json

{"sql":"CREATE STREAM tfdemo () WITH (DATASOURCE=\"tfdemo\", FORMAT=\"BINARY\")"}
定义规则
通过 Kuiper rest API 定义规则。 我们将创建一个名为 ruleTf 的规则。 我们只是从 tfdemo 流中读取图像,然后对其运行自定义函数 labelImage。 返回结果将是 AI 识别的图像的标签。
POST http://{{host}}/rules
Content-Type: application/json

{
  "id": "ruleTf",
  "sql": "SELECT labelImage(self) FROM tfdemo",
  "actions": [
    {
      "log": {}
    }
  ]
}
输入数据
在这里,我们创建了一个 go 程序,用于将图像数据发送到 tfdemo 主题以便由规则进行处理。
package main

import (
    "fmt"
    mqtt "github.com/eclipse/paho.mqtt.golang"
    "io/ioutil"
    "time"
)

func main(){
    const TOPIC = "tfdemo"

    images := []string{
        "peacock.png",
        "frog.jpg",
        // 其他你需要的图像
    }
    opts := mqtt.NewClientOptions().AddBroker("tcp://yourownhost:1883")
    client := mqtt.NewClient(opts)
    if token := client.Connect(); token.Wait() && token.Error() != nil {
        panic(token.Error())
    }
    for _, image := range images {
        fmt.Println("Publishing " + image);
        payload, err := ioutil.ReadFile(image)
        if err != nil{
            fmt.Println(err)
            continue
        }
        if token := client.Publish(TOPIC, 0, false, payload); token.Wait() && token.Error() != nil {
            fmt.Println(token.Error())
        } else {
            fmt.Println("Published " + image);
        }
        time.Sleep(1 * time.Second)
    }
    client.Disconnect(0)
}
运行 pub.go,它将开始将图像输入 tfdemo 主题。
检查结果
因为我们的规则定义只有一个目标:log,所以结果将被写入日志文件。 我们用 peacock.png 和 frog.png 两个图像填充流。 检查日志文件,我们会发现:
time="2021-02-05 16:23:29" level=info msg="sink result for rule ruleTf: [{\"labelImage\":\"peacock\"}]" file="sinks/log_sink.go:16" rule=ruleTf
time="2021-02-05 16:23:30" level=info msg="sink result for rule ruleTf: [{\"labelImage\":\"bullfrog\"}]" file="sinks/log_sink.go:16" rule=ruleTf
图像标记正确。
结论
通过本篇教程,您可以构建自定义的 Kuiper 插件,以使用预先训练好的 TensorFlow Lite 模型。如果需要使用其他模型,则只需按照规定步骤创建另一个函数即可。请注意,如果在同一环境中运行,构建的 TensorFlow C API 可以在所有函数之间共享。希望本文能帮助您更好地在边缘计算中利用 AI,让 AI 为您的边缘设备赋能。
版权声明: 本文为 EMQ 原创,转载请注明出处。原文链接:https://www.emqx.cn/blog/run-tensorflow-lite-model-with-kuiper-function-plugin

android NDK 神经网络 API—— 是给 tensorflow lite 调用的底层 API,应用开发者使用 tensorflow lite 即可
eural Networks API
In this document show more
- Understanding the Neural Networks API Runtime
- Neural Networks API Programming Model
- More About Operands
Related API reference
NeuralNetworks.h
Related sample
- Android Neural Networks API Sample
The Android Neural Networks API (NNAPI) is an Android C API designed for running computationally intensive operations for machine learning on mobile devices. NNAPI is designed to provide a base layer of functionality for higher-level machine learning frameworks (such as TensorFlow Lite, Caffe2, or others) that build and train neural networks. The API is available on all devices running Android 8.1 (API level 27) or higher.
NNAPI supports inferencing by applying data from Android devices to previously trained, developer-defined models. Examples of inferencing include classifying images, predicting user behavior, and selecting appropriate responses to a search query.
On-device inferencing has many benefits:
- Latency: You don’t need to send a request over a network connection and wait for a response. This can be critical for video applications that process successive frames coming from a camera.
- Availability: The application runs even when outside of network coverage.
- Speed: New hardware specific to neural networks processing provide significantly faster computation than with general-use CPU alone.
- Privacy: The data does not leave the device.
- Cost: No server farm is needed when all the computations are performed on the device.
There are also trade-offs that a developer should keep in mind:
- System utilization: Evaluating neural networks involve a lot of computation, which could increase battery power usage. You should consider monitoring the battery health if this is a concern for your app, especially for long-running computations.
- Application size: Pay attention to the size of your models. Models may take up multiple megabytes of space. If bundling large models in your APK would unduly impact your users, you may want to consider downloading the models after app installation, using smaller models, or running your computations in the cloud. NNAPI does not provide functionality for running models in the cloud.
Understanding the Neural Networks API runtime
NNAPI is meant to be called by machine learning libraries, frameworks, and tools that let developers train their models off-device and deploy them on Android devices. Apps typically would not use NNAPI directly, but would instead directly use higher-level machine learning frameworks. These frameworks in turn could use NNAPI to perform hardware-accelerated inference operations on supported devices.
Based on the app’s requirements and the hardware capabilities on a device, Android’s neural networks runtime can efficiently distribute the computation workload across available on-device processors, including dedicated neural network hardware, graphics processing units (GPUs), and digital signal processors (DSPs).
For devices that lack a specialized vendor driver, the NNAPI runtime relies on optimized code to execute requests on the CPU.
The diagram below shows a high-level system architecture for NNAPI.
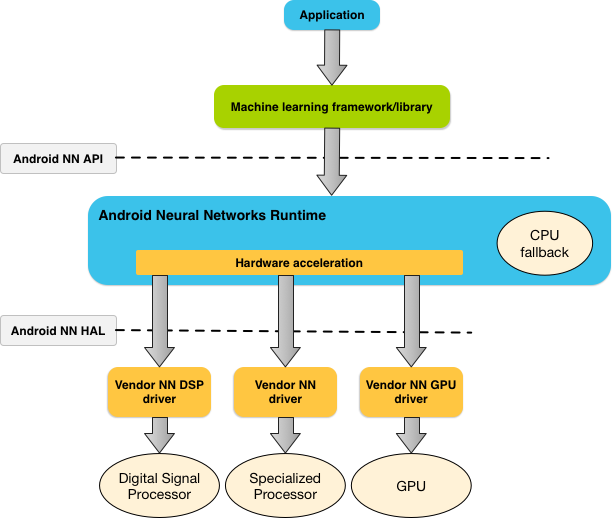 Figure 1. System architecture for Android Neural Networks API
eural Networks API
In this document show more
- Understanding the Neural Networks API Runtime
- Neural Networks API Programming Model
- More About Operands
Related API reference
NeuralNetworks.h
Related sample
- Android Neural Networks API Sample
The Android Neural Networks API (NNAPI) is an Android C API designed for running computationally intensive operations for machine learning on mobile devices. NNAPI is designed to provide a base layer of functionality for higher-level machine learning frameworks (such as TensorFlow Lite, Caffe2, or others) that build and train neural networks. The API is available on all devices running Android 8.1 (API level 27) or higher.
NNAPI supports inferencing by applying data from Android devices to previously trained, developer-defined models. Examples of inferencing include classifying images, predicting user behavior, and selecting appropriate responses to a search query.
On-device inferencing has many benefits:
- Latency: You don’t need to send a request over a network connection and wait for a response. This can be critical for video applications that process successive frames coming from a camera.
- Availability: The application runs even when outside of network coverage.
- Speed: New hardware specific to neural networks processing provide significantly faster computation than with general-use CPU alone.
- Privacy: The data does not leave the device.
- Cost: No server farm is needed when all the computations are performed on the device.
There are also trade-offs that a developer should keep in mind:
- System utilization: Evaluating neural networks involve a lot of computation, which could increase battery power usage. You should consider monitoring the battery health if this is a concern for your app, especially for long-running computations.
- Application size: Pay attention to the size of your models. Models may take up multiple megabytes of space. If bundling large models in your APK would unduly impact your users, you may want to consider downloading the models after app installation, using smaller models, or running your computations in the cloud. NNAPI does not provide functionality for running models in the cloud.
Understanding the Neural Networks API runtime
NNAPI is meant to be called by machine learning libraries, frameworks, and tools that let developers train their models off-device and deploy them on Android devices. Apps typically would not use NNAPI directly, but would instead directly use higher-level machine learning frameworks. These frameworks in turn could use NNAPI to perform hardware-accelerated inference operations on supported devices.
Based on the app’s requirements and the hardware capabilities on a device, Android’s neural networks runtime can efficiently distribute the computation workload across available on-device processors, including dedicated neural network hardware, graphics processing units (GPUs), and digital signal processors (DSPs).
For devices that lack a specialized vendor driver, the NNAPI runtime relies on optimized code to execute requests on the CPU.
The diagram below shows a high-level system architecture for NNAPI.
Figure 1. System architecture for Android Neural Networks API
参考:https://developer.android.com/ndk/guides/neuralnetworks/index.html

bazel 编译 tensorflow 生成 libtensorflow_inference.so 和 libandroid_tensorflow_inference_java.jar
bazel build -c opt //tensorflow/contrib/android:libtensorflow_inference.so --crosstool_top=//external:android/crosstool --host_crosstool_top=@bazel_tools//tools/cpp:toolchain --cpu=armeabi-v7a
在我的机器上,对于 tf 1.0,同时自己笔记本仅仅 4G 内存:
/home/bonelee/app/bazel-0.4.2/bin/bazel build -c opt //tensorflow/contrib/android:libtensorflow_inference.so --crosstool_top=//external:android/crosstool --host_crosstool_top=@bazel_tools//tools/cpp:toolchain --cpu=arm64-v8a
2022 /home/bonelee/app/bazel-0.4.2/bin/bazel build -c opt //tensorflow/contrib/android:libtensorflow_inference.so --crosstool_top=//external:android/crosstool --host_crosstool_top=@bazel_tools//tools/cpp:toolchain --cpu=arm64-v8a --local_resources=2048,.5,1.0 -j 3
你将在这里找到 libtensorflow_inference.so 文件:
bazel-bin/tensorflow/contrib/android/libtensorflow_inference.so
除了 .so 文件之外,我们还需要一个 JAR 文件。运行:
bazel build //tensorflow/contrib/android:android_tensorflow_inference_java
你将在这里找到该文件:
bazel-bin/tensorflow/contrib/android/libandroid_tensorflow_inference_java.jar
现在,可以将 .so 和 .jar 文件一起移到你的安卓项目中的「libs」文件夹。

github/tensorflow/tensorflow/contrib/slim/
TensorFlow-Slim
TF-Slim 是一个轻量级的库,用来在 TF 中定义、训练和评估复杂模型。tf-slim 能够自由混入原生 TF 和其它框架(如 tf.contrib.learn 中)。
用法
import tensorflow.contrib.slim as slim为什么用 TF-Slim?
TF-Slim 中都有什么组成部分?
定义模型
变量
层
Scopes
实例:实现 VGG16
训练模型
Training Tensorflow models requires a model, a loss function, the gradient computation and a training routine that iteratively computes the gradients of the model weights relative to the loss and updates the weights accordingly. TF-Slim provides both common loss functions and a set of helper functions that run the training and evaluation routines.
损失
The loss function defines a quantity that we want to minimize. For classification problems, this is typically the cross entropy between the true distribution and the predicted probability distribution across classes. For regression problems, this is often the sum-of-squares differences between the predicted and true values.
Certain models, such as multi-task learning models, require the use of multiple loss functions simultaneously. In other words, the loss function ultimately being minimized is the sum of various other loss functions. For example, consider a model that predicts both the type of scene in an image as well as the depth from the camera of each pixel. This model''s loss function would be the sum of the classification loss and depth prediction loss.
TF-Slim provides an easy-to-use mechanism for defining and keeping track of loss functions via the losses module. Consider the simple case where we want to train the VGG network:
Training Loop
TF-Slim provides a simple but powerful set of tools for training models found in learning.py. These include a Train function that repeatedly measures the loss, computes gradients and saves the model to disk, as well as several convenience functions for manipulating gradients. For example, once we''ve specified the model, the loss function and the optimization scheme, we can call slim.learning.create_train_op and slim.learning.train to perform the optimization:
实例:训练 VGG16 模型
To illustrate this, let''s examine the following sample of training the VGG network:
微调已存在的模型
Brief Recap on Restoring Variables from a Checkpoint
After a model has been trained, it can be restored using tf.train.Saver() which restores Variables from a given checkpoint. For many cases, tf.train.Saver() provides a simple mechanism to restore all or just a few variables.
Partially Restoring Models
It is often desirable to fine-tune a pre-trained model on an entirely new dataset or even a new task. In these situations, one can use TF-Slim''s helper functions to select a subset of variables to restore:
Restoring models with different variable names
Fine-Tuning a Model on a different task
Consider the case where we have a pre-trained VGG16 model. The model was trained on the ImageNet dataset, which has 1000 classes. However, we would like to apply it to the Pascal VOC dataset which has only 20 classes. To do so, we can initialize our new model using the values of the pre-trained model excluding the final layer:
评估模型
Once we''ve trained a model (or even while the model is busy training) we''d like to see how well the model performs in practice. This is accomplished by picking a set of evaluation metrics, which will grade the model''s performance, and the evaluation code which actually loads the data, performs inference, compares the results to the ground truth and records the evaluation scores. This step may be performed once or repeated periodically.
度量
我们定义一个度量来衡量训练效果,这不是一个损失函数(损失被用来在训练过程中进行优化的)。例如,我们训练时最小化 log 损失,但是评估模型时我们也许会用 F1 score , 或者 Intersection Over Union score(这个值不可微,因此也不能用在损失函数上)。
TF-Slim 提供了一组度量 operations。笼统地讲,计算一个度量值可以被分为三部分:
- 初始化:初始化用来计算度量的变量。
- Aggregation: perform operations (sums, etc) used to compute the metrics.
- Finalization: (optionally) perform any final operation to compute metric values. For example, computing means, mins, maxes, etc.
例如,计算 mean_absolute_error,两个变量 (count 和 total) 被初始化为 0。在 aggregation,我们得到一组 predictions 和 labels,计算它们的绝对误差并总计为 total。我们每增加一组,count也随之增加。最后,在 finalization 阶段 ,total 除以 count 来获得均值。
The following example demonstrates the API for declaring metrics. Because metrics are often evaluated on a test set which is different from the training set (upon which the loss is computed), we''ll assume we''re using test data:
images, labels = LoadTestData(...)
predictions = MyModel(images)

mae_value_op, mae_update_op = slim.metrics.streaming_mean_absolute_error(predictions, labels)
mre_value_op, mre_update_op = slim.metrics.streaming_mean_relative_error(predictions, labels)
pl_value_op, pl_update_op = slim.metrics.percentage_less(mean_relative_errors, 0.3)
就像例子描述的那样,创建的 metric 返回两个值: value_op 和 update_op。 value_op 是一个 idempotent operation 返回 metric 的当前值。update_op 是一个 operation,它执行 aggregation 步骤 并返回 metric 的值。
跟踪 value_op 和 update_op 费时费力。为了解决这个问题,TF-Slim 提供两个方便的函数:
# 总计value和update ops 到两个列表中:
value_ops, update_ops = slim.metrics.aggregate_metrics(
    slim.metrics.streaming_mean_absolute_error(predictions, labels),
    slim.metrics.streaming_mean_squared_error(predictions, labels))

# 总起value和update ops 到两个字典中:
names_to_values, names_to_updates = slim.metrics.aggregate_metric_map({
    "eval/mean_absolute_error": slim.metrics.streaming_mean_absolute_error(predictions, labels),
    "eval/mean_squared_error": slim.metrics.streaming_mean_squared_error(predictions, labels),
})
关于tensorflow lite 之生成 tflite 模型文件和tensorflow模型转tflite的介绍现已完结,谢谢您的耐心阅读,如果想了解更多关于AI 赋能边缘计算:在 Kuiper 中运行 TensorFlow Lite 模型、android NDK 神经网络 API—— 是给 tensorflow lite 调用的底层 API,应用开发者使用 tensorflow lite 即可、bazel 编译 tensorflow 生成 libtensorflow_inference.so 和 libandroid_tensorflow_inference_java.jar、github/tensorflow/tensorflow/contrib/slim/的相关知识,请在本站寻找。
本文标签:


