本文将介绍简单说说SpringSecurity使用的详细情况,特别是关于附加验证码登录,自定义认证的相关信息。我们将通过案例分析、数据研究等多种方式,帮助您更全面地了解这个主题,同时也将涉及一些关于7
本文将介绍简单说说Spring Security 使用的详细情况,特别是关于附加验证码登录,自定义认证的相关信息。我们将通过案例分析、数据研究等多种方式,帮助您更全面地了解这个主题,同时也将涉及一些关于7. Spring Boot中Spring Security短信验证码登录、JavaWeb-SpringSecurity使用短信验证码登陆、spring boot 集成 spring security 实现json串登录和短信验证码登录(1)、Spring Security 3.0 登录表单自定义验证的知识。
本文目录一览:- 简单说说Spring Security 使用(附加验证码登录,自定义认证)(spring验证码实现)
- 7. Spring Boot中Spring Security短信验证码登录
- JavaWeb-SpringSecurity使用短信验证码登陆
- spring boot 集成 spring security 实现json串登录和短信验证码登录(1)
- Spring Security 3.0 登录表单自定义验证
(spring验证码实现)")
简单说说Spring Security 使用(附加验证码登录,自定义认证)(spring验证码实现)
先看官方文档: http://docs.spring.io/spring-security/site/docs/4.0.x/reference/htmlsingle/
spring security4已经加入了注解的方式,但是为了比较清晰了解,还是使用了配置的方式。
第一步:web.xml 加入拦截
<!-- 配置springSecurityFilter -->
    <filter>
      <filter-name>springSecurityFilterChain</filter-name>
      <filter-class>org.springframework.web.filter.DelegatingFilterProxy</filter-class>
    </filter>
    <filter-mapping>
      <filter-name>springSecurityFilterChain</filter-name>
      <url-pattern>/*</url-pattern>
    </filter-mapping>
第二步:编写配置文件:spring-security.xml
<beans:beans xmlns="http://www.springframework.org/schema/security"
    xmlns:beans="http://www.springframework.org/schema/beans" xmlns:xsi="http://www.w3.org/2001/XMLSchema-instance"
    xsi:schemaLocation="http://www.springframework.org/schema/beans      http://www.springframework.org/schema/beans/spring-beans-3.2.xsd      http://www.springframework.org/schema/security      http://www.springframework.org/schema/security/spring-security-3.2.xsd ">
    <http pattern="/common/**" security="none" />
    <http pattern="/login.jsp" security="none" />
    <http pattern="/user/login" security="none" />
    <http pattern="/index" security="none" />
    <http use-expressions="true">   <intercept-url pattern="/**" access="isAuthenticated()" />   <form-login login-page="/login.jsp"    authentication-failure-url="/login.jsp?error=1" />    <logout invalidate-session="true" logout-url="/logout"  logout-success-url="/"  />
    </http>
    <authentication-manager alias="myAuthenticationManager">   <authentication-provider user-service-ref="cwSysUserDetailsService">       <password-encoder hash="md5"></password-encoder>   </authentication-provider>
    </authentication-manager></beans:beans>
第三步:编写登录认证函数
package com.eshore.upsweb.service;

import java.util.ArrayList;
import java.util.HashSet;
import java.util.List;
import java.util.Set;

import org.springframework.beans.factory.annotation.Autowired;
import org.springframework.security.core.GrantedAuthority;
import org.springframework.security.core.authority.SimpleGrantedAuthority;
import org.springframework.security.core.userdetails.User;
import org.springframework.security.core.userdetails.UserDetails;
import org.springframework.security.core.userdetails.UserDetailsService;
import org.springframework.security.core.userdetails.UsernameNotFoundException;
import org.springframework.stereotype.Service;

import com.eshore.upsweb.dao.CwSysUserDAO;
import com.eshore.upsweb.model.CwSysUser;
import com.eshore.upsweb.model.CwSysUserRole;

@Service(value="cwSysUserDetailsService")
public class CwSysUserDetailsService implements UserDetailsService{

  @Autowired
  CwSysUserDAO cwSysUserDAO;

  @Override
  public UserDetails loadUserByUsername(String username)
      throws UsernameNotFoundException {
     System.out.println("username is " + username);
    CwSysUser user = cwSysUserDAO.findUser(username);
    List<GrantedAuthority> authorities = buildUserAuthority(user.getUserRoles());
    return buildUserForAuthentication(user, authorities);
  }

  /**
   * 返回验证角色
   * @param userRoles
   * @return
   */
  private List<GrantedAuthority> buildUserAuthority(Set<CwSysUserRole> userRoles){
    Set<GrantedAuthority> setAuths = new HashSet<GrantedAuthority>();
    for(CwSysUserRole userRole:userRoles){
      setAuths.add(new SimpleGrantedAuthority(userRole.getRole().getRoleId().toString()));
    }
    List<GrantedAuthority> result = new ArrayList<GrantedAuthority>(setAuths);
    return result;
  }

  /**
   * 返回验证用户
   * @param user
   * @param authorities
   * @return
   */
  private User buildUserForAuthentication(CwSysUser user,List<GrantedAuthority> authorities){
    return new User(user.getUserNo(),user.getPassword(),true,true,true,true,authorities);
  }

  /**
   *
   */


}
第五步:编写对应的登录jsp
<%@ page language="java" contentType="text/html; charset=UTF-8"
  pageEncoding="UTF-8"%>
  <%@ taglib prefix="c" uri="http://java.sun.com/jsp/jstl/core"%>
<!DOCTYPE html">
<html>
<head>
<meta http-equiv="Content-Type" content="text/html; charset=UTF-8">
<title>Login</title>
 <link href="./common/bootstrap/css/bootstrap.min.css" rel="stylesheet">
<link href="./common/bootstrap/css/bootstrap-theme.min.css" rel="stylesheet">
  <link rel="stylesheet" type="text/css" href="./common/css/demo.css">
  <link rel="stylesheet" type="text/css" href="./common/css/style.css">
<link rel="stylesheet" type="text/css" href="./common/css/animate-custom.css">
<link rel="stylesheet" href="./common/bootstrap/css/bootstrap.css" type="text/css"></link>
<script type="text/javascript" src="./common/bootstrap/js/bootstrap.min.js"></script>
<script type="text/javascript" src="./common/jquery/jquery-2.1.1.min.js"></script>
<body>
    <div>
      <header> </header>
        <div id="container_demo">
          <div id="wrapper">
            <div id="login" >
         <!--  <form name=''loginForm'' action="<c:url value=''j_spring_security_check'' />" method=''POST''> -->
                <h1>电信融合支付平台</h1>
                <form id=''loginForm'' method="POST">
                <p>
                  <label for="" data-icon="u"> 用户名 </label>
                  <input id="username" name="username" required="required" type="text" placeholder="myusername or mymail@mail.com">
                </p>
                <p>
                  <label for="" data-icon="p"> 密码 </label>
                  <input id="password" name="password" required="required" type="password" placeholder="eg. X8df!90EO">
                </p>
                 <p>
                  <label for="verification" data-icon="v"> 验证  </label>
                   <img src="index" id="verify" title="看不清,请点我"  /><br/>
                   <input type="verification" id="verifyCode" name="verifyCode" placeholder="验证码" required="required">
                </p>
                <!--
                <p>
                  <input type="checkbox" name="loginkeeping" id="loginkeeping" value="loginkeeping">
                  <label for="loginkeeping">保持登录</label>
                </p>
                 -->
                <p >
                  <input type="submit" id="submitId" value="登录">
                </p>
              </form>
            </div>
           </div>
           </div>
</body>

  <script type="text/javascript">
    $(function(){
      /////////////////登录提交////////////////////////////
      $("#loginForm").submit(function() {
        var username=$("#username").val();
        var password=$("#password").val();
        var verifyCode=$("#verifyCode").val();
        var data={username:username,password:password,verifyCode:verifyCode};
        var url="/upsweb/user/login";
         $.ajax({
            type: "POST",
            url: url,
            data: data,
             // contentType: "application/json",
            dataType: "json",
            success:function (result) {
              if(result.ok){
                location.href="/upsweb";
              }else{
                $(".error").remove();
                $("#loginForm").prepend("<div><font color=''red''>"+result.msg+"</font></div>");
                $("#verify").attr("src","/upsweb/index?timestamp="+new Date().getTime());  // 刷新验证码
              }
            },
            error:function(XMLHttpRequest, textStatus, errorThrown){
             //  alert(XMLHttpRequest.status);
               // alert(XMLHttpRequest.readyState);
              //   alert(textStatus);
                 //alert(XMLHttpRequest.responseText);
            alert(''读取超时,请检查网络连接'');
            }
          });
         return false;
      });
      ///////////////////验证码更新/////////////
      $("#verify").click(function(){
           $(this).attr("src","/upsweb/index?timestamp="+new Date().getTime());
      });

    });


    $(function ()
      { $("#dd").popover();
    });
  </script>
</html>
7. Spring Boot中Spring Security短信验证码登录
在Spring Security添加图形验证码一节中,我们已经实现了基于Spring Boot + Spring Security的账号密码登录,并集成了图形验证码功能。时下另一种非常常见的网站登录方式为手机短信验证码登录,但Spring Security默认只提供了账号密码的登录认证逻辑,所以要实现手机短信验证码登录认证功能,我们需要模仿Spring Security账号密码登录逻辑代码来实现一套自己的认证逻辑。
短信验证码生成
我们在上一节Spring Security添加图形验证码的基础上来集成短信验证码登录的功能。
和图形验证码类似,我们先定义一个短信验证码对象SmsCode:
public class SmsCode {
    private String code;
    private LocalDateTime expireTime;

    public SmsCode(String code, int expireIn) {
        this.code = code;
        this.expireTime = LocalDateTime.now().plusSeconds(expireIn);
    }

    public SmsCode(String code, LocalDateTime expireTime) {
        this.code = code;
        this.expireTime = expireTime;
    }

    public boolean isExpire() {
        return LocalDateTime.now().isAfter(expireTime);
    }

    public String getCode() {
        return code;
    }

    public void setCode(String code) {
        this.code = code;
    }

    public LocalDateTime getExpireTime() {
        return expireTime;
    }

    public void setExpireTime(LocalDateTime expireTime) {
        this.expireTime = expireTime;
    }
}
SmsCode对象包含了两个属性:code验证码和expireTime过期时间。isExpire方法用于判断短信验证码是否已过期。
接着在ValidateCodeController中加入生成短信验证码相关请求对应的方法:
@RestController
public class ValidateController {

    public final static String SESSION_KEY_SMS_CODE = "SESSION_KEY_SMS_CODE";


    @GetMapping("/code/sms")
    public void createSmsCode(HttpServletRequest request, HttpServletResponse response, String mobile) throws IOException {
        SmsCode smsCode = createSMSCode();
        sessionStrategy.setAttribute(new ServletWebRequest(request), SESSION_KEY_SMS_CODE + mobile, smsCode);
        // 输出验证码到控制台代替短信发送服务
        System.out.println("您的登录验证码为:" + smsCode.getCode() + ",有效时间为60秒");
    }

    private SmsCode createSMSCode() {
        //引入commons-lang包
        String code = RandomStringUtils.randomNumeric(6);
        return new SmsCode(code, 60);
    }
}这里我们使用createSMSCode方法生成了一个6位的纯数字随机数,有效时间为60秒。然后通过SessionStrategy对象的setAttribute方法将短信验证码保存到了Session中,对应的key为SESSION_KEY_SMS_CODE。
至此,短信验证码生成模块编写完毕,下面开始改造登录页面。
改造登录页
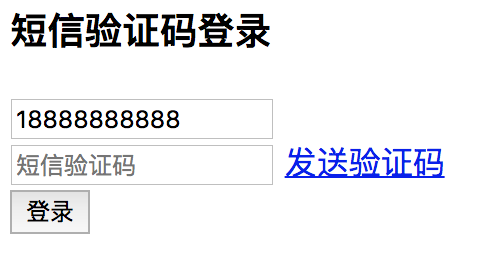
我们在登录页面中加入一个与手机短信验证码认证相关的Form表单:
<form action="/login/mobile" method="post">
    <div>
        <h3>短信验证码登录</h3>
        <input type="text" placeholder="手机号" name="mobile" value="18888888888" required="required"/>
        <br>
        <span>
            <input type="text" name="smsCode" placeholder="短信验证码"/>
            <a href="/code/sms?mobile=18888888888">发送验证码</a>
        </span>
        <br>
        <button type="submit">登录</button>
    </div>
</form>其中a标签的href属性值对应我们的短信验证码生成方法的请求URL。Form的action对应处理短信验证码登录方法的请求URL,这个方法下面在进行具体实现。同时,我们需要在Spring Security中配置/code/sms路径免验证:
@Override
protected void configure(HttpSecurity http) throws Exception {

    http.addFilterBefore(validateCodeFilter, UsernamePasswordAuthenticationFilter.class) // 添加验证码校验过滤器
            .formLogin() // 表单登录
                // http.httpBasic() // HTTP Basic
                .loginPage("/authentication/require") // 登录跳转 URL
                .loginProcessingUrl("/login") // 处理表单登录 URL
                .successHandler(authenticationSucessHandler) // 处理登录成功
                .failureHandler(authenticationFailureHandler) // 处理登录失败
            .and()
                .authorizeRequests() // 授权配置
                .antMatchers("/authentication/require",
                        "/login.html", "/code/image","/code/sms").permitAll() // 无需认证的请求路径
                .anyRequest()  // 所有请求
                .authenticated() // 都需要认证
            .and()
                .csrf().disable();
}
重启项目,访问http://localhost:8080/login.html:
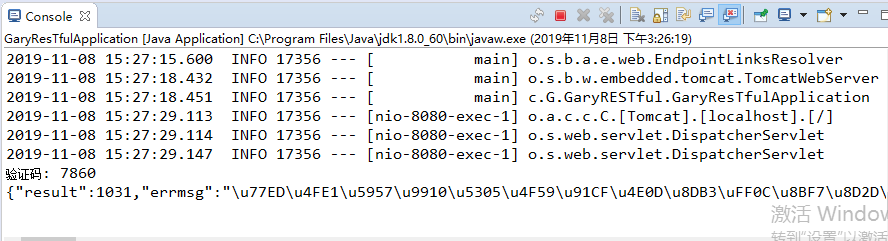
点击发送验证码,控制台输出如下:
![]()
接下来开始实现使用短信验证码登录认证逻辑。
添加短信验证码认证
在Spring Security中,使用用户名密码认证的过程大致如下图所示:
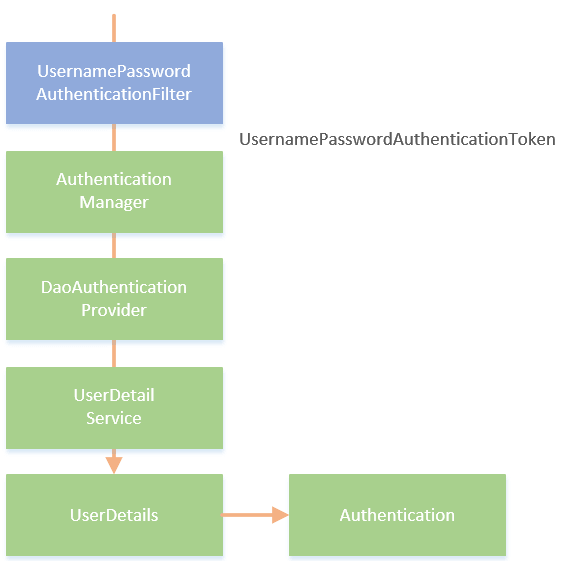
Spring Security使用UsernamePasswordAuthenticationFilter过滤器来拦截用户名密码认证请求,将用户名和密码封装成一个UsernamePasswordToken对象交给AuthenticationManager处理。AuthenticationManager将挑出一个支持处理该类型Token的AuthenticationProvider(这里为DaoAuthenticationProvider,AuthenticationProvider的其中一个实现类)来进行认证,认证过程中DaoAuthenticationProvider将调用UserDetailService的loadUserByUsername方法来处理认证,如果认证通过(即UsernamePasswordToken中的用户名和密码相符)则返回一个UserDetails类型对象,并将认证信息保存到Session中,认证后我们便可以通过Authentication对象获取到认证的信息了。
由于Spring Security并没用提供短信验证码认证的流程,所以我们需要仿照上面这个流程来实现:
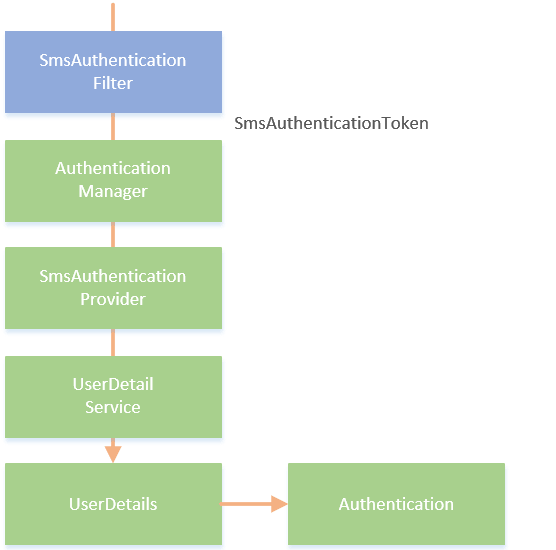
在这个流程中,我们自定义了一个名为SmsAuthenticationFitler的过滤器来拦截短信验证码登录请求,并将手机号码封装到一个叫SmsAuthenticationToken的对象中。在Spring Security中,认证处理都需要通过AuthenticationManager来代理,所以这里我们依旧将SmsAuthenticationToken交由AuthenticationManager处理。接着我们需要定义一个支持处理SmsAuthenticationToken对象的SmsAuthenticationProvider,SmsAuthenticationProvider调用UserDetailService的loadUserByUsername方法来处理认证。与用户名密码认证不一样的是,这里是通过SmsAuthenticationToken中的手机号去数据库中查询是否有与之对应的用户,如果有,则将该用户信息封装到UserDetails对象中返回并将认证后的信息保存到Authentication对象中。
为了实现这个流程,我们需要定义SmsAuthenticationFitler、SmsAuthenticationToken和SmsAuthenticationProvider,并将这些组建组合起来添加到Spring Security中。下面我们来逐步实现这个过程。
定义SmsAuthenticationToken
查看UsernamePasswordAuthenticationToken的源码,将其复制出来重命名为SmsAuthenticationToken,并稍作修改,修改后的代码如下所示:
org.springframework.security.authentication.UsernamePasswordAuthenticationToken
public class SmsAuthenticationToken extends AbstractAuthenticationToken {
    private static final long serialVersionUID = SpringSecurityCoreVersion.SERIAL_VERSION_UID;

    /**
     * 手机号
     */
    private final Object principal;

    /**
     * SmsCodeAuthenticationFilter中构建的未认证的Authentication
     * @param mobile
     */
    public SmsAuthenticationToken(String mobile) {
        super(null);
        this.principal = mobile;
        setAuthenticated(false);
    }


    /**
     * SmsCodeAuthenticationProvider中构建已认证的Authentication
     * @param principal
     * @param authorities
     */
    public SmsAuthenticationToken(Object principal, Collection<? extends GrantedAuthority> authorities) {
        super(authorities);
        this.principal = principal;
        super.setAuthenticated(true);
    }

    @Override
    public Object getCredentials() {
        return null;
    }

    @Override
    public Object getPrincipal() {
        return this.principal;
    }

    @Override
    public void setAuthenticated(boolean isAuthenticated) throws IllegalArgumentException {
        if (isAuthenticated) {
            throw new IllegalArgumentException(
                    "Cannot set this token to trusted - use constructor which takes a GrantedAuthority list instead");
        }
        super.setAuthenticated(false);
    }

    @Override
    public void eraseCredentials() {
        super.eraseCredentials();
    }
}
SmsAuthenticationToken包含一个principal属性,从它的两个构造函数可以看出,在认证之前principal存的是手机号,认证之后存的是用户信息。UsernamePasswordAuthenticationToken原来还包含一个credentials属性用于存放密码,这里不需要就去掉了。
定义SmsAuthenticationFilter
org.springframework.security.web.authentication.UsernamePasswordAuthenticationFilter
定义完SmsAuthenticationToken后,我们接着定义用于处理短信验证码登录请求的过滤器SmsAuthenticationFilter,同样的复制UsernamePasswordAuthenticationFilter源码并稍作修改:
public class SmsAuthenticationFilter extends
        AbstractAuthenticationProcessingFilter {

    /**
     * request中必须含有mobile参数
     */
    public static final String MOBILE_KEY = "mobile";

    private String mobileParameter = MOBILE_KEY;

    /**
     * post请求
     */
    private boolean postOnly = true;

    /**
     * 处理的手机验证码登录请求处理url
     */
    public SmsAuthenticationFilter() {
        super(new AntPathRequestMatcher("/login/mobile", "POST"));
    }


    @Override
    public Authentication attemptAuthentication(HttpServletRequest request,
                                                HttpServletResponse response) throws AuthenticationException {
        //判断是是不是post请求
        if (postOnly && !request.getMethod().equals("POST")) {
            throw new AuthenticationServiceException(
                    "Authentication method not supported: " + request.getMethod());
        }
        //从请求中获取手机号码
        String mobile = obtainMobile(request);

        if (mobile == null) {
            mobile = "";
        }

        mobile = mobile.trim();

        //创建SmsCodeAuthenticationToken(未认证)
        SmsAuthenticationToken authRequest = new SmsAuthenticationToken(mobile);

        //设置用户信息
        setDetails(request, authRequest);

        //返回Authentication实例
        return this.getAuthenticationManager().authenticate(authRequest);
    }

    /**
     * 获取手机号
     */
    protected String obtainMobile(HttpServletRequest request) {
        return request.getParameter(mobileParameter);
    }

    protected void setDetails(HttpServletRequest request,
                              SmsAuthenticationToken authRequest) {
        authRequest.setDetails(authenticationDetailsSource.buildDetails(request));
    }

    public void setMobileParameter(String mobileParameter) {
        Assert.hasText(mobileParameter, "mobile parameter must not be empty or null");
        this.mobileParameter = mobileParameter;
    }

    public void setPostOnly(boolean postOnly) {
        this.postOnly = postOnly;
    }

    public final String getMobileParameter() {
        return mobileParameter;
    }
}构造函数中指定了当请求为/login/mobile,请求方法为POST的时候该过滤器生效。mobileParameter属性值为mobile,对应登录页面手机号输入框的name属性。attemptAuthentication方法从请求中获取到mobile参数值,并调用SmsAuthenticationToken的SmsAuthenticationToken(String mobile)构造方法创建了一个SmsAuthenticationToken。下一步就如流程图中所示的那样,SmsAuthenticationFilter将SmsAuthenticationToken交给AuthenticationManager处理。
定义SmsAuthenticationProvider
在创建完SmsAuthenticationFilter后,我们需要创建一个支持处理该类型Token的类,即SmsAuthenticationProvider,该类需要实现AuthenticationProvider的两个抽象方法:
public class SmsAuthenticationProvider implements AuthenticationProvider {

    private UserDetailService userDetailService;

    @Override
    public Authentication authenticate(Authentication authentication) throws AuthenticationException {
        SmsAuthenticationToken authenticationToken = (SmsAuthenticationToken) authentication;
        //调用自定义的userDetailsService认证
        UserDetails userDetails = userDetailService.loadUserByUsername((String) authenticationToken.getPrincipal());

        if (userDetails == null) {
            throw new InternalAuthenticationServiceException("未找到与该手机号对应的用户");
        }
        //如果user不为空重新构建SmsCodeAuthenticationToken(已认证)
        SmsAuthenticationToken authenticationResult = new SmsAuthenticationToken(userDetails, userDetails.getAuthorities());

        authenticationResult.setDetails(authenticationToken.getDetails());

        return authenticationResult;
    }

    /**
     * 只有Authentication为SmsCodeAuthenticationToken使用此Provider认证
     * @param authentication
     * @return
     */
    @Override
    public boolean supports(Class<?> authentication) {
        return SmsAuthenticationToken.class.isAssignableFrom(authentication);
    }

    public UserDetailService getUserDetailService() {
        return userDetailService;
    }

    public void setUserDetailService(UserDetailService userDetailService) {
        this.userDetailService = userDetailService;
    }
}其中supports方法指定了支持处理的Token类型为SmsAuthenticationToken,authenticate方法用于编写具体的身份认证逻辑。在authenticate方法中,我们从SmsAuthenticationToken中取出了手机号信息,并调用了UserDetailService的loadUserByUsername方法。该方法在用户名密码类型的认证中,主要逻辑是通过用户名查询用户信息,如果存在该用户并且密码一致则认证成功;而在短信验证码认证的过程中,该方法需要通过手机号去查询用户,如果存在该用户则认证通过。认证通过后接着调用SmsAuthenticationToken的SmsAuthenticationToken(Object principal, Collection<? extends GrantedAuthority> authorities)构造函数构造一个认证通过的Token,包含了用户信息和用户权限。
你可能会问,为什么这一步没有进行短信验证码的校验呢?实际上短信验证码的校验是在SmsAuthenticationFilter之前完成的,即只有当短信验证码正确以后才开始走认证的流程。所以接下来我们需要定一个过滤器来校验短信验证码的正确性。
定义SmsCodeFilter
@Component
public class SmsCodeFilter extends OncePerRequestFilter {

    @Autowired
    private AuthenticationFailureHandler authenticationFailureHandler;

    private SessionStrategy sessionStrategy = new HttpSessionSessionStrategy();

    @Override
    protected void doFilterInternal(HttpServletRequest httpServletRequest, HttpServletResponse httpServletResponse,
                                    FilterChain filterChain) throws ServletException, IOException {
        if (StringUtils.equalsIgnoreCase("/login/mobile", httpServletRequest.getRequestURI())
                && StringUtils.equalsIgnoreCase(httpServletRequest.getMethod(), "post")) {
            try {
                validateSmsCode(new ServletWebRequest(httpServletRequest));
            } catch (ValidateCodeException e) {
                authenticationFailureHandler.onAuthenticationFailure(httpServletRequest, httpServletResponse, e);
                return;
            }
        }
        filterChain.doFilter(httpServletRequest, httpServletResponse);
    }

    private void validateSmsCode(ServletWebRequest servletWebRequest) throws ServletRequestBindingException {
        String smsCodeInRequest = ServletRequestUtils.getStringParameter(servletWebRequest.getRequest(), "smsCode");
        String mobile = ServletRequestUtils.getStringParameter(servletWebRequest.getRequest(), "mobile");
        SmsCode codeInSession = (SmsCode) sessionStrategy.getAttribute(servletWebRequest, ValidateController.SESSION_KEY_SMS_CODE + mobile);

        if (StringUtils.isBlank(smsCodeInRequest)) {
            throw new ValidateCodeException("验证码不能为空!");
        }
        if (codeInSession == null) {
            throw new ValidateCodeException("验证码不存在,请重新发送!");
        }
        if (codeInSession.isExpire()) {
            sessionStrategy.removeAttribute(servletWebRequest, ValidateController.SESSION_KEY_SMS_CODE + mobile);
            throw new ValidateCodeException("验证码已过期,请重新发送!");
        }
        if (!StringUtils.equalsIgnoreCase(codeInSession.getCode(), smsCodeInRequest)) {
            throw new ValidateCodeException("验证码不正确!");
        }
        sessionStrategy.removeAttribute(servletWebRequest, ValidateController.SESSION_KEY_SMS_CODE + mobile);

    }
}
配置生效
在定义完所需的组件后,我们需要进行一些配置,将这些组件组合起来形成一个和上面流程图对应的流程。创建一个配置类SmsAuthenticationConfig:
@Component
public class SmsAuthenticationConfig extends SecurityConfigurerAdapter<DefaultSecurityFilterChain, HttpSecurity> {

    @Autowired
    private AuthenticationSuccessHandler authenticationSuccessHandler;

    @Autowired
    private AuthenticationFailureHandler authenticationFailureHandler;

    @Autowired
    private UserDetailService userDetailService;

    @Override
    public void configure(HttpSecurity http) throws Exception {
        SmsAuthenticationFilter smsAuthenticationFilter = new SmsAuthenticationFilter();
        smsAuthenticationFilter.setAuthenticationManager(http.getSharedObject(AuthenticationManager.class));
        smsAuthenticationFilter.setAuthenticationSuccessHandler(authenticationSuccessHandler);
        smsAuthenticationFilter.setAuthenticationFailureHandler(authenticationFailureHandler);

        SmsAuthenticationProvider smsAuthenticationProvider = new SmsAuthenticationProvider();
        smsAuthenticationProvider.setUserDetailService(userDetailService);

        http.authenticationProvider(smsAuthenticationProvider)
                .addFilterAfter(smsAuthenticationFilter, UsernamePasswordAuthenticationFilter.class);

    }
}在流程中第一步需要配置SmsAuthenticationFilter,分别设置了AuthenticationManager、AuthenticationSuccessHandler和AuthenticationFailureHandler属性。这些属性都是来自SmsAuthenticationFilter继承的AbstractAuthenticationProcessingFilter类中。
第二步配置SmsAuthenticationProvider,这一步只需要将我们自个的UserDetailService注入进来即可。
最后调用HttpSecurity的authenticationProvider方法指定了AuthenticationProvider为SmsAuthenticationProvider,并将SmsAuthenticationFilter过滤器添加到了UsernamePasswordAuthenticationFilter后面。
到这里我们已经将短信验证码认证的各个组件组合起来了,最后一步需要做的是配置短信验证码校验过滤器,并且将短信验证码认证流程加入到Spring Security中。在BrowserSecurityConfig的configure方法中添加如下配置:
@Configuration
public class BrowserSecurityConfig extends WebSecurityConfigurerAdapter {
    @Bean
    public PasswordEncoder passwordEncoder() {
        return new BCryptPasswordEncoder();
    }

    @Autowired
    private MyAuthenticationSucessHandler authenticationSucessHandler;

    @Autowired
    private MyAuthenticationFailureHandler authenticationFailureHandler;

    @Autowired
    private ValidateCodeFilter validateCodeFilter;

    @Autowired
    private UserDetailService userDetailService;
    @Autowired
    private DataSource dataSource;

    @Autowired
    private SmsCodeFilter smsCodeFilter;

    @Autowired
    private SmsAuthenticationConfig smsAuthenticationConfig;


    @Override
    protected void configure(HttpSecurity http) throws Exception {
        http.addFilterBefore(validateCodeFilter, UsernamePasswordAuthenticationFilter.class) // 添加验证码校验过滤器
                .addFilterBefore(smsCodeFilter, UsernamePasswordAuthenticationFilter.class) // 添加短信验证码校验过滤器
                .formLogin() // 表单登录
                .loginPage("/authentication/require") // 登录跳转 URL
                .loginProcessingUrl("/login") // 处理表单登录 URL
                .successHandler(authenticationSucessHandler)//处理登录成功
                .failureHandler(authenticationFailureHandler)//处理登录失败
                .and()
                .rememberMe()
                .tokenRepository(persistentTokenRepository()) // 配置 token 持久化仓库
                .tokenValiditySeconds(3600) // remember 过期时间,单为秒
                .userDetailsService(userDetailService) // 处理自动登录逻辑
                .and()
                .authorizeRequests() // 授权配置
                .antMatchers("/authentication/require", "/login.html", "/code/image","/code/sms").permitAll() // 登录跳转 URL 无需认证
                .anyRequest()  // 所有请求
                .authenticated() // 都需要认证
                .and().csrf().disable()
                .apply(smsAuthenticationConfig);// 将短信验证码认证配置加到 Spring Security 中
    }

    /**
     * token持久化对象
     */

    @Bean
    public PersistentTokenRepository persistentTokenRepository() {
        JdbcTokenRepositoryImpl jdbcTokenRepository = new JdbcTokenRepositoryImpl();
        jdbcTokenRepository.setDataSource(dataSource);
        jdbcTokenRepository.setCreateTableOnStartup(false);
        return jdbcTokenRepository;
    }
}
测试
重启项目,浏览器打开两个窗口访问http://localhost:8080/login.html,
第一个窗口点击发送验证码,控制台输出如下:
![]()
第二个窗口输入验证码登录:

认证成功
源码:https://gitee.com/hekang_admin/security-demo4.git

JavaWeb-SpringSecurity使用短信验证码登陆
相关博文
JavaWeb-SpringBoot_一个类实现腾讯云SDK发送短信 传送门
系列博文
项目已上传至guthub 传送门
JavaWeb-SpringSecurity初认识 传送门
JavaWeb-SpringSecurity在数据库中查询登陆用户 传送门
JavaWeb-SpringSecurity自定义登陆页面 传送门
JavaWeb-SpringSecurity实现需求-判断请求是否以html结尾 传送门
JavaWeb-SpringSecurity自定义登陆配置 传送门
JavaWeb-SpringSecurity图片验证ImageCode 传送门
JavaWeb-SpringSecurity记住我功能 传送门
JavaWeb-SpringSecurity使用短信验证码登陆 传送门
在项目GaryRESTful.validate.code包下创建SmsCode.java


package com.Gary.GaryRESTful.validate.code;

import java.time.LocalDateTime;

public class SmsCode {

    //发送短信code
    private String code;

    //当前系统时间
    private LocalDateTime expireTime;

    public SmsCode(String code,int exprieTime)
    {
        this.code = code;
        this.expireTime = LocalDateTime.now().plusSeconds(exprieTime);
    }

    public SmsCode(String code,LocalDateTime expireTime)
    {
        this.code = code;
        this.expireTime = expireTime;
    }

    //判断当前时间是否存在过期之后
    public boolean isExpired()
    {

        return LocalDateTime.now().isAfter(expireTime);
    }

    public String getCode() {
        return code;
    }

    public void setCode(String code) {
        this.code = code;
    }

    public LocalDateTime getExpireTime() {
        return expireTime;
    }

    public void setExpireTime(LocalDateTime expireTime) {
        this.expireTime = expireTime;
    }


}
优化ImageCode.java与SmsCode.java,将SmsCode.java重命名为ValidateCode.java,并用ImageCode.java继承ValidateCode.java


package com.Gary.GaryRESTful.validate.code;

import java.time.LocalDateTime;

public class ValidateCode {

    //发送短信code
    private String code;

    //当前系统时间
    private LocalDateTime expireTime;

    public ValidateCode(String code,int expireTime)
    {
        this.code = code;
        this.expireTime = LocalDateTime.now().plusSeconds(expireTime);
    }

    public ValidateCode(String code,LocalDateTime expireTime)
    {
        this.code = code;
        this.expireTime = expireTime;
    }

    //判断当前时间是否存在过期之后
    public boolean isExpired()
    {

        return LocalDateTime.now().isAfter(expireTime);
    }

    public String getCode() {
        return code;
    }

    public void setCode(String code) {
        this.code = code;
    }

    public LocalDateTime getExpireTime() {
        return expireTime;
    }

    public void setExpireTime(LocalDateTime expireTime) {
        this.expireTime = expireTime;
    }


}
导入腾讯云发短信qcloudsms-1.0.5.jar包
ValidateCodeController.java中实现接收发送短信验证码的请求@GetMapping("/code/sms")
@GetMapping("/code/sms")
    public void createSmsCode(HttpServletRequest request,HttpServletResponse response) throws ServletRequestBindingException
    {
        //生成短信的校验码
        ValidateCode smsCode = createSmsCode();
        //将我们的校验码放入session域中
        sessionStrategy.setAttribute(new ServletWebRequest(request), sessionSmsKey, smsCode);
        //从request域中获取手机号
        String mobile = ServletRequestUtils.getRequiredStringParameter(request, "mobile");
        //发短信(给mobile手机号发送smsCode验证码)
        sendSms(mobile,smsCode.getCode());
    }

    //发短信(给mobile手机号发送smsCode验证码)
    private void sendSms(String mobile, String code) {
        //1.腾讯云自己项目的AppID
        int appid = 1400182502;

        String appkey = "58f61b731363faba756087b9504bff46";

        int templateId =193928;

        String smsSign = "Garyd公众号";

        String phoneNumber = mobile;

        String[] params = new String[1];
        params[0] = code;
        //将验证码打印出来
        System.out.println("验证码: "+code);

        SmsSingleSender sender = new SmsSingleSender(appid,appkey);

        //86,手机号,模板id,验证码,smsSign
        try {
            SmsSingleSenderResult result = sender.sendWithParam("86", phoneNumber, templateId, params, smsSign, "", "");

            //打印是否发送成功
            System.out.println(result);
        } catch (JSONException | HTTPException | IOException e) {
            // TODO Auto-generated catch block
            e.printStackTrace();
        }

    }

    //生成短信的校验码
    private ValidateCode createSmsCode() {
        Random r = new Random();
        String code = "" +r.nextInt(10)+r.nextInt(10)+r.nextInt(10)+r.nextInt(10);
        return new ValidateCode(code,120);
    }
别忘了在SecurityConfig.java中的configure()方法中打开对/code/sms请求的拦截
//在访问我们的URL时,我们是不需要省份认证,可以立即访问
            .antMatchers("/login.html","/require","/code/image","/code/sms").permitAll()
测试
发送验证码请求 localhost:8080/code/sms?mobile=17689470428

后台result信息输出
【出现result:1031错误表示短信包没钱了!( ╯□╰ )窘迫~】
当短信发送成功时,result返回值是0,返回值是"OK"
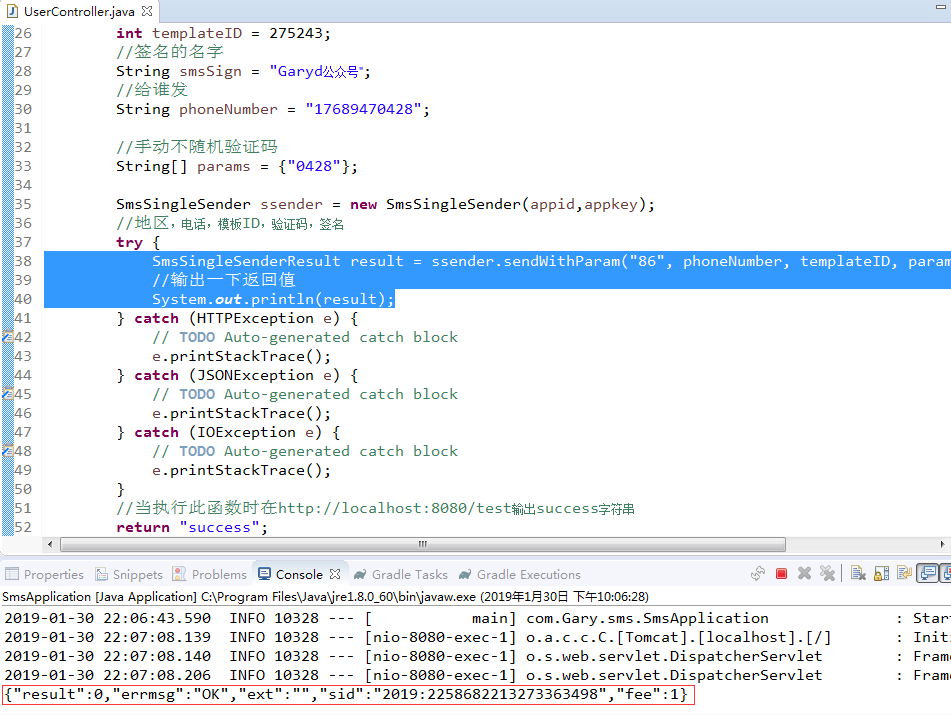
【当控制台输出result第一个参数为 0 后稍等几秒手机便会接收腾讯云发送的短信】


#datasource
spring.datasource.url=jdbc:mysql:///springsecurity?serverTimezone=UTC&characterEncoding=utf-8
spring.datasource.username=root
spring.datasource.password=123456
spring.datasource.dricer-class-name=com.mysql.jdbc.Driver

#jpa
#打印出数据库语句
spring.jpa.show-sql=true
#更新数据库表
spring.jpa.hibernate.ddl-auto=update

#配置登陆方式
gary.security.loginType = JSON

server.port=8080

#验证码长度
gary.security.code.image.length = 6
#验证码图片的长
gary.security.code.image.width = 100

#配置哪些需要我们验证码的Filter
gary.security.code.image.url = /user,/user/*

#Token过期时间
gary.security.rememberMeSeconds = 3600


package com.Gary.GaryRESTful.config;

import javax.sql.DataSource;

import org.springframework.beans.factory.annotation.Autowired;
import org.springframework.context.annotation.Bean;
import org.springframework.context.annotation.Configuration;
import org.springframework.security.config.annotation.web.builders.HttpSecurity;
import org.springframework.security.config.annotation.web.configuration.WebSecurityConfigurerAdapter;
import org.springframework.security.core.userdetails.UserDetailsService;
import org.springframework.security.crypto.bcrypt.BCryptPasswordEncoder;
import org.springframework.security.crypto.password.PasswordEncoder;
import org.springframework.security.web.authentication.UsernamePasswordAuthenticationFilter;
import org.springframework.security.web.authentication.rememberme.JdbcTokenRepositoryImpl;
import org.springframework.security.web.authentication.rememberme.PersistentTokenRepository;

import com.Gary.GaryRESTful.filter.ValidateCodeFilter;
import com.Gary.GaryRESTful.handler.LoginFailureHandler;
import com.Gary.GaryRESTful.handler.LoginSuccessHandler;
import com.Gary.GaryRESTful.properties.GarySecurityProperties;


//Web应用安全适配器
@Configuration
public class SecurityConfig extends WebSecurityConfigurerAdapter{

    //告诉SpringSecurity密码用什么加密的
    @Bean
    public PasswordEncoder passwordEncoder()
    {
        return new BCryptPasswordEncoder();
    }

    @Autowired
    private LoginSuccessHandler loginSuccessHandler;

    @Autowired
    private LoginFailureHandler loginFailureHandler;

    @Autowired
    private GarySecurityProperties garySecurityProperties;

    @Autowired
    private DataSource dataSource;

    //负责操作数据库
    public PersistentTokenRepository  persistentTokenRepository()
    {
        JdbcTokenRepositoryImpl tokenRepository = new JdbcTokenRepositoryImpl();
        tokenRepository.setDataSource(dataSource);
        return tokenRepository;
    }

    @Autowired
    public UserDetailsService userDetailService;


    protected void configure(HttpSecurity http) throws Exception{

        //声明我们自己写的过滤器
        ValidateCodeFilter validateCodeFilter = new ValidateCodeFilter();
        //给过滤器赋值
        validateCodeFilter.setAuthenticationFailureHandler(loginFailureHandler);
        validateCodeFilter.setGarySecurityProperties(garySecurityProperties);
        validateCodeFilter.afterPropertiesSet();

        //表单验证(身份认证)
        http.addFilterBefore(validateCodeFilter, UsernamePasswordAuthenticationFilter.class)
            .formLogin()
            //自定义登陆页面
            .loginPage("/require")
            //如果URL为loginPage,则用SpringSecurity中自带的过滤器去处理该请求
            .loginProcessingUrl("/loginPage")
            //配置登陆成功调用loginSuccessHandler
            .successHandler(loginSuccessHandler)
            //配置登陆失败调用loginFailureHandler
            .failureHandler(loginFailureHandler)
            //记住我功能
            .and()
            .rememberMe()
            //配置persistentTokenRepository
            .tokenRepository(persistentTokenRepository())
            //配置过期秒数
            .tokenValiditySeconds(garySecurityProperties.getRememberMeSeconds())
            //配置userDetailsService
            .userDetailsService(userDetailService)
            .and()
            //请求授权
            .authorizeRequests()
            //在访问我们的URL时,我们是不需要省份认证,可以立即访问
            .antMatchers("/login.html","/require","/code/image","/code/sms").permitAll()
            //所有请求都被拦截,跳转到(/login请求中)
            .anyRequest()
            //都需要我们身份认证
            .authenticated()
            //SpringSecurity保护机制
            .and().csrf().disable();
    }

}


package com.Gary.GaryRESTful.controller;

import java.awt.Color;
import java.awt.Font;
import java.awt.Graphics;
import java.awt.image.BufferedImage;
import java.io.IOException;
import java.util.Random;

import javax.imageio.ImageIO;
import javax.servlet.http.HttpServletRequest;
import javax.servlet.http.HttpServletResponse;

import org.json.JSONException;
import org.springframework.beans.factory.annotation.Autowired;
import org.springframework.social.connect.web.HttpSessionSessionStrategy;
import org.springframework.social.connect.web.SessionStrategy;
import org.springframework.web.bind.ServletRequestBindingException;
import org.springframework.web.bind.ServletRequestUtils;
import org.springframework.web.bind.annotation.GetMapping;
import org.springframework.web.bind.annotation.RestController;
import org.springframework.web.context.request.ServletWebRequest;

import com.Gary.GaryRESTful.properties.GarySecurityProperties;
import com.Gary.GaryRESTful.validate.code.ImageCode;
import com.Gary.GaryRESTful.validate.code.ValidateCode;
import com.github.qcloudsms.SmsSingleSender;
import com.github.qcloudsms.SmsSingleSenderResult;
import com.github.qcloudsms.httpclient.HTTPException;

@RestController
public class ValidateCodeController {

    //操作Session
    private SessionStrategy sessionStrategy = new HttpSessionSessionStrategy();

    public static String sessionKey = "session_key_image_code";

    public static String sessionSmsKey = "session_key_sms_code";

    @Autowired
    private GarySecurityProperties garySecurityProperties;


    @GetMapping("/code/sms")
    public void createSmsCode(HttpServletRequest request,HttpServletResponse response) throws ServletRequestBindingException
    {
        //生成短信的校验码
        ValidateCode smsCode = createSmsCode();
        //将我们的校验码放入session域中
        sessionStrategy.setAttribute(new ServletWebRequest(request), sessionSmsKey, smsCode);
        //从request域中获取手机号
        String mobile = ServletRequestUtils.getRequiredStringParameter(request, "mobile");
        //发短信(给mobile手机号发送smsCode验证码)
        sendSms(mobile,smsCode.getCode());
    }

    //发短信(给mobile手机号发送smsCode验证码)
    private void sendSms(String mobile, String code) {
        //1.腾讯云自己项目的AppID
        int appid = 1400184301;

        String appkey = "58f61b731363faba756087b9504bff46";

        //短信正文的id
        int templateId =275243;

        String smsSign = "Garyd公众号";

        String phoneNumber = mobile;

        String[] params = new String[1];
        params[0] = code;
        //将验证码打印出来
        System.out.println("验证码: "+code);

        SmsSingleSender sender = new SmsSingleSender(appid,appkey);

        //86,手机号,模板id,验证码,smsSign
        try {
            SmsSingleSenderResult result = sender.sendWithParam("86", phoneNumber, templateId, params, smsSign, "", "");

            //打印是否发送成功
            System.out.println(result);
        } catch (JSONException | HTTPException | IOException e) {
            // TODO Auto-generated catch block
            e.printStackTrace();
        }

    }

    //生成短信的校验码
    private ValidateCode createSmsCode() {
        Random r = new Random();
        String code = "" +r.nextInt(10)+r.nextInt(10)+r.nextInt(10)+r.nextInt(10);
        return new ValidateCode(code,120);
    }


    @GetMapping("/code/image")
    public void createCode(HttpServletRequest request,HttpServletResponse response) throws IOException
    {
        //生成随机数的图片
        ImageCode imageCode = createImageCode(request);

        //将随机数放入到session中
        sessionStrategy.setAttribute(new ServletWebRequest(request), sessionKey, imageCode);

        //将我们生成的图片写到接口的响应的输出流中
        ImageIO.write(imageCode.getImage(), "JPEG", response.getOutputStream());

    }

    //生成图片验证码(验证码,图片,失效的时间)
    private ImageCode createImageCode(HttpServletRequest request)
    {
        //定义图片的长和宽
        int width = ServletRequestUtils.getIntParameter(request, "width", garySecurityProperties.getCode().getImage().getWidth());
        int height =  ServletRequestUtils.getIntParameter(request, "height", garySecurityProperties.getCode().getImage().getHeight());;

        //生成一张图片
        BufferedImage image = new BufferedImage(width,height,BufferedImage.TYPE_INT_RGB);

        //获得画笔工具
        Graphics g = image.getGraphics();

        //画一个矩形
        g.setColor(new Color(255,255,255));
        g.fillRect(0, 0, width, height);

        //画干扰线
        g.setColor(new Color(0,0,0));
        //设置字体
        g.setFont(new Font("Time New Roman",Font.ITALIC,20));
        Random random = new Random();

        for(int i=0;i<20;i++)
        {
            int x = random.nextInt(width);
            int y = random.nextInt(height);
            int x1 = random.nextInt(12);
            int y1 = random.nextInt(12);
            //(x,y)到(x+x1,y+y1)
            g.drawLine(x, y, x+x1, y+y1);
        }

        //画数据
        String sRand = "";
        for(int i = 0;i<garySecurityProperties.getCode().getImage().getLength();i++)
        {
            String rand =String.valueOf(random.nextInt(10));
            //System.out.println(rand);
            sRand += rand;
            //每一个字都改变一下颜色
            g.setColor(new Color(20+random.nextInt(110),20+random.nextInt(110),20+random.nextInt(110)));
            //画每一个数据
            g.drawString(rand, 13*i, 16);
        }

        g.dispose();

        //生成我们自己的验证码数据(图片,验证码,过期时间)
        return new ImageCode(image,sRand,garySecurityProperties.getCode().getImage().getExpireIn());
    }

    public SessionStrategy getSessionStrategy() {
        return sessionStrategy;
    }

    public void setSessionStrategy(SessionStrategy sessionStrategy) {
        this.sessionStrategy = sessionStrategy;
    }

    public static String getSessionKey() {
        return sessionKey;
    }

    public static void setSessionKey(String sessionKey) {
        ValidateCodeController.sessionKey = sessionKey;
    }


}
在GaryRESTful.properties包下创建SmsCodeProperties.java,配置Sms发送短信的配置


package com.Gary.GaryRESTful.properties;

public class SmsCodeProperties {

    private int length = 6;
    private int expireIn = 120;
    private String url;


    public int getLength() {
        return length;
    }
    public void setLength(int length) {
        this.length = length;
    }
    public int getExpireIn() {
        return expireIn;
    }
    public void setExpireIn(int expireIn) {
        this.expireIn = expireIn;
    }
    public String getUrl() {
        return url;
    }
    public void setUrl(String url) {
        this.url = url;
    }


}
优化ImageCodeProperties.java与SmsCodeProperties.java,将ImageCodeProperties.java继承SmsCodeProperties.java,并于少写代码


package com.Gary.GaryRESTful.properties;

public class ImageCodeProperties extends SmsCodeProperties{

    private int width = 67;
    private int height = 23;

    public ImageCodeProperties()
    {
        setLength(4);
    }

    public int getWidth() {
        return width;
    }
    public void setWidth(int width) {
        this.width = width;
    }
    public int getHeight() {
        return height;
    }
    public void setHeight(int height) {
        this.height = height;
    }


}
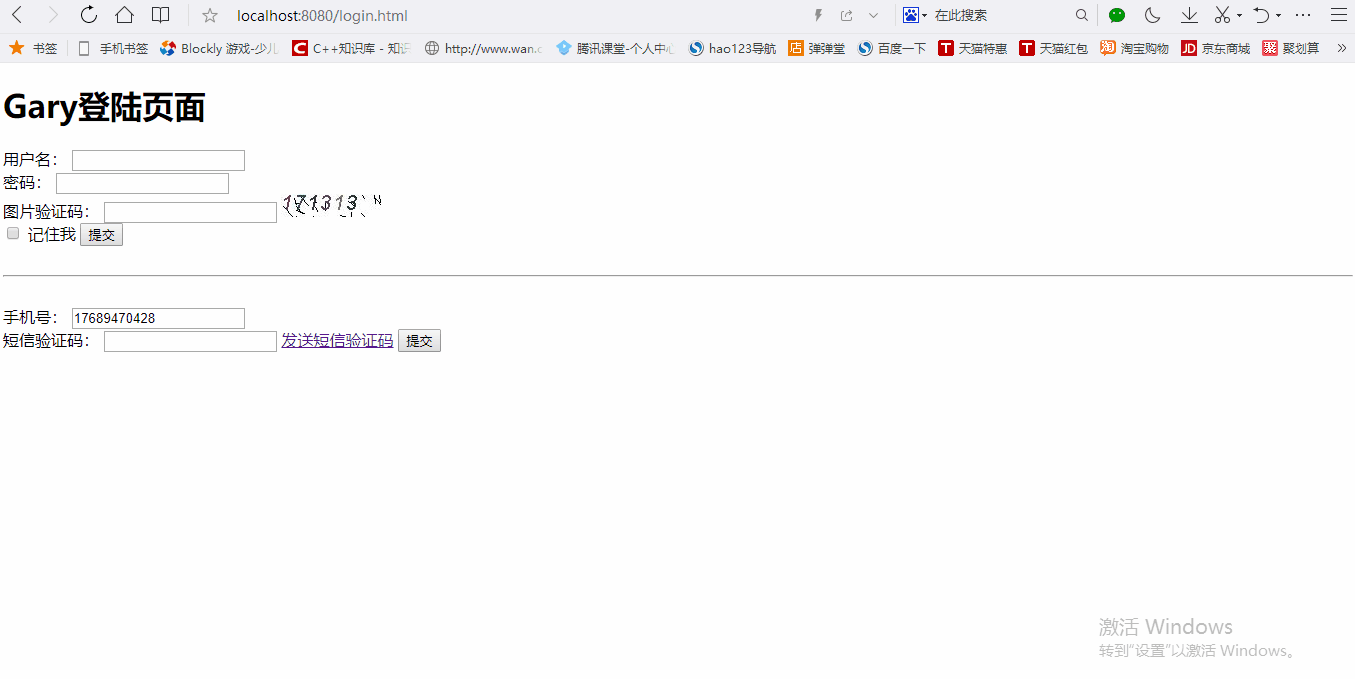
在login.html中添加填写手机验证码<input>,发送验证码的手机号我们给个定值value=17689470428,发送请求时都是通过ajax去进行数据交互,这里直接给个定制,通过<a>标签去访问请求/code/sms?mobile=17689470428(手机号不变)
<form action="">

        手机号:
        <input type="text" name=“mobile” value="17689470428">
        <br>
        短信验证码:
        <input type="text" name="smsCode">
        <a href="/code/sms?mobile=17689470428">发送短信验证码</a>

        <input type = "submit">
    </form>


<!DOCTYPE html>
<html>
<head>
<meta charset="UTF-8">
<title>Insert title here</title>
</head>
<body>

<h1>Gary登陆页面</h1>
    <form action="/loginPage" method="post">

        用户名:
        <input type="text" name="username">
        <br>

        密码:
        <input type="password" name="password">
        <br>

        图片验证码:
        <input type="text" name="imageCode">
        <img src="/code/image">
        <br>

        <input name="remember-me" type="checkbox" value="true">
        记住我

        <input type="submit">

    </form>

    <br>
    <hr>
    <br>
    <form action="">

        手机号:
        <input type="text" name=“mobile” value="17689470428">
        <br>
        短信验证码:
        <input type="text" name="smsCode">
        <a href="/code/sms?mobile=17689470428">发送短信验证码</a>

        <input type = "submit">
    </form>

</body>
</html>


#datasource
spring.datasource.url=jdbc:mysql:///springsecurity?serverTimezone=UTC&characterEncoding=utf-8
spring.datasource.username=root
spring.datasource.password=123456
spring.datasource.dricer-class-name=com.mysql.jdbc.Driver

#jpa
#打印出数据库语句
spring.jpa.show-sql=true
#更新数据库表
spring.jpa.hibernate.ddl-auto=update

#配置登陆方式
gary.security.loginType = JSON

server.port=8080

#验证码长度
gary.security.code.image.length = 6
#验证码图片的长
gary.security.code.image.width = 100

#配置哪些需要我们验证码的Filter
gary.security.code.image.url = /user,/user/*

#Token过期时间
gary.security.rememberMeSeconds = 3600


package com.Gary.GaryRESTful.config;

import javax.sql.DataSource;

import org.springframework.beans.factory.annotation.Autowired;
import org.springframework.context.annotation.Bean;
import org.springframework.context.annotation.Configuration;
import org.springframework.security.config.annotation.web.builders.HttpSecurity;
import org.springframework.security.config.annotation.web.configuration.WebSecurityConfigurerAdapter;
import org.springframework.security.core.userdetails.UserDetailsService;
import org.springframework.security.crypto.bcrypt.BCryptPasswordEncoder;
import org.springframework.security.crypto.password.PasswordEncoder;
import org.springframework.security.web.authentication.UsernamePasswordAuthenticationFilter;
import org.springframework.security.web.authentication.rememberme.JdbcTokenRepositoryImpl;
import org.springframework.security.web.authentication.rememberme.PersistentTokenRepository;

import com.Gary.GaryRESTful.filter.ValidateCodeFilter;
import com.Gary.GaryRESTful.handler.LoginFailureHandler;
import com.Gary.GaryRESTful.handler.LoginSuccessHandler;
import com.Gary.GaryRESTful.properties.GarySecurityProperties;


//Web应用安全适配器
@Configuration
public class SecurityConfig extends WebSecurityConfigurerAdapter{

    //告诉SpringSecurity密码用什么加密的
    @Bean
    public PasswordEncoder passwordEncoder()
    {
        return new BCryptPasswordEncoder();
    }

    @Autowired
    private LoginSuccessHandler loginSuccessHandler;

    @Autowired
    private LoginFailureHandler loginFailureHandler;

    @Autowired
    private GarySecurityProperties garySecurityProperties;

    @Autowired
    private DataSource dataSource;

    //负责操作数据库
    public PersistentTokenRepository  persistentTokenRepository()
    {
        JdbcTokenRepositoryImpl tokenRepository = new JdbcTokenRepositoryImpl();
        tokenRepository.setDataSource(dataSource);
        return tokenRepository;
    }

    @Autowired
    public UserDetailsService userDetailService;


    protected void configure(HttpSecurity http) throws Exception{

        //声明我们自己写的过滤器
        ValidateCodeFilter validateCodeFilter = new ValidateCodeFilter();
        //给过滤器赋值
        validateCodeFilter.setAuthenticationFailureHandler(loginFailureHandler);
        validateCodeFilter.setGarySecurityProperties(garySecurityProperties);
        validateCodeFilter.afterPropertiesSet();

        //表单验证(身份认证)
        http.addFilterBefore(validateCodeFilter, UsernamePasswordAuthenticationFilter.class)
            .formLogin()
            //自定义登陆页面
            .loginPage("/require")
            //如果URL为loginPage,则用SpringSecurity中自带的过滤器去处理该请求
            .loginProcessingUrl("/loginPage")
            //配置登陆成功调用loginSuccessHandler
            .successHandler(loginSuccessHandler)
            //配置登陆失败调用loginFailureHandler
            .failureHandler(loginFailureHandler)
            //记住我功能
            .and()
            .rememberMe()
            //配置persistentTokenRepository
            .tokenRepository(persistentTokenRepository())
            //配置过期秒数
            .tokenValiditySeconds(garySecurityProperties.getRememberMeSeconds())
            //配置userDetailsService
            .userDetailsService(userDetailService)
            .and()
            //请求授权
            .authorizeRequests()
            //在访问我们的URL时,我们是不需要省份认证,可以立即访问
            .antMatchers("/login.html","/require","/code/image","/code/sms").permitAll()
            //所有请求都被拦截,跳转到(/login请求中)
            .anyRequest()
            //都需要我们身份认证
            .authenticated()
            //SpringSecurity保护机制
            .and().csrf().disable();
    }

}


package com.Gary.GaryRESTful.controller;

import java.awt.Color;
import java.awt.Font;
import java.awt.Graphics;
import java.awt.image.BufferedImage;
import java.io.IOException;
import java.util.Random;

import javax.imageio.ImageIO;
import javax.servlet.http.HttpServletRequest;
import javax.servlet.http.HttpServletResponse;

import org.json.JSONException;
import org.springframework.beans.factory.annotation.Autowired;
import org.springframework.social.connect.web.HttpSessionSessionStrategy;
import org.springframework.social.connect.web.SessionStrategy;
import org.springframework.web.bind.ServletRequestBindingException;
import org.springframework.web.bind.ServletRequestUtils;
import org.springframework.web.bind.annotation.GetMapping;
import org.springframework.web.bind.annotation.RestController;
import org.springframework.web.context.request.ServletWebRequest;

import com.Gary.GaryRESTful.properties.GarySecurityProperties;
import com.Gary.GaryRESTful.validate.code.ImageCode;
import com.Gary.GaryRESTful.validate.code.ValidateCode;
import com.github.qcloudsms.SmsSingleSender;
import com.github.qcloudsms.SmsSingleSenderResult;
import com.github.qcloudsms.httpclient.HTTPException;

@RestController
public class ValidateCodeController {

    //操作Session
    private SessionStrategy sessionStrategy = new HttpSessionSessionStrategy();

    public static String sessionKey = "session_key_image_code";

    public static String sessionSmsKey = "session_key_sms_code";

    @Autowired
    private GarySecurityProperties garySecurityProperties;


    @GetMapping("/code/sms")
    public void createSmsCode(HttpServletRequest request,HttpServletResponse response) throws ServletRequestBindingException
    {
        //生成短信的校验码
        ValidateCode smsCode = createSmsCode();
        //将我们的校验码放入session域中
        sessionStrategy.setAttribute(new ServletWebRequest(request), sessionSmsKey, smsCode);
        //从request域中获取手机号
        String mobile = ServletRequestUtils.getRequiredStringParameter(request, "mobile");
        //发短信(给mobile手机号发送smsCode验证码)
        sendSms(mobile,smsCode.getCode());
    }

    //发短信(给mobile手机号发送smsCode验证码)
    private void sendSms(String mobile, String code) {
        //1.腾讯云自己项目的AppID
        int appid = 1400184301;

        String appkey = "58f61b731363faba756087b9504bff46";

        //短信正文的id
        int templateId =275243;

        String smsSign = "Garyd公众号";

        String phoneNumber = mobile;

        String[] params = new String[1];
        params[0] = code;
        //将验证码打印出来
        System.out.println("验证码: "+code);

        SmsSingleSender sender = new SmsSingleSender(appid,appkey);

        //86,手机号,模板id,验证码,smsSign
        try {
            SmsSingleSenderResult result = sender.sendWithParam("86", phoneNumber, templateId, params, smsSign, "", "");

            //打印是否发送成功
            System.out.println(result);
        } catch (JSONException | HTTPException | IOException e) {
            // TODO Auto-generated catch block
            e.printStackTrace();
        }

    }

    //生成短信的校验码
    private ValidateCode createSmsCode() {
        Random r = new Random();
        String code = "" ;
        for(int i=0;i<garySecurityProperties.getCode().getSms().getLength();i++)
        {
            code += r.nextInt(10);
        }
        return new ValidateCode(code,garySecurityProperties.getCode().getSms().getExpireIn());
    }


    @GetMapping("/code/image")
    public void createCode(HttpServletRequest request,HttpServletResponse response) throws IOException
    {
        //生成随机数的图片
        ImageCode imageCode = createImageCode(request);

        //将随机数放入到session中
        sessionStrategy.setAttribute(new ServletWebRequest(request), sessionKey, imageCode);

        //将我们生成的图片写到接口的响应的输出流中
        ImageIO.write(imageCode.getImage(), "JPEG", response.getOutputStream());

    }

    //生成图片验证码(验证码,图片,失效的时间)
    private ImageCode createImageCode(HttpServletRequest request)
    {
        //定义图片的长和宽
        int width = ServletRequestUtils.getIntParameter(request, "width", garySecurityProperties.getCode().getImage().getWidth());
        int height =  ServletRequestUtils.getIntParameter(request, "height", garySecurityProperties.getCode().getImage().getHeight());;

        //生成一张图片
        BufferedImage image = new BufferedImage(width,height,BufferedImage.TYPE_INT_RGB);

        //获得画笔工具
        Graphics g = image.getGraphics();

        //画一个矩形
        g.setColor(new Color(255,255,255));
        g.fillRect(0, 0, width, height);

        //画干扰线
        g.setColor(new Color(0,0,0));
        //设置字体
        g.setFont(new Font("Time New Roman",Font.ITALIC,20));
        Random random = new Random();

        for(int i=0;i<20;i++)
        {
            int x = random.nextInt(width);
            int y = random.nextInt(height);
            int x1 = random.nextInt(12);
            int y1 = random.nextInt(12);
            //(x,y)到(x+x1,y+y1)
            g.drawLine(x, y, x+x1, y+y1);
        }

        //画数据
        String sRand = "";
        for(int i = 0;i<garySecurityProperties.getCode().getImage().getLength();i++)
        {
            String rand =String.valueOf(random.nextInt(10));
            //System.out.println(rand);
            sRand += rand;
            //每一个字都改变一下颜色
            g.setColor(new Color(20+random.nextInt(110),20+random.nextInt(110),20+random.nextInt(110)));
            //画每一个数据
            g.drawString(rand, 13*i, 16);
        }

        g.dispose();

        //生成我们自己的验证码数据(图片,验证码,过期时间)
        return new ImageCode(image,sRand,garySecurityProperties.getCode().getImage().getExpireIn());
    }

    public SessionStrategy getSessionStrategy() {
        return sessionStrategy;
    }

    public void setSessionStrategy(SessionStrategy sessionStrategy) {
        this.sessionStrategy = sessionStrategy;
    }

    public static String getSessionKey() {
        return sessionKey;
    }

    public static void setSessionKey(String sessionKey) {
        ValidateCodeController.sessionKey = sessionKey;
    }


}


package com.Gary.GaryRESTful.properties;

public class ValidateCodeProperties {

    //图片验证码
    private ImageCodeProperties image = new ImageCodeProperties();

    private SmsCodeProperties sms = new SmsCodeProperties();


    public SmsCodeProperties getSms() {
        return sms;
    }

    public void setSms(SmsCodeProperties sms) {
        this.sms = sms;
    }

    public ImageCodeProperties getImage() {
        return image;
    }

    public void setImage(ImageCodeProperties image) {
        this.image = image;
    }


}
")
spring boot 集成 spring security 实现json串登录和短信验证码登录(1)
security 实现json 登录。
问题:用spring security 实现json串登录方式一般用来解决前后端分离的登录问题的处理,前端通过输入用户名密码json串发送后端由security验证登录,登录成功返回登录成功标识token。以后请求只需带token即可通过验证。这其中涉及到几个问题:
1.如何让spring security 校验我们自定义的json串登录过滤器
2.登录成功后,后续请求如何让spring security 验证token来实现自动认证
那么,解决这两个问题,首先得看spring security登录的实现方式,spring security实现登录是通过一系列过滤器链来最终来完成登录,所以我们需要自定义一个json登录和校验过滤器加入到security的过滤器链。而且我们通过spring security 的UsernamePasswordAuthenticationFilter.class源码
public Authentication attemptAuthentication(HttpServletRequest request, HttpServletResponse response) throws AuthenticationException {
    if (this.postOnly && !request.getMethod().equals("POST")) {
        throw new AuthenticationServiceException("Authentication method not supported: " + request.getMethod());
    } else {
        String username = this.obtainUsername(request);
        String password = this.obtainPassword(request);
        if (username == null) {
            username = "";
        }

        if (password == null) {
            password = "";
        }

        username = username.trim();
        UsernamePasswordAuthenticationToken authRequest = new UsernamePasswordAuthenticationToken(username, password);
        this.setDetails(request, authRequest);
        return this.getAuthenticationManager().authenticate(authRequest);
    }
}
发现我们只需将用户名密码传给UsernamePasswordAuthenticationToken类并调用UsernamePasswordAuthenticationFilter的this.getAuthenticationManager().authenticate(authRequest)方法即可实现框架的自动认证
首先我们需要定义一个Json 用户名密码登录配置器
/**
 * Json 用户名密码登录配置文件(配置器)
 *
 * @author liaofuxing
 * @date 2020/02/18 11:50
 */
@Configuration
public class JsonAuthenticationConfigurer extends SecurityConfigurerAdapter<DefaultSecurityFilterChain, HttpSecurity> {

    @Autowired
    private AuthenticationSuccessHandler defaultAuthenticationSuccessHandler;

    @Autowired
    private AuthenticationFailureHandler defaultAuthenticationFailureHandler;


    @Override
    public void configure(HttpSecurity http) throws Exception {

        JsonAuthenticationFilter jsonAuthenticationFilter = new JsonAuthenticationFilter();
        jsonAuthenticationFilter.setAuthenticationManager(http.getSharedObject(AuthenticationManager.class));
        jsonAuthenticationFilter.setAuthenticationSuccessHandler(defaultAuthenticationSuccessHandler);
        jsonAuthenticationFilter.setAuthenticationFailureHandler(defaultAuthenticationFailureHandler);

        http.addFilterAfter(jsonAuthenticationFilter, UsernamePasswordAuthenticationFilter.class);

    }
}
设置登录成功失败的Handler,登录成功Handler里面实现成功biao''stoken的返回,具体代码稍后在gitee中查看,这里就不一一列出,和验证登录的过滤器jsonAuthenticationFilter,
并模仿UsernamePasswordAuthenticationFilter自定义JsonAuthenticationFilter过滤器
/**
 * Json 用户名密码登录过滤器
 *
 * @author liaofuxing
 * @date 2020/02/18 11:50
 */
public class JsonAuthenticationFilter extends AbstractAuthenticationProcessingFilter {
   private boolean postOnly = true;

   public JsonAuthenticationFilter() {
      super(new AntPathRequestMatcher("/user/login", "POST"));
   }

   @Override
   public Authentication attemptAuthentication(HttpServletRequest request, HttpServletResponse httpServletResponse) throws AuthenticationException, IOException, ServletException {

         if (postOnly && !request.getMethod().equals("POST")) {
            throw new AuthenticationServiceException("Authentication method not supported: " + request.getMethod());
         }

         DocumentBuilderFactory dbf = DocumentBuilderFactory.newInstance();
         dbf.setExpandEntityReferences(false);
         StringBuffer sb = new StringBuffer();
         try (InputStream inputStream = request.getInputStream(); BufferedReader bufferedReader = new BufferedReader(new InputStreamReader(inputStream))) {
            String str;
            while ((str = bufferedReader.readLine()) != null) {
               sb.append(str);
            }
         } catch (IOException ex) {
            throw new RuntimeException("获取请求内容异常", ex);
         }

         JSONObject jsonObject = JSON.parseObject(sb.toString());
         String username = jsonObject.getString("username");
         String password = jsonObject.getString("password");

         UsernamePasswordAuthenticationToken authenticationToken = new UsernamePasswordAuthenticationToken(username, password);

         return this.getAuthenticationManager().authenticate(authenticationToken);
      }

}
与UsernamePasswordAuthenticationFilter一样继承AbstractAuthenticationProcessingFilter重写attemptAuthentication方法实现框架的自动认证
ps:UsernamePasswordAuthenticationFilter的自动登录认证是通过定义的UserDetailServiceImpl来实现用户名密码校验的,所以先要定义好UserDetailServiceImpl 和User实体类。这些都是先决条件。
将我们定义的JsonAuthenticationConfigurer 添加到spring security的配置链中去,
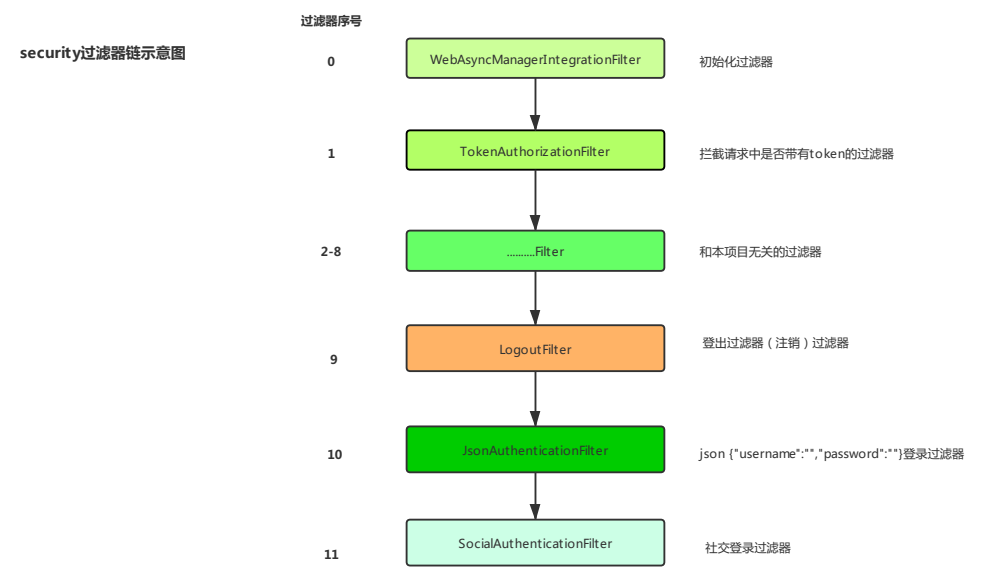
@Override
protected void configure(HttpSecurity http) throws Exception {
    //处理跨域请求
    http.cors().and().csrf().disable()
            .apply(jsonAuthenticationConfigurer)
            .and()
            .apply(springSocialConfigurer)
            .and()
            .apply(smsCodeAuthenticationConfigurer)
            .and()
            //权限不足结果处理
            .exceptionHandling().authenticationEntryPoint(authenticationEntryPoint).accessDeniedHandler(accessDeniedHandler)
            .and()
            //设置登出url
            .logout().logoutUrl("/user/logout")
            //设置登出成功处理器(下面介绍)
            .logoutSuccessHandler(logoutSuccessHandler).and()
            .authorizeRequests()
            .antMatchers("/authentication/require",
                    "/sms/*",
                    "/user/regist").permitAll()
            .antMatchers("/user/lala/**").hasRole("ADMIN")
            .anyRequest()
            .authenticated();

    /*  authorizationFilter是用来拦截登录请求判断请求中是否带有token,并且token是否有对应的已经登录的用户,如果有应该直接授权通过
     *  所以这个过滤器应该在UsernamePasswordAuthenticationFilter过滤器之前执行,所以放在LogoutFilter之后
     */
    http.addFilterAfter(authorizationFilter, LogoutFilter.class);


}
这个是完整配置,jsonAuthenticationConfigurer是我们添加进去的。
这样就实现了json串形式的登录,解决了问题1,
问题2,实现后续请求的token校验,同样是定义过滤器,添加到security 过滤器链
代码
@Component
public class TokenAuthorizationFilter extends OncePerRequestFilter {

    @Autowired
    private StringRedisTemplate redisTemplate;

    @Autowired
    private UserDetailServiceImpl userDetailsService;

    @Override
    protected void doFilterInternal(HttpServletRequest request, HttpServletResponse response, FilterChain chain) throws IOException, ServletException {
        //从请求头中取出token
        String token = request.getHeader("token");
        if(!StringUtils.isEmpty(token)) {
            if (SecurityContextHolder.getContext().getAuthentication() == null) {
                //从redis中获取用户名
                String username = redisTemplate.opsForValue().get("SECURITY_TOKEN:"+ token);
                //从数据库中根据用户名获取用户
                UserDetails systemUser = userDetailsService.loadUserByUsername(username);
                if (systemUser != null) {
                    //解析并设置认证信息
                    UsernamePasswordAuthenticationToken authentication =
                            new UsernamePasswordAuthenticationToken(systemUser, null, systemUser.getAuthorities());
                    authentication.setDetails(new WebAuthenticationDetailsSource().buildDetails(request));
                    SecurityContextHolder.getContext().setAuthentication(authentication);
                }
            }
        }
        chain.doFilter(request, response);
    }
}
以上只是部分代码,主要是梳理流程,具体代码:spring cloud学习实例代码
代码在 api-gateway 这个项目中。ps:本文并不是最优是实现,最优实现应该自定义实现AuthenticationProvider,实现自定义认证。
可以参考别人的文章:spring security 系列文章
项目过滤器示意图。

Spring Security 3.0 登录表单自定义验证
原文地址:http://www.xx566.com/detail/173.html
之前的两篇关于Spring Security多登陆入口的实现与配置:Spring Security 2.0 多登录入口的实现与配置与Spring Security 3.0 多登录入口的实现与配置 中,我们简单的介绍了通过Spring Security 2和 3 分别配置的登录验证,不过使用的都是spring security内部提供的过滤器,很多情况下,我们的登录表单提交不仅仅是用户名和密码等信息,可能还需要额外的处理一些表单参数,这时我们可以通过自 定义表单验证来处理表单参数信息,本篇,我们就来简单的实现一个表单的自定义验证。
首先, 我们看一下Spring Security3中使用的登录验证的过滤配置,如下:
<!-- 前台用户登陆 -->
<bean id="frontLoginFilter"
      >
    <property name="authenticationManager" ref="authenticationManager"/>
    <property name="filterProcessesUrl" value="/j_spring_security_check"/>
    <property name="authenticationFailureHandler" ref="frontFailureHandler"/>
    <property name="authenticationSuccessHandler" ref="frontSuccessHandler"/>
</bean>

<!-- 后台用户登陆 -->
<bean id="adminLoginFilter"
      >
    <property name="authenticationManager" ref="authenticationManager"/>
    <property name="filterProcessesUrl" value="/admin/j_spring_security_check"/>
    <property name="authenticationFailureHandler" ref="adminFailureHandler"/>
    <property name="authenticationSuccessHandler" ref="adminSuccessHandler"/>
</bean>这里使用到了org.springframework.security.web.authentication.UsernamePasswordAuthenticationFilter,我们需要做的就是自定义一个Fliter,继承UsernamePasswordAuthenticationFilter,以实现对表单参数的控制与获取处理,如下:
package security;

import org.springframework.security.authentication.BadCredentialsException;
import org.springframework.security.core.Authentication;
import org.springframework.security.core.AuthenticationException;
import org.springframework.security.core.GrantedAuthority;
import org.springframework.security.core.userdetails.UsernameNotFoundException;
import org.springframework.security.web.authentication.UsernamePasswordAuthenticationFilter;

import javax.servlet.http.HttpServletRequest;
import javax.servlet.http.HttpServletResponse;
import java.util.Collection;

public class MyLoginAuthenticationFilter extends UsernamePasswordAuthenticationFilter {

    @Override
    public Authentication attemptAuthentication(HttpServletRequest request, HttpServletResponse response)
            throws AuthenticationException {

        String url = request.getRequestURI();

        // 获取用户名、密码数据
        String username = obtainUsername(request);

        //根据用户名获取真实用户信息
        SecurityUser user = new SecurityUser();
//      SecurityUser user = this.securityUserSpecMapper.selectByUsername(username);

        // 判断用户相关信息
        if (user == null) {
            throw new UsernameNotFoundException("用户" + username + "不存在");
        }

        //假设需要进行用户权限的判断
        Collection<GrantedAuthority> authorities = user.getAuthorities();
        if (url.contains("admin")) {
            // 如果通过后台链接,只有admin角色能够登录
            if (!authorities.contains("ROLE_ADMIN")) {
                throw new BadCredentialsException("对不起,您没有权限通过此页面登录!");
            }
        } else {
            // 如果通过前台链接,只有front角色能够登录
            if (!authorities.contains("ROLE_FRONT")) {
                throw new BadCredentialsException("对不起,您没有权限通过此页面登录!");
            }
        }
        return super.attemptAuthentication(request, response);
    }

}
最后,我们只需要简单的对Spring Security配置文件中的class进行修改即可。
相关代码地址:http://git.oschina.net/realfighter/xx566-diary/tree/master/src/security
今天关于简单说说Spring Security 使用和附加验证码登录,自定义认证的介绍到此结束,谢谢您的阅读,有关7. Spring Boot中Spring Security短信验证码登录、JavaWeb-SpringSecurity使用短信验证码登陆、spring boot 集成 spring security 实现json串登录和短信验证码登录(1)、Spring Security 3.0 登录表单自定义验证等更多相关知识的信息可以在本站进行查询。
本文标签:


