对于springboot发送邮件的几种方式感兴趣的读者,本文将提供您所需要的所有信息,我们将详细讲解springboot发送邮件的步骤,并且为您提供关于(入门SpringBoot)SpringBoot
对于springboot发送邮件的几种方式感兴趣的读者,本文将提供您所需要的所有信息,我们将详细讲解springboot发送邮件的步骤,并且为您提供关于(入门SpringBoot)SpringBoot发送邮件(十一)、25、springboot发送邮件、7.6 SpringBoot 读取 Resource 下文件的几种方式、Spring Boot发送邮件的宝贵知识。
本文目录一览:- springboot发送邮件的几种方式(springboot发送邮件的步骤)
- (入门SpringBoot)SpringBoot发送邮件(十一)
- 25、springboot发送邮件
- 7.6 SpringBoot 读取 Resource 下文件的几种方式
- Spring Boot发送邮件
")
springboot发送邮件的几种方式(springboot发送邮件的步骤)
springboot发送邮件的几种方式
准备工作(以QQ邮箱为例)
SMTP 协议全称为 Simple Mail Transfer Protocol,译作简单邮件传输协议,它定义了邮件客户端软件与 SMTP 服务器之间,以及 SMTP 服务器与 SMTP 服务器之间的通信规则。
也就是说 aaa@qq.com 用户先将邮件投递到腾讯的 SMTP 服务器这个过程就使用了 SMTP 协议,然后腾讯的 SMTP 服务器将邮件投递到网易的 SMTP 服务器这个过程也依然使用了 SMTP 协议,SMTP 服务器就是用来收邮件。
而 POP3 协议全称为 Post Office Protocol ,译作邮局协议,它定义了邮件客户端与 POP3 服务器之间的通信规则,那么该协议在什么场景下会用到呢?当邮件到达网易的 SMTP 服务器之后, 111@163.com 用户需要登录服务器查看邮件,这个时候就该协议就用上了:邮件服务商都会为每一个用户提供专门的邮件存储空间,SMTP 服务器收到邮件之后,就将邮件保存到相应用户的邮件存储空间中,如果用户要读取邮件,就需要通过邮件服务商的 POP3 邮件服务器来完成。
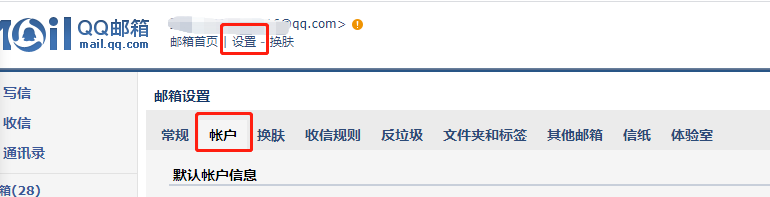
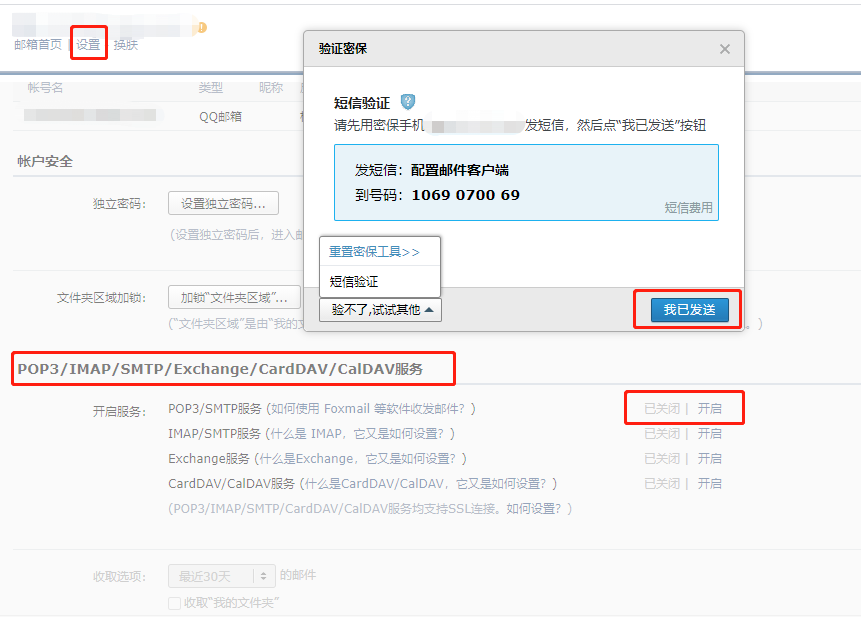
所以在使用springboot发送邮件之前,要开启POP3和SMTP协议,需要获得邮件服务器的授权码,这里以qq邮箱为例,展示获取授权码的过程:
在账户的下面有一个开启SMTP协议的开关并进行密码验证:
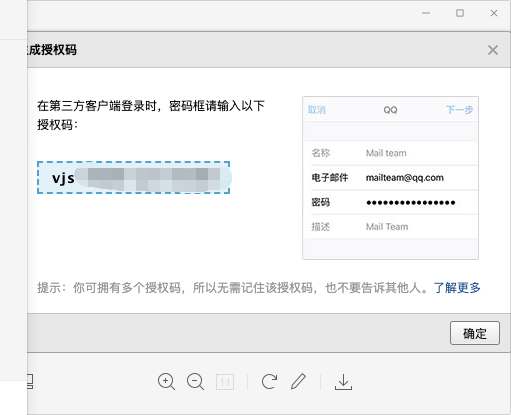
以下就是你的授权码:
项目创建
<dependency>
    <groupId>org.springframework.boot</groupId>
    <artifactId>spring-boot-starter-mail</artifactId>
</dependency>
配置邮箱基本信息
spring:
  mail:
    # 配置 SMTP 服务器地址
    host: smtp.qq.com
    # 发送者邮箱
    username: 790933839@qq.com
    # 配置密码,注意不是真正的密码,而是刚刚申请到的授权码
    password: vjst32rgdaawbdbd
    # 端口号465或587
    port: 587
    # 默认的邮件编码为UTF-8
    default-encoding: UTF-8
    # 配置SSL 加密工厂
    properties:
      mail:
        smtp:
          socketFactoryClass: javax.net.ssl.SSLSocketFactory
        #表示开启 DEBUG 模式,这样,邮件发送过程的日志会在控制台打印出来,方便排查错误
        debug: true
126邮箱SMTP服务器地址:smtp.126.com,端口号:465或者994
2163邮箱SMTP服务器地址:smtp.163.com,端口号:465或者994
yeah邮箱SMTP服务器地址:smtp.yeah.net,端口号:465或者994
qq邮箱SMTP服务器地址:smtp.qq.com,端口号465或587*
配置好这些后,springboot会自动帮我们配置好相关的邮件发送类。
发送普通邮件
发送普通邮件就是指发送一段文本文件。
    @Autowired
    JavaMailSender javaMailSender;
		/**
     * 普通邮件发送
     */
    @Test
    public void sendSimpleMail() {
        // 构建一个邮件对象
        SimpleMailMessage message = new SimpleMailMessage();
        // 设置邮件主题
        message.setSubject("这是一封测试邮件");
        // 设置邮件发送者,这个跟application.yml中设置的要一致
        message.setFrom("7*****9@qq.com");
        // 设置邮件接收者,可以有多个接收者,中间用逗号隔开,以下类似
      	// message.setTo("10*****16@qq.com","12****32*qq.com");
        message.setTo("10*****16@qq.com");
        // 设置邮件抄送人,可以有多个抄送人
        message.setCc("12****32*qq.com");
        // 设置隐秘抄送人,可以有多个
        message.setBcc("7******9@qq.com");
        // 设置邮件发送日期
        message.setSentDate(new Date());
        // 设置邮件的正文
        message.setText("这是测试邮件的正文");
        // 发送邮件
        javaMailSender.send(message);
    }
抄送:将邮件同时送给收信人以外的人,用户所写的邮件抄送一份给别人,对方可以看见该用户的E-mail发送给了谁。
密送:将邮件同时送给收信人以外的人,用户所写的邮件抄送一份给别人,但是对方不能查看到这封邮件同时还发送给了哪些人。
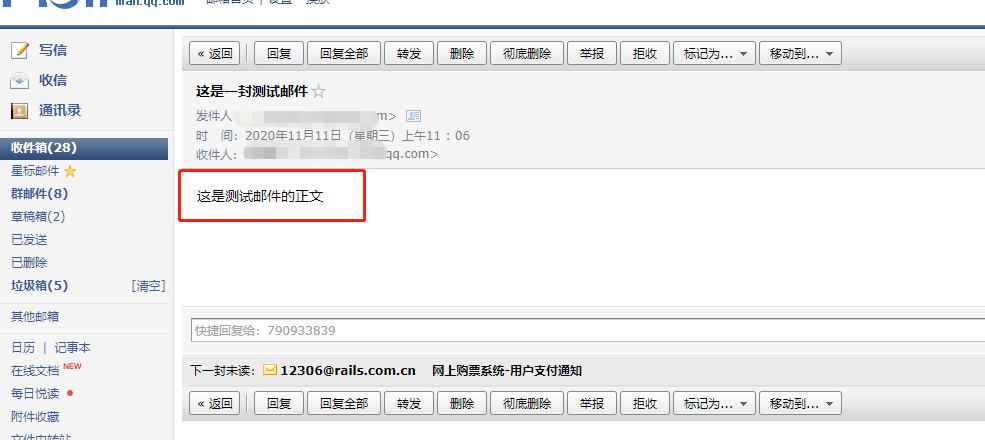
发送的效果如下:
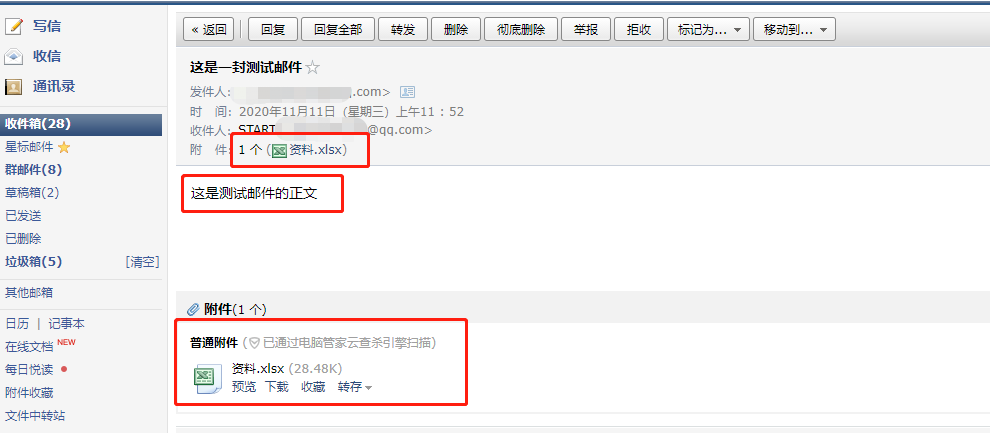
发送带附件的邮件
    /**
     * 发送带附件的邮件
     * @throws MessagingException
     */
    @Test
    public void sendAttachFileMail() throws MessagingException {
        MimeMessage mimeMessage = javaMailSender.createMimeMessage();
      	// true表示构建一个可以带附件的邮件对象
        MimeMessageHelper helper = new MimeMessageHelper(mimeMessage,true);

        helper.setSubject("这是一封测试邮件");
        helper.setFrom("79******9@qq.com");
        helper.setTo("10*****16@qq.com");
        //helper.setCc("37xxxxx37@qq.com");
        //helper.setBcc("14xxxxx098@qq.com");
        helper.setSentDate(new Date());
        helper.setText("这是测试邮件的正文");
        // 第一个参数是自定义的名称,后缀需要加上,第二个参数是文件的位置
        helper.addAttachment("资料.xlsx",new File("/Users/gamedev/Desktop/测试数据 2.xlsx"));
        javaMailSender.send(mimeMessage);
    }
注意这里的构建邮件对象的方式跟上面有一点不同,因为这里是需要带附件上传,所以先使用javaMailSender创建一个复杂的邮件对象,然后使用MimeMessageHelper对邮件进行配置,MimeMessageHelper 是一个邮件配置的辅助工具类,创建时候的 true 表示构建一个 multipart message 类型的邮件,有了 MimeMessageHelper 之后,我们针对邮件的配置都是由 MimeMessageHelper 来代劳。然后通过addAttachment()方法添加附件。
发送的效果如下:
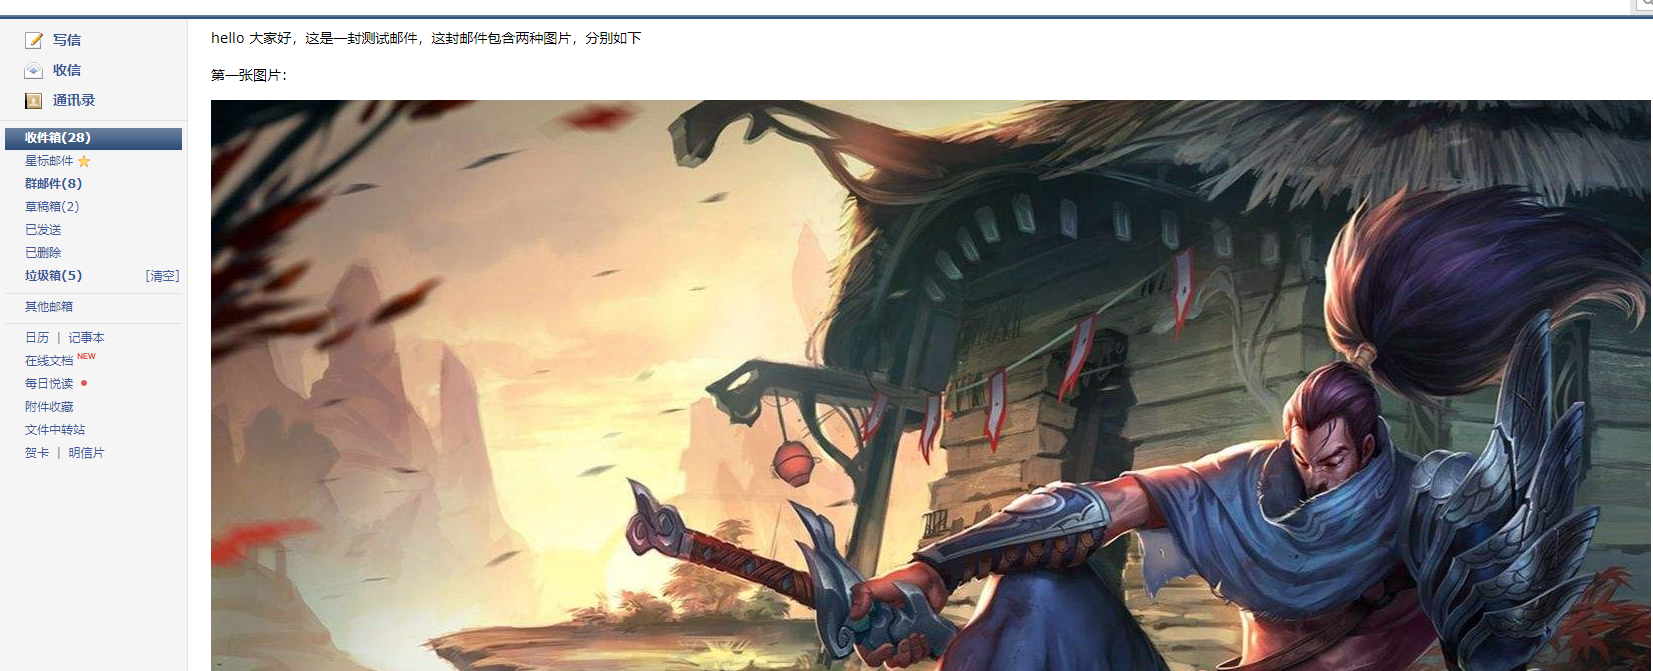
发送带图片资源的邮件
图片资源和附件有什么区别呢?图片资源是放在邮件正文中的,即一打开邮件,就能看到图片。但是一般来说,不建议使用这种方式,一些公司会对邮件内容的大小有限制(因为这种方式是将图片一起发送的)。
/**
 * 正文中带图片的邮件
 * @throws MessagingException
 */
@Test
public void sendImgResMail() throws MessagingException {
    MimeMessage mimeMessage = javaMailSender.createMimeMessage();
    MimeMessageHelper helper = new MimeMessageHelper(mimeMessage, true);
    helper.setSubject("这是一封测试邮件");
    helper.setFrom("79*****39@qq.com");
    helper.setTo("10****6@qq.com");
    //helper.setCc("37xxxxx37@qq.com");
    //helper.setBcc("14xxxxx098@qq.com");
    helper.setSentDate(new Date());
    // src=''cid:p01'' 占位符写法 ,第二个参数true表示这是一个html文本
    helper.setText("<p>hello 大家好,这是一封测试邮件,这封邮件包含两种图片,分别如下</p><p>第一张图片:</p><img src=''cid:p01''/><p>第二张图片:</p><img src=''cid:p02''/>",true);
    // 第一个参数指的是html中占位符的名字,第二个参数就是文件的位置
    helper.addInline("p01",new FileSystemResource(new File("/Users/gamedev/Desktop/压缩.jpeg")));
    helper.addInline("p02",new FileSystemResource(new File("/Users/gamedev/Desktop/瑞文.jpg")));
    javaMailSender.send(mimeMessage);
}
发送的效果如下:
在公司实际开发中,第一种和第三种都不是使用最多的邮件发送方案。因为正常来说,邮件的内容都是比较的丰富的,所以大部分邮件都是通过 HTML 来呈现的,如果直接拼接 HTML 字符串,这样以后不好维护,为了解决这个问题,一般邮件发送,都会有相应的邮件模板。
使用 Thymeleaf 作邮件模板
推荐在 Spring Boot 中使用 Thymeleaf 来构建邮件模板。因为 Thymeleaf 的自动化配置提供了一个 TemplateEngine,通过 TemplateEngine 可以方便的将 Thymeleaf 模板渲染为 HTML ,同时,Thymeleaf 的自动化配置在这里是继续有效的 。
首先,引入 Thymeleaf 依赖:
<dependency>
  <groupId>org.springframework.boot</groupId>
  <artifactId>spring-boot-starter-thymeleaf</artifactId>
 </dependency>
创建Thymeleaf模板:
<!DOCTYPE html>
<html lang="en" xmlns:th="http://www.thymeleaf.org">
<head>
<meta charset="UTF-8">
<title>Title</title>
</head>
<body>
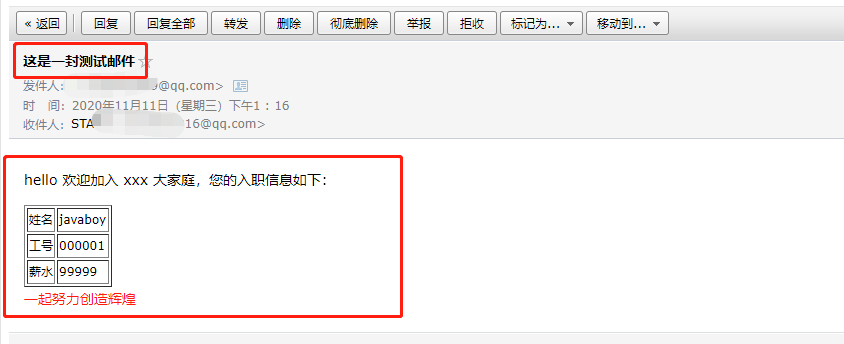
<p>hello 欢迎加入 xxx 大家庭,您的入职信息如下:</p>
<table border="1">
<tr>
<td>姓名</td>
<td th:text="${username}"></td>
</tr>
<tr>
<td>工号</td>
<td th:text="${num}"></td>
</tr>
<tr>
<td>薪水</td>
<td th:text="${salary}"></td>
</tr>
</table>
<div>一起努力创造辉煌</div>
</body>
</html>
发送邮件:
    @Autowired
    TemplateEngine templateEngine;

    @Test
    public void sendThymeleafMail() throws MessagingException {
        MimeMessage mimeMessage = javaMailSender.createMimeMessage();
        MimeMessageHelper helper = new MimeMessageHelper(mimeMessage, true);
        helper.setSubject("这是一封测试邮件");
        helper.setFrom("790933839@qq.com");
        helper.setTo("1032065316@qq.com");
//        helper.setCc("37xxxxx37@qq.com");
//        helper.setBcc("14xxxxx098@qq.com");
        helper.setSentDate(new Date());
      	// 这里引入的是Template的Context
        Context context = new Context();
      	// 设置模板中的变量
        context.setVariable("username", "javaboy");
        context.setVariable("num","000001");
        context.setVariable("salary", "99999");
      	// 第一个参数为模板的名称
        String process = templateEngine.process("hello.html", context);
      	// 第二个参数true表示这是一个html文本
        helper.setText(process,true);
        javaMailSender.send(mimeMessage);
    }
发送的效果如下:
本文参考:http://springboot.javaboy.org/2019/0717/springboot-mail
SpringBoot发送邮件(十一)")
(入门SpringBoot)SpringBoot发送邮件(十一)
SpringBoot配置邮件服务:
1.引入jar
<!-- 邮件 -->
<dependency>
<groupId>org.springframework.boot</groupId>
<artifactId>spring-boot-starter-mail</artifactId>
</dependency>
2.配置资源文件,邮箱参数:
#邮件:邮件服务器
spring.mail.host=smtp.163.com
#发件人邮箱
spring.mail.username=xxx@163.com
#授权码:
spring.mail.password=abc123
#编码:
spring.mail.default-encoding=UTF-8
3.准备发送邮件方法:
service层读取配置文件参数,注入JavaMailSender
@Value("${spring.mail.username}")
private String sender; //读取配置文件中的参数
@Autowired
private JavaMailSender mailSender; //自动注入的Bean
/**
* 发送普通文本:
* @param to 发送人:
* @param subject 发送标题:
* @param context 发送内容:
*/
@Override
public void sendSimpleMail(String to, String subject, String context) {
SimpleMailMessage message = new SimpleMailMessage();
message.setFrom(sender);
message.setTo(to);
message.setSubject(subject);
message.setText(context);
mailSender.send(message);
}
/**
* 发送html:
* @param to 发送人:
* @param subject 发送标题:
* @param context 发送内容:
*/
@Override
public void sendSimpleMailHTML(String to, String subject, String context) {
MimeMessage message = null;
try {
message = mailSender.createMimeMessage();
MimeMessageHelper helper = new MimeMessageHelper(message, true);
helper.setFrom(sender);
helper.setTo(to);
helper.setSubject("标题:发送Html内容");
StringBuffer sb = new StringBuffer();
sb.append("<h1>大标题-h1</h1>")
.append("<pcolor:#F00''>红色字</p>")
.append("<ptext-align:right''>右对齐</p>");
helper.setText(sb.toString(), true);
} catch (Exception e) {
e.printStackTrace();
}
mailSender.send(message);
}
推荐学习网址:https://github.com/ityouknow/awesome-spring-boot

25、springboot发送邮件
啊·虽然现在短信验证已经最流行也是最常用的验证方式;但是邮件验证还是必不可少,依然是网站的必备功能之一。什么注册验证,忘记密码或者是给用户发送营销信息都是可以使用邮件发送功能的。最早期使用JavaMail的相关api来进行发送邮件的功能开发,后来spring整合了JavaMail的相关api推出了JavaMailSender更加简化了邮件发送的代码编写,现在springboot对此进行了封装就有了现在的spring-boot-starter-mail。
1、新建项目sc-mail,对应的pom.xml文件如下
<project xmlns="http://maven.apache.org/POM/4.0.0" xmlns:xsi="http://www.w3.org/2001/XMLSchema-instance"
    xsi:schemaLocation="http://maven.apache.org/POM/4.0.0 http://maven.apache.org/xsd/maven-4.0.0.xsd">
    <modelVersion>4.0.0</modelVersion>

    <groupId>spring-cloud</groupId>
    <artifactId>sc-mail</artifactId>
    <version>0.0.1-SNAPSHOT</version>
    <packaging>jar</packaging>

    <name>sc-mail</name>
    <url>http://maven.apache.org</url>
    <parent>
        <groupId>org.springframework.boot</groupId>
        <artifactId>spring-boot-starter-parent</artifactId>
        <version>2.0.4.RELEASE</version>
    </parent>

    <dependencyManagement>
        <dependencies>
            <dependency>
                <groupId>org.springframework.cloud</groupId>
                <artifactId>spring-cloud-dependencies</artifactId>
                <version>Finchley.RELEASE</version>
                <type>pom</type>
                <scope>import</scope>
            </dependency>

        </dependencies>
    </dependencyManagement>

    <properties>
        <project.build.sourceEncoding>UTF-8</project.build.sourceEncoding>
        <maven.compiler.source>1.8</maven.compiler.source>
        <maven.compiler.target>1.8</maven.compiler.target>
    </properties>

    <dependencies>

        <dependency>
            <groupId>org.springframework.boot</groupId>
            <artifactId>spring-boot-starter-mail</artifactId>
        </dependency>


        <dependency>
            <groupId>org.springframework.boot</groupId>
            <artifactId>spring-boot-starter-test</artifactId>
            <scope>test</scope>
        </dependency>

    </dependencies>
</project>
2、新建配置文件application.yml
spring:
  application:
    name: sc-mail
  mail:
    host: smtp.qq.com #邮箱服务器地址
    port: 465
    username: 515768476@qq.com #用户名
    password: vfcqhwsnnwugbhcx #密码 (改成自己的密码)
    default-encoding: UTF-8
    properties:
      mail:
        smtp:
          ssl:
            enable:
              true
3、新建邮件发送服务类
package sc.mail.service.impl;

import java.io.File;

import javax.mail.internet.MimeMessage;

import org.slf4j.Logger;
import org.slf4j.LoggerFactory;
import org.springframework.beans.factory.annotation.Autowired;
import org.springframework.core.io.FileSystemResource;
import org.springframework.mail.SimpleMailMessage;
import org.springframework.mail.javamail.JavaMailSender;
import org.springframework.mail.javamail.MimeMessageHelper;
import org.springframework.stereotype.Service;

import sc.mail.service.MailService;

@Service
public class MailServiceImpl implements MailService {

    private final Logger logger = LoggerFactory.getLogger(this.getClass());

    @Autowired
    private JavaMailSender mailSender;

    /**
     * 文本
     * @param from
     * @param to
     * @param subject
     * @param content
     */
    @Override
    public void sendSimpleMail(String from, String to, String subject, String content) {
        SimpleMailMessage message = new SimpleMailMessage();
        message.setFrom(from);
        message.setTo(to);
        message.setSubject(subject);
        message.setText(content);
        try {
            mailSender.send(message);
            logger.info("simple mail had send。");
        } catch (Exception e) {
            logger.error("send mail error", e);
        }
    }

    /**
     * @param from
     * @param to
     * @param subject
     * @param content
     */
    public void sendTemplateMail(String from, String to, String subject, String content) {
        MimeMessage message = mailSender.createMimeMessage();
        try {
            //true表示需要创建一个multipart message
            MimeMessageHelper helper = new MimeMessageHelper(message, true);
            helper.setFrom(from);
            helper.setTo(to);
            helper.setSubject(subject);
            helper.setText(content, true);
            mailSender.send(message);
            logger.info("send template success");
        } catch (Exception e) {
            logger.error("send template eror", e);
        }
    }


    /**
     * 附件
     *
     * @param from
     * @param to
     * @param subject
     * @param content
     * @param filePath
     */
    public void sendAttachmentsMail(String from, String to, String subject, String content, String filePath){
        MimeMessage message = mailSender.createMimeMessage();
        try {
            MimeMessageHelper helper = new MimeMessageHelper(message, true);
            helper.setFrom(from);
            helper.setTo(to);
            helper.setSubject(subject);
            helper.setText(content, true);
            FileSystemResource file = new FileSystemResource(new File(filePath));
            String fileName = filePath.substring(filePath.lastIndexOf(File.separator));
            helper.addAttachment(fileName, file);
            mailSender.send(message);
            logger.info("send mail with attach success。");
        } catch (Exception e) {
            logger.error("send mail with attach success", e);
        }
    }


    /**
     * 发送内嵌图片
     *
     * @param from
     * @param to
     * @param subject
     * @param content
     * @param imgPath
     * @param imgId
     */
    public void sendInlineResourceMail(String from, String to, String subject, String content,
            String imgPath, String imgId){
        MimeMessage message = mailSender.createMimeMessage();
        try {
            MimeMessageHelper helper = new MimeMessageHelper(message, true);
            helper.setFrom(from);
            helper.setTo(to);
            helper.setSubject(subject);
            helper.setText(content, true);
            FileSystemResource res = new FileSystemResource(new File(imgPath));
            helper.addInline(imgId, res);
            mailSender.send(message);
            logger.info("send inner resources success。");
        } catch (Exception e) {
            logger.error("send inner resources fail", e);
        }
    }

}
4、新建测试类
package sc.mail;

import org.junit.Test;
import org.junit.runner.RunWith;
import org.springframework.beans.factory.annotation.Autowired;
import org.springframework.boot.test.context.SpringBootTest;
import org.springframework.test.context.junit4.SpringRunner;

import sc.mail.service.MailService;

@RunWith(SpringRunner.class)
@SpringBootTest
public class MailSendTest {

    @Autowired
    private MailService mailService;

    @Test
    public void sendSimpleMailTest() {
        mailService.sendSimpleMail("515768476@qq.com", "happy.huangjinjin@163.com",
                "sendSimpleMailTest", "sendSimpleMailTest from 515768476@qq.com");
    }

    @Test
    public void sendTemplateMailTest() {
        String html = "<html><body>"
                + " <div> "
                + "    sendTemplateMailTest from 515768476@qq.com </br>"
                + "    <b>这是模板邮件</b>"
                + "</div>"
                + "</body></html>";
        mailService.sendTemplateMail("515768476@qq.com", "happy.huangjinjin@163.com",
                "sendTemplateMailTest", html);
    }

    @Test
    public void sendAttachmentsMailTest() {
        String filePath = "D:\\springcloudws\\sc-mail\\src\\main\\java\\sc\\mail\\service\\impl\\MailServiceImpl.java";
        mailService.sendAttachmentsMail("515768476@qq.com", "happy.huangjinjin@163.com",
                "sendAttachmentsMailTest", "sendAttachmentsMailTest from 515768476@qq.com", filePath);
    }

    @Test
    public void sendInlineResourceMailTest() {
        String imgId = "img1";

        String content = "<html><body>"
                + "sendInlineResourceMailTest:<img src=\''cid:" + imgId + "\'' >"
                        + "</body></html>";

        String imgPath = "D:\\springcloudws\\sc-mail\\src\\main\\resources\\20181015223228.jpg";

        mailService.sendInlineResourceMail("515768476@qq.com", "happy.huangjinjin@163.com",
                "sendAttachmentsMailTest", content, imgPath, imgId);
    }

}
5、运行测试类验证是否发送邮件成功
登录happy.huangjinjin@163.com邮箱
简单邮件
模板邮件
附件邮件
内嵌图片邮件


7.6 SpringBoot 读取 Resource 下文件的几种方式
https://www.jianshu.com/p/7d7e5e4e8ae3
最近在项目中涉及到 Excle 的导入功能,通常是我们定义完模板供用户下载,用户按照模板填写完后上传;这里模板位置 resource/excelTemplate/test.xlsx,尝试了四种读取方式,并且测试了四种读取方式分别的 windows 开发环境下 (IDE 中) 读取和生产环境 (linux 下 jar 包运行读取)。
第一种:
ClassPathResource classPathResource = new ClassPathResource("excleTemplate/test.xlsx");
InputStream inputStream =classPathResource.getInputStream();
第二种:
InputStream inputStream = Thread.currentThread().getContextClassLoader().getResourceAsStream("excleTemplate/test.xlsx");第三种:
InputStream inputStream = this.getClass().getResourceAsStream("/excleTemplate/test.xlsx");第四种:
File file = ResourceUtils.getFile("classpath:excleTemplate/test.xlsx");
InputStream inputStream = new FileInputStream(file);
经测试:
前三种方法在开发环境 (IDE 中) 和生产环境 (linux 部署成 jar 包) 都可以读取到,第四种只有开发环境 时可以读取到,生产环境读取失败。
推测主要原因是 springboot 内置 tomcat,打包后是一个 jar 包,因此通过文件读取获取流的方式行不通,因为无法直接读取压缩包中的文件,读取只能通过类加载器读取。
前三种都可以读取到其实殊途同归,直接查看底层代码都是通过类加载器读取文件流,类加载器可以读取 jar 包中的编译后的 class 文件,当然也是可以读取 jar 包中的文件流了。
用解压软件打开 jar 包查看结果如下:
其中 cst 文件中是编译后 class 文件存放位置,excleTemplate 是模板存放位置,类加载器读取的是 cst 下 class 文件,同样可以读取 excleTemplate 下的模板的文件流了。

Spring Boot发送邮件
Spring提供了非常好用的JavaMailSender接口实现邮件发送。在Spring Boot的Starter模块中也为此提供了自动化配置。下面通过实例看看如何在Spring Boot中使用JavaMailSender发送邮件。
快速入门:
那么如何进行使用呢?很简单最核心的就两个步骤:
在Spring Boot的工程中的pom.xml中引入spring-boot-starter-mail依赖:
<!-- 发送邮件. -->
<dependency>
<groupId>org.springframework.boot</groupId>
<artifactId>spring-boot-starter-mail</artifactId>
</dependency>
如其他自动化配置模块一样,在完成了依赖引入之后,只需要在application.properties中配置相应的属性内容。
下面我们以QQ邮箱为例,在application.properties中加入如下配置(注意替换自己的用户名和密码):
########################################################
###mail setting
########################################################
# 设置邮箱主机
spring.mail.host=smtp.qq.com
# 设置用户名
spring.mail.username=用户名
# 设置密码
spring.mail.password=密码
# 设置是否需要认证,如果为true,那么用户名和密码就必须的,
#如果设置false,可以不设置用户名和密码,当然也得看你的对接的平台是否支持无密码进行访问的。
spring.mail.properties.mail.smtp.auth=true
# STARTTLS[1] 是对纯文本通信协议的扩展。它提供一种方式将纯文本连接升级为加密连接(TLS或SSL),而不是另外使用一个端口作加密通信。
spring.mail.properties.mail.smtp.starttls.enable=true
spring.mail.properties.mail.smtp.starttls.required=true
接下来我们通过单元测试来测试简单邮件的发送:
(如何在spring boot进行单元测试可以参看文章:
http://412887952-qq-com.iteye.com/blog/2292739
)
package com.kfit;
import org.junit.Test;
import org.junit.runner.RunWith;
import org.springframework.beans.factory.annotation.Autowired;
import org.springframework.boot.test.SpringApplicationConfiguration;
import org.springframework.mail.SimpleMailMessage;
import org.springframework.mail.javamail.JavaMailSender;
import org.springframework.test.context.junit4.SpringJUnit4ClassRunner;
/**
*
* @author Angel(QQ:412887952)
* @version v.0.1
*/
@RunWith(SpringJUnit4ClassRunner.class)
@SpringApplicationConfiguration(classes = App.class)
public class AppTest {
@Autowired
private JavaMailSender mailSender;
/**
* 修改application.properties的用户,才能发送。
*/
@Test
public void sendSimpleEmail(){
SimpleMailMessage message = new SimpleMailMessage();
message.setFrom("412887952@qq.com");//发送者.
message.setTo("1473773560@qq.com");//接收者.
message.setSubject("测试邮件(邮件主题)");//邮件主题.
message.setText("这是邮件内容");//邮件内容.
mailSender.send(message);//发送邮件
}
}
一个简单的邮件发送就完成了,运行一下该单元测试,看看效果如何?
由于Spring Boot的starter模块提供了自动化配置,所以在引入了spring-boot-starter-mail依赖之后,会根据配置文件中的内容去创建JavaMailSender实例,因此我们可以直接在需要使用的地方直接@Autowired来引入邮件发送对象。
进阶使用:
我们通过使用SimpleMailMessage实现了简单的邮件发送,但是实际使用过程中,我们还可能会带上附件、或是使用邮件模块等。这个时候我们就需要使用MimeMessage来设置复杂一些的邮件内容,下面我们就来依次实现一下。
发送附件
发送附件主要通过MimeMessageHelper来进行操作的,实际中也很简单。
/**
* 测试发送附件.(这里发送图片.)
* @throws MessagingException
*/
@Test
public void sendAttachmentsEmail() throws MessagingException{
//这个是javax.mail.internet.MimeMessage下的,不要搞错了。
MimeMessage mimeMessage = mailSender.createMimeMessage();
MimeMessageHelper helper = new MimeMessageHelper(mimeMessage, true);
//基本设置.
helper.setFrom("412887952@qq.com");//发送者.
helper.setTo("1473773560@qq.com");//接收者.
helper.setSubject("测试附件(邮件主题)");//邮件主题.
helper.setText("这是邮件内容(有附件哦.)");//邮件内容.
//org.springframework.core.io.FileSystemResource下的:
//附件1,获取文件对象.
FileSystemResource file1 = new FileSystemResource(newFile("D:/test/head/head1.jpg"));
//添加附件,这里第一个参数是在邮件中显示的名称,也可以直接是head.jpg,但是一定要有文件后缀,不然就无法显示图片了。
helper.addAttachment("头像1.jpg", file1);
//附件2
FileSystemResource file2 = new FileSystemResource(newFile("D:/test/head/head2.jpg"));
helper.addAttachment("头像2.jpg", file2);
mailSender.send(mimeMessage);
}
嵌入静态资源:
除了发送附件之外,我们在邮件内容中可能希望通过嵌入图片等静态资源,让邮件获得更好的阅读体验,而不是从附件中查看具体图片,下面的测试用例演示了如何通过MimeMessageHelper实现在邮件正文中嵌入静态资源。
内嵌图片,给定一个CID值即可,增加附件,使用MimeMessageHelper的addAttachment即可现在一般不会做内嵌图片,因为这样邮件会很大,容易对服务器造成压力,一般做法是使用图片链接另外,如果要做内嵌或发送图片,你应该使用信用较高的邮箱帐户,否则会报错:554 DT:SPM 发送的邮件内容包含了未被许可的信息,或被系统识别为垃圾邮件。请检查是否有用户发送病毒或者垃圾邮件
对于163邮箱服务器会产生的其他问题,参见:http://help.163.com/09/1224/17/5RAJ4LMH00753VB8.html
以下是发送静态资源的核心代码:
/**
* 邮件中使用静态资源.
* @throws Exception
*/
@Test
public void sendInlineMail() throws Exception {
MimeMessage mimeMessage = mailSender.createMimeMessage();
MimeMessageHelper helper = new MimeMessageHelper(mimeMessage, true);
//基本设置.
helper.setFrom("412887952@qq.com");//发送者.
helper.setTo("1473773560@qq.com");//接收者.
helper.setSubject("测试静态资源(邮件主题)");//邮件主题.
// 邮件内容,第二个参数指定发送的是HTML格式
//说明:嵌入图片<img src=''cid:head''/>,其中cid:是固定的写法,而aaa是一个contentId。
helper.setText("<body>这是图片:<img src=''cid:head'' /></body>", true);
FileSystemResource file = new FileSystemResource(newFile("D:/test/head/head1.jpg"));
helper.addInline("head",file);
mailSender.send(mimeMessage);
}
这里需要注意的是addInline函数中资源名称head需要与正文中cid:head对应起来
嵌入图片<img src=''cid:head''/>,其中cid:是固定的写法,而aaa是一个contentId。


模板邮件:
通常我们使用邮件发送服务的时候,都会有一些固定的场景,比如重置密码、注册确认等,给每个用户发送的内容可能只有小部分是变化的。所以,很多时候我们会使用模板引擎来为各类邮件设置成模板,这样我们只需要在发送时去替换变化部分的参数即可。
在Spring Boot中使用模板引擎来实现模板化的邮件发送也是非常容易的,下面我们以freemarker为例实现一下。
引入freemarker模块的依赖:
<!-- 引入模板引擎. -->
<dependency>
<groupId>org.springframework.boot</groupId>
<artifactId>spring-boot-starter-freemarker</artifactId>
</dependency>
加入配置信息:
########################################################
###FREEMARKER (FreeMarkerAutoConfiguration)
########################################################
spring.freemarker.allow-request-override=false
spring.freemarker.cache=true
spring.freemarker.check-template-location=true
spring.freemarker.charset=UTF-8
spring.freemarker.content-type=text/html
spring.freemarker.expose-request-attributes=false
spring.freemarker.expose-session-attributes=false
spring.freemarker.expose-spring-macro-helpers=false
#spring.freemarker.prefix=
#spring.freemarker.request-context-attribute=
#spring.freemarker.settings.*=
#spring.freemarker.suffix=.ftl
#spring.freemarker.template-loader-path=classpath:/templates/ #comma-separated list
在resources/templates/下,创建一个模板页面email.ftl:
<html>
<body>
<h3>你好, ${username}, 这是一封模板邮件!</h3>
</body>
</html>
最后,我们在单元测试中加入发送模板邮件的测试用例,具体如下:
/**
* 模板邮件;
* @throws Exception
*/
@Test
public void sendTemplateMail() throws Exception {
MimeMessage mimeMessage = mailSender.createMimeMessage();
MimeMessageHelper helper = new MimeMessageHelper(mimeMessage, true);
//基本设置.
helper.setFrom("412887952@qq.com");//发送者.
helper.setTo("1473773560@qq.com");//接收者.
helper.setSubject("模板邮件(邮件主题)");//邮件主题.
Map<String, Object> model = new HashMap<String, Object>();
model.put("username", "林峰");
Configuration cfg = new Configuration(Configuration.VERSION_2_3_23);
// 设定去哪里读取相应的ftl模板
cfg.setClassForTemplateLoading(this.getClass(), "/templates");
// 在模板文件目录中寻找名称为name的模板文件
Template template = cfg.getTemplate("email.ftl");
String html = FreeMarkerTemplateUtils.processTemplateIntoString(template, model);
helper.setText(html, true);
mailSender.send(mimeMessage);
}
运行一下,就可以收到内容为你好,林峰, 这是一封模板邮件!的邮件。这里,我们通过传入username的参数,在邮件内容中替换了模板中的${username}变量。
我们今天的关于springboot发送邮件的几种方式和springboot发送邮件的步骤的分享就到这里,谢谢您的阅读,如果想了解更多关于(入门SpringBoot)SpringBoot发送邮件(十一)、25、springboot发送邮件、7.6 SpringBoot 读取 Resource 下文件的几种方式、Spring Boot发送邮件的相关信息,可以在本站进行搜索。
本文标签:


