本文的目的是介绍lapis项目添加prometheus监控的详细情况,特别关注prometheus监控配置的相关信息。我们将通过专业的研究、有关数据的分析等多种方式,为您呈现一个全面的了解lapis项
本文的目的是介绍lapis 项目添加 prometheus 监控的详细情况,特别关注prometheus 监控配置的相关信息。我们将通过专业的研究、有关数据的分析等多种方式,为您呈现一个全面的了解lapis 项目添加 prometheus 监控的机会,同时也不会遗漏关于Echo 框架:添加 Prometheus 监控、Gin 框架:添加 Prometheus 监控、GoFrame 框架:添加 Prometheus 监控、istio prometheus 预警 Prometheus AlertManager 安装 -- 误区的知识。
本文目录一览:- lapis 项目添加 prometheus 监控(prometheus 监控配置)
- Echo 框架:添加 Prometheus 监控
- Gin 框架:添加 Prometheus 监控
- GoFrame 框架:添加 Prometheus 监控
- istio prometheus 预警 Prometheus AlertManager 安装 -- 误区
")
lapis 项目添加 prometheus 监控(prometheus 监控配置)
lapis 是基于 openresty 扩展的,所以直接将支持 prometheus 的模块构建进 openresty 就可以了
我使用的是 nginx-module-vts 模块
环境准备
我已经构建好了支持的基础镜像,可以直接配置即可,具体的可以看下面的参考资料
- docker-compose 文件
version: "3"
services:
 api:
   build: ./
   ports:
   - "8080:8080"
   volumes:
- "./web:/web"- dockerfile
FROM dalongrong/lapis-1.7.0:metrics
ENTRYPOINT [ "lapis","server" ]- dalongrong/lapis-1.7.0:metrics 镜像
FROM dalongrong/openresty-nginx-module-vts:fat
RUN apk add openssl-dev
WORKDIR /web
RUN /usr/local/openresty/luajit/bin/luarocks install lapis- dalongrong/openresty-nginx-module-vts:fat 镜像
可以参考 https://github.com/rongfengliang/openresty-nginx-module-vts - nginx.conf 配置 vts 支持
主要是 web 中 nginx.conf 模版的添加
worker_processes ${{NUM_WORKERS}};
error_log stderr notice;
daemon off;
pid logs/nginx.pid;

events {
  worker_connections 1024;
}

http {
  include mime.types;
  vhost_traffic_status_zone;
  server {
    listen ${{PORT}};
    lua_code_cache ${{CODE_CACHE}};
    vhost_traffic_status_filter_by_set_key $uri uris::$server_name;
    vhost_traffic_status_filter_by_host on;
    location / {
      vhost_traffic_status_bypass_limit on;
      default_type text/html;
      content_by_lua ''
        require("lapis").serve("app")
      '';
    }
    location /status {
        vhost_traffic_status_display;
        vhost_traffic_status_display_format html;
    }
    location /static/ {
      alias static/;
    }

    location /favicon.ico {
      alias static/favicon.ico;
    }
  }
}
启动 && 测试
- 启动
docker-compose up -d- 效果
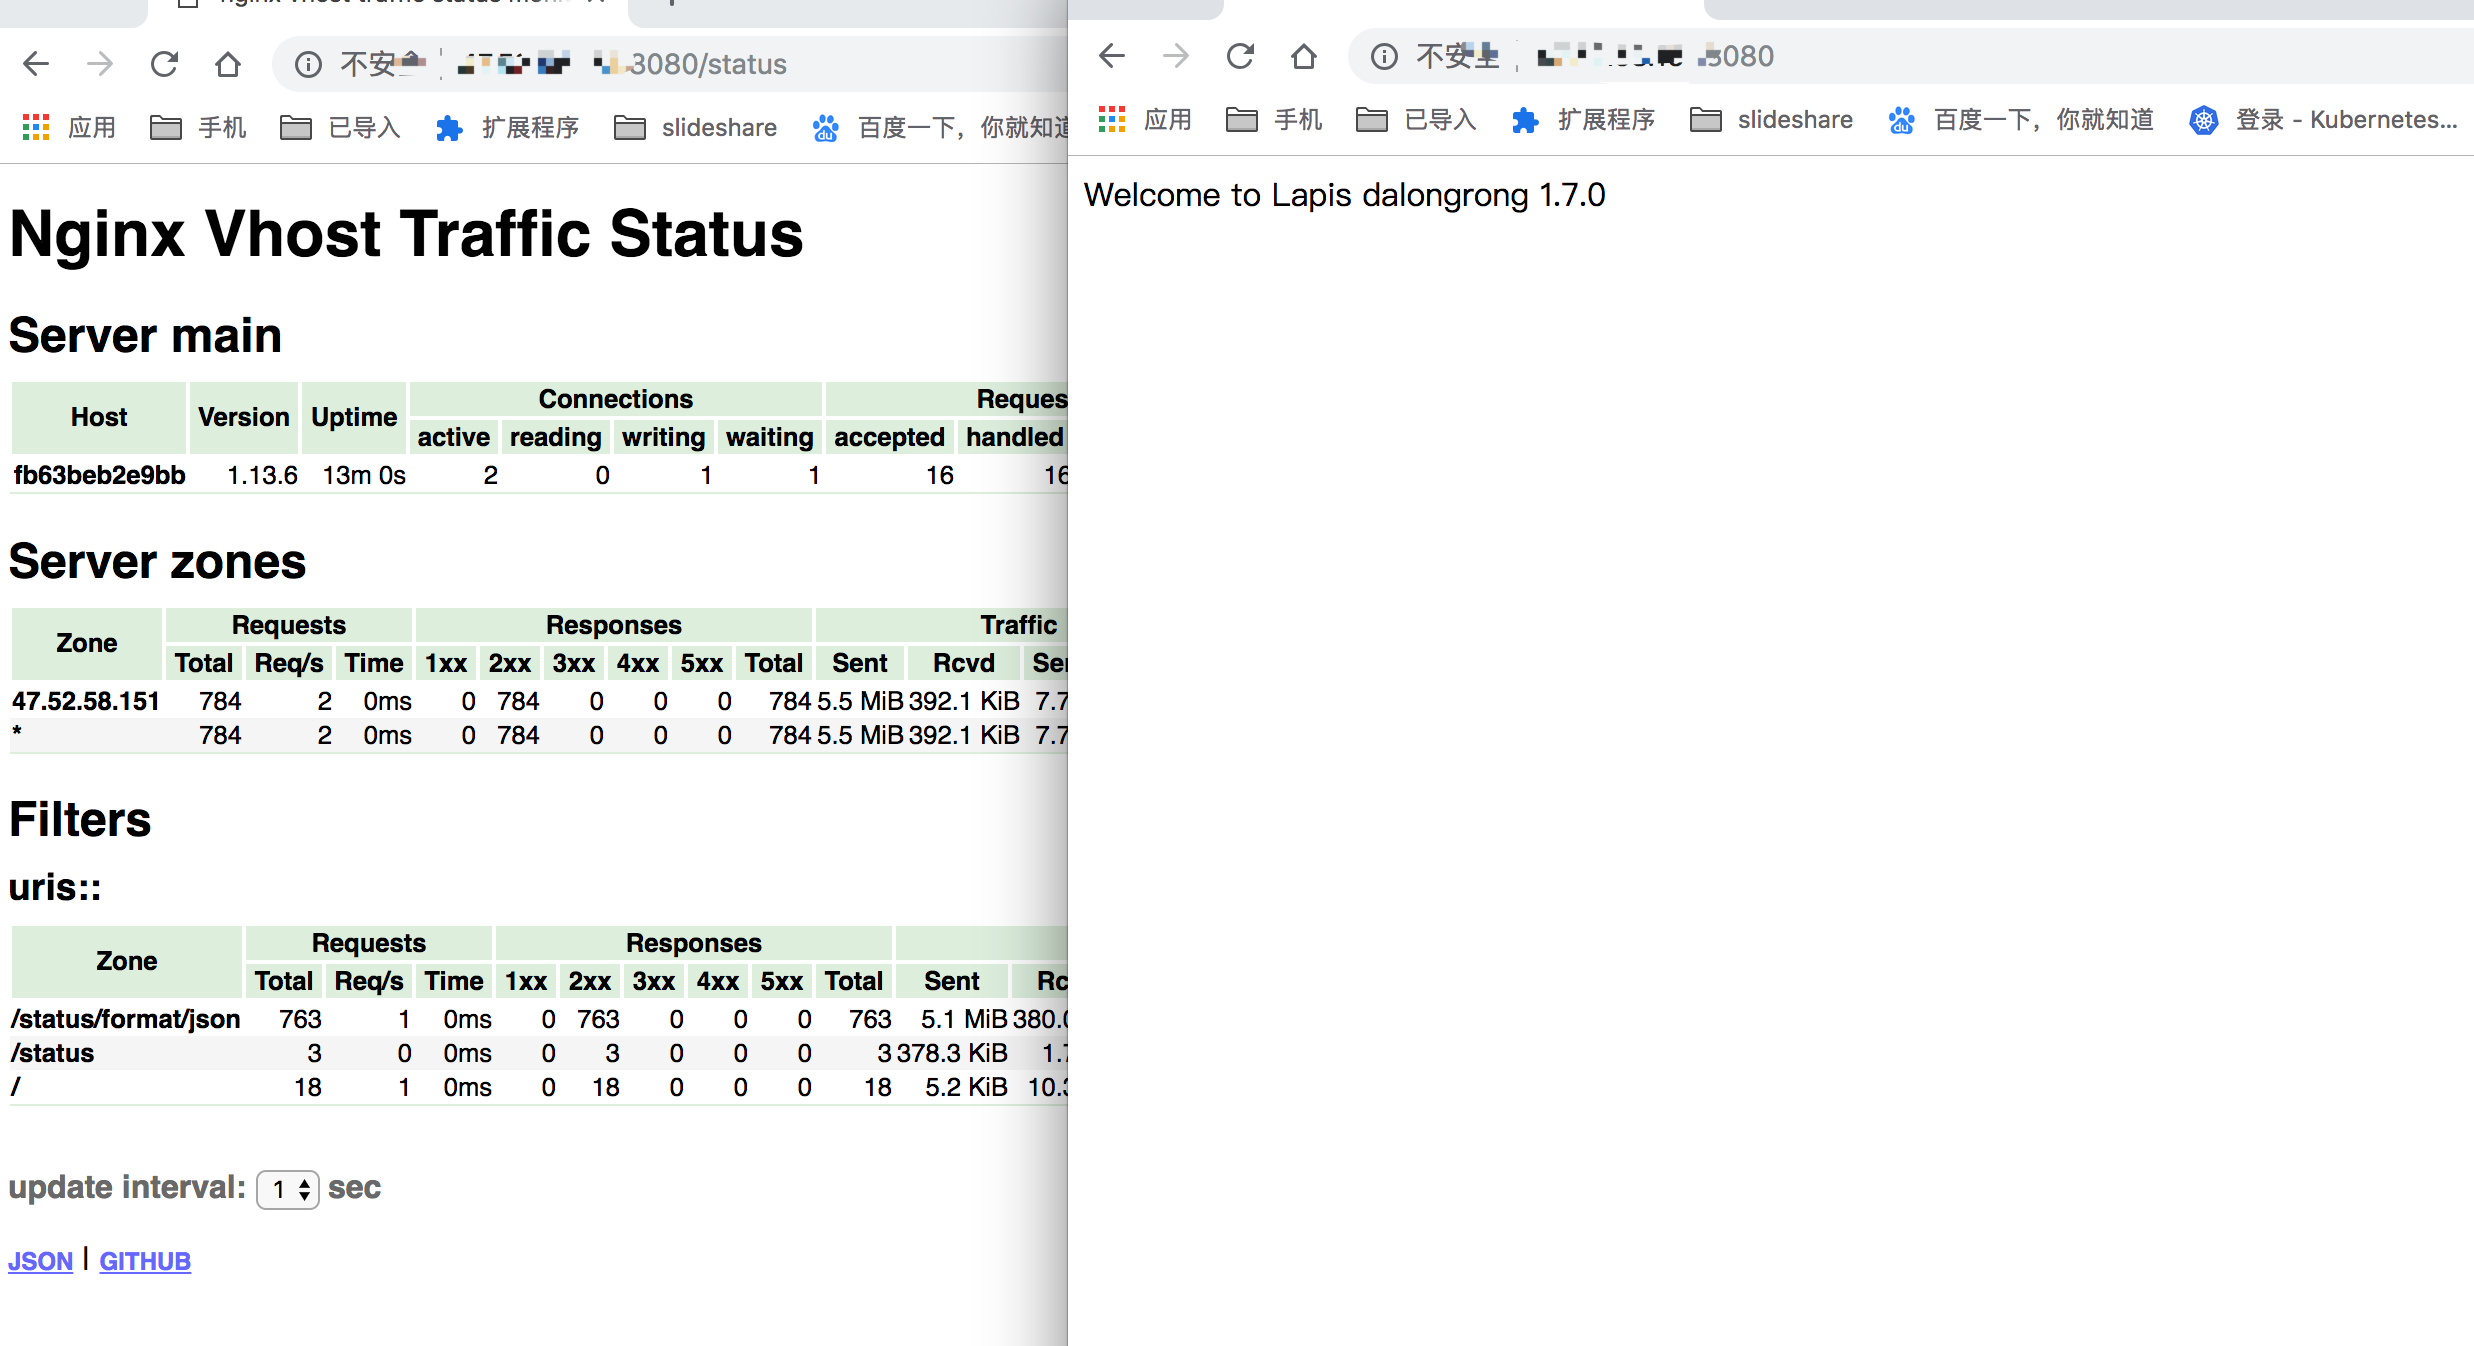
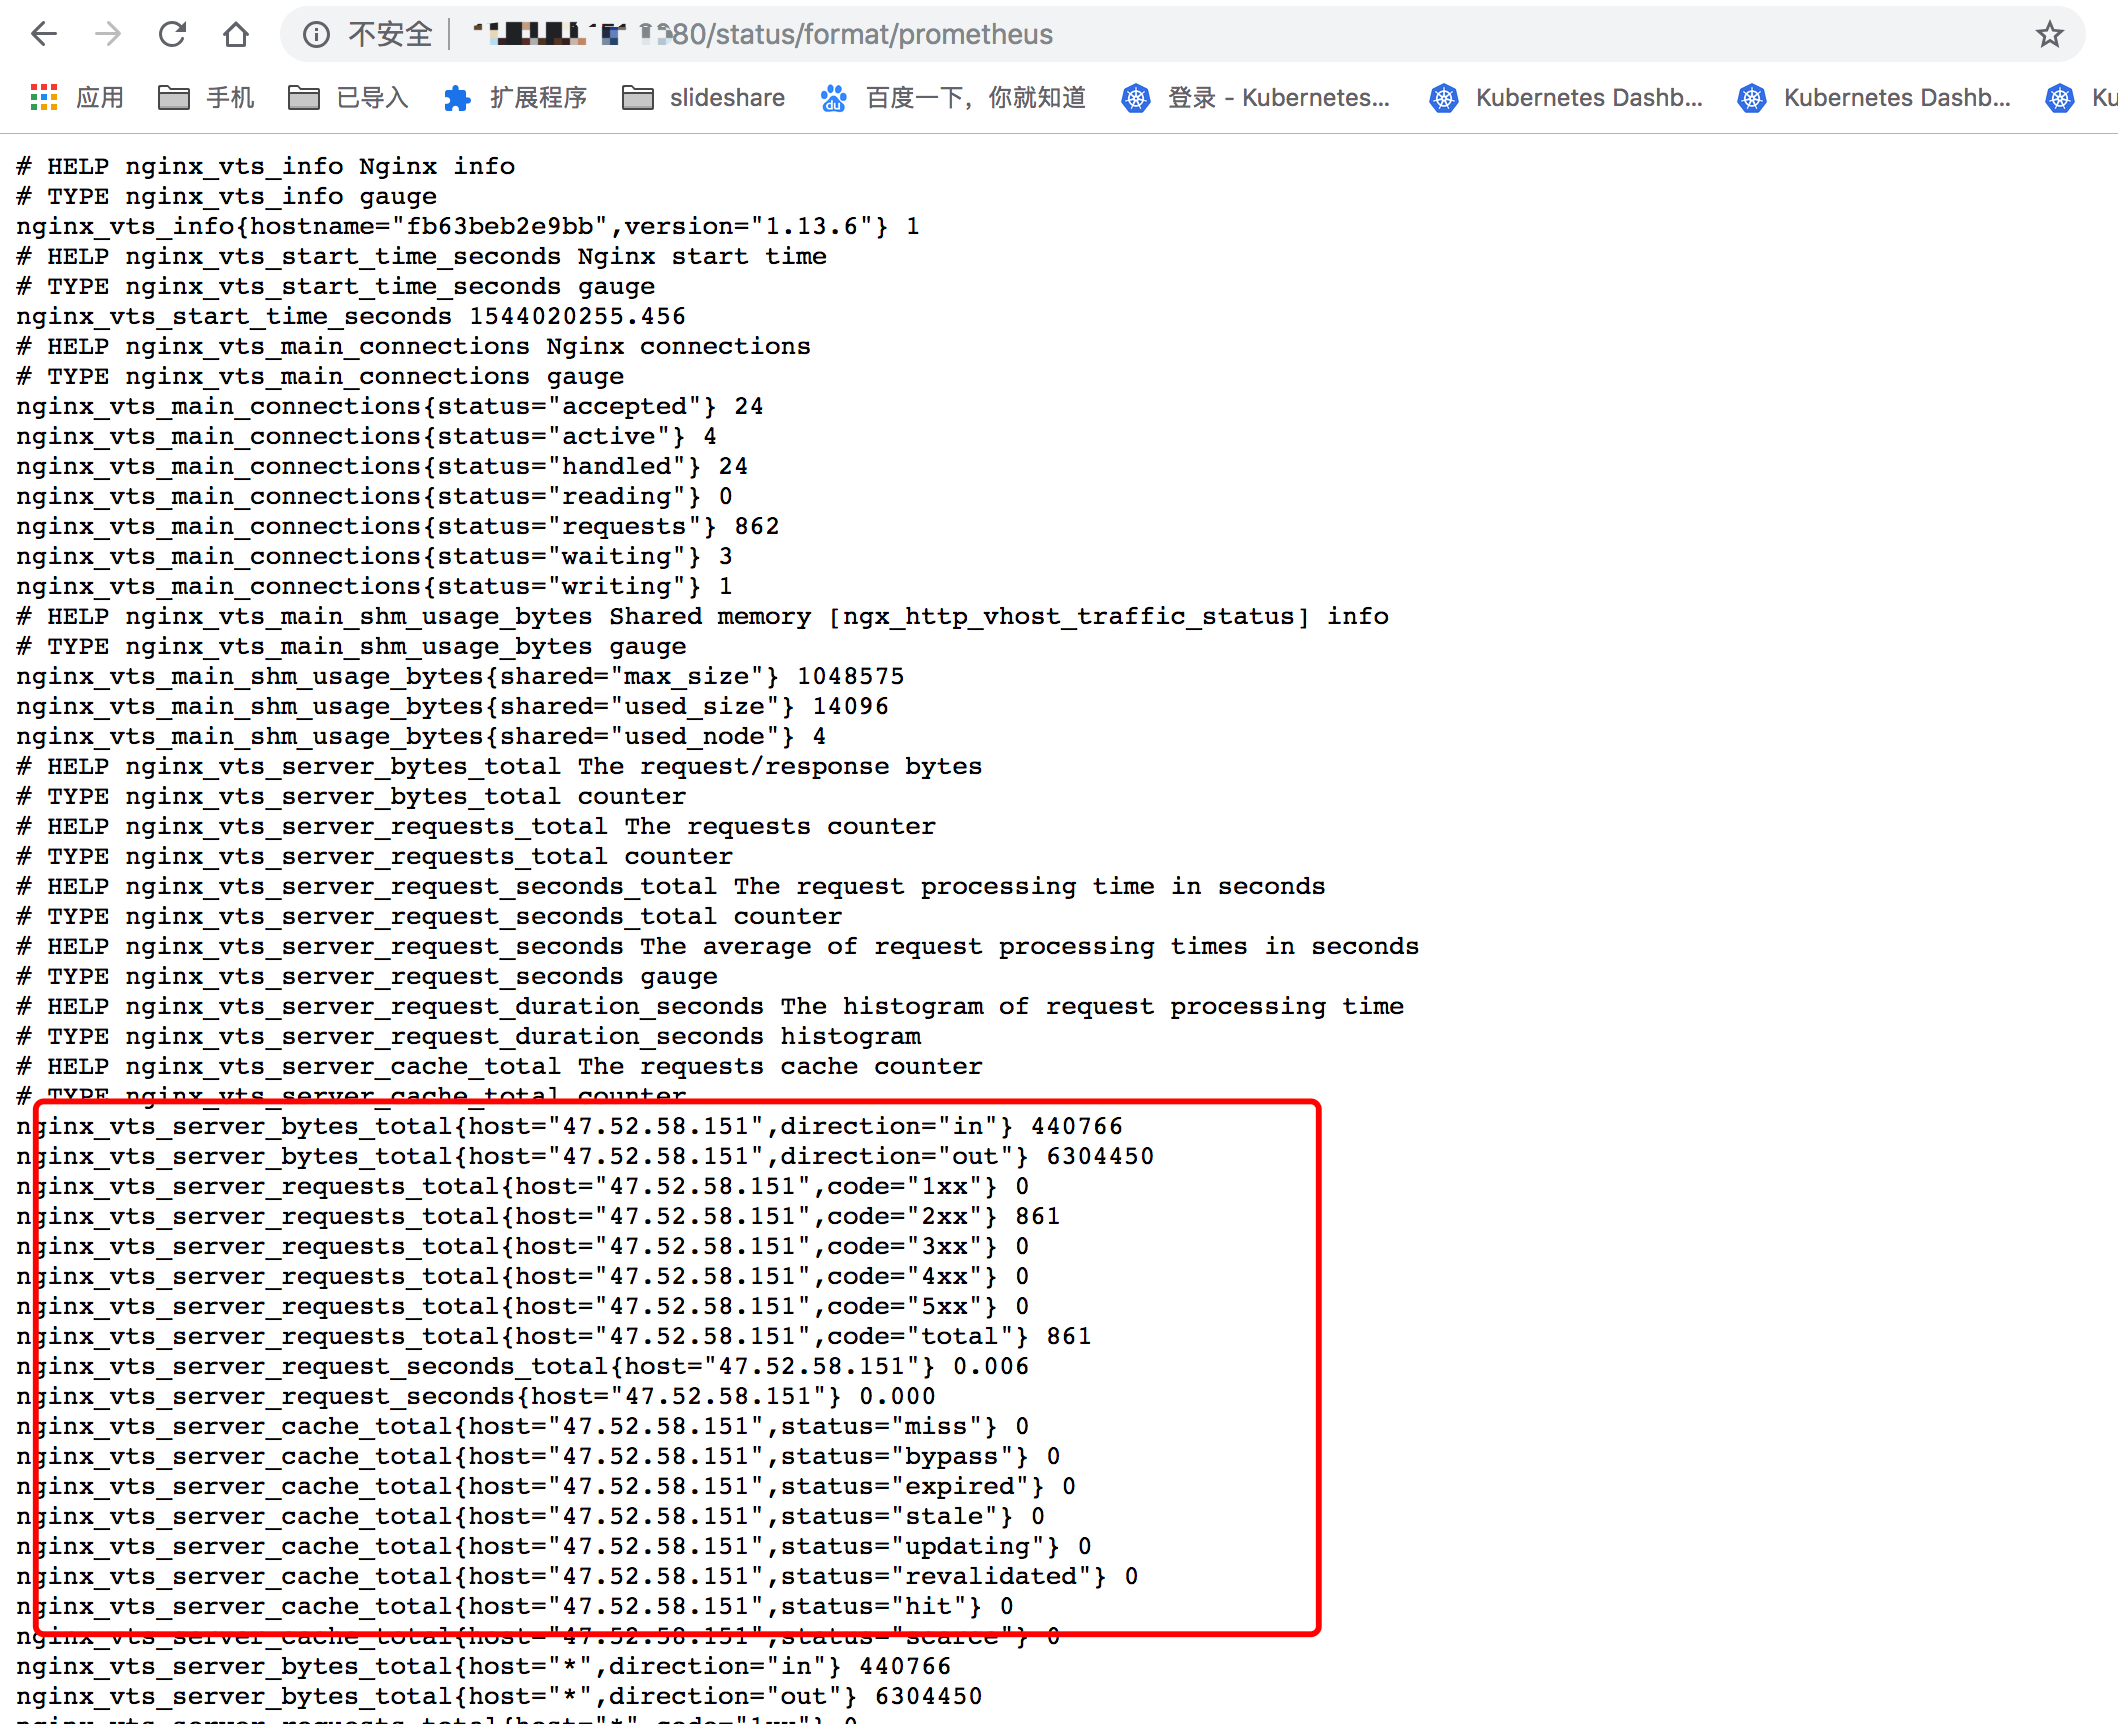
prometheus metrics
参考资料
https://github.com/rongfengliang/openresty-nginx-module-vts
https://github.com/rongfengliang/openresty_nginx-module-vts_prometheus_grafana
https://github.com/rongfengliang/lapis-docker

Echo 框架:添加 Prometheus 监控

介绍
通过一个完整例子,在基于 Echo 框架的微服务中添加 Prometheus 监控。
Echo 框架监控中间件,会在后续的文章中介绍。
我们将会使用 rk-boot 来启动 Echo 基于框架的微服务。
请访问如下地址获取完整教程:
- https://rkdocs.netlify.app/cn
安装
go get github.com/rookie-ninja/rk-boot
go get github.com/rookie-ninja/rk-echo
快速开始
1.创建 boot.yaml
boot.yaml 文件描述了 Echo 框架启动的原信息,rk-boot 通过读取 boot.yaml 来启动 Echo。
---
echo:
  - name: greeter
    port: 8080
    enabled: true
    prom:
      enabled: true      # Enable prometheus client
#      path: "metrics"   # Default value is "metrics", set path as needed.
2.创建 main.go
package main

import (
	"context"
	"github.com/rookie-ninja/rk-boot"
	_ "github.com/rookie-ninja/rk-echo/boot"
)

// Application entrance.
func main() {
	// Create a new boot instance.
	boot := rkboot.NewBoot()

	// Bootstrap
	boot.Bootstrap(context.Background())

	// Wait for shutdown sig
	boot.WaitForShutdownSig(context.Background())
}
3.启动 main.go
$ go run main.go
4.验证
访问: http://localhost:8080/metrics

Prometheus 客户端中添加监控
我们需要先了解 Prometheus 中的如下概念。

| 名字 | 详情 |
|---|---|
| MetricsSet | RK 自定义的结构,通过 MetricsSet 注册 Prometheus 的 Counter,Gauge,Histogram 和 Summary |
| Prometheus Registerer | Prometheus 会通过 Registrerer 来管理 Counter,Gauge,Histogram 和 Summary |
| Prometheus Counter | Counter 是一个累积度量,表示单个单调增加的计数器,其值只能增加或重置为零 |
| Prometheus Gauge | Gauge 值可以随意加减 |
| Prometheus Histogram | Histogram 进行采样(通常是请求持续时间或响应大小之类的内容)并将它们计算在可配置的桶中,同时还提供所有观测值的总和 |
| Prometheus Summary | 与 Histogram 类似,摘要样本观察(通常是请求持续时间和响应大小之类的东西) |
| Prometheus Namespace | Prometheus 监控名格式: namespace_subSystem_metricsName |
| Prometheus SubSystem | Prometheus 监控名格式: namespace_subSystem_metricsName |
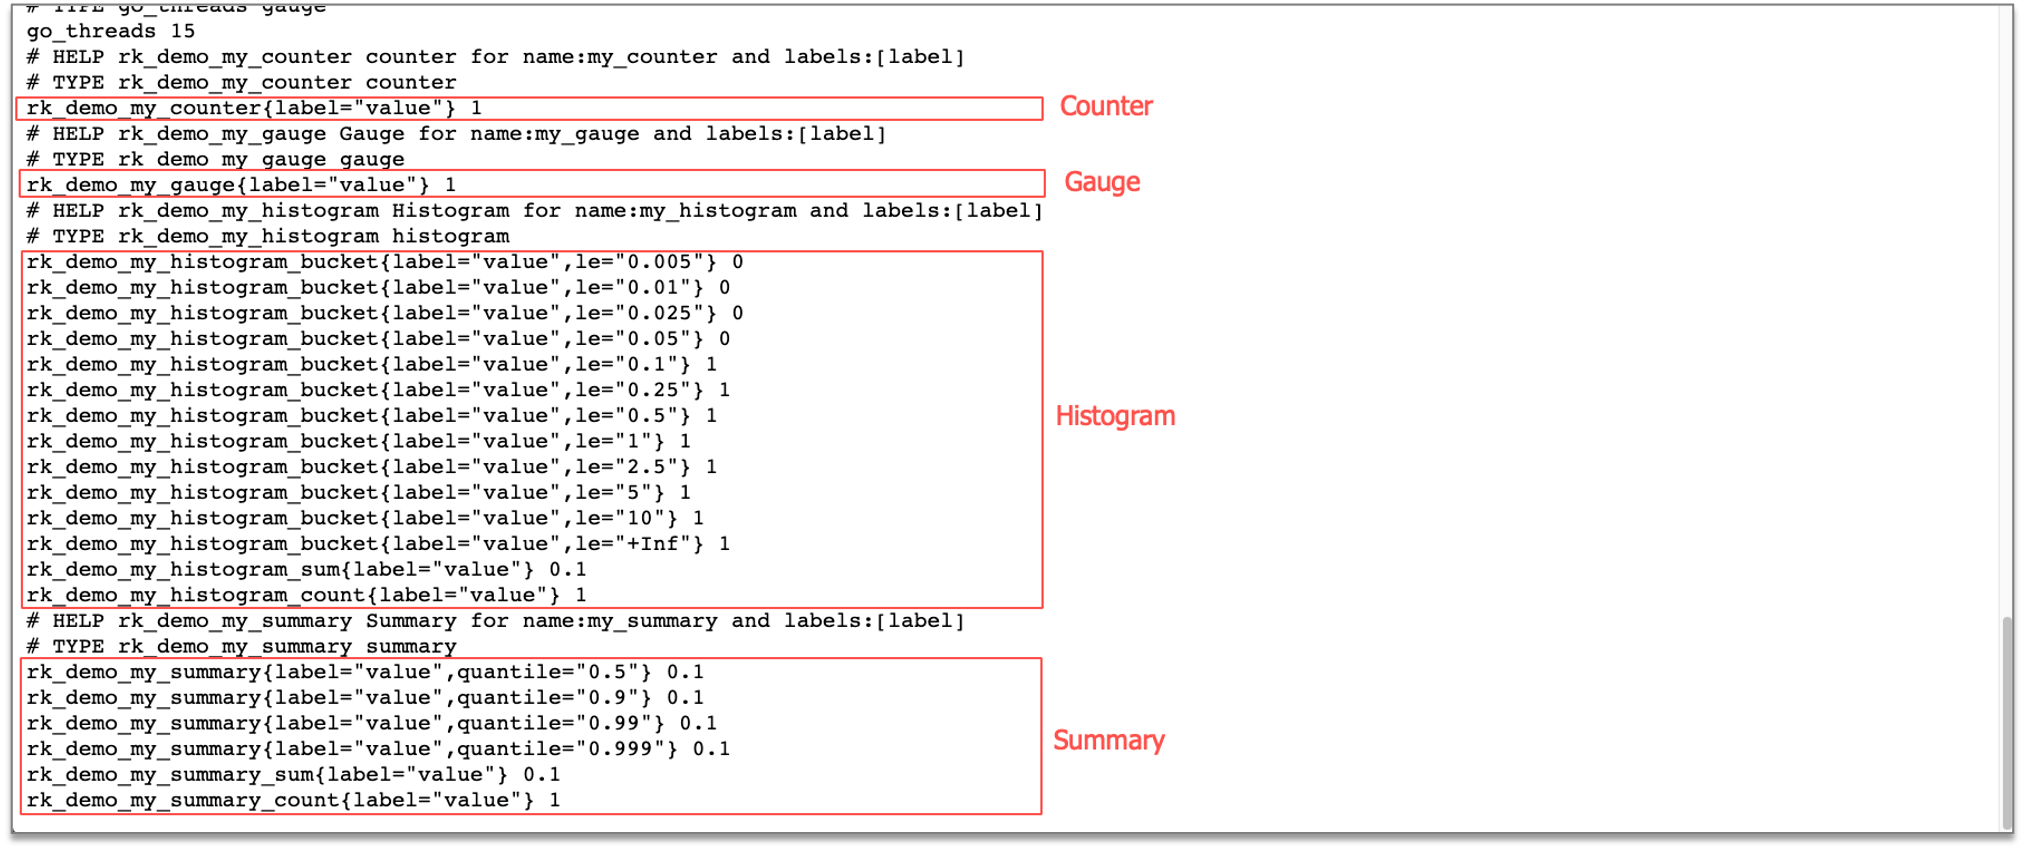
1.在 main.go 中添加监控项
package main

import (
	"context"
	"github.com/rookie-ninja/rk-boot"
	"github.com/rookie-ninja/rk-echo/boot"
	"github.com/rookie-ninja/rk-prom"
)

// Application entrance.
func main() {
	// Create a new boot instance.
	boot := rkboot.NewBoot()

	// Bootstrap
	boot.Bootstrap(context.Background())

	// Create a metrics set into prometheus.Registerer
	set := rkprom.NewMetricsSet("rk", "demo",boot.GetEntry("greeter").(*rkecho.EchoEntry).PromEntry.Registerer)

	// Register counter, gauge, histogram, summary
	set.RegisterCounter("my_counter", "label")
	set.RegisterGauge("my_gauge", "label")
	set.RegisterHistogram("my_histogram", []float64{}, "label")
	set.RegisterSummary("my_summary", rkprom.SummaryObjectives, "label")

	// Increase counter, gauge, histogram, summary with label value
	set.GetCounterWithValues("my_counter", "value").Inc()
	set.GetGaugeWithValues("my_gauge", "value").Add(1.0)
	set.GetHistogramWithValues("my_histogram", "value").Observe(0.1)
	set.GetSummaryWithValues("my_summary", "value").Observe(0.1)

	// Wait for shutdown sig
	boot.WaitForShutdownSig(context.Background())
}
2.启动 main.go
$ go run main.go
3.验证
访问: http://localhost:8080/metrics
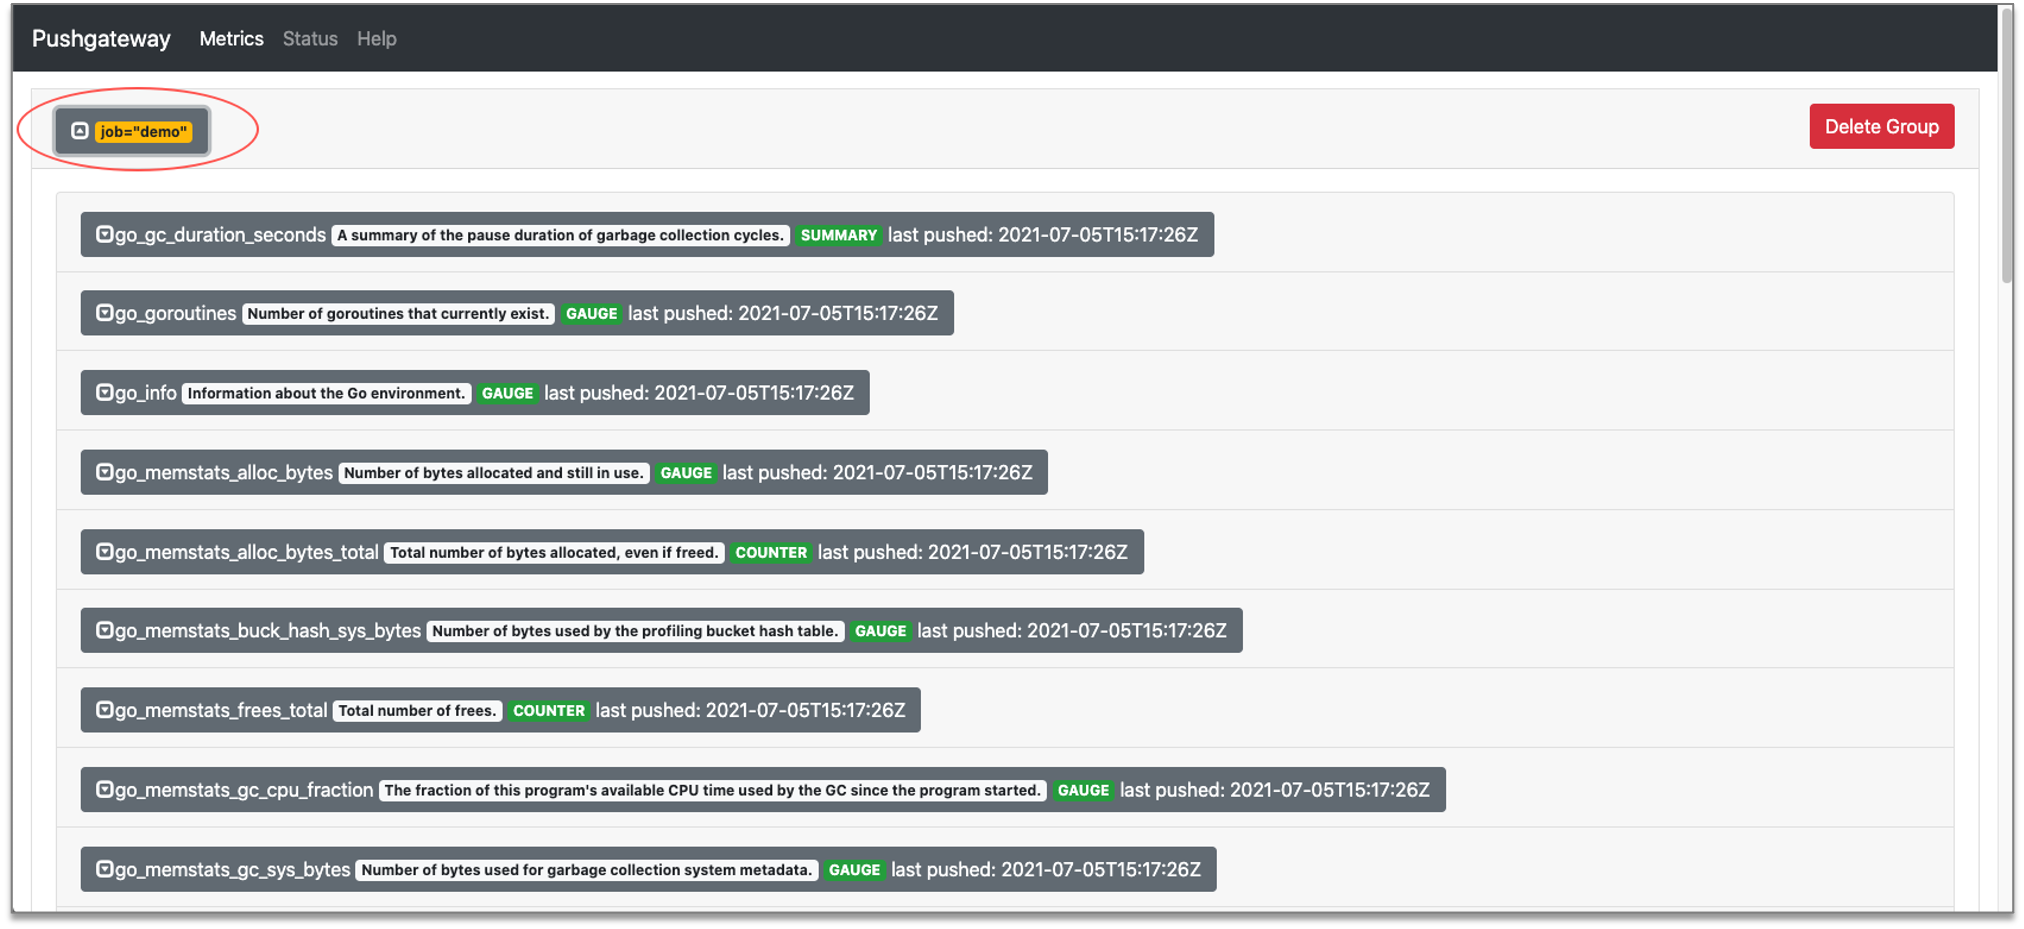
推送到 pushgateway
接下来,我们看一下,如何自动把监控数据推送到远程 pushgateway 中。
1.boot.yaml 中启动 pusher
---
echo:
  - name: greeter
    port: 8080
    enabled: true
    prom:
      enabled: true                         # Enable prometheus client
      pusher:
        enabled : true                      # Enable backend job push metrics to remote pushgateway
        jobName: "demo"                     # Name of current push job
        remoteAddress: "localhost:9091"     # Remote address of pushgateway
        intervalMs: 2000                    # Push interval in milliseconds
#        basicAuth: "user:pass"             # Basic auth of pushgateway
#        cert:
#          ref: "ref"                       # Cert reference defined in CertEntry. Please see advanced user guide for details.
2.在本地启动 pushgateway
我们使用 docker 启动 pushgateway
$ docker run prom/pushgateway -p 9091:9091
3.启动 main.go
$ go run main.go
4.验证
访问: http://localhost:9091/metrics

完整选项
| 名字 | 描述 | 类型 | 默认值 |
|---|---|---|---|
| echo.prom.enabled | 启动 prometheus | boolean | false |
| echo.prom.path | Prometheus Web 路径 | string | /metrics |
| echo.prom.pusher.enabled | 启动 prometheus pusher | bool | false |
| echo.prom.pusher.jobName | JobName 将会以标签的形式添加到监控指标,并推送到远程 pushgateway | string | "" |
| echo.prom.pusher.remoteAddress | Pushgateway 远程地址, http://x.x.x.x 或者 x.x.x.x | string | "" |
| echo.prom.pusher.intervalMs | 推送间隔(毫秒) | string | 1000 |
| echo.prom.pusher.basicAuth | 远程 Pushgateway 的 Basic auth。 格式:[user:pass] | string | "" |
| echo.prom.pusher.cert.ref | rkentry.CertEntry 的引用,请参考官网高级指南 | string | "" |

Gin 框架:添加 Prometheus 监控

介绍
通过一个完整例子,往 Gin 框架微服务中添加 Prometheus 监控。
Gin 框架监控中间件,会在后续的文章中介绍。
我们将会使用 rk-boot 来启动 Gin 框架微服务。
请访问如下地址获取完整教程:
- https://rkdocs.netlify.app/cn
安装
go get github.com/rookie-ninja/rk-boot
go get github.com/rookie-ninja/rk-gin
快速开始
1.创建 boot.yaml
boot.yaml 文件描述了 Gin 框架启动的原信息,rk-boot 通过读取 boot.yaml 来启动 Gin。
---
gin:
  - name: greeter
    port: 8080
    enabled: true
    prom:
      enabled: true      # Enable prometheus client
#      path: "metrics"   # Default value is "metrics", set path as needed.
2.创建 main.go
package main

import (
	"context"
	"github.com/rookie-ninja/rk-boot"
	_ "github.com/rookie-ninja/rk-gin/boot"
)

// Application entrance.
func main() {
	// Create a new boot instance.
	boot := rkboot.NewBoot()

	// Bootstrap
	boot.Bootstrap(context.Background())

	// Wait for shutdown sig
	boot.WaitForShutdownSig(context.Background())
}
3.启动 main.go
$ go run main.go
4.验证
访问: http://localhost:8080/metrics
Prometheus 客户端中添加监控
我们需要先了解 Prometheus 中的如下概念。

| 名字 | 详情 |
|---|---|
| MetricsSet | RK 自定义的结构,通过 MetricsSet 注册 Prometheus 的 Counter,Gauge,Histogram 和 Summary |
| Prometheus Registerer | Prometheus 会通过 Registrerer 来管理 Counter,Gauge,Histogram 和 Summary |
| Prometheus Counter | Counter 是一个累积度量,表示单个单调增加的计数器,其值只能增加或重置为零 |
| Prometheus Gauge | Gauge 值可以随意加减 |
| Prometheus Histogram | Histogram 进行采样(通常是请求持续时间或响应大小之类的内容)并将它们计算在可配置的桶中,同时还提供所有观测值的总和 |
| Prometheus Summary | 与 Histogram 类似,摘要样本观察(通常是请求持续时间和响应大小之类的东西) |
| Prometheus Namespace | Prometheus 监控名格式: namespace_subSystem_metricsName |
| Prometheus SubSystem | Prometheus 监控名格式: namespace_subSystem_metricsName |
1.在 main.go 中添加监控项
package main

import (
	"context"
	"github.com/rookie-ninja/rk-boot"
	"github.com/rookie-ninja/rk-prom"
	"github.com/rookie-ninja/rk-gin/boot"
)

// Application entrance.
func main() {
	// Create a new boot instance.
	boot := rkboot.NewBoot()

	// Bootstrap
	boot.Bootstrap(context.Background())

	// Create a metrics set into prometheus.Registerer
	set := rkprom.NewMetricsSet("rk", "demo", boot.GetEntry("greeter").(*rkgin.GinEntry).PromEntry.Registerer)

	// Register counter, gauge, histogram, summary
	set.RegisterCounter("my_counter", "label")
	set.RegisterGauge("my_gauge", "label")
	set.RegisterHistogram("my_histogram", []float64{}, "label")
	set.RegisterSummary("my_summary", rkprom.SummaryObjectives, "label")

	// Increase counter, gauge, histogram, summary with label value
	set.GetCounterWithValues("my_counter", "value").Inc()
	set.GetGaugeWithValues("my_gauge", "value").Add(1.0)
	set.GetHistogramWithValues("my_histogram", "value").Observe(0.1)
	set.GetSummaryWithValues("my_summary", "value").Observe(0.1)

	// Wait for shutdown sig
	boot.WaitForShutdownSig(context.Background())
}
2.启动 main.go
$ go run main.go
3.验证
访问: http://localhost:8080/metrics
推送到 pushgateway
接下来,我们看一下,如何自动把监控数据推送到远程 pushgateway 中。
1.boot.yaml 中启动 pusher
---
gin:
  - name: greeter
    port: 8080
    enabled: true
    prom:
      enabled: true                         # Enable prometheus client
      pusher:
        enabled : true                      # Enable backend job push metrics to remote pushgateway
        jobName: "demo"                     # Name of current push job
        remoteAddress: "localhost:9091"     # Remote address of pushgateway
        intervalMs: 2000                    # Push interval in milliseconds
#        basicAuth: "user:pass"             # Basic auth of pushgateway
#        cert:
#          ref: "ref"                       # Cert reference defined in CertEntry. Please see advanced user guide for details.
2.在本地启动 pushgateway
我们使用 docker 启动 pushgateway
$ docker run prom/pushgateway -p 9091:9091
3.启动 main.go
$ go run main.go
4.验证
访问: http://localhost:9091/metrics
完整选项
| 名字 | 描述 | 类型 | 默认值 |
|---|---|---|---|
| gin.prom.enabled | 启动 prometheus | boolean | false |
| gin.prom.path | Prometheus Web 路径 | string | /metrics |
| gin.prom.pusher.enabled | 启动 prometheus pusher | bool | false |
| gin.prom.pusher.jobName | JobName 将会以标签的形式添加到监控指标,并推送到远程 pushgateway | string | "" |
| gin.prom.pusher.remoteAddress | Pushgateway 远程地址, http://x.x.x.x 或者 x.x.x.x | string | "" |
| gin.prom.pusher.intervalMs | 推送间隔(毫秒) | string | 1000 |
| gin.prom.pusher.basicAuth | 远程 Pushgateway 的 Basic auth。 格式:[user:pass] | string | "" |
| gin.prom.pusher.cert.ref | rkentry.CertEntry 的引用,请参考官网高级指南 | string | "" |

GoFrame 框架:添加 Prometheus 监控

介绍
通过一个完整例子,在基于 GoFrame 框架的微服务中添加 Prometheus 监控。
GoFrame 框架监控中间件,会在后续的文章中介绍。
我们将会使用 rk-boot 来启动 GoFrame 微服务。
请访问如下地址获取完整教程:
- https://rkdocs.netlify.app/cn
安装
go get github.com/rookie-ninja/rk-boot
go get github.com/rookie-ninja/rk-gf
快速开始
1.创建 boot.yaml
boot.yaml 文件描述了 GoFrame 框架启动参数,rk-boot 通过读取 boot.yaml 来启动 GoFrame。
---
gf:
  - name: greeter
    port: 8080
    enabled: true
    prom:
      enabled: true      # Enable prometheus client
#      path: "metrics"   # Default value is "metrics", set path as needed.
2.创建 main.go
// Copyright (c) 2021 rookie-ninja
//
// Use of this source code is governed by an Apache-style
// license that can be found in the LICENSE file.
package main

import (
	"context"
	"github.com/rookie-ninja/rk-boot"
	_ "github.com/rookie-ninja/rk-gf/boot"
)

// Application entrance.
func main() {
	// Create a new boot instance.
	boot := rkboot.NewBoot()

	// Bootstrap
	boot.Bootstrap(context.Background())

	// Wait for shutdown sig
	boot.WaitForShutdownSig(context.Background())
}
3.启动 main.go
$ go run main.go
4.验证
访问: http://localhost:8080/metrics

Prometheus 客户端中添加监控
我们需要先了解 Prometheus 中的如下概念。

| 名字 | 详情 |
|---|---|
| MetricsSet | RK 自定义的结构,通过 MetricsSet 注册 Prometheus 的 Counter,Gauge,Histogram 和 Summary |
| Prometheus Registerer | Prometheus 会通过 Registrerer 来管理 Counter,Gauge,Histogram 和 Summary |
| Prometheus Counter | Counter 是一个累积度量,表示单个单调增加的计数器,其值只能增加或重置为零 |
| Prometheus Gauge | Gauge 值可以随意加减 |
| Prometheus Histogram | Histogram 进行采样(通常是请求持续时间或响应大小之类的内容)并将它们计算在可配置的桶中,同时还提供所有观测值的总和 |
| Prometheus Summary | 与 Histogram 类似,摘要样本观察(通常是请求持续时间和响应大小之类的东西) |
| Prometheus Namespace | Prometheus 监控名格式: namespace_subSystem_metricsName |
| Prometheus SubSystem | Prometheus 监控名格式: namespace_subSystem_metricsName |
1.在 main.go 中添加监控项
// Copyright (c) 2021 rookie-ninja
//
// Use of this source code is governed by an Apache-style
// license that can be found in the LICENSE file.
package main

import (
	"context"
	"github.com/rookie-ninja/rk-boot"
	"github.com/rookie-ninja/rk-gf/boot"
	"github.com/rookie-ninja/rk-prom"
)

// Application entrance.
func main() {
	// Create a new boot instance.
	boot := rkboot.NewBoot()

	// Bootstrap
	boot.Bootstrap(context.Background())

	// Create a metrics set into prometheus.Registerer
	set := rkprom.NewMetricsSet("rk", "demo",boot.GetEntry("greeter").(*rkgf.GfEntry).PromEntry.Registerer)

	// Register counter, gauge, histogram, summary
	set.RegisterCounter("my_counter", "label")
	set.RegisterGauge("my_gauge", "label")
	set.RegisterHistogram("my_histogram", []float64{}, "label")
	set.RegisterSummary("my_summary", rkprom.SummaryObjectives, "label")

	// Increase counter, gauge, histogram, summary with label value
	set.GetCounterWithValues("my_counter", "value").Inc()
	set.GetGaugeWithValues("my_gauge", "value").Add(1.0)
	set.GetHistogramWithValues("my_histogram", "value").Observe(0.1)
	set.GetSummaryWithValues("my_summary", "value").Observe(0.1)

	// Wait for shutdown sig
	boot.WaitForShutdownSig(context.Background())
}
2.启动 main.go
$ go run main.go
3.验证
访问: http://localhost:8080/metrics
推送到 pushgateway
接下来,我们看一下,如何自动把监控数据推送到远程 pushgateway 中。
1.boot.yaml 中启动 pusher
---
gf:
  - name: greeter
    port: 8080
    enabled: true
    prom:
      enabled: true                         # Enable prometheus client
      pusher:
        enabled : true                      # Enable backend job push metrics to remote pushgateway
        jobName: "demo"                     # Name of current push job
        remoteAddress: "localhost:9091"     # Remote address of pushgateway
        intervalMs: 2000                    # Push interval in milliseconds
#        basicAuth: "user:pass"             # Basic auth of pushgateway
#        cert:
#          ref: "ref"                       # Cert reference defined in CertEntry. Please see advanced user guide for details.
2.在本地启动 pushgateway
我们使用 docker 启动 pushgateway
$ docker run -p 9091:9091 prom/pushgateway
3.启动 main.go
$ go run main.go
4.验证
访问: http://localhost:9091/metrics

完整选项
| 名字 | 描述 | 类型 | 默认值 |
|---|---|---|---|
| gf.prom.enabled | 启动 prometheus | boolean | false |
| gf.prom.path | Prometheus Web 路径 | string | /metrics |
| gf.prom.pusher.enabled | 启动 prometheus pusher | bool | false |
| gf.prom.pusher.jobName | JobName 将会以标签的形式添加到监控指标,并推送到远程 pushgateway | string | "" |
| gf.prom.pusher.remoteAddress | Pushgateway 远程地址, http://x.x.x.x 或者 x.x.x.x | string | "" |
| gf.prom.pusher.intervalMs | 推送间隔(毫秒) | string | 1000 |
| gf.prom.pusher.basicAuth | 远程 Pushgateway 的 Basic auth。 格式:[user:pass] | string | "" |
| gf.prom.pusher.cert.ref | rkentry.CertEntry 的引用,请参考官网高级指南 | string | "" |

istio prometheus 预警 Prometheus AlertManager 安装 -- 误区
误区:因为 prometheus 是一个 pod 不能重启,所以此方案适用于单独非容器安装的 prometheus。
1. 进入 pod
kubectl exec -n istio-system -it grafana-694477c588-8rbvc /bin/bash
2. 下载安装 Prometheus AlertManager
grafana-cli plugins install camptocamp-prometheus-alertmanager-datasource
3.restart grafana service
service grafana-server restart

4. 查看错误原因
grafana-server -homepath /usr/share/grafana
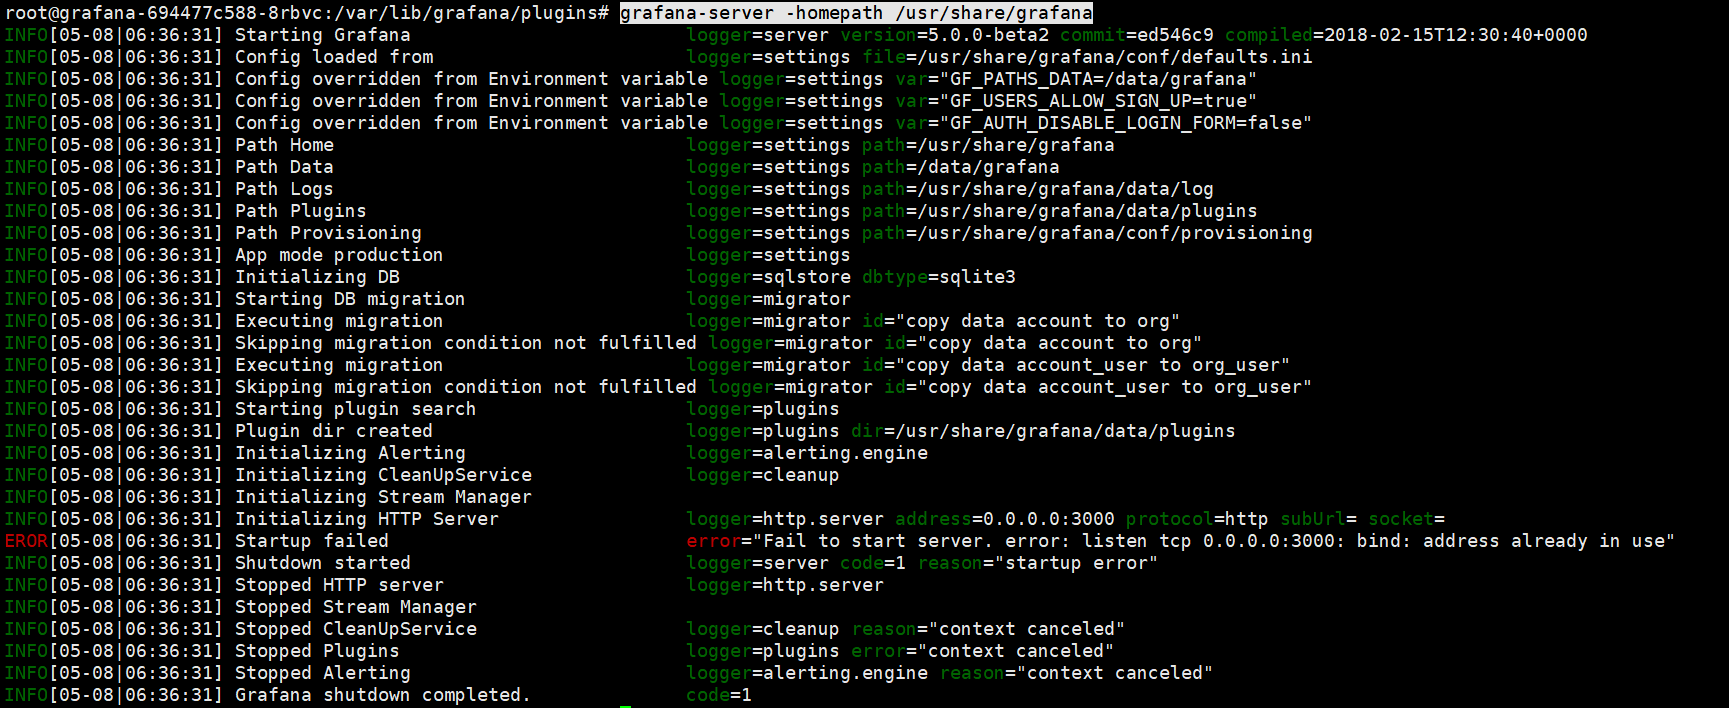
Right. Something is already using port 3000.
Stop the grafana services
systemctl stop grafana.service -l
do a ps aux |grep grafana and kill if any process exits
Then start grafana using
systemctl stop grafana.service -l
Tailf for grafana logs
tailf /var/log/grafana/grafana.log
5. 查看本地安装的 Plugin
grafana-cli plugins ls

service grafana-server restart
今天关于lapis 项目添加 prometheus 监控和prometheus 监控配置的分享就到这里,希望大家有所收获,若想了解更多关于Echo 框架:添加 Prometheus 监控、Gin 框架:添加 Prometheus 监控、GoFrame 框架:添加 Prometheus 监控、istio prometheus 预警 Prometheus AlertManager 安装 -- 误区等相关知识,可以在本站进行查询。
本文标签:


