本篇文章给大家谈谈SpringBoot异步请求,以及springboot异步请求处理的知识点,同时本文还将给你拓展SpringBoot异步请求和异步调用,一文搞定!、SpringBoot两个异步请求的
本篇文章给大家谈谈SpringBoot异步请求,以及springboot异步请求处理的知识点,同时本文还将给你拓展Spring Boot 异步请求和异步调用,一文搞定!、Spring Boot两个异步请求的方法详解、Spring Boot实现异步请求(Servlet 3.0)、Spring Boot异步发送邮件和请求拦截器配置等相关知识,希望对各位有所帮助,不要忘了收藏本站喔。
本文目录一览:- SpringBoot异步请求(springboot异步请求处理)
- Spring Boot 异步请求和异步调用,一文搞定!
- Spring Boot两个异步请求的方法详解
- Spring Boot实现异步请求(Servlet 3.0)
- Spring Boot异步发送邮件和请求拦截器配置
")
SpringBoot异步请求(springboot异步请求处理)
何为异步请求
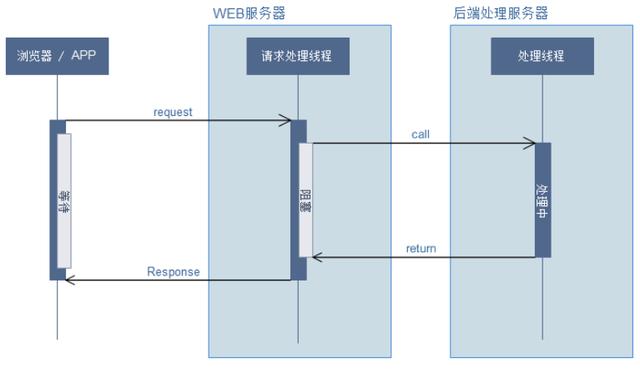
在Servlet 3.0之前,Servlet采用Thread-Per-Request的方式处理请求,即每一次Http请求都由某一个线程从头到尾负责处理。如果一个请求需要进行IO操作,比如访问数据库、调用第三方服务接口等,那么其所对应的线程将同步地等待**IO操作完成, 而IO操作是非常慢的,所以此时的线程并不能及时地释放回线程池以供后续使用,在并发量越来越大的情况下,这将带来严重的性能问题。其请求流程大致为:
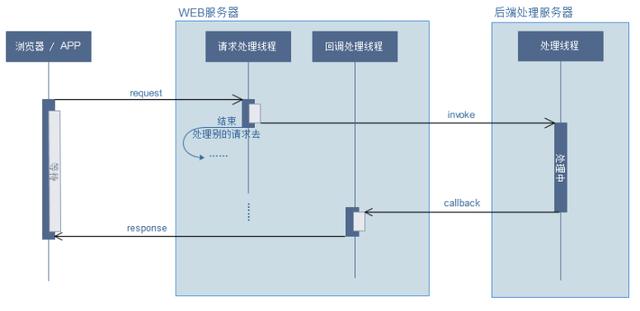
而在Servlet3.0发布后,提供了一个新特性:异步处理请求。可以先释放容器分配给请求的线程与相关资源,减轻系统负担,释放了容器所分配线程的请求,其响应将被延后,可以在耗时处理完成(例如长时间的运算)时再对客户端进行响应。其请求流程为:
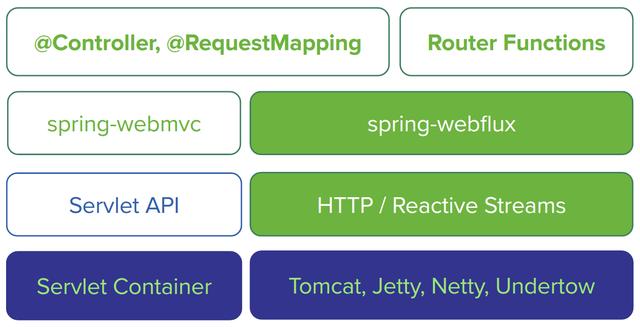
随着Spring5发布,提供了一个响应式Web框架:Spring WebFlux。之后可能就不需要Servlet容器的支持了。以下是其先后对比图:
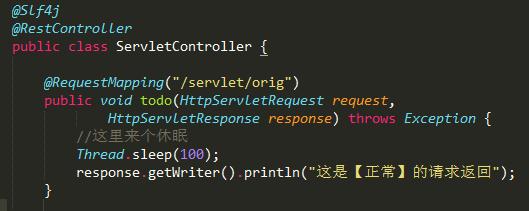
原生异步请求,Servlet方式实现异步请求
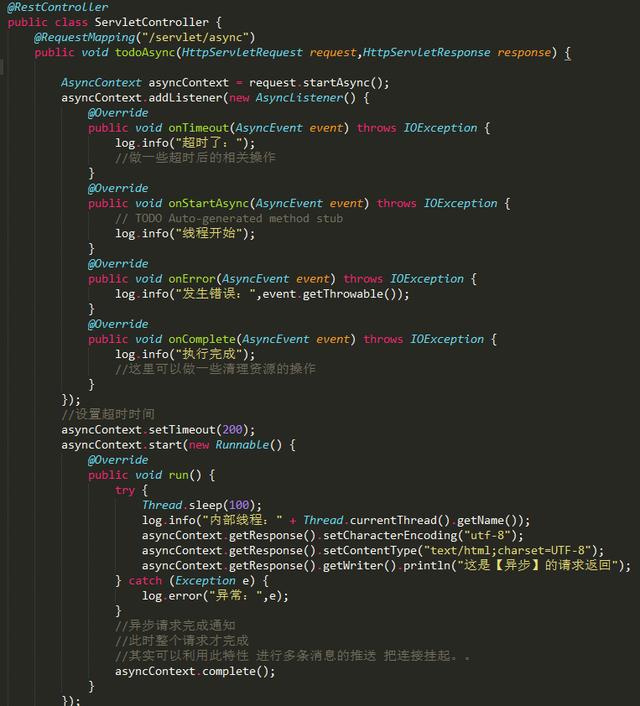
注意:异步请求时,可以利用ThreadPoolExecutor自定义个线程池。
Spring方式实现异步请求
在Spring中,有多种方式实现异步请求,比如callable、DeferredResult或者WebAsyncTask。每个的用法略有不同,可根据不同的业务场景选择不同的方式。以下主要介绍一些常用的用法
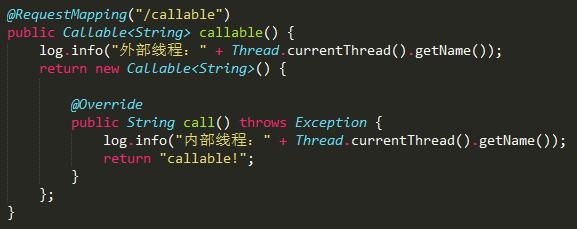
Callable
控制台输出:

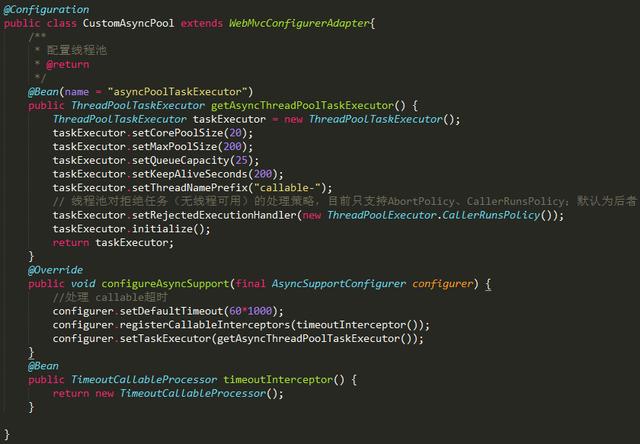
超时、自定义线程设置
从控制台可以看见,异步响应的线程使用的是名为:MvcAsync1的线程。第一次再访问时,就是MvcAsync2了。若采用默认设置,会无限的创建新线程去处理异步请求,所以正常都需要配置一个线程池及超时时间。
编写一个配置类:CustomAsyncPool.java
自定义一个超时异常处理类:CustomAsyncRequestTimeoutException.java

同时,在统一异常处理加入对CustomAsyncRequestTimeoutException类的处理即可,这样就有个统一的配置了。
之后,再运行就可以看见使用了自定义的线程池了,超时的可以自行模拟下:

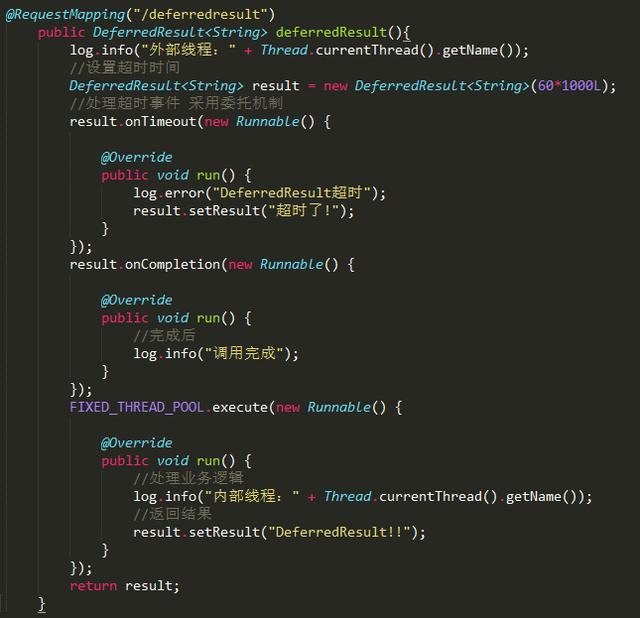
DeferredResult
相比于callable,DeferredResult可以处理一些相对复杂一些的业务逻辑,最主要还是可以在另一个线程里面进行业务处理及返回,即可在两个完全不相干的线程间的通信。
控制台输出:

注意:返回结果时记得调用下setResult方法。
题外话:利用DeferredResult可实现一些长连接的功能,比如当某个操作是异步时,我们可以保存这个DeferredResult对象,当异步通知回来时,我们在找回这个DeferredResult对象,之后在setResult会结果即可。提高性能。
WebAsyncTask
使用方法都类似,只是WebAsyncTask是直接返回了。觉得就是写法不同而已

控制台输出:

总结
主要是讲解了异步请求的使用及相关配置,如超时,异常等处理。设置异步请求时,记得不要忘记设置超时时间。

Spring Boot 异步请求和异步调用,一文搞定!
作者:会炼钢的小白龙
https://www.cnblogs.com/baixi...
一、Spring Boot中异步请求的使用
1、异步请求与同步请求


特点:
可以先释放容器分配给请求的线程与相关资源,减轻系统负担,释放了容器所分配线程的请求,其响应将被延后,可以在耗时处理完成(例如长时间的运算)时再对客户端进行响应。
一句话:增加了服务器对客户端请求的吞吐量(实际生产上我们用的比较少,如果并发请求量很大的情况下,我们会通过nginx把请求负载到集群服务的各个节点上来分摊请求压力,当然还可以通过消息队列来做请求的缓冲)。
2、异步请求的实现
方式一:Servlet方式实现异步请求
@RequestMapping(value = "/email/servletReq", method = GET)
  public void servletReq (HttpServletRequest request, HttpServletResponse response) {
      AsyncContext asyncContext = request.startAsync();
      //设置监听器:可设置其开始、完成、异常、超时等事件的回调处理
      asyncContext.addListener(new AsyncListener() {
          @Override
          public void onTimeout(AsyncEvent event) throws IOException {
              System.out.println("超时了...");
              //做一些超时后的相关操作...
          }
          @Override
          public void onStartAsync(AsyncEvent event) throws IOException {
              System.out.println("线程开始");
          }
          @Override
          public void onError(AsyncEvent event) throws IOException {
              System.out.println("发生错误:"+event.getThrowable());
          }
          @Override
          public void onComplete(AsyncEvent event) throws IOException {
              System.out.println("执行完成");
              //这里可以做一些清理资源的操作...
          }
      });
      //设置超时时间
      asyncContext.setTimeout(20000);
      asyncContext.start(new Runnable() {
          @Override
          public void run() {
              try {
                  Thread.sleep(10000);
                  System.out.println("内部线程:" + Thread.currentThread().getName());
                  asyncContext.getResponse().setCharacterEncoding("utf-8");
                  asyncContext.getResponse().setContentType("text/html;charset=UTF-8");
                  asyncContext.getResponse().getWriter().println("这是异步的请求返回");
              } catch (Exception e) {
                  System.out.println("异常:"+e);
              }
              //异步请求完成通知
              //此时整个请求才完成
              asyncContext.complete();
          }
      });
      //此时之类 request的线程连接已经释放了
      System.out.println("主线程:" + Thread.currentThread().getName());
  }
方式二:使用很简单,直接返回的参数包裹一层callable即可,可以继承WebMvcConfigurerAdapter类来设置默认线程池和超时处理
@RequestMapping(value = "/email/callableReq", method = GET)
  @ResponseBody
  public Callable<String> callableReq () {
      System.out.println("外部线程:" + Thread.currentThread().getName());

      return new Callable<String>() {

          @Override
          public String call() throws Exception {
              Thread.sleep(10000);
              System.out.println("内部线程:" + Thread.currentThread().getName());
              return "callable!";
          }
      };
  }

  @Configuration
  public class RequestAsyncPoolConfig extends WebMvcConfigurerAdapter {

  @Resource
  private ThreadPoolTaskExecutor myThreadPoolTaskExecutor;

  @Override
  public void configureAsyncSupport(final AsyncSupportConfigurer configurer) {
      //处理 callable超时
      configurer.setDefaultTimeout(60*1000);
      configurer.setTaskExecutor(myThreadPoolTaskExecutor);
      configurer.registerCallableInterceptors(timeoutCallableProcessingInterceptor());
  }

  @Bean
  public TimeoutCallableProcessingInterceptor timeoutCallableProcessingInterceptor() {
      return new TimeoutCallableProcessingInterceptor();
  }
}
方式三:和方式二差不多,在Callable外包一层,给WebAsyncTask设置一个超时回调,即可实现超时处理
@RequestMapping(value = "/email/webAsyncReq", method = GET)
    @ResponseBody
    public WebAsyncTask<String> webAsyncReq () {
        System.out.println("外部线程:" + Thread.currentThread().getName());
        Callable<String> result = () -> {
            System.out.println("内部线程开始:" + Thread.currentThread().getName());
            try {
                TimeUnit.SECONDS.sleep(4);
            } catch (Exception e) {
                // TODO: handle exception
            }
            logger.info("副线程返回");
            System.out.println("内部线程返回:" + Thread.currentThread().getName());
            return "success";
        };
        WebAsyncTask<String> wat = new WebAsyncTask<String>(3000L, result);
        wat.onTimeout(new Callable<String>() {

            @Override
            public String call() throws Exception {
                // TODO Auto-generated method stub
                return "超时";
            }
        });
        return wat;
    }
方式四:DeferredResult可以处理一些相对复杂一些的业务逻辑,最主要还是可以在另一个线程里面进行业务处理及返回,即可在两个完全不相干的线程间的通信。
@RequestMapping(value = "/email/deferredResultReq", method = GET)
    @ResponseBody
    public DeferredResult<String> deferredResultReq () {
        System.out.println("外部线程:" + Thread.currentThread().getName());
        //设置超时时间
        DeferredResult<String> result = new DeferredResult<String>(60*1000L);
        //处理超时事件 采用委托机制
        result.onTimeout(new Runnable() {

            @Override
            public void run() {
                System.out.println("DeferredResult超时");
                result.setResult("超时了!");
            }
        });
        result.onCompletion(new Runnable() {

            @Override
            public void run() {
                //完成后
                System.out.println("调用完成");
            }
        });
        myThreadPoolTaskExecutor.execute(new Runnable() {

            @Override
            public void run() {
                //处理业务逻辑
                System.out.println("内部线程:" + Thread.currentThread().getName());
                //返回结果
                result.setResult("DeferredResult!!");
            }
        });
       return result;
    }
二、Spring Boot中异步调用的使用
1、介绍
异步请求的处理。除了异步请求,一般上我们用的比较多的应该是异步调用。通常在开发过程中,会遇到一个方法是和实际业务无关的,没有紧密性的。比如记录日志信息等业务。这个时候正常就是启一个新线程去做一些业务处理,让主线程异步的执行其他业务。
2、使用方式(基于spring下)
需要在启动类加入@EnableAsync使异步调用@Async注解生效
在需要异步执行的方法上加入此注解即可@Async("threadPool"),threadPool为自定义线程池。
代码略。。。就俩标签,自己试一把就可以了
3、注意事项
在默认情况下,未设置TaskExecutor时,默认是使用SimpleAsyncTaskExecutor这个线程池,但此线程不是真正意义上的线程池,因为线程不重用,每次调用都会创建一个新的线程。可通过控制台日志输出可以看出,每次输出线程名都是递增的。所以最好我们来自定义一个线程池。
调用的异步方法,不能为同一个类的方法(包括同一个类的内部类),简单来说,因为Spring在启动扫描时会为其创建一个代理类,而同类调用时,还是调用本身的代理类的,所以和平常调用是一样的。
其他的注解如@Cache等也是一样的道理,说白了,就是Spring的代理机制造成的。所以在开发中,最好把异步服务单独抽出一个类来管理。下面会重点讲述。。
4、什么情况下会导致@Async异步方法会失效?
调用同一个类下注有@Async异步方法:
在spring中像@Async和@Transactional、cache等注解本质使用的是动态代理,其实Spring容器在初始化的时候Spring容器会将含有AOP注解的类对象“替换”为代理对象(简单这么理解),那么注解失效的原因就很明显了,就是因为调用方法的是对象本身而不是代理对象,因为没有经过Spring容器,那么解决方法也会沿着这个思路来解决。
调用的是静态(static )方法
调用(private)私有化方法
5、解决4中问题1的方式(其它2,3两个问题自己注意下就可以了)
将要异步执行的方法单独抽取成一个类,原理就是当你把执行异步的方法单独抽取成一个类的时候,这个类肯定是被Spring管理的,其他Spring组件需要调用的时候肯定会注入进去,这时候实际上注入进去的就是代理类了。
其实我们的注入对象都是从Spring容器中给当前Spring组件进行成员变量的赋值,由于某些类使用了AOP注解,那么实际上在Spring容器中实际存在的是它的代理对象。那么我们就可以通过上下文获取自己的代理对象调用异步方法。
@Controller
@RequestMapping("/app")
public class EmailController {

    //获取ApplicationContext对象方式有多种,这种最简单,其它的大家自行了解一下
    @Autowired
    private ApplicationContext applicationContext;

    @RequestMapping(value = "/email/asyncCall", method = GET)
    @ResponseBody
    public Map<String, Object> asyncCall () {
        Map<String, Object> resMap = new HashMap<String, Object>();
        try{
            //这样调用同类下的异步方法是不起作用的
            //this.testAsyncTask();
            //通过上下文获取自己的代理对象调用异步方法
            EmailController emailController = (EmailController)applicationContext.getBean(EmailController.class);
            emailController.testAsyncTask();
            resMap.put("code",200);
        }catch (Exception e) {
            resMap.put("code",400);
            logger.error("error!",e);
        }
        return resMap;
    }

    //注意一定是public,且是非static方法
    @Async
    public void testAsyncTask() throws InterruptedException {
        Thread.sleep(10000);
        System.out.println("异步任务执行完成!");
    }

}
开启cglib代理,手动获取Spring代理类,从而调用同类下的异步方法。首先,在启动类上加上@EnableAspectJAutoProxy(exposeProxy = true)注解。代码实现,如下:
@Service
@Transactional(value = "transactionManager", readOnly = false, propagation = Propagation.REQUIRED, rollbackFor = Throwable.class)
public class EmailService {

    @Autowired
    private ApplicationContext applicationContext;

    @Async
    public void testSyncTask() throws InterruptedException {
        Thread.sleep(10000);
        System.out.println("异步任务执行完成!");
    }

    public void asyncCallTwo() throws InterruptedException {
        //this.testSyncTask();
//        EmailService emailService = (EmailService)applicationContext.getBean(EmailService.class);
//        emailService.testSyncTask();
        boolean isAop = AopUtils.isAopProxy(EmailController.class);//是否是代理对象;
        boolean isCglib = AopUtils.isCglibProxy(EmailController.class);  //是否是CGLIB方式的代理对象;
        boolean isJdk = AopUtils.isJdkDynamicProxy(EmailController.class);  //是否是JDK动态代理方式的代理对象;
        //以下才是重点!!!
        EmailService emailService = (EmailService)applicationContext.getBean(EmailService.class);
        EmailService proxy = (EmailService) AopContext.currentProxy();
        System.out.println(emailService == proxy ? true : false);
        proxy.testSyncTask();
        System.out.println("end!!!");
    }
}
三、异步请求与异步调用的区别
两者的使用场景不同,异步请求用来解决并发请求对服务器造成的压力,从而提高对请求的吞吐量;而异步调用是用来做一些非主线流程且不需要实时计算和响应的任务,比如同步日志到kafka中做日志分析等。
异步请求是会一直等待response相应的,需要返回结果给客户端的;而异步调用我们往往会马上返回给客户端响应,完成这次整个的请求,至于异步调用的任务后台自己慢慢跑就行,客户端不会关心。
四、总结
异步请求和异步调用的使用到这里基本就差不多了,有问题还希望大家多多指出。这边文章提到了动态代理,而spring中Aop的实现原理就是动态代理,后续会对动态代理做详细解读,还望多多支持哈~
近期热文推荐:
1.Java 15 正式发布, 14 个新特性,刷新你的认知!!
2.终于靠开源项目弄到 IntelliJ IDEA 激活码了,真香!
3.我用 Java 8 写了一段逻辑,同事直呼看不懂,你试试看。。
4.吊打 Tomcat ,Undertow 性能很炸!!
5.《Java开发手册(嵩山版)》最新发布,速速下载!
觉得不错,别忘了随手点赞+转发哦!

Spring Boot两个异步请求的方法详解
在spring 3.2 及以后版本中增加了对请求的异步处理,这篇文章主要介绍了spring boot实现异步请求(servlet 3.0),感兴趣的小伙伴们可以参考一下。
在spring 3.2 及以后版本中增加了对请求的异步处理,旨在提高请求的处理速度降低服务性能消耗。
在我们的请求中做了耗时处理,当并发请求的情况下,为了避免web server的连接池被长期占用而引起性能问题,调用后生成一个非web的服务线程来处理,增加web服务器的吞吐量。
为此 Servlet 3.0 新增了请求的异步处理,Spring 也在此基础上做了封装处理。
本文还是以代码例子的方式说明如何在 Spring Boot 中应用异步请求。
首先说一下几个要点:
1、@WebFilter 和 @WebServlet 注解中的 asyncSupported = true 属性
异步处理的servlet若存在过滤器,则过滤器的注解@WebFilter应设置asyncSupported=true,
否则会报错 A filter or servlet of the current chain does not support asynchronous operations.
2、@EnableAsync 注解
Spring Boot 默认添加了一些拦截 /* 的过滤器,因为 /* 会拦截所有请求,按理说我们也要设置 asyncSupported=true 属性。因为这些过滤器都是 Spring Boot 初始化的,所以它提供了 @EnableAsync 注解来统一配置,该注解只针对 “非 @WebFilter 和 @WebServlet 注解的有效”,所以我们自己定义的 Filter 还是需要自己配置 asyncSupported=true 的。
3、AsyncContext 对象
获取一个异步请求的上下文对象。
4、asyncContext.setTimeout(20 * 1000L);
我们不能让异步请求无限的等待下去,通过 setTimeout 来设定最大超时时间。
下面通过两种方式来测试异步任务:
先在 SpringBootSampleApplication 上添加 @EnableAsync 注解。
再检查所有自定义的Filter,如存在如下两种情况需要配置 asyncSupported=true
1) 自定义Filter 拦截了 /*
2) 某Filter 拦截了 /shanhy/* ,我们需要执行的异步请求的 Servlet 为 /shanhy/testcomet
方法一:原生Servlet方式
package org.springboot.sample.servlet;

import java.io.IOException;
import java.util.Queue;
import java.util.concurrent.LinkedBlockingQueue;
import java.util.concurrent.TimeUnit;

import javax.servlet.AsyncContext;
import javax.servlet.ServletException;
import javax.servlet.annotation.WebServlet;
import javax.servlet.http.HttpServlet;
import javax.servlet.http.HttpServletRequest;
import javax.servlet.http.HttpServletResponse;

/**
 * HTTP长连接实现
 *
 * @author 单红宇(365384722)
 * @myblog http://blog.csdn.net/catoop/
 * @create 2016年3月29日
 */
@WebServlet(urlPatterns = "/xs/cometservlet", asyncSupported = true)
//异步处理的servlet若存在过滤器,则过滤器的注解@WebFilter应设置asyncSupported=true,
//否则会报错A filter or servlet of the current chain does not support asynchronous operations.
public class CometServlet extends HttpServlet {

 private static final long serialVersionUID = -8685285401859800066L;

 private final Queue<AsyncContext> asyncContexts = new LinkedBlockingQueue<>();

 private final Thread generator = new Thread("Async Event generator") {

  @Override
  public void run() {
   while (!generator.isInterrupted()) {// 线程有效
    try {
     while (!asyncContexts.isEmpty()) {// 不为空
      TimeUnit.SECONDS.sleep(10);// 秒,模拟耗时操作
      AsyncContext asyncContext = asyncContexts.poll();
      HttpServletResponse res = (HttpServletResponse) asyncContext.getResponse();
      res.getWriter().write("{\"result\":\"OK - "+System.currentTimeMillis()+"\"}");
      res.setStatus(HttpServletResponse.SC_OK);
      res.setContentType("application/json");
      asyncContext.complete();// 完成
     }
    } catch (InterruptedException e) {
     Thread.currentThread().interrupt();
     e.printStackTrace();
    } catch (IOException e) {
     e.printStackTrace();
    }
   }
  }

 };

 @Override
 public void init() throws ServletException {
  super.init();
  generator.start();
 }

 @Override
 protected void doGet(HttpServletRequest req, HttpServletResponse resp) throws ServletException, IOException {
  System.out.println(">>>>>>>>>>CometServlet Request<<<<<<<<<<<");
  doPost(req, resp);
 }

 @Override
 protected void doPost(HttpServletRequest req, HttpServletResponse resp) throws ServletException, IOException {
  AsyncContext asyncContext = req.startAsync();
  asyncContext.setTimeout(20 * 1000L);
  asyncContexts.offer(asyncContext);
 }

 @Override
 public void destroy() {
  super.destroy();
  generator.interrupt();
 }
}方法二:Controller 方式
@Controller
public class PageController {

 @RequestMapping("/async/test")
 @ResponseBody
 public Callable<String> callable() {
  // 这么做的好处避免web server的连接池被长期占用而引起性能问题,
  // 调用后生成一个非web的服务线程来处理,增加web服务器的吞吐量。
  return new Callable<String>() {
   @Override
   public String call() throws Exception {
    Thread.sleep(3 * 1000L);
    return "小单 - " + System.currentTimeMillis();
   }
  };
 }

}最后写一个comet.jsp页面测试:
<%@ page pageEncoding="UTF-8"%>
<!DOCTYPE HTML PUBLIC "-//W3C//DTD HTML 4.01 Transitional//EN">
<html>
<head>
<title>长连接测试</title>
<script type="text/javascript" src="${pageContext.request.contextPath }/webjarslocator/jquery/jquery.js"></script>
<script type="text/javascript">
$(function(){
function longPolling(){
$.getJSON('${pageContext.request.contextPath }/xs/cometservlet', function(data){
console.log(data.result);
$('#n1').html(data.result);
longPolling();
});
}
longPolling();
function longPolling2(){
$.get('${pageContext.request.contextPath }/async/test', function(data){
console.log(data);
$('#n2').html(data);
longPolling2();
});
}
longPolling2();
});
</script>
</head>
<body>
<h1>长连接测试</h1>
<h2 id="n1"></h2>
<h2 id="n2"></h2>
</body>
</html>【相关推荐】
1. Java免费视频教程
2. Java实现图片等比例缩略图视频教程
3. FastJson教程手册
以上就是Spring Boot两个异步请求的方法详解的详细内容,更多请关注php中文网其它相关文章!
")
Spring Boot实现异步请求(Servlet 3.0)
在spring 3.2 及以后版本中增加了对请求的异步处理,旨在提高请求的处理速度降低服务性能消耗。
在我们的请求中做了耗时处理,当并发请求的情况下,为了避免web server的连接池被长期占用而引起性能问题,调用后生成一个非web的服务线程来处理,增加web服务器的吞吐量。
为此 Servlet 3.0 新增了请求的异步处理,Spring 也在此基础上做了封装处理。
本文还是以代码例子的方式说明如何在 Spring Boot 中应用异步请求。
首先说一下几个要点:
1、@WebFilter 和 @WebServlet 注解中的 asyncSupported = true 属性
异步处理的servlet若存在过滤器,则过滤器的注解@WebFilter应设置asyncSupported=true,
否则会报错 A filter or servlet of the current chain does not support asynchronous operations.
2、@EnableAsync 注解
Spring Boot 默认添加了一些拦截 /* 的过滤器,因为 /* 会拦截所有请求,按理说我们也要设置 asyncSupported=true 属性。因为这些过滤器都是 Spring Boot 初始化的,所以它提供了 @EnableAsync 注解来统一配置,该注解只针对 “非 @WebFilter 和 @WebServlet 注解的有效”,所以我们自己定义的 Filter 还是需要自己配置 asyncSupported=true 的。
3、AsyncContext 对象
获取一个异步请求的上下文对象。
4、asyncContext.setTimeout(20 * 1000L);
我们不能让异步请求无限的等待下去,通过 setTimeout 来设定最大超时时间。
下面通过两种方式来测试异步任务:
先在 SpringBootSampleApplication 上添加 @EnableAsync 注解。
再检查所有自定义的Filter,如存在如下两种情况需要配置 asyncSupported=true
1) 自定义Filter 拦截了 /*
2) 某Filter 拦截了 /shanhy/* ,我们需要执行的异步请求的 Servlet 为 /shanhy/testcomet
方法一:原生Servlet方式
package org.springboot.sample.servlet;

import java.io.IOException;
import java.util.Queue;
import java.util.concurrent.LinkedBlockingQueue;
import java.util.concurrent.TimeUnit;

import javax.servlet.AsyncContext;
import javax.servlet.servletexception;
import javax.servlet.annotation.WebServlet;
import javax.servlet.http.HttpServlet;
import javax.servlet.http.HttpServletRequest;
import javax.servlet.http.HttpServletResponse;

/**
 * HTTP长连接实现
 *
 * @author 单红宇(365384722)
 * @myblog http://blog.csdn.net/catoop/
 * @create 2016年3月29日
 */
@WebServlet(urlPatterns = "/xs/cometservlet",asyncSupported = true)
//异步处理的servlet若存在过滤器,则过滤器的注解@WebFilter应设置asyncSupported=true,
//否则会报错A filter or servlet of the current chain does not support asynchronous operations.
public class CometServlet extends HttpServlet {

 private static final long serialVersionUID = -8685285401859800066L;

 private final Queue<AsyncContext> asyncContexts = new LinkedBlockingQueue<>();

 private final Thread generator = new Thread("Async Event generator") {

  @Override
  public void run() {
   while (!generator.isInterrupted()) {// 线程有效
    try {
     while (!asyncContexts.isEmpty()) {// 不为空
      TimeUnit.SECONDS.sleep(10);// 秒,模拟耗时操作
      AsyncContext asyncContext = asyncContexts.poll();
      HttpServletResponse res = (HttpServletResponse) asyncContext.getResponse();
      res.getWriter().write("{\"result\":\"OK - "+System.currentTimeMillis()+"\"}");
      res.setStatus(HttpServletResponse.SC_OK);
      res.setContentType("application/json");
      asyncContext.complete();// 完成
     }
    } catch (InterruptedException e) {
     Thread.currentThread().interrupt();
     e.printstacktrace();
    } catch (IOException e) {
     e.printstacktrace();
    }
   }
  }

 };

 @Override
 public void init() throws servletexception {
  super.init();
  generator.start();
 }

 @Override
 protected void doGet(HttpServletRequest req,HttpServletResponse resp) throws servletexception,IOException {
  System.out.println(">>>>>>>>>>CometServlet Request<<<<<<<<<<<");
  doPost(req,resp);
 }

 @Override
 protected void doPost(HttpServletRequest req,IOException {
  AsyncContext asyncContext = req.startAsync();
  asyncContext.setTimeout(20 * 1000L);
  asyncContexts.offer(asyncContext);
 }

 @Override
 public void destroy() {
  super.destroy();
  generator.interrupt();
 }


}
方法二:Controller 方式
@Controller
public class PageController {

 @RequestMapping("/async/test")
 @ResponseBody
 public Callable<String> callable() {
  // 这么做的好处避免web server的连接池被长期占用而引起性能问题,
  // 调用后生成一个非web的服务线程来处理,增加web服务器的吞吐量。
  return new Callable<String>() {
   @Override
   public String call() throws Exception {
    Thread.sleep(3 * 1000L);
    return "小单 - " + System.currentTimeMillis();
   }
  };
 }

}
最后写一个comet.jsp页面测试:
<%@ page pageEncoding="UTF-8"%>
<!DOCTYPE HTML PUBLIC "-//W3C//DTD HTML 4.01 Transitional//EN">
<html>
 <head>
 <title>长连接测试</title>
 <script type="text/javascript" src="${pageContext.request.contextpath }/webjarslocator/jquery/jquery.js"></script>
 <script type="text/javascript">
  $(function(){
   function longPolling(){
    $.getJSON('${pageContext.request.contextpath }/xs/cometservlet',function(data){
     console.log(data.result);
     $('#n1').html(data.result);
     longPolling();
    });
   }
   longPolling();

   function longPolling2(){
    $.get('${pageContext.request.contextpath }/async/test',function(data){
     console.log(data);
     $('#n2').html(data);
     longPolling2();
    });
   }
   longPolling2();
  });
 </script>
 </head>

 <body>
 <h1>长连接测试</h1>
 <h2 id="n1"></h2>
 <h2 id="n2"></h2>
 </body>
</html>
以上就是本文的全部内容,希望对大家的学习有所帮助,也希望大家多多支持编程小技巧。
您可能感兴趣的文章:
- springboot+Quartz实现任务调度的示例代码
- SpringBoot 调度任务及常用任务表达式
- 深入理解spring boot异步调用方式@Async
- spring boot 使用@Async实现异步调用方法
- spring boot中使用@Async实现异步调用任务
- spring boot异步(Async)任务调度实现方法

Spring Boot异步发送邮件和请求拦截器配置
用户登录流程图:
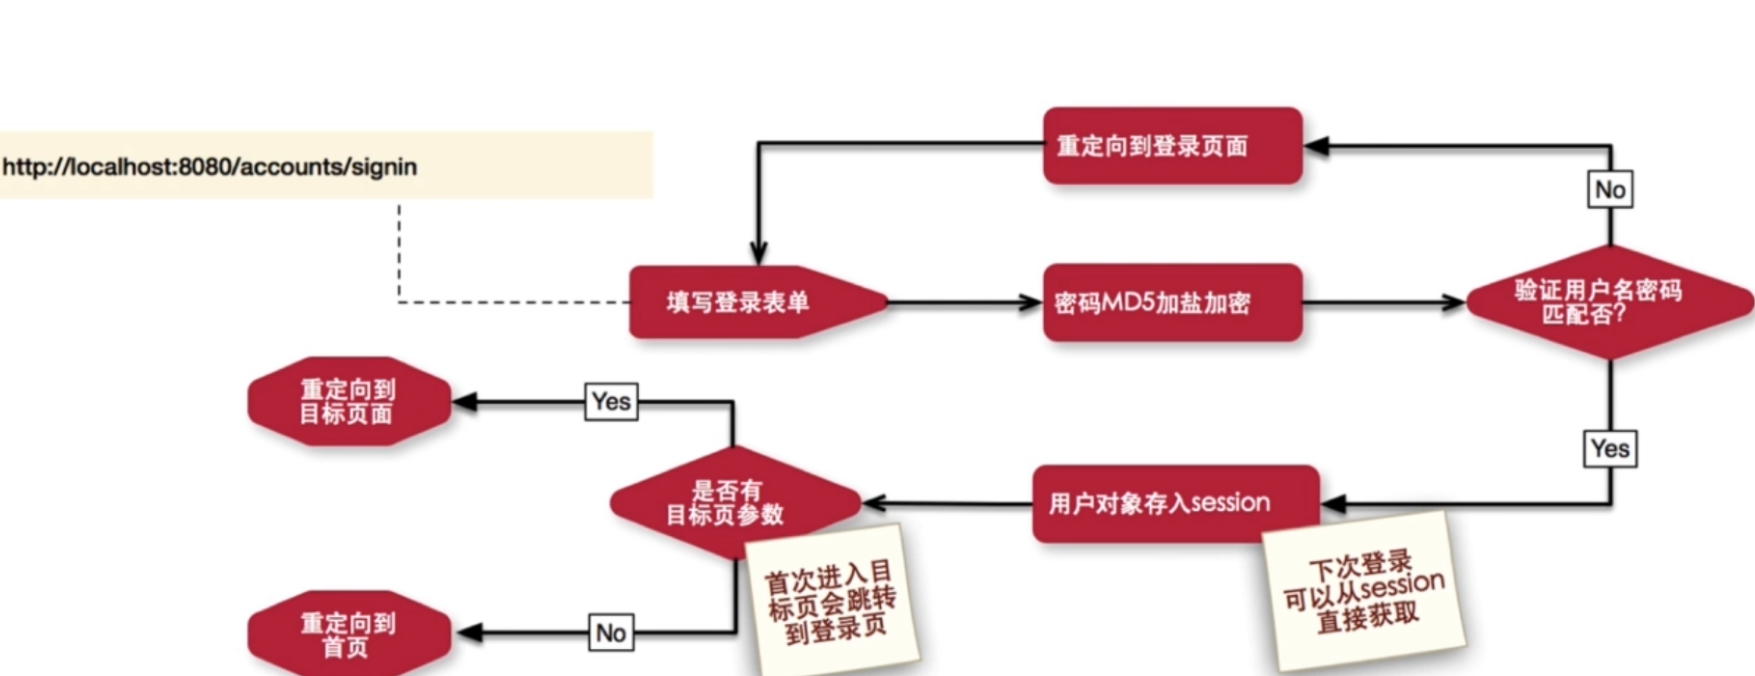
在spring拦截器中进行鉴权操作:

控制器的拦截:
import com.mooc.house.common.model.User;
import org.springframework.stereotype.Component;
import org.springframework.web.servlet.HandlerInterceptor;
import org.springframework.web.servlet.ModelAndView;
import javax.servlet.http.HttpServletRequest;
import javax.servlet.http.HttpServletResponse;
import java.net.URLEncoder;

@Component  //成为spring ben
public class AuthActionInterceptor implements HandlerInterceptor {
    @Override
    public boolean preHandle(HttpServletRequest request, HttpServletResponse response, Object o)
            throws Exception {
        User user= UserContext.getUser();
        if(user==null){ //重定向到登录界面
            String msg= URLEncoder.encode("请先登录","utf-8");
            String target = URLEncoder.encode(request.getRequestURL().toString(),"utf-8");
            if ("GET".equalsIgnoreCase(request.getMethod())) {
                response.sendRedirect("/accounts/signin?errorMsg=" + msg + "&target="+target);
                return false;
            }else {
                response.sendRedirect("/accounts/signin?errorMsg="+msg);
                return false;
            }
        }
        return false;
    }

    @Override
    public void postHandle(HttpServletRequest httpServletRequest, HttpServletResponse httpServletResponse, Object o, ModelAndView modelAndView) throws Exception {

    }

    @Override
    public void afterCompletion(HttpServletRequest httpServletRequest, HttpServletResponse httpServletResponse, Object o, Exception e) throws Exception {

    }
}
import com.google.common.base.Joiner;
import com.mooc.house.common.constants.CommonConstants;
import com.mooc.house.common.model.User;
import org.springframework.stereotype.Component;
import org.springframework.web.servlet.HandlerInterceptor;
import org.springframework.web.servlet.ModelAndView;
import javax.servlet.http.HttpServletRequest;
import javax.servlet.http.HttpServletResponse;
import javax.servlet.http.HttpSession;
import java.util.Map;

@Component  //实现拦截器接口
public class AuthInterceptor implements HandlerInterceptor {
    @Override  //在控制器执行之前拦截执行的
    public boolean preHandle(HttpServletRequest request, HttpServletResponse httpServletResponse, Object o)
            throws Exception {
        Map<String,String[]> map=request.getParameterMap(); //获取所有的请求
        map.forEach((k,v)->{
            if (k.equals("errorMsg") || k.equals("successMsg") || k.equals("target")) {
                request.setAttribute(k, Joiner.on(",").join(v));
            }
        });
        String reqUri=request.getRequestURI();
        if(reqUri.startsWith("/static")||reqUri.startsWith("/error")){
            return true;
        }
        HttpSession session=request.getSession(true);  //没有的话创建
        User user=(User)session.getAttribute(CommonConstants.USER_ATTRIBUTE);
        if(user!=null){
            UserContext.setUser(user);
        }
        return true;
    }

    @Override
    public void postHandle(HttpServletRequest httpServletRequest, HttpServletResponse httpServletResponse, Object o, ModelAndView modelAndView) throws Exception {

    }

    @Override
    public void afterCompletion(HttpServletRequest httpServletRequest, HttpServletResponse httpServletResponse, Object o, Exception e) throws Exception {
         UserContext.remove();
    }
}
获取删除得到用户信息:
public class UserContext {
    private static  final  ThreadLocal<User> USER_THREAD_LOCAL=new ThreadLocal<>();
    public static  void setUser(User user){
        USER_THREAD_LOCAL.set(user);
    }
    public static  void remove(){
        USER_THREAD_LOCAL.remove();
    }
    public static User getUser(){
        return USER_THREAD_LOCAL.get();
    }
}
注册到请求接口:
import org.springframework.beans.factory.annotation.Autowired;
import org.springframework.context.annotation.Configuration;
import org.springframework.web.servlet.config.annotation.InterceptorRegistry;
import org.springframework.web.servlet.config.annotation.WebMvcConfigurerAdapter;

@Configuration
public class WebMvcConf  extends WebMvcConfigurerAdapter {
    @Autowired
    private  AuthActionInterceptor authActionInterceptor;

    @Autowired
    private AuthInterceptor authInterceptor;
    //管理拦截请求
    @Override
    public void addInterceptors(InterceptorRegistry registry){
        registry.addInterceptor(authInterceptor).excludePathPatterns("/static").addPathPatterns("/**");
        registry
                .addInterceptor(authActionInterceptor).addPathPatterns("/house/toAdd")
                .addPathPatterns("/accounts/profile").addPathPatterns("/accounts/profileSubmit")
                .addPathPatterns("/house/bookmarked").addPathPatterns("/house/del")
                .addPathPatterns("/house/ownlist").addPathPatterns("/house/add")
                .addPathPatterns("/house/toAdd").addPathPatterns("/agency/agentMsg")
                .addPathPatterns("/comment/leaveComment").addPathPatterns("/comment/leaveBlogComment");
        super.addInterceptors(registry);
    }
}
拦截器编写配置步骤:


在配置中加入:
domain.name=127.0.0.1:8090

spring.mail.host=smtp.163.com
spring.mail.username=
spring.mail.password=
spring.mail.properties.mail.smtp.outh=true
spring.mail.properties.mail.smtp.starttls.enable=true
spring.mail.properties.mail.smtp.starttls.required=true
发送邮件:
import java.util.List;
import java.util.concurrent.TimeUnit;

import org.apache.commons.lang3.RandomStringUtils;
import org.apache.commons.lang3.StringUtils;
import org.springframework.beans.factory.annotation.Autowired;
import org.springframework.beans.factory.annotation.Value;
import org.springframework.mail.SimpleMailMessage;
import org.springframework.mail.javamail.JavaMailSender;
import org.springframework.scheduling.annotation.Async;
import org.springframework.stereotype.Service;

import com.google.common.base.Objects;
import com.google.common.cache.Cache;
import com.google.common.cache.CacheBuilder;
import com.google.common.cache.RemovalListener;
import com.google.common.cache.RemovalNotification;
import com.mooc.house.biz.mapper.UserMapper;
import com.mooc.house.common.model.User;

@Service
public class MailService {

  @Autowired
  private JavaMailSender mailSender;

  @Value("${spring.mail.username}")
  private String from;


  @Value("${domain.name}")
  private String domainName;


  @Autowired
  private UserMapper userMapper;


  private final Cache<String, String> registerCache =
      CacheBuilder.newBuilder().maximumSize(100).expireAfterAccess(15, TimeUnit.MINUTES)
          .removalListener(new RemovalListener<String, String>() {

            @Override
            public void onRemoval(RemovalNotification<String, String> notification) {
              String email = notification.getValue();
              User user = new User();
              user.setEmail(email);
              List<User> targetUser = userMapper.selectUsersByQuery(user);
              if (!targetUser.isEmpty() && Objects.equal(targetUser.get(0).getEnable(), 0)) {
                userMapper.delete(email);// 代码优化: 在删除前首先判断用户是否已经被激活,对于未激活的用户进行移除操作
              }

            }
          }).build();


  private final Cache<String, String> resetCache =  CacheBuilder.newBuilder().maximumSize(100).expireAfterAccess(15, TimeUnit.MINUTES).build();

  @Async
  public void sendMail(String title, String url, String email) {
    SimpleMailMessage message = new SimpleMailMessage();
    message.setFrom(from);
    message.setSubject(title);
    message.setTo(email);
    message.setText(url);
    mailSender.send(message);
  }

  /**
   * 1.缓存key-email的关系 2.借助spring mail 发送邮件 3.借助异步框架进行异步操作
   *
   * @param email
   */
  @Async
  public void registerNotify(String email) {
    String randomKey = RandomStringUtils.randomAlphabetic(10);
    registerCache.put(randomKey, email);
    String url = "http://" + domainName + "/accounts/verify?key=" + randomKey;
    sendMail("房产平台激活邮件", url, email);
  }

  /**
   * 发送重置密码邮件
   *
   * @param email
   */
  @Async
  public void resetNotify(String email) {
    String randomKey = RandomStringUtils.randomAlphanumeric(10);
    resetCache.put(randomKey, email);
    String content = "http://" + domainName + "/accounts/reset?key=" + randomKey;
    sendMail("房产平台密码重置邮件", content, email);
  }

  public String getResetEmail(String key){
    return resetCache.getIfPresent(key);
  }

  public void invalidateRestKey(String key){
    resetCache.invalidate(key);
  }

  public boolean enable(String key) {
    String email = registerCache.getIfPresent(key);
    if (StringUtils.isBlank(email)) {
      return false;
    }
    User updateUser = new User();
    updateUser.setEmail(email);
    updateUser.setEnable(1);
    userMapper.update(updateUser);
    registerCache.invalidate(key);
    return true;
  }
}
关于SpringBoot异步请求和springboot异步请求处理的介绍已经告一段落,感谢您的耐心阅读,如果想了解更多关于Spring Boot 异步请求和异步调用,一文搞定!、Spring Boot两个异步请求的方法详解、Spring Boot实现异步请求(Servlet 3.0)、Spring Boot异步发送邮件和请求拦截器配置的相关信息,请在本站寻找。
本文标签:


