本篇文章给大家谈谈曹工说SpringBoot源码,以及19--Spring带给我们的工具利器,创建代理不用愁的知识点,同时本文还将给你拓展SpringAOP-ProxyFactoryBean创建代理及
本篇文章给大家谈谈曹工说Spring Boot源码,以及19-- Spring 带给我们的工具利器,创建代理不用愁的知识点,同时本文还将给你拓展Spring AOP - ProxyFactoryBean创建代理及代理的执行逻辑、Spring AOP源码分析(七)ProxyFactoryBean介绍、Spring api 之手动创建代理对象 ProxyFactory、Spring Boot源码分析(4) -- BeanFactoryProcessor加载分析等相关知识,希望对各位有所帮助,不要忘了收藏本站喔。
本文目录一览:- 曹工说Spring Boot源码(19)-- Spring 带给我们的工具利器,创建代理不用愁(ProxyFactory)
- Spring AOP - ProxyFactoryBean创建代理及代理的执行逻辑
- Spring AOP源码分析(七)ProxyFactoryBean介绍
- Spring api 之手动创建代理对象 ProxyFactory
- Spring Boot源码分析(4) -- BeanFactoryProcessor加载分析
-- Spring 带给我们的工具利器,创建代理不用愁(ProxyFactory)")
曹工说Spring Boot源码(19)-- Spring 带给我们的工具利器,创建代理不用愁(ProxyFactory)
写在前面的话
相关背景及资源:
曹工说Spring Boot源码(1)-- Bean Definition到底是什么,附spring思维导图分享
曹工说Spring Boot源码(2)-- Bean Definition到底是什么,咱们对着接口,逐个方法讲解
曹工说Spring Boot源码(3)-- 手动注册Bean Definition不比游戏好玩吗,我们来试一下
曹工说Spring Boot源码(4)-- 我是怎么自定义ApplicationContext,从json文件读取bean definition的?
曹工说Spring Boot源码(5)-- 怎么从properties文件读取bean
曹工说Spring Boot源码(6)-- Spring怎么从xml文件里解析bean的
曹工说Spring Boot源码(7)-- Spring解析xml文件,到底从中得到了什么(上)
曹工说Spring Boot源码(8)-- Spring解析xml文件,到底从中得到了什么(util命名空间)
曹工说Spring Boot源码(9)-- Spring解析xml文件,到底从中得到了什么(context命名空间上)
曹工说Spring Boot源码(10)-- Spring解析xml文件,到底从中得到了什么(context:annotation-config 解析)
曹工说Spring Boot源码(11)-- context:component-scan,你真的会用吗(这次来说说它的奇技淫巧)
曹工说Spring Boot源码(12)-- Spring解析xml文件,到底从中得到了什么(context:component-scan完整解析)
曹工说Spring Boot源码(13)-- AspectJ的运行时织入(Load-Time-Weaving),基本内容是讲清楚了(附源码)
曹工说Spring Boot源码(14)-- AspectJ的Load-Time-Weaving的两种实现方式细细讲解,以及怎么和Spring Instrumentation集成
曹工说Spring Boot源码(15)-- Spring从xml文件里到底得到了什么(context:load-time-weaver 完整解析)
曹工说Spring Boot源码(16)-- Spring从xml文件里到底得到了什么(aop:config完整解析【上】)
曹工说Spring Boot源码(17)-- Spring从xml文件里到底得到了什么(aop:config完整解析【中】)
曹工说Spring Boot源码(18)-- Spring AOP源码分析三部曲,终于快讲完了 (aop:config完整解析【下】)
工程代码地址 思维导图地址
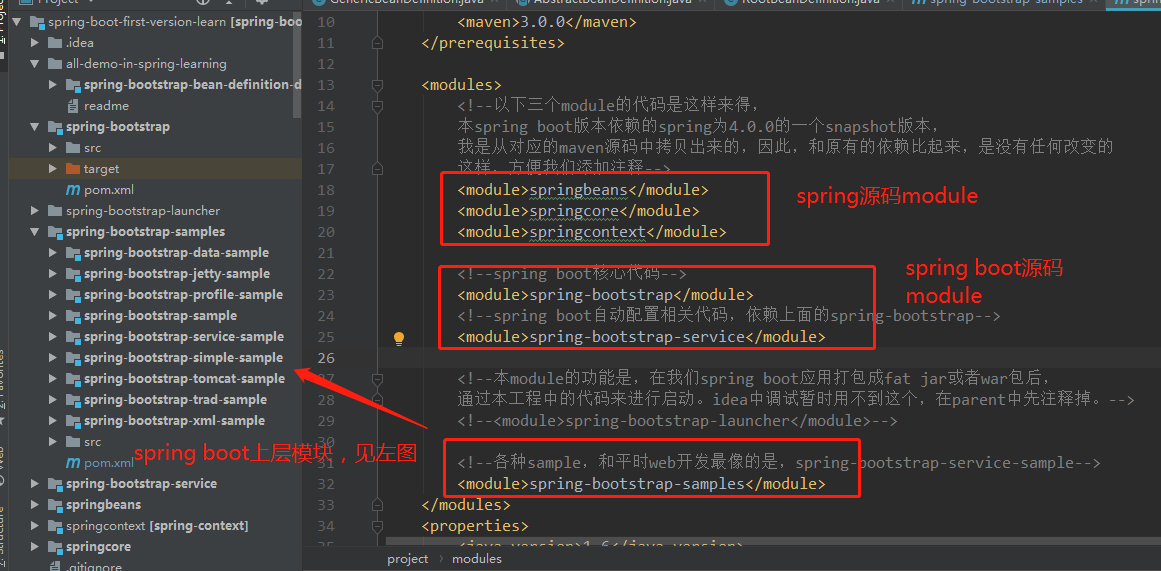
工程结构图:
概要
本篇是接着前三篇讲的,但是本篇相对独立,即使不使用spring aop 和spring ioc,我们也可以利用今天要讲的ProxyFactory为我们所用。
曹工说Spring Boot源码(16)-- Spring从xml文件里到底得到了什么(aop:config完整解析【上】)
曹工说Spring Boot源码(17)-- Spring从xml文件里到底得到了什么(aop:config完整解析【中】)
曹工说Spring Boot源码(18)-- Spring AOP源码分析三部曲,终于快讲完了 (aop:config完整解析【下】)
前面几篇说到,spring如何实现aop,即将匹配切点的bean,生成动态代理,并将生成的动态代理放到ioc容器,来替换原先的bean,一系列骚操作,完成"代理换真身"的操作。
jdk动态代理
比较老套的话题,但是,我问大家几个问题,看看大家是否真的足够了解他呢?
##在代理对象上,调用不在接口中的方法
package foo;


public class Performer implements Perform {
    @Override
    public void sing() {
        try {
            Thread.sleep(1000);
        } catch (InterruptedException e) {
            e.printStackTrace();
        }
        System.out.println("男孩在唱歌");

    }

    public void eat() {
        System.out.println("男孩在吃饭");
    }
}
可以看到,我们sing是实现了接口中的方法,而eat不在接口中定义。
那么,如下代码,结果会是啥:
@Test
public void createJdkDynamicProxyManual() throws NoSuchMethodException, InvocationTargetException, IllegalAccessException {
    ClassLoader loader = Thread.currentThread().getContextClassLoader();
    Object generatedProxy = Proxy.newProxyInstance(loader, new Class[]{Perform.class}, new InvocationHandler() {
        @Override
        public Object invoke(Object proxy, Method method, Object[] args) throws Throwable {
            System.out.println("proxy:" + proxy.getClass());
            return "hahh";
        }
    });
    Method eat = Perform.class.getMethod("eat");
    eat.setAccessible(true);
    eat.invoke(generatedProxy,null);
}
代码中,我们创建了一个代理对象:generatedProxy;然后,调用了其eat方法,结果会是啥呢?
java.lang.NoSuchMethodException: foo.Perform.eat()
at java.lang.Class.getMethod(Class.java:1665)
at java.lang.Class.getMethod(Class.java:1665)
为啥会这样呢?因为我们创建代理对象时,是在Perform.class这个接口上创建的。大家可以再仔细看看。
jdk 动态代理(Proxy.newProxyInstance)有哪几个步骤
这个问题,有人思考过吗?简单来说,其实有3个步骤。
- 生成动态代理类的class,虽然不像其他class文件那样,是编译了就有的,这里,是动态生成的;
- 加载第一步拿到的字节流,丢给jvm加载该class,拿到Class对象
- 根据第二步的Class对象,反射生成动态代理对象。
我刚仔细看了Proxy.newProxyInstance的方法注释:
Returns an instance of a proxy class for the specified interfaces
that dispatches method invocations to the specified invocation
handler.  This method is equivalent to:

Proxy.getProxyClass(loader, interfaces).         // 对应步骤1和2
	getConstructor(new Class[] { InvocationHandler.class }).   // 对应步骤3
	newInstance(new Object[] { handler }); // 对应步骤3
其中,第一步,细问一下,class是怎么生成的,很多人估计又答不上了。咱们这里就看一下:
public static Object newProxyInstance(ClassLoader loader,
                                      Class<?>[] interfaces,
                                      InvocationHandler h)
    throws IllegalArgumentException
{
    /*
     * Look up or generate the designated proxy class.
     */
    Class<?> cl = getProxyClass0(loader, interfaces);

    /*
     * Invoke its constructor with the designated invocation handler.
     */
    return newInstance(cons, ih);
}
可以看到,主要的获取Class,是getProxyClass0方法,这个方法里面代码不少,去掉非核心的缓存等部分,核心的部分如下:
String proxyName = proxyPkg + "$Proxy" + num;

/*
 * Generate the specified proxy class.
 */
byte[] proxyClassFile = ProxyGenerator.generateProxyClass(
    proxyName, interfaces);
proxyClass = defineClass0(loader, proxyName,
                          proxyClassFile, 0, proxyClassFile.length);
这其中,ProxyGenerator.generateProxyClass 负责生成class的字节流,对应我们前面讲到的步骤1;defineClass0对应类加载。我们仔细说说:
-
字节流生成
这部分呢,其实就是调用了ProxyGenerator.generateProxyClass,我们跟踪发现,它的全名为:sun.misc.ProxyGenerator,是sun包下的。这部分没法看源码,还好我之前下载过openjdk的源码,这里我给大家全文贴一下:
	/**
     * Generate a class file for the proxy class.  This method drives the
     * class file generation process.
     */
    private byte[] generateClassFile() {

        /* ============================================================
         * Step 1: Assemble ProxyMethod objects for all methods to
         * generate proxy dispatching code for.
         */

        /*
         * Record that proxy methods are needed for the hashCode, equals,
         * and toString methods of java.lang.Object.  This is done before
         * the methods from the proxy interfaces so that the methods from
         * java.lang.Object take precedence over duplicate methods in the
         * proxy interfaces.
         */
        addProxyMethod(hashCodeMethod, Object.class);
        addProxyMethod(equalsMethod, Object.class);
        addProxyMethod(toStringMethod, Object.class);

        /*
         * Now record all of the methods from the proxy interfaces, giving
         * earlier interfaces precedence over later ones with duplicate
         * methods.
         */
        for (int i = 0; i < interfaces.length; i++) {
            Method[] methods = interfaces[i].getMethods();
            for (int j = 0; j < methods.length; j++) {
                addProxyMethod(methods[j], interfaces[i]);
            }
        }

        /*
         * For each set of proxy methods with the same signature,
         * verify that the methods'' return types are compatible.
         */
        for (List<ProxyMethod> sigmethods : proxyMethods.values()) {
            checkReturnTypes(sigmethods);
        }

        /* ============================================================
         * Step 2: Assemble FieldInfo and MethodInfo structs for all of
         * fields and methods in the class we are generating.
         */
        try {
            methods.add(generateConstructor());

            for (List<ProxyMethod> sigmethods : proxyMethods.values()) {
                for (ProxyMethod pm : sigmethods) {

                    // add static field for method''s Method object
                    fields.add(new FieldInfo(pm.methodFieldName,
                        "Ljava/lang/reflect/Method;",
                         ACC_PRIVATE | ACC_STATIC));

                    // generate code for proxy method and add it
                    methods.add(pm.generateMethod());
                }
            }

            methods.add(generateStaticInitializer());

        } catch (IOException e) {
            throw new InternalError("unexpected I/O Exception");
        }

        if (methods.size() > 65535) {
            throw new IllegalArgumentException("method limit exceeded");
        }
        if (fields.size() > 65535) {
            throw new IllegalArgumentException("field limit exceeded");
        }

        /* ============================================================
         * Step 3: Write the final class file.
         */

        /*
         * Make sure that constant pool indexes are reserved for the
         * following items before starting to write the final class file.
         */
        cp.getClass(dotToSlash(className));
        cp.getClass(superclassName);
        for (int i = 0; i < interfaces.length; i++) {
            cp.getClass(dotToSlash(interfaces[i].getName()));
        }

        /*
         * Disallow new constant pool additions beyond this point, since
         * we are about to write the final constant pool table.
         */
        cp.setReadOnly();

        ByteArrayOutputStream bout = new ByteArrayOutputStream();
        DataOutputStream dout = new DataOutputStream(bout);

        try {
            /*
             * Write all the items of the "ClassFile" structure.
             * See JVMS section 4.1.
             */
                                        // u4 magic;
            dout.writeInt(0xCAFEBABE);
                                        // u2 minor_version;
            dout.writeShort(CLASSFILE_MINOR_VERSION);
                                        // u2 major_version;
            dout.writeShort(CLASSFILE_MAJOR_VERSION);

            cp.write(dout);             // (write constant pool)

                                        // u2 access_flags;
            dout.writeShort(ACC_PUBLIC | ACC_FINAL | ACC_SUPER);
                                        // u2 this_class;
            dout.writeShort(cp.getClass(dotToSlash(className)));
                                        // u2 super_class;
            dout.writeShort(cp.getClass(superclassName));

                                        // u2 interfaces_count;
            dout.writeShort(interfaces.length);
                                        // u2 interfaces[interfaces_count];
            for (int i = 0; i < interfaces.length; i++) {
                dout.writeShort(cp.getClass(
                    dotToSlash(interfaces[i].getName())));
            }

                                        // u2 fields_count;
            dout.writeShort(fields.size());
                                        // field_info fields[fields_count];
            for (FieldInfo f : fields) {
                f.write(dout);
            }

                                        // u2 methods_count;
            dout.writeShort(methods.size());
                                        // method_info methods[methods_count];
            for (MethodInfo m : methods) {
                m.write(dout);
            }

                                         // u2 attributes_count;
            dout.writeShort(0); // (no ClassFile attributes for proxy classes)

        } catch (IOException e) {
            throw new InternalError("unexpected I/O Exception");
        }

        return bout.toByteArray();
    }
这里其实是有面试题的,我之前还被问过,问我用的什么技术来生成class字节流,这里其实是没有用任何第三方工具的,这个类的import语句部分,也没有asm、javaasist等工具。
import java.io.ByteArrayOutputStream; import java.io.DataOutputStream; import java.io.FileOutputStream; import java.io.IOException; import java.io.OutputStream; import java.lang.reflect.Array; import java.lang.reflect.Method; import java.util.ArrayList; import java.util.HashMap; import java.util.LinkedList; import java.util.List; import java.util.ListIterator; import java.util.Map; import sun.security.action.GetBooleanAction;-
加载class字节流为Class
这部分的代码即为前面提到的:
try {
    proxyClass = defineClass0(loader, proxyName,
        proxyClassFile, 0, proxyClassFile.length);
}
其中,defineClass0 是一个native方法:
java.lang.reflect.Proxy#defineClass0
private static native Class defineClass0(ClassLoader loader, String name,
                                         byte[] b, int off, int len);
让我比较惊讶的是,这个native方法,是在Proxy类里,且除了此处的调用,没有被其他代码调用。
我去看了Classloader这个类的代码,里面也有几个native的defineClass的方法:
private native Class defineClass0(String name, byte[] b, int off, int len,
                                  ProtectionDomain pd);

private native Class defineClass1(String name, byte[] b, int off, int len,
                                  ProtectionDomain pd, String source);

private native Class defineClass2(String name, java.nio.ByteBuffer b,
                                  int off, int len, ProtectionDomain pd,
                                  String source);
看来,Proxy是自己自立门户啊,没有使用Classloader类下面的defineClass等方法。
如果大家想看生成的class的文件的内容,可以加这个虚拟机启动参数:
-Dsun.misc.ProxyGenerator.saveGeneratedFiles=true或者main最前面,加这个:
System.getProperties().put("sun.misc.ProxyGenerator.saveGeneratedFiles", "true"); -
反射生成代理对象
这步就没啥好说的了,经过上面第二步,已经拿到Class对象了。反射对于大家,也是轻车熟路了。
Constructor<?> cons = cl.getConstructor({ InvocationHandler.class });
final InvocationHandler ih = h;
newInstance(cons, ih);

private static Object newInstance(Constructor<?> cons, InvocationHandler h) {
    return cons.newInstance(new Object[] {h} );
}
这里,我们看到,获取的构造函数,就是要接收一个InvocationHandler对象的。拿到了构造函数后,接下来,就调用了构造函数的newInstance,来生成代理对象。
具体的调用就不说了,反正你调用的任何方法(只能调用接口里有的那些),都会转到invocationHandler的invoke方法。
-
关于jdk动态代理的思考
其实,大家看到上面,会想下面这个问题不?现在在代理对象上,调用方法,最终都会进入到:
 java.lang.reflect.InvocationHandler#invoke
 public Object invoke(Object proxy, Method method, Object[] args)
     throws Throwable;
我如果想在这个逻辑里面,去调用原始目标的方法,怎么办呢?
我们看看传给我们的几个参数:
1. proxy,代理对象;这个没办法拿到原始对象
2. method,是被调用的方法,也拿不到原始对象
3. args,给method的参数,也拿不到原始对象。
这就迷离了。那我咋办呢?
答案是,在创建InvocationHandler时,把原始对象传进去,以及其他一切必要的信息,都传进去。
当然,你也可以不传进去,在invoke方法里,为所欲为,比如下面的方法:
  ClassLoader loader = Thread.currentThread().getContextClassLoader();
  Object generatedProxy = Proxy.newProxyInstance(loader, new Class[]{Perform.class}, new InvocationHandler() {
      @Override
      public Object invoke(Object proxy, Method method, Object[] args) throws Throwable {
          System.out.println("到我这为止,不会调用target了");
          return null;
      }
  });
  // 这里,虽然调用了sing,但里面的逻辑也不会执行。
  ((Perform)generatedProxy).sing();
其实,这个代理,已经相当于是Perform接口的另一个实现了;和之前的实现类,没有半毛钱关系。
如果要让它实施代理的工作,可以这样做:
  @Test
  public  void createJdkDynamicProxyManual() throws NoSuchMethodException, InvocationTargetException, IllegalAccessException {
      Performer performer = new Performer();
      MyCustomInvocationHandler myCustomInvocationHandler = new MyCustomInvocationHandler(performer);

      ClassLoader loader = Thread.currentThread().getContextClassLoader();
      Object generatedProxy = Proxy.newProxyInstance(loader,
              new Class[]{Perform.class}, myCustomInvocationHandler);

      ((Perform)generatedProxy).sing();

  }

  public static class MyCustomInvocationHandler implements InvocationHandler {
      Performer performer;

      public MyCustomInvocationHandler(Performer performer) {
          this.performer = performer;
      }

      @Override
      public Object invoke(Object proxy, Method method, Object[] args) throws Throwable {
          System.out.println("我是一个称职的代理");
          return method.invoke(performer,args);
      }
  }
上面这个代码,就没问题了。会输出如下:
我是一个称职的代理
男孩在唱歌
jdk动态代理实现思路的案例代码
我们上面说了怎么样正确地实现代理的思路,就是要把target/原始bean,在new invocationHandler的时候,传递给它,后续在invoke里再使用。我们看看框架对invocationHandler的其他实现,是怎么做的吧?
我在project里找了下InvocationHandler的实现类,发现了jdbc中的一个实现类。
org.springframework.jdbc.datasource.ConnectionProxy

public interface ConnectionProxy extends Connection {

   /**
    * Return the target Connection of this proxy.
    * <p>This will typically be the native driver Connection
    * or a wrapper from a connection pool.
    * @return the underlying Connection (never {@code null})
    */
   Connection getTargetConnection();

}
这个是Connection的子接口,通过这个接口,获取真正的数据库连接。我们看看其代理实现:
org.springframework.jdbc.datasource.LazyConnectionDataSourceProxy#getConnection(java.lang.String, java.lang.String)
public Connection getConnection(String username, String password) throws SQLException {
   return (Connection) Proxy.newProxyInstance(
         ConnectionProxy.class.getClassLoader(),
         new Class[] {ConnectionProxy.class},
         new LazyConnectionInvocationHandler(username, password));
}
这个代理实现,主要是延迟获取数据库连接,等到使用的时候,才去获取连接;而不是启动时,即建立连接池。
private class LazyConnectionInvocationHandler implements InvocationHandler {

   private String username;

   private String password;

   private Boolean readOnly = Boolean.FALSE;

   private Integer transactionIsolation;

   private Boolean autoCommit;

   private boolean closed = false;

   private Connection target;

   public LazyConnectionInvocationHandler() {
      this.autoCommit = defaultAutoCommit();
      this.transactionIsolation = defaultTransactionIsolation();
   }

   public LazyConnectionInvocationHandler(String username, String password) {
      this();
      this.username = username;
      this.password = password;
   }

   public Object invoke(Object proxy, Method method, Object[] args) throws Throwable {
      // Invocation on ConnectionProxy interface coming in...

      if (method.getName().equals("equals")) {
         // We must avoid fetching a target Connection for "equals".
         // Only consider equal when proxies are identical.
         return (proxy == args[0]);
      }
      ...
      else if (method.getName().equals("getTargetConnection")) {
         // Handle getTargetConnection method: return underlying connection.
         return getTargetConnection(method);
      }
      ...
   }
这里呢,如果方法为getTargetConnection,则调用了以下方法:
private Connection getTargetConnection(Method operation) throws SQLException {
      if (this.target == null) {
         // No target Connection held -> fetch one.
         if (logger.isDebugEnabled()) {
            logger.debug("Connecting to database for operation ''" + operation.getName() + "''");
         }

         // 通过用户名,密码去获取数据库连接
         this.target = (this.username != null) ?
               getTargetDataSource().getConnection(this.username, this.password) :
               getTargetDataSource().getConnection();

         // If we still lack default connection properties, check them now.
         checkDefaultConnectionProperties(this.target);

         // Apply kept transaction settings, if any.
         if (this.readOnly) {
            try {
               this.target.setReadOnly(this.readOnly);
            }
            catch (Exception ex) {
               // "read-only not supported" -> ignore, it''s just a hint anyway
               logger.debug("Could not set JDBC Connection read-only", ex);
            }
         }
         if (this.transactionIsolation != null &&
               !this.transactionIsolation.equals(defaultTransactionIsolation())) {
            this.target.setTransactionIsolation(this.transactionIsolation);
         }
         if (this.autoCommit != null && this.autoCommit != this.target.getAutoCommit()) {
            this.target.setAutoCommit(this.autoCommit);
         }
      }

      return this.target;
   }
}
大家从上面代码,可以看到,是有通过用户名密码去获取数据库连接的。
所以,看来,正确的实现代理的思路就是,在构造proxy的时候,把你需要的东西,都通过构造函数或setter,传递给invocationHandler。然后再在invoke方法内去使用这些东西,来完成你的逻辑。
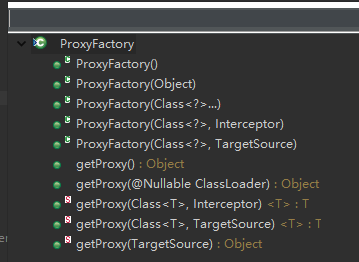
Spring提供给我们的强大工具类:ProxyFactory
大家看了上面,觉得生成代理,简单,还是复杂呢?也许还不是很难。但如果是使用cglib的方式去创建代理,代码可就要多好一些了。(这个留到后面讲)
其实,spring里给我们提供了神器的,即我们要说的:ProxyFactory。其注释如下,意思是,aop代理工厂,不用通过bean factory,可以直接使用。这个类提供一个简单的获取和配置aop代理的方式。
* Factory for AOP proxies for programmatic use, rather than via a bean
* factory. This class provides a simple way of obtaining and configuring
* AOP proxies in code.
意思是,我们平时,实现aop,主要依靠spring的aop,即通过注解或者xml的方式,声明式地创建aop(比如配置事务时)。这里的意思是,我们可以通过代码方式来实现同样的效果,即,创建代理。
大家把这个类,理解为代理工厂即可,工厂嘛,就是给它东西,它给你返回产品,这个产品,就是代理对象。
##如何利用ProxyFactory创建代理
我们看看,把它当成黑盒的话,如何利用它,来简化我们创建代理的过程:
 @Test
    public void createJdkDynamicProxy() {
        ProxyFactory proxyFactory = new ProxyFactory();
//        Performer performer = new Performer();
//        proxyFactory.setTarget(performer);

        proxyFactory.addInterface(Perform.class);

        Perform proxy = (Perform) proxyFactory.getProxy();

        log.info("proxy class:{}",proxy.getClass().getName());
        proxy.sing();
        log.info("proxy:{}",proxy);
    }
正常情况下,按照我们前面对jdk动态代理的理解,上面这样就够了。但是,上面代码会报错,说没有指定target 对象。所以,我们实际上,需要把上面那两行注释给放开,否则报如下错误。
org.springframework.aop.framework.AopConfigException: No advisors and no TargetSource specified

	at org.springframework.aop.framework.JdkDynamicAopProxy.<init>(JdkDynamicAopProxy.java:103)
	at org.springframework.aop.framework.DefaultAopProxyFactory.createAopProxy(DefaultAopProxyFactory.java:65)
	at org.springframework.aop.framework.ProxyCreatorSupport.createAopProxy(ProxyCreatorSupport.java:105)
	at org.springframework.aop.framework.ProxyFactory.getProxy(ProxyFactory.java:98)
	at ProxyFactoryTest.createJdkDynamicProxy(ProxyFactoryTest.java:44)
上面放开那个注释代码后,默认就会去调用target的对应方法,会有如下输出:
2020-02-25 08:32:29.828 [main] INFO  ProxyFactoryTest - proxy class:com.sun.proxy.$Proxy5
男孩在唱歌
2020-02-25 08:32:30.910 [main] INFO  ProxyFactoryTest - proxy:foo.Performer@502775a1
如何创建代理的同时,织入切面
我们上面只是创建了代理,默认去调用了target的对应方法,假设我们要切一下,怎么办?
不慌!
@Test
    public void createJdkDynamicProxyWithAdvisor() {
        ProxyFactory proxyFactory = new ProxyFactory();
        Performer performer = new Performer();
        proxyFactory.setTarget(performer);

        proxyFactory.addInterface(Perform.class);
        DefaultPointcutAdvisor advisor = new DefaultPointcutAdvisor();
        advisor.setAdvice(new MethodInterceptor() {
            @Override
            public Object invoke(MethodInvocation invocation) throws Throwable {
                Object result = invocation.proceed();
                System.out.println("男孩唱完要行礼");
                return result;
            }
        });

        proxyFactory.addAdvisor(advisor);

        Perform proxy = (Perform) proxyFactory.getProxy();

        ProxyFactoryTest.log.info("proxy class:{}",proxy.getClass().getName());
        proxy.sing();
    }
这里的重点代码就是:
		DefaultPointcutAdvisor advisor = new DefaultPointcutAdvisor();
        advisor.setAdvice(new MethodInterceptor() {
            @Override
            public Object invoke(MethodInvocation invocation) throws Throwable {
                Object result = invocation.proceed();
                System.out.println("男孩唱完要行礼");
                return result;
            }
        });

        proxyFactory.addAdvisor(advisor);
这上面的几行代码,主要是创建了一个advisor,一个advisor 几乎等于切点+通知。
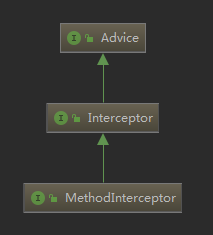
advisor的setAdvice呢,主要接受一个Advice类型的参数。而MethodInterceptor就是它的子接口。
当然了,其实advice的实现很多,包括spring里都有很多内部实现。我这里找了一个,对方法执行耗时,进行监测的。
我把上面的代码改动了一行:
advisor.setAdvice(new PerformanceMonitorInterceptor());
这个类,的继承关系如下:
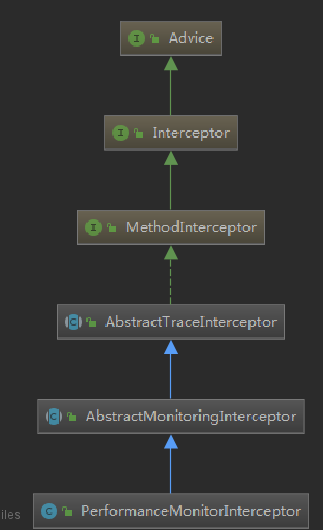
主要功能就是记录耗时,此时,输出如下:
2020-02-25 08:40:06.825 [main] INFO ProxyFactoryTest - proxy class:com.sun.proxy.$Proxy5 男孩在唱歌 2020-02-25 08:40:07.868 [main] TRACE o.s.aop.interceptor.PerformanceMonitorInterceptor - StopWatch ''foo.Perform.sing'': running time (millis) = 1006
总结
今天大概讲了jdk动态代理的原理,和ProxyFactory的使用。下一讲,继续aop之旅,主要讲解ProxyFactory的原理。
原文出处:https://www.cnblogs.com/grey-wolf/p/12359963.html

Spring AOP - ProxyFactoryBean创建代理及代理的执行逻辑
引文:
ConfigurationClassPostProcessor 处理装配时的 bean 引用:ConfigurationClassEnhancer 的拦截器 BeanMethodInterceptor
方法的入参注解校验 MethodValidationInterceptor & AnnotationAwareAspectJAutoProxyCreator 创建代理
Spring 的事务管理(2)- 事务切面的解析处理过程
Spring 代理方式 - JDK & CGLIB
在上述几篇文章里, 都有说到一个观点:
在Spring里使用cglib代理,类内部方法的互调是不会再次进入拦截器方法逻辑的, 只有首次入口调用才会进拦截器。但cglib不是类似于''为target类生成一个proxy子类'' 吗? 不应该再次进入子类逻辑吗?
JDK的代理与Cglib代理有个明显的不同: 不提供方法A调用类内部其他方法B时可再次进行拦截器的方式,这种情况下只是类内部层面的方法调用。那在Spring里,出于保持功能设计一致的考虑对于cglib来使用了MethodProxy#invoke!
org.springframework.aop.framework.ProxyFactoryBean 创建代理
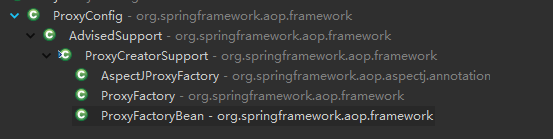
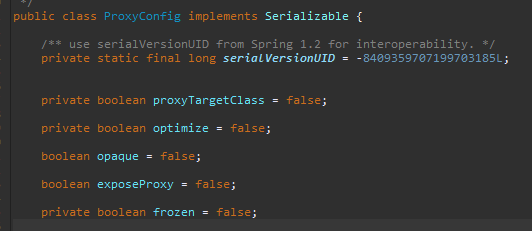
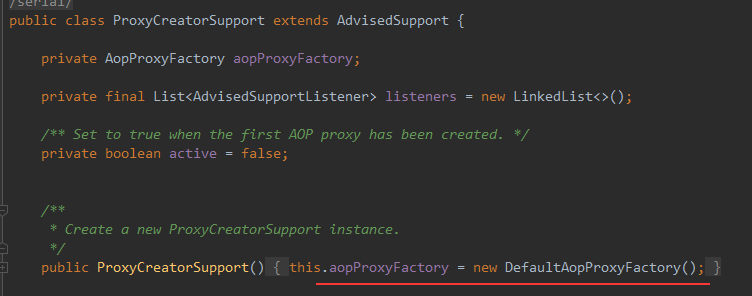
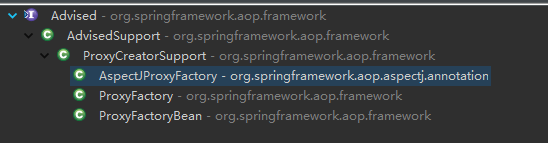
它们的超类统一是:org.springframework.aop.framework.ProxyConfig
关键类是:org.springframework.aop.framework.AdvisedSupport, 内部持有拦截器组和代理接口集合。

提供的常用方法如下:
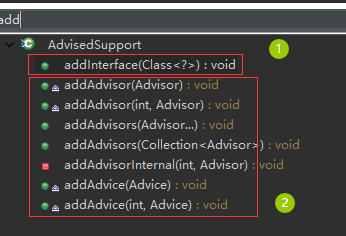
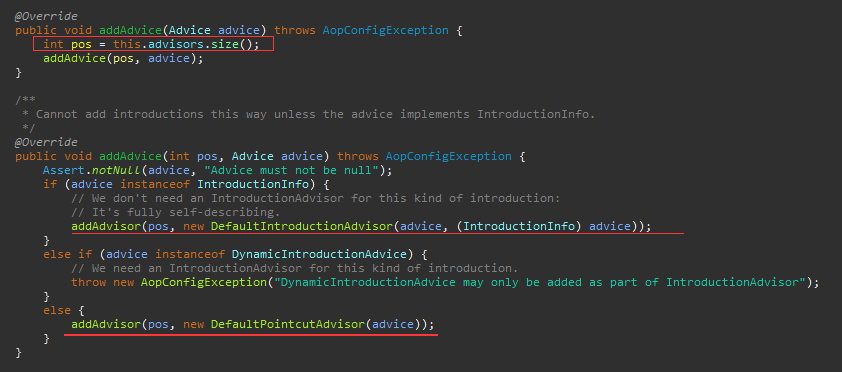
org.springframework.aop.framework.DefaultAdvisorChainFactory#getInterceptorsAndDynamicInterceptionAdvice(Advised config, Method method, @Nullable Class<?> targetClass)方法: 能将 AdvisedSupport(ProxyFactoryBean ) 中持有的切面配置集合“Advisors” 在业务方法上MethodMatcher#matches匹配切面规则筛选后归集。AdvisedSupport#addAdvice方法:增加拦截器MethodInterceptor。 被默认封装成的DefaultPointcutAdvisor加入到ProxyFactoryBean实例的Advisor集合中,也就是说可以有多个拦截器。 它默认使用匹配方法都返回true的org.springframework.aop.TruePointcut.
使用示例:
	T createProxy(Class<T> clas) {
		ProxyFactoryBean factory = new ProxyFactoryBean();
		factory.setProxyTargetClass(true); // 这里设置使用Cglib代理, 但还需要符合其他条件.
		factory.addAdvice(new MethodInterceptor() {
			@Override
			public Object invoke(MethodInvocation invocation) throws Throwable {
				return new CustomizerClientProxy(clas);
			}
		});
		factory.setTargetClass(clas);
		return (T) factory.getObject(); // 执行DefaultAopProxyFactory.createAopProxy 会选择走JdkDynamicAopProxy或ObjenesisCglibAopProxy
}这里有两个关键因素会影响到DefaultAopProxyFactory选择哪种方式创建代理对象。
- 方法
setProxyTargetClass设置代理方式 。 - 方法
setInterfaces指定代理接口 。
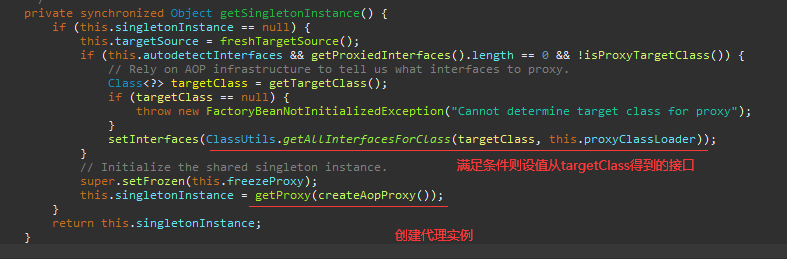
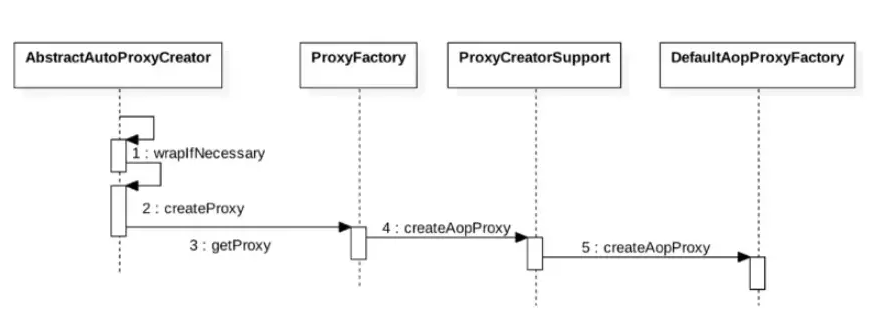
ProxyFactoryBean#getObject() -> #getSingletonInstance() -> #getProxy(AopProxy aopProxy)得到代理对象。
如果 【ProxyTargetClass为false && 还没有指定接口】,则“interfaces”设置成:从“targetClass”获取它实现的全部接口
父类org.springframework.aop.framework.ProxyCreatorSupport内部有接口 org.springframework.aop.framework.AopProxyFactory的实例org.springframework.aop.framework.DefaultAopProxyFactory。
生成代理对象的方法:
DefaultAopProxyFactory#createAopProxy(AdvisedSupport config),把 “ProxyFactoryBean | ProxyFactory”本身当做入参传入。- 简单一点可以使用
org.springframework.aop.framework.ProxyFactory,原理是相同的。
org.springframework.aop.framework.DefaultAopProxyFactory
看实际场景来决定选择JdkDynamicAopProxy还是ObjenesisCglibAopProxy。
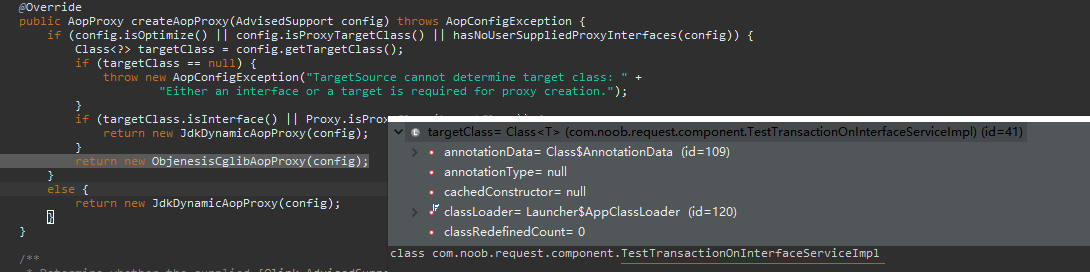
下面对if中的判断逻辑逐个解释:
- config.isOptimize():是否优化 ,默认false。若否则选择JDK,于是可推知Spring认为CGLIB代理的性能更高点。
- config.isProxyTargetClass(): 是否直接代理目标类(Cglib),默认false。
- hasNoUserSuppliedProxyInterfaces(config):没有指定代理接口,且不是SpringProxy。
- targetClass.isInterface():指定的对象是否是接口
- Proxy.isProxyClass(targetClass):是否是JDK代理类

这里 “config.getProxiedInterfaces()” 就是获取AdvisedSupport中的“interfaces”属性。
因此:【(指定proxyTargetClass == true || 没有指定代理接口)&& targetClass 非接口类型 && targetClass 非JDK代理类 】时,执行Cglib代理;其他情况下都是用JDK代理。
org.springframework.aop.framework.ObjenesisCglibAopProxy
继承了org.springframework.aop.framework.CglibAopProxy。重点看下它的创建代理类型的方法getProxy()。
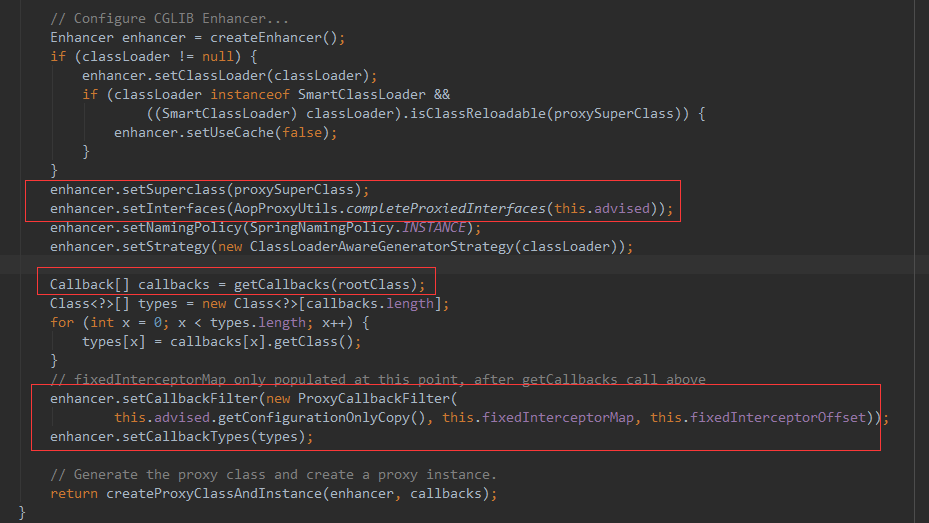
执行方法Class<?>[] org.springframework.aop.framework.AopProxyUtils#completeProxiedInterfaces(AdvisedSupport advised, boolean decoratingProxy)获取可代理的接口:
使用的是方法 AdvisedSupport#setInterfaces (优先) | AdvisedSupport#getProxiedInterfaces(),操作的是ProxyFactoryBean实例内的属性“interfaces”。
若没有额外执行 AdvisedSupport#setInterfaces 设置 && targetClass 不是接口, 则表示外部指定接口集合“specifiedInterfaces” 为空。-> 若为空,则判定targetClass是否 【接口类型 或 java.lang.reflect.Proxy代理类型】。
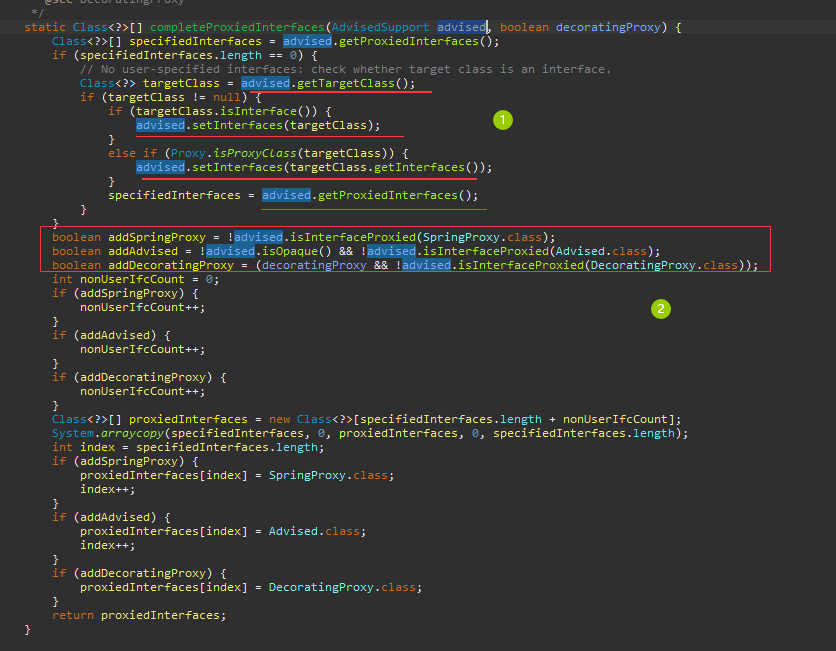
随后增加代理接口:
org.springframework.aop.SpringProxyorg.springframework.aop.framework.Advisedorg.springframework.core.DecoratingProxy
- 在使用
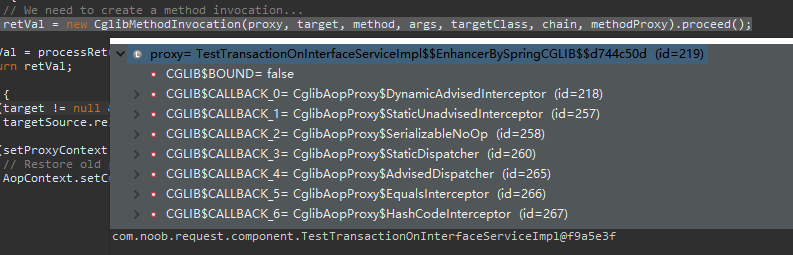
org.springframework.cglib.proxy.Enhancer创建代理对象时,设置的拦截器是:CglibAopProxy#DynamicAdvisedInterceptor,它内部持有了AdvisedSupport(ProxyFactoryBean)实例 。
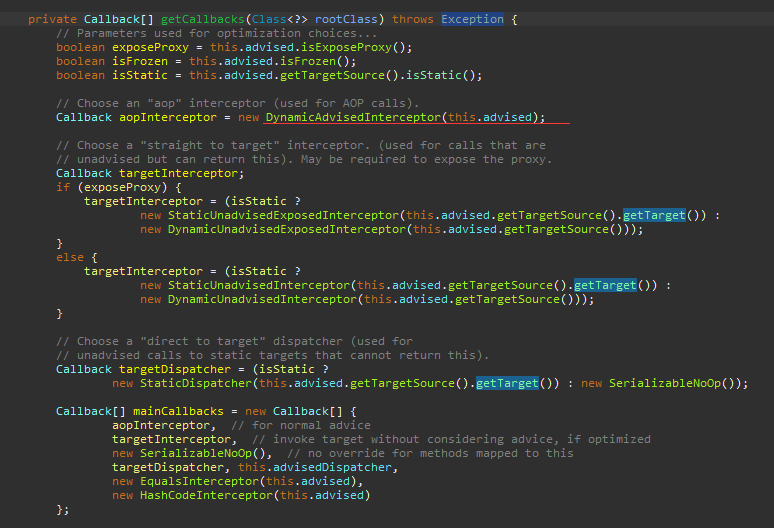
拦截器处理方法DynamicAdvisedInterceptor#intercept:将多个拦截器做链式处理。
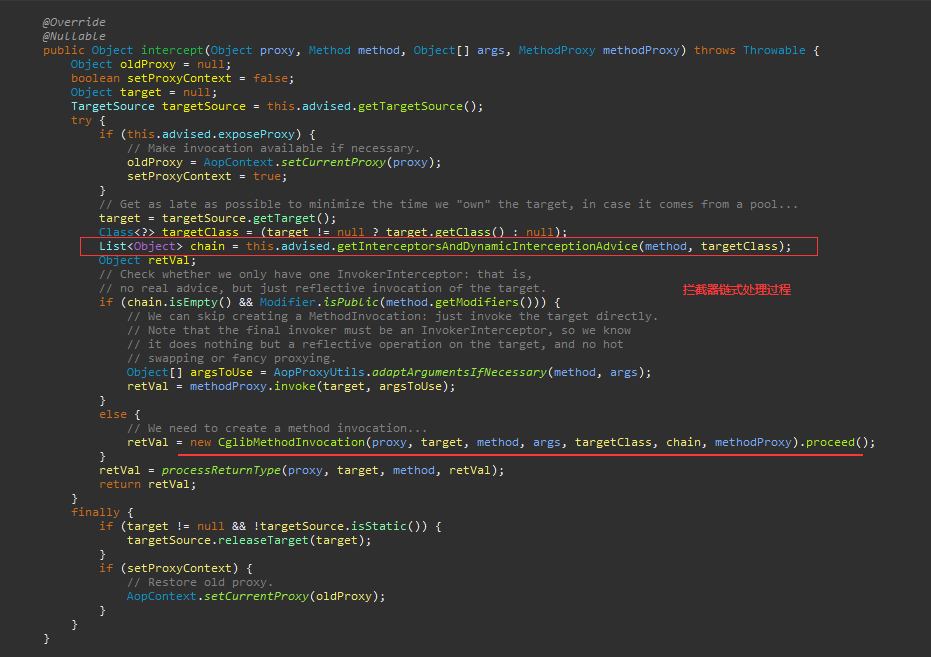
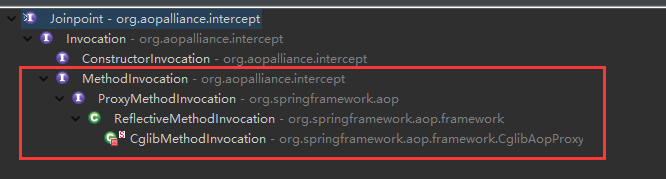
创建了org.springframework.aop.framework.CglibAopProxy.CglibMethodInvocation 对象, 它实现了org.aopalliance.intercept.MethodInvocation接口。
切面事务方法执行示例讲述执行过程proceed()
它 执行这里有几个重要的参数:
1、“proxy” : 原始Bean实例的代理。
2、“target” 、“targetClass”: 真实的Bean实例

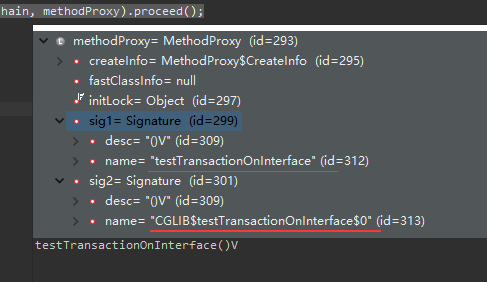
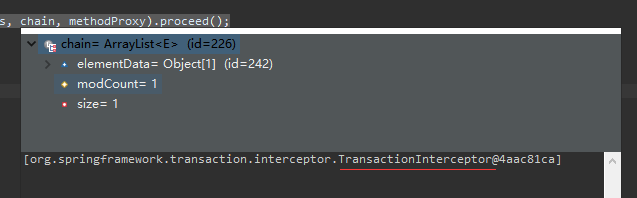
3、 “methodProxy” : 代理方法
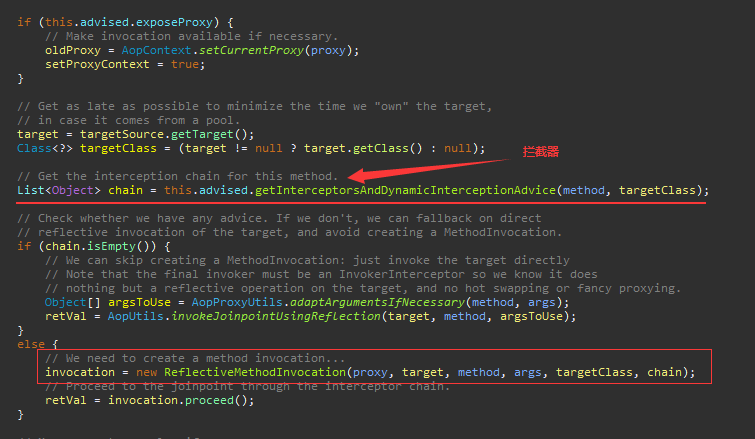
4、 “chain” : 拦截器组链,示例里只有TransactionInterceptor。 既然是链式设计,那关键之处就在于此:拦截器链上的处理。 接着向下看!
首次执行到ReflectiveMethodInvocation#proceed()时:

选择拦截器组链中第一个执行, 链组下标 currentInterceptorIndex++。所以执行进入了 TransactionInterceptor.invoke

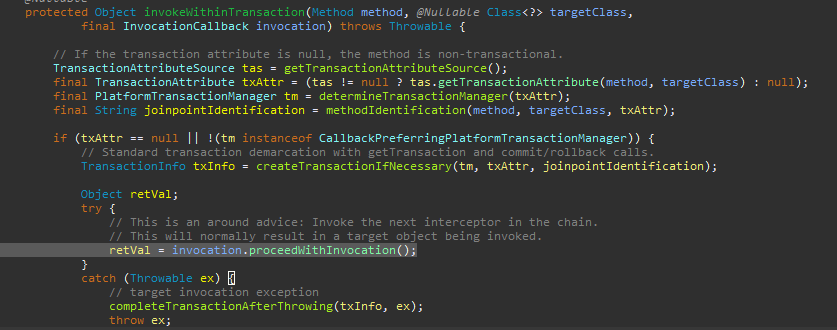
于是,这里又再次执行进入了ReflectiveMethodInvocation#proceed(),此时因为链组下标处已经没有拦截器了。

所以执行进入了ReflectiveMethodInvocation#invokeJoinpoint() -> CglibAopProxy&CglibMethodInvocation#invokeJoinpoint() (重写)
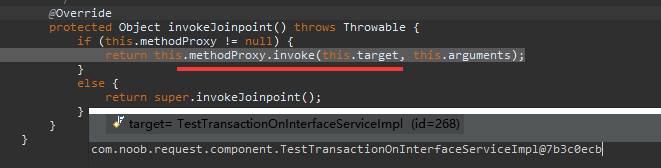
这里使用的是 org.springframework.cglib.proxy.MethodProxy.invoke操作真实target实例,这样内部调用其他即使可以被代理的方法也不会走拦截器逻辑。
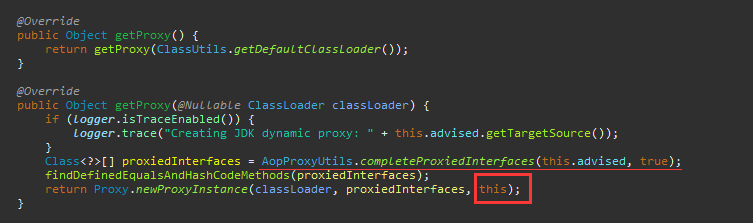
org.springframework.aop.framework.JdkDynamicAopProxy
本身自己就实现了java.lang.reflect.InvocationHandler接口 !
final class JdkDynamicAopProxy implements AopProxy, InvocationHandler, Serializable JdkDynamicAopProxy 将自己当做拦截处理类去创建代理对象,也是执行方法AopProxyUtils#completeProxiedInterfaces获取代理指定的接口。
拦截器处理方法JdkDynamicAopProxy#invoke的逻辑和 DynamicAdvisedInterceptor#intercept类似都是将多个Advice作链式处理。只是这里创建的是org.springframework.aop.framework.ReflectiveMethodInvocation。
最终执行链路:
ReflectiveMethodInvocation#proceed()链式处理 -> #invokeJoinpoint()
-> org.springframework.aop.support.AopUtils.AopUtils#invokeJoinpointUsingReflection:反射方式执行target实例对象的指定方法。

ProxyFactoryBean介绍")
Spring AOP源码分析(七)ProxyFactoryBean介绍
这篇文章里面就要说说Spring自己的AOP,搞清楚哪种方式是Spring自己实现的AOP,哪种方式是Spring引入aspectj的AOP。Spring自己的AOP实现在于ProxyFactoryBean。先看下使用案例(仍和之前的案例是一样的):接口AService、实现类AServiceImpl、通知MyBeforeAdvice
public interface AService {

	public void fooA(String _msg);

    public void barA();
}
public class AServiceImpl implements AService{
@Override
public void fooA(String _msg) {
System.out.println("AServiceImpl.fooA(msg:"+_msg+")");
}
@Override
public void barA() {
System.out.println("AServiceImpl.barA()");
}
}public class MyBeforeAdvice implements MethodBeforeAdvice{
@Override
public void before(Method method, Object[] args, Object target)
throws Throwable {
System.out.println("run my before advice");
}
}然后就是xml的配置:
<bean id="aServiceImpl"/>
	<bean id="myBeforAdvice"/>

	<bean>
		<property name="interfaces" value="com.lg.aop.service.AService"/>
		<property name="target">
			<ref bean="aServiceImpl"/>
		</property>
		 <property name="interceptorNames">
            <list>
                <value>myBeforAdvice</value>
            </list>
        </property>
	</bean>
然后就可以使用了:
@Autowired
	private AService aService;

	@Test
	public void testAOP(){
		aService.barA();
	}
运行这个单元测试,然后你就会看到报如下错误:
No qualifying bean of type [com.lg.aop.service.AService] is defined: expected single matching bean but found 2: aServiceImpl,org.springframework.aop.framework.ProxyFactoryBean#0原因就是对于接口AService,有两个实现类aServiceImpl和ProxyFactoryBean所生产的代理类。所以我们不能使用@Autowired(它是按类型注入),所以要使用按名称注入,我们怎么获取ProxyFactoryBean所产生的代理类的名称呢?其实就是ProxyFactoryBean配置的名称。因为ProxyFactoryBean实现了FactoryBean接口,对于这种接口从容器中获取该bean,不是获取的本身而是获取他的getObject方法所返回的值,看FactoryBean的文档:
/**
 * Interface to be implemented by objects used within a {@link BeanFactory}
 * which are themselves factories. If a bean implements this interface,
 * it is used as a factory for an object to expose, not directly as a bean
 * instance that will be exposed itself.
 *
 * <p><b>NB: A bean that implements this interface cannot be used as a
 * normal bean.</b> A FactoryBean is defined in a bean style, but the
 * object exposed for bean references ({@link #getObject()} is always
 * the object that it creates.
所以通过beanName找到了ProxyFactoryBean,然而不是返回该对象,而是返回他的getObject方法的返回值,所以我们通过ProxyFactoryBean的id就可以获取到它所产生的代理对象,所以更改如下:
<bean  id="aServiceImplProxy">
其他略
在使用注入的时候按名称注入
@Resource(name="aServiceImplProxy")
	private AService aService;
然后就可以正常运行了如下:
run my before advice
AServiceImpl.barA()
然后我们就要源码分析下这一过程,先看下是如何产生代理对象的,在ProxyFactoryBean的getObject方法中:
public Object getObject() throws BeansException {
//重点1
		initializeAdvisorChain();
		if (isSingleton()) {
//重点2
			return getSingletonInstance();
		}
		else {
			if (this.targetName == null) {
				logger.warn("Using non-singleton proxies with singleton targets is often undesirable. " +
						"Enable prototype proxies by setting the ''targetName'' property.");
			}
			return newPrototypeInstance();
		}
	}
重点1:就是根据我们配置的interceptorNames来获取对应的bean,并却转化成Advisor。如下:
private synchronized void initializeAdvisorChain() throws AopConfigException, BeansException {
		if (this.advisorChainInitialized) {
			return;
		}

		if (!ObjectUtils.isEmpty(this.interceptorNames)) {
			if (this.beanFactory == null) {
				throw new IllegalStateException("No BeanFactory available anymore (probably due to serialization) " +
						"- cannot resolve interceptor names " + Arrays.asList(this.interceptorNames));
			}

			// Globals can''t be last unless we specified a targetSource using the property...
			if (this.interceptorNames[this.interceptorNames.length - 1].endsWith(GLOBAL_SUFFIX) &&
					this.targetName == null && this.targetSource == EMPTY_TARGET_SOURCE) {
				throw new AopConfigException("Target required after globals");
			}

			// Materialize interceptor chain from bean names.
			for (String name : this.interceptorNames) {
				if (logger.isTraceEnabled()) {
					logger.trace("Configuring advisor or advice ''" + name + "''");
				}

				if (name.endsWith(GLOBAL_SUFFIX)) {
					if (!(this.beanFactory instanceof ListableBeanFactory)) {
						throw new AopConfigException(
								"Can only use global advisors or interceptors with a ListableBeanFactory");
					}
					addGlobalAdvisor((ListableBeanFactory) this.beanFactory,
							name.substring(0, name.length() - GLOBAL_SUFFIX.length()));
				}

				else {
					// If we get here, we need to add a named interceptor.
					// We must check if it''s a singleton or prototype.
					Object advice;
					if (this.singleton || this.beanFactory.isSingleton(name)) {
						// Add the real Advisor/Advice to the chain.
						advice = this.beanFactory.getBean(name);
					}
					else {
						// It''s a prototype Advice or Advisor: replace with a prototype.
						// Avoid unnecessary creation of prototype bean just for advisor chain initialization.
						advice = new PrototypePlaceholderAdvisor(name);
					}
					addAdvisorOnChainCreation(advice, name);
				}
			}
		}

		this.advisorChainInitialized = true;
	}
this.advisorChainInitialized:标示是否已进行过初始化,若以初始化则不再进行初始化。然后就是将interceptorNames转化成Advisor。根据interceptorNames所包含的字符串到容器中进行查找,如果含有*则,则表示进行一定的匹配,符合的都会纳入。如官方文档中说的:
<bean id="proxy">
    <property name="target" ref="service"/>
    <property name="interceptorNames">
        <list>
            <value>global*</value>
        </list>
    </property>
</bean>

<bean id="global_debug"/>
<bean id="global_performance"/>
这中间页经过了Advice到Advisor的转换,如下:
private void addAdvisorOnChainCreation(Object next, String name) {
		// We need to convert to an Advisor if necessary so that our source reference
		// matches what we find from superclass interceptors.
		Advisor advisor = namedBeanToAdvisor(next);
		if (logger.isTraceEnabled()) {
			logger.trace("Adding advisor with name ''" + name + "''");
		}
		addAdvisor(advisor);
	}
private Advisor namedBeanToAdvisor(Object next) {
try {
return this.advisorAdapterRegistry.wrap(next);
}
}
}public Advisor wrap(Object adviceObject) throws UnknownAdviceTypeException {
if (adviceObject instanceof Advisor) {
return (Advisor) adviceObject;
}
if (!(adviceObject instanceof Advice)) {
throw new UnknownAdviceTypeException(adviceObject);
}
Advice advice = (Advice) adviceObject;
if (advice instanceof MethodInterceptor) {
// So well-known it doesn''t even need an adapter.
return new DefaultPointcutAdvisor(advice);
}
for (AdvisorAdapter adapter : this.adapters) {
// Check that it is supported.
if (adapter.supportsAdvice(advice)) {
return new DefaultPointcutAdvisor(advice);
}
}
throw new UnknownAdviceTypeException(advice);
}这个包裹过程已经见过很多遍了,采用了适配器的模式。
之后又是和其他的AOP方式接轨了,设置一些列要实现的接口和参数,使用DefaultAopProxyFactory先创建出AopProxy,要么是JdkDynamicAopProxy,要么是CglibAopProxy,然后就可以调用AopProxy的getProxy方法来获取代理对象了。这个过程详见上一篇博客http://lgbolgger.iteye.com/blog/2119810。
这种方式实现的AOP还是比较麻烦的,同时配置一个ProxyFactoryBean仅能实现对一个目标对象的拦截,要想拦截多个目标对象,需要配置多个ProxyFactoryBean。所以大部分还是使用Spring引进的aspectj的AOP方式来进行AOP编程。
若想转载请注明出处
作者:乒乓狂魔

Spring api 之手动创建代理对象 ProxyFactory
可以通过注解的方式来自定义代理对象的创建,同时也可以通过 SpringAPI,手动编程的方式来创建代理对象。
几个重要的 API:
ProxyFactory
MethodInterceptor
Advice
AfterReturningAdvice
MethodBeforeAdvice
import java.lang.reflect.Method;
import org.aopalliance.intercept.Interceptor;
import org.aopalliance.intercept.MethodInterceptor;
import org.aopalliance.intercept.MethodInvocation;
import org.junit.Test;
import org.springframework.aop.AfterAdvice;
import org.springframework.aop.AfterReturningAdvice;
import org.springframework.aop.MethodBeforeAdvice;
import org.springframework.aop.framework.ProxyFactory;
import cn.hessian.service.HelloWorldService;
import cn.hessian.service.impl.HelloWorldServiceImpl2;
/**
* @author beijing
* 2013-4-2
*/
public class SpringProgramicProxyDemo {
@Test
public void test(){
// 代理对象需要的实现的接口
Class[] interfaces=new Class[]{HelloWorldService.class};
// 利用 spring 的 API, 创建代理工厂
ProxyFactory proxyFactory=new ProxyFactory(interfaces);
// 设置目标对象
proxyFactory.setTarget(new HelloWorldServiceImpl());
/**
* Set whether proxies created by this configuration should be prevented from being cast to Advised to query proxy status.
Default is "false", meaning that any AOP proxy can be cast to Advised.
* */
proxyFactory.setOpaque(true);
// 添加方法前置通知
proxyFactory.addAdvice(new MethodBeforeAdvice() {
@Override
public void before(Method method, Object[] args, Object target)
throws Throwable {
System.out.println ("1--- 在方法调用之前拦截");
}
});
// 可以添加多个方法前置或者后置通知
proxyFactory.addAdvice(new MethodBeforeAdvice() {
@Override
public void before(Method method, Object[] args, Object target)
throws Throwable {
System.out.println ("2--- 在方法调用之前拦截");
}
});
// 可以添加多个方法前置或者后置通知
proxyFactory.addAdvice(new AfterReturningAdvice() {
@Override
public void afterReturning(Object returnValue, Method method,
Object[] args, Object target) throws Throwable {
System.out.println ("方法完成之后调用的方法 ---1");
}
});
// 可以添加多个方法前置或者后置通知
proxyFactory.addAdvice(new AfterReturningAdvice() {
@Override
public void afterReturning(Object returnValue, Method method,
Object[] args, Object target) throws Throwable {
System.out.println ("方法完成之后调用的方法 ---2");
}
});
// 对于环绕通知只能添加一个,多添加也是没有用的,spring 会选第一个 advice,请看结果
proxyFactory.addAdvice(new MethodInterceptor() {
@Override
public Object invoke(MethodInvocation invocation) throws Throwable {
System.out.println ("1--- 环绕通知");
Object[] params=invocation.getArguments();
Method method=invocation.getMethod();
Object target=invocation.getThis();
Object bytes=method.invoke(target, params);
byte[] result=(byte[]) bytes;
System.out.println ("1--- 环绕通知生成的结果:"+new String (result));
return "北京生活圈".getBytes ();
}
});
// 对于环绕通知只能添加一个,多添加也是没有用的,spring 会选第一个 advice,请看结果
proxyFactory.addAdvice(new MethodInterceptor() {
@Override
public Object invoke(MethodInvocation invocation) throws Throwable {
System.out.println ("2--- 环绕通知");
Object[] params=invocation.getArguments();
Method method=invocation.getMethod();
Object target=invocation.getThis();
Object bytes=method.invoke(target, params);
byte[] result=(byte[]) bytes;
System.out.println ("2--- 环绕通知生成的结果:"+new String (result));
return bytes;
}
});
Object proxy=proxyFactory.getProxy(proxyFactory.getClass().getClassLoader());
Class[] inters=proxy.getClass().getInterfaces();
for(Class str: inters ){
System.out.println(str.getSimpleName());
}
HelloWorldService helloWorldService=(HelloWorldService)proxy;
System.out.println (new String (helloWorldService.sayHelloWorld ("北京")));
}
}
结果:
自己动手丰衣足食~~~~
本文分享自微信公众号 - JAVA 乐园(happyhuangjinjin88)。
如有侵权,请联系 support@oschina.cn 删除。
本文参与 “OSC 源创计划”,欢迎正在阅读的你也加入,一起分享。
 -- BeanFactoryProcessor加载分析")
Spring Boot源码分析(4) -- BeanFactoryProcessor加载分析
Spring Boot源码分析(4) -- BeanFactoryProcessor加载分析
在SpringApplication分析中我们谈论到,在准备好ApplicationContext上下文后,调用了refresh方法。从上面的分析中可以看到,使用的是AnnotationConfigApplicationContext实例的上下文。这一篇的内容主要围绕refresh方法分析BeanFactoryProcessor。主要分析refresh方法中的invokeBeanFactoryPostProcessors(beanFactory)方法。
我们直接看invokeBeanFactoryPostProcessors(beanFactory),从方法名称来看,这个方法处理的是BeanFactoryPostProcessor接口的Bean。调用方法如下:
protected void invokeBeanFactoryPostProcessors(ConfigurableListableBeanFactory beanFactory) {
	// 调用BeanFactoryPostProcessor
	PostProcessorRegistrationDelegate.invokeBeanFactoryPostProcessors(beanFactory, getBeanFactoryPostProcessors());
	// 省略LoadTimeWeaver接口处理
}
可能你会好奇,getBeanFactoryPostProcessors()方法获取了哪些BeanFactoryPostProcessor?所有的BeanFactoryPostProcessor都保存在beanFactoryPostProcessors属性中,而添加是通过addBeanFactoryPostProcessor(BeanFactoryPostProcessor postProcessor)方法处理的。
public void addBeanFactoryPostProcessor(BeanFactoryPostProcessor postProcessor) {
	Assert.notNull(postProcessor, "BeanFactoryPostProcessor must not be null");
	this.beanFactoryPostProcessors.add(postProcessor);
}
运行调式发现,有以下几个BeanFactoryPostProcessor实例。
- ConfigurationWarningsApplicationContextInitializer$ConfigurationWarningsPostProcessor
- SharedMetadataReaderFactoryContextInitializer$CachingMetadataReaderFactoryPostProcessor
- ConfigFileApplicationListener$PropertySourceOrderingPostProcessor
是不是觉得这些类很熟悉,这些类就是我们在前面分析Spring Boot初始化器和监听器的时候说过的。
BeanFactoryPostProcessor处理过程
关于具体是如何处理BeanFactoryPostProcessor的,我们需要跟进到PostProcessorRegistrationDelegate的invokeBeanFactoryPostProcessors方法中去看。调用方法如下:
public static void invokeBeanFactoryPostProcessors(
		ConfigurableListableBeanFactory beanFactory, List<BeanFactoryPostProcessor> beanFactoryPostProcessors) {
	Set<String> processedBeans = new HashSet<String>();

	if (beanFactory instanceof BeanDefinitionRegistry) {
		BeanDefinitionRegistry registry = (BeanDefinitionRegistry) beanFactory;
		// 普通的处理器
		List<BeanFactoryPostProcessor> regularPostProcessors = new LinkedList<BeanFactoryPostProcessor>();
		// 注册用处理器
		List<BeanDefinitionRegistryPostProcessor> registryProcessors = new LinkedList<BeanDefinitionRegistryPostProcessor>();

		// 单独处理BeanDefinitionRegistryPostProcessor
		for (BeanFactoryPostProcessor postProcessor : beanFactoryPostProcessors) {
			if (postProcessor instanceof BeanDefinitionRegistryPostProcessor) {
				BeanDefinitionRegistryPostProcessor registryProcessor =
						(BeanDefinitionRegistryPostProcessor) postProcessor;
				registryProcessor.postProcessBeanDefinitionRegistry(registry);
				registryProcessors.add(registryProcessor);
			}
			else {
				regularPostProcessors.add(postProcessor);
			}
		}

		// 这里并不会初始化FactoryBean,所有普通的Bean不会初始化,而是让BeanFactoryPostProcessor应用于他们。
		// 对于BeanDefinitionRegistryPostProcessors,实现PriorityOrdered、Ordered接口的分开处理。
		List<BeanDefinitionRegistryPostProcessor> currentRegistryProcessors = new ArrayList<BeanDefinitionRegistryPostProcessor>();

		// 首先,获取实现PriorityOrdered接口的BeanDefinitionRegistryPostProcessor。
		// 当调用getBean方法时,就已经完成了这些Bean的加载。
		String[] postProcessorNames =
				beanFactory.getBeanNamesForType(BeanDefinitionRegistryPostProcessor.class, true, false);
		for (String ppName : postProcessorNames) {
			if (beanFactory.isTypeMatch(ppName, PriorityOrdered.class)) {
				currentRegistryProcessors.add(beanFactory.getBean(ppName, BeanDefinitionRegistryPostProcessor.class));
				processedBeans.add(ppName);
			}
		}
		// 排序
		sortPostProcessors(currentRegistryProcessors, beanFactory);
		// 添加到registryProcessors中,获取到ConfigurationClassPostProcessor实例
		registryProcessors.addAll(currentRegistryProcessors);
		invokeBeanDefinitionRegistryPostProcessors(currentRegistryProcessors, registry);
		currentRegistryProcessors.clear();
		// 处理实现Ordered接口的实例
		postProcessorNames = beanFactory.getBeanNamesForType(BeanDefinitionRegistryPostProcessor.class, true, false);
		for (String ppName : postProcessorNames) {
			if (!processedBeans.contains(ppName) && beanFactory.isTypeMatch(ppName, Ordered.class)) {
				currentRegistryProcessors.add(beanFactory.getBean(ppName, BeanDefinitionRegistryPostProcessor.class));
				processedBeans.add(ppName);
			}
		}
		sortPostProcessors(currentRegistryProcessors, beanFactory);
		registryProcessors.addAll(currentRegistryProcessors);
		invokeBeanDefinitionRegistryPostProcessors(currentRegistryProcessors, registry);
		currentRegistryProcessors.clear();

		// 处理其他所有的BeanDefinitionRegistryPostProcessor
		boolean reiterate = true;
		while (reiterate) {
			reiterate = false;
			postProcessorNames = beanFactory.getBeanNamesForType(BeanDefinitionRegistryPostProcessor.class, true, false);
			for (String ppName : postProcessorNames) {
				if (!processedBeans.contains(ppName)) {
					currentRegistryProcessors.add(beanFactory.getBean(ppName, BeanDefinitionRegistryPostProcessor.class));
					processedBeans.add(ppName);
					reiterate = true;
				}
			}
			sortPostProcessors(currentRegistryProcessors, beanFactory);
			registryProcessors.addAll(currentRegistryProcessors);
			invokeBeanDefinitionRegistryPostProcessors(currentRegistryProcessors, registry);
			currentRegistryProcessors.clear();
		}

		// 处理BeanFactoryPostProcessor
		invokeBeanFactoryPostProcessors(registryProcessors, beanFactory);
		invokeBeanFactoryPostProcessors(regularPostProcessors, beanFactory);
	}
	else {
		invokeBeanFactoryPostProcessors(beanFactoryPostProcessors, beanFactory);
	}

	// 省略对BeanFactoryPostProcessor接口的处理,处理方式和BeanDefinitionRegistryPostProcessor接口一样
调用流程说明
上面的代码很长,我们说一下其中的流程。
-
首先,处理BeanDefinitionRegistryPostProcessor接口。优先处理通过参数beanFactoryPostProcessors传入的,然后处理容器注册进来的实例。处理的过程按照实现PriorityOrdered、Ordered、没有排序接口实现的顺序进行处理。
上面已经说过,参数传入beanFactoryPostProcessors实例为:ConfigurationWarningsApplicationContextInitializer$ConfigurationWarningsPostProcessor、
SharedMetadataReaderFactoryContextInitializer$CachingMetadataReaderFactoryPostProcessor、
ConfigFileApplicationListener$PropertySourceOrderingPostProcessor。其中前两个实现了BeanDefinitionRegistryPostProcessor接口。
注册获取的BeanDefinitionRegistryPostProcessor实例为:ConfigurationClassPostProcessor,这个类负责处理注解配置,后面单独分析。
-
其次,处理BeanFactoryPostProcessor接口。处理原则和上面一致。
先处理ConfigFileApplicationListener$PropertySourceOrderingPostProcessor,然后从注册获取到以下实例:ConfigurationClassPostProcessor、PropertySourcesPlaceholderConfigurer、ConfigurationPropertiesBindingPostProcessor.store
对于已经执行过的会跳过处理。
调用方法流程说明
-
调用BeanDefinitionRegistryPostProcessor#postProcessBeanDefinitionRegistry(registry)方法。参数beanFactoryPostProcessors传入的优先处理掉。然后获取容器注册的,对于这些Bean按照PriorityOrdered接口、Ordered、没有排序接口的实例分别进行处理。
-
调用BeanFactoryPostProcessor#postProcessBeanFactory(beanFactory)方法。备注:BeanDefinitionRegistryPostProcessor属于BeanFactoryPostProcessor子接口。先处理属于BeanDefinitionRegistryPostProcessor接口实例的postProcessBeanFactory(beanFactory)方法,然后获取容器注册的。对于这些Bean按照PriorityOrdered接口、Ordered、没有排序接口的实例分别进行处理。
今天的关于曹工说Spring Boot源码和19-- Spring 带给我们的工具利器,创建代理不用愁的分享已经结束,谢谢您的关注,如果想了解更多关于Spring AOP - ProxyFactoryBean创建代理及代理的执行逻辑、Spring AOP源码分析(七)ProxyFactoryBean介绍、Spring api 之手动创建代理对象 ProxyFactory、Spring Boot源码分析(4) -- BeanFactoryProcessor加载分析的相关知识,请在本站进行查询。
本文标签:


