本文将带您了解关于Asp.NetCore安全验证之JWT的新内容,同时我们还将为您解释asp.netcorejwt验证token的相关知识,另外,我们还将为您提供关于.netcorejwt授权验证、.
本文将带您了解关于Asp.NetCore安全验证之JWT的新内容,同时我们还将为您解释asp.net core jwt验证token的相关知识,另外,我们还将为您提供关于.net core jwt 授权验证、.netcore3.1 添加 swagger 及 JWT Authorize 验证、.NETcore中使用jwt来对api进行身份验证、Asp .net core JWT验证的实用信息。
本文目录一览:- Asp.NetCore安全验证之JWT(asp.net core jwt验证token)
- .net core jwt 授权验证
- .netcore3.1 添加 swagger 及 JWT Authorize 验证
- .NETcore中使用jwt来对api进行身份验证
- Asp .net core JWT验证
")
Asp.NetCore安全验证之JWT(asp.net core jwt验证token)
本文只是介绍了下基于AspNetCore自带的System.IdentityModel.Tokens.Jwt.dll工具在项目中Token的应用。
我这里谈到的很浅显就两点:
一,超时时间
二,数据的加载
1,废话不多说上代码,首先是自定义的载体类如下
1   public class DtoRecLogin
2     {
3         public string Data1 { get; set; }
4         public string Data2 { get; set; }
5         public string Data3 { get; set; }
6     }
2,接着是Token生成的签名信息
public class TokenAuthOption
    {
        public static string Audience { get; } = "ExampleAudience";
        public static string Issuer { get; } = "ExampleIssuer";
        public static RsaSecurityKey Key { get; } = new RsaSecurityKey(RSAKeyHelper.GenerateKey());
        public static SigningCredentials SigningCredentials { get; } = new SigningCredentials(Key, SecurityAlgorithms.RsaSha256Signature);

        public static TimeSpan ExpiresSpan { get; } = TimeSpan.FromMinutes(1440);
    }
3,好了准备工作完成接着贴上生成Token的代码
 1 private static string GenerateToken(DtoRecLogin reclogin, DateTime expires)
 2         {
 3             var handler = new JwtSecurityTokenHandler();
 4
 5             ClaimsIdentity identity = new ClaimsIdentity(
 6                 new GenericIdentity(reclogin.Data1, "TokenAuth"),
 7                 new[] {
 8             new Claim("ID", reclogin.Data2),
 9             new Claim("SysCode",reclogin.Data3)
10                 }
11             );
12
13             var securityToken = handler.CreateToken(new SecurityTokenDescriptor
14             {
15                 Issuer = TokenAuthOption.Issuer,
16                 Audience = TokenAuthOption.Audience,
17                 SigningCredentials = TokenAuthOption.SigningCredentials,
18                 Subject = identity,
19                 Expires = expires
20             });
21             return handler.WriteToken(securityToken);
22         }
这个方法有2个参数
1)DtoRecLogin对象用于承载需要传递的信息
2) expires 是Token的超时时间
4,Token生成完毕我们来模拟下调用和解析Token
public static void Main(string[] args)
        {
            #region 生成Token
            var timeout = DateTime.Now + TimeSpan.FromSeconds(5);
            var token = GenerateToken(new DtoRecLogin()
            {
                Data1 = "TestData1",
                Data2 = "TestData2",
                Data3 = "TestData3"
            }, timeout);
            #endregion


            #region 解析Token
            //当前的时间戳用于判断token是否过期
            var now = Math.Round((DateTime.UtcNow - new DateTime(1970, 1, 1, 0, 0, 0, DateTimeKind.Utc)).TotalSeconds);

            var encodedJwt = new JwtSecurityTokenHandler().ReadJwtToken(token);
            //开始时间
            var iat = Convert.ToDouble(encodedJwt.Claims.FirstOrDefault(u => u.Type == "iat").Value);
            //结束时间
            var exp = Convert.ToDouble(encodedJwt.Claims.FirstOrDefault(u => u.Type == "exp").Value);

            //如果当前时间戳不再Token声明周期范围内,则返回Token过期
            if (!(iat < now && now < exp))
            {
                throw (new Exception() { Source = "TokenTimeOut" });
            }

            var data1 = encodedJwt.Claims.FirstOrDefault(u => u.Type == "unique_name").Value;
            var data2 = encodedJwt.Claims.FirstOrDefault(u => u.Type == "ID").Value;
            var data3 = encodedJwt.Claims.FirstOrDefault(u => u.Type == "SysCode").Value;
            #endregion


        }
注释的很详细就不多说了,为了方便的测试我用了5秒钟超时,在调试的时候 可以在
var now = Math.Round((DateTime.UtcNow - new DateTime(1970, 1, 1, 0, 0, 0, DateTimeKind.Utc)).TotalSeconds);
打上断点,然后一次直接跳过此处,一次等待5秒以上在往下走,可以发现超过5秒会抛Token过期异常

好了,到此结束,希望可以帮到刚接触Token验证的朋友。

.net core jwt 授权验证
代码我参考了一本书 Modern API Design with ASP.NET Core 2 Building Cross-Platform Back-End Systems
网上也有一个很牛 https://jasonwatmore.com/post/2018/08/14/aspnet-core-21-jwt-authentication-tutorial-with-example-api
1.获取token 的controller
 1  [HttpGet]
 2         public IActionResult GetToken()
 3         {
 4             var authorizationHeader = Request.Headers["Authorization"].First();
 5             var key = authorizationHeader.Split('' '')[1];
 6             var credentials = Encoding.UTF8.GetString(Convert.FromBase64String(key)).Split('':'');
 7
 8             var serverSecret = new SymmetricSecurityKey(Encoding.UTF8.GetBytes(_configuration["JWT:ServerSecret"]));
 9             //验证是否是信任用户的用户名和密码,可在数据库中查询
10             if (credentials[0] == "awesome-username" && credentials[1] == "awesome-password")
11             {
12                 var result = new
13                 {
14                     token = GenerateToken(serverSecret)
15                 };
16
17                 return Ok(result);
18             }
19
20             return BadRequest();
21         }
22
23         private string GenerateToken(SecurityKey key)
24         {
25             var now = DateTime.UtcNow;
26             //发行人
27             var issuer = _configuration["JWT:Issuer"];
28             //接收者??
29             var audience = _configuration["JWT:Audience"];
30             var identity = new ClaimsIdentity();
31             //可以放一些claim进去授权时候使用
32             Claim claim = new Claim(ClaimTypes.Name, "Leo");
33             identity.AddClaim(claim);
34             //登录凭证
35             var signingCredentials = new SigningCredentials(key,
36                 SecurityAlgorithms.HmacSha256);
37             var handler = new JwtSecurityTokenHandler();
38             //生成token,设置1小时的过期时间
39             var token = handler.CreateJwtSecurityToken(issuer, audience, identity,
40                 now, now.Add(TimeSpan.FromHours(1)), now, signingCredentials);
41             var encodedJwt = handler.WriteToken(token);
42             return encodedJwt;
43         }
2.Startup 配置类
 1  services.AddAuthentication(JwtBearerDefaults.AuthenticationScheme)
 2                 .AddJwtBearer(options =>
 3                 {
 4                     var serverSecret = new SymmetricSecurityKey(Encoding.UTF8.
 5                         GetBytes(Configuration["JWT:ServerSecret"]));
 6                     options.TokenValidationParameters = new
 7                         TokenValidationParameters
 8                         {
 9                             IssuerSigningKey = serverSecret,
10                             //RequireExpirationTime = true,
11                             ClockSkew = TimeSpan.Zero,
12                             ValidIssuer = Configuration["JWT:Issuer"],
13                             ValidAudience = Configuration["JWT:Audience"]
14                         };
15                 });
3.appsettings.json
"JWT": {
    "ServerSecret": "qwertyuiopasdfghjklzxcvbnm123456",
    "Issuer": "https://awesome.io",
    "Audience": "https://app.awesome.io"
  },
4.客户端调用
 1  static void Main(string[] args)
 2         {
 3
 4             HttpClient client = new HttpClient();
 5             var identity = "awesome-username:awesome-password";
 6             string idString = Base64Code(identity);
 7             client.DefaultRequestHeaders.Add("Authorization", $"Basic {idString}");
 8             //var respMsg =  client.GetAsync("http://localhost:8082/api/Todo/GetTodoItems");
 9             var respMsg = client.GetAsync("http://localhost:8082/api/Authenticate/GetToken");
10             string msgBody = respMsg.Result.Content.ReadAsStringAsync().Result;
11             TokenClass obj = JsonConvert.DeserializeObject<TokenClass>(msgBody);
12             string token = obj.token;
13             Console.WriteLine(token);
14             Console.ReadKey();
15
16             //2.获取token后再次发送请求
17             //var token = "123";
18             HttpClient getItemsClient = new HttpClient();
19             getItemsClient.DefaultRequestHeaders.Add("Authorization",$"Bearer {token}");
20             var respGetItems = getItemsClient.GetAsync("http://localhost:8082/api/Todo/GetTodoItems");
21             string msgGetItems = respGetItems.Result.Content.ReadAsStringAsync().Result;
22
23             Console.WriteLine(msgGetItems);
24             Console.ReadKey();
25
26
27
28         }
5.必须在需要验证授权的controller或action上添加 [Authorize]特性才能生效
6.我后期在core2.2遇到了302 问题,找了半天在 stackoverflow 找到答案
 1     services.AddAuthentication(options =>
 2                 {
 3                     options.DefaultAuthenticateScheme = JwtBearerDefaults.AuthenticationScheme;
 4                     options.DefaultChallengeScheme = JwtBearerDefaults.AuthenticationScheme;
 5                 })
 6                 .AddJwtBearer(JwtBearerDefaults.AuthenticationScheme, options =>
 7                 {
 8                     var serverSecret = new SymmetricSecurityKey(Encoding.UTF8.
 9                         GetBytes(Configuration["JWT:ServerSecret"]));
10                     options.TokenValidationParameters = new
11                         TokenValidationParameters
12                         {
13                             IssuerSigningKey = serverSecret,
14                             //RequireExpirationTime = true,
15                             //ClockSkew = TimeSpan.Zero,
16                             ValidIssuer = Configuration["JWT:Issuer"],
17                             ValidAudience = Configuration["JWT:Audience"]
18                         };
19
20
21                 });

.netcore3.1 添加 swagger 及 JWT Authorize 验证

上一篇我们已经弄好了 swaager , 接下赖集成一下 jwt 进行认证。
首先引入 Microsoft.AspNetCore.Authentication.JwtBearer nuget 包
在 startup 中加入 jwt 配置。这里 ValidIssuer 和 ValidAudience 和 secret 最好配置一下,我这里写死了。
services.AddAuthentication(x =>
            {
                x.DefaultAuthenticateScheme = JwtBearerDefaults.AuthenticationScheme;
                x.DefaultChallengeScheme = JwtBearerDefaults.AuthenticationScheme;
            }).AddJwtBearer(x =>
            {
                x.RequireHttpsMetadata = false;
                x.SaveToken = true;
                x.TokenValidationParameters = new TokenValidationParameters
                {
                    ValidateIssuerSigningKey = true,
                    IssuerSigningKey = new SymmetricSecurityKey(Encoding.ASCII.GetBytes("123456111111111111111111")),//token.Secret)),
                    ValidIssuer = "webapi.cn",//token.Issuer,
                    ValidAudience = "WebApi",//token.Audience,
                    ValidateIssuer = true,
                    ValidateAudience = true
                };
            });
        }
在上一篇 swagger 的配置中加入 jwt 验证配置
services.AddSwaggerGen(s =>
            {
                s.SwaggerDoc("v1", new OpenApiInfo { Title = "My API", Version = "v1" });
                s.AddSecurityDefinition("Bearer", new OpenApiSecurityScheme()
                {
                    Description = "在下框中输入请求头中需要添加Jwt授权Token:Bearer Token",
                    Name = "Authorization",
                    In = ParameterLocation.Header,
                    Type = SecuritySchemeType.ApiKey,
                    BearerFormat = "JWT",
                    Scheme = "Bearer"
                });

                s.AddSecurityRequirement(new OpenApiSecurityRequirement
                    {
                        {
                            new OpenApiSecurityScheme{
                                Reference = new OpenApiReference {
                                            Type = ReferenceType.SecurityScheme,
                                            Id = "Bearer"}
                           },new string[] { }
                        }
                    });


            });
这样 swaager 的 jwt 授权认证就弄好了,接下来写个接口获取一下 token
 [HttpGet]
        [Route("/GetToken")]
        public ActionResult<string> GetToken()
        {
            var claims = new[]
           {
                new Claim(ClaimTypes.Name,"Ers")
            };
            var key = new SymmetricSecurityKey(Encoding.UTF8.GetBytes("123456111111111111111111"));
            var credentials = new SigningCredentials(key, SecurityAlgorithms.HmacSha256);
            var jwtToken = new JwtSecurityToken("webapi.cn", "WebApi", claims, expires: DateTime.Now.AddMinutes(30), signingCredentials: credentials);

            var token = new JwtSecurityTokenHandler().WriteToken(jwtToken);

            return token;
        }
在原来的天气接口上加上 [Authorize] 特性
在 startup 管道中启用授权 app.UseAuthentication ();
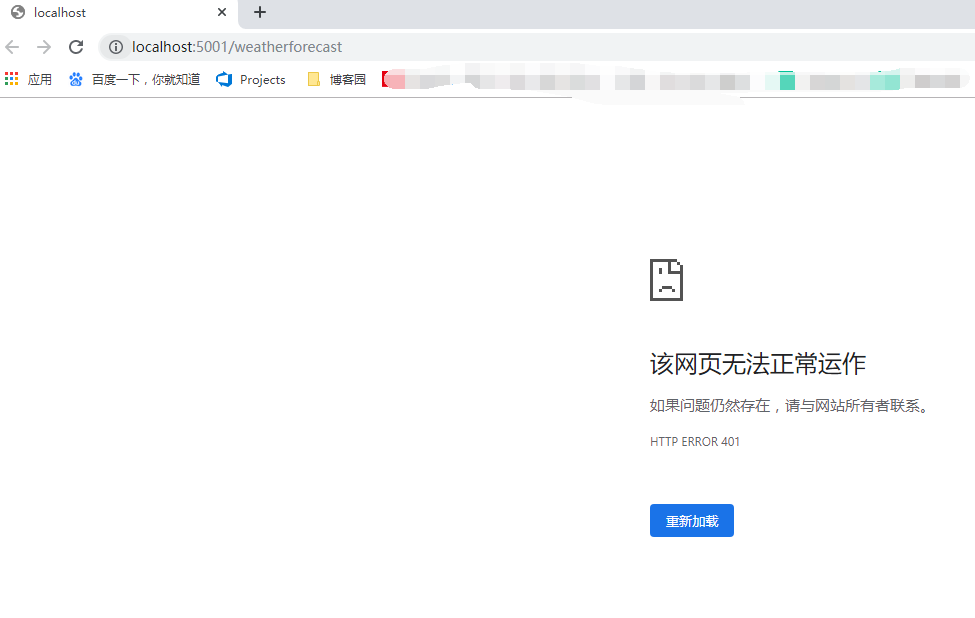
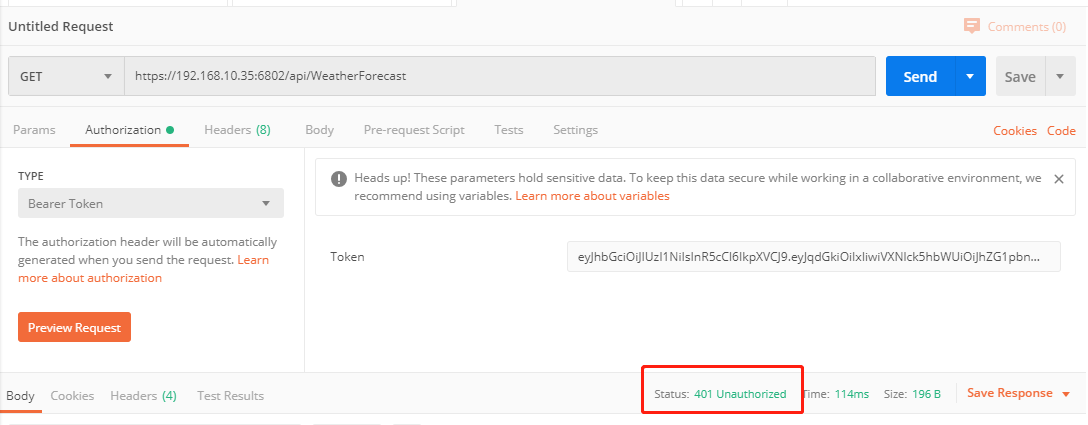
运行一下,访问天气接口,发现访问不了,因为加了 [Authorize] 特性后需要认证,如下图,出现 401 没有权限的标志。
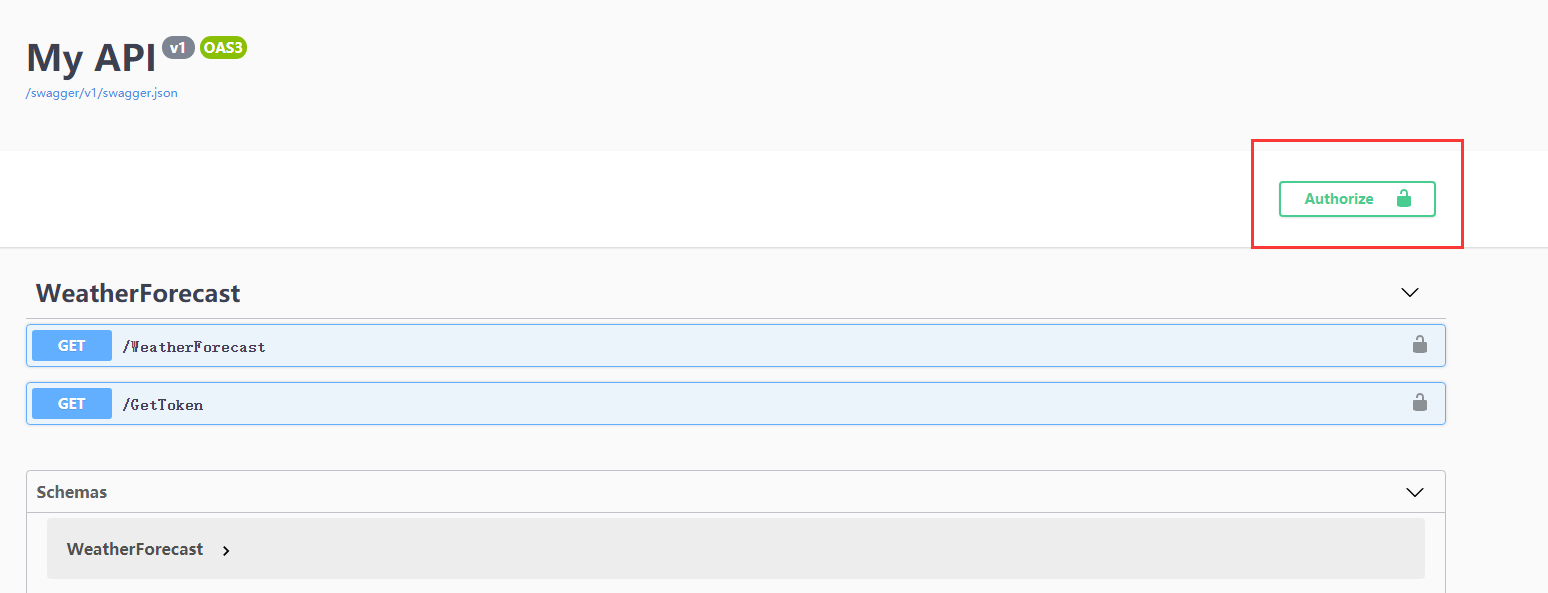
访问 swagger 主页出现一个 Authorize 的标志,点击可以输入 jwt 的验证字符。
运行获取 weatherforecast 接口,运行结果还是 401, 因为我们在接口添加了【Authorize】后接口需要一个认证

现在去拿一下 token, 运行 GetToken, 获取 Token 字符串,

将字符串添加到 swagger 提供的 Authorize 认证框里面,粘贴 token 之前要写上 Bearer 加一个空格,再粘上 token. 点击 Authorize,完成。

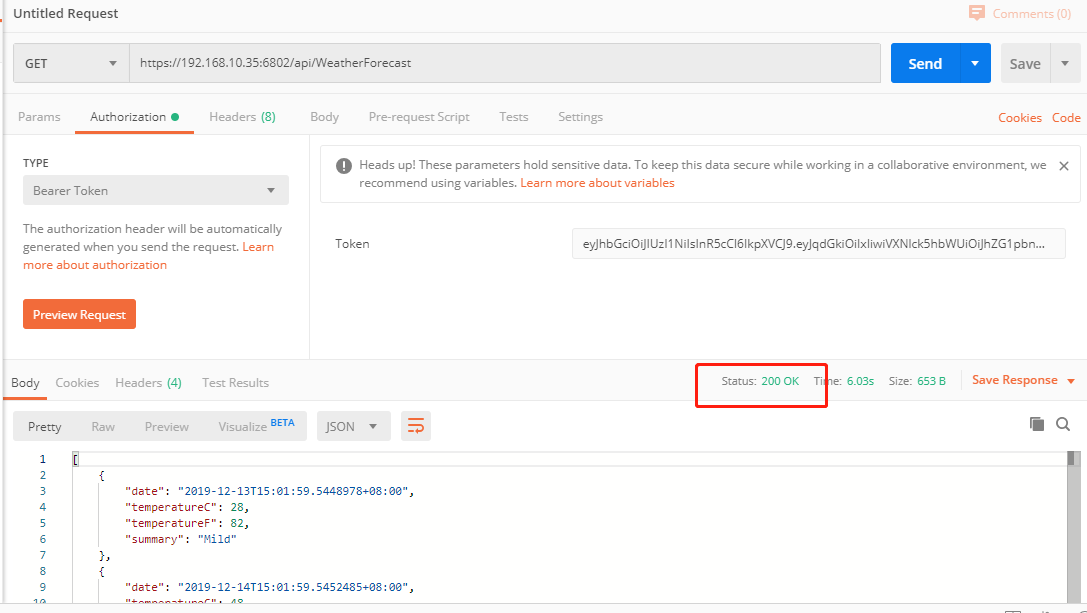
再次运行获取天气接口
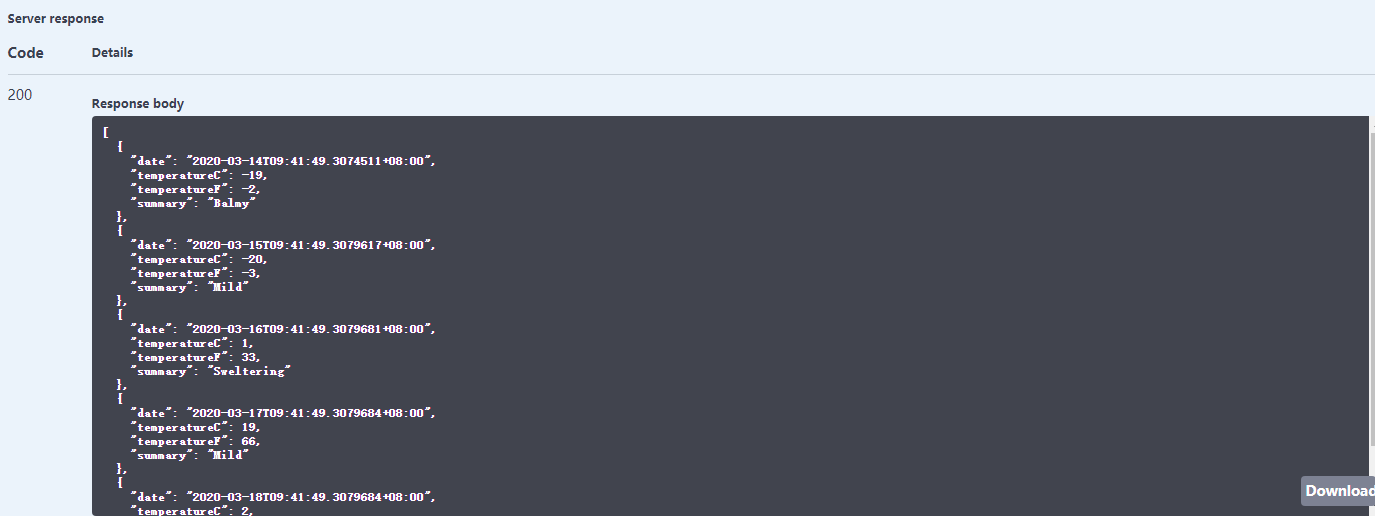
成功了,。

.NETcore中使用jwt来对api进行身份验证
对于 登陆,身份,授权这之类的操作,我们最常用的几种方法无非就是 cookie session token
这三者的差别
https://www.cnblogs.com/moyand/p/9047978.html
这篇文章写的非常好
cookie和session到了微服务和负载均衡需要扩展时,就显得力不从心,而token这种无状态的身份验证就更加适合
JWT
所谓JWT就是 JSON WEB Token 是一种基于JSON的、用于在网络上声明某种主张的令牌(token)。JWT通常由三部分组成:头信息(header),消息体(payload)和签名(signature)。
头信心中会生命算法类型:
header = ''{"alg":"HS256","typ":"JWT"}''
消息体:
payload = ''{"loggedInAs":"admin","iat":1422779638}''//iat表示令牌生成的时间只有签名是加密的,但是你真实中看到的token样子是长这样
eyJhbGciOiJIUzI1NiIsInR5cCI6IkpXVCJ9.eyJqdGkiOiIxIiwiVXNlck5hbWUiOiJhZG1pbnMiLCJpYXQiOiIxNTc2MTE3MTY0IiwibmJmIjoiMTU3NjExNzE2NCIsImV4cCI6MTU3NjExNzg4NCwiaXNzIjoiRnl0U29hIiwiYXVkIjpbIkNtcyIsIkNtcyJdLCJodHRwOi8vc2NoZW1hcy5taWNyb3NvZnQuY29tL3dzLzIwMDgvMDYvaWRlbnRpdHkvY2xhaW1zL3JvbGUiOiJBZG1pbnMifQ.1HFSPephhGAUqwl0zRvTvd-ow7_6E_S78DGvaiY_UnQ
一眼看上去好像都被加密了,但其实上header和payload只是进行了base64的编码,仔细的话你可以发现token里面有两个点“.”,进行分隔
认证与授权
首先我们要弄清楚认证(Authentication)和授权(Authorization)的区别,以免混淆了。认证是确认的过程中你是谁,而授权围绕是你被允许做什么,即权限。显然,在确认允许用户做什么之前,你需要知道他们是谁,因此,在需要授权时,还必须以某种方式对用户进行身份验证。
开始代码
首先,我写了一个JWTapi的.netcore3.0作为授权服务,一个TestApi2作为业务api

首先看JWTapi

仅仅需要一个谁都能访问的接口,提供登陆服务,(查询登陆结果那个地方,应该做数据库的匹配,我节省时间写了个假的)
生成token的方法中要设置Issuer,Audience,JWTSecretKey,这三者要与认证服务中的相同才能解开
接下来来看Testapi2
Testapi2作为一个业务api,作为一个被访问者,不是谁都能见我的,你要到达某个级别,才能见到我,所以要对来访的人进行认证
所以要在ConfigureServices中,添加
services.AddAuthentication()
.AddJwtBearer(JwtAuthorizeAttribute.JwtAuthenticationScheme, o =>
{
o.TokenValidationParameters = new TokenValidationParameters
{
ValidateIssuer = true,//是否验证Issuer
ValidateAudience = true,//是否验证Audience
ValidateIssuerSigningKey = true,//是否验证SecurityKey
ValidateLifetime = true,//是否验证超时 当设置exp和nbf时有效 同时启用ClockSkew
ClockSkew = TimeSpan.FromSeconds(30),//注意这是缓冲过期时间,总的有效时间等于这个时间加上jwt的过期时间,如果不配置,默认是5分钟
ValidAudience = Configuration["JwtAuth:Audience"],//Audience
ValidIssuer = Configuration["JwtAuth:Issuer"],//Issuer,这两项和前面签发jwt的设置一致
RequireExpirationTime = true,
IssuerSigningKey = new SymmetricSecurityKey(Encoding.UTF8.GetBytes(Configuration["JwtAuth:SecurityKey"]))//拿到SecurityKey
};
o.Events = new JwtBearerEvents
{
OnAuthenticationFailed = context =>
{
// 如果过期,则把<是否过期>添加到,返回头信息中
if (context.Exception.GetType() == typeof(SecurityTokenExpiredException))
{
context.Response.Headers.Add("Token-Expired", "true");
}
return Task.CompletedTask;
}
};
});
这里面的Issuer,Audience,SecurityKey这三者,要与生成token时使用的一样
然后找一个controller,加上某种角色才可以访问的限制

使用postman模拟登陆

会得到一串token值,将这串token放入postman,选择Testapi2中的api进行发送
可以发送,获得200的返回值,如果token写错了,就会得到
401的返回值注意,认证中的规则只会在网站第一次访问时跑一次,也就是AddJwtBearer中的代码只会在网站第一次访问时跑一次,如果你的加密Audience,Issuer,SecurityKey变了,也需要重新启动一次网站
本例子gitee地址
https://gitee.com/hallejuyahaha/OcelotDemo-Dotnet2.2

Asp .net core JWT验证
Jwt
安装Nuget包 3 1IdentityModel 版本3.10.102
Microsoft.AspNetCore.Authorization 版本2.2.03
Microsoft.AspNetCore.Authentication.JwtBearer 版本2.2.0类 17 1
public class JwtSettings2
{
3
/// <summary>4
/// token是谁颁发的5
/// </summary>6
public string Issuer { get; set; }
7
8
/// <summary>9
/// token可以给那些客户端使用10
/// </summary>11
public string Audience { get; set; }
12
13
/// <summary>14
/// 加密的key(SecretKey必须大于16个,是大于,不是大于等于)15
/// </summary>16
public string SecretKey { get; set; }
17
}appsetting配置添加 6 1
,2
"JwtSettings": {
3
"Issuer": "https://localhost:44336",//谁颁发的4
"Audience": "https://localhost:44336",//允许谁使用5
"SecretKey": "Hello-key----------"//加密密钥大于166
}startup注入服务 57 1
ConfigureServices()里面添加2
/*注入Jwt服务*/3 4
//将appsettings.json中的JwtSettings部分文件读取到JwtSettings中,这是给其他地方用的5
services.Configure<JwtSettings>(Configuration.GetSection("JwtSettings"));
6
var jwtsettings = new JwtSettings();7
//将配置绑定到JwtSettings实例中8
Configuration.Bind("JwtSettings", jwtsettings);
9
//添加身份验证10
services.AddAuthentication(options=> {
11
//认证middleware配置12
options.DefaultAuthenticateScheme = JwtBearerDefaults.AuthenticationScheme;13
options.DefaultChallengeScheme = JwtBearerDefaults.AuthenticationScheme;14
}).15
AddJwtBearer(o =>16
{
17
//jwt token参数设置18
o.TokenValidationParameters = new TokenValidationParameters19
{
20
NameClaimType = JwtClaimTypes.Name,21
RoleClaimType = JwtClaimTypes.Role,22
//Token颁发机构23
Validissuer = jwtsettings.Issuer,24
//颁发给谁25
ValidAudience = jwtsettings.Audience,26
//这里的key要进行加密27
IssuerSigningKey = new SymmetricSecurityKey(Encoding.UTF8.GetBytes(jwtsettings.SecretKey)),28 29
/***********************************TokenValidationParameters的参数默认值***********************************/30
// RequireSignedTokens = true,31
// SaveSigninToken = false,32
// ValidateActor = false,33
// 将下面两个参数设置为false,可以不验证Issuer和Audience,但是不建议这样做。34
// ValidateAudience = true,35
// ValidateIssuer = true,36
// ValidateIssuerSigningKey = false,37
// 是否要求Token的Claims中必须包含Expires38
// RequireExpirationTime = true,39
// 允许的服务器时间偏移量40
// ClockSkew = TimeSpan.FromSeconds(300),41
// 是否验证Token有效期,使用当前时间与Token的Claims中的NotBefore和Expires对比42
// ValidateLifetime = true43
};44
});45
/*声明授权*/46
services.AddAuthorization(options =>47
{
48
options.AddPolicy("IsUser", policy => policy.RequireClaim("IsAdmin", "false"));
49
options.AddPolicy("IsAdmin", policy => policy.RequireClaim("IsAdmin", "true"));
50
/*角色*/51
//options.AddPolicy("IsAdmin", policy => policy.RequireRole("Administrator", "admin","member"));
52
});53 54
configure()里面添加55
//身份授权认证56
app.UseAuthentication();57
app.UseHttpsRedirection();依赖注入,要验证的地方添加[Authorize],运行未验证的用户访问[AllowAnonymous] 100 1
namespace Jwt.Controllers2
{
3
[ApiController]4
[Route("[controller]")]
5
public class WeatherForecastController : ControllerBase6
{
7
8
//获取JwtSettings对象信息9
private JwtSettings _jwtSettings;10
public WeatherForecastController(IOptions<JwtSettings> _jwtSettingsAccesser)11
{
12
_jwtSettings = _jwtSettingsAccesser.Value;13
}14 15
/// <summary>16
/// 获取token17
/// </summary>18
/// <param name="user"></param>19
private object Token(user model)20
{
21
//测试自己创建的对象22
var user = new user23
{
24
id = 1,25
username = "138000000",26
password = "e10adc3949ba59abbe56e057f20f883e"27
};28
var tokenHandler = new JwtSecurityTokenHandler();29 30
var key = Encoding.UTF8.GetBytes(_jwtSettings.SecretKey);31
var authTime = DateTime.Now;//授权时间32
var expiresAt = authTime.AddDays(0.1);//过期时间33
var tokenDescripor = new SecurityTokenDescriptor34
{
35
Subject = new ClaimsIdentity(new Claim[] {
36
new Claim(JwtClaimTypes.Audience,_jwtSettings.Audience),37
new Claim(JwtClaimTypes.Issuer,_jwtSettings.Issuer),38
new Claim(JwtClaimTypes.Name, user.username.ToString()),39
new Claim("IsMember", member), //声明授权
40
}),41
Expires = expiresAt,42
//对称秘钥SymmetricSecurityKey43
//签名证书(秘钥,加密算法)SecurityAlgorithms44
SigningCredentials = new SigningCredentials(new SymmetricSecurityKey(key), SecurityAlgorithms.HmacSha256Signature)45
};46
var token = tokenHandler.Createtoken(tokenDescripor);47
var tokenString = tokenHandler.Writetoken(token);48
var result = new49
{
50
access_token = tokenString,51
token_type = "Bearer",52
profile = new53
{
54
id = user.id,55
name = user.username,56
phone = user.username,57
auth_time = authTime,58
expires_at = expiresAt59
}60
};61
return result;62
}63 64 65
[HttpGet]66
[Route("get_token")]
67
public IActionResult Get()68
{
69
return Ok(Token(null));70
}71 72
[Authorize(Policy = "IsUser")]73
[Authorize(Policy = "IsAdmin")]74
[Route("get_user_info")]
75
[HttpGet]76
public IActionResult GetUserInfo()77
{
78
//获取当前请求用户的信息,包含token信息79
var user = HttpContext.User;80 81
return Ok(82
new83
{
84
Issuer = base.User.Identity.Name,85
message = "HAHA",86
Issure2 = user.Identity,87
user = user.Claims.Count(),88
user1 = user.Claims.ElementAt(0).Value,89
user2 = user.Claims.ElementAt(1).Value,90
user3 = user.Claims.ElementAt(2).Value,91
user4 = user.Claims.ElementAt(3).Value,92
user5 = user.Claims.ElementAt(4).Value,93
user6 = user.Claims.ElementAt(5).Value,94
user7 = user.Claims.ElementAt(6).Value,95
user8 = user.Claims.ElementAt(7).Value,96
}) ;97
}98
}99
}100 创建token
 依赖注入
依赖注入
 注入服务
注入服务
 注入服务1
注入服务1
 获取信息
获取信息

我们今天的关于Asp.NetCore安全验证之JWT和asp.net core jwt验证token的分享已经告一段落,感谢您的关注,如果您想了解更多关于.net core jwt 授权验证、.netcore3.1 添加 swagger 及 JWT Authorize 验证、.NETcore中使用jwt来对api进行身份验证、Asp .net core JWT验证的相关信息,请在本站查询。
本文标签:


