对于想了解Ember.js入门指南——loading、error子状态的读者,本文将是一篇不可错过的文章,我们将详细介绍js中em,并且为您提供关于Day19:EmberJS入门指南、EFCore2.
对于想了解Ember.js 入门指南——loading、error子状态的读者,本文将是一篇不可错过的文章,我们将详细介绍js中em,并且为您提供关于Day 19: EmberJS 入门指南、EF Core 2.1 中的 Eager loading、Explicit loading 和 LazyLoading (转自 MSDN)、Ember.js 入门指南--目录、Ember.js 入门指南——action触发变化的有价值信息。
本文目录一览:- Ember.js 入门指南——loading、error子状态(js中em)
- Day 19: EmberJS 入门指南
- EF Core 2.1 中的 Eager loading、Explicit loading 和 LazyLoading (转自 MSDN)
- Ember.js 入门指南--目录
- Ember.js 入门指南——action触发变化
")
Ember.js 入门指南——loading、error子状态(js中em)
在前面的《Ember.js 入门指南——路由定义》提过loading、error子路由,它们是ember默认创建的,并在beforeModel、model、afterModel这三个回调执行完毕之前会先渲染当前路由的loading和error模板。
Router.map(function() {
  this.route(''posts'', function() {
      this.route(''post'', { path: ''/:post_id''});
  });
});
对于上述的路由设置ember会生成如下的路由列表:

每个路由都会自动生成一个loading、error路由,下面我将一一演示这两个路由的作用。
图片前面loading、error路由对应的application路由。posts_loading和posts_error对应的是posts路由。
1,loading子状态
Ember建议数据放在beforeModel、model、afterModel回调中获取并传递到模板显示。但是只要是加载数据就需要时间,对于Ember应用来说,在model等回调中加载完数据才会渲染模板,如果加载数据比较慢那么用户看到的页面就是一个空白的页面,用户体验很差!
Ember提供的解决办法是:在beforeModel、model、afterModel回调还没返回前先进入一个叫loading的子状态,然后渲染一个叫routeName-loading的模板(如果是application路由则对应的直接是loading、error不需要前缀)。
为了演示这效果在app/templates下创建一个posts-loading模板。如果程序正常,在渲染模板posts之前会先渲染这个模板。
<!-- app/templates/posts-loading.hbs -->

<img src="assets/images/loading/loading.gif" />
然后修改路由posts.js,让model回调执行时间更长一些。
//  app/routes/posts.js

import Ember from ''ember'';

export default Ember.Route.extend({

       model: function() {
              //  模拟一个延时操作,
              for (var i = 0; i < 10000000;i++) {

              }
              return Ember.$.getJSON(''https://api.github.com/repos/emberjs/ember.js/pulls'');
       }
});执行http://localhost:4200/posts,首先会看到执行的loading模板的内容,然后才看到真正要显示的数据。有一个加载过程,如下面2幅图片所示。
2,loading事件
在beforeModel、model、afterModel回调没有立即返回之前,会先执行一个名为loading的事件。
//  app/routes/posts.js

import Ember from ''ember'';

export default Ember.Route.extend({

       model: function() {
              //  模拟一个延时操作,
              for (var i = 0; i < 10000000;i++) {

              }
              return Ember.$.getJSON(''https://api.github.com/repos/emberjs/ember.js/pulls'');
       },
       actions: {
              loading: function(transition, originRoute) {
                     alert("Sorry this is taking so long to load!!");
              }
       }
});页面刷新后会弹出一个提示框,先不点击“确定”。打开浏览器的“开发者à开发者工具”,切换到Network标签下。找到“pulls”这个请求,点击它。

从图中可以看到此时model回调并没有返回。此时响应的内容是空的,说明loading事件实在model回调返回之前执行了。
然后点击弹出框的“确定”,此时可以看到Response有数据了。说明model回调已经执行完毕。
注意:如果当前的路由没有显示定义loading事件,这个时间会冒泡到父路由,如果父路由也没有显示定义loading事件,那么会继续向上冒泡,一直到最顶端的路由application。
3,error子状态
与loading子状态类似,error子状态会在beforeModel、model、afterModel回调执行过程中出现错误的时候触发。
命名方式与loading子状态也是类似的。现在定义一个名为posts-error.hbs的模板。
<!--  app/templates/posts-error.hbs -->

<p >
posts回调解析出错。。。。
</p>
然后在model回调中手动添加一个错误代码。
//  app/routes/posts.js

import Ember from ''ember'';

export default Ember.Route.extend({

       model: function() {
              //  模拟一个延时操作,
              for (var i = 0; i < 10000000;i++) {

              }
              var e = parseInt(value);
              return Ember.$.getJSON(''https://api.github.com/repos/emberjs/ember.js/pulls'');
       }
});注意“var e = parseInt(value);”这句代码,由于value没有定义所以应该会报错。那么此时页面会显示什么呢??
如果你的演示程序没有其他问题那么你也会得到上图的结果。但是如果没有定义这个模板,那么界面上将是什么都不显示。
如果你想在xxx-error.hbs模板上看到是什么错误信息,你可以在模板上打印model的值。如下:
<!--  app/templates/posts-error.hbs -->

<p >
posts回调解析出错。。。。
<br>
{{model}}
</p>
此时页面会显示出你的代码是什么错误。
不过相比于浏览器控制台打印的错误信息简单很多!!!
4,error事件
error事件与第一点讲的loading事件也是相似的。使用方式与loading一样。个人觉得这个事件非常有用,我们可以在这个事件中根据error状态码的不同执行不同的逻辑,比如跳转到不同的路由上。
//  app/routes/posts.js

import Ember from ''ember'';

export default Ember.Route.extend({

       model: function() {
              return Ember.$.getJSON(''https://api.github.com/repos/emberjs/ember.js/pulls____'');
       },

       actions: {
              error: function(error, transition) {
                     console.log(''error = '' + error.status);
                     //  打印error对象里的所有属性和方法名
                     for(var name in error){
                  console.log(name);
                  // console.log(''属性值或者方法体==》'' + error[name]);
               }
               alert(names);
                     if (error && error.status === 400) {
                            return this.transitionTo("about");
                     } else if (error.status === 404) {
                            return this.transitionTo("form");
                     } else {
                            console.log(''else......'');
                     }
              }
       }
});
注意getJSON方法里的URL,我在URL后面随机加了一些字符,目的是让这个URL不存在。此时请求应该会找不到这个地址error的响应码应该是404。然后直接跳转到form这个路由上。
运行http://localhost:4200/posts之后,浏览器控制台打印信息如下:

页面也会跳转到form。
到此路由加载数据过程中涉及的两个状态loading和error的内容全部介绍完,这两个状态在优化用户体验方面是非常有用的,希望想学习Ember的同学好好掌握!!!=^=

Day 19: EmberJS 入门指南
编者注:我们发现了有趣的系列文章《30天学习30种新技术》,正在翻译,一天一篇更新,年终礼包。下面是第19天的内容。
到目前为止,我们这一系列文章涉及了Bower、AngularJS、GruntJS、PhoneGap和MeteorJS 这些JavaScript技术。今天我打算学习一个名为Ember的框架。本文将介绍如何用Ember创建一个单页面的社交化书签应用。本教程将包括两篇:第1篇介绍客户端代码和用HTML 5本地存储持久保存数据,第2篇中我们将使用一个部署在OpenShift上的REST后端。过几天我会写第2篇。

应用
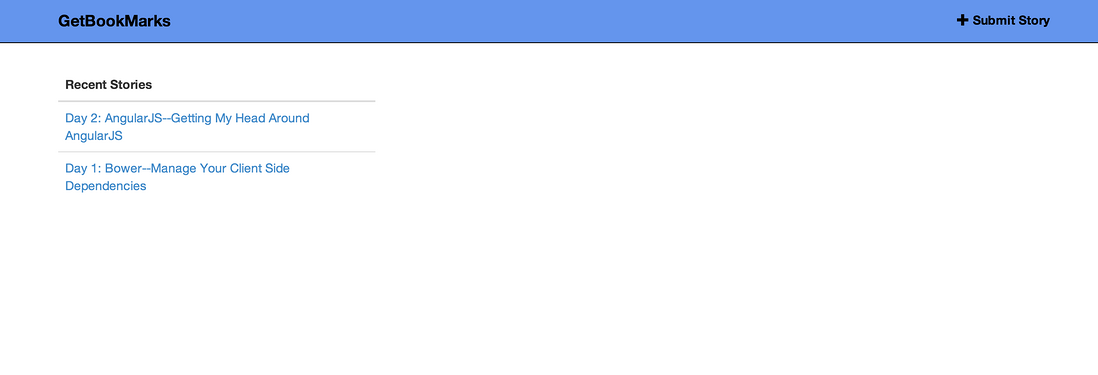
我们将开发一个社交化书签应用,允许用户提交和分享链接。你可以在这里查看这个应用。这个应用可以做到:
当用户访问
/时,他会看到以提交时间排序的报道列表。当用户访问某个书签时,例如
#/stories/d6p88,用户会看到关于这个报道的信息,例如是谁提交的,何时提交的,以及文章的摘要。最后,当用户通过
#/story/new提交新报道时,内容会存储在用户浏览器的本地存储上。

什么是Ember?
Ember是一个客户端的JavaScript MV* 框架,用来构建野心勃勃的web应用。它依赖于jQuery和Handlebars库。如果你曾经在Backbone下工作,那么你会发现Ember是一个武断的Backbone,或者Backbone++。Ember可以为你完成很多事情,如果你遵循它的命名约定的话。Ember.js在这方面很突出。因此,如果我们在应用中加入了url路由和报道,那么我们就有了这些:
- 报道的模板
- StoriesRoute
- StoriesController
请参考命名约定文档来理解Ember的命名约定。
Ember核心概念
本节将介绍我们的示例应用中将涉及的四个EmberJS的核心概念:
模型:模型代表我们展示给用户的应用领域内的对象。在上述例子中,一个报道就代表一个模型。报道,加上它的属性,包括标题、url等,构成一个模型。模型可以通过jQuery加载服务器端的JSON数据的方式来获取和更新,也可以通过Ember Data来获取和更新。Ember Data是一个客户端的ORM实现,可以利用它方便地对底层的持久性存储进行CRUD操作。Ember Data提供一个仓库接口,可以借助提供的一些适配器配置。Ember Data提供的两个核心适配器是RESTAdapter和FixtureAdapter。在本文中,我们将使用LocalStorage适配器,该适配器将数据持久化为 HTML 5 的LocalStorage。请参阅此文档了解详情。
路由器和路由:路由器指定应用的所有路由。路由器将URL映射到路由。例如,当一个用户访问
/#/story/new的时候,将渲染newstory模板。该模板展现了一个HTML表单。用户可通过创建Ember.Route子类来定制路由。在上述例子中,用户访问/#/story/new将渲染一个基于newstory模板的默认模型。NewStoryRoute会负责将默认的模型分配给newstory模板。请参阅文档了解详情。控制器:控制器可以做两件事——首先它装饰路由返回的模型,接着它监听用户执行的行动。例如,当用户提交报道的时候,NewStoryController负责通过Ember Data API将报道的数据持续化到存储层。请参阅文档了解详情。
模版:模板向用户展示应用的界面。每个应用都有一个默认的应用模板。
Ember的Chrome插件
EmberJS提供了一个Chrome插件,因此调试ember应用很容易。这个插件可以在 chrome web store 下载安装。可以查看Ember团队做的视频了解chrome插件的详情。
Github仓库
今天的示例程序的代码可从github取得。
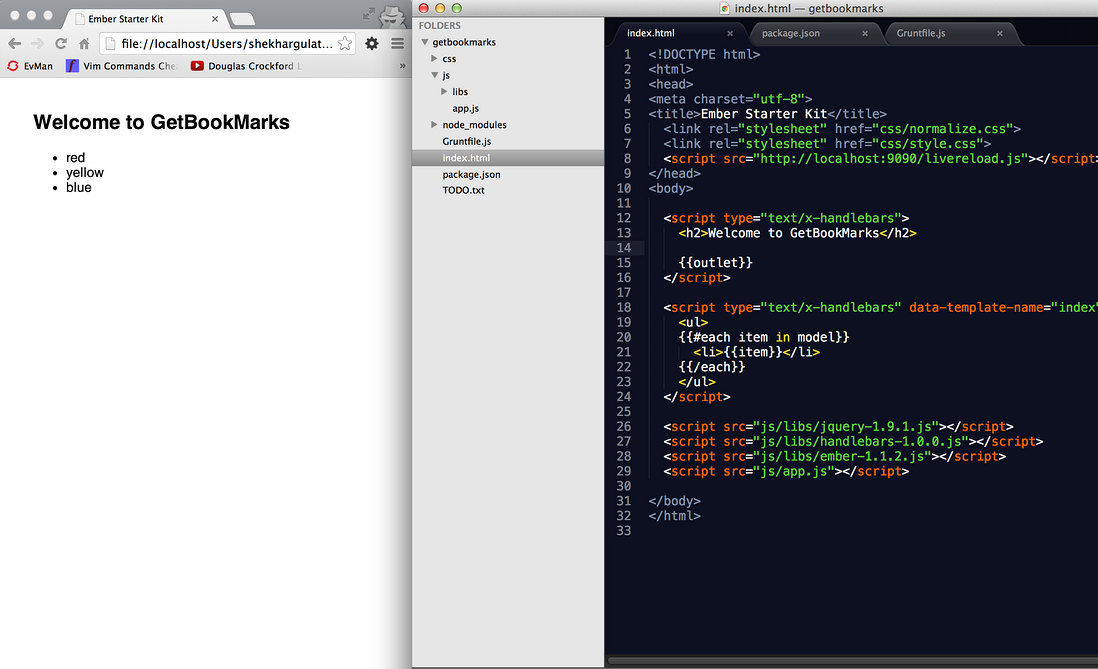
第一步 下载新手套装
ember提供了一套新手装备,因此开始使用框架非常简单。新手套装包括了需要用到的javascript文件(ember-*.js、jquery-*.js和handlerbars-*.js)以及示例应用。下载新手套装,解压缩,最后重命名为getbookmarks。
wget https://github.com/emberjs/starter-kit/archive/v1.1.2.zip
unzip v1.1.2.zip
mv starter-kit-1.1.2/ getbookmarks
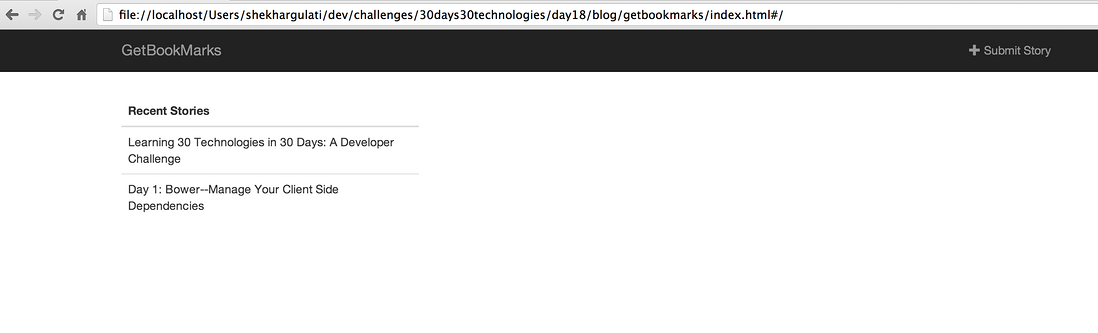
在浏览器中打开index.html,你会看到如下页面:

第二步 启用GruntJS监视
这一步是可选的,不过如果你做了这步,那么你的生活质量将大大提高。如果你决定跳过这步,那么每次你做了改动之后都需要刷新浏览器。在第7天的文章,我讨论了GruntJS的在线重载功能。我没有在EmberJS里找到任何自动重载的功能,因此我决定使用GruntJS的livereload来提高效率。你需要Node、NPM和Grunt-CLI。请参考我第5天和第7天的文章了解详情。
在getbookmarks文件夹内创建package.json,内容如下:
{
  "name": "getbookmarks",
  "version": "0.0.1",
  "description": "GetBookMarks application",
  "devDependencies": {
    "grunt": "~0.4.1",
    "grunt-contrib-watch": "~0.5.3"
  }
}
创建Gruntfile.js,内容如下:
module.exports = function(grunt) {


  grunt.initConfig({

    watch :{
      scripts :{
        files : [''js/app.js'',''css/*.css'',''index.html''],
        options : {
          livereload : 9090,
        }
      }
    }

  });

  grunt.loadNpmTasks(''grunt-contrib-watch'');

  grunt.registerTask(''default'', []);
};
使用npm安装依赖:
npm install grunt --save-dev
npm install grunt-contrib-watch --save-dev
在index.html的头部加入:
<script src="http://localhost:9090/livereload.js"></script>
调用grunt watch命令,同时在你的默认浏览器中打开index.html。
; grunt watch
Running "watch" task
Waiting...OK
修改index.html,无需刷新就能看到改变:
第三步 理解新手模板应用
在新手模板中,除了css之外,有两个和应用相关的文件——index.html和app.js。为了理解模板应用的作用,我们需要理解app.js。
App = Ember.Application.create();

App.Router.map(function() {
  // put your routes here
});

App.IndexRoute = Ember.Route.extend({
  model: function() {
    return [''red'', ''yellow'', ''blue''];
  }
});
解释下以上的代码:
第一行创建了一个Ember应用的实例。
使用
App.Route.map定义应用的路由。每个Ember应用都有一个默认路由Index,绑定到/。所以,当调用/路由的时候,index模板将被渲染。index模板由index.html定义。感觉到了很多“约定大于配置”了吧?在Ember中,每个模板都有一个model作为支持。路由负责制定哪个mobdel支持哪个模板。在上述
app.js中,IndexRoute返回一个字符串数组,作为index模板的model。index模板迭代这个数组然后渲染一个列表。
第四步 移除新手模板代码
移除js/app.js中的代码,然后用以下内容替换:
App = Ember.Application.create();

App.Router.map(function() {
  // put your routes here
});
相应地,将index.html的内容替换为:
<!DOCTYPE html>
<html>
<head>
<meta charset="utf-8">
<title>GetBookMarks -- Share your favorite links online</title>
  <link rel="stylesheet" href="css/normalize.css">
  <link rel="stylesheet" href="css/style.css">
  <script src="http://localhost:9090/livereload.js"></script>
</head>
<body>

  <script type="text/x-handlebars">
    {{outlet}}
  </script>

  <script type="text/x-handlebars" data-template-name="index">

  </script>
  <script src="js/libs/jquery-1.9.1.js"></script>
  <script src="js/libs/handlebars-1.0.0.js"></script>
  <script src="js/libs/ember-1.1.2.js"></script>
  <script src="js/app.js"></script>

</body>
</html>
第五步 添加Twitter Bootstrap
我们将使用twitter bootstrap来给应用添加样式。从官网下载twitter bootstrap包,然后复制bootstrap.css到css文件夹,同时复制字体文件夹。
接着在index.html中加入bootstrap.css,在页首使用一个固定位置的导航条。
<!DOCTYPE html>
<html>
<head>
<meta charset="utf-8">
<title>GetBookMarks -- Share your favorite links online</title>
  <link rel="stylesheet" href="css/normalize.css">
  <link rel="stylesheet" type="text/css" href="css/bootstrap.css">
  <link rel="stylesheet" href="css/style.css">
  <script src="http://localhost:9090/livereload.js"></script>
</head>
<body>

  <script type="text/x-handlebars">
    <navrole="navigation">
      <div>
        <div>
          <ahref="#">GetBookMarks</a>
        </div>


      </div>
    </nav>
    <div id="main">
      {{outlet}}
    </div>
  </script>

  <script type="text/x-handlebars" data-template-name="index">

  </script>

  <script src="js/libs/jquery-1.9.1.js"></script>
  <script src="js/libs/handlebars-1.0.0.js"></script>
  <script src="js/libs/ember-1.1.2.js"></script>
  <script src="js/app.js"></script>

</body>
</html>
上述html中,<script type="text/x-handlebars">代表我们的应用模板。应用模板使用{{outlet}}标签为其他模板预留位置,其内容取决于url。
在css/style.css中加入下面的代码。这会在正文上方添加一个40px的空白。这样才能正确地渲染固定位置的导航条。
body{
    padding-top: 40px;
}
第五步 提交新报道
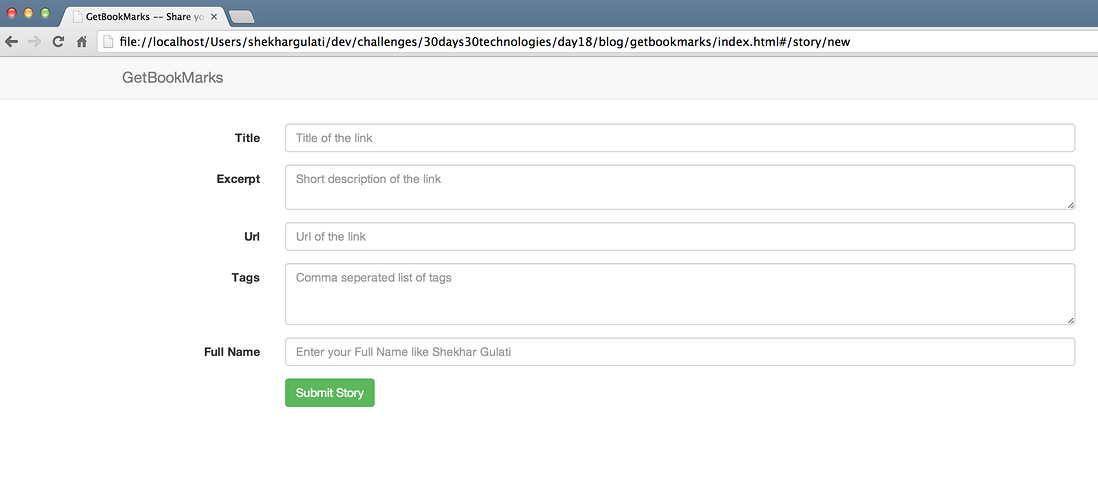
我们将开始实现提交新报道的功能。Ember建议你围绕着URL思考。当用户访问#/story/new的时候,会展示一个表单。
在App.Router.Map中增加一个绑定#/story/new的新路由:
App.Router.map(function() {
  this.resource(''newstory'' , {path : ''story/new''});
});
接着我们在index.html中添加一个渲染表单的newstory模板:
<script type="text/x-handlebars" id="newstory">
    <formrole="form">
      <div>
        <label for="title">Title</label>
        <div>
          <input type="title"id="title" name="title" placeholder="Title of the link" required>
        </div>
      </div>
      <div>
        <label for="excerpt">Excerpt</label>
        <div>
          <textareaid="excerpt" name="excerpt" placeholder="Short description of the link" required></textarea>
        </div>
      </div>

      <div>
        <label for="url">Url</label>
        <div>
          <input type="url"id="url" name="url" placeholder="Url of the link" required>
        </div>
      </div>
      <div>
        <label for="tags">Tags</label>
        <div>
          <textarea id="tags"name="tags" placeholder="Comma seperated list of tags" rows="3" required></textarea>
        </div>
      </div>
      <div>
        <label for="fullname">Full Name</label>
        <div>
          <input type="text"id="fullname" name="fullname" placeholder="Enter your Full Name like Shekhar Gulati" required>
        </div>
      </div>
      <div>
        <div>
          <button type="submit"{{action ''save''}}>Submit Story</button>
        </div>
      </div>
  </form>
  </script>
访问#/story/new即可查看表单:
接着我们在导航条中添加一个链接,这样访问报道提交表单就很容易。替换一下nav元素:
<navrole="navigation">
      <div>
        <div>
          <ahref="#">GetBookMarks</a>

        </div>
        <ul>
            <li>{{#link-to ''newstory''}}<span></span> Submit Story{{/link-to}}</li>
        </ul>

      </div>
    </nav>
注意上面我们用{{#link-to}}创建了一个指向路由的链接。请参阅文档了解详情。
表单已经有了,接下来要添加HTML 5本地存储的功能。为了添加本地存储支持,我们需要首先下载Ember Data和Local Storage Adapter JavaScript文件。将这些文件放在js/libs下。接着,在index.html中添加这些script标签。
<script src="js/libs/jquery-1.9.1.js"></script>
<script src="js/libs/handlebars-1.0.0.js"></script>
<script src="js/libs/ember-1.1.2.js"></script>
<script src="js/libs/ember-data.js"></script>
<script src="js/libs/localstorage_adapter.js"></script>
<script src="js/app.js"></script>
如前所述,Ember Data是一个客户端的ORM实现,它使在底层存储进行CRUD操作很容易。这里我们将使用LSAdapter。在app.js中加入:
App.ApplicationAdapter = DS.LSAdapter.extend({
  namespace: ''stories''
});
接着是定义model。一篇报道需要有url、title(标题)、fullname(提交报道的用户的全名)、excerpt(摘要),以及SubmittedOn(日期)信息。在下面的模型中,我们使用了字符串和日期类型。适配器默认支持的属性类型为字符串、数字、布尔值和日期。
App.Story = DS.Model.extend({
    url : DS.attr(''string''),
    tags : DS.attr(''string''),
    fullname : DS.attr(''string''),
    title : DS.attr(''string''),
    excerpt : DS.attr(''string''),
    submittedOn : DS.attr(''date'')

});
接着我们编写NewstoryController来持久化内容:
App.NewstoryController = Ember.ObjectController.extend({

 actions :{
    save : function(){
        var url = $(''#url'').val();
        var tags = $(''#tags'').val();
        var fullname = $(''#fullname'').val();
        var title = $(''#title'').val();
        var excerpt = $(''#excerpt'').val();
        var submittedOn = new Date();
        var store = this.get(''store'');
        var story = store.createRecord(''story'',{
            url : url,
            tags : tags,
            fullname : fullname,
            title : title,
            excerpt : excerpt,
            submittedOn : submittedOn
        });
        story.save();
        this.transitionToRoute(''index'');
    }
 }
});
以上代码展示了如何从获取表单中的值,然后使用store API在内存中创建记录。为了在localstorage中存储记录,我们需要调用Story对象的save方法。最后,我们将用户重定向到index路由。
接着我们测试下这个应用,创建一个新的报道,接着打开Chrome开发者工具,在资源区域你可以查看这则报道。
第六步 显示所有报道
接着我们要做的是,当用户访问首页的时候,展示所有报道。
正如我之前提到的,路由负责询问model。我们将加上IndexRoute,它会找出本地存储中保存的所有报道。
App.IndexRoute = Ember.Route.extend({
    model : function(){
        var stories = this.get(''store'').findAll(''story'');
        return stories;
    }
});
每个路由支持一个模板。IndexRoute支持index模板,因此我们需要修改index.html:
  <script type="text/x-handlebars" id="index">
    <div>
      <div>
        <tabletable''>
          <thead>
            <tr><th>Recent Stories</th></tr>
          </thead>
          {{#each controller}}
            <tr><td>

              {{title}}

            </td></tr>

          {{/each}}
        </table>
      </div>
      <div>
        {{outlet}}
      </div>
    </div>
  </script>
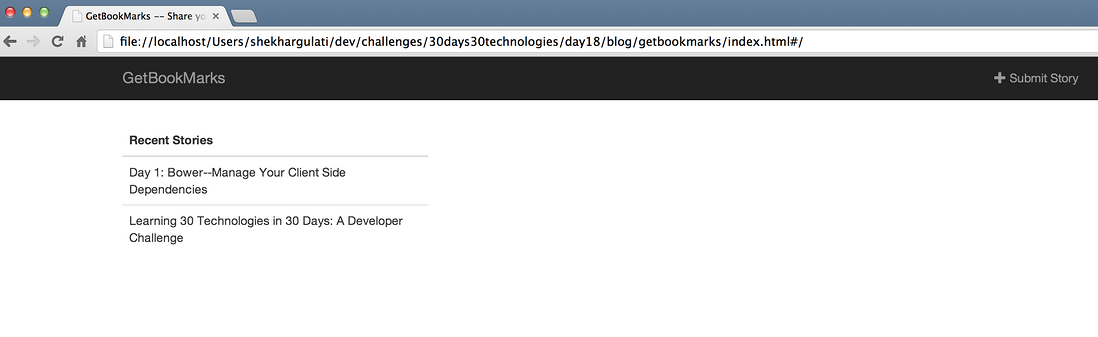
现在访问/,我们会看到一个报道的列表:
还有一个问题,报道没有按照时间顺序排列。我们将创建一个IndexController负责排序。我们指定依照submittedOn属性倒序排列,以确保新的报道出现在上面。
App.IndexController = Ember.ArrayController.extend({
    sortProperties : [''submittedOn''],
    sortAscending : false
});
修改之后,我们会看到按照submittedOn属性排序的报道。
第七步 查看单独的报道
最后要实现的功能是:用户点击某则报道的时候会看到详细信息。我们加一个路由:
App.Router.map(function() {
    this.resource(''index'',{path : ''/''},function(){
        this.resource(''story'', { path:''/stories/:story_id'' });
    });

    this.resource(''newstory'' , {path : ''story/new''});

});
以上的代码展示了如何嵌套路由。
:story_id部分叫做动态字段,因为相应的报道 id会被注入URL。
然后我们添加根据报道id获取报道的StoryRoute。
App.StoryRoute = Ember.Route.extend({
    model : function(params){
        var store = this.get(''store'');
        return store.find(''story'',params.story_id);
    }
});
最后,我们更新下index.html,给每个报道添加链接:
<script type="text/x-handlebars" id="index">
<div>
<div>
<tabletable''>
<thead>
<tr><th>Recent Stories</th></tr>
</thead>
{{#each controller}}
<tr><td>
{{#link-to ''story'' this}}
{{title}}
{{/link-to}}
</td></tr>
{{/each}}
</table>
</div>
<div>
{{outlet}}
</div>
</div>
</script>
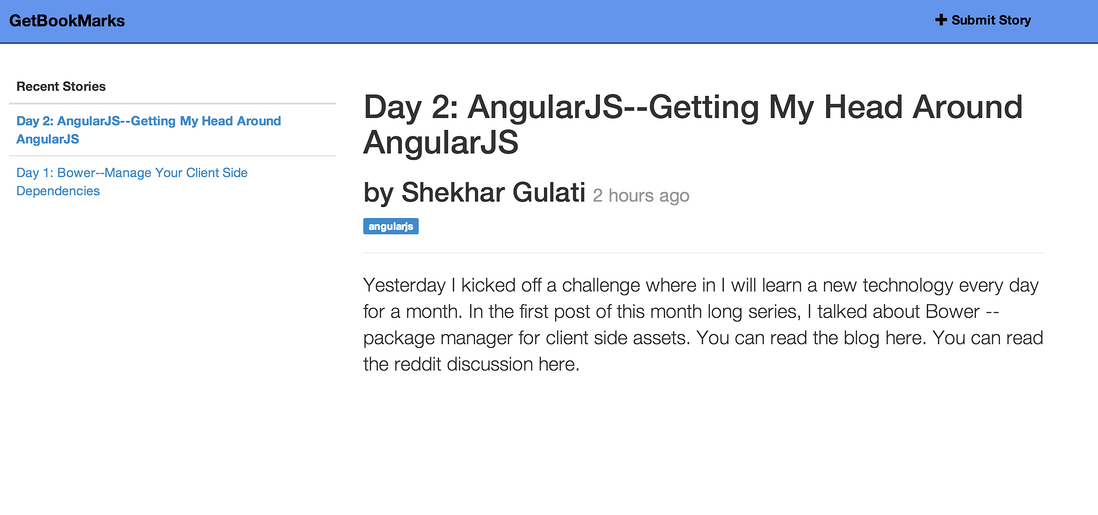
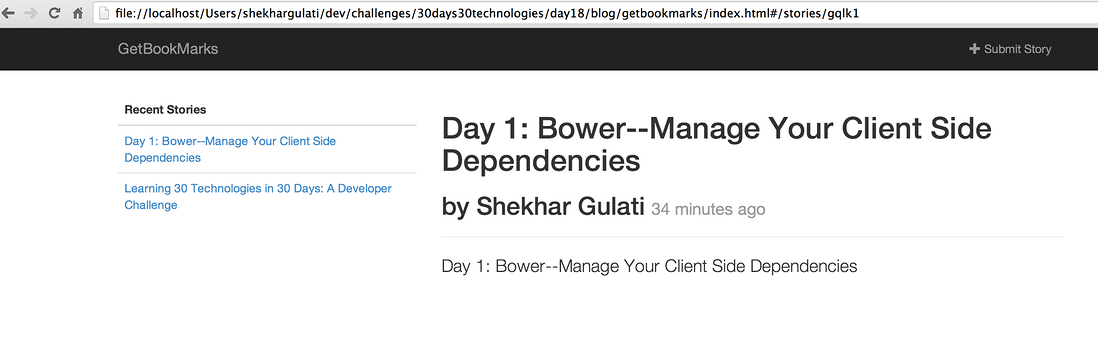
<script type="text/x-handlebars" id="story">
<h1>{{title}}</h1>
<h2> by {{fullname}} <small>{{submittedOn}}</small></h2>
{{#each tagnames}}
<span>{{this}}</span>
{{/each}}
<hr>
<p>
{{excerpt}}
</p>
</script>
修改完毕地后,可以在浏览器中直接看到结果。

第八步 为submittedOn日期添加格式
Ember下有辅助函数的概念。所有Handlebars模板都可以调用辅助函数。
我们将使用moment.js库为日期添加格式。将以下代码加入index.html。
<script src="http://cdnjs.cloudflare.com/ajax/libs/moment.js/2.4.0/moment.min.js"></script>
接着我们将定义我们的第一个辅助函数,该函数将日期转为人类可读的形式:
Ember.Handlebars.helper(''format-date'', function(date){
    return moment(date).fromNow();
});
最后我们在报道模板中加入format-data辅助函数。
<script type="text/x-handlebars" id="story">
    <h1>{{title}}</h1>
    <h2> by {{fullname}} <small>{{format-date submittedOn}}</small></h2>
    {{#each tagnames}}

        <span>{{this}}</span>

      {{/each}}
    <hr>
    <p>
      {{excerpt}}
    </p>

  </script>
报道页面的效果如下:
今天就到这里了。持续反馈。
原文 Day 19: Ember--The Missing EmberJS Tutorial
翻译 SegmentFault
")
EF Core 2.1 中的 Eager loading、Explicit loading 和 LazyLoading (转自 MSDN)
Entity Framework Core allows you to use the navigation properties in your model to load related entities. There are three common O/RM patterns used to load related data.
- Eager loading means that the related data is loaded from the database as part of the initial query.
- Explicit loading means that the related data is explicitly loaded from the database at a later time.
- Lazy loading means that the related data is transparently loaded from the database when the navigation property is accessed.
Tip
You can view this article''s sample on GitHub.
Eager loading
You can use the Include method to specify related data to be included in query results. In the following example, the blogs that are returned in the results will have their Posts property populated with the related posts.
using (var context = new BloggingContext())
{
    var blogs = context.Blogs
        .Include(blog => blog.Posts)
        .ToList();
}
Tip
Entity Framework Core will automatically fix-up navigation properties to any other entities that were previously loaded into the context instance. So even if you don''t explicitly include the data for a navigation property, the property may still be populated if some or all of the related entities were previously loaded.You can include related data from multiple relationships in a single query.
using (var context = new BloggingContext())
{
    var blogs = context.Blogs
        .Include(blog => blog.Posts)
        .Include(blog => blog.Owner)
        .ToList();
}
Including multiple levels
You can drill down through relationships to include multiple levels of related data using the ThenInclude method. The following example loads all blogs, their related posts, and the author of each post.
using (var context = new BloggingContext())
{
    var blogs = context.Blogs
        .Include(blog => blog.Posts)
            .ThenInclude(post => post.Author)
        .ToList();
}
Note
Current versions of Visual Studio offer incorrect code completion options and can cause correct expressions to be flagged with syntax errors when using the ThenInclude method after a collection navigation property. This is a symptom of an IntelliSense bug tracked at https://github.com/dotnet/roslyn/issues/8237. It is safe to ignore these spurious syntax errors as long as the code is correct and can be compiled successfully.You can chain multiple calls to ThenInclude to continue including further levels of related data.
using (var context = new BloggingContext())
{
    var blogs = context.Blogs
        .Include(blog => blog.Posts)
            .ThenInclude(post => post.Author)
            .ThenInclude(author => author.Photo)
        .Include(blog => blog.Owner)
            .ThenInclude(owner => owner.Photo)
        .ToList();
}
You can combine all of this to include related data from multiple levels and multiple roots in the same query.
using (var context = new BloggingContext())
{
    var blogs = context.Blogs
        .Include(blog => blog.Posts)
            .ThenInclude(post => post.Author)
            .ThenInclude(author => author.Photo)
        .Include(blog => blog.Owner)
            .ThenInclude(owner => owner.Photo)
        .ToList();
}
You may want to include multiple related entities for one of the entities that is being included. For example, when querying Blogs, you include Posts and then want to include both the Author and Tags of the Posts. To do this, you need to specify each include path starting at the root. For example, Blog -> Posts -> Author and Blog -> Posts -> Tags. This does not mean you will get redundant joins, in most cases EF will consolidate the joins when generating SQL.
using (var context = new BloggingContext())
{
    var blogs = context.Blogs
        .Include(blog => blog.Posts)
            .ThenInclude(post => post.Author)
        .Include(blog => blog.Posts)
            .ThenInclude(post => post.Tags)
        .ToList();
}
Include on derived types
You can include related data from navigations defined only on a derived type using Include and ThenInclude.
Given the following model:
public class SchoolContext : DbContext
{
    public DbSet<Person> People { get; set; }
    public DbSet<School> Schools { get; set; }

    protected override void OnModelCreating(ModelBuilder modelBuilder)
    {
        modelBuilder.Entity<School>().HasMany(s => s.Students).WithOne(s => s.School);
    }
}

public class Person
{
    public int Id { get; set; }
    public string Name { get; set; }
}

public class Student : Person
{
    public School School { get; set; }
}

public class School
{
    public int Id { get; set; }
    public string Name { get; set; }

    public List<Student> Students { get; set; }
}
Contents of School navigation of all People who are Students can be eagerly loaded using a number of patterns:
- using cast
context.People.Include(person => ((Student)person).School).ToList()- using as operator
context.People.Include(person => (person as Student).School).ToList()using overload of Include that takes parameter of type string
context.People.Include("Student").ToList()
Ignored includes
If you change the query so that it no longer returns instances of the entity type that the query began with, then the include operators are ignored.
In the following example, the include operators are based on the Blog, but then the Select operator is used to change the query to return an anonymous type. In this case, the include operators have no effect.
using (var context = new BloggingContext())
{
    var blogs = context.Blogs
        .Include(blog => blog.Posts)
        .Select(blog => new
        {
            Id = blog.BlogId,
            Url = blog.Url
        })
        .ToList();
}
By default, EF Core will log a warning when include operators are ignored. See Logging for more information on viewing logging output. You can change the behavior when an include operator is ignored to either throw or do nothing. This is done when setting up the options for your context - typically in DbContext.OnConfiguring, or in Startup.cs if you are using ASP.NET Core.
protected override void OnConfiguring(DbContextOptionsBuilder optionsBuilder)
{
    optionsBuilder
        .UseSqlServer(@"Server=(localdb)\mssqllocaldb;Database=EFQuerying;Trusted_Connection=True;ConnectRetryCount=0")
        .ConfigureWarnings(warnings => warnings.Throw(CoreEventId.IncludeIgnoredWarning));
}
Explicit loading
Note
This feature was introduced in EF Core 1.1.
You can explicitly load a navigation property via the DbContext.Entry(...) API.
using (var context = new BloggingContext())
{
    var blog = context.Blogs
        .Single(b => b.BlogId == 1);

    context.Entry(blog)
        .Collection(b => b.Posts)
        .Load();

    context.Entry(blog)
        .Reference(b => b.Owner)
        .Load();
}
You can also explicitly load a navigation property by executing a separate query that returns the related entities. If change tracking is enabled, then when loading an entity, EF Core will automatically set the navigation properties of the newly-loaded entitiy to refer to any entities already loaded, and set the navigation properties of the already-loaded entities to refer to the newly-loaded entity.
Querying related entities
You can also get a LINQ query that represents the contents of a navigation property.
This allows you to do things such as running an aggregate operator over the related entities without loading them into memory.
using (var context = new BloggingContext())
{
    var blog = context.Blogs
        .Single(b => b.BlogId == 1);

    var postCount = context.Entry(blog)
        .Collection(b => b.Posts)
        .Query()
        .Count();
}
You can also filter which related entities are loaded into memory.
using (var context = new BloggingContext())
{
    var blog = context.Blogs
        .Single(b => b.BlogId == 1);

    var goodPosts = context.Entry(blog)
        .Collection(b => b.Posts)
        .Query()
        .Where(p => p.Rating > 3)
        .ToList();
}
Explicit loading 中 Query 方法后面的查询条件,是会动态生成数据库 SQL 的,例如下面的代码中,我们使用 Query 方法后,又使用了 Where 方法做筛选:
var category = context.Category.First();

context.Entry(category).Collection(e => e.CategoryLanguage).Query().Where(e => e.LanguageCode == "CN").Load();
那么我们可以通过 EF Core 的后台日志看到,其生成的 SQL 查询中相应地包含了我们上面 Where 方法的筛选条件:
=============================== EF Core log started ===============================
Executed DbCommand (213ms) [Parameters=[@__get_Item_0=''?'' (Size = 50)], CommandType=''Text'', CommandTimeout=''0'']
SELECT [e].[CategoryCode], [e].[LanguageCode], [e].[CategoryName], [e].[DataStatus], [e].[ID]
FROM [MD].[CategoryLanguage] AS [e]
WHERE ([e].[CategoryCode] = @__get_Item_0) AND ([e].[LanguageCode] = N''CN'')
=============================== EF Core log finished ===============================
Lazy loading
Note
This feature was introduced in EF Core 2.1.
The simplest way to use lazy-loading is by installing the Microsoft.EntityFrameworkCore.Proxies package and enabling it with a call to UseLazyLoadingProxies. For example:
protected override void OnConfiguring(DbContextOptionsBuilder optionsBuilder)
    => optionsBuilder
        .UseLazyLoadingProxies()
        .UseSqlServer(myConnectionString);
Or when using AddDbContext:
.AddDbContext<BloggingContext>(
    b => b.UseLazyLoadingProxies()
          .UseSqlServer(myConnectionString));
EF Core will then enable lazy loading for any navigation property that can be overridden--that is, it must be virtual and on a class that can be inherited from. For example, in the following entities, the Post.Blog and Blog.Posts navigation properties will be lazy-loaded.
public class Blog
{
    public int Id { get; set; }
    public string Name { get; set; }

    public virtual ICollection<Post> Posts { get; set; }
}

public class Post
{
    public int Id { get; set; }
    public string Title { get; set; }
    public string Content { get; set; }

    public virtual Blog Blog { get; set; }
}
Lazy loading 中又使用 Eager loading
如果在启用 Lazy loading 后又使用了 Include 方法来使用 Eager loading,那么实际上是 Eager loading 在起作用,这样 EF Core 实体的导航属性不会再单独开启数据库连接去数据库查询数据,而是用 sql 语句的 join 预先在数据库中查询数据:
假设我们现在有 Person 实体里面有个 Book 导航属性,返回 ICollection<Book> 类型来获取关联一个 Person 的所有 Book 数据,假如我们启用 Lazy loading 然后查询 Person 实体的 Book 导航属性,代码如下:
using (TestDBContext dbContext = new TestDBContext())
{
    var p=dbContext.Person.First();
    var books = p.Book;
}
查看 EF Core 的日志,我们发现会开启两个数据库连接做两次查询,第一次查询 Person 表的数据,第二次查询 Book 表的数据:
第一次数据库连接查询 Person 表的数据:
=============================== EF Core log started ===============================
Opening connection to database ''TestDB'' on server ''localhost''.
=============================== EF Core log finished ===============================
“dotnet.exe”(CoreCLR: clrhost): 已加载“C:\Program Files\dotnet\shared\Microsoft.AspNetCore.App\2.1.4\System.Text.Encoding.CodePages.dll”。已跳过加载符号。模块进行了优化,并且调试器选项“仅我的代码”已启用。
=============================== EF Core log started ===============================
Opened connection to database ''TestDB'' on server ''localhost''.
=============================== EF Core log finished ===============================
=============================== EF Core log started ===============================
Executing DbCommand [Parameters=[], CommandType=''Text'', CommandTimeout=''30'']
SELECT TOP(1) [p].[Code], [p].[CreateTime], [p].[ID], [p].[Name], [p].[UpdateTime]
FROM [Person] AS [p]
=============================== EF Core log finished ===============================
“dotnet.exe”(CoreCLR: clrhost): 已加载“C:\Program Files\dotnet\shared\Microsoft.NETCore.App\2.1.4\System.Xml.ReaderWriter.dll”。已跳过加载符号。模块进行了优化,并且调试器选项“仅我的代码”已启用。
=============================== EF Core log started ===============================
Executed DbCommand (16ms) [Parameters=[], CommandType=''Text'', CommandTimeout=''30'']
SELECT TOP(1) [p].[Code], [p].[CreateTime], [p].[ID], [p].[Name], [p].[UpdateTime]
FROM [Person] AS [p]
=============================== EF Core log finished ===============================
=============================== EF Core log started ===============================
A data reader was disposed.
=============================== EF Core log finished ===============================
=============================== EF Core log started ===============================
Closing connection to database ''TestDB'' on server ''localhost''.
=============================== EF Core log finished ===============================
=============================== EF Core log started ===============================
Closed connection to database ''TestDB'' on server ''localhost''.
=============================== EF Core log finished ===============================
第二次数据库连接,查询 Book 表的数据:
=============================== EF Core log started ===============================
Opening connection to database ''TestDB'' on server ''localhost''.
=============================== EF Core log finished ===============================
=============================== EF Core log started ===============================
Opened connection to database ''TestDB'' on server ''localhost''.
=============================== EF Core log finished ===============================
=============================== EF Core log started ===============================
Executing DbCommand [Parameters=[@__get_Item_0=''?'' (Size = 50)], CommandType=''Text'', CommandTimeout=''30'']
SELECT [e].[BookCode], [e].[BookName], [e].[ID], [e].[PersonCode]
FROM [Book] AS [e]
WHERE [e].[PersonCode] = @__get_Item_0
=============================== EF Core log finished ===============================
=============================== EF Core log started ===============================
Executed DbCommand (8ms) [Parameters=[@__get_Item_0=''?'' (Size = 50)], CommandType=''Text'', CommandTimeout=''30'']
SELECT [e].[BookCode], [e].[BookName], [e].[ID], [e].[PersonCode]
FROM [Book] AS [e]
WHERE [e].[PersonCode] = @__get_Item_0
=============================== EF Core log finished ===============================
=============================== EF Core log started ===============================
Context ''Book'' started tracking ''TestDBContext'' entity. Consider using ''DbContextOptionsBuilder.EnableSensitiveDataLogging'' to see key values.
=============================== EF Core log finished ===============================
=============================== EF Core log started ===============================
A data reader was disposed.
=============================== EF Core log finished ===============================
=============================== EF Core log started ===============================
Closing connection to database ''TestDB'' on server ''localhost''.
=============================== EF Core log finished ===============================
=============================== EF Core log started ===============================
Closed connection to database ''TestDB'' on server ''localhost''.
=============================== EF Core log finished ===============================
现在我们修改代码如下,改为在 Lazy loading 下使用 Include 方法来结合 Eager loading:
using (TestDBContext dbContext = new TestDBContext())
{
    var p = dbContext.Person.Include(e => e.Book).First();
    var books = p.Book;
}
我们再来查看 EF Core 的日志,发现这一次只开启了一次数据库连接,用 sql 语句的 join 直接把 Person 表和 Book 表的数据都查出来,说明这种情况下实际上是 Eager loading 在起作用:
=============================== EF Core log started ===============================
Opening connection to database ''TestDB'' on server ''localhost''.
=============================== EF Core log finished ===============================
“dotnet.exe”(CoreCLR: clrhost): 已加载“C:\Program Files\dotnet\shared\Microsoft.AspNetCore.App\2.1.4\System.Text.Encoding.CodePages.dll”。已跳过加载符号。模块进行了优化,并且调试器选项“仅我的代码”已启用。
=============================== EF Core log started ===============================
Opened connection to database ''TestDB'' on server ''localhost''.
=============================== EF Core log finished ===============================
=============================== EF Core log started ===============================
Executing DbCommand [Parameters=[], CommandType=''Text'', CommandTimeout=''30'']
SELECT TOP(1) [e].[Code], [e].[CreateTime], [e].[ID], [e].[Name], [e].[UpdateTime]
FROM [Person] AS [e]
ORDER BY [e].[Code]
=============================== EF Core log finished ===============================
“dotnet.exe”(CoreCLR: clrhost): 已加载“C:\Program Files\dotnet\shared\Microsoft.NETCore.App\2.1.4\System.Xml.ReaderWriter.dll”。已跳过加载符号。模块进行了优化,并且调试器选项“仅我的代码”已启用。
=============================== EF Core log started ===============================
Executed DbCommand (21ms) [Parameters=[], CommandType=''Text'', CommandTimeout=''30'']
SELECT TOP(1) [e].[Code], [e].[CreateTime], [e].[ID], [e].[Name], [e].[UpdateTime]
FROM [Person] AS [e]
ORDER BY [e].[Code]
=============================== EF Core log finished ===============================
=============================== EF Core log started ===============================
Context ''Person'' started tracking ''TestDBContext'' entity. Consider using ''DbContextOptionsBuilder.EnableSensitiveDataLogging'' to see key values.
=============================== EF Core log finished ===============================
=============================== EF Core log started ===============================
A data reader was disposed.
=============================== EF Core log finished ===============================
=============================== EF Core log started ===============================
Executing DbCommand [Parameters=[], CommandType=''Text'', CommandTimeout=''30'']
SELECT [e.Book].[BookCode], [e.Book].[BookName], [e.Book].[ID], [e.Book].[PersonCode]
FROM [Book] AS [e.Book]
INNER JOIN (
    SELECT TOP(1) [e0].[Code]
    FROM [Person] AS [e0]
    ORDER BY [e0].[Code]
) AS [t] ON [e.Book].[PersonCode] = [t].[Code]
ORDER BY [t].[Code]
=============================== EF Core log finished ===============================
=============================== EF Core log started ===============================
Executed DbCommand (5ms) [Parameters=[], CommandType=''Text'', CommandTimeout=''30'']
SELECT [e.Book].[BookCode], [e.Book].[BookName], [e.Book].[ID], [e.Book].[PersonCode]
FROM [Book] AS [e.Book]
INNER JOIN (
    SELECT TOP(1) [e0].[Code]
    FROM [Person] AS [e0]
    ORDER BY [e0].[Code]
) AS [t] ON [e.Book].[PersonCode] = [t].[Code]
ORDER BY [t].[Code]
=============================== EF Core log finished ===============================
=============================== EF Core log started ===============================
A data reader was disposed.
=============================== EF Core log finished ===============================
=============================== EF Core log started ===============================
Closing connection to database ''TestDB'' on server ''localhost''.
=============================== EF Core log finished ===============================
=============================== EF Core log started ===============================
Closed connection to database ''TestDB'' on server ''localhost''.
=============================== EF Core log finished ===============================
Lazy loading without proxies
Lazy-loading proxies work by injecting the ILazyLoader service into an entity, as described in Entity Type Constructors. For example:
public class Blog
{
    private ICollection<Post> _posts;

    public Blog()
    {
    }

    private Blog(ILazyLoader lazyLoader)
    {
        LazyLoader = lazyLoader;
    }

    private ILazyLoader LazyLoader { get; set; }

    public int Id { get; set; }
    public string Name { get; set; }

    public ICollection<Post> Posts
    {
        get => LazyLoader.Load(this, ref _posts);
        set => _posts = value;
    }
}

public class Post
{
    private Blog _blog;

    public Post()
    {
    }

    private Post(ILazyLoader lazyLoader)
    {
        LazyLoader = lazyLoader;
    }

    private ILazyLoader LazyLoader { get; set; }

    public int Id { get; set; }
    public string Title { get; set; }
    public string Content { get; set; }

    public Blog Blog
    {
        get => LazyLoader.Load(this, ref _blog);
        set => _blog = value;
    }
}
This doesn''t require entity types to be inherited from or navigation properties to be virtual, and allows entity instances created with new to lazy-load once attached to a context. However, it requires a reference to the ILazyLoader service, which is defined in the Microsoft.EntityFrameworkCore.Abstractions package. This package contains a minimal set of types so that there is very little impact in depending on it. However, to completely avoid depending on any EF Core packages in the entity types, it is possible to inject the ILazyLoader.Load method as a delegate. For example:
public class Blog
{
    private ICollection<Post> _posts;

    public Blog()
    {
    }

    private Blog(Action<object, string> lazyLoader)
    {
        LazyLoader = lazyLoader;
    }

    private Action<object, string> LazyLoader { get; set; }

    public int Id { get; set; }
    public string Name { get; set; }

    public ICollection<Post> Posts
    {
        get => LazyLoader.Load(this, ref _posts);
        set => _posts = value;
    }
}

public class Post
{
    private Blog _blog;

    public Post()
    {
    }

    private Post(Action<object, string> lazyLoader)
    {
        LazyLoader = lazyLoader;
    }

    private Action<object, string> LazyLoader { get; set; }

    public int Id { get; set; }
    public string Title { get; set; }
    public string Content { get; set; }

    public Blog Blog
    {
        get => LazyLoader.Load(this, ref _blog);
        set => _blog = value;
    }
}
The code above uses a Load extension method to make using the delegate a bit cleaner:
public static class PocoLoadingExtensions
{
    public static TRelated Load<TRelated>(
        this Action<object, string> loader,
        object entity,
        ref TRelated navigationField,
        [CallerMemberName] string navigationName = null)
        where TRelated : class
    {
        loader?.Invoke(entity, navigationName);

        return navigationField;
    }
}
Note
The constructor parameter for the lazy-loading delegate must be called "lazyLoader". Configuration to use a different name than this is planned for a future release.
蛋疼,现在构造函数的参数必须要叫lazyLoader这个参数名,期待上面说的 is planned for a future release吧。。。
Related data and serialization(ASP.NET Core MVC 如何避免 EF Core 的 Lazy loading 开启后,实体在 Json 序列化时被循环引用,造成死循环)
Because EF Core will automatically fix-up navigation properties, you can end up with cycles in your object graph. For example, loading a blog and its related posts will result in a blog object that references a collection of posts. Each of those posts will have a reference back to the blog.
Some serialization frameworks do not allow such cycles. For example, Json.NET will throw the following exception if a cycle is encountered.
Newtonsoft.Json.JsonSerializationException: Self referencing loop detected for property ''Blog'' with type ''MyApplication.Models.Blog''.If you are using ASP.NET Core, you can configure Json.NET to ignore cycles that it finds in the object graph. This is done in the ConfigureServices(...) method in Startup.cs.
public void ConfigureServices(IServiceCollection services)
{
    ...

    services.AddMvc()
        .AddJsonOptions(
            options => options.SerializerSettings.ReferenceLoopHandling = Newtonsoft.Json.ReferenceLoopHandling.Ignore
        );

    ...
}
可以看到 ASP.NET Core MVC 有很简单的机制,来防止 EF Core 开启 Lazy loading 后,其实体进行 Json 序列化时被循环引用造成死循环,AddJsonOptions 方法中一个设置就搞定了,很智能。
原文链接

Ember.js 入门指南--目录
本系列文章全部从(http://ibeginner.sinaapp.com/)迁移过来,欢迎访问原网站。
Ember.js 是什么?我想对于想学习它的人应该知道它是个什么东西,如果你想了解那就赶紧去 Google 或者百度,本系列教程是通过学习官网教程然后摘抄个人觉得比较重要的部分,加上学习实例整合而成,如有疏漏欢迎提出修改意见,一起成长!
Ember官网:http://emberjs.com/
教程官网:http://guides.emberjs.com/v2.0.0/
在此简单介绍下 Ember;
Ember是一个雄心勃勃的Web应用程序,消除了样板,并提供了一个标准的应用程序架构的JavaScript框架。
Ember核心组成有如下几个部分:
路由
在Ember应用程序中,程序的状态是又URL表示出来的。每一个URL都有一个对应的路由对象,这个对象可以控制是否对用户可见。
模型
每一个路由都有一个与此关联的模型,模型中包含应用程序当前状态相关的数据。对于应用程序来说,可以通过使用jQuery从服务器加载JSON对象,并将这些JSON对象作为模型,很多的应用程序都是使用模型库来处理数据,比如Ember data。
模板
模板是用于构建一个应用程序的HTML以及作为模板语言。(HTMLBars是Handlebars的另一个版本,用于构建DOM元素而不是构建成一个字符串。)
组件
一个组件就是一个自定义的HTML标签。标签的行为是用JavaScript实现,用HTMLBars模板展示,组件包含了他们使用的数据。它们可以嵌套,并且可以通过事件(events)与父组件通信。其他的组件库也是可以在Ember应用程序中使用,比如Polymer
服务
服务是个单例对象,用于长期保持数据,比如用户的session。
本教程的目录
1,Ember.js 入门指南——类的定义、初始化、继承
2,Ember.js 入门指南——扩展(reopen)
3,Ember.js 入门指南——计算属性(compute properties)
4,Ember.js 入门指南——观察者(observer)
5,Ember.js 入门指南——绑定(bingding)
6,Ember.js 入门指南——枚举(enumerables)
参考文献:
1, http://www.cnblogs.com/rush/archive/2013/04/29/3051191.html
2,http://ember-doc.com
3,https://blog.openshift.com/day-19-ember-the-missing-emberjs-tutorial
4,http://eviltrout.com/2013/02/10/why-discourse-uses-emberjs.html

Ember.js 入门指南——action触发变化
组件就像一个相对独立的盒子。在前面的文章中介绍过组件是怎么通过属性传递参数,并且这个属性值你可以在模板或者js代码中获取。
但是到目前为止还没介绍过子组件从父组件中获取数组,在Ember应用中组件之间的通信是通过actions实现的。
跟着下面的步骤来,创建一个组件之间通信的示例。
1,创建组件
创建组件的方法不用我多说,直接使用Ember CLI命令创建即可。
ember g component button-with-confirmation
ember g component user-profile
ember g route button-with-confirmation-route
为了测试方便多增加了一个路由。
下面是组件user-profile的定义,调用组件button-with-confirmation,那么此时user-profile作为父组件,button-with-confirmation作为子组件:
<!--  app/temlates/components/user-profile.hbs  -->

{{button-with-confirmation text="Click OK to delete your account"}}
2,在组件类中添加action
要想action能执行需要作如下两步:
在父组件中定义好需要处理的动作(action)。在这个例子中父组件的动作是要删除用户账号并发送一个提示信息到另一个组件。
在子组件中,判断发生什么事件并发出通知信息。在这个例子中当用户点击“确认”按钮之后触发一个外部的动作(删除账户或者发送提示信息)。
下面是实现代码:
实现父组件动作(action)
在父组件中,定义好当用户点击“确认”之后触发的动作。在这个例子中的动作(action)是先找出用户账号再删除。
在Ember应用中,每个组件都有一个名为actions的属性。这个属性值是函数,是可以被用户或者子组件执行的函数。
//  app/components/user-profile.js

import Ember from ''ember'';

export default Ember.Component.extend({
       actions: {
              userDidDeleteAccount: function() {
                     console.log(“userDidDeleteAccount…”);
              }
       }
});现在已经实现了父组件逻辑,但是并没有告诉Ember这个动作什么时候触发,下一步将实现这个功能。
实现子组件动作(action)
这一步我们将实现当用户点击“确定”之后触发事件的逻辑。
//  app/components/button-with-confirmation.js

import Ember from ''ember'';

export default Ember.Component.extend({
       tagName: ''button'',
       click: function() {
              if (confirm(this.get(''text''))) {
                     // 在这里获取父组件的事件(数据)并触发
              }
       }
});
3,传递action到组件中
现在我们在user-profile组件中使用onConfirm()方法触发组件button-with-confirmation类中的userDidDeleteAccount事件。
<!--  app/temlates/components/user-profile.hbs  -->

{{#button-with-confirmation text="Click OK to delete your account" onConfirm=(action ''userDidDeleteAccount'')}}
执行userDidDeleteAccount方法
{{/button-with-confirmation}}这段代码的意思是告诉父组件,''userDidDeleteAccount''方法会通过onConfirm方法执行。
现在你可以在子组件中使用onConfirm方法执行父组件的动作。
//  app/components/button-with-confirmation.js

import Ember from ''ember'';

export default Ember.Component.extend({
       tagName: ''button'',
       click: function() {
              if (confirm(this.get(''text''))) {
                     // 在父组件中触发动作
                     this.get(''onConfirm'')();
              }
       }
});this.gete(“onConfirm”)从父组件返回一个值“onConfirm”,然后与“()”组合成了一个个方法onConfirm()。
在模板button-with-confirmation-route.hbs中调用组件。
<!--  app/temlates/button-with-confirmation-route.hbs  -->

{{user-profile}}
最后是运行结果:
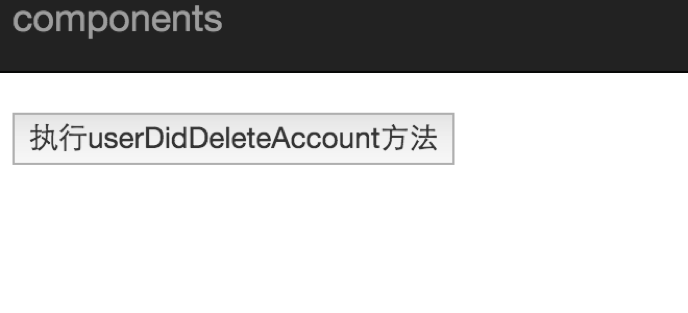
点击这个button,会触发事件。弹出对话框。再点击“确认”后执行方法userDidDeleteAccount,可以看到浏览器控制台输出了“userDidDeleteAccount…”,未点击“确认”前或者点击“取消”不会输出这个信息,说明不执行这个方法userDidDeleteAccount。


像普通属性,actions可以组件的一个属性,唯一的区别是,属性设置为一个函数,它知道如何触发的行为。
在组件的actions属性中定义的方法,允许你决定怎么去处理一个事件,有助于模块化,提高组件重用率。
到此,组件这一章节的内容全部介绍完毕了,不知道你看懂了多少?如果有疑问请给我留言一起交流学习,获取是直接去官网学习官方教程。
今天关于Ember.js 入门指南——loading、error子状态和js中em的分享就到这里,希望大家有所收获,若想了解更多关于Day 19: EmberJS 入门指南、EF Core 2.1 中的 Eager loading、Explicit loading 和 LazyLoading (转自 MSDN)、Ember.js 入门指南--目录、Ember.js 入门指南——action触发变化等相关知识,可以在本站进行查询。
本文标签:


