对于springmvc+mybatis整合案例感兴趣的读者,本文将会是一篇不错的选择,我们将详细介绍springmvcmybatis整合,并为您提供关于AngularJS整合Springmvc、Spr
对于springmvc+mybatis整合案例感兴趣的读者,本文将会是一篇不错的选择,我们将详细介绍springmvc mybatis整合,并为您提供关于AngularJS整合Springmvc、Spring、Mybatis搭建开发环境、Intellij-IDEA-maven+springMVC+mybatis整合、javaweb 各种框架组合案例 (二):maven+spring+springMVC+mybatis、JavaWeb_(SpringMVC框架)SpringMVC&Spring&MyBatis整合的有用信息。
本文目录一览:- springmvc+mybatis整合案例(springmvc mybatis整合)
- AngularJS整合Springmvc、Spring、Mybatis搭建开发环境
- Intellij-IDEA-maven+springMVC+mybatis整合
- javaweb 各种框架组合案例 (二):maven+spring+springMVC+mybatis
- JavaWeb_(SpringMVC框架)SpringMVC&Spring&MyBatis整合
")
springmvc+mybatis整合案例(springmvc mybatis整合)
----------------------------映射文件----重要的是插入一条记录---------------------------------------
<?xml version="1.0" encoding="UTF-8" ?>
<!DOCTYPE mapper PUBLIC "-//mybatis.org//DTD Mapper 3.0//EN"
"http://mybatis.org/dtd/mybatis-3-mapper.dtd">
<mapper namespace="cn.gdpe.bean.Emps">
<resultMap type="emps" id="empsMap">
<id property="id" column="id"/>
<result property="name" column="ename"/>
<result property="sex" column="esex"/>
<result property="sal" column="esal"/>
</resultMap>
<insert id="addEmp" parameterType="emps" useGeneratedKeys="false">
<selectKey resultType="int" keyProperty="id" order="BEFORE">
select EMPS_SEQ.nextval as id from dual
</selectKey>
insert into emps(id,ename,esex,esal) values(#{id},#{name},#{sex},#{sal})
</insert>
<!-- <insert id="addEmp" parameterType="emps" keyProperty="id" useGeneratedKeys="false">
insert into emps(id,ename,esex,esal) values(EMPS_SEQ.nextval,#{name},#{sex},#{sal})
</insert> -->
<select id="findAll" resultMap="empsMap">
select id,ename,esex,esal from emps;
</select>
<select id="findById" parameterType="int" resultMap="empsMap">
select id,ename,esex,esal from emps where id =#{id}
</select>
</mapper>
--------------------------------mybaits.xml配置文件---------------------------------------
<?xml version="1.0" encoding="utf-8"?>
<!DOCTYPE configuration PUBLIC "-//mybatis.org//DTD Config 3.0//EN"
"http://mybatis.org/dtd/mybatis-3-config.dtd">
<configuration>
<!-- 资源文件 -->
<properties resource="db.properties"/>
<typeAliases>
<typeAlias type="cn.gdpe.bean.Emps" alias="emps"/>
</typeAliases>
<environments default="oracle_development">
<environment id="mysql_development">
<!--mybatis的事务管理方式 -->
<transactionManager type="JDBC"/>
<dataSource type="POOLED">
<property name="driver" value="${mysql.driver}"/>
<property name="url" value="${mysql.url}"/>
<property name="username" value="${mysql.username}"/>
<property name="password" value="${mysql.password}"/>
</dataSource>
</environment>
<environment id="oracle_development">
<transactionManager type="JDBC"/>
<dataSource type="POOLED">
<property name="driver" value="${oracle.driver}"/>
<property name="url" value="${oracle.url}"/>
<property name="username" value="${oracle.username}"/>
<property name="password" value="${oracle.password}"/>
</dataSource>
</environment>
</environments>
<!-- 映射文件 -->
<mappers>
<mapper resource="cn/gdpe/bean/EmpsMapper.xml"/>
</mappers>
</configuration>
--------------------------------------资源文件-----------------------------------------------------
mysql.driver=com.mysql.jdbc.Driver
mysql.url=jdbc:mysql://127.0.0.1:3306/day15
mysql.username=root
mysql.password=root
oracle.driver=oracle.jdbc.driver.OracleDriver
oracle.url=jdbc:oracle:thin:@127.0.0.1 :1521:orcl
oracle.username=scott
oracle.password=root
---------------------------------------------springmvc配置文件---------------------------------
<?xml version="1.0" encoding="UTF-8"?>
<beans
xmlns="http://www.springframework.org/schema/beans"
xmlns:xsi="http://www.w3.org/2001/XMLSchema-instance"
xmlns:mvc="http://www.springframework.org/schema/mvc"
xmlns:context="http://www.springframework.org/schema/context"
xmlns:aop="http://www.springframework.org/schema/aop"
xmlns:tx="http://www.springframework.org/schema/tx"
xsi:schemaLocation="
http://www.springframework.org/schema/aop http://www.springframework.org/schema/aop/spring-aop-3.0.xsd
http://www.springframework.org/schema/tx http://www.springframework.org/schema/tx/spring-tx-3.0.xsd
http://www.springframework.org/schema/beans http://www.springframework.org/schema/beans/spring-beans-3.0.xsd
http://www.springframework.org/schema/mvc http://www.springframework.org/schema/mvc/spring-mvc-3.0.xsd
http://www.springframework.org/schema/context http://www.springframework.org/schema/context/spring-context-3.0.xsd
">
<context:component-scan base-package="cn.gdpe"></context:component-scan>
<!-- 注册这4个 BeanPostProcessor的作用,就是为了你的系统能够识别相应的注解。
上面一句代码,就已经帮我们做了这一步,所以有了context:component-scan 就省略这一步
-->
<context:annotation-config />
<!-- 配置连接池 -->
<bean id="dataSource">
<property name="driverClass" value="oracle.jdbc.driver.OracleDriver"></property>
<property name="jdbcUrl" value="jdbc:oracle:thin:@127.0.0.1 :1521:orcl"></property>
<property name="user" value="scott"></property>
<property name="password" value="root"></property>
</bean>
<!-- 配置数据工厂 加载mybatis配置文件-->
<bean id="sqlSessionFactory">
<property name="dataSource" ref="dataSource"></property>
<property name="configLocation" value="classpath:mybatis.xml"></property>
</bean>
<!-- 配置 -->
<!-- 配置事务管理器 mybatis底层用的是jdbc事务管理器 不知道是不是这里必须配置JDBC事务管理器-->
<bean id="txManager">
<property name="dataSource" ref="dataSource"></property>
</bean>
<!-- 事务通知器 即哪些方法需要事务 -->
<tx:advice id="tx" transaction-manager="txManager">
<tx:attributes>
<tx:method name="add*" propagation="REQUIRED"/>
<tx:method name="delete*" propagation="REQUIRED"/>
<tx:method name="update*" propagation="REQUIRED"/>
<tx:method name="*" propagation="NEVER"/>
</tx:attributes>
</tx:advice>
<!-- 切面 -->
<aop:config>
<!-- 切点 -->
<aop:pointcut id="emp" expression="execution(* cn.gdpe.service.*.* (..))" />
<!-- 关联事务通知器与切点 -->
<aop:advisor advice-ref="tx" pointcut-ref="emp"/>
</aop:config>
<!-- 注解方法适配器 主要解决json-->
<bean>
<property name="messageConverters">
<list>
<bean></bean>
</list>
</property>
</bean>
</beans>
--------------------------------web.xml配置文件----------------------------------------------
<?xml version="1.0" encoding="UTF-8"?>
<web-app version="2.5"
xmlns="http://java.sun.com/xml/ns/javaee"
xmlns:xsi="http://www.w3.org/2001/XMLSchema-instance"
xsi:schemaLocation="http://java.sun.com/xml/ns/javaee
http://java.sun.com/xml/ns/javaee/web-app_2_5.xsd">
<filter>
<filter-name>characterEncoding</filter-name>
<filter-class>org.springframework.web.filter.CharacterEncodingFilter</filter-class>
<init-param>
<param-name>encoding</param-name>
<param-value>UTF-8</param-value>
</init-param>
</filter>
<filter-mapping>
<filter-name>characterEncoding</filter-name>
<url-pattern>/*</url-pattern>
</filter-mapping>
<servlet>
<servlet-name>DispatcherServlet</servlet-name>
<servlet-class>org.springframework.web.servlet.DispatcherServlet</servlet-class>
<init-param>
<param-name>contextConfigLocation</param-name>
<param-value>classpath:springmvc.xml</param-value>
</init-param>
</servlet>
<servlet-mapping>
<servlet-name>DispatcherServlet</servlet-name>
<url-pattern>*.action</url-pattern>
</servlet-mapping>
<welcome-file-list>
<welcome-file>index.jsp</welcome-file>
</welcome-file-list>
</web-app>
---------------------------------------工具类---------两个------------------------------------
package cn.gdpe.util;
import javax.sql.DataSource;
import org.apache.commons.dbutils.QueryRunner;
import com.mchange.v2.c3p0.ComboPooledDataSource;
public class JdbcUtil {
private static DataSource dataSource;
static{
dataSource=new ComboPooledDataSource();
}
public static DataSource getDataSource(){
return dataSource;
}
public static QueryRunner getQueryRunner(){
return new QueryRunner(dataSource);
}
}
package cn.gdpe.util;
import java.io.InputStream;
import org.apache.ibatis.session.SqlSession;
import org.apache.ibatis.session.SqlSessionFactory;
import org.apache.ibatis.session.SqlSessionFactoryBuilder;
public class MybatisUtil {
private static ThreadLocal<SqlSession> threadLocal=new ThreadLocal<SqlSession>();
private static SqlSessionFactory sqlSessoinFactory;
private MybatisUtil(){}
static{
InputStream is=MybatisUtil.class.getResourceAsStream("/mybatis.xml");
sqlSessoinFactory=new SqlSessionFactoryBuilder().build(is);
}
public static SqlSession getSqlSession(){
//从当前线程取出sqlsession
SqlSession sqlSession=threadLocal.get();
//如果为空
if(sqlSession==null){
//就从sqlSessoinFactory中打开一个sqlSession
sqlSession=sqlSessoinFactory.openSession();
//将session与当前线程绑在一起
threadLocal.set(sqlSession);
}
return sqlSession;
}
public static void closeSqlSession(){
//从当前线程取出sqlsession
SqlSession sqlSession=threadLocal.get();
//如果不为空
if(sqlSession!=null){
//将session与当前线程分开
sqlSession.close();
threadLocal.remove();
}
}

AngularJS整合Springmvc、Spring、Mybatis搭建开发环境
最近想学习AngularJS的使用,网上搜了一圈后,折腾了半天解决bug后,成功使用AngularJS整合Springmvc、Spring、Mybatis搭建了一个开发环境。(这里Spring使用的版本是4.0.6,Mybatis版本是3.2.5,AngularJS的版本是1.0.3)
第一步:创建一Maven项目,在pom.xml下添加需要的包
<project xmlns="http://maven.apache.org/POM/4.0.0" xmlns:xsi="http://www.w3.org/2001/XMLSchema-instance"
 xsi:schemaLocation="http://maven.apache.org/POM/4.0.0 http://maven.apache.org/maven-v4_0_0.xsd">
 <modelVersion>4.0.0</modelVersion>
 <groupId>test.AngularSpringmvcMybatis</groupId>
 <artifactId>AngularSpringmvcMybatis</artifactId>
 <packaging>war</packaging>
 <version>0.0.1-SNAPSHOT</version>
 <name>AngularSpringmvcMybatis Maven Webapp</name>
 <url>http://maven.apache.org</url>
 <dependencies>
 <dependency>
  <groupId>junit</groupId>
  <artifactId>junit</artifactId>
  <version>3.8.1</version>
  <scope>test</scope>
 </dependency>

 <dependency>
  <groupId>org.springframework</groupId>
  <artifactId>spring-webmvc</artifactId>
  <version>4.0.6.RELEASE</version>
 </dependency>

 <dependency>
  <groupId>org.springframework</groupId>
  <artifactId>spring-core</artifactId>
  <version>4.0.6.RELEASE</version>
 </dependency>

 <dependency>
  <groupId>org.springframework</groupId>
  <artifactId>spring-tx</artifactId>
  <version>4.0.6.RELEASE</version>
 </dependency>

 <dependency>
  <groupId>org.springframework</groupId>
  <artifactId>spring-jdbc</artifactId>
  <version>4.0.6.RELEASE</version>
 </dependency>

 <dependency>
  <groupId>org.springframework</groupId>
  <artifactId>spring-orm</artifactId>
  <version>4.0.6.RELEASE</version>
 </dependency>

 <dependency>
  <groupId>org.springframework</groupId>
  <artifactId>spring-aspects</artifactId>
  <version>4.0.6.RELEASE</version>
 </dependency>

 <dependency>
  <groupId>org.springframework</groupId>
  <artifactId>spring-context-support</artifactId>
  <version>4.0.6.RELEASE</version>
 </dependency>

 <dependency>
  <groupId>org.mybatis</groupId>
  <artifactId>mybatis</artifactId>
  <version>3.2.5</version>
 </dependency>

 <dependency>
  <groupId>org.mybatis</groupId>
  <artifactId>mybatis-spring</artifactId>
  <version>1.2.0</version>
 </dependency>

 <dependency>
  <groupId>org.aspectj</groupId>
  <artifactId>aspectjweaver</artifactId>
  <version>1.6.8</version>
 </dependency>

 <dependency>
  <groupId>mysql</groupId>
  <artifactId>mysql-connector-java</artifactId>
  <version>5.1.6</version>
 </dependency>

 <dependency>
  <groupId>c3p0</groupId>
  <artifactId>c3p0</artifactId>
  <version>0.9.1</version>
 </dependency>

 <dependency>
  <groupId>log4j</groupId>
  <artifactId>log4j</artifactId>
  <version>1.2.16</version>
 </dependency>

 <dependency>
  <groupId>javax.servlet</groupId>
  <artifactId>servlet-api</artifactId>
  <version>3.0-alpha-1</version>
 </dependency>

 <dependency>
  <groupId>asm</groupId>
  <artifactId>asm</artifactId>
  <version>3.3</version>
 </dependency>
 <dependency>
  <groupId>asm</groupId>
  <artifactId>asm-commons</artifactId>
  <version>3.3</version>
 </dependency>
 <dependency>
  <groupId>asm</groupId>
  <artifactId>asm-tree</artifactId>
  <version>3.3</version>
 </dependency>

 <dependency>
  <groupId>ognl</groupId>
  <artifactId>ognl</artifactId>
  <version>3.0.6</version>
 </dependency>

 <dependency>
  <groupId>commons-logging</groupId>
  <artifactId>commons-logging</artifactId>
  <version>1.1.3</version>
 </dependency>

 <dependency>
  <groupId>org.apache.velocity</groupId>
  <artifactId>velocity</artifactId>
  <version>1.7</version>
 </dependency>

 <dependency>
  <groupId>org.codehaus.jackson</groupId>
  <artifactId>jackson-mapper-asl</artifactId>
  <version>1.9.12</version>
 </dependency>

 </dependencies>
 <build>
 <finalName>AngularSpringmvcMybatis</finalName>
 </build>
</project>
第二步:在src/main/resources下添加配置文件,如下:

(注:如果刚创建的maven项目中没显示src/main/resources与src/test/java目录,可以右键项目,再properties,在Java Build Path中,将JRE System Library修改为1.7版本,如下)

配置文件中applicationContext.xml如下:
<?xml version="1.0" encoding="UTF-8"?>
<beans xmlns="http://www.springframework.org/schema/beans"
 xmlns:xsi="http://www.w3.org/2001/XMLSchema-instance"
 xmlns:p="http://www.springframework.org/schema/p"
 xmlns:aop="http://www.springframework.org/schema/aop"
 xmlns:context="http://www.springframework.org/schema/context"
 xmlns:jee="http://www.springframework.org/schema/jee"
 xmlns:tx="http://www.springframework.org/schema/tx"
 xsi:schemaLocation="
  http://www.springframework.org/schema/aop http://www.springframework.org/schema/aop/spring-aop-4.0.xsd
  http://www.springframework.org/schema/beans http://www.springframework.org/schema/beans/spring-beans-4.0.xsd
  http://www.springframework.org/schema/context http://www.springframework.org/schema/context/spring-context-4.0.xsd
  http://www.springframework.org/schema/jee http://www.springframework.org/schema/jee/spring-jee-4.0.xsd
  http://www.springframework.org/schema/tx http://www.springframework.org/schema/tx/spring-tx-4.0.xsd">

 <!-- 自动扫描 -->
 <context:component-scan base-package="com.hin.dao" />
 <context:component-scan base-package="com.hin.service" />

 <!-- 配置数据源 -->
 <bean id="dataSource">
  <property name="driverClassName" value="com.mysql.jdbc.Driver"/>
  <property name="url" value="jdbc:mysql://localhost:3306/db_news"/>
  <property name="username" value="root"/>
  <property name="password" value="root"/>
 </bean>

 <!-- 配置mybatis的sqlSessionFactory -->
 <bean id="sqlSessionFactory">
  <property name="dataSource" ref="dataSource" />
  <!-- 自动扫描mappers.xml文件 ,要加上classpath:com/...-->
  <property name="mapperLocations" value="classpath:com/hin/mappers/*.xml"></property>
  <!-- mybatis配置文件 -->
  <property name="configLocation" value="classpath:mybatis-config.xml"></property>
 </bean>

 <!-- DAO接口所在包名,Spring会自动查找其下的类 -->
 <bean>
  <property name="basePackage" value="com.hin.dao" />
  <property name="sqlSessionFactoryBeanName" value="sqlSessionFactory"></property>
 </bean>

 <!-- (事务管理)transaction manager, use JtaTransactionManager for global tx -->
 <bean id="transactionManager">
  <property name="dataSource" ref="dataSource" />
 </bean>

 <!-- 配置事务通知属性 -->
 <tx:advice id="txAdvice" transaction-manager="transactionManager">
  <!-- 定义事务传播属性 -->
  <tx:attributes>
   <tx:method name="insert*" propagation="REQUIRED" />
   <tx:method name="update*" propagation="REQUIRED" />
   <tx:method name="edit*" propagation="REQUIRED" />
   <tx:method name="save*" propagation="REQUIRED" />
   <tx:method name="add*" propagation="REQUIRED" />
   <tx:method name="new*" propagation="REQUIRED" />
   <tx:method name="set*" propagation="REQUIRED" />
   <tx:method name="remove*" propagation="REQUIRED" />
   <tx:method name="delete*" propagation="REQUIRED" />
   <tx:method name="change*" propagation="REQUIRED" />
   <tx:method name="get*" propagation="REQUIRED" read-only="true" />
   <tx:method name="find*" propagation="REQUIRED" read-only="true" />
   <tx:method name="load*" propagation="REQUIRED" read-only="true" />
   <tx:method name="*" propagation="REQUIRED" read-only="true" />
  </tx:attributes>
 </tx:advice>

 <!-- 配置事务切面 -->
 <aop:config>
  <aop:pointcut id="serviceOperation"
   expression="execution(* com.hin.service.*.*(..))" />
  <aop:advisor advice-ref="txAdvice" pointcut-ref="serviceOperation" />
 </aop:config>

</beans>
spring-mvc.xml如下:
<?xml version="1.0" encoding="UTF-8"?>
<beans xmlns="http://www.springframework.org/schema/beans"
 xmlns:xsi="http://www.w3.org/2001/XMLSchema-instance"
 xmlns:p="http://www.springframework.org/schema/p"
 xmlns:aop="http://www.springframework.org/schema/aop"
 xmlns:mvc="http://www.springframework.org/schema/mvc"
 xmlns:context="http://www.springframework.org/schema/context"
 xmlns:jee="http://www.springframework.org/schema/jee"
 xmlns:tx="http://www.springframework.org/schema/tx"
 xsi:schemaLocation="
  http://www.springframework.org/schema/aop http://www.springframework.org/schema/aop/spring-aop-4.0.xsd
  http://www.springframework.org/schema/beans http://www.springframework.org/schema/beans/spring-beans-4.0.xsd
  http://www.springframework.org/schema/mvc http://www.springframework.org/schema/mvc/spring-mvc-4.0.xsd
  http://www.springframework.org/schema/context http://www.springframework.org/schema/context/spring-context-4.0.xsd
  http://www.springframework.org/schema/jee http://www.springframework.org/schema/jee/spring-jee-4.0.xsd
  http://www.springframework.org/schema/tx http://www.springframework.org/schema/tx/spring-tx-4.0.xsd">

 <mvc:annotation-driven />

 <mvc:resources mapping="/resources/**" location="/resources/" />

 <bean id="velocityConfig">
  <property name="resourceLoaderPath" value="/WEB-INF/html/"/>
 </bean>

 <!-- 使用注解的包,包括子集 -->
 <context:component-scan base-package="com.hin.controller" />

 <bean id="viewResolver">
  <property name="cache" value="true"/>
  <property name="prefix" value=""/>
  <property name="suffix" value=".html"/>
  <property name="exposeSpringMacroHelpers" value="true"/>
 </bean>

</beans>
完后配置web.xml,如下:
<!DOCTYPE web-app PUBLIC
 "-//Sun Microsystems, Inc.//DTD Web Application 2.3//EN"
 "http://java.sun.com/dtd/web-app_2_3.dtd" >

<web-app>
 <display-name>Archetype Created Web Application</display-name>

 <!-- Spring配置文件 -->
 <context-param>
  <param-name>contextConfigLocation</param-name>
  <param-value>classpath:applicationContext.xml</param-value>
 </context-param>
 <!-- 编码过滤器 -->
 <filter>
  <filter-name>encodingFilter</filter-name>
  <filter-class>org.springframework.web.filter.CharacterEncodingFilter</filter-class>
  <async-supported>true</async-supported>
  <init-param>
   <param-name>encoding</param-name>
   <param-value>UTF-8</param-value>
  </init-param>
 </filter>
 <filter-mapping>
  <filter-name>encodingFilter</filter-name>
  <url-pattern>/*</url-pattern>
 </filter-mapping>
 <!-- Spring监听器 -->
 <listener>
  <listener-class>org.springframework.web.context.ContextLoaderListener</listener-class>
 </listener>

 <!-- 添加对springmvc的支持 -->
 <servlet>
  <servlet-name>springMVC</servlet-name>
  <servlet-class>org.springframework.web.servlet.DispatcherServlet</servlet-class>
  <init-param>
   <param-name>contextConfigLocation</param-name>
   <param-value>classpath:spring-mvc.xml</param-value>
  </init-param>
  <load-on-startup>1</load-on-startup>
  <!--
  <async-supported>true</async-supported>
   -->

 </servlet>
 <servlet-mapping>
  <servlet-name>springMVC</servlet-name>
  <url-pattern>/</url-pattern>
 </servlet-mapping>
</web-app>
第三步:编写各个Java类,以下是用户控制器(实现db_news数据库中t_user表的用户添加与用户删除)
package com.hin.controller;
import java.util.List;
import javax.annotation.Resource;
import org.springframework.stereotype.Controller;
import org.springframework.web.bind.annotation.PathVariable;
import org.springframework.web.bind.annotation.RequestMapping;
import org.springframework.web.bind.annotation.RequestMethod;
import org.springframework.web.bind.annotation.ResponseBody;
import com.hin.entity.User;
import com.hin.service.UserService;

@Controller
@RequestMapping("/users")
public class UserController {

 @Resource
 private UserService userService;

 @RequestMapping("/userlist.json")
 public @ResponseBody List<User> getUserList() {
  return userService.getAllUsers();
 }

 @RequestMapping(value = "/addUser/{userName}", method = RequestMethod.POST)
 public @ResponseBody void addUser(@PathVariable("userName") String userName) {
  userService.addUser(userName);
 }

 @RequestMapping(value = "/removeUser/{userName}", method = RequestMethod.DELETE)
 public @ResponseBody void removeUser(@PathVariable("userName") String userName) {
  userService.deleteUser(userName);
 }

 @RequestMapping(value = "/removeAllUsers", method = RequestMethod.DELETE)
 public @ResponseBody void removeAllUsers() {
  userService.deleteAll();
 }

 @RequestMapping("/layout")
 public String getUserPartialPage() {
  return "users/layout";
 }
}
第四步:引入angular的js文件,如下:

这里使用Angular来实现添加用户与删除用户功能主要是UserController.js,如下:
''use strict'';

/**
 * UserController
 */
var UserController = function($scope, $http) {
 $scope.fetchUsersList = function() {
  $http.get(''users/userlist.json'').success(function(userList){
   $scope.users = userList;
  });
 };

 $scope.addNewUser = function(newUser) {
  $http.post(''users/addUser/'' + newUser).success(function() {
   $scope.fetchUsersList();
  });
  $scope.userName = '''';
 };

 $scope.removeUser = function(user) {
  $http.delete(''users/removeUser/'' + user).success(function() {
   $scope.fetchUsersList();
  });
 };

 $scope.removeAllUsers = function() {
  $http.delete(''users/removeAllUsers'').success(function() {
   $scope.fetchUsersList();
  });

 };

 $scope.fetchUsersList();
};
关于Angular的其他文件具体可看源码,最后再右键项目,Run as,Maven install,再发布到Tomcat下就可以看到效果了,如下:

AngularJS整合Springmvc、Spring、Mybatis搭建开发环境就完成了,希望对大家的学习有所帮助。
- 使用maven整合Spring+SpringMVC+Mybatis框架详细步骤(图文)
- springboot+springmvc+mybatis项目整合
- Java框架搭建之Maven、Mybatis、Spring MVC整合搭建(图文)
- Spring+SpringMVC+MyBatis整合详细教程(SSM)
- 一步步教你整合SSM框架(Spring MVC+Spring+MyBatis)详细教程
- SpringMVC4 + MyBatis3 + SQL Server 2014整合教程(含增删改查分页)
- 详解spring+springmvc+mybatis整合注解
- SpringMVC整合mybatis实例代码
- MyBatis SpringMVC整合实现步骤详解

Intellij-IDEA-maven+springMVC+mybatis整合
GitHub地址
https://github.com/Ethel731/WebProjectDemo
前言
之前都是在已经建立好的项目基础上开发,没有自己建立过IDEA的maven+springMVC+Mybatis项目,今天刚好学习一下。
maven的本地安装自行度娘~
步骤
新建项目
首先,打开IDEA后新建一个project:

选择maven项目和JDK版本后,勾选Create from archetype创建原型,因为我们这是一个web项目,因此选择maven-archetype-webapp,点击“next”:

此时跳出的窗口是对maven仓库的基本配置,groupID中填写本项目仓库路径(默认小写),artifactID为项目名称。Version一般分两种,SNAPSHOT为快照版本,RELEASE为最终发布版本,前面的编号为版本号:

接下来进入maven配置阶段,我的本地安装路径为D:\apache-maven-3.5.0,接下来两个分别是maven配置文件地址和本地仓库地址:

最后审查一下我们的配置,点击"finish":

添加源码文件夹
IDEA生成的项目目录src下并没有源码文件夹,需要在main下新建一个Java文件夹:

新建文件夹后,IDEA仍然不能识别源码和resources文件地址,需要我们手动设置一下。
设置Source Root和Resource Root
右键新建的Java文件夹,mark directory as sources root:

对同目录下的resources文件夹也是同样的操作,mark directory as resources root:

完成后项目目录是这样的:

配置web.xml
web.xml为JavaWEB核心配置文件,也是程序的入口,因此我们首要配置它。IDEA自动生成的web.xml并不是规范的,是DOCTYPE规范,而我们WEB-INF下的web.xml是XML文件。这里需要清空后全部覆盖,此处贴上我的一个初始配置:
<?xml version="1.0" encoding="UTF-8"?>
<web-app xmlns:xsi="http://www.w3.org/2001/XMLSchema-instance"
 xmlns="http://java.sun.com/xml/ns/javaee" xmlns:web="http://java.sun.com/xml/ns/javaee/web-app_2_5.xsd"
 xsi:schemaLocation="http://java.sun.com/xml/ns/javaee http://java.sun.com/xml/ns/javaee/web-app_2_5.xsd"
 id="ssm" version="2.5">

  <!-- 初始化spring容器 -->
  <context-param>
<param-name>contextConfigLocation</param-name>
<param-value>classpath:applicationContext.xml</param-value>
  </context-param>
  <listener>
<listener-class>org.springframework.web.context.ContextLoaderListener</listener-class>
  </listener>


  <!-- 解决post乱码 -->
  <filter>
<filter-name>CharacterEncodingFilter</filter-name>
<filter-class>org.springframework.web.filter.CharacterEncodingFilter</filter-class>
<init-param>
  <param-name>encoding</param-name>
  <param-value>utf-8</param-value>
</init-param>
  </filter>
  <filter-mapping>
<filter-name>CharacterEncodingFilter</filter-name>
<url-pattern>/*</url-pattern>
  </filter-mapping>

  <!-- 解决jsp include html 乱码问题 -->
  <jsp-config>
<jsp-property-group>
  <description>html encoding</description>
  <display-name>JSPConfiguration</display-name>
  <url-pattern>*.html</url-pattern>
  <el-ignored>true</el-ignored>
  <page-encoding>UTF-8</page-encoding>
  <scripting-invalid>false</scripting-invalid>
  <include-prelude></include-prelude>
  <include-coda></include-coda>
</jsp-property-group>
  </jsp-config>

  <!-- springmvc的前端控制器 -->
  <servlet>
<servlet-name>springmvc</servlet-name>
<servlet-class>org.springframework.web.servlet.DispatcherServlet</servlet-class>
<init-param>
  <param-name>contextConfigLocation</param-name>
  <param-value>classpath:springmvc.xml</param-value>
</init-param>
<load-on-startup>1</load-on-startup>
  </servlet>
  <servlet-mapping>
<servlet-name>springmvc</servlet-name>
<url-pattern>/</url-pattern>
  </servlet-mapping>
</web-app>
pom.xml
配置完web.xml之后,紧接着就是项目根目录下的pom文件,该文件用于管理源代码、配置文件、开发者的信息和角色、问题追踪系统、组织信息、项目授权、项目的url、项目的依赖关系等等。
配置pom前,首先是技术选型,也就是这个项目所需要用到哪些技术栈。如果不知道自己dependency怎么写,可以直接去https://mvnrepository.com/中搜索。eg:搜索mybatis弹出mybatis相关,点击mybatis后进入版本列表,点击其中一个版本,出现其配置方法:

现在贴入本DEMO的pom.xml(注意MyBatis Generator的配置,下面会讲到):
<project xmlns="http://maven.apache.org/POM/4.0.0" xmlns:xsi="http://www.w3.org/2001/XMLSchema-instance"
 xsi:schemaLocation="http://maven.apache.org/POM/4.0.0 http://maven.apache.org/maven-v4_0_0.xsd">
  <modelVersion>4.0.0</modelVersion>
  <groupId>com.zyx.freemarkerworddemo</groupId>
  <artifactId>FreemarkerWordDemo</artifactId>
  <packaging>war</packaging>
  <version>1.0-SNAPSHOT</version>
  <name>FreemarkerWordDemo Maven Webapp</name>
  <url>http://maven.apache.org</url>

  <!-- 集中定义依赖版本号 -->
  <properties>
<spring.version>4.1.3.RELEASE</spring.version>
<mybatis.version>3.2.8</mybatis.version>
<mybatis.spring.version>1.2.2</mybatis.spring.version>
<mybatis-generator.version>1.3.5</mybatis-generator.version>
<mysql.version>5.1.32</mysql.version>
<druid.version>1.0.9</druid.version>
<slf4j.version>1.6.4</slf4j.version>
<jstl.version>1.2</jstl.version>
<servlet-api.version>2.5</servlet-api.version>
<jsp-api.version>2.0</jsp-api.version>
<commons-lang3.version>3.3.2</commons-lang3.version>
<commons-io.version>2.5</commons-io.version>
<commons-net.version>3.3</commons-net.version>
<freemarker.version>2.3.23</freemarker.version>
<project.build.sourceEncoding>UTF-8</project.build.sourceEncoding>
  </properties>

  <dependencies>
<!-- Apache工具组件 -->
<dependency>
  <groupId>org.apache.commons</groupId>
  <artifactId>commons-lang3</artifactId>
  <version>${commons-lang3.version}</version>
</dependency>
<dependency>
  <groupId>commons-io</groupId>
  <artifactId>commons-io</artifactId>
  <version>${commons-io.version}</version>
</dependency>
<dependency>
  <groupId>commons-net</groupId>
  <artifactId>commons-net</artifactId>
  <version>${commons-net.version}</version>
</dependency>
<!-- 日志处理 -->
<dependency>
  <groupId>org.slf4j</groupId>
  <artifactId>slf4j-log4j12</artifactId>
  <version>${slf4j.version}</version>
</dependency>
<!-- Mybatis -->
<dependency>
  <groupId>org.mybatis</groupId>
  <artifactId>mybatis</artifactId>
  <version>${mybatis.version}</version>
</dependency>
<dependency>
  <groupId>org.mybatis</groupId>
  <artifactId>mybatis-spring</artifactId>
  <version>${mybatis.spring.version}</version>
</dependency>
<!-- MySql -->
<dependency>
  <groupId>mysql</groupId>
  <artifactId>mysql-connector-java</artifactId>
  <version>${mysql.version}</version>
</dependency>
<!-- 连接池 -->
<dependency>
  <groupId>com.alibaba</groupId>
  <artifactId>druid</artifactId>
  <version>${druid.version}</version>
</dependency>

<!-- Spring -->
<dependency>
  <groupId>org.springframework</groupId>
  <artifactId>spring-context</artifactId>
  <version>${spring.version}</version>
</dependency>
<dependency>
  <groupId>org.springframework</groupId>
  <artifactId>spring-beans</artifactId>
  <version>${spring.version}</version>
</dependency>
<dependency>
  <groupId>org.springframework</groupId>
  <artifactId>spring-webmvc</artifactId>
  <version>${spring.version}</version>
</dependency>
<dependency>
  <groupId>org.springframework</groupId>
  <artifactId>spring-jdbc</artifactId>
  <version>${spring.version}</version>
</dependency>
<dependency>
  <groupId>org.springframework</groupId>
  <artifactId>spring-aspects</artifactId>
  <version>${spring.version}</version>
</dependency>
<dependency>
  <groupId>org.springframework</groupId>
  <artifactId>spring-test</artifactId>
  <version>${spring.version}</version>
</dependency>
<!-- freemarker -->
<dependency>
  <groupId>org.springframework</groupId>
  <artifactId>spring-context-support</artifactId>
  <version>${spring.version}</version>
</dependency>
<!-- JSP相关 -->
<dependency>
  <groupId>jstl</groupId>
  <artifactId>jstl</artifactId>
  <version>${jstl.version}</version>
</dependency>
<dependency>
  <groupId>javax.servlet</groupId>
  <artifactId>servlet-api</artifactId>
  <version>${servlet-api.version}</version>
  <scope>provided</scope>
</dependency>
<dependency>
  <groupId>javax.servlet</groupId>
  <artifactId>jsp-api</artifactId>
  <version>${jsp-api.version}</version>
  <scope>provided</scope>
</dependency>
<dependency>
  <groupId>org.freemarker</groupId>
  <artifactId>freemarker</artifactId>
  <version>${freemarker.version}</version>
</dependency>

<!-- mybatis generator -->
<dependency>
  <groupId>org.mybatis.generator</groupId>
  <artifactId>mybatis-generator-core</artifactId>
  <version>${mybatis-generator.version}</version>
</dependency>

<dependency>
  <groupId>junit</groupId>
  <artifactId>junit</artifactId>
  <version>3.8.1</version>
  <scope>test</scope>
</dependency>
  </dependencies>
  <build>
<finalName>FreemarkerWordDemo</finalName>
<pluginManagement>
  <plugins>
<!-- 配置Tomcat插件 -->
<plugin>
  <groupId>org.apache.tomcat.maven</groupId>
  <artifactId>tomcat7-maven-plugin</artifactId>
  <version>2.2</version>
  <configuration>
<port>80</port>
  </configuration>
</plugin>
<!-- MyBatis Generator -->
<plugin>
  <groupId>org.mybatis.generator</groupId>
  <artifactId>mybatis-generator-maven-plugin</artifactId>
  <version>1.3.2</version>
</plugin>
  </plugins>
</pluginManagement>

<!-- 解决配置文件不拷贝的问题 -->
<resources>
  <resource>
<directory>src/main/java</directory>
<includes>
  <include>**/*.properties</include>
  <include>**/*.xml</include>
</includes>
<filtering>false</filtering>
  </resource>
  <resource>
<directory>src/main/resources</directory>
<includes>
  <include>**/*.properties</include>
  <include>**/*.xml</include>
</includes>
<excludes>
  <exclude>generatorConfig.xml</exclude>
</excludes>
<filtering>false</filtering>
  </resource>
</resources>
  </build>
</project>
resources资源目录
一般resources文件夹下存放的都是我们项目集成的配置文件,springMVC、Mybatis等文件配置都放在这里。本DEMO中的配置文件目录如下:

首先是spring配置文件applicationContext.xml,此处有两个地方需要注意,一个是阿里的druid数据库连接池,我们的jdbc.properties在这里被加载;一个是整合mybatis和spring,需要在MapperScannerConfigurer中配置DAO路径以便创建MapperFactoryBean。
jdbc.properties:
jdbc.driver=com.mysql.jdbc.Driver
jdbc.url=jdbc:mysql://localhost:3306/demofreeword?characterEncoding=utf-8
jdbc.username=root
jdbc.password=123456
applicationContext.xml:
    <?xml version="1.0" encoding="UTF-8"?>
    <beans xmlns="http://www.springframework.org/schema/beans"
    	xmlns:context="http://www.springframework.org/schema/context" xmlns:p="http://www.springframework.org/schema/p"
    	xmlns:aop="http://www.springframework.org/schema/aop" xmlns:tx="http://www.springframework.org/schema/tx"
    	xmlns:xsi="http://www.w3.org/2001/XMLSchema-instance"
    	xsi:schemaLocation="http://www.springframework.org/schema/beans http://www.springframework.org/schema/beans/spring-beans-4.0.xsd
    	http://www.springframework.org/schema/context http://www.springframework.org/schema/context/spring-context-4.0.xsd
    	http://www.springframework.org/schema/aop http://www.springframework.org/schema/aop/spring-aop-4.0.xsd http://www.springframework.org/schema/tx http://www.springframework.org/schema/tx/spring-tx-4.0.xsd
    	http://www.springframework.org/schema/util http://www.springframework.org/schema/util/spring-util-4.0.xsd">

    	<!-- 加载配置文件 -->
    	 <context:property-placeholder location="classpath:jdbc.properties"/>
    	<!-- 数据库连接池 -->
    	<bean id="dataSource"destroy-method="close">
    		<property name="url" value="${jdbc.url}" />
    		<property name="username" value="${jdbc.username}" />
    		<property name="password" value="${jdbc.password}" />
    		<property name="driverClassName" value="${jdbc.driver}" />
    		<!-- 配置初始化大小、最小、最大 -->
    		<property name="initialSize">
    			<value>1</value>
    		</property>
    		<property name="maxActive">
    			<value>5</value>
    		</property>
    		<property name="minIdle">
    			<value>1</value>
    		</property>
    		<!-- 配置获取连接等待超时的时间 -->
    		<property name="maxWait">
    			<value>60000</value>
    		</property>
    		<!-- 配置监控统计拦截的filters -->
    		<property name="filters">
    			<value>stat</value>
    		</property>
    		<!-- 配置间隔多久才进行一次检测,检测需要关闭的空闲连接,单位是毫秒 -->
    		<property name="timeBetweenEvictionRunsMillis">
    			<value>60000</value>
    		</property>
    		<!-- 配置一个连接在池中最小生存的时间,单位是毫秒 -->
    		<property name="minEvictableIdleTimeMillis">
    			<value>300000</value>
    		</property>
    	</bean>

    	<!-- 让spring管理sqlsessionfactory 使用mybatis和spring整合包中的 -->
    	<bean id="sqlSessionFactory">
    		<!-- 数据库连接池 -->
    		<property name="dataSource" ref="dataSource" />
    		<!-- 加载mybatis的全局配置文件 -->
    		<property name="configLocation" value="classpath:mybatis-config.xml" />
    	</bean>
    	<bean>
    		<property name="basePackage" value="com.zyx.dao" />
    	</bean>

    	<!-- aop -->
    	<aop:aspectj-autoproxy/>
    </beans>
其余配置文件大同小异,在此就不一一列举了。详情可下载源码。
源码文件夹下的项目目录
配置文件完成后就是建立J2EE的项目目录了,源码文件都在Java文件夹下,具体目录见下图:

到此,项目目录已完成。
mybatis-genterator插件配置:
mybatis-generator是mybatis的一个插件,用于自动生成model及DAO(mapper)层的代码,需要开发者事前在数据库中设置好数据库表及其字段、属性等,以便自动映射JAVA对象。此处只写其配置及使用。
先在pom.xml文件中配置Tomcat插件和MyBatis Generator(上文pom.xml已给出),并定义generatorConfig.xml(打包时不打入war包,只在创建DAO,model层时用到),此处直接贴入generatorConfiguration:
generatorConfig.xml:
<?xml version="1.0" encoding="UTF-8" ?>
<!DOCTYPE generatorConfiguration PUBLIC "-//mybatis.org//DTD MyBatis Generator Configuration 1.0//EN" "http://mybatis.org/dtd/mybatis-generator-config_1_0.dtd" >
<generatorConfiguration>
<classPathEntry
location="D:\apache-maven-3.5.0\repo\mysql\mysql-connector-java\5.1.32\mysql-connector-java-5.1.32.jar" />
<context id="context1" targetRuntime="MyBatis3">
<!-- 序列化pojo -->
<plugin type="org.mybatis.generator.plugins.SerializablePlugin" />
<commentGenerator>
<property name="suppressDate" value="true" />
<property name="suppressAllComments" value="true" />
</commentGenerator>
<jdbcConnection driverconnectionURL="jdbc:mysql://localhost:3306/demofreeword?characterEncoding=utf-8"
userId="root" password="123456" />
<javaModelGenerator targetPackage="com.zyx.model"
targetProject="src\main\java" />
<sqlMapGenerator targetPackage="com.zyx.dao"
targetProject="src\main\java" />
<javaClientGenerator targetPackage="com.zyx.dao"
targetProject="src\main\java" type="XMLMAPPER" />
<table schema="" tableName="resume">
<!-- 实体类中的成员变量和表的列明一一对应 -->
   <property name="useActualColumnNames" value="true"/>
</table>
</context>
</generatorConfiguration>
在generatorConfiguration中:
- location为本地MySQL包的地址
- jdbcConnection配置数据库连接
- javaModelGenerator targetPackage配置需要生成model文件的地址
- sqlMapGenerator targetPackage配置需要生成的mapper.xml文件地址
- javaClientGenerator targetPackage配置需要生成的DAO文件地址
配置完成后,点击右上角
 ,
,
点击“+”添加一个新的configuration,选择“maven”:

在弹出的对话框Name填写插件的名字mybatis-generator(这里是自己定义的,最好写上插件的名字),command line中填写mybatis-generator:generate -e(这里**-e后面不能出现空格**,-e表示在控制台显示错误信息):

点击确定后,可看出右上角已显示配置好的mybatis-generator,先点击右侧的maven project弹出maven相关操作按钮,进入run configurations,选择mybatis-generator。双击运行或者右键run:

出现下图结果后,表示项目建成:

备注:在上述生成文件中,dao目录下接口文件会以Mapper为后缀,可选择手动更改为DAO文件。当rename文件成功后,mapper.xml中namespace将自动更改,无需更多操作。
部署项目
项目生成后,部署到Tomcat。窗口右上角处点击“Edit Configurations...”,在弹出窗口左上角点击“+”号选择Tomcat Server——本地Tomcat:

填写所用服务名称(自定义),在server选项下,选择默认开启的浏览器,点击下图“+”号创建Artifacts,选择war exploded:
- war模式:将WEB工程以包的形式上传到服务器 ;
- war exploded模式:将WEB工程以当前文件夹的位置关系上传到服务器;
详情参见:http://blog.csdn.net/xlgen157387/article/details/56498938

创建号创建Artifacts:

选择打包方式为war exploded模式:

服务器设置完成之后,切换选项卡到部署(deployment),选择Artifacts:

再次选择war exploded:

一切做完了,点击Apply无报错表示部署成功,OK退出。
运行项目
选择已部署的项目,点击右边绿色三角即为run:

:maven+spring+springMVC+mybatis")
javaweb 各种框架组合案例 (二):maven+spring+springMVC+mybatis
1.mybatis 是比较新的半自动 orm 框架,效率也比较高,优点是 sql 语句的定制,管理与维护,包括优化,缺点是对开发人员的 sql 功底要求较高,如果比较复杂的查询,表与表之间的关系映射到对象与对象之间的关系时,mapper.xml 中的配置会恶心死你;
2.demo 中只涉及到一张 user 表,同样的,我将演示 ssm 对单表的操作;
3. 与案例一相同,我还是会对 dao 进行抽离,使得抽离出的核心 dao 具有通用性,其他模块 dao 只需继承核心 dao 即可;
4.demo 整体包结构
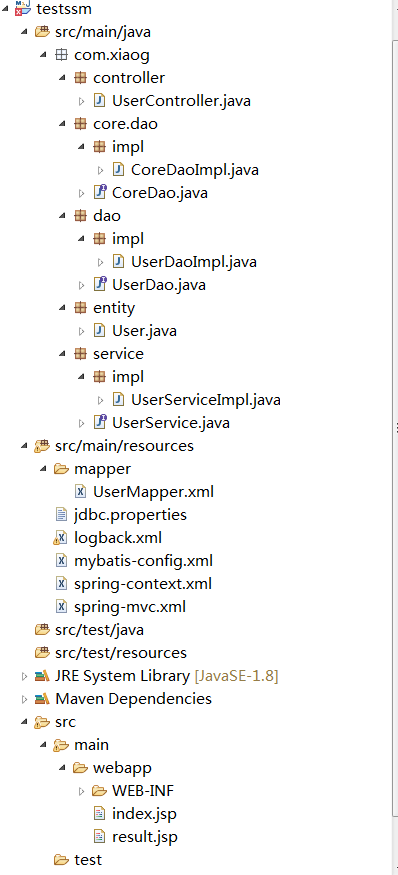
数据库
create database ssjdbc;//创建ssjdbc数据库

//创建user表
CREATE TABLE `user` (
  `id` int(11) NOT NULL AUTO_INCREMENT,
  `username` varchar(32) DEFAULT NULL,
  `password` varchar(32) DEFAULT NULL,
  PRIMARY KEY (`id`)
) ENGINE=InnoDB AUTO_INCREMENT=4 DEFAULT CHARSET=utf8;

//插入数据3条
insert into user(username,password) values (1001,123),(1002,456),(1003,789);
5. 各配置文件
(1)pom.xml
<project xmlns="http://maven.apache.org/POM/4.0.0" xmlns:xsi="http://www.w3.org/2001/XMLSchema-instance" xsi:schemaLocation="http://maven.apache.org/POM/4.0.0 http://maven.apache.org/xsd/maven-4.0.0.xsd">
  <modelVersion>4.0.0</modelVersion>
  <groupId>com.xiaog</groupId>
  <artifactId>testssm</artifactId>
  <version>0.0.1-SNAPSHOT</version>
  <packaging>war</packaging>

  <dependencies>
      <!-- spring+springmvc顶级依赖包,包含spring-webmvc、spring-aop、spring-beans、
      spring-context、spring-core、spring-jcl、spring-expression、spring-web -->
      <dependency>
      <groupId>org.springframework</groupId>
      <artifactId>spring-webmvc</artifactId>
      <version>5.1.5.RELEASE</version>
    </dependency>

    <!-- spring-aop所依赖的静态代理 ,
        使用aop方式管理事务,在service方法执行前开启事务,
        方法执行后提交事务,方法执行失败回滚事务-->
    <dependency>
        <groupId>org.aspectj</groupId>
        <artifactId>aspectjrt</artifactId>
        <version>1.8.0</version>
    </dependency>
    <dependency>
        <groupId>org.aspectj</groupId>
        <artifactId>aspectjweaver</artifactId>
        <version>1.8.0</version>
    </dependency>

    <!-- 使用jdbcTemplate中的事务实现 -->
    <dependency>
      <groupId>org.springframework</groupId>
      <artifactId>spring-jdbc</artifactId>
      <version>5.1.5.RELEASE</version>
    </dependency>

    <!-- 数据库方面 -->
    <dependency>
        <groupId>mysql</groupId>
        <artifactId>mysql-connector-java</artifactId>
        <version>5.1.47</version>
    </dependency>
    <dependency>
        <groupId>com.alibaba</groupId>
        <artifactId>druid</artifactId>
        <version>1.1.10</version>
    </dependency>

    <!-- orm框架 -->
    <dependency>
        <groupId>org.mybatis</groupId>
        <artifactId>mybatis</artifactId>
        <version>3.5.0</version>
    </dependency>
    <dependency>
        <groupId>org.mybatis</groupId>
        <artifactId>mybatis-spring</artifactId>
        <version>1.3.0</version>
    </dependency>

    <!-- Logback -->
    <dependency>
        <groupId>ch.qos.logback</groupId>
        <artifactId>logback-classic</artifactId>
        <version>1.1.3</version>
    </dependency>
    <dependency>
        <groupId>org.logback-extensions</groupId>
        <artifactId>logback-ext-spring</artifactId>
        <version>0.1.2</version>
    </dependency>
    <dependency>
        <groupId>org.slf4j</groupId>
        <artifactId>jcl-over-slf4j</artifactId>
        <version>1.7.12</version>
    </dependency>

    <!-- jsp需要 -->
    <dependency>
      <groupId>javax.servlet</groupId>
      <artifactId>servlet-api</artifactId>
      <version>3.0-alpha-1</version>
      <scope>provided</scope>
    </dependency>
    <dependency>
      <groupId>jstl</groupId>
      <artifactId>jstl</artifactId>
      <version>1.1.2</version>
    </dependency>
  </dependencies>

  <build>
  <defaultGoal>compile</defaultGoal>
      <plugins>
          <!-- maven插件 -->
         <plugin>
            <groupId>org.apache.maven.plugins</groupId>
            <artifactId>maven-compiler-plugin</artifactId>
            <version>3.1</version>
            <configuration>
            <source>1.8</source>
            <target>1.8</target>
                <encoding>UTF-8</encoding>
            </configuration>
         </plugin>

        <!-- tomcat插件 -->
        <plugin>
            <groupId>org.apache.tomcat.maven</groupId>
            <artifactId>tomcat7-maven-plugin</artifactId>
            <version>2.1</version>
            <configuration>
                <port>9999</port>
                <path>/testssm</path>
                <uriEncoding>UTF-8</uriEncoding>
                <finalName>testssm</finalName>
                <server>tomcat7</server>
            </configuration>
        </plugin>

      </plugins>
  </build>
</project>
(2)spring-context.xml
<?xml version="1.0" encoding="UTF-8"?>
<beans xmlns="http://www.springframework.org/schema/beans"
    xmlns:xsi="http://www.w3.org/2001/XMLSchema-instance" xmlns:context="http://www.springframework.org/schema/context"
    xmlns:tx="http://www.springframework.org/schema/tx" xmlns:aop="http://www.springframework.org/schema/aop"
    xsi:schemaLocation="http://www.springframework.org/schema/aop http://www.springframework.org/schema/aop/spring-aop-4.0.xsd
        http://www.springframework.org/schema/beans http://www.springframework.org/schema/beans/spring-beans.xsd
        http://www.springframework.org/schema/tx http://www.springframework.org/schema/tx/spring-tx-4.0.xsd
        http://www.springframework.org/schema/context http://www.springframework.org/schema/context/spring-context-4.0.xsd"
        default-autowire="byName" default-lazy-init="true">
    <description>Spring公共配置 </description>
    <!-- 1.扫描包: @Repository @Service @Autowired @Resource  -->
    <context:component-scan base-package="com.xiaog.dao,com.xiaog.service" />

    <!-- 2.加载配置文件 -->
    <context:property-placeholder location="classpath:jdbc.properties" />

    <!-- 3.配置连接池 :druid连接池 -->
    <bean id="dataSource" class="com.alibaba.druid.pool.DruidDataSource">
        <property name="driverClassName" value="${jdbc.driver}" />
        <property name="url" value="${jdbc.url}" />
        <property name="username" value="${jdbc.username}" />
        <property name="password" value="${jdbc.password}" />
        <!-- 初始化连接数量 -->
       <property name="initialSize" value="5" />
       <!-- 最大连接数 -->
       <property name="maxActive" value="100" />
       <!-- 最小连接数 -->
       <property name="minIdle" value="5" />
       <!-- 配置获取连接等待超时的时间 -->
       <property name="maxWait" value="120000" />
       <!-- 超过时间限制是否回收 -->
       <property name="removeAbandoned" value="true" />
       <!-- 超过时间限制多长 -->
       <property name="removeAbandonedTimeout" value="1800" />
       <!-- 配置间隔多久才进行一次检测,检测需要关闭的空闲连接,单位是毫秒 -->
       <property name="timeBetweenEvictionRunsMillis" value="120000" />
       <!-- 配置一个连接在池中最小生存的时间,单位是毫秒 -->
       <property name="minEvictableIdleTimeMillis" value="300000" />
       <!-- 用来检测连接是否有效的sql,要求是一个查询语句 -->
       <property name="validationQuery" value="SELECT 1" />
       <!-- 申请连接的时候检测 -->
       <property name="testWhileIdle" value="true" />
       <!-- 申请连接时执行validationQuery检测连接是否有效,配置为true会降低性能 -->
       <property name="testOnBorrow" value="false" />
       <!-- 归还连接时执行validationQuery检测连接是否有效,配置为true会降低性能 -->
       <property name="testOnReturn" value="false" />
       <!-- 打开PSCache,并且指定每个连接上PSCache的大小 -->
       <property name="poolPreparedStatements" value="true" />
       <property name="maxPoolPreparedStatementPerConnectionSize" value="20" />
       <property name="defaultAutoCommit" value="false" />
       <!-- 配置监控统计拦截的filters -->
       <property name="filters" value="stat"/>
    </bean>

    <!-- 4.spring集成mybatis  -->
    <bean id="sqlSessionFactory" class="org.mybatis.spring.SqlSessionFactoryBean">
        <property name="dataSource" ref="dataSource" />
        <property name="configLocation" value="classpath:mybatis-config.xml" />
        <property name="mapperLocations" value="classpath:mapper/*.xml" />
    </bean>

   <!-- 5.配置事务管理器 -->
    <bean id="transactionManager" class="org.springframework.jdbc.datasource.DataSourceTransactionManager">
        <property name="dataSource" ref="dataSource" />
    </bean>
    <!-- 6.配置aop -->
    <!-- 配置通知: 定位方法 -->
    <tx:advice id="txAdvice" transaction-manager="transactionManager">
        <tx:attributes>
            <tx:method name="*" />
        </tx:attributes>
    </tx:advice>
    <!-- 配置切面 -->
    <aop:config>
        <!-- 定位具体的类:完整类名,使用通配符 -->
        <aop:advisor advice-ref="txAdvice" pointcut="execution(* com.xiaog.service.*.*(..))" />
    </aop:config>

</beans>
(3)spring-mvc.xml
<?xml version="1.0" encoding="UTF-8"?>
<beans xmlns="http://www.springframework.org/schema/beans"
    xmlns:xsi="http://www.w3.org/2001/XMLSchema-instance"
    xmlns:context="http://www.springframework.org/schema/context"
    xmlns:mvc="http://www.springframework.org/schema/mvc"
    xsi:schemaLocation="http://www.springframework.org/schema/beans
    http://www.springframework.org/schema/beans/spring-beans.xsd
        http://www.springframework.org/schema/context
        http://www.springframework.org/schema/context/spring-context-4.0.xsd
        http://www.springframework.org/schema/mvc
        http://www.springframework.org/schema/mvc/spring-mvc-4.0.xsd">

        <!-- 1.启动自动扫描 -->
        <context:component-scan base-package="com.xiaog.controller" />

        <!-- 2.注册MVC注解驱动 -->
        <mvc:annotation-driven />

        <!-- 3.配置静态资源    css js imgs -->
        <mvc:resources location="/resources/**" mapping="/resources"/>
        <mvc:resources location="/webapp/static/**" mapping="/webapp/static"/>

        <!-- 4.配置视图解析器 -->
        <bean class="org.springframework.web.servlet.view.InternalResourceViewResolver">
            <property name = "prefix" value="/" /><!-- 前缀 -->
            <property name = "suffix" value = ".jsp" /><!-- 后缀 -->
             <property name="viewClass" value="org.springframework.web.servlet.view.JstlView" />
        </bean>

</beans>
(4)mybatis-config.xml
<?xml version="1.0" encoding="UTF-8" ?>
<!DOCTYPE configuration
  PUBLIC "-//mybatis.org//DTD Config 3.0//EN"
  "http://mybatis.org/dtd/mybatis-3-config.dtd">
<configuration>
    <typeAliases>
        <package name="com.xiaog.entity" />
    </typeAliases>
</configuration>
(5)logback.xml
<?xml version="1.0" encoding="UTF-8"?>
<configuration>
    <!-- 控制台输出 -->
    <appender name="STDOUT" class="ch.qos.logback.core.ConsoleAppender">
       <!-- 日志输出编码 -->
       <!-- <Encoding>UTF-8</Encoding>    -->
        <layout class="ch.qos.logback.classic.PatternLayout">
             <!--格式化输出:%d表示日期,%thread表示线程名,%-5level:级别从左显示5个字符宽度%msg:日志消息,%n是换行符-->
            <pattern>%d{yyyy-MM-dd HH:mm:ss.SSS} [%thread] %-5level %logger{50} - %msg%n
            </pattern>
        </layout>
    </appender>
    <!-- 日志输出级别 -->
    <root level="INFO">
        <appender-ref ref="STDOUT" />
    </root>
    <!-- 打印sql语句 -->
    <logger name="com.xiaog.dao" level="DEBUG" />
</configuration>
(6)jdbc.properties
jdbc.driver=com.mysql.jdbc.Driver
jdbc.url=jdbc:mysql://localhost:3306/ssjdbc?useSSL=false&useUnicode=true&characterEncoding=utf8
jdbc.username=root
jdbc.password=root
(7)UserMapper.xml
<?xml version="1.0" encoding="UTF-8" ?>
<!DOCTYPE mapper PUBLIC "-//mybatis.org//DTD Mapper 3.0//EN" "http://mybatis.org/dtd/mybatis-3-mapper.dtd" >
<mapper namespace="com.xiaog.dao.UserDao" >
  <resultMap id="BaseResultMap" type="User" >
    <id column="id" property="id" jdbcType="INTEGER" />
    <result column="username" property="username" jdbcType="VARCHAR" />
    <result column="password" property="password" jdbcType="VARCHAR" />
  </resultMap>
  <sql id="Base_Column_List" >
    id, username, password
  </sql>

  <select id="getOne" resultMap="BaseResultMap" parameterType="java.lang.Integer" >
    select
    <include refid="Base_Column_List" />
    from user
    where id = #{id,jdbcType=INTEGER}
  </select>

  <select id="getList" resultMap="BaseResultMap" parameterType="java.lang.Integer" >
    select
    <include refid="Base_Column_List" />
    from user
    <where>
      <if test="username != null" >
       and username = #{username,jdbcType=VARCHAR}
      </if>
      <if test="password != null" >
       and password = #{password,jdbcType=VARCHAR}
      </if>
    </where>
  </select>

  <delete id="delete" parameterType="java.lang.Integer" >
    delete from user
    where id = #{id,jdbcType=INTEGER}
  </delete>

  <insert id="insert" parameterType="User" >
    insert into user
    <trim prefix="(" suffix=")" suffixOverrides="," >
      <if test="id != null" >
        id,
      </if>
      <if test="username != null" >
        username,
      </if>
      <if test="password != null" >
        password,
      </if>
    </trim>
    <trim prefix="values (" suffix=")" suffixOverrides="," >
      <if test="id != null" >
        #{id,jdbcType=INTEGER},
      </if>
      <if test="username != null" >
        #{username,jdbcType=VARCHAR},
      </if>
      <if test="password != null" >
        #{password,jdbcType=VARCHAR},
      </if>
    </trim>
  </insert>

  <update id="update" parameterType="User" >
    update user
    <set >
      <if test="username != null" >
        username = #{username,jdbcType=VARCHAR},
      </if>
      <if test="password != null" >
        password = #{password,jdbcType=VARCHAR},
      </if>
    </set>
    where id = #{id,jdbcType=INTEGER}
  </update>

</mapper>
(8)web.xml
<?xml version="1.0" encoding="UTF-8"?>
<web-app xmlns:xsi="http://www.w3.org/2001/XMLSchema-instance" xmlns="http://java.sun.com/xml/ns/javaee" xsi:schemaLocation="http://java.sun.com/xml/ns/javaee http://java.sun.com/xml/ns/javaee/web-app_3_0.xsd" version="3.0">
  <display-name>testssm</display-name>
  <!-- spring配置文件 -->
      <context-param>
        <param-name>contextConfigLocation</param-name>
        <param-value>classpath:spring-context.xml</param-value>
    </context-param>
  <!-- spring监听器 -->
      <listener>
        <listener-class>org.springframework.web.context.ContextLoaderListener</listener-class>
    </listener>

     <!-- 字符编码过滤器   spring web自动提供一个 -->
    <filter>
        <filter-name>encodingFilter</filter-name>
        <filter-class>org.springframework.web.filter.CharacterEncodingFilter</filter-class>
        <init-param>
            <param-name>encoding</param-name>
            <param-value>UTF-8</param-value>
        </init-param>
        <init-param>
            <param-name>forceEncoding</param-name>
            <param-value>true</param-value>
        </init-param>
    </filter>
    <filter-mapping>
        <filter-name>encodingFilter</filter-name>
        <url-pattern>/*</url-pattern>
    </filter-mapping>


    <!-- spring  mvc 配置  【中央控制器/前端控制器/总控】 -->
    <servlet>
        <servlet-name>spring-mvc</servlet-name>
        <servlet-class>org.springframework.web.servlet.DispatcherServlet</servlet-class>
         <!-- 配置Spring mvc下的配置文件的位置和名称 -->
        <init-param>
             <param-name>contextConfigLocation</param-name>
             <param-value>classpath:spring-mvc.xml</param-value>
         </init-param>
        <load-on-startup>1</load-on-startup>
    </servlet>
    <!-- 可以配置扩展名,*.do -->
    <servlet-mapping>
        <servlet-name>spring-mvc</servlet-name>
        <url-pattern>/</url-pattern>
    </servlet-mapping>

       <!-- 添加日志监听器 -->
    <context-param>
        <param-name>logbackConfigLocation</param-name>
        <param-value>classpath:logback.xml</param-value>
    </context-param>
    <listener>
        <listener-class>ch.qos.logback.ext.spring.web.LogbackConfigListener</listener-class>
    </listener>

  <welcome-file-list>
    <welcome-file>index.jsp</welcome-file>
  </welcome-file-list>
</web-app>
6. 实体类 User
package com.xiaog.entity;

public class User {
    private Integer id;

    private String username;

    private String password;

    public Integer getId() {
        return id;
    }

    public void setId(Integer id) {
        this.id = id;
    }

    public String getUsername() {
        return username;
    }

    public void setUsername(String username) {
        this.username = username == null ? null : username.trim();
    }

    public String getPassword() {
        return password;
    }

    public void setPassword(String password) {
        this.password = password == null ? null : password.trim();
    }

    @Override
    public String toString() {
        return "User [id=" + id + ", username=" + username + ", password=" + password + "]";
    }

}
7. 核心 Dao 接口及其实现
package com.xiaog.core.dao;

import java.util.List;

public interface CoreDao<T> {

    int insert(T t);

    int delete(int id);

    int update(T t);

    T getOne(int id);

    List<T> getList(T t);

}
package com.xiaog.core.dao.impl;
import java.lang.reflect.ParameterizedType;
import java.util.List;
import org.mybatis.spring.support.SqlSessionDaoSupport;
import com.xiaog.core.dao.CoreDao;
public class CoreDaoImpl<T> extends SqlSessionDaoSupport implements CoreDao<T> {
private Class<T> clazz;
private static String PREFIX;
@SuppressWarnings("unchecked")
public CoreDaoImpl() {
this.clazz = (Class<T>)((ParameterizedType) getClass().getGenericSuperclass()).getActualTypeArguments()[0];
PREFIX = "com.xiaog.dao."+clazz.getSimpleName()+"Dao.";
}
@Override
public int insert(T t) {
return super.getSqlSession().insert(PREFIX+"insert",t);
}
@Override
public int delete(int id) {
return super.getSqlSession().delete(PREFIX+"delete", id);
}
@Override
public int update(T t) {
return super.getSqlSession().update(PREFIX+"update", t);
}
@Override
public T getOne(int id) {
return super.getSqlSession().selectOne(PREFIX+"getOne", id);
}
@Override
public List<T> getList(T t) {
return super.getSqlSession().selectList(PREFIX+"getList", t);
}
}
8. 模块 dao 接口及其实现
package com.xiaog.dao;

import com.xiaog.core.dao.CoreDao;
import com.xiaog.entity.User;

public interface UserDao extends CoreDao<User> {

}
package com.xiaog.dao.impl;
import org.springframework.stereotype.Repository;
import com.xiaog.core.dao.impl.CoreDaoImpl;
import com.xiaog.dao.UserDao;
import com.xiaog.entity.User;
@Repository
public class UserDaoImpl extends CoreDaoImpl<User> implements UserDao {
}
9.service 接口及其实现
package com.xiaog.service;

import com.xiaog.entity.User;

public interface UserService {

    User login(User user);

}
package com.xiaog.service.impl;
import java.util.List;
import org.springframework.beans.factory.annotation.Autowired;
import org.springframework.stereotype.Service;
import com.xiaog.dao.UserDao;
import com.xiaog.entity.User;
import com.xiaog.service.UserService;
@Service
public class UserServiceImpl implements UserService {
@Autowired
private UserDao userDao;
@Override
public User login(User user) {
List<User> users = userDao.getList(user);
if(users!=null && users.size()>0) {
return users.get(0);
}else {
return null;
}
}
}
10.controller
package com.xiaog.controller;

import org.slf4j.Logger;
import org.slf4j.LoggerFactory;
import org.springframework.beans.factory.annotation.Autowired;
import org.springframework.stereotype.Controller;
import org.springframework.ui.Model;
import org.springframework.web.bind.annotation.RequestMapping;

import com.xiaog.entity.User;
import com.xiaog.service.UserService;

@Controller
@RequestMapping("/user")
public class UserController {

    @Autowired
    private UserService userService;

    private final static Logger logger = LoggerFactory.getLogger(UserController.class);

    @RequestMapping(value = "/login",params= {"username","password","username!=","password!="})
    public String login(Model model,User user) {
        user = userService.login(user);
        logger.info("user="+user);
        model.addAttribute("user", user);
        return "result";
    }

}
11. 测试登录的 jsp 页面
(1)index.jsp
<%@ page language="java" contentType="text/html; charset=UTF-8" pageEncoding="UTF-8"%>
<!doctype html>
<html>
<head>
<meta charset="UTF-8">
<title>Insert title here</title>
</head>
<body>
    <form action="user/login" method="post">
        <div>
            <label>username</label>
            <input type="text" name="username"/>
        </div>
        <div>
            <label>password</label>
            <input type="password" name="password"/>
        </div>
        <div>
            <input type="submit" value="登录">
        </div>
    </form>
</body>
</html>
(2)result.jsp
<%@ page language="java" contentType="text/html; charset=UTF-8" pageEncoding="UTF-8"%>
<!doctype html>
<html>
<head>
<meta charset="UTF-8">
<title></title>
</head>
<body>
    username=${user}
</body>
</html>
12. 启动项目
项目右击 -->run as-->maven build-> 在 Goals 中填 tomcat7:run,然后 apply,run 就启动项目了
浏览器输入 http://localhost:9999/testssm
SpringMVC&Spring&MyBatis整合")
JavaWeb_(SpringMVC框架)SpringMVC&Spring&MyBatis整合
JavaWeb_(SpringMVC框架)测试SpringMVC&Spring&MyBatis三大整合 传送门
1、整合ssm 3大框架 过程
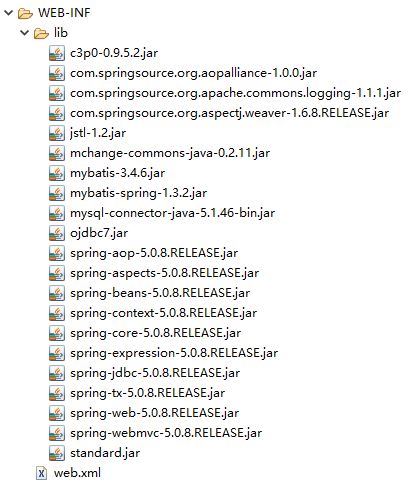
a)导包 -> spring_Jar整理 -> ssm框架整合包
b)配置 -> web.xml
i.读取spring配置文件;
ii.配置springmvc前端控制器;
c)配置 -> applicationContext.xml
i.读取数据库配置文件;
ii.配置数据源连接池;
iii.开启注解扫描;
iv.配置事务核心管理器;
v.开启注解事务;
vi.配置视图解析器;
vii.配置Mybatis:
1.配置sqlSessionFactory;
2.配置别名;
3.配置mapper工厂;
a)导包 -> spring_Jar整理 -> ssm框架整合包
b)配置 -> web.xml
i.读取spring配置文件;
ii.配置springmvc前端控制器;
<!-- 配置springmvc前端控制器 和 读取配置文件 -->
  <servlet>
      <servlet-name>springmvc</servlet-name>
          <servlet-class>org.springframework.web.servlet.DispatcherServlet</servlet-class>
          <init-param>
              <!-- 读取配置文件 -->
              <param-name>contextConfigLocation</param-name>
              <param-value>classpath:applicationContext.xml</param-value>
          </init-param>
  </servlet>
  <servlet-mapping>
      <servlet-name>springmvc</servlet-name>
      <url-pattern>*.do</url-pattern>
  </servlet-mapping>


<?xml version="1.0" encoding="UTF-8"?>
<web-app xmlns:xsi="http://www.w3.org/2001/XMLSchema-instance" xmlns="http://xmlns.jcp.org/xml/ns/javaee" xsi:schemaLocation="http://xmlns.jcp.org/xml/ns/javaee http://xmlns.jcp.org/xml/ns/javaee/web-app_3_1.xsd" id="WebApp_ID" version="3.1">
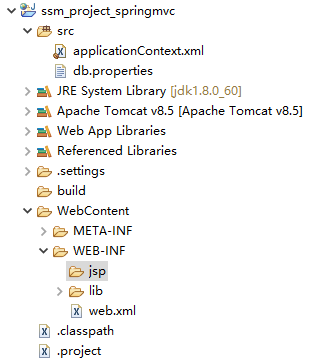
<display-name>ssm_project_springmvc</display-name>
<!-- 配置springmvc前端控制器 和 读取配置文件 -->
<servlet>
<servlet-name>springmvc</servlet-name>
<servlet-class>org.springframework.web.servlet.DispatcherServlet</servlet-class>
<init-param>
<!-- 读取配置文件 -->
<param-name>contextConfigLocation</param-name>
<param-value>classpath:applicationContext.xml</param-value>
</init-param>
</servlet>
<servlet-mapping>
<servlet-name>springmvc</servlet-name>
<url-pattern>*.do</url-pattern>
</servlet-mapping>
<welcome-file-list>
<welcome-file>index.html</welcome-file>
<welcome-file>index.htm</welcome-file>
<welcome-file>index.jsp</welcome-file>
<welcome-file>default.html</welcome-file>
<welcome-file>default.htm</welcome-file>
<welcome-file>default.jsp</welcome-file>
</welcome-file-list>
</web-app>
c)配置 -> applicationContext.xml
i.读取数据库配置文件;
ii.配置数据源连接池;
iii.开启注解扫描;
iv.配置事务核心管理器;
v.开启注解事务;
vi.配置视图解析器;
vii.配置Mybatis:
1.配置sqlSessionFactory;
2.配置别名;
3.配置mapper工厂;
db.properties
jdbc.driverClass=com.mysql.jdbc.Driver
jdbc.jdbcUrl=jdbc:mysql://localhost:3306/ssm_springmvc
jdbc.user=root
jdbc.password=123456


jdbc.driverClass=com.mysql.jdbc.Driver
jdbc.jdbcUrl=jdbc:mysql://localhost:3306/ssm_springmvc
jdbc.user=root
jdbc.password=123456
applicationContext.xml
    <!-- 读取配置文件 数据库 -->
    <context:property-placeholder location="classpath:db.properties"/>

        <!-- 配置数据源 -->
        <bean name="dataSource" class="com.mchange.v2.c3p0.ComboPooledDataSource">
            <property name="driverClass" value="${jdbc.driverClass}"/>
            <property name="jdbcUrl" value="${jdbc.jdbcUrl}"/>
            <property name="user" value="${jdbc.user}"/>
            <property name="password" value="${jdbc.password}"/>
        </bean>

        <!-- 开启注解扫描 -->
        <context:component-scan base-package="com.Gary"></context:component-scan>

        <!-- 事务核心管理器 -->
        <bean name="transactionManager" class="org.springframework.jdbc.datasource.DataSourceTransactionManager">
            <property name="dataSource" ref="dataSource"/>
        </bean>

        <!-- 开启注解事务 -->
        <tx:annotation-driven/>

        <!-- 配置视图解析器 -->
        <bean class="org.springframework.web.servlet.view.InternalResourceViewResolver">
            <property name="prefix" value="/WEB-INF/jsp/"/>
            <property name="suffix" value=".jsp"/>
        </bean>

        <!-- 配置mybatis -->
        <bean name="sqlSessionFactory" class="org.mybatis.spring.SqlSessionFactoryBean">
            <property name="dataSource" ref="dataSource"/>
            <property name="typeAliasesPackage" value="com.Gary.bean"/>
        </bean>

        <!-- mapper工厂 -->
        <bean class="org.mybatis.spring.mapper.MapperScannerConfigurer">
            <property name="basePackage" value="com.Gary.mapper"/>
        </bean>


<?xml version="1.0" encoding="UTF-8"?>
<beans xmlns="http://www.springframework.org/schema/beans"
    xmlns:xsi="http://www.w3.org/2001/XMLSchema-instance"
    xmlns:context="http://www.springframework.org/schema/context"
    xmlns:aop="http://www.springframework.org/schema/aop"
    xmlns:mvc="http://www.springframework.org/schema/mvc"
    xmlns:tx="http://www.springframework.org/schema/tx"
    xsi:schemaLocation="http://www.springframework.org/schema/mvc http://www.springframework.org/schema/mvc/spring-mvc-4.3.xsd
        http://www.springframework.org/schema/beans http://www.springframework.org/schema/beans/spring-beans-4.3.xsd
        http://www.springframework.org/schema/context http://www.springframework.org/schema/context/spring-context-4.3.xsd
        http://www.springframework.org/schema/aop http://www.springframework.org/schema/aop/spring-aop-4.3.xsd
        http://www.springframework.org/schema/tx http://www.springframework.org/schema/tx/spring-tx-4.3.xsd">

        <!-- 读取配置文件 数据库 -->
        <context:property-placeholder location="classpath:db.properties"/>

        <!-- 配置数据源 -->
        <bean name="dataSource" class="com.mchange.v2.c3p0.ComboPooledDataSource">
            <property name="driverClass" value="${jdbc.driverClass}"/>
            <property name="jdbcUrl" value="${jdbc.jdbcUrl}"/>
            <property name="user" value="${jdbc.user}"/>
            <property name="password" value="${jdbc.password}"/>
        </bean>

        <!-- 开启注解扫描 -->
        <context:component-scan base-package="com.Gary"></context:component-scan>

        <!-- 事务核心管理器 -->
        <bean name="transactionManager" class="org.springframework.jdbc.datasource.DataSourceTransactionManager">
            <property name="dataSource" ref="dataSource"/>
        </bean>

        <!-- 开启注解事务 -->
        <tx:annotation-driven/>

        <!-- 配置视图解析器 -->
        <bean class="org.springframework.web.servlet.view.InternalResourceViewResolver">
            <property name="prefix" value="/WEB-INF/jsp/"/>
            <property name="suffix" value=".jsp"/>
        </bean>

        <!-- 配置mybatis -->
        <bean name="sqlSessionFactory" class="org.mybatis.spring.SqlSessionFactoryBean">
            <property name="dataSource" ref="dataSource"/>
            <property name="typeAliasesPackage" value="com.Gary.bean"/>
        </bean>

        <!-- mapper工厂 -->
        <bean class="org.mybatis.spring.mapper.MapperScannerConfigurer">
            <property name="basePackage" value="com.Gary.mapper"/>
        </bean>

</beans>我们今天的关于springmvc+mybatis整合案例和springmvc mybatis整合的分享就到这里,谢谢您的阅读,如果想了解更多关于AngularJS整合Springmvc、Spring、Mybatis搭建开发环境、Intellij-IDEA-maven+springMVC+mybatis整合、javaweb 各种框架组合案例 (二):maven+spring+springMVC+mybatis、JavaWeb_(SpringMVC框架)SpringMVC&Spring&MyBatis整合的相关信息,可以在本站进行搜索。
本文标签:


