在本文中,我们将为您详细介绍jquery.validate.js的remote后台验证的相关知识,并且为您解答关于jquery的validate前端表单验证的疑问,此外,我们还会提供一些关于CKEdi
在本文中,我们将为您详细介绍jquery.validate.js 的 remote 后台验证的相关知识,并且为您解答关于jquery的validate前端表单验证的疑问,此外,我们还会提供一些关于CKEditor无法验证的解决方案(js验证+jQuery Validate验证)_jquery、halo.validate jquery.validate 形式的后端验证方式、jquery easyui validatebox remote的使用详解、jquery validate demo 基础的有用信息。
本文目录一览:- jquery.validate.js 的 remote 后台验证(jquery的validate前端表单验证)
- CKEditor无法验证的解决方案(js验证+jQuery Validate验证)_jquery
- halo.validate jquery.validate 形式的后端验证方式
- jquery easyui validatebox remote的使用详解
- jquery validate demo 基础
")
jquery.validate.js 的 remote 后台验证(jquery的validate前端表单验证)
之前已经有一篇关于 jquery.validate.js 验证的文章,还不太理解的可以先看看:jQuery Validate 表单验证 (这篇文章只是介绍了一下如何实现前台验证,并没有涉及后台验证 remote 方法)。
有时候我们不仅仅对表单所录入的信息进行验证还需要将录入的值与数据库进行比较,这时我们就需要借助 remote 方法来实现。这篇文章就是介绍 jquery.validate.js 的后台验证的 remote 方法,准备工作,前台页面:
<!DOCTYPE html PUBLIC "-//W3C//DTD HTML 4.01 Transitional//EN" "http://www.w3.org/TR/html4/loose.dtd">
<html>
<head>
<meta http-equiv="Content-Type" content="text/html; charset=UTF-8">
<title>Insert title here</title>
<style type="text/css">
form{max-width:800px; margin:0 auto;}
form label{display:inline-block;width:150px; text-align:right;}
fieldset{margin-bottom:25px;}
legend {
border: 1px solid #77848D;
font-family: "Arial";
font-size: 14px;
margin-left: 15px;
padding: 5px;
}
em.error{font-weight:normal; color:red;}
</style>
<script src="test/jquery.js" type="text/javascript"></script>
<script src="test/jquery.validate.js" type="text/javascript"></script>
<script src="test/jquery.validate.message_cn.js" type="text/javascript"></script>
</head>
<body>
<form name="test" id="testform" method="get" action="get.php">
<fieldset>
<legend title="用户注册(User Register)">用户注册(User Login)</legend>
<p>
<label for="name">用户名:</label>
<input id="name" name="name" type="text" />
</p>
<p>
<label for="mail">邮箱:</label>
<input id="mail" name="mail" type="password" />
</p>
<p>
<label for="password">密码:</label>
<input id="password" name="password" type="password" />
</p>
<p>
<label for="repassword">重复密码:</label>
<input id="repassword" name="repassword" type="password" />
</p>
<p>
<label for="hash">邀请码:</label>
<input id="hash" name="hash" type="text" />
</p>
<p>
<label for="sel">选择:</label>
<select id="sel" name="sel">
<option value="">请选择</option>
<option value="1">选择1</option>
<option value="2">选择2</option>
<option value="3">选择3</option>
<option value="4">选择4</option>
</select>
</p>
<p>
<label for="type">用户类型:</label>
<span><input name="type" type="radio" value="1" />类型1</span>
<span><input name="type" type="radio" value="2" />类型2</span>
<span><input name="type" type="radio" value="3" />类型3</span>
</p>
<p>
<label for="submit"> </label>
<input class="submit" type="submit" value="注册"/>
</p>
</fieldset>
</form>
</body>
</html>要实现的效果:
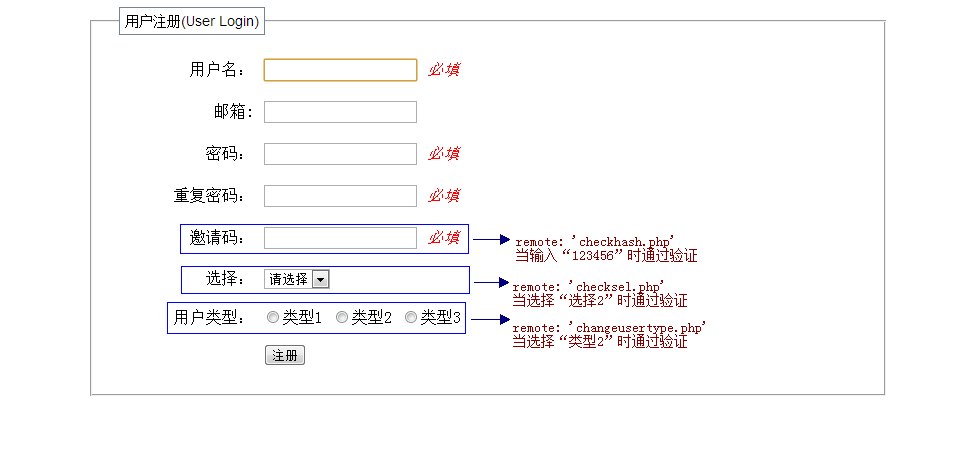
由图可知我们要准备三个远程验证的文件 (这里只是做到这种效果,就不连接数据库查找数据了,如果要和数据库的数据进行匹配原理是一样的,在这里就不赘述查找数据的方法了,相信程序员们都该掌握数据库的操作才行。在这里我们直接定义一个变量来进行匹配):
1.checkhash.php
<?php
if($_GET)
{
    $hash = $_GET[''hash''];
    if($hash == ''123456'')
    {
        echo ''true'';
    }else{
        echo ''false'';
    }
    exit();
}
2.checksel.php
<?php
if($_GET)
{
    $sel = $_GET[''sel''];
    if($sel == 2)
    {
        echo ''true'';
    }else{
        echo ''false'';
    }
    exit();
}
3.changeusertype.php
<?php
if($_GET)
{
    $type = $_GET[''type''];
    if($type == 2)
    {
        echo ''true'';
    }else{
        echo ''false'';
    }
    exit();
}
验证代码:
<script type="text/javascript">
$(function(){
	$("#testform").validate({
		rules : {
        	    name : {
            	        required : true
        	    },
        	    password: {
		        required: true,
		        minlength: 5
		    },
		    repassword: {
		        required: true,
		        minlength: 5,
		        equalTo: "#password"
		    },
		    hash: {
		        required: true,
		        remote: ''checkhash.php''
		    },
		    sel: {
		        remote: ''checksel.php''
		    },
		    type: {
		        remote:{
		            url: "changeusertype.php",
		            type: "get",
		            dataType: ''json'',
			        data: {
			            ''type'': function(){return $(''input[name="type"]:checked'').val();}
		            }
		    }
	        }
    	},
    	messages : {
        	name : {
            	    required : ''必填''
        	},
        	password: {
		    required: ''必填'',
		    minlength: ''最少5个字符''
		},
		repassword: {
		    required: ''必填'',
		    minlength: ''最少5个字符'',
		    equalTo: ''两次输入的密码不一样''
		},
		hash: {
		    required: ''必填'',
		    remote: ''邀请码不正确''
		},
		sel: {
		    remote: ''选择不正确''
		},
		type: {
		    remote: ''类型不可更改''
		}
    	},
	focusInvalid: true,
    	/*指定错误信息位置*/
	errorPlacement: function (error, element) {
            error.appendTo(element.closest("p"));
	},
	//设置错误信息存放标签
	errorElement: "em",
    	submitHandler: function(form) {
	}
    });
})
</script>
预览效果是这样的:

这样似乎已经达到了要求,但是有一个小问题当我们输入正确的值里点击提交出现了这样的问题 (邀请码和选择的验证没有问题,但是单选按钮的出现了问题):

这是为什么?查阅了一些资料,在验证时会判断之前有没有验证过,当有验证过并有 previousValue 值时它就会忽略再次提交的值而是取上一次验证结果显示,有很多解决方法都是说更改源码,其它可以不用,我们在提交表单之前先清空之前一次验证绑定的 previousValue 值,这样就解决问题了。我们在验证方法之前加一个清空 previousValue 值的函数:
function emptyValue()
{
	if($(''input[name="type"]'').data("previousValue"))
		$(''input[name="type"]'').data("previousValue").old = null;
	return true;
}
在提交表单之前调用这个方法:
<input class="submit" onclick="emptyValue()" type="submit" value="注册"/>
现在应该是这样的效果了 (选择正确的用户类型点击提交应该可以通过验证):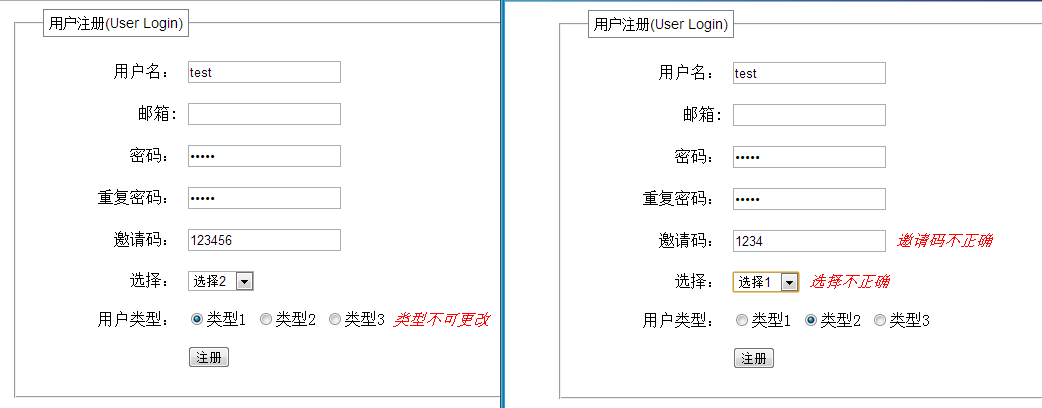
这个问题是在工作时碰到的,纠结了好久是改源码呢还是不改呢,最后找到了解决方法,在闲暇的时间整理了一下,现在贴出来以作参考,如果你有更好的方法也可以告诉我哦!
_jquery")
CKEditor无法验证的解决方案(js验证+jQuery Validate验证)_jquery
最近项目的前端使用了jquery,表单的前端验证用的是jquery validate,用起来很简单方便,一直都很满意的。
前段时间,根据需求为表单中的 textarea 类型的元素加上了html富文本编辑器,用的是CKEditor,功能强大,定制方便,也很满意。
不过用CKEditor增强过的 textarea 元素,这个字段要求是非空的,在jQuery Validate总是验证不通过,原因就是在 CKEditor 编辑器填写了内容之后,编辑器并不是立即把内容更新到原来的 textarea 元素中的,我没仔细看源代码,试过一种情况就是每一次提交不通过,第二次提交就可以通过的,貌似编辑器是在 submit 事件之前把编辑器的内容更新到 textarea 中的(这个是猜测,不知道对不对,我对jQuery 和 CKEditor 都不太熟悉,算是拿来就用,有问题就放狗的那种)。
于是在网上找到了解决问题的代码,代码不是我写的,我只是记录一下我遇到的问题,代码非原创。原理就是当编辑器更新了内容之后,立即把内容更新到 textarea 元素。
CKEDITOR.instances["page_content"].on("instanceReady", function()
    {
            //set keyup event
            this.document.on("keyup", updateTextArea);
             //and paste event
            this.document.on("paste", updateTextArea);

    });

    function updateTextArea()
    {
        CKEDITOR.tools.setTimeout( function()
              {
                $("#page_content").val(CKEDITOR.instances.page_content.getData());
                $("#page_content").trigger(''keyup'');
              }, 0);
    }
目前一切使用正常,算是解决了一个让我头痛的问题。
另一种解决思路:
CKEditor 编辑器是增强过的 textarea 元素,在填写了内容之后,编辑器并不立即把内容更新到原来的 textarea 元素中的,而是等到 submit 事件之前把编辑器的内容更新到 textarea 中.
因此,普通的js验证或是jquery validate验证都获取不到编辑器的值.)
1.js验证
获取CKEditor 编辑器的值其实很容易,其值就是CKEDITOR.instances.mckeditor.getData(),实例代码如下:
<script language="javascript" type="text/javascript">

  function checkForm()
       {
         var f=document.form1;
         var topicHeading=f.tbTopicHeading.value;
         topicHeading = topicHeading.replace(/^\s+/g,"");
         topicHeading = topicHeading.replace(/\s+$/g,"");
                 if (topicHeading =="")
                  {
                    alert("请输入发表话题的标题.");
                    f.tbTopicHeading.focus();
                    return false;
                  }
                  if(topicHeading.length>50);
                  {
                   alert("话题的主题长度必须在50字符以内.");
                   f.tbTopicHeading.focus();
                   return false;
                  }
         var topicContent=CKEDITOR.instances.mckeditor.getData();

         topicContent = topicContent.replace(/^\s+/g,"");
         topicContent = topicContent.replace(/\s+$/g,"");
                 if (topicContent =="")
                  {
                    alert("请填写话题内容.");
                    f.mckeditor.focus();
                    return false;
                  }

                  if(topicContent.length>4000)
                  {
                   alert("话题内容的长度必须在4000字符以内.");
                   f.mckeditor.focus();
                   return false;
                  }

       }
       </script>
其中,mckeditor为编辑器的textarea的id和name.
ASP.NET中也是一样:
2.jQuery Validate验证
jquery的验证模式不能直接使用CKEDITOR.instances.mckeditor.getData()这个值.
它是使用如下形式来提交验证:
function InitRules() {
      opts = {
         rules:
         {
            tbTopicHeading:{
            required:true,
            maxlength:50
          },
          mckeditor:{
            required:true,
            maxlength:4000
          }
         },
         messages:
         {
          tbTopicHeading:{
          required:"请输入发表话题的标题.",
          maxlength:jQuery.format("话题的主题长度必须在50字符以内.")
        },
          mckeditor:{
          required:"请填写话题内容.",
          maxlength:jQuery.format("话题内容的长度必须在4000字符以内.")
        }
         }
      }
    }
其中mckeditor为控件id,不仅有取值的作用,还有提示信息定位的作用.
因此,可以在页面加载时,加入实例化编辑器代码,实现编辑器更新了内容之后,立即把内容更新到 textarea 元素。
代码如下:
<script type="text/javascript">
//<![CDATA[
CKEDITOR.instances["mckeditor"].on("instanceReady", function()
    {
            //set keyup event
            this.document.on("keyup", updateTextArea);
             //and paste event
            this.document.on("paste", updateTextArea);
    });

    function updateTextArea()
    {
        CKEDITOR.tools.setTimeout( function()
              {
                $("#mckeditor").val(CKEDITOR.instances.mckeditor.getData());
                $("#mckeditor").trigger(''keyup'');
              }, 0);
    }
//]]>
              </script>
此段代码放在编辑器控件之下即可.完整实例如下:
<asp:TextBox ID="mckeditor" runat="server" TextMode="MultiLine" Width="98%" Height="400px" Css></asp:TextBox>
<script type="text/javascript">
//<![CDATA[
CKEDITOR.replace( ''<%=mckeditor.ClientID %>'',// mckeditor.ClientID为TextBox mckeditor生成的对应客户端看到的id
{
skin : ''kama'',//设置皮肤
enterMode : Number(2),//设置enter键的输入1.<p>2为<br/>3为<div>
shiftEnterMode : Number(1), // 设置shiftenter的输入
disableNativeSpellChecker:false,
scayt_autoStartup:false,
toolbar_Full : [
[''Source'',''-'',''Save'',''NewPage'',''Preview'',''-''],
[''Cut'',''Copy'',''Paste'',''PasteText'',''PasteFromWord'',''-''],
[''Undo'',''Redo'',''-'',''Find'',''Replace'',''-'',''SelectAll'',''RemoveFormat''],
[''NumberedList'',''BulletedList'',''-'',''Outdent'',''Indent''],
[''JustifyLeft'',''JustifyCenter'',''JustifyRight'',''JustifyBlock''],
[''Link'',''Unlink'',''Anchor''],
[''Image'',''Table'',''HorizontalRule''],[''Subscript'',''Superscript''],
''/'',
[''Bold'',''Italic'',''Underline''],
[''TextColor'',''BGColor''],
[''Styles'',''Format'',''Font'',''FontSize'']
],
//filebrowserBrowseUrl: ''<%=ResolveUrl("~/ckfinder/ckfinder.html")%>'', //启用浏览功能,正式使用场合可以关闭,只允许用户上传
//filebrowserImageBrowseUrl:''<%=ResolveUrl("~/ckfinder/ckfinder.html?Type=Images")%>'',
//filebrowserImageUploadUrl:''<%=ResolveUrl("~/ckfinder/core/connector/aspx/connector.aspx?command=QuickUpload&type=Images")%>'' 如果使用ckfinder 就不要屏蔽
//自定义的上传
filebrowserImageUploadUrl:''<%=ResolveUrl("~/fileupload/fileupload.aspx?command=QuickUpload&type=Images")%>''
});
CKEDITOR.instances["mckeditor"].on("instanceReady", function()
{
//set keyup event
this.document.on("keyup", updateTextArea);
//and paste event
this.document.on("paste", updateTextArea);
});
function updateTextArea()
{
CKEDITOR.tools.setTimeout( function()
{
$("#mckeditor").val(CKEDITOR.instances.mckeditor.getData());
$("#mckeditor").trigger(''keyup'');
}, 0);
}
//]]>
</script> 以上就是解决CKEditor无法验证的两种方案,相信大家和小编一样都有所收获,谢谢大家的阅读。

halo.validate jquery.validate 形式的后端验证方式
#halo.validate
    @Validate(rules = {
            @Rule(value = "required:true", message = "用户名不能为空"),
            @Rule(value = "checkUsernameExists:", message = "用户名不能重复"),
            @Rule(value = "maxlength:10", message = "输入长度最多是 10 的字符串(汉字算一个字符)。"),
            @Rule(value = "minlength:5", message = "输入长度最小是 5 的字符串(汉字算一个字符)。")
    })
    private String username;

    @Validate(rules = { @Rule(value = "required:true", message = "密码不能为空") })
    private String password;

    public static void main(String[] args) {
        User user = new User();
        user.setUsername("admin");
        IValidateService validate = new BaseValidateService();
        validate.validate(user);
    }
jquery.Validate 形式的验证方式
继承 Validation 实现验证
配置 ValidationRegister 注解
例子:
   @ValidationRegister("checkUsernameExists")
    public class UsernameValidation implements Validation {

        @Override
        public Boolean validate(Object attrValue, Class<?> attrType, Object params) {
            if (attrValue.equals("admin")) { return true; }
            return false;
        }
    }
应用:
 @Validate(rules = {
            @Rule(value = "required:true", message = "用户名不能为空"),
            @Rule(value = "checkUsernameExists:", message = "用户名不能重复")
    })
    private String username;
出错提示:
   Exception in thread "main" com.dasuanzhuang.halo.validate.error.ValidateException: [code:required,message:用户名不能为空]
    at com.dasuanzhuang.halo.validate.BaseValidateService.parseRuleAndValidate(BaseValidateService.java:39)
    at com.dasuanzhuang.halo.validate.BaseValidateService.validate(BaseValidateService.java:55)
    at com.dasuanzhuang.halo.test.User.main(User.java:41)

jquery easyui validatebox remote的使用详解
1字符串
2数组,应用多个验证
3对象,每个key是一个验证名称value是验证的数组参数
