本文将分享node-exporter+prometheus+grafana的详细内容,此外,我们还将为大家带来关于12.centos7基于Docker搭建node-exporter+Prometheu
本文将分享node-exporter+prometheus+grafana的详细内容,此外,我们还将为大家带来关于12.centos7 基于Docker搭建node-exporter+Prometheus+Grafana服务器监控平台、docker-compose 部署 prometheus+grafana+alertmanager、Exporter+Promethues+Grafana可视化监控、GPE(Grafana+Prometheus+Exporter)项目实战之Golang篇(上)的相关知识,希望对你有所帮助。
本文目录一览:- node-exporter+prometheus+grafana
- 12.centos7 基于Docker搭建node-exporter+Prometheus+Grafana服务器监控平台
- docker-compose 部署 prometheus+grafana+alertmanager
- Exporter+Promethues+Grafana可视化监控
- GPE(Grafana+Prometheus+Exporter)项目实战之Golang篇(上)

node-exporter+prometheus+grafana
1 系统安装 docker
yum install -y docker
systemctl enable docker
systemctl start docker
2 下载镜像包:
docker pull prom/prometheus
docker pull prom/node-exporter
docker pull grafana/grafana
3 启动 node-exporter
3.1 启动镜像
docker run -d -p 9100:9100 -v /proc:/host/proc:ro -v /sys:/host/sys:ro -v /:/rootfs:ro --net=host prom/node-exporter
注:
- 试过以其他端口启动,不成功。
- 由于 node-exporter 是需要采集服务器的信息,所以,docker 的 net 模式为 --net=host,意思是 docker 使用的网络实际上和宿主机一样。
3.2 登陆
http://ipserver:9100/metrics
4 启动 prometheus
4.1 新建目录 prometheus, 编辑配置文件 prometheus.yml, 内容如下
global:
scrape_interval: 60s
evaluation_interval: 60s
scrape_configs:
- job_name: prometheus
static_configs:
- targets: [''localhost:9090'']
labels:
instance: prometheus
- job_name: linux
static_configs:
- targets: [''ipserver:9100''] -- 这个是需要监控的 linux 服务器的地址
labels:
instance: localhost
4.2 启动 prometheus
docker run -d -p 19090:9090 -v /opt/prometheus/prometheus.yml:/etc/prometheus/prometheus.yml prom/prometheus
4.3 登陆 url
http://ipserver:19090/graph http://ipserver:19090/status
5 安装 grafana
5.1 新建空文件夹 /opt/grafana-storage
mkdir /opt/grafana-storage
chmod 777 -R /opt/grafana-storage
5.2 启动 grafana
docker run -d -p 13000:3000 --name=grafana -v /opt/grafana-storage:/var/lib/grafana grafana/grafana
5.3 登陆 url
http://ipserver:13000/login
###### 错误 ######
启动 grafana 容器出错的话,
GF_PATHS_DATA=''/var/lib/grafana'' is not writable.
You may have issues with file permissions, more information here: http://docs.grafana.org/installation/docker/#migration-from-a-previous-version-of-the-docker-container-to-5-1-or-later
mkdir: cannot create directory ''/var/lib/grafana/plugins'': Permission denied
--------- 解决办法:chmod 777 -R /opt/grafana-storage

12.centos7 基于Docker搭建node-exporter+Prometheus+Grafana服务器监控平台
基于Docker搭建node-exporter+Prometheus+Grafana服务器监控平台
基于Docker搭建node-exporter+Prometheus+Grafana服务器监控平台 - 1、node-exporter安装
- 2、Prometheus安装及配置
- 3、 mysqld_exporter安装
- 4、Grafana安装
- 5、Grafana配置
- 6、实现对Linux某个进程的监控
1、node-exporter安装
- 拉取镜像
[root@localhost ~]# docker pull prom/node-exporter
Using default tag: latest
latest: Pulling from prom/node-exporter
dc6dd4561653: Pull complete
613f88646930: Pull complete
edad907fb257: Pull complete
Digest: sha256:22fbde17ab647ddf89841e5e464464eece111402b7d599882c2a3393bc0d2810
Status: Downloaded newer image for prom/node-exporter:latest
docker.io/prom/node-exporter:latest
- 生成容器
[root@localhost ~]# docker run -d -p 9100:9100 prom/node-exporter
cd7f165e33062838c0acbde540f2539e759dba202680b104d42e98c2d5dc4686
-d 以后台模式运行
-p 9100:9100端口映射
netstat -anpt ----查看端口是否启动1466/docker-proxy
tcp6 0 0 :::9100 ::

docker-compose 部署 prometheus+grafana+alertmanager
cat docker-compose.yml 如下
version: ''2''
services:
  # 添加 普罗米修斯服务
  prometheus:
    # Docker Hub 镜像
    image: prom/prometheus:latest
    # 容器名称
    container_name: Myprometheus
    # 容器内部 hostname
    hostname: prometheus
    # 容器支持自启动
    restart: always
    # 容器与宿主机 端口映射
    ports:
      - ''9090:9090''
    # 将宿主机中的config文件夹,挂载到容器中/config文件夹
    volumes:
      - ''./prometheus/config:/config''
      - ''./prometheus/data/prometheus:/prometheus/data''
    # 指定容器中的配置文件
    command:
      - ''--config.file=/config/prometheus.yml''
      # 支持热更新
      - ''--web.enable-lifecycle''

  # 添加告警模块
  alertmanager:
    image: prom/alertmanager:latest
    container_name: Myalertmanager
    hostname: alertmanager
    restart: always
    ports:
      - ''9093:9093''
    volumes:
      - ''./prometheus/config:/config''
      - ''./prometheus/data/alertmanager:/alertmanager/data''
    command:
      - ''--config.file=/config/alertmanager.yml''

  # 添加监控可视化面板
  grafana:
    image: docker.xxxxx.com/library/grafana:v20191225
    container_name: Mygrafana
    hostname: grafana
    restart: always
    ports:
      - ''3000:3000''
    volumes:
      # 配置grafana 邮件服务器
      - ''./grafana/config/grafana.ini:/etc/grafana/grafana.ini''
      - ''./grafana/data/grafana:/var/lib/grafana''
prometheus.yml 配置文件如下
# my global config
global:
  scrape_interval:     15s # Set the scrape interval to every 15 seconds. Default is every 1 minute.
  evaluation_interval: 15s # Evaluate rules every 15 seconds. The default is every 1 minute.
  # scrape_timeout is set to the global default (10s).

# Alertmanager configuration
alerting:
  alertmanagers:
  - static_configs:
    - targets:
      # - alertmanager:9093

# Load rules once and periodically evaluate them according to the global ''evaluation_interval''.
rule_files:
  # - "first_rules.yml"
  # - "second_rules.yml"

# A scrape configuration containing exactly one endpoint to scrape:
# Here it''s Prometheus itself.
scrape_configs:
  # The job name is added as a label `job=<job_name>` to any timeseries scraped from this config.


- job_name: ''promethus''
  static_configs:
     - targets: [''192.168.1.100:9090'']
       labels:
        instance: ''Monitor-Service-01''
        platform: ''master''

- job_name: ''system''
  static_configs:
     - targets: [''192.168.1.101:9100'']
       labels:
        instance: ''Monitor Service-01''
        platform: ''worker''

- job_name: ''Server''
  static_configs:
     - targets: [''192.168.2.100:9100'']
       labels:
        instance: ''Service-web01''
        platform: ''esc01''
     - targets: [''192.168.2.101:9101'']
       labels:
        instance: ''Service-db01''
        platform: ''esc01''
     - targets: [''192.168.2.102:9102'']
       labels:
        instance: ''Service-db02''
        platform: ''esc01''
     - targets: [''192.168.2.103:9103'']
       labels:
        instance: ''Service-dbpool''
        platform: ''esc01''
alertmanager.yml 配置信息如下
global:
  resolve_timeout: 1m
  # The smarthost and SMTP sender used for mail notifications.
  #smtp_smarthost: ''''
  #smtp_from: ''''
  #smtp_auth_username: ''''
  #smtp_auth_password: ''''

route:
  receiver: ''default-receiver''
    # The labels by which incoming alerts are grouped together. For example,
  # multiple alerts coming in for cluster=A and alertname=LatencyHigh would
  # be batched into a single group.
  #group_by: [''alertname'']

  # When a new group of alerts is created by an incoming alert, wait at
  # least ''group_wait'' to send the initial notification.
  # This way ensures that you get multiple alerts for the same group that start
  # firing shortly after another are batched together on the first
  # notification.
  # group_wait: 5s

  # When the first notification was sent, wait ''group_interval'' to send a batch
  # of new alerts that started firing for that group.
  # group_interval: 30s

  # If an alert has successfully been sent, wait ''repeat_interval'' to
  # resend them.
  repeat_interval: 1m
receivers:
  - name: ''default-receiver''

Exporter+Promethues+Grafana可视化监控
一、node-exporter和prom/promtheus简介

1、node-exporter(采集数据)
为了能够采集到主机的运行指标如cpu, 内存,磁盘等信息,就需要用到node_exporter。
2、prom/promtheus(存储数据)
Prometheus是一个开源的系统监控和报警系统,在kubernetes容器管理系统中,通常会搭配prometheus进行监控,同
时也支持多种exporter采集数据,还支持pushgateway进行数据上报,Prometheus性能足够支撑上万台规模的集群。
3、Grafana(展示数据)
Grafana是一个跨平台的开源的度量分析和可视化工具,纯JavaScript开发的前端工具,通过访问库(如InfluxDB),展示自
定义报表、显示图表等。大多时候用在时序数据的监控上。Grafana功能强大、UI灵活,并且提供了丰富的插件。
二、Docker下载node-exporter
1、查看docker版本:docker -v
![]()
2、下载 node-exporter:docker pull prom/node-exporter

3、新建启动容器
docker run -d -p 9100:9100 -v "/proc:/host/proc:ro" -v "/sys:/host/sys:ro" -v "/:/rootfs:ro" prom/node-exporter

4、验证是否启动
1)查看端口号:netstat -ano|grep 9100
![]()
2)命令行查看
curl http://172.16.227.132:9100/metrics

3)浏览器查看:http://172.16.227.132:9100/metrics

三、Docker下载Promethues
1、docker下载Prometheus:docker pull prom/prometheus

2、新建启动
1)prometheus.yml配置文件,配置文件目录/data/prometheus/prometheus.yml
注意:配置文件端口号和IP
global:
scrape_interval: 60s
evaluation_interval: 60s
scrape_configs:
- job_name: prometheus
static_configs:
- targets: [''localhost:9090'']
labels:
instance: prometheus
- job_name: localhost
static_configs:
- targets: [''172.16.227.132:9100'']
labels:
instance: localhost


2)新建启动容器
docker run -d -p 9090:9090 -v /data/prometheus/prometheus.yml:/etc/prometheus/prometheus.yml --privileged=true prom/prometheus
![]()
3、验证是否启动
1)查看端口号:netstat -ano|grep 9090
![]()
2)查看容器:docker ps

3)使用命令访问:curl http://172.16.227.132:9090/targets

4)浏览器访问:http://172.16.227.132:9090/targets

3、新建启动prometheus过程中问题排查
1)启动容器prometheus,查不到9090端口号,docker ps已启动的容器也查不到

2)使用docker ps -a 查看所有容器,看到90e3开头那个容器,查看90e3,这个容器的日志;
permission denied 没有权限拒绝访问。

![]()
3)新建启动容器prometheus,加上 --privileged=true
新启动的容器依旧没有端口号,报错:yaml: line 6: did not find expected ''-'' indicator" Yaml:第6行:没有找到预期的“-”指示符”
查看配置文件prometheus.yml 第六行,删除重新复制,配置文件内容各项对其后,新建容器,并查看端口号


四、Docker下载grafana
1、下载镜像:docker pull grafana/grafana
2、新建启动容器:docker run -itd --name grafana -p 3000:3000 grafana/grafana
3、浏览器输入地址访问http://123.123.123.129:3000/login 账号密码:admin/admin 4、设置-->Data Sources-->Add data source-->Prometheus 配置url-->点击Save&test

5、点击Dashboards-->import-->输入 11074 点击load-->VictoriaMetrics选择Prometheus-->点击import


四、总结
1、node-exporter
1)下载镜像:docker pull prom/node-exporter
2)启动容器:docker run -d -p 9100:9100 -v "/proc:/host/proc:ro" -v "/sys:/host/sys:ro" -v "/:/rootfs:ro" prom/node-exporter
3)检查验证
查看端口号:netstat -ano|grep 9100
命令行查看:curl http://172.16.227.132:9100/metrics
浏览器查看:http://172.16.227.132:9100/metrics
2、prom/prometheus
1)下载镜像:docker pull prom/prometheus
2)创建配置文件目录:/data/prometheus/prometheus.yml
配置文件写入内容
3)启动容器:docker run -d -p 9090:9090 -v /data/prometheus/prometheus.yml:/etc/prometheus/prometheus.yml --privileged=true prom/prometheus
4)检查验证
查看端口号:netstat -ano|grep 9090
命令行查看:curl http://172.16.227.132:9090/targets
浏览器查看:http://172.16.227.132:9090/targets
3、Grafan
1)下载镜像:docker pull grafana/grafana
2)启动容器:docker run -itd --name grafana -p 3000:3000 grafana/grafana
3)配置数据源:http://172.16.227.132:9090
4)导入dashboards面板id:11074
项目实战之Golang篇(上)")
GPE(Grafana+Prometheus+Exporter)项目实战之Golang篇(上)
项目目标-为什么要搭建GPE(Grafana+Prometheus+Exporter)
关注我的朋友知道,前几天开源了boot4go-gateway的项目,boot4go-gateway的http服务没有使用go net/http的原生http服务,使用的fasthttp改造后的http服务,在单一请求访问的情况下,fasthttp的性能秒杀go net/http,当然虽然go net/http性能已经比springboot系列的tomcat优秀不少,但是和fasthttp还是相形见绌了, 希望通过压力性能测试来对boot4go-gateway的性能以及并发负载能力进行测试,工欲善其事,必先利其器,压力测试里必不少的就是系统的监控体系,jmeter里也有机器采集的性能metrics,但是毕竟薄弱,metrics当然要选择最专业的GPE组合了。
先来看看效果图
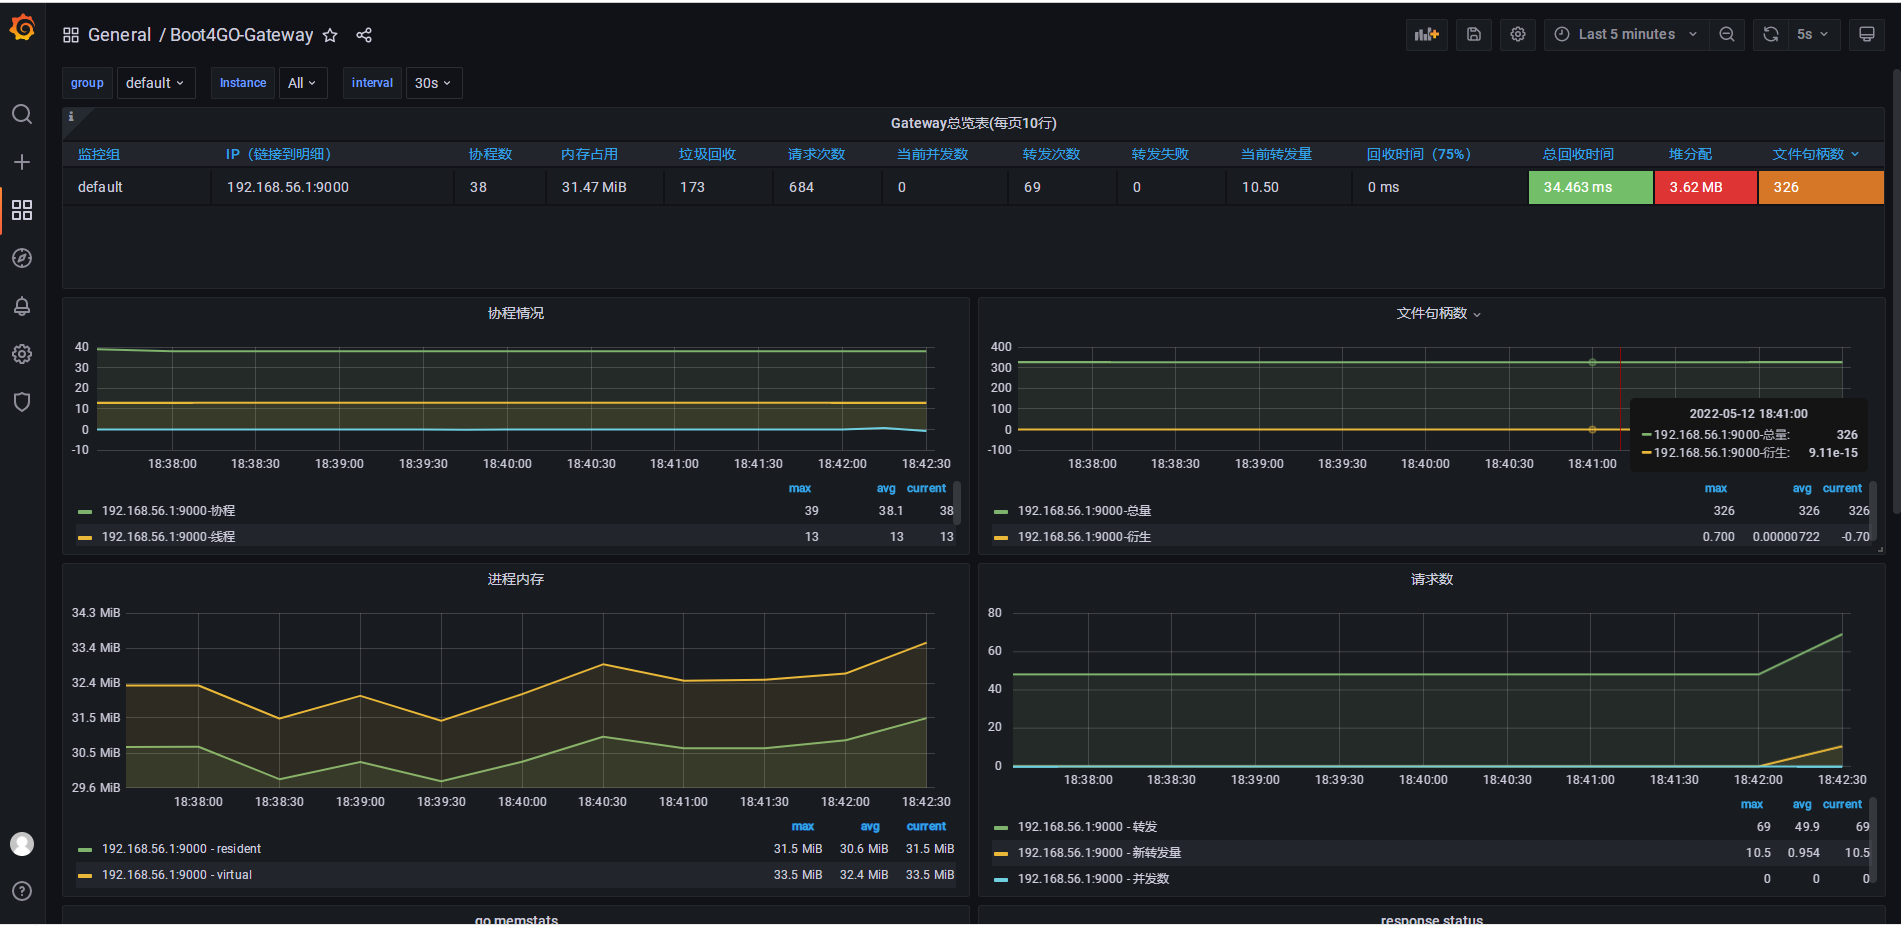
这个仪表盘展示了有关golang程序的相关metrics,包括负载量,并非数,总请求数,失败请求数,内存变化,文件句柄变化,协程数,线程数,GC数量,alloc数量,这些能够反映一个golang程序的当前状况的关键性指标。
如何把自己的golang集成到Prometheus里
首先要了解Prometheus的运行方式, prometheus可以看作是一个TimeSerialDB时序数据库,prometheus产品系列里的TSDB,也是一个不错的好产品, prometheus的服务端通过pull待采集端的exporter的程序,将需要采集的数据,抓取到promethues服务端来, prometheus保存到自己的TSDB里, prometheus提供自己的ql语法,进行时序数据的查询分析和统计。
所以要将golang集成到prometheus里,就是要找到合适的exporter即可。go-prometheus的客户端包,已经包含了一些有关prometheus的client接口, 要把自己的golang集成到prometheus里,
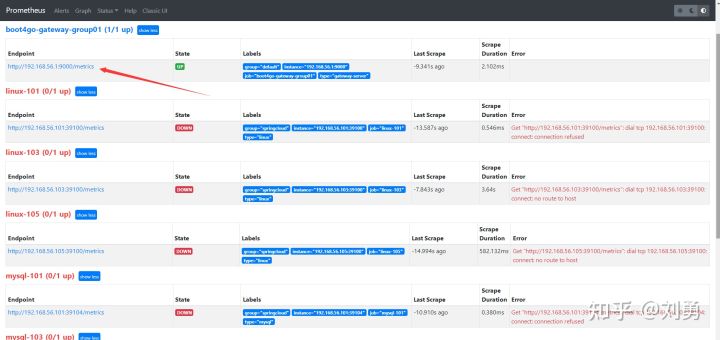
下图就是prometheus里制定要进行抓取的exporter Job
动手开干, 支持fasthttp
go-prometheus支持的是标准的net/http库,golang里最有名的以快著称的是fasthttp。而prometheus没有支持fasthttp。 例如咱们的boot4go-gateway就是用fasthttp进行http服务实现的,要让fasthttp支持,就必须了解一下go-prometheus的exporter格式,自行来写了, 不过这里还好, boot4go-prometheus这个子项目,在go-prometheus的基础上,封装了fasthttp的支持, 由于是直接在go-prometheus提供的包进行封装改造的,不需要担心以后exporter协议升级的兼容问题,
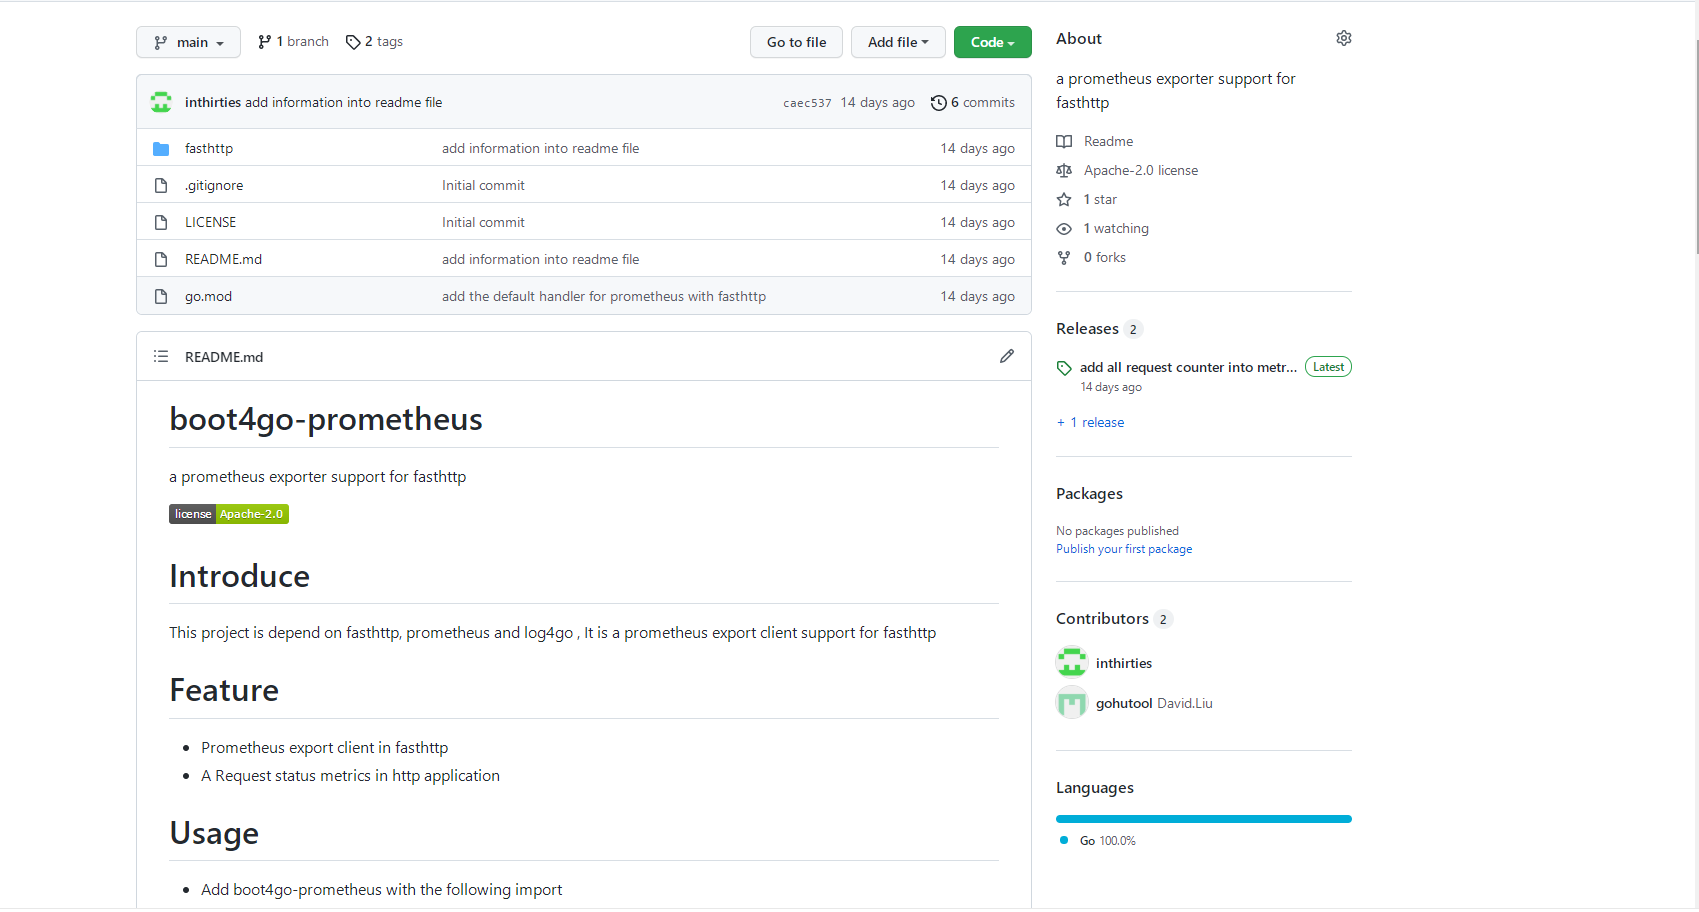
如果有朋友也是用fasthttp进行开发的,可以直接使用boot4go-prometheus这个包
import (
prometheusfasthttp "github.com/gohutool/boot4go-prometheus/fasthttp"
)
添加自己的指标metrics
虽然go-prometheus包含了一些metrics,但是毕竟自己的golang有时必不可少的满足不到已有的metrics,就需要加入自己的指标
网关转发数量
TotalCounterVec = prometheus.NewCounterVec(
   prometheus.CounterOpts{
      Subsystem: "go",
      Name:      "forward_total",
      Help:      "Total number of host forward",
   },
   []string{"host"},
进行网关转发中的并发请求数量
ConcurrentRequestsGauge = prometheus.NewGauge(
   prometheus.GaugeOpts{
      Subsystem: "go",
      Name:      "request_handle_concurrent",
      Help:      "Number of incoming HTTP Requests handling concurrently Now.",
   },
)
网关转发的延迟响应时间
LatencyRequestsHistogram = prometheus.NewHistogramVec(
   prometheus.HistogramOpts{
      Subsystem: "go",
      Name:      "request_handle_latency",
      Help:      "Histogram statistics of http(s) requests latency second",
      Buckets:   []float64{0.01, 0.1, 0.2, 0.5, 1, 2, 5, 10, 30},
   },
   []string{"code"},
)
通过boot4go-prometheus集成fasthttp
fasthttp目前不支持prometheus的集成,所以在做boot4go-gateway的过程中,把这块的东西单独拿出来,作为一个golang的独立包项目,该项目地址在
https://github.com/gohutool/boot4go-prometheus
注册采集器
prometheus.MustRegister(ConcurrentRequestsGauge)
prometheus.MustRegister(LatencyRequestsHistogram)
prometheus.MustRegister(TotalCounterVec)
加入RequestHandler
return prometheusfasthttp.RequestCounterHandler(func(ctx *fasthttp.RequestCtx) {

   host := string(ctx.Host())

   if string(ctx.Path()) == "/metrics" {
      prometheusfasthttp.PrometheusHandler(prometheusfasthttp.HandlerOpts{})(ctx)

      return
   } else {
      if next != nil {
         TotalCounterVec.WithLabelValues(host).Inc()
         startTime := time.Now()

         ConcurrentRequestsGauge.Inc()
         defer ConcurrentRequestsGauge.Dec()

         next(ctx)

         finishTime := time.Now()
         LatencyRequestsHistogram.WithLabelValues(
            strconv.Itoa(ctx.Response.StatusCode())).Observe(float64(finishTime.Sub(startTime) / time.Second))
      }
   }
})
程序方面就差不多了,下面就到重头戏,Grafana+Prometheus了
作为开发人员的我,其实对这些运维工具是特别有兴趣的, 这些工具的集成和搭配以及选型,才是多元化的,才正在的有味道。
下一期,将接着实战后面的grafana和prometheus的安装配置
关于node-exporter+prometheus+grafana的问题我们已经讲解完毕,感谢您的阅读,如果还想了解更多关于12.centos7 基于Docker搭建node-exporter+Prometheus+Grafana服务器监控平台、docker-compose 部署 prometheus+grafana+alertmanager、Exporter+Promethues+Grafana可视化监控、GPE(Grafana+Prometheus+Exporter)项目实战之Golang篇(上)等相关内容,可以在本站寻找。
本文标签:


