对于Kubernetes排障指南感兴趣的读者,本文将提供您所需要的所有信息,我们将详细讲解kubernetes排错,并且为您提供关于KubeKey升级Kubernetes次要版本实战指南、KubeKe
对于Kubernetes排障指南感兴趣的读者,本文将提供您所需要的所有信息,我们将详细讲解kubernetes排错,并且为您提供关于KubeKey 升级 Kubernetes 次要版本实战指南、KubeKey 升级 KubeSphere 和 Kubernetes 补丁版本实战指南、Kubernetes - Launch Single Node Kubernetes Cluster、kubernetes - 使用 kubeadm 部署 kubernetes 集群的宝贵知识。
本文目录一览:- Kubernetes排障指南(kubernetes排错)
- KubeKey 升级 Kubernetes 次要版本实战指南
- KubeKey 升级 KubeSphere 和 Kubernetes 补丁版本实战指南
- Kubernetes - Launch Single Node Kubernetes Cluster
- kubernetes - 使用 kubeadm 部署 kubernetes 集群
")
Kubernetes排障指南(kubernetes排错)
“主要介绍了pod和flannel常见异常的排查步骤及方法
1)pod故障排查
一般情况下,问题出在pod本身,我们可以按照如下步骤进行分析定位问题
-
kubectl get pod 查看是否存在不正常的pod -
journalctl -u kubelet -f 查看kubelet,是否存在异常日志 -
kubectl logs pod/xxxxx -n kube-system
2)示例排查 CrashLoopBackOff和OOMkilled异常
1 查看节点运行情况
[root@k8s-m1 src]# kubectl get nodeNAME STATUS ROLES AGE VERSIONk8s-c1 Ready <none> 16h v1.14.2k8s-m1 Ready master 17h v1.14.2
2 首先查看pod状态是否正常
[root@k8s-m1 docker]# kubectl get pod -n kube-system NAME READY STATUS RESTARTS AGEcoredns-fb8b8dccf-5g2cx 1/1 Running 0 2d14hcoredns-fb8b8dccf-c5skq 1/1 Running 0 2d14hetcd-k8s-master 1/1 Running 0 2d14hkube-apiserver-k8s-master 1/1 Running 0 2d14hkube-controller-manager-k8s-master 1/1 Running 0 2d14hkube-flannel-ds-arm64-7cr2b 0/1 CrashLoopBackOff 629 2d12hkube-flannel-ds-arm64-hnsrv 0/1 CrashLoopBackOff 4 2d12hkube-proxy-ldw8m 1/1 Running 0 2d14hkube-proxy-xkfdw 1/1 Running 0 2d14hkube-scheduler-k8s-master 1/1 Running 0 2d14h
3 查看kublet日志
[root@k8s-m1 src]# journalctl -u kubelet -f12月 09 09:12:45 k8s-m1 kubelet[35667]: E1209 09:12:45.895575 35667 pod_workers.go:190] Error syncing pod 2eaa8ef9-1822-11ea-a1d9-70fd45ac3f1f ("kube-flannel-ds-arm64-7cr2b_kube-system(2eaa8ef9-1822-11ea-a1d9-70fd45ac3f1f)"), skipping: failed to "StartContainer" for "kube-flannel" with CrashLoopBackOff: "Back-off 5m0s restarting failed container=kube-flannel pod=kube-flannel-ds-arm64-7cr2b_kube-system(2eaa8ef9-1822-11ea-a1d9-70fd45ac3f1f)"
4 查看网路插件kube-flannel的日志
[root@k8s-m1 src]# kubectl logs kube-flannel-ds-arm64-88rjz -n kube-systemE1209 01:20:42.527856 1 iptables.go:115] Failed to ensure iptables rules: Error checking rule existence: failed to check rule existence: running [/sbin/iptables -t nat -C POSTROUTING ! -s 10.244.0.0/16 -d 10.244.0.0/16 -j MASQUERADE --random-fully --wait]: exit status -1: E1209 01:20:46.928502 1 iptables.go:115] Failed to ensure iptables rules: Error checking rule existence: failed to check rule existence: running [/sbin/iptables -t filter -C FORWARD -s 10.244.0.0/16 -j ACCEPT --wait]: exit status -1: E1209 01:20:52.128049 1 iptables.go:115] Failed to ensure iptables rules: Error checking rule existence: failed to check rule existence: running [/sbin/iptables -t filter -C FORWARD -s 10.244.0.0/16 -j ACCEPT --wait]: exit status -1: E1209 01:20:52.932263 1 iptables.go:115] Failed to ensure iptables rules: Error checking rule existence: failed to check rule existence: fork/exec /sbin/iptables: cannot allocate memory
kube-flannel-ds-arm64-hnsrv 0/1 OOMKilled 4 2d12h
containers: - name: kube-flannel image: quay.io/coreos/flannel:v0.11.0-amd64 command: - /opt/bin/flanneld args: - --ip-masq - --kube-subnet-mgr resources: requests: cpu: "100m" memory: "50Mi" limits: cpu: "100m" memory: "50Mi" securityContext: privileged: false capabilities: add: ["NET_ADMIN"]
3)ImagePullBackOff 异常解决
-
镜像名称无效-例如,你拼错了名称,或者 image 不存在 -
你为 image 指定了不存在的标签
4)网络插件kube-flannel无法启动问题
一般情况下是因为网络插件flannel下载问题,默认的网络插件下载地址是quay.io/coreos/flannel,但是这个地址国内网络无法直接访问到,这个时候我们需要从quay-mirror.qiniu.com/coreos/flannel地址下载,然后重命名城quay.io,然后执行
kubectl create -f kube-flannel.yml
5)子节点无法加入问题
主节点一切安装成功,并且提示子节点加入命令,当输入到子节点时发现无法加入,或者一直卡在加入shell命令行界面,无法加入。
第一:先看防火墙 systemctl firewalld.service status 因为集群间需要组网通信,如果防火墙是打开的建议关闭或者加入到iptables里面。默认可以访问。
第二:查看自己是否配置host组件
-
执行cat /etc/hosts命令,修改hosts文件。 -
添加集群所有节点的IP及hostname信息 -
hostnamectl --static set-hostname centos-1依次执行
如果还是没有解决则需要根据节点日志,具体问题具体分析解决。
6)OCI runtime create failed
12月 09 08:56:41 k8s-client1 kubelet[39382]: E1209 08:56:41.691178 39382 kuberuntime_sandbox.go:68] CreatePodSandbox for pod "kube-flannel-ds-arm64-hnsrv_kube-system(2eaafd62-1822-11ea-a1d9-70fd45ac3f1f)" failed: rpc error: code = Unknown desc = failed to start sandbox container for pod "kube-flannel-ds-arm64-hnsrv": Error response from daemon: OCI runtime create failed: systemd cgroup flag passed, but systemd support for managing cgroups is not available: unknown
查看daemon.json文件
因为指定了systemd,导致文件docker 运行镜像失败
-
cat /etc/docker/daemon.json{“registry-mirrors”: [“https://registry.docker-cn.co”],“exec-opts”: [“native.cgroupdriver=systemd”]} 去掉
-
“exec-opts”: [“native.cgroupdriver=systemd”] 重启docker 服务
7)子节点不支持kubectl get node
The connection to the server localhost:8080 was refused - did you specify the right host or port?
-
解决方法如下,将主节点中的【/etc/kubernetes/admin.conf】文件拷贝到从节点相同目录下,然后如提示配置环境变量:
Your Kubernetes control-plane has initialized successfully! To start using your cluster, you need to run the following as a regular user: mkdir -p $HOME/.kube sudo cp -i /etc/kubernetes/admin.conf $HOME/.kube/config sudo chown $(id -u):$(id -g) $HOME/.kube/config
另外一种解决办法
echo "export KUBECONFIG=/etc/kubernetes/admin.conf" >> ~/.bash_profile source ~/.bash_profile
总结
添加关注直接获取更多技术书籍、视频资源
原创不易,如果觉得有用,可以随手转发或者”在看“
本文分享自微信公众号 - 云原生技术爱好者社区(programmer_java)。
如有侵权,请联系 support@oschina.cn 删除。
本文参与“OSC源创计划”,欢迎正在阅读的你也加入,一起分享。

KubeKey 升级 Kubernetes 次要版本实战指南

前言
知识点
- 定级:入门级
- KubeKey 如何升级 Kubernetes 次要版本
- Kubernetes 升级准备及验证
- KubeKey 升级 Kubernetes 的常见问题
实战服务器配置 (架构 1:1 复刻小规模生产环境,配置略有不同)
| 主机名 | IP | CPU | 内存 | 系统盘 | 数据盘 | 用途 |
|---|---|---|---|---|---|---|
| k8s-master-1 | 192.168.9.91 | 4 | 16 | 40 | 100 | KubeSphere/k8s-master |
| k8s-master-2 | 192.168.9.92 | 4 | 16 | 40 | 100 | KubeSphere/k8s-master |
| k8s-master-3 | 192.168.9.93 | 4 | 16 | 40 | 100 | KubeSphere/k8s-master |
| k8s-worker-1 | 192.168.9.95 | 8 | 16 | 40 | 100 | k8s-worker/CI |
| k8s-worker-2 | 192.168.9.96 | 8 | 16 | 40 | 100 | k8s-worker |
| k8s-worker-3 | 192.168.9.97 | 8 | 16 | 40 | 100 | k8s-worker |
| k8s-storage-1 | 192.168.9.81 | 4 | 16 | 40 | 100/100/100/100/100 | ElasticSearch/GlusterFS/Ceph-Rook/Longhorn/NFS/ |
| k8s-storage-2 | 192.168.9.82 | 4 | 16 | 40 | 100/100/100/100 | ElasticSearch/GlusterFS/Ceph-Rook/Longhorn/ |
| k8s-storage-3 | 192.168.9.83 | 4 | 16 | 40 | 100/100/100/100 | ElasticSearch/GlusterFS/Ceph-Rook/Longhorn/ |
| registry | 192.168.9.80 | 4 | 8 | 40 | 100 | Sonatype Nexus 3 |
| 合计 | 10 | 52 | 152 | 400 | 2000 |
实战环境涉及软件版本信息
- 操作系统:CentOS 7.9 x86_64
- KubeSphere:v3.4.1
- Kubernetes:v1.24.14 to v1.26.5
- Containerd:1.6.4
- KubeKey: v3.0.13
1. 简介
上一期我们完成了 KubeSphere 和 Kubernetes 补丁版本升级实战 , 本期我们实战如何利用 KubeKey 实现 Kubernetes 次要版本升级。
本期内容没有涉及 KubeSphere 的次要版本升级,有需要的读者可以参考对应版本的官方升级文档。
关于跨次要版本升级,个人的考虑如下:
- 无论是 KubeSphere 还是 Kubernetes 非必要不升级(风险高,不可控的因素太多,就算是提前做了充分的验证测试,谁敢保证生产升级不出意外?)
- Kubernetes 非必要不原地升级,建议采用 “建设新版本集群 + 迁移业务应用” 或是蓝绿升级 的方案
- 一定要原地升级尽量控制在 2 个次要版本之内,且要做好充分的调研验证(比如版本不同、API 不同造成的资源兼容性,升级失败的爆炸半径等)
- KubeSphere 的跨版本升级更复杂,启用的额外插件越多,涉及的组件和中间价越多,升级需要考虑验证的点也就越多
KubeKey 支持 All-in-One 集群和多节点集群两种升级场景,本文只实战演示多节点集群的升级场景, All-in-One 集群请参考官方升级指南。
KubeSphere 和 Kubernetes 次要版本升级流程与补丁版本升级流程一致,这里就不过多描述了,详情请看上文。
2. 升级实战前提条件
上一期我们完成了 Kubernetes v1.24.12 到 v1.24.14 升级,本期实战我们将基于同一套环境将 Kubernetes v1.24.14 升级到 v1.26.5。
同时,为了模拟真实的业务场景,我们继续创建一些测试资源。在验证之前,我们还需要记录当前集群的一些关键信息。
2.1 集群环境
- KubeSphere v3.4.1,并启用大部分插件
- 安装 v1.24.14 的 Kubernetes 集群
- 对接 NFS 存储或是其他存储作为持久化存储(本文测试环境选用 NFS)
2.2 查看当前集群环境信息
下面查看的当前集群环境信息并不充分,只是查看几个具有代表性的资源,肯定有被忽略的组件和信息。
- 查看所有节点信息
[root@k8s-master-1 ~]# kubectl get nodes -o wide
NAME           STATUS   ROLES                  AGE     VERSION    INTERNAL-IP    EXTERNAL-IP   OS-IMAGE                KERNEL-VERSION                CONTAINER-RUNTIME
k8s-master-1   Ready    control-plane          6d21h   v1.24.14   192.168.9.91   <none>        CentOS Linux 7 (Core)   5.4.261-1.el7.elrepo.x86_64   containerd://1.6.4
k8s-master-2   Ready    control-plane,worker   6d21h   v1.24.14   192.168.9.92   <none>        CentOS Linux 7 (Core)   5.4.261-1.el7.elrepo.x86_64   containerd://1.6.4
k8s-master-3   Ready    control-plane,worker   6d21h   v1.24.14   192.168.9.93   <none>        CentOS Linux 7 (Core)   5.4.261-1.el7.elrepo.x86_64   containerd://1.6.4
k8s-worker-1   Ready    worker                 6d21h   v1.24.14   192.168.9.95   <none>        CentOS Linux 7 (Core)   5.4.261-1.el7.elrepo.x86_64   containerd://1.6.4
k8s-worker-2   Ready    worker                 6d21h   v1.24.14   192.168.9.96   <none>        CentOS Linux 7 (Core)   5.4.261-1.el7.elrepo.x86_64   containerd://1.6.4
k8s-worker-3   Ready    worker                 6d19h   v1.24.14   192.168.9.97   <none>        CentOS Linux 7 (Core)   5.4.261-1.el7.elrepo.x86_64   containerd://1.6.4
- 查看所有的 Deployment 使用的 Image,方便升级后对比(仅作为记录,实际意义不大,结果中不包含 Kubernetes 核心组件)
# 受限于篇幅,输出结果略,请自己保存结果
kubectl get deploy -A -o wide
- 查看 Kubernetes 资源(受限于篇幅,不展示 pod 结果)
[root@k8s-master-1 ~]# kubectl get pods,deployment,sts,ds -o wide -n kube-system
NAME                                          READY   UP-TO-DATE   AVAILABLE   AGE     CONTAINERS                     IMAGES                                                                    SELECTOR
deployment.apps/calico-kube-controllers       1/1     1            1           6d21h   calico-kube-controllers        registry.cn-beijing.aliyuncs.com/kubesphereio/kube-controllers:v3.26.1    k8s-app=calico-kube-controllers
deployment.apps/coredns                       2/2     2            2           6d21h   coredns                        registry.cn-beijing.aliyuncs.com/kubesphereio/coredns:1.8.6               k8s-app=kube-dns
deployment.apps/metrics-server                1/1     1            1           6d21h   metrics-server                 registry.cn-beijing.aliyuncs.com/kubesphereio/metrics-server:v0.4.2       k8s-app=metrics-server
deployment.apps/openebs-localpv-provisioner   1/1     1            1           6d21h   openebs-provisioner-hostpath   registry.cn-beijing.aliyuncs.com/kubesphereio/provisioner-localpv:3.3.0   name=openebs-localpv-provisioner,openebs.io/component-name=openebs-localpv-provisioner

NAME                                   READY   AGE     CONTAINERS            IMAGES
statefulset.apps/snapshot-controller   1/1     6d21h   snapshot-controller   registry.cn-beijing.aliyuncs.com/kubesphereio/snapshot-controller:v4.0.0

NAME                          DESIRED   CURRENT   READY   UP-TO-DATE   AVAILABLE   NODE SELECTOR            AGE     CONTAINERS    IMAGES                                                                     SELECTOR
daemonset.apps/calico-node    6         6         6       6            6           kubernetes.io/os=linux   6d21h   calico-node   registry.cn-beijing.aliyuncs.com/kubesphereio/node:v3.26.1                 k8s-app=calico-node
daemonset.apps/kube-proxy     6         6         6       6            6           kubernetes.io/os=linux   6d21h   kube-proxy    registry.cn-beijing.aliyuncs.com/kubesphereio/kube-proxy:v1.24.14          k8s-app=kube-proxy
daemonset.apps/nodelocaldns   6         6         6       6            6           <none>                   6d21h   node-cache    registry.cn-beijing.aliyuncs.com/kubesphereio/k8s-dns-node-cache:1.15.12   k8s-app=nodelocaldns
- 查看当前 Master 和 Worker 节点使用的 Image
# Master
[root@k8s-master-1 ~]#  crictl images | grep v1.24.14
registry.cn-beijing.aliyuncs.com/kubesphereio/kube-apiserver            v1.24.14            b651b48a617a5       34.3MB
registry.cn-beijing.aliyuncs.com/kubesphereio/kube-controller-manager   v1.24.14            d40212fa9cf04       31.5MB
registry.cn-beijing.aliyuncs.com/kubesphereio/kube-proxy                v1.24.14            e57c0d007d1ef       39.7MB
registry.cn-beijing.aliyuncs.com/kubesphereio/kube-scheduler            v1.24.14            19bf7b80c50e5       15.8MB

# Worker
[root@k8s-worker-1 ~]# crictl images | grep v1.24.14
registry.cn-beijing.aliyuncs.com/kubesphereio/kube-proxy                      v1.24.14                       e57c0d007d1ef       39.7MB
- 查看 Kubernetes 核心组件二进制文件(记录比对是否有升级)
[root@k8s-master-1 ~]# ll /usr/local/bin/
total 352448
-rwxr-xr-x 1 root root  65770992 Dec  4 15:09 calicoctl
-rwxr-xr-x 1 root root  23847904 Nov 29 13:50 etcd
-rwxr-xr-x 1 kube root  17620576 Nov 29 13:50 etcdctl
-rwxr-xr-x 1 root root  46182400 Dec  4 15:09 helm
-rwxr-xr-x 1 root root  44748800 Dec  4 15:09 kubeadm
-rwxr-xr-x 1 root root  46080000 Dec  4 15:09 kubectl
-rwxr-xr-x 1 root root 116646168 Dec  4 15:09 kubelet
drwxr-xr-x 2 kube root        71 Nov 29 13:51 kube-scripts
2.3 创建测试验证资源
- 创建测试命名空间
upgrade-test
kubectl create ns upgrade-test
- 创建测试资源文件(使用 StatefulSet,便于快速创建对应的测试卷),使用镜像 nginx:latest 创建 1 个 6 副本的测试业务(包含 pvc),每个副本分布在 1 台 Worker 节点,
vi nginx-test.yaml
apiVersion: apps/v1
kind: StatefulSet
metadata:
  name: test-nginx
  namespace: upgrade-test
spec:
  selector:
    matchLabels:
      app: nginx
  serviceName: "nginx"
  replicas: 6
  template:
    metadata:
      labels:
        app: nginx
    spec:
      containers:
      - name: nginx
        image: nginx:latest
        ports:
        - containerPort: 80
          name: web
        volumeMounts:
        - name: nfs-volume
          mountPath: /usr/share/nginx/html
  volumeClaimTemplates:
  - metadata:
      name: nfs-volume
    spec:
      accessModes: [ "ReadWriteOnce" ]
      storageClassName: "nfs-sc"
      resources:
        requests:
          storage: 1Gi
- 创建测试资源
kubectl apply -f nginx-test.yaml
- 写入 index 主页文件
for id in $(seq 0 1 5);do kubectl exec -it test-nginx-$id -n upgrade-test -- sh -c "echo I test-nginx-$id > /usr/share/nginx/html/index.html";done
- 查看测试资源
# 查看 Pod(每个节点一个副本)
[root@k8s-master-1 ~]# kubectl get pods -o wide -n upgrade-test
NAME           READY   STATUS    RESTARTS   AGE     IP              NODE           NOMINATED NODE   READINESS GATES
test-nginx-0   1/1     Running   0          8m32s   10.233.80.77    k8s-master-1   <none>           <none>
test-nginx-1   1/1     Running   0          8m10s   10.233.96.33    k8s-master-3   <none>           <none>
test-nginx-2   1/1     Running   0          7m47s   10.233.85.99    k8s-master-2   <none>           <none>
test-nginx-3   1/1     Running   0          7m25s   10.233.87.104   k8s-worker-3   <none>           <none>
test-nginx-4   1/1     Running   0          7m3s    10.233.88.180   k8s-worker-1   <none>           <none>
test-nginx-5   1/1     Running   0          6m41s   10.233.74.129   k8s-worker-2   <none>           <none>

# 查看 PVC
[root@k8s-master-1 ~]# kubectl get pvc -o wide -n upgrade-test
NAME                      STATUS   VOLUME                                     CAPACITY   ACCESS MODES   STORAGECLASS   AGE     VOLUMEMODE
nfs-volume-test-nginx-0   Bound    pvc-e7875a9c-2736-4b32-aa29-b338959bb133   1Gi        RWO            nfs-sc         8m52s   Filesystem
nfs-volume-test-nginx-1   Bound    pvc-8bd760a8-64f9-40e9-947f-917b6308c146   1Gi        RWO            nfs-sc         8m30s   Filesystem
nfs-volume-test-nginx-2   Bound    pvc-afb47509-c249-4892-91ad-da0f69e33495   1Gi        RWO            nfs-sc         8m7s    Filesystem
nfs-volume-test-nginx-3   Bound    pvc-e6cf5935-2852-4ef6-af3d-a06458bceb49   1Gi        RWO            nfs-sc         7m45s   Filesystem
nfs-volume-test-nginx-4   Bound    pvc-7d176238-8106-4cc9-b49d-fceb25242aee   1Gi        RWO            nfs-sc         7m23s   Filesystem
nfs-volume-test-nginx-5   Bound    pvc-dc35e933-0b3c-4fb9-9736-78528d26ce6f   1Gi        RWO            nfs-sc         7m1s    Filesystem

# 查看 index.html
[root@k8s-master-1 ~]# for id in $(seq 0 1 5);do kubectl exec -it test-nginx-$id -n upgrade-test  -- cat /usr/share/nginx/html/index.html;done
I test-nginx-0
I test-nginx-1
I test-nginx-2
I test-nginx-3
I test-nginx-4
I test-nginx-5
2.4 升级时观测集群和业务状态
本文的观测并不一定全面充分,所以各位在实际升级验证测试时,需要根据真实环境补充。观测过程不便截图,请读者自行观察。
- 观察集群节点状态
watch kubectl get nodes
- 观查测试命名空间的资源状态(重点观察 RESTARTS 是否变化)
watch kubectl get pods -o wide -n upgrade-test
- ping 测模拟的业务 IP(随机找一个 Pod)
ping 10.233.80.77
- curl 模拟的业务 IP(随机找一个 Pod,跟 Ping 测的不同)
watch curl 10.233.88.180
- 观测模拟的业务磁盘挂载情况(没验证写入,重点观察输出结果是否有 nfs 存储)
watch kubectl exec -it test-nginx-3 -n upgrade-test -- df -h
3. 下载 KubeKey
升级集群前执行以下命令,下载最新版或是指定版本的 KubeKey。
export KKZONE=cn
curl -sfL https://get-kk.kubesphere.io | VERSION=v3.0.13 sh -
4. 生成集群部署配置文件
4.1 使用 KubeKey 生成配置文件
升级之前需要准备集群部署文件,首选,建议使用 KubeKey 部署 KubeSphere 和 Kubernetes 集群时使用的配置文件。
如果部署时使用的配置丢失,可以执行以下命令,基于现有集群创建一个 sample.yaml 配置文件(本文重点演示)。
./kk create config --from-cluster
备注 :
本文假设 kubeconfig 位于
~/.kube/config。您可以通过--kubeconfig标志进行修改。
实际命令执行结果如下:
[root@k8s-master-1 kubekey]# ./kk create config --from-cluster
Notice: /root/kubekey/sample.yaml has been created. Some parameters need to be filled in by yourself, please complete it.
生成的配置文件 sample.yaml
apiVersion: kubekey.kubesphere.io/v1alpha2
kind: Cluster
metadata:
  name: sample
spec:
  hosts:
  ##You should complete the ssh information of the hosts
  - {name: k8s-master-1, address: 192.168.9.91, internalAddress: 192.168.9.91}
  - {name: k8s-master-2, address: 192.168.9.92, internalAddress: 192.168.9.92}
  - {name: k8s-master-3, address: 192.168.9.93, internalAddress: 192.168.9.93}
  - {name: k8s-worker-1, address: 192.168.9.95, internalAddress: 192.168.9.95}
  - {name: k8s-worker-2, address: 192.168.9.96, internalAddress: 192.168.9.96}
  - {name: k8s-worker-3, address: 192.168.9.97, internalAddress: 192.168.9.97}
  roleGroups:
    etcd:
    - SHOULD_BE_REPLACED
    master:
    worker:
    - k8s-master-1
    - k8s-master-2
    - k8s-master-3
    - k8s-worker-1
    - k8s-worker-2
    - k8s-worker-3
  controlPlaneEndpoint:
    ##Internal loadbalancer for apiservers
    #internalLoadbalancer: haproxy

    ##If the external loadbalancer was used, ''address'' should be set to loadbalancer''s ip.
    domain: lb.opsman.top
    address: ""
    port: 6443
  kubernetes:
    version: v1.24.14
    clusterName: opsman.top
    proxyMode: ipvs
    masqueradeAll: false
    maxPods: 110
    nodeCidrMaskSize: 24
  network:
    plugin: calico
    kubePodsCIDR: 10.233.64.0/18
    kubeServiceCIDR: 10.233.0.0/18
  registry:
    privateRegistry: ""
4.2 修改配置文件模板
根据实际的集群配置修改 sample.yaml 文件,请确保正确修改以下字段。
hosts:您主机的基本信息(主机名和 IP 地址)以及使用 SSH 连接至主机的信息(重点修改,需要加入 SSH 用户名和密码)。roleGroups.etcd:etcd 节点(重点修改)。roleGroups.master:master 节点(重点修改,默认没生成,必须手动加入否则会报错,参见 常见问题 1),注意: 该参数字段在部署时生成的配置文件中的名称为roleGroups.control-plane。roleGroups.worker:worker 节点(核对修改)。controlPlaneEndpoint:负载均衡器信息(可选)。kubernetes.containerManager:修改容器运行时(必选,默认没生成,必须手动加入否则会报错,参见 常见问题 2)registry:镜像服务信息(可选)。
修改后文件内容:
apiVersion: kubekey.kubesphere.io/v1alpha2
kind: Cluster
metadata:
  name: sample
spec:
  hosts:
  ##You should complete the ssh information of the hosts
  - {name: k8s-master-1, address: 192.168.9.91, internalAddress: 192.168.9.91, user: root, password: "P@88w0rd"}
  - {name: k8s-master-2, address: 192.168.9.92, internalAddress: 192.168.9.92, user: root, password: "P@88w0rd"}
  - {name: k8s-master-3, address: 192.168.9.93, internalAddress: 192.168.9.93, user: root, password: "P@88w0rd"}
  - {name: k8s-worker-1, address: 192.168.9.95, internalAddress: 192.168.9.95, user: root, password: "P@88w0rd"}
  - {name: k8s-worker-2, address: 192.168.9.96, internalAddress: 192.168.9.96, user: root, password: "P@88w0rd"}
  - {name: k8s-worker-3, address: 192.168.9.97, internalAddress: 192.168.9.97, user: root, password: "P@88w0rd"}
  roleGroups:
    etcd:
    - k8s-master-1
    - k8s-master-2
    - k8s-master-3
    master:
    - k8s-master-1
    - k8s-master-2
    - k8s-master-3
    worker:
    - k8s-master-1
    - k8s-master-2
    - k8s-master-3
    - k8s-worker-1
    - k8s-worker-2
    - k8s-worker-3
  controlPlaneEndpoint:
    ##Internal loadbalancer for apiservers
    internalLoadbalancer: haproxy

    ##If the external loadbalancer was used, ''address'' should be set to loadbalancer''s ip.
    domain: lb.opsman.top
    address: ""
    port: 6443
  kubernetes:
    version: v1.24.12
    clusterName: opsman.top
    proxyMode: ipvs
    masqueradeAll: false
    maxPods: 110
    nodeCidrMaskSize: 24
    containerManager: containerd
  network:
    plugin: calico
    kubePodsCIDR: 10.233.64.0/18
    kubeServiceCIDR: 10.233.0.0/18
  registry:
    privateRegistry: ""
5. 升级 Kubernetes
5.1 升级 Kubernetes
执行以下命令,将 Kubernetes 从 v1.24.14 升级至 v1.26.5。
export KKZONE=cn
./kk upgrade --with-kubernetes v1.26.5 -f sample.yaml
执行后的结果如下(按提示输入 yes 继续):
[root@k8s-master-1 kubekey]# ./kk upgrade --with-kubernetes v1.26.5 -f sample.yaml


 _   __      _          _   __
| | / /     | |        | | / /
| |/ / _   _| |__   ___| |/ /  ___ _   _
|    \| | | | ''_ \ / _ \    \ / _ \ | | |
| |\  \ |_| | |_) |  __/ |\  \  __/ |_| |
\_| \_/\__,_|_.__/ \___\_| \_/\___|\__, |
                                    __/ |
                                   |___/

09:26:43 CST [GreetingsModule] Greetings
09:26:43 CST message: [k8s-worker-3]
Greetings, KubeKey!
09:26:44 CST message: [k8s-master-3]
Greetings, KubeKey!
09:26:44 CST message: [k8s-master-1]
Greetings, KubeKey!
09:26:44 CST message: [k8s-worker-1]
Greetings, KubeKey!
09:26:44 CST message: [k8s-master-2]
Greetings, KubeKey!
09:26:44 CST message: [k8s-worker-2]
Greetings, KubeKey!
09:26:44 CST success: [k8s-worker-3]
09:26:44 CST success: [k8s-master-3]
09:26:44 CST success: [k8s-master-1]
09:26:44 CST success: [k8s-worker-1]
09:26:44 CST success: [k8s-master-2]
09:26:44 CST success: [k8s-worker-2]
09:26:44 CST [NodePreCheckModule] A pre-check on nodes
09:26:45 CST success: [k8s-worker-2]
09:26:45 CST success: [k8s-worker-3]
09:26:45 CST success: [k8s-master-2]
09:26:45 CST success: [k8s-worker-1]
09:26:45 CST success: [k8s-master-3]
09:26:45 CST success: [k8s-master-1]
09:26:45 CST [ClusterPreCheckModule] Get KubeConfig file
09:26:45 CST skipped: [k8s-master-3]
09:26:45 CST skipped: [k8s-master-2]
09:26:45 CST success: [k8s-master-1]
09:26:45 CST [ClusterPreCheckModule] Get all nodes Kubernetes version
09:26:45 CST success: [k8s-worker-2]
09:26:45 CST success: [k8s-worker-3]
09:26:45 CST success: [k8s-worker-1]
09:26:45 CST success: [k8s-master-2]
09:26:45 CST success: [k8s-master-3]
09:26:45 CST success: [k8s-master-1]
09:26:45 CST [ClusterPreCheckModule] Calculate min Kubernetes version
09:26:45 CST skipped: [k8s-master-3]
09:26:45 CST success: [k8s-master-1]
09:26:45 CST skipped: [k8s-master-2]
09:26:45 CST [ClusterPreCheckModule] Check desired Kubernetes version
09:26:45 CST skipped: [k8s-master-3]
09:26:45 CST success: [k8s-master-1]
09:26:45 CST skipped: [k8s-master-2]
09:26:45 CST [ClusterPreCheckModule] Check KubeSphere version
09:26:45 CST skipped: [k8s-master-3]
09:26:45 CST skipped: [k8s-master-2]
09:26:45 CST success: [k8s-master-1]
09:26:45 CST [ClusterPreCheckModule] Check dependency matrix for KubeSphere and Kubernetes
09:26:45 CST skipped: [k8s-master-3]
09:26:45 CST skipped: [k8s-master-2]
09:26:45 CST success: [k8s-master-1]
09:26:45 CST [ClusterPreCheckModule] Get kubernetes nodes status
09:26:45 CST skipped: [k8s-master-3]
09:26:45 CST skipped: [k8s-master-2]
09:26:45 CST success: [k8s-master-1]
09:26:45 CST [UpgradeConfirmModule] Display confirmation form
+--------------+------+------+---------+----------+-------+-------+---------+-----------+--------+--------+------------+------------+-------------+------------------+--------------+
| name         | sudo | curl | openssl | ebtables | socat | ipset | ipvsadm | conntrack | chrony | docker | containerd | nfs client | ceph client | glusterfs client | time         |
+--------------+------+------+---------+----------+-------+-------+---------+-----------+--------+--------+------------+------------+-------------+------------------+--------------+
| k8s-master-1 | y    | y    | y       | y        | y     | y     | y       | y         | y      |        | v1.6.4     | y          |             |                  | CST 09:26:45 |
| k8s-master-2 | y    | y    | y       | y        | y     | y     | y       | y         | y      |        | v1.6.4     | y          |             |                  | CST 09:26:45 |
| k8s-master-3 | y    | y    | y       | y        | y     | y     | y       | y         | y      |        | v1.6.4     | y          |             |                  | CST 09:26:45 |
| k8s-worker-1 | y    | y    | y       | y        | y     | y     | y       | y         | y      |        | v1.6.4     | y          |             |                  | CST 09:26:45 |
| k8s-worker-2 | y    | y    | y       | y        | y     | y     | y       | y         | y      |        | v1.6.4     | y          |             |                  | CST 09:26:45 |
| k8s-worker-3 | y    | y    | y       | y        | y     | y     | y       | y         | y      |        | v1.6.4     | y          |             |                  | CST 09:26:45 |
+--------------+------+------+---------+----------+-------+-------+---------+-----------+--------+--------+------------+------------+-------------+------------------+--------------+

Cluster nodes status:
NAME           STATUS   ROLES                  AGE     VERSION    INTERNAL-IP    EXTERNAL-IP   OS-IMAGE                KERNEL-VERSION                CONTAINER-RUNTIME
k8s-master-1   Ready    control-plane          6d21h   v1.24.14   192.168.9.91   <none>        CentOS Linux 7 (Core)   5.4.261-1.el7.elrepo.x86_64   containerd://1.6.4
k8s-master-2   Ready    control-plane,worker   6d21h   v1.24.14   192.168.9.92   <none>        CentOS Linux 7 (Core)   5.4.261-1.el7.elrepo.x86_64   containerd://1.6.4
k8s-master-3   Ready    control-plane,worker   6d21h   v1.24.14   192.168.9.93   <none>        CentOS Linux 7 (Core)   5.4.261-1.el7.elrepo.x86_64   containerd://1.6.4
k8s-worker-1   Ready    worker                 6d21h   v1.24.14   192.168.9.95   <none>        CentOS Linux 7 (Core)   5.4.261-1.el7.elrepo.x86_64   containerd://1.6.4
k8s-worker-2   Ready    worker                 6d21h   v1.24.14   192.168.9.96   <none>        CentOS Linux 7 (Core)   5.4.261-1.el7.elrepo.x86_64   containerd://1.6.4
k8s-worker-3   Ready    worker                 6d19h   v1.24.14   192.168.9.97   <none>        CentOS Linux 7 (Core)   5.4.261-1.el7.elrepo.x86_64   containerd://1.6.4

Upgrade Confirmation:
kubernetes version: v1.24.14 to v1.26.5

Continue upgrading cluster? [yes/no]:
注意: Upgrade 信息确认,Kubernetes 提示从 v1.24.14 升级至 v1.26.5。
点击「yes」后,删减版最终执行结果如下:
09:47:18 CST [ProgressiveUpgradeModule 2/2] Set current k8s version
09:47:18 CST skipped: [LocalHost]
09:47:18 CST [ChownModule] Chown user $HOME/.kube dir
09:47:19 CST success: [k8s-worker-3]
09:47:19 CST success: [k8s-worker-1]
09:47:19 CST success: [k8s-worker-2]
09:47:19 CST success: [k8s-master-1]
09:47:19 CST success: [k8s-master-2]
09:47:19 CST success: [k8s-master-3]
09:47:19 CST Pipeline[UpgradeClusterPipeline] execute successfully
注意: 由于篇幅限制,我无法粘贴完整的执行结果。然而,我强烈建议各位读者保存并仔细分析升级过程日志,以便更深入地理解 Kubekey 升级 Kubernetes 的流程。这些日志文件提供了关于升级过程中所发生事件的重要信息,可以帮助您更好地理解整个升级过程以及可能遇到的问题,并在需要时进行故障排除。
5.2 升级过程观测说明
升级的过程中观测任务输出结果,有几点需要注意:
- Master 和 Worker 节点会逐一升级(Master 2 分钟左右,Worker 1 分钟左右),升级过程中在 Master 节点执行 kubectl 的命令时会出现 API 无法连接的情况
[root@k8s-master-1 ~]# kubectl get nodes
The connection to the server lb.opsman.top:6443 was refused - did you specify the right host or port?
说明:
出现这种现象并不是说 Kubernetes 的 API 没有高可用,实际上是伪高可用。
主要是因为 KubeKey 部署的内置负载均衡 HAProxy 只作用于 Worker 节点,在 Master 节点只会连接本机的 kube-apiserver(因此,也说明有条件还是自建负载均衡比较好)。
# Master 节点
[root@k8s-master-1 ~]# ss -ntlup | grep 6443
tcp    LISTEN     0      32768  [::]:6443               [::]:*                   users:(("kube-apiserver",pid=11789,fd=7))


# Worker 节点
[root@k8s-worker-1 ~]# ss -ntlup | grep 6443
tcp    LISTEN     0      4000   127.0.0.1:6443                  *:*                   users:(("haproxy",pid=53535,fd=7))
- 测试的 Nginx 业务服务未中断(ping、curl、df 都未见异常)
- Kubernetes 核心组件升级顺序:先升级到 v1.25.10,再升级到 v1.26.5(符合 Kubekey 设计 和 Kubernetes 次要版本升级差异的要求)
- kube-apiserver、kube-controller-manager、kube-proxy、kube-scheduler 镜像从 v1.24.14 先升级到 v1.25.10,然后再升级到 v1.26.5。
升级到 v1.25.10 时下载的二进制软件列表 **(标粗的说明有变化)**:
-
kubeadm v1.25.10
-
kubelet v1.25.10
-
kubectl v1.25.10
-
helm v3.9.0
-
kubecni v1.2.0
-
crictl v1.24.0
-
etcd v3.4.13
-
containerd 1.6.4
-
runc v1.1.1
-
calicoctl v3.26.1
升级到 v1.26.5 时下载的二进制软件列表 **(标粗的说明有变化)**:
-
kubeadm v1.26.5
-
kubelet v1.26.5
-
kubectl v1.26.5
-
其他的没变化
升级过程中涉及的 Image 列表 **(标粗的说明有变化)**:
- calico/cni:v3.26.1
- calico/kube-controllers:v3.26.1
- calico/node:v3.26.1
- calico/pod2daemon-flexvol:v3.26.1
- coredns/coredns:1.9.3
- kubesphere/k8s-dns-node-cache:1.15.12
- kubesphere/kube-apiserver:v1.25.10
- kubesphere/kube-apiserver:v1.26.5
- kubesphere/kube-controller-manager:v1.25.10
- kubesphere/kube-controller-manager:v1.26.5
- kubesphere/kube-proxy:v1.25.10
- kubesphere/kube-proxy:v1.26.5
- kubesphere/kube-scheduler:v1.25.10
- kubesphere/kube-scheduler:v1.26.5
- kubesphere/pause:3.8
- library/haproxy:2.3
升级后所有节点核心 Image 列表(验证升级版本的顺序):
# Master 命令有筛选,去掉了 v1.24.12 和重复的 docker.io 开通的镜像
[root@k8s-master-1 ~]# crictl images | grep v1.2[4-6] | grep -v "24.12"| grep -v docker.io | sort
registry.cn-beijing.aliyuncs.com/kubesphereio/kube-apiserver            v1.24.14            b651b48a617a5       34.3MB
registry.cn-beijing.aliyuncs.com/kubesphereio/kube-apiserver            v1.25.10            4aafc4b1604b9       34.4MB
registry.cn-beijing.aliyuncs.com/kubesphereio/kube-apiserver            v1.26.5             25c2ecde661fc       35.5MB
registry.cn-beijing.aliyuncs.com/kubesphereio/kube-controller-manager   v1.24.14            d40212fa9cf04       31.5MB
registry.cn-beijing.aliyuncs.com/kubesphereio/kube-controller-manager   v1.25.10            e446ea5ea9b1b       31.5MB
registry.cn-beijing.aliyuncs.com/kubesphereio/kube-controller-manager   v1.26.5             a7403c147a516       32.4MB
registry.cn-beijing.aliyuncs.com/kubesphereio/kube-proxy                v1.24.14            e57c0d007d1ef       39.7MB
registry.cn-beijing.aliyuncs.com/kubesphereio/kube-proxy                v1.25.10            0cb798db55ff2       20.3MB
registry.cn-beijing.aliyuncs.com/kubesphereio/kube-proxy                v1.26.5             08440588500d7       21.5MB
registry.cn-beijing.aliyuncs.com/kubesphereio/kube-scheduler            v1.24.14            19bf7b80c50e5       15.8MB
registry.cn-beijing.aliyuncs.com/kubesphereio/kube-scheduler            v1.25.10            de3c37c13188f       16MB
registry.cn-beijing.aliyuncs.com/kubesphereio/kube-scheduler            v1.26.5             200132c1d91ab       17.7MB

# Worker
[root@k8s-worker-1 ~]# crictl images | grep v1.2[4-6] | grep -v "24.12"| grep -v docker.io | sort
registry.cn-beijing.aliyuncs.com/kubesphereio/kube-proxy                      v1.24.14                       e57c0d007d1ef       39.7MB
registry.cn-beijing.aliyuncs.com/kubesphereio/kube-proxy                      v1.25.10                       0cb798db55ff2       20.3MB
registry.cn-beijing.aliyuncs.com/kubesphereio/kube-proxy                      v1.26.5                        08440588500d7       21.5MB
5.3 Kubernetes 升级后验证
- 查看 Nodes 版本(VERSION 更新为 v1.26.5)
[root@k8s-master-1 ~]# kubectl get nodes -o wide
NAME           STATUS   ROLES                  AGE     VERSION   INTERNAL-IP    EXTERNAL-IP   OS-IMAGE                KERNEL-VERSION                CONTAINER-RUNTIME
k8s-master-1   Ready    control-plane          6d22h   v1.26.5   192.168.9.91   <none>        CentOS Linux 7 (Core)   5.4.261-1.el7.elrepo.x86_64   containerd://1.6.4
k8s-master-2   Ready    control-plane,worker   6d22h   v1.26.5   192.168.9.92   <none>        CentOS Linux 7 (Core)   5.4.261-1.el7.elrepo.x86_64   containerd://1.6.4
k8s-master-3   Ready    control-plane,worker   6d22h   v1.26.5   192.168.9.93   <none>        CentOS Linux 7 (Core)   5.4.261-1.el7.elrepo.x86_64   containerd://1.6.4
k8s-worker-1   Ready    worker                 6d22h   v1.26.5   192.168.9.95   <none>        CentOS Linux 7 (Core)   5.4.261-1.el7.elrepo.x86_64   containerd://1.6.4
k8s-worker-2   Ready    worker                 6d22h   v1.26.5   192.168.9.96   <none>        CentOS Linux 7 (Core)   5.4.261-1.el7.elrepo.x86_64   containerd://1.6.4
k8s-worker-3   Ready    worker                 6d20h   v1.26.5   192.168.9.97   <none>        CentOS Linux 7 (Core)   5.4.261-1.el7.elrepo.x86_64   containerd://1.6.4
- 查看 Kubernetes 资源(受限于篇幅,不展示 pod 结果,但实际变化都在 Pod 上)
[root@k8s-master-1 kubekey]# kubectl get pod,deployment,sts,ds -o wide -n kube-system
NAME                                          READY   UP-TO-DATE   AVAILABLE   AGE     CONTAINERS                     IMAGES                                                                    SELECTOR
deployment.apps/calico-kube-controllers       1/1     1            1           6d22h   calico-kube-controllers        registry.cn-beijing.aliyuncs.com/kubesphereio/kube-controllers:v3.26.1    k8s-app=calico-kube-controllers
deployment.apps/coredns                       2/2     2            2           6d22h   coredns                        registry.cn-beijing.aliyuncs.com/kubesphereio/coredns:1.8.6               k8s-app=kube-dns
deployment.apps/metrics-server                1/1     1            1           6d22h   metrics-server                 registry.cn-beijing.aliyuncs.com/kubesphereio/metrics-server:v0.4.2       k8s-app=metrics-server
deployment.apps/openebs-localpv-provisioner   1/1     1            1           6d22h   openebs-provisioner-hostpath   registry.cn-beijing.aliyuncs.com/kubesphereio/provisioner-localpv:3.3.0   name=openebs-localpv-provisioner,openebs.io/component-name=openebs-localpv-provisioner

NAME                                   READY   AGE     CONTAINERS            IMAGES
statefulset.apps/snapshot-controller   1/1     6d22h   snapshot-controller   registry.cn-beijing.aliyuncs.com/kubesphereio/snapshot-controller:v4.0.0

NAME                          DESIRED   CURRENT   READY   UP-TO-DATE   AVAILABLE   NODE SELECTOR            AGE     CONTAINERS    IMAGES                                                             SELECTOR
daemonset.apps/calico-node    6         6         6       6            6           kubernetes.io/os=linux   6d22h   calico-node   registry.cn-beijing.aliyuncs.com/kubesphereio/node:v3.26.1         k8s-app=calico-node
daemonset.apps/kube-proxy     6         6         6       6            6           kubernetes.io/os=linux   6d22h   kube-proxy    registry.cn-beijing.aliyuncs.com/kubesphereio/kube-proxy:v1.26.5   k8s-app=kube-proxy
daemonset.apps/nodelocaldns   6         6         6       6            6           <none>                   6d22h   node-cache    kubesphere/k8s-dns-node-cache:1.15.12                              k8s-app=nodelocaldns
- 查看二进制文件(对比升级前结果,验证组件是否有变更)
[root@k8s-master-1 ~]# ll /usr/local/bin/
total 360880
-rwxr-xr-x 1 root root  65770992 Dec  6 09:41 calicoctl
-rwxr-xr-x 1 root root  23847904 Nov 29 13:50 etcd
-rwxr-xr-x 1 kube root  17620576 Nov 29 13:50 etcdctl
-rwxr-xr-x 1 root root  46182400 Dec  6 09:41 helm
-rwxr-xr-x 1 root root  46788608 Dec  6 09:41 kubeadm
-rwxr-xr-x 1 root root  48046080 Dec  6 09:41 kubectl
-rwxr-xr-x 1 root root 121277432 Dec  6 09:41 kubelet
drwxr-xr-x 2 kube root        71 Nov 29 13:51 kube-scripts
注意: 除了 etcd、etcdctl 其他都有更新,说明 ETCD 不在组件更新范围内
- 创建测试资源
kubectl create deployment nginx-upgrade-test --image=nginx:latest --replicas=6 -n upgrade-test
说明: 本测试比较简单,生产环境建议更充分的测试。
- 查看创建的测试资源
# 查看 Deployment
[root@k8s-master-1 ~]# kubectl get deployment -n upgrade-test -o wide
NAME                 READY   UP-TO-DATE   AVAILABLE   AGE   CONTAINERS   IMAGES         SELECTOR
nginx-upgrade-test   6/6     6            6           13s   nginx        nginx:latest   app=nginx-upgrade-test

# 查看 Pod
[root@k8s-master-1 ~]# kubectl get deployment,pod -n upgrade-test -o wide
NAME                                 READY   UP-TO-DATE   AVAILABLE   AGE   CONTAINERS   IMAGES         SELECTOR
deployment.apps/nginx-upgrade-test   6/6     6            6           56s   nginx        nginx:latest   app=nginx-upgrade-test

NAME                                      READY   STATUS    RESTARTS   AGE   IP              NODE           NOMINATED NODE   READINESS GATES
pod/nginx-upgrade-test-7b668447c4-cglmh   1/1     Running   0          56s   10.233.80.85    k8s-master-1   <none>           <none>
pod/nginx-upgrade-test-7b668447c4-cmzqx   1/1     Running   0          56s   10.233.88.181   k8s-worker-1   <none>           <none>
pod/nginx-upgrade-test-7b668447c4-ggnjg   1/1     Running   0          56s   10.233.87.106   k8s-worker-3   <none>           <none>
pod/nginx-upgrade-test-7b668447c4-hh8h4   1/1     Running   0          56s   10.233.96.38    k8s-master-3   <none>           <none>
pod/nginx-upgrade-test-7b668447c4-hs7n7   1/1     Running   0          56s   10.233.74.130   k8s-worker-2   <none>           <none>
pod/nginx-upgrade-test-7b668447c4-s6wps   1/1     Running   0          56s   10.233.85.102   k8s-master-2   <none>           <none>
pod/test-nginx-0                          1/1     Running   0          85m   10.233.80.77    k8s-master-1   <none>           <none>
pod/test-nginx-1                          1/1     Running   0          85m   10.233.96.33    k8s-master-3   <none>           <none>
pod/test-nginx-2                          1/1     Running   0          84m   10.233.85.99    k8s-master-2   <none>           <none>
pod/test-nginx-3                          1/1     Running   0          84m   10.233.87.104   k8s-worker-3   <none>           <none>
pod/test-nginx-4                          1/1     Running   0          83m   10.233.88.180   k8s-worker-1   <none>           <none>
pod/test-nginx-5                          1/1     Running   0          83m   10.233.74.129   k8s-worker-2   <none>           <none>
- 重建已有 Pod(未验证,生产环境升级必须验证,防止出现跨版本的兼容性问题)
- 在 KubeSphere 管理控制台查看集群状态
经过一系列的操作,我们成功地利用 KubeKey 完成了 Kubernetes 次要版本的升级和测试验证。在这个过程中,我们经历了多个关键环节,包括实战环境准备、升级实施以及测试验证等。最终,我们实现了版本升级的目标,并且验证了升级后的系统(基本)能够正常运行。
6. 常见问题
问题 1
- 报错信息
[root@k8s-master-1 kubekey]# ./kk upgrade --with-kubesphere v3.4.1 -f sample.yaml
14:00:54 CST [FATA] The number of master/control-plane cannot be 0
- 解决方案
修改集群部署文件 sample.yaml,正确填写 roleGroups.master:master 节点信息
问题 2
- 报错信息
Continue upgrading cluster? [yes/no]: yes
14:07:02 CST success: [LocalHost]
14:07:02 CST [SetUpgradePlanModule 1/2] Set upgrade plan
14:07:02 CST success: [LocalHost]
14:07:02 CST [SetUpgradePlanModule 1/2] Generate kubeadm config
14:07:02 CST message: [k8s-master-1]
Failed to get container runtime cgroup driver.: Failed to exec command: sudo -E /bin/bash -c "docker info | grep ''Cgroup Driver''"
/bin/bash: docker: command not found: Process exited with status 1
14:07:02 CST retry: [k8s-master-1]
14:07:07 CST message: [k8s-master-1]
Failed to get container runtime cgroup driver.: Failed to exec command: sudo -E /bin/bash -c "docker info | grep ''Cgroup Driver''"
/bin/bash: docker: command not found: Process exited with status 1
14:07:07 CST retry: [k8s-master-1]
14:07:12 CST message: [k8s-master-1]
Failed to get container runtime cgroup driver.: Failed to exec command: sudo -E /bin/bash -c "docker info | grep ''Cgroup Driver''"
/bin/bash: docker: command not found: Process exited with status 1
14:07:12 CST skipped: [k8s-master-3]
14:07:12 CST skipped: [k8s-master-2]
14:07:12 CST failed: [k8s-master-1]
error: Pipeline[UpgradeClusterPipeline] execute failed: Module[SetUpgradePlanModule 1/2] exec failed:
failed: [k8s-master-1] [GenerateKubeadmConfig] exec failed after 3 retries: Failed to get container runtime cgroup driver.: Failed to exec command: sudo -E /bin/bash -c "docker info | grep ''Cgroup Driver''"
/bin/bash: docker: command not found: Process exited with status 1
- 解决方案
修改集群部署文件 sample.yaml,正确填写 kubernetes.containerManager: containerd,默认使用 Docker。
7. 总结
本文通过实战演示了 KubeKey 部署的 KubeSphere 和 Kubernetes 集群升级 Kubernetes 次要版本的详细过程,以及升级过程中遇到的问题和对应的解决方案。同时,也阐述了在升级前和升级后需要进行哪些验证,以确保系统升级的成功。
利用 KubeKey 升级 KubeSphere 和 Kubernetes 并完成测试验证是一个复杂而重要的任务。通过这次升级实战,我们验证了技术可行性、实现了系统的更新和优化,提高了系统的性能和安全性。同时,我们也积累了宝贵的经验教训,为未来的生产环境升级工作提供了参考和借鉴。
概括总结全文主要涉及以下内容:
- 升级实战环境准备
- Kubernetes 升级准备和升级过程监测
- 利用 KubeKey 升级 Kubernetes
- Kubernetes 升级后验证
本文所提供的实战内容可以直接应用于测试和研发环境。同时,对于生产环境也有一定的参考价值。然而,请务必谨慎对待,不要直接将其应用于生产环境。
本文由博客一文多发平台 OpenWrite 发布!

KubeKey 升级 KubeSphere 和 Kubernetes 补丁版本实战指南
前言
知识点
- 定级:入门级
- KubeKey 如何升级 KubeSphere 补丁版本
- KubeKey 如何升级 Kubernetes 补丁版本
- KubeSphere 和 Kubernetes 升级准备及验证
- KubeKey 升级 KubeSphere 和 Kubernetes 的常见问题
实战服务器配置 (架构 1:1 复刻小规模生产环境,配置略有不同)
| 主机名 | IP | CPU | 内存 | 系统盘 | 数据盘 | 用途 |
|---|---|---|---|---|---|---|
| k8s-master-1 | 192.168.9.91 | 4 | 16 | 40 | 100 | KubeSphere/k8s-master |
| k8s-master-2 | 192.168.9.92 | 4 | 16 | 40 | 100 | KubeSphere/k8s-master |
| k8s-master-3 | 192.168.9.93 | 4 | 16 | 40 | 100 | KubeSphere/k8s-master |
| k8s-worker-1 | 192.168.9.95 | 8 | 16 | 40 | 100 | k8s-worker/CI |
| k8s-worker-2 | 192.168.9.96 | 8 | 16 | 40 | 100 | k8s-worker |
| k8s-worker-3 | 192.168.9.97 | 8 | 16 | 40 | 100 | k8s-worker |
| k8s-storage-1 | 192.168.9.81 | 4 | 16 | 40 | 100/100/100/100/100 | ElasticSearch/GlusterFS/Ceph-Rook/Longhorn/NFS/ |
| k8s-storage-2 | 192.168.9.82 | 4 | 16 | 40 | 100/100/100/100 | ElasticSearch/GlusterFS/Ceph-Rook/Longhorn/ |
| k8s-storage-3 | 192.168.9.83 | 4 | 16 | 40 | 100/100/100/100 | ElasticSearch/GlusterFS/Ceph-Rook/Longhorn/ |
| registry | 192.168.9.80 | 4 | 8 | 40 | 100 | Sonatype Nexus 3 |
| 合计 | 10 | 52 | 152 | 400 | 2000 |
实战环境涉及软件版本信息
- 操作系统:CentOS 7.9 x86_64
- KubeSphere:v3.4.0 to v3.4.1
- Kubernetes:v1.24.12 to v1.24.14
- Containerd:1.6.4
- KubeKey: v3.0.13
1. 简介
1.1 Kubernetes 版本升级概述
KubeSphere v3.4.1 已于 2023 年 11 月 10 日正式发布,升级说明详见 Releases-v3.4.1 发布说明。该发布版修复了 v3.4.0 中存在的许多问题,建议所有人更新。
KubeSphere 官方的升级文档 操作比较简单。但是,实际升级过程还是遇到 2 个小问题。正好借此机会,写一篇完整版的 KubeSphere 和 Kubernetes 补丁版本升级完全实战指南。
为什么强调补丁版本?这里就要简单点介绍一下 Kubernetes 版本命名规则及升级策略。
Kubernetes 版本以 x.y.z 表示,其中 x 是主要版本, y 是次要版本,z 是补丁版本。Kubernetes 跨版本升级从 v1.28 开始支持 3 个次要版本,v1.28 以前支持 2 个次要版本。但是在升级时,高可用性(HA)集群 和 单节点集群,不同组件之间的偏差要求也不尽相同,具体信息可参考 Kubernetes 官方文档的版本偏差策略。
原生的 Kubeadm 和 Kubekey 都支持跨次版本升级,当使用 KubeKey 升级 Kubernetes 次要版本时,将从一个次要版本升级到下一个次要版本,直到目标版本。例如,v1.22 升级到 v.1.24 您会发现升级过程先从 v1.22 先升级到 v1.23 然后再升级到 v1.24,而不是直接从 v1.22 升级到 v1.24。
本文只适用于 KubeSphere 和 Kubernetes 组件的补丁版本升级,不涉及次要版本升级。
- KubeSphere v3.4.0 升级到 v3.4.1
- Kubernetes v1.24.x 升级到 v1.24.y
- 且只适用于小规模集群,中大规模集群有待验证
本期为什么暂时不涉及次要版本升级(仅作为个人观点)?
- 没有十足把握(谁敢说有?),生产环境不建议升级次要版本,尤其是跨越多个次要版本
- 必须要升级时,建议采用 **「建设新版本集群 + 迁移业务应用 」** 的解决方案(适用于有全局负载或是网关,存算分离即 Kubernetes 和 后端存储耦合性不强的场景)
- 一定要原地跨次要版本升级,在做好充分备份、测试验证后,自求多福吧
- 升级有风险,操作需谨慎
当然,为了技术学习,也为了积累原地升级的实战经验,后期还是会推出次要版本升级指南。
KubeKey 支持 All-in-One 集群和多节点集群两种升级场景,本文只实战演示多节点集群的升级场景, All-in-One 集群请参考官方升级指南。
1.2 KubeSphere 和 Kubernetes 升级流程概述
本文演示多节点集群升级场景。在该场景下我们分别升级 KubeSphere 和 Kubernetes。 KubeKey 本身支持一键直接升级 KubeSphere 和 Kubernetes。但是,个人建议生产环境建议分别升级、分别验证。
具体的升级流程如下:
- 备份(必须)
- 下载最新版 KubeKey
- 生成集群部署配置文件并修改
- 升级并验证 KubeSphere
- 升级并验证 Kubernetes
- 验证测试
第一步,备份是一定要做的。具体备份啥?本文没有涉及,这个没有通用标准。我个人理解 Kubernetes 相关的 Etcd、集群配置是必须的,再有其他业务重要数据。可用备份迁移工具 Velero 完整备份,但是这也需要大量的额外存储。KubeKey 部署的 Kubernetes 集群自带定时备份 Etcd 的策略。
对于备份有以下想法意见仅供参考:
- 无论集群规模大小,只要是生产集群,就有必要建立日常备份、重大操作备份的备份方案
- 如果日常有备份的习惯建议定期根据备份做恢复演练,验证备份是否可用(实操很难)
- 现有的备份方案是否真的能恢复集群?能恢复集群到什么状态?
- 自用 Kubernetes 集群,建议将所有集群管理 YAMl 和业务部署 YAML 存入 GitLab 进行版本控制(利于备份恢复失败或无备份时快速重建业务,但是数据另算)
- 尽量设计存算分离的架构,让计算集群和存储集群松耦合,避免计算集群崩溃造成数据丢失。同时,也有利于计算集群崩溃重建的业务快速恢复。
2. 升级实战前提条件
为了进行实战演示,我们将使用 KubeKey 工具提前安装和部署一套 KubeSphere 和 Kubernetes 集群。同时,为了模拟真实的业务场景,我们将创建一些测试资源。在验证之前,我们还需要记录当前集群的一些关键信息。
2.1 集群环境
- 安装 v3.4.0 KubeSphere,并启用大部分插件
- 安装 v1.24.x 的 Kubernetes 集群(本文使用 v1.24.12)
- 对接 NFS 存储或是其他存储作为持久化存储(本文测试环境选用 NFS)
2.2 查看当前集群环境信息
下面查看的当前集群环境信息并不充分,只是查看几个具有代表性的资源,肯定有被忽略的组件和信息。
- 查看所有的 Deployment 使用的 Image,方便升级后对比
# 受限于篇幅,输出结果略,请自己保存结果
kubectl get deploy -A -o wide
- 查看命名空间
kubesphere-system内的常用资源(还有其他命名规则 kubesphere- 的命名空间,本文略)
[root@k8s-master-1 ~]# kubectl get pod,deployment,sts,ds -o wide -n kubesphere-system
NAME                                         READY   STATUS      RESTARTS       AGE     IP              NODE           NOMINATED NODE   READINESS GATES
pod/ks-apiserver-7d7f8c7456-cr6hs            1/1     Running     3 (143m ago)   4d23h   10.233.88.111   k8s-worker-1   <none>           <none>
pod/ks-console-697f467f5c-bkfkl              1/1     Running     3 (143m ago)   4d23h   10.233.88.115   k8s-worker-1   <none>           <none>
pod/ks-controller-manager-755cbdf744-xllxj   1/1     Running     8 (141m ago)   4d23h   10.233.88.116   k8s-worker-1   <none>           <none>
pod/ks-installer-69b7c7cf6c-kkz8w            1/1     Running     5 (143m ago)   4d23h   10.233.74.87    k8s-worker-2   <none>           <none>
pod/minio-746f646bfb-4h7xj                   1/1     Running     3 (143m ago)   4d23h   10.233.88.119   k8s-worker-1   <none>           <none>
pod/openldap-0                               1/1     Running     4 (143m ago)   4d23h   10.233.88.100   k8s-worker-1   <none>           <none>
pod/openpitrix-import-job-plzc5              0/1     Completed   0              139m    10.233.85.48    k8s-master-2   <none>           <none>

NAME                                    READY   UP-TO-DATE   AVAILABLE   AGE     CONTAINERS              IMAGES                                                                             SELECTOR
deployment.apps/ks-apiserver            1/1     1            1           4d23h   ks-apiserver            registry.cn-beijing.aliyuncs.com/kubesphereio/ks-apiserver:v3.4.0                  app=ks-apiserver,tier=backend
deployment.apps/ks-console              1/1     1            1           4d23h   ks-console              registry.cn-beijing.aliyuncs.com/kubesphereio/ks-console:v3.4.0                    app=ks-console,tier=frontend
deployment.apps/ks-controller-manager   1/1     1            1           4d23h   ks-controller-manager   registry.cn-beijing.aliyuncs.com/kubesphereio/ks-controller-manager:v3.4.0         app=ks-controller-manager,tier=backend
deployment.apps/ks-installer            1/1     1            1           4d23h   installer               registry.cn-beijing.aliyuncs.com/kubesphereio/ks-installer:v3.4.0                  app=ks-installer
deployment.apps/minio                   1/1     1            1           4d23h   minio                   registry.cn-beijing.aliyuncs.com/kubesphereio/minio:RELEASE.2019-08-07T01-59-21Z   app=minio,release=ks-minio

NAME                        READY   AGE     CONTAINERS    IMAGES
statefulset.apps/openldap   1/1     4d23h   openldap-ha   registry.cn-beijing.aliyuncs.com/kubesphereio/openldap:1.3.0
- 查看 Kubernetes 资源(受限于篇幅,不展示 pod 结果)
[root@k8s-master-1 ~]# kubectl get pods,deployment,sts,ds -o wide -n kube-system
NAME                                          READY   UP-TO-DATE   AVAILABLE   AGE     CONTAINERS                     IMAGES                                                                    SELECTOR
deployment.apps/calico-kube-controllers       1/1     1            1           4d23h   calico-kube-controllers        registry.cn-beijing.aliyuncs.com/kubesphereio/kube-controllers:v3.26.1    k8s-app=calico-kube-controllers
deployment.apps/coredns                       2/2     2            2           4d23h   coredns                        registry.cn-beijing.aliyuncs.com/kubesphereio/coredns:1.8.6               k8s-app=kube-dns
deployment.apps/metrics-server                1/1     1            1           4d23h   metrics-server                 registry.cn-beijing.aliyuncs.com/kubesphereio/metrics-server:v0.4.2       k8s-app=metrics-server
deployment.apps/openebs-localpv-provisioner   1/1     1            1           4d23h   openebs-provisioner-hostpath   registry.cn-beijing.aliyuncs.com/kubesphereio/provisioner-localpv:3.3.0   name=openebs-localpv-provisioner,openebs.io/component-name=openebs-localpv-provisioner

NAME                                   READY   AGE     CONTAINERS            IMAGES
statefulset.apps/snapshot-controller   1/1     4d23h   snapshot-controller   registry.cn-beijing.aliyuncs.com/kubesphereio/snapshot-controller:v4.0.0

NAME                          DESIRED   CURRENT   READY   UP-TO-DATE   AVAILABLE   NODE SELECTOR            AGE     CONTAINERS    IMAGES                                                                     SELECTOR
daemonset.apps/calico-node    6         6         6       6            6           kubernetes.io/os=linux   4d23h   calico-node   registry.cn-beijing.aliyuncs.com/kubesphereio/node:v3.26.1                 k8s-app=calico-node
daemonset.apps/kube-proxy     6         6         6       6            6           kubernetes.io/os=linux   4d23h   kube-proxy    registry.cn-beijing.aliyuncs.com/kubesphereio/kube-proxy:v1.24.12          k8s-app=kube-proxy
daemonset.apps/nodelocaldns   6         6         6       6            6           <none>                   4d23h   node-cache    registry.cn-beijing.aliyuncs.com/kubesphereio/k8s-dns-node-cache:1.15.12   k8s-app=nodelocaldns
- 查看二进制文件
[root@k8s-master-1 ~]# ll /usr/local/bin/
total 352428
-rwxr-xr-x 1 kube root  65770992 Nov 29 11:42 calicoctl
-rwxr-xr-x 1 root root  23847904 Nov 29 13:50 etcd
-rwxr-xr-x 1 kube root  17620576 Nov 29 13:50 etcdctl
-rwxr-xr-x 1 kube root  46182400 Nov 29 11:42 helm
-rwxr-xr-x 1 kube root  44744704 Nov 29 11:42 kubeadm
-rwxr-xr-x 1 kube root  46075904 Nov 29 11:42 kubectl
-rwxr-xr-x 1 kube root 116637176 Nov 29 11:42 kubelet
drwxr-xr-x 2 kube root        71 Nov 29 13:51 kube-scripts
2.3 创建测试验证资源
- 创建测试命名空间
upgrade-test
kubectl create ns upgrade-test
- 创建测试资源文件,使用镜像 nginx:latest 创建 1 个 6 副本的测试业务(包含 pvc),每个副本分布在 1 台 Worker 节点,
vi nginx-test.yaml
apiVersion: apps/v1
kind: StatefulSet
metadata:
  name: test-nginx
  namespace: upgrade-test
spec:
  selector:
    matchLabels:
      app: nginx
  serviceName: "nginx"
  replicas: 6
  template:
    metadata:
      labels:
        app: nginx
    spec:
      containers:
      - name: nginx
        image: nginx:latest
        ports:
        - containerPort: 80
          name: web
        volumeMounts:
        - name: nfs-volume
          mountPath: /usr/share/nginx/html
  volumeClaimTemplates:
  - metadata:
      name: nfs-volume
    spec:
      accessModes: [ "ReadWriteOnce" ]
      storageClassName: "nfs-sc"
      resources:
        requests:
          storage: 1Gi
- 创建测试资源
kubectl apply -f nginx-test.yaml
- 写入 index 主页文件
for id in $(seq 0 1 5);do kubectl exec -it test-nginx-$id -n upgrade-test -- sh -c "echo I test-nginx-$id > /usr/share/nginx/html/index.html";done
- 查看测试资源
# 查看 Pod(每个节点一个副本)
[root@k8s-master-1 ~]# kubectl get pods -o wide -n upgrade-test
NAME           READY   STATUS    RESTARTS   AGE    IP              NODE           NOMINATED NODE   READINESS GATES
test-nginx-0   1/1     Running   0          2m3s   10.233.85.56    k8s-master-2   <none>           <none>
test-nginx-1   1/1     Running   0          101s   10.233.80.32    k8s-master-1   <none>           <none>
test-nginx-2   1/1     Running   0          79s    10.233.96.16    k8s-master-3   <none>           <none>
test-nginx-3   1/1     Running   0          57s    10.233.74.99    k8s-worker-2   <none>           <none>
test-nginx-4   1/1     Running   0          35s    10.233.87.68    k8s-worker-3   <none>           <none>
test-nginx-5   1/1     Running   0          13s    10.233.88.130   k8s-worker-1   <none>           <none>

# 查看 PVC
[root@k8s-master-1 ~]# kubectl get pvc -o wide -n upgrade-test
NAME                      STATUS   VOLUME                                     CAPACITY   ACCESS MODES   STORAGECLASS   AGE     VOLUMEMODE
nfs-volume-test-nginx-0   Bound    pvc-569f3eea-7e91-4ae0-8bdf-3f38b9ab3ee5   1Gi        RWO            nfs-sc         2m32s   Filesystem
nfs-volume-test-nginx-1   Bound    pvc-f1ef2599-7a7a-45c4-bdd6-8f3884f1fa7b   1Gi        RWO            nfs-sc         2m10s   Filesystem
nfs-volume-test-nginx-2   Bound    pvc-78bdb52c-1efc-425f-9533-445d8aadc495   1Gi        RWO            nfs-sc         108s    Filesystem
nfs-volume-test-nginx-3   Bound    pvc-1ce168eb-22fb-41a1-bb39-d252dbca4b39   1Gi        RWO            nfs-sc         86s     Filesystem
nfs-volume-test-nginx-4   Bound    pvc-553e2e5a-bf6c-4995-8856-9fd5d0ab2623   1Gi        RWO            nfs-sc         64s     Filesystem
nfs-volume-test-nginx-5   Bound    pvc-fa12b4b2-25e0-4860-a5dd-81c4eaf6e7f0   1Gi        RWO            nfs-sc         42s     Filesystem

# 查看 index.html
[root@k8s-master-1 ~]# for id in $(seq 0 1 5);do kubectl exec -it test-nginx-$id -n upgrade-test  -- cat /usr/share/nginx/html/index.html;done
I test-nginx-0
I test-nginx-1
I test-nginx-2
I test-nginx-3
I test-nginx-4
I test-nginx-5
2.4 升级时观测集群和业务状态
本文的观测并不一定全面充分,所以各位在实际升级验证测试时,需要根据真实环境补充。
- 观察集群节点状态
watch kubectl get nodes
- 观查测试命名空间的资源状态
kubectl get pods -o wide -n upgrade-test
- ping 测模拟的业务 IP(随机找一个 Pod)
ping 10.233.80.31
- curl 模拟的业务 IP(随机找一个 Pod,跟 Ping 测的不同)
watch curl 10.233.88.130
- 观测模拟的业务磁盘挂载情况(没验证写入)
watch kubectl exec -it test-nginx-3 -n upgrade-test -- df -h
3. 下载 KubeKey
升级集群前执行以下命令,下载最新版或是指定版本的 KubeKey。
export KKZONE=cn
curl -sfL https://get-kk.kubesphere.io | VERSION=v3.0.13 sh -
4. 生成集群部署配置文件
4.1 使用 KubeKey 生成配置文件
升级之前需要准备集群部署文件,首选,建议使用 KubeKey 部署 KubeSphere 和 Kubernetes 集群时使用的配置文件。
如果部署时使用的配置丢失,可以执行以下命令,基于现有集群创建一个 sample.yaml 配置文件(本文重点演示)。
./kk create config --from-cluster
备注 :
本文假设 kubeconfig 位于
~/.kube/config。您可以通过--kubeconfig标志进行修改。
实际命令执行结果如下:
[root@k8s-master-1 kubekey]# ./kk create config --from-cluster
Notice: /root/kubekey/sample.yaml has been created. Some parameters need to be filled in by yourself, please complete it.
生成的配置文件 sample.yaml
apiVersion: kubekey.kubesphere.io/v1alpha2
kind: Cluster
metadata:
  name: sample
spec:
  hosts:
  ##You should complete the ssh information of the hosts
  - {name: k8s-master-1, address: 192.168.9.91, internalAddress: 192.168.9.91}
  - {name: k8s-master-2, address: 192.168.9.92, internalAddress: 192.168.9.92}
  - {name: k8s-master-3, address: 192.168.9.93, internalAddress: 192.168.9.93}
  - {name: k8s-worker-1, address: 192.168.9.95, internalAddress: 192.168.9.95}
  - {name: k8s-worker-2, address: 192.168.9.96, internalAddress: 192.168.9.96}
  - {name: k8s-worker-3, address: 192.168.9.97, internalAddress: 192.168.9.97}
  roleGroups:
    etcd:
    - SHOULD_BE_REPLACED
    master:
    worker:
    - k8s-master-1
    - k8s-master-2
    - k8s-master-3
    - k8s-worker-1
    - k8s-worker-2
    - k8s-worker-3
  controlPlaneEndpoint:
    ##Internal loadbalancer for apiservers
    #internalLoadbalancer: haproxy

    ##If the external loadbalancer was used, ''address'' should be set to loadbalancer''s ip.
    domain: lb.opsman.top
    address: ""
    port: 6443
  kubernetes:
    version: v1.24.12
    clusterName: opsman.top
    proxyMode: ipvs
    masqueradeAll: false
    maxPods: 110
    nodeCidrMaskSize: 24
  network:
    plugin: calico
    kubePodsCIDR: 10.233.64.0/18
    kubeServiceCIDR: 10.233.0.0/18
  registry:
    privateRegistry: ""
4.2 修改配置文件模板
根据实际的集群配置修改 sample.yaml 文件,请确保正确修改以下字段。
hosts:您主机的基本信息(主机名和 IP 地址)以及使用 SSH 连接至主机的信息(重点修改,需要加入 SSH 用户名和密码)。roleGroups.etcd:etcd 节点(重点修改)。roleGroups.master:master 节点(重点修改,默认没生成,必须手动加入否则会报错,参见 常见问题 1),注意: 该参数字段在部署时生成的配置文件中的名称为roleGroups.control-plane。roleGroups.worker:worker 节点(核对修改)。controlPlaneEndpoint:负载均衡器信息(可选)。kubernetes.containerManager:修改容器运行时(必选,默认没生成,必须手动加入否则会报错,参见 常见问题 2)registry:镜像服务信息(可选)。
修改后文件内容:
apiVersion: kubekey.kubesphere.io/v1alpha2
kind: Cluster
metadata:
  name: sample
spec:
  hosts:
  ##You should complete the ssh information of the hosts
  - {name: k8s-master-1, address: 192.168.9.91, internalAddress: 192.168.9.91, user: root, password: "P@88w0rd"}
  - {name: k8s-master-2, address: 192.168.9.92, internalAddress: 192.168.9.92, user: root, password: "P@88w0rd"}
  - {name: k8s-master-3, address: 192.168.9.93, internalAddress: 192.168.9.93, user: root, password: "P@88w0rd"}
  - {name: k8s-worker-1, address: 192.168.9.95, internalAddress: 192.168.9.95, user: root, password: "P@88w0rd"}
  - {name: k8s-worker-2, address: 192.168.9.96, internalAddress: 192.168.9.96, user: root, password: "P@88w0rd"}
  - {name: k8s-worker-3, address: 192.168.9.97, internalAddress: 192.168.9.97, user: root, password: "P@88w0rd"}
  roleGroups:
    etcd:
    - k8s-master-1
    - k8s-master-2
    - k8s-master-3
    master:
    - k8s-master-1
    - k8s-master-2
    - k8s-master-3
    worker:
    - k8s-master-1
    - k8s-master-2
    - k8s-master-3
    - k8s-worker-1
    - k8s-worker-2
    - k8s-worker-3
  controlPlaneEndpoint:
    ##Internal loadbalancer for apiservers
    internalLoadbalancer: haproxy

    ##If the external loadbalancer was used, ''address'' should be set to loadbalancer''s ip.
    domain: lb.opsman.top
    address: ""
    port: 6443
  kubernetes:
    version: v1.24.12
    clusterName: opsman.top
    proxyMode: ipvs
    masqueradeAll: false
    maxPods: 110
    nodeCidrMaskSize: 24
    containerManager: containerd
  network:
    plugin: calico
    kubePodsCIDR: 10.233.64.0/18
    kubeServiceCIDR: 10.233.0.0/18
  registry:
    privateRegistry: ""
5. 升级 KubeSphere
5.1 升级 KubeSphere
执行以下命令,将 KubeSphere 从 v3.4.0 升级至 v3.4.1:
export KKZONE=cn
./kk upgrade --with-kubesphere v3.4.1 -f sample.yaml
执行后的结果如下(按提示输入 yes 继续):
[root@k8s-master-1 kubekey]# ./kk upgrade --with-kubesphere v3.4.1 -f sample.yaml


 _   __      _          _   __
| | / /     | |        | | / /
| |/ / _   _| |__   ___| |/ /  ___ _   _
|    \| | | | ''_ \ / _ \    \ / _ \ | | |
| |\  \ |_| | |_) |  __/ |\  \  __/ |_| |
\_| \_/\__,_|_.__/ \___\_| \_/\___|\__, |
                                    __/ |
                                   |___/

14:04:22 CST [GreetingsModule] Greetings
14:04:22 CST message: [k8s-worker-3]
Greetings, KubeKey!
14:04:22 CST message: [k8s-master-3]
Greetings, KubeKey!
14:04:22 CST message: [k8s-master-1]
Greetings, KubeKey!
14:04:23 CST message: [k8s-master-2]
Greetings, KubeKey!
14:04:23 CST message: [k8s-worker-1]
Greetings, KubeKey!
14:04:23 CST message: [k8s-worker-2]
Greetings, KubeKey!
14:04:23 CST success: [k8s-worker-3]
14:04:23 CST success: [k8s-master-3]
14:04:23 CST success: [k8s-master-1]
14:04:23 CST success: [k8s-master-2]
14:04:23 CST success: [k8s-worker-1]
14:04:23 CST success: [k8s-worker-2]
14:04:23 CST [NodePreCheckModule] A pre-check on nodes
14:04:23 CST success: [k8s-master-2]
14:04:23 CST success: [k8s-master-1]
14:04:23 CST success: [k8s-worker-1]
14:04:23 CST success: [k8s-master-3]
14:04:23 CST success: [k8s-worker-2]
14:04:23 CST success: [k8s-worker-3]
14:04:23 CST [ClusterPreCheckModule] Get KubeConfig file
14:04:23 CST skipped: [k8s-master-3]
14:04:23 CST skipped: [k8s-master-2]
14:04:23 CST success: [k8s-master-1]
14:04:23 CST [ClusterPreCheckModule] Get all nodes Kubernetes version
14:04:24 CST success: [k8s-worker-1]
14:04:24 CST success: [k8s-worker-2]
14:04:24 CST success: [k8s-worker-3]
14:04:24 CST success: [k8s-master-2]
14:04:24 CST success: [k8s-master-1]
14:04:24 CST success: [k8s-master-3]
14:04:24 CST [ClusterPreCheckModule] Calculate min Kubernetes version
14:04:24 CST skipped: [k8s-master-3]
14:04:24 CST success: [k8s-master-1]
14:04:24 CST skipped: [k8s-master-2]
14:04:24 CST [ClusterPreCheckModule] Check desired Kubernetes version
14:04:24 CST skipped: [k8s-master-3]
14:04:24 CST success: [k8s-master-1]
14:04:24 CST skipped: [k8s-master-2]
14:04:24 CST [ClusterPreCheckModule] Check KubeSphere version
14:04:24 CST skipped: [k8s-master-3]
14:04:24 CST skipped: [k8s-master-2]
14:04:24 CST success: [k8s-master-1]
14:04:24 CST [ClusterPreCheckModule] Check dependency matrix for KubeSphere and Kubernetes
14:04:24 CST skipped: [k8s-master-3]
14:04:24 CST success: [k8s-master-1]
14:04:24 CST skipped: [k8s-master-2]
14:04:24 CST [ClusterPreCheckModule] Get kubernetes nodes status
14:04:24 CST skipped: [k8s-master-3]
14:04:24 CST skipped: [k8s-master-2]
14:04:24 CST success: [k8s-master-1]
14:04:24 CST [UpgradeConfirmModule] Display confirmation form
+--------------+------+------+---------+----------+-------+-------+---------+-----------+--------+--------+------------+------------+-------------+------------------+--------------+
| name         | sudo | curl | openssl | ebtables | socat | ipset | ipvsadm | conntrack | chrony | docker | containerd | nfs client | ceph client | glusterfs client | time         |
+--------------+------+------+---------+----------+-------+-------+---------+-----------+--------+--------+------------+------------+-------------+------------------+--------------+
| k8s-master-1 | y    | y    | y       | y        | y     | y     | y       | y         | y      |        | v1.6.4     | y          |             |                  | CST 14:04:23 |
| k8s-master-2 | y    | y    | y       | y        | y     | y     | y       | y         | y      |        | v1.6.4     | y          |             |                  | CST 14:04:23 |
| k8s-master-3 | y    | y    | y       | y        | y     | y     | y       | y         | y      |        | v1.6.4     | y          |             |                  | CST 14:04:23 |
| k8s-worker-1 | y    | y    | y       | y        | y     | y     | y       | y         | y      |        | v1.6.4     | y          |             |                  | CST 14:04:23 |
| k8s-worker-2 | y    | y    | y       | y        | y     | y     | y       | y         | y      |        | v1.6.4     | y          |             |                  | CST 14:04:23 |
| k8s-worker-3 | y    | y    | y       | y        | y     | y     | y       | y         | y      |        | v1.6.4     | y          |             |                  | CST 14:04:23 |
+--------------+------+------+---------+----------+-------+-------+---------+-----------+--------+--------+------------+------------+-------------+------------------+--------------+

Cluster nodes status:
NAME           STATUS   ROLES                  AGE    VERSION    INTERNAL-IP    EXTERNAL-IP   OS-IMAGE                KERNEL-VERSION                CONTAINER-RUNTIME
k8s-master-1   Ready    control-plane          5d2h   v1.24.12   192.168.9.91   <none>        CentOS Linux 7 (Core)   5.4.261-1.el7.elrepo.x86_64   containerd://1.6.4
k8s-master-2   Ready    control-plane,worker   5d2h   v1.24.12   192.168.9.92   <none>        CentOS Linux 7 (Core)   5.4.261-1.el7.elrepo.x86_64   containerd://1.6.4
k8s-master-3   Ready    control-plane,worker   5d2h   v1.24.12   192.168.9.93   <none>        CentOS Linux 7 (Core)   5.4.261-1.el7.elrepo.x86_64   containerd://1.6.4
k8s-worker-1   Ready    worker                 5d2h   v1.24.12   192.168.9.95   <none>        CentOS Linux 7 (Core)   5.4.261-1.el7.elrepo.x86_64   containerd://1.6.4
k8s-worker-2   Ready    worker                 5d2h   v1.24.12   192.168.9.96   <none>        CentOS Linux 7 (Core)   5.4.261-1.el7.elrepo.x86_64   containerd://1.6.4
k8s-worker-3   Ready    worker                 5d     v1.24.12   192.168.9.97   <none>        CentOS Linux 7 (Core)   5.4.261-1.el7.elrepo.x86_64   containerd://1.6.4

Upgrade Confirmation:
kubernetes version: v1.24.12 to v1.24.12
kubesphere version: v3.4.0 to v3.4.1

Continue upgrading cluster? [yes/no]:
注意: Upgrade 信息确认,Kubernetes 保持版本不变,KubeSphere 提示从 v3.4.0 升级至 v3.4.1。
点击「yes」后,删减版执行结果如下:
14:11:53 CST [ProgressiveUpgradeModule 2/2] Set current k8s version
14:11:53 CST skipped: [LocalHost]
14:11:53 CST [ChownModule] Chown user $HOME/.kube dir
14:11:53 CST success: [k8s-worker-2]
14:11:53 CST success: [k8s-worker-3]
14:11:53 CST success: [k8s-worker-1]
14:11:53 CST success: [k8s-master-3]
14:11:53 CST success: [k8s-master-2]
14:11:53 CST success: [k8s-master-1]
14:11:53 CST Pipeline[UpgradeClusterPipeline] execute successfully
5.2 KubeSphere 升级后验证
查看命名空间 kubesphere-system 内的常用资源(还有其他命名规则 kubesphere- 的命名空间,本文略)
[root@k8s-master-1 kubekey]# kubectl get pod,deployment,sts,ds -o wide -n kubesphere-system
NAME                                         READY   STATUS      RESTARTS        AGE     IP              NODE           NOMINATED NODE   READINESS GATES
pod/ks-apiserver-746df45599-bcx2k            1/1     Running     0               67s     10.233.85.63    k8s-master-2   <none>           <none>
pod/ks-console-7c65d9b546-rqsgk              1/1     Running     0               67s     10.233.80.33    k8s-master-1   <none>           <none>
pod/ks-controller-manager-7c87998597-g45jc   1/1     Running     0               66s     10.233.85.64    k8s-master-2   <none>           <none>
pod/ks-installer-7cc98d8bcb-jrhv7            1/1     Running     0               4m34s   10.233.85.62    k8s-master-2   <none>           <none>
pod/minio-746f646bfb-4h7xj                   1/1     Running     3 (5h15m ago)   5d2h    10.233.88.119   k8s-worker-1   <none>           <none>
pod/openldap-0                               1/1     Running     4 (5h15m ago)   5d2h    10.233.88.100   k8s-worker-1   <none>           <none>
pod/openpitrix-import-job-wcccl              0/1     Completed   0               42s     10.233.80.34    k8s-master-1   <none>           <none>

NAME                                    READY   UP-TO-DATE   AVAILABLE   AGE    CONTAINERS              IMAGES                                                                             SELECTOR
deployment.apps/ks-apiserver            1/1     1            1           5d2h   ks-apiserver            registry.cn-beijing.aliyuncs.com/kubesphereio/ks-apiserver:v3.4.1                  app=ks-apiserver,tier=backend
deployment.apps/ks-console              1/1     1            1           5d2h   ks-console              registry.cn-beijing.aliyuncs.com/kubesphereio/ks-console:v3.4.1                    app=ks-console,tier=frontend
deployment.apps/ks-controller-manager   1/1     1            1           5d2h   ks-controller-manager   registry.cn-beijing.aliyuncs.com/kubesphereio/ks-controller-manager:v3.4.1         app=ks-controller-manager,tier=backend
deployment.apps/ks-installer            1/1     1            1           5d2h   installer               registry.cn-beijing.aliyuncs.com/kubesphereio/ks-installer:v3.4.1                  app=ks-installer
deployment.apps/minio                   1/1     1            1           5d2h   minio                   registry.cn-beijing.aliyuncs.com/kubesphereio/minio:RELEASE.2019-08-07T01-59-21Z   app=minio,release=ks-minio

NAME                        READY   AGE    CONTAINERS    IMAGES
statefulset.apps/openldap   1/1     5d2h   openldap-ha   registry.cn-beijing.aliyuncs.com/kubesphereio/openldap:1.3.0
分析执行(不完全)结果:
- ks-apiserver、ks-console、ks-controller-manager、ks-installer、openpitrix-import-job 等组件有重新执行和重建的动作(查看 AGE 列)
- ks-apiserver、ks-console、ks-controller-manager、ks-installer 等组件使用的 Image 版本变成了 v3.4.1
- 升级过程中观测的 Nginx 业务没有出现中断
- 其他有变化的 Pod 可以使用命令查看
kubectl get pods -A
登陆管理控制台验证:
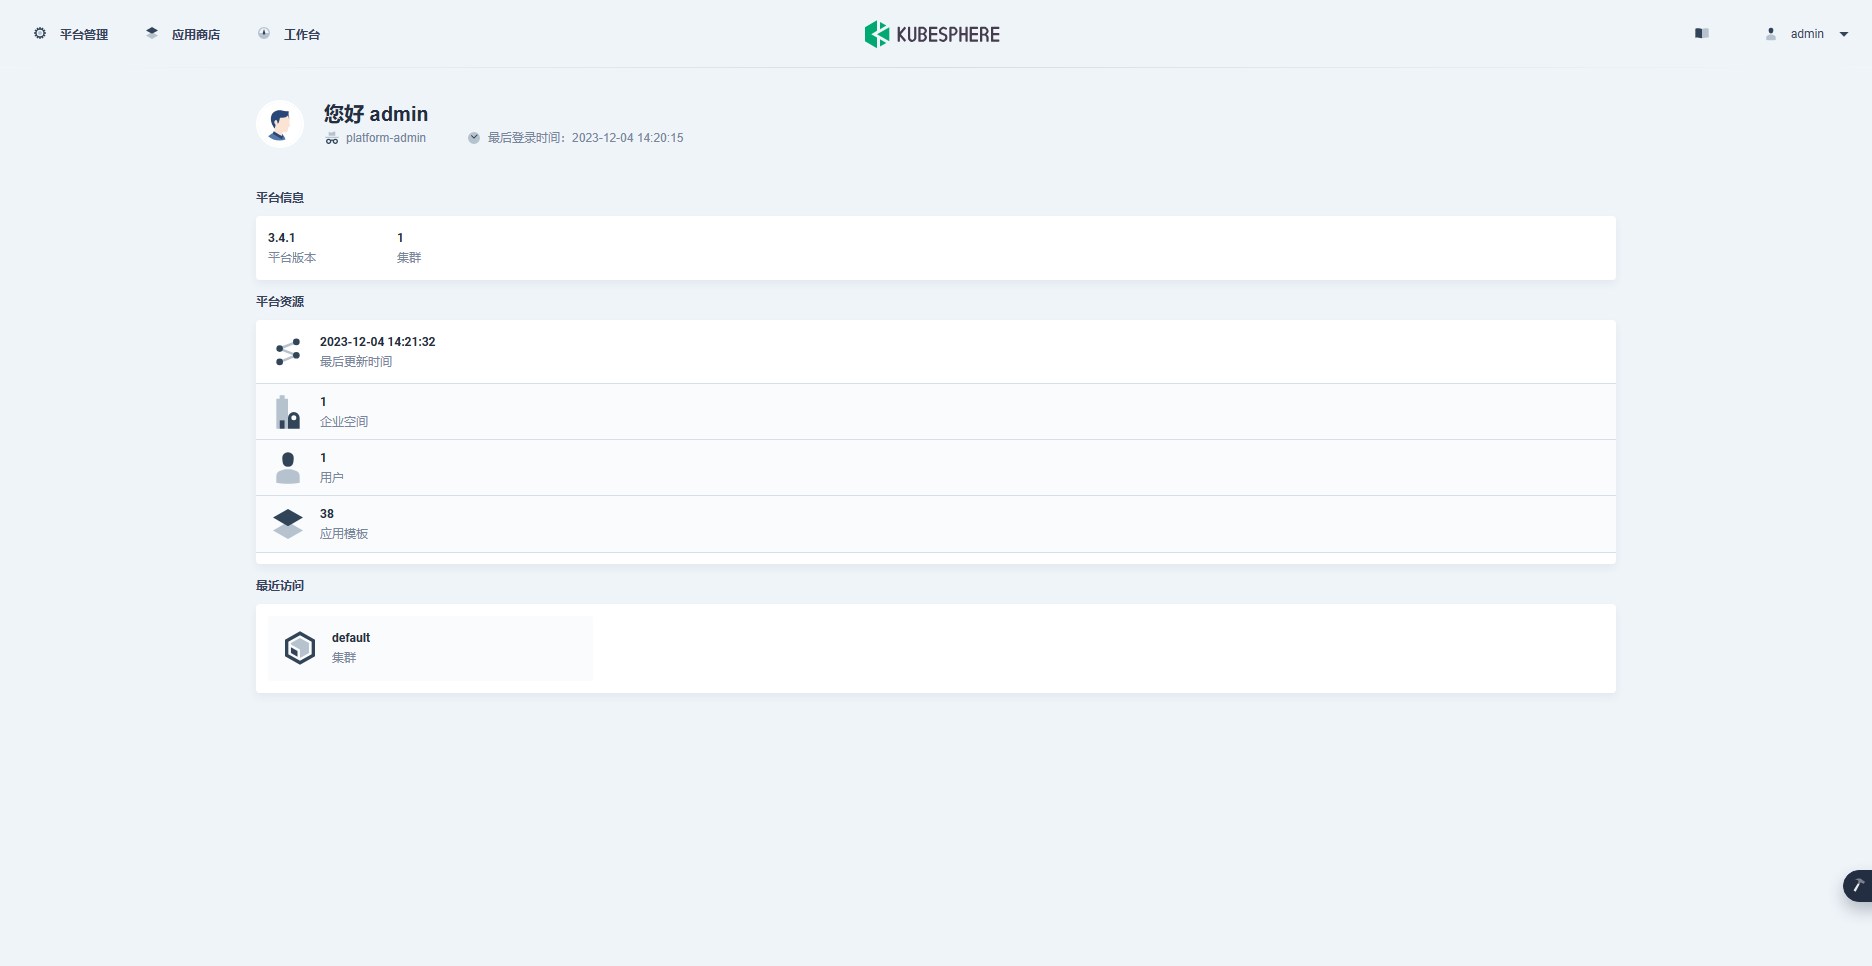
- 工作台首页显示的版本号变更为 3.4.1(升级前未截图,只是在命令行中有显示)
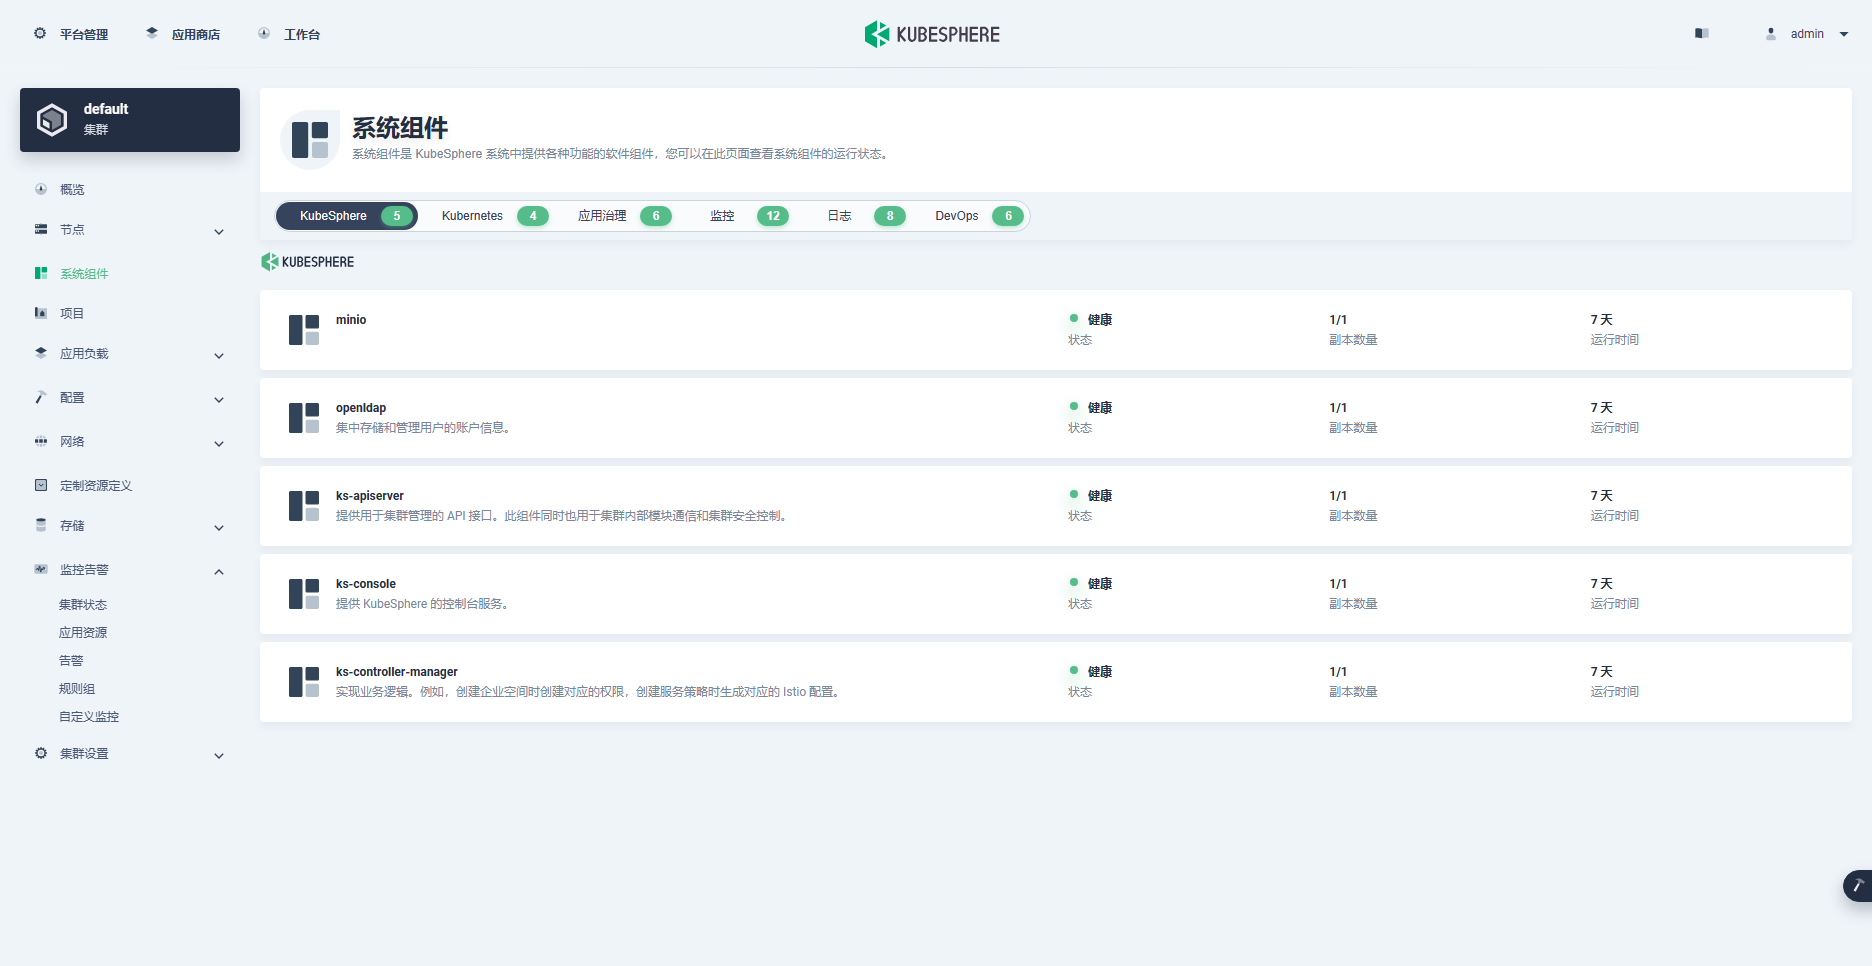
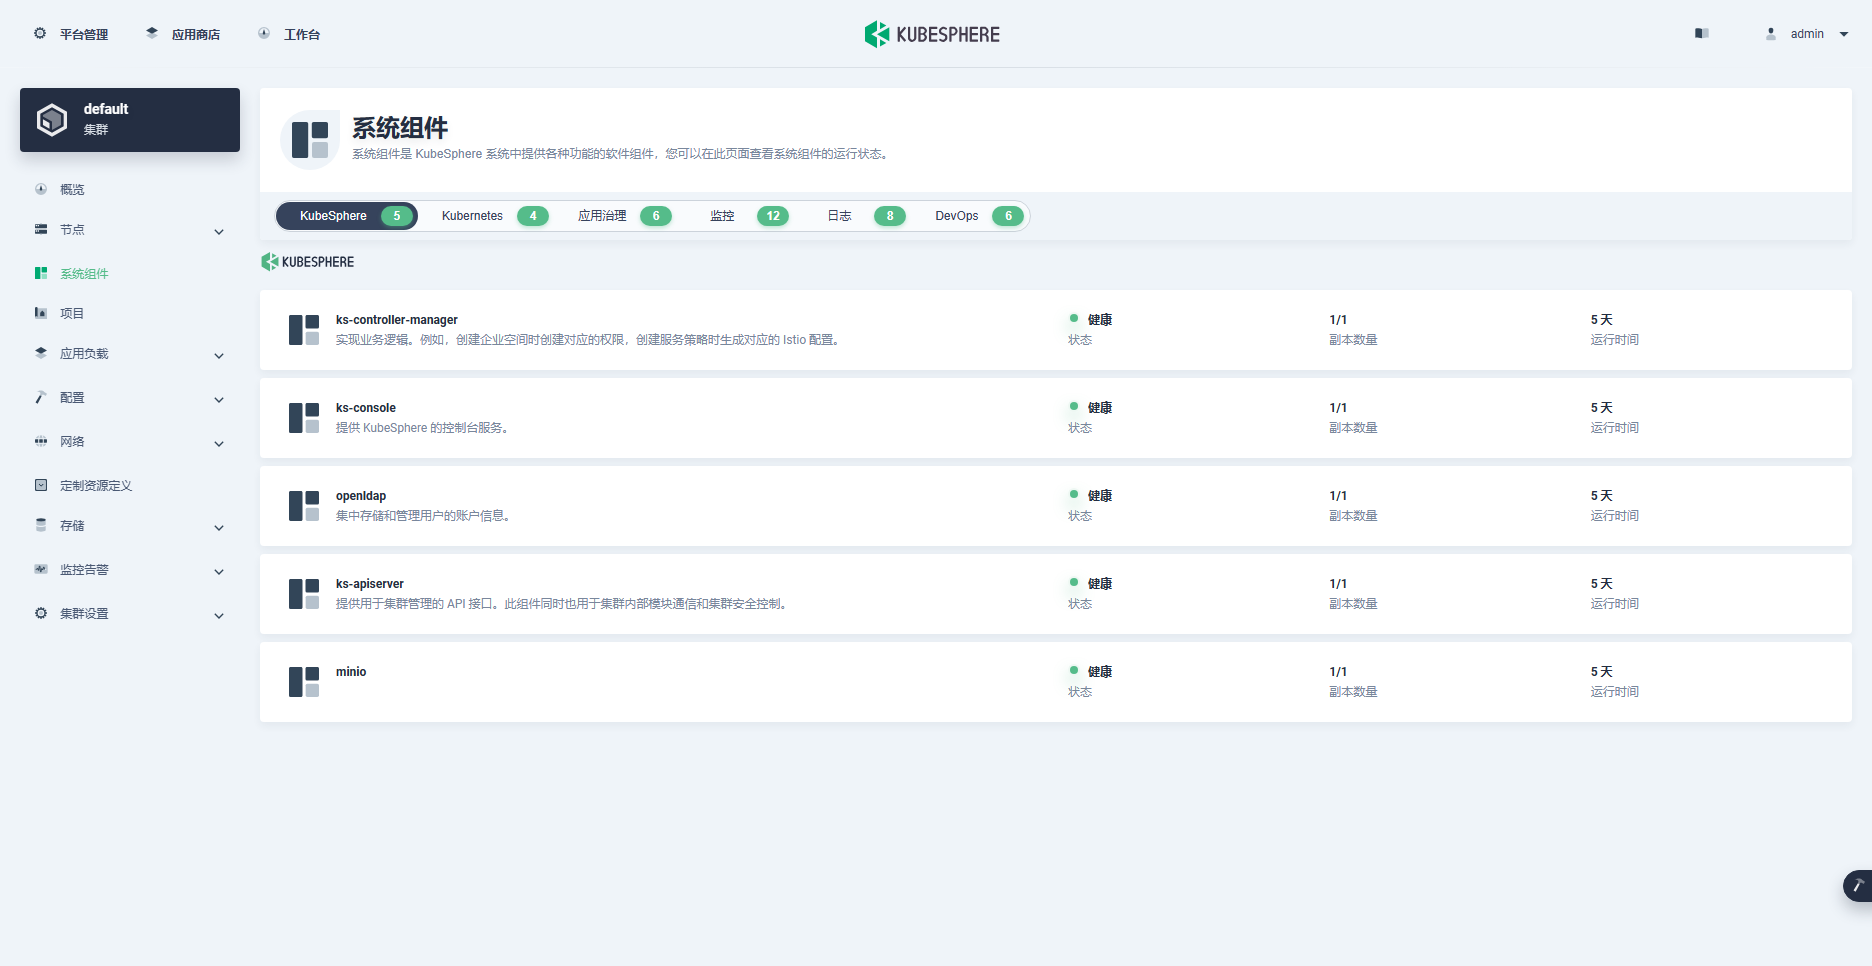
- 系统组件状态(所有组件显示正常)
6. 升级 Kubernetes
6.1 升级 Kubernetes
执行以下命令,将 Kubernetes 从 v1.24.12 升级至 v1.24.14。
./kk upgrade --with-kubernetes v1.24.14 -f sample.yaml
执行后的结果如下(按提示输入 yes 继续):
[root@k8s-master-1 kubekey]# ./kk upgrade --with-kubernetes v1.24.14 -f sample.yaml


 _   __      _          _   __
| | / /     | |        | | / /
| |/ / _   _| |__   ___| |/ /  ___ _   _
|    \| | | | ''_ \ / _ \    \ / _ \ | | |
| |\  \ |_| | |_) |  __/ |\  \  __/ |_| |
\_| \_/\__,_|_.__/ \___\_| \_/\___|\__, |
                                    __/ |
                                   |___/

14:54:10 CST [GreetingsModule] Greetings
14:54:10 CST message: [k8s-worker-3]
Greetings, KubeKey!
14:54:10 CST message: [k8s-master-3]
Greetings, KubeKey!
14:54:10 CST message: [k8s-master-1]
Greetings, KubeKey!
14:54:11 CST message: [k8s-master-2]
Greetings, KubeKey!
14:54:11 CST message: [k8s-worker-1]
Greetings, KubeKey!
14:54:11 CST message: [k8s-worker-2]
Greetings, KubeKey!
14:54:11 CST success: [k8s-worker-3]
14:54:11 CST success: [k8s-master-3]
14:54:11 CST success: [k8s-master-1]
14:54:11 CST success: [k8s-master-2]
14:54:11 CST success: [k8s-worker-1]
14:54:11 CST success: [k8s-worker-2]
14:54:11 CST [NodePreCheckModule] A pre-check on nodes
14:54:11 CST success: [k8s-worker-3]
14:54:11 CST success: [k8s-master-2]
14:54:11 CST success: [k8s-master-3]
14:54:11 CST success: [k8s-worker-2]
14:54:11 CST success: [k8s-worker-1]
14:54:11 CST success: [k8s-master-1]
14:54:11 CST [ClusterPreCheckModule] Get KubeConfig file
14:54:11 CST skipped: [k8s-master-3]
14:54:11 CST skipped: [k8s-master-2]
14:54:11 CST success: [k8s-master-1]
14:54:11 CST [ClusterPreCheckModule] Get all nodes Kubernetes version
14:54:12 CST success: [k8s-worker-2]
14:54:12 CST success: [k8s-worker-1]
14:54:12 CST success: [k8s-worker-3]
14:54:12 CST success: [k8s-master-2]
14:54:12 CST success: [k8s-master-3]
14:54:12 CST success: [k8s-master-1]
14:54:12 CST [ClusterPreCheckModule] Calculate min Kubernetes version
14:54:12 CST skipped: [k8s-master-3]
14:54:12 CST skipped: [k8s-master-2]
14:54:12 CST success: [k8s-master-1]
14:54:12 CST [ClusterPreCheckModule] Check desired Kubernetes version
14:54:12 CST skipped: [k8s-master-3]
14:54:12 CST skipped: [k8s-master-2]
14:54:12 CST success: [k8s-master-1]
14:54:12 CST [ClusterPreCheckModule] Check KubeSphere version
14:54:12 CST skipped: [k8s-master-3]
14:54:12 CST skipped: [k8s-master-2]
14:54:12 CST success: [k8s-master-1]
14:54:12 CST [ClusterPreCheckModule] Check dependency matrix for KubeSphere and Kubernetes
14:54:12 CST skipped: [k8s-master-3]
14:54:12 CST skipped: [k8s-master-2]
14:54:12 CST success: [k8s-master-1]
14:54:12 CST [ClusterPreCheckModule] Get kubernetes nodes status
14:54:12 CST skipped: [k8s-master-3]
14:54:12 CST skipped: [k8s-master-2]
14:54:12 CST success: [k8s-master-1]
14:54:12 CST [UpgradeConfirmModule] Display confirmation form
+--------------+------+------+---------+----------+-------+-------+---------+-----------+--------+--------+------------+------------+-------------+------------------+--------------+
| name         | sudo | curl | openssl | ebtables | socat | ipset | ipvsadm | conntrack | chrony | docker | containerd | nfs client | ceph client | glusterfs client | time         |
+--------------+------+------+---------+----------+-------+-------+---------+-----------+--------+--------+------------+------------+-------------+------------------+--------------+
| k8s-master-1 | y    | y    | y       | y        | y     | y     | y       | y         | y      |        | v1.6.4     | y          |             |                  | CST 14:54:11 |
| k8s-master-2 | y    | y    | y       | y        | y     | y     | y       | y         | y      |        | v1.6.4     | y          |             |                  | CST 14:54:11 |
| k8s-master-3 | y    | y    | y       | y        | y     | y     | y       | y         | y      |        | v1.6.4     | y          |             |                  | CST 14:54:11 |
| k8s-worker-1 | y    | y    | y       | y        | y     | y     | y       | y         | y      |        | v1.6.4     | y          |             |                  | CST 14:54:11 |
| k8s-worker-2 | y    | y    | y       | y        | y     | y     | y       | y         | y      |        | v1.6.4     | y          |             |                  | CST 14:54:11 |
| k8s-worker-3 | y    | y    | y       | y        | y     | y     | y       | y         | y      |        | v1.6.4     | y          |             |                  | CST 14:54:11 |
+--------------+------+------+---------+----------+-------+-------+---------+-----------+--------+--------+------------+------------+-------------+------------------+--------------+

Cluster nodes status:
NAME           STATUS   ROLES                  AGE    VERSION    INTERNAL-IP    EXTERNAL-IP   OS-IMAGE                KERNEL-VERSION                CONTAINER-RUNTIME
k8s-master-1   Ready    control-plane          5d3h   v1.24.12   192.168.9.91   <none>        CentOS Linux 7 (Core)   5.4.261-1.el7.elrepo.x86_64   containerd://1.6.4
k8s-master-2   Ready    control-plane,worker   5d3h   v1.24.12   192.168.9.92   <none>        CentOS Linux 7 (Core)   5.4.261-1.el7.elrepo.x86_64   containerd://1.6.4
k8s-master-3   Ready    control-plane,worker   5d3h   v1.24.12   192.168.9.93   <none>        CentOS Linux 7 (Core)   5.4.261-1.el7.elrepo.x86_64   containerd://1.6.4
k8s-worker-1   Ready    worker                 5d3h   v1.24.12   192.168.9.95   <none>        CentOS Linux 7 (Core)   5.4.261-1.el7.elrepo.x86_64   containerd://1.6.4
k8s-worker-2   Ready    worker                 5d3h   v1.24.12   192.168.9.96   <none>        CentOS Linux 7 (Core)   5.4.261-1.el7.elrepo.x86_64   containerd://1.6.4
k8s-worker-3   Ready    worker                 5d1h   v1.24.12   192.168.9.97   <none>        CentOS Linux 7 (Core)   5.4.261-1.el7.elrepo.x86_64   containerd://1.6.4

Upgrade Confirmation:
kubernetes version: v1.24.12 to v1.24.14

Continue upgrading cluster? [yes/no]:
注意: Upgrade 信息确认,Kubernetes 提示从 v1.24.12 升级至 v1.24.14。
点击「yes」后,删减版执行结果如下:
15:15:35 CST [ProgressiveUpgradeModule 2/2] Set current k8s version
15:15:35 CST skipped: [LocalHost]
15:15:35 CST [ChownModule] Chown user $HOME/.kube dir
15:15:35 CST success: [k8s-worker-1]
15:15:35 CST success: [k8s-worker-3]
15:15:35 CST success: [k8s-worker-2]
15:15:35 CST success: [k8s-master-2]
15:15:35 CST success: [k8s-master-1]
15:15:35 CST success: [k8s-master-3]
15:15:35 CST Pipeline[UpgradeClusterPipeline] execute successfully
升级的软件列表(由于并没有使用原有的 Kubekey 目录的数据升级集群。因此,会自动下载所需的所有软件包,标粗的为实际更新的软件)
-
kubeadm v1.24.14
-
kubelet v1.24.14
-
kubectl v1.24.14
-
helm v3.9.0
-
kubecni v1.2.0
-
crictl v1.24.0
-
etcd v3.4.13
-
containerd 1.6.4
-
runc v1.1.1
-
calicoctl v3.26.1
升级中观测结果
- Master 和 Worker 节点会逐一升级,升级过程中在 Master 节点执行 kubectl 的命令时会出现 API 无法连接的情况
[root@k8s-master-1 ~]# kubectl get nodes
The connection to the server lb.opsman.top:6443 was refused - did you specify the right host or port?
说明:
出现这种现象并不是说 Kubernetes 的 API 没有高可用,实际上是伪高可用。
主要是因为 KubeKey 部署的内置负载均衡 HAProxy 只作用于 Worker 节点,在 Master 节点只会连接本机的 kube-apiserver(因此,也说明有条件还是自建负载均衡比较好)。
# Master 节点
[root@k8s-master-1 ~]# ss -ntlup | grep 6443
tcp    LISTEN     0      32768  [::]:6443               [::]:*                   users:(("kube-apiserver",pid=5780,fd=7))

# Worker 节点
[root@k8s-worker-1 ~]# ss -ntlup | grep 6443
tcp    LISTEN     0      4000   127.0.0.1:6443                  *:*                   users:(("haproxy",pid=1778,fd=7))
- 测试的 Nginx 业务服务未中断(ping、curl、df 都未见异常)
- kube-apiserver、kube-controller-manager、kube-proxy、kube-scheduler 镜像从 v1.24.12 直接升级到了 v1.24.14,没有经过中间的补丁版本
[root@k8s-master-1 ~]# crictl images | grep v1.24
registry.cn-beijing.aliyuncs.com/kubesphereio/kube-apiserver            v1.24.12            2d5d51b77357e       34.1MB
registry.cn-beijing.aliyuncs.com/kubesphereio/kube-apiserver            v1.24.14            b651b48a617a5       34.3MB
registry.cn-beijing.aliyuncs.com/kubesphereio/kube-controller-manager   v1.24.12            d30605171488d       31.3MB
registry.cn-beijing.aliyuncs.com/kubesphereio/kube-controller-manager   v1.24.14            d40212fa9cf04       31.5MB
registry.cn-beijing.aliyuncs.com/kubesphereio/kube-proxy                v1.24.12            562ccc25ea629       39.6MB
registry.cn-beijing.aliyuncs.com/kubesphereio/kube-proxy                v1.24.14            e57c0d007d1ef       39.7MB
registry.cn-beijing.aliyuncs.com/kubesphereio/kube-scheduler            v1.24.12            cfa5d12eaa131       15.7MB
registry.cn-beijing.aliyuncs.com/kubesphereio/kube-scheduler            v1.24.14            19bf7b80c50e5       15.8MB
6.2 Kubernetes 升级后验证
- 查看 Nodes 版本(VERSION 更新为 v1.24.14)
[root@k8s-master-1 ~]# kubectl get nodes -o wide
NAME           STATUS   ROLES                  AGE    VERSION    INTERNAL-IP    EXTERNAL-IP   OS-IMAGE                KERNEL-VERSION                CONTAINER-RUNTIME
k8s-master-1   Ready    control-plane          5d3h   v1.24.14   192.168.9.91   <none>        CentOS Linux 7 (Core)   5.4.261-1.el7.elrepo.x86_64   containerd://1.6.4
k8s-master-2   Ready    control-plane,worker   5d3h   v1.24.14   192.168.9.92   <none>        CentOS Linux 7 (Core)   5.4.261-1.el7.elrepo.x86_64   containerd://1.6.4
k8s-master-3   Ready    control-plane,worker   5d3h   v1.24.14   192.168.9.93   <none>        CentOS Linux 7 (Core)   5.4.261-1.el7.elrepo.x86_64   containerd://1.6.4
k8s-worker-1   Ready    worker                 5d3h   v1.24.14   192.168.9.95   <none>        CentOS Linux 7 (Core)   5.4.261-1.el7.elrepo.x86_64   containerd://1.6.4
k8s-worker-2   Ready    worker                 5d3h   v1.24.14   192.168.9.96   <none>        CentOS Linux 7 (Core)   5.4.261-1.el7.elrepo.x86_64   containerd://1.6.4
k8s-worker-3   Ready    worker                 5d1h   v1.24.14   192.168.9.97   <none>        CentOS Linux 7 (Core)   5.4.261-1.el7.elrepo.x86_64   containerd://1.6.4
- 查看 Kubernetes 资源(受限于篇幅,不展示 pod 结果,但实际变化都在 Pod 上)
[root@k8s-master-1 kubekey]# kubectl get deployment,sts,ds -o wide -n kube-system
NAME                                          READY   UP-TO-DATE   AVAILABLE   AGE    CONTAINERS                     IMAGES                                                                    SELECTOR
deployment.apps/calico-kube-controllers       1/1     1            1           5d3h   calico-kube-controllers        registry.cn-beijing.aliyuncs.com/kubesphereio/kube-controllers:v3.26.1    k8s-app=calico-kube-controllers
deployment.apps/coredns                       2/2     2            2           5d3h   coredns                        registry.cn-beijing.aliyuncs.com/kubesphereio/coredns:1.8.6               k8s-app=kube-dns
deployment.apps/metrics-server                1/1     1            1           5d3h   metrics-server                 registry.cn-beijing.aliyuncs.com/kubesphereio/metrics-server:v0.4.2       k8s-app=metrics-server
deployment.apps/openebs-localpv-provisioner   1/1     1            1           5d3h   openebs-provisioner-hostpath   registry.cn-beijing.aliyuncs.com/kubesphereio/provisioner-localpv:3.3.0   name=openebs-localpv-provisioner,openebs.io/component-name=openebs-localpv-provisioner

NAME                                   READY   AGE    CONTAINERS            IMAGES
statefulset.apps/snapshot-controller   1/1     5d3h   snapshot-controller   registry.cn-beijing.aliyuncs.com/kubesphereio/snapshot-controller:v4.0.0

NAME                          DESIRED   CURRENT   READY   UP-TO-DATE   AVAILABLE   NODE SELECTOR            AGE    CONTAINERS    IMAGES                                                                     SELECTOR
daemonset.apps/calico-node    6         6         6       6            6           kubernetes.io/os=linux   5d3h   calico-node   registry.cn-beijing.aliyuncs.com/kubesphereio/node:v3.26.1                 k8s-app=calico-node
daemonset.apps/kube-proxy     6         6         6       6            6           kubernetes.io/os=linux   5d3h   kube-proxy    registry.cn-beijing.aliyuncs.com/kubesphereio/kube-proxy:v1.24.14          k8s-app=kube-proxy
daemonset.apps/nodelocaldns   6         6         6       6            6           <none>                   5d3h   node-cache    registry.cn-beijing.aliyuncs.com/kubesphereio/k8s-dns-node-cache:1.15.12   k8s-app=nodelocaldns
- 查看二进制文件
[root@k8s-master-1 kubekey]# ll /usr/local/bin/
total 352448
-rwxr-xr-x 1 root root  65770992 Dec  4 15:09 calicoctl
-rwxr-xr-x 1 root root  23847904 Nov 29 13:50 etcd
-rwxr-xr-x 1 kube root  17620576 Nov 29 13:50 etcdctl
-rwxr-xr-x 1 root root  46182400 Dec  4 15:09 helm
-rwxr-xr-x 1 root root  44748800 Dec  4 15:09 kubeadm
-rwxr-xr-x 1 root root  46080000 Dec  4 15:09 kubectl
-rwxr-xr-x 1 root root 116646168 Dec  4 15:09 kubelet
drwxr-xr-x 2 kube root        71 Nov 29 13:51 kube-scripts
注意: 除了 etcd 其他都有更新,说明 ETCD 不在组件更新范围内
- 创建测试资源
kubectl create deployment nginx-upgrade-test --image=nginx:latest --replicas=6 -n upgrade-test
说明: 本测试比较简单,生产环境建议更充分的测试
- 查看创建的测试资源
# 查看 Deployment
[root@k8s-master-1 ~]#  kubectl get deployment -n upgrade-test
NAME                 READY   UP-TO-DATE   AVAILABLE   AGE
nginx-upgrade-test   6/6     6            6           14s

# 查看 Pod
[root@k8s-master-1 ~]#  kubectl get deployment,pod -n upgrade-test
NAME                                 READY   UP-TO-DATE   AVAILABLE   AGE
deployment.apps/nginx-upgrade-test   6/6     6            6           54s

NAME                                      READY   STATUS    RESTARTS        AGE
pod/nginx-upgrade-test-6df47f7cd7-8fv9l   1/1     Running   0               54s
pod/nginx-upgrade-test-6df47f7cd7-8jtmn   1/1     Running   0               54s
pod/nginx-upgrade-test-6df47f7cd7-9k7lr   1/1     Running   0               54s
pod/nginx-upgrade-test-6df47f7cd7-gq7mz   1/1     Running   0               54s
pod/nginx-upgrade-test-6df47f7cd7-qj9lf   1/1     Running   0               54s
pod/nginx-upgrade-test-6df47f7cd7-v8x6s   1/1     Running   0               54s
pod/test-nginx-0                          1/1     Running   1 (3h13m ago)   5h55m
pod/test-nginx-1                          1/1     Running   1 (3h13m ago)   5h55m
pod/test-nginx-2                          1/1     Running   1 (3h13m ago)   5h54m
pod/test-nginx-3                          1/1     Running   1 (3h13m ago)   5h54m
pod/test-nginx-4                          1/1     Running   1 (3h13m ago)   5h53m
pod/test-nginx-5                          1/1     Running   1 (3h13m ago)   5h53m
至此,我们顺利的完成了 KubeSphere 和 Kubernetes 的补丁版本升级及测试验证。
7. 常见问题
7.1 问题 1
- 报错信息
[root@k8s-master-1 kubekey]# ./kk upgrade --with-kubesphere v3.4.1 -f sample.yaml
14:00:54 CST [FATA] The number of master/control-plane cannot be 0
- 解决方案
修改集群部署文件 sample.yaml,正确填写 roleGroups.master:master 节点信息
7.2 问题 2
- 报错信息
Continue upgrading cluster? [yes/no]: yes
14:07:02 CST success: [LocalHost]
14:07:02 CST [SetUpgradePlanModule 1/2] Set upgrade plan
14:07:02 CST success: [LocalHost]
14:07:02 CST [SetUpgradePlanModule 1/2] Generate kubeadm config
14:07:02 CST message: [k8s-master-1]
Failed to get container runtime cgroup driver.: Failed to exec command: sudo -E /bin/bash -c "docker info | grep ''Cgroup Driver''"
/bin/bash: docker: command not found: Process exited with status 1
14:07:02 CST retry: [k8s-master-1]
14:07:07 CST message: [k8s-master-1]
Failed to get container runtime cgroup driver.: Failed to exec command: sudo -E /bin/bash -c "docker info | grep ''Cgroup Driver''"
/bin/bash: docker: command not found: Process exited with status 1
14:07:07 CST retry: [k8s-master-1]
14:07:12 CST message: [k8s-master-1]
Failed to get container runtime cgroup driver.: Failed to exec command: sudo -E /bin/bash -c "docker info | grep ''Cgroup Driver''"
/bin/bash: docker: command not found: Process exited with status 1
14:07:12 CST skipped: [k8s-master-3]
14:07:12 CST skipped: [k8s-master-2]
14:07:12 CST failed: [k8s-master-1]
error: Pipeline[UpgradeClusterPipeline] execute failed: Module[SetUpgradePlanModule 1/2] exec failed:
failed: [k8s-master-1] [GenerateKubeadmConfig] exec failed after 3 retries: Failed to get container runtime cgroup driver.: Failed to exec command: sudo -E /bin/bash -c "docker info | grep ''Cgroup Driver''"
/bin/bash: docker: command not found: Process exited with status 1
- 解决方案
修改集群部署文件 sample.yaml,正确填写 kubernetes.containerManager: containerd,默认使用 Docker。
8. 总结
本文通过实战演示了 KubeKey 部署的 KubeSphere 和 Kubernetes 升级补丁版本的详细过程,以及可能遇到的问题和对应的解决方案。同时,也阐述了在升级前和升级后需要进行哪些验证,以确保系统升级的成功。
概括总结全文主要涉及以下内容:
- Kubernetes 版本升级策略介绍
- 升级实战环境准备
- KubeSphere 和 Kubernetes 升级准备和升级过程监测
- 利用 KubeKey 升级 KubeSphere
- 利用 KubeKey 升级 Kubernetes
- KubeSphere 和 Kubernetes 升级后验证
本文所提供的实战内容可以直接应用于测试和研发环境。同时,对于生产环境也有一定的参考价值。然而,请务必谨慎对待,不要直接将其应用于生产环境。
本文由博客一文多发平台 OpenWrite 发布!

Kubernetes - Launch Single Node Kubernetes Cluster
Minikube is a tool that makes it easy to run Kubernetes locally. Minikube runs a single-node Kubernetes cluster inside a VM on your laptop for users looking to try out Kubernetes or develop with it day-to-day.
More details can be found at https://github.com/kubernetes/minikube
Step 1 - Start Minikube
Minikube has been installed and configured in the environment. Check that it is properly installed, by running the minikube version command:
minikube versionStart the cluster, by running the minikube start command:
minikube startGreat! You now have a running Kubernetes cluster in your online terminal. Minikube started a virtual machine for you, and a Kubernetes cluster is now running in that VM.
Step 2 - Cluster Info
The cluster can be interacted with using the kubectl CLI. This is the main approach used for managing Kubernetes and the applications running on top of the cluster.
Details of the cluster and its health status can be discovered via
kubectl cluster-infoTo view the nodes in the cluster using
kubectl get nodesIf the node is marked as NotReady then it is still starting the components.
This command shows all nodes that can be used to host our applications. Now we have only one node, and we can see that it’s status is ready (it is ready to accept applications for deployment).
Step 3 - Deploy Containers
With a running Kubernetes cluster, containers can now be deployed.
Using kubectl run, it allows containers to be deployed onto the cluster -
kubectl run first-deployment --image=katacoda/docker-http-server --port=80The status of the deployment can be discovered via the running Pods -
kubectl get podsOnce the container is running it can be exposed via different networking options, depending on requirements. One possible solution is NodePort, that provides a dynamic port to a container.
kubectl expose deployment first-deployment --port=80 --type=NodePortThe command below finds the allocated port and executes a HTTP request.
export PORT=$(kubectl get svc first-deployment -o go-template=''{{range.spec.ports}}{{if .nodePort}}{{.nodePort}}{{"\n"}}{{end}}{{end}}'') echo "Accessing host01:$PORT" curl host01:$PORTThe results is the container that processed the request.
Step 4 - Dashboard
The Kubernetes dashboard allows you to view your applications in a UI. In this deployment, the dashboard has been made available on port 30000.
The URL to the dashboard is https://2886795296-30000-ollie02.environments.katacoda.com/

kubernetes - 使用 kubeadm 部署 kubernetes 集群
k8s 官网介绍
Kubernetes 是一个可移植的,可扩展的开源平台,用于管理容器化的工作负载和服务,可促进声明式配置和自动化。它拥有一个庞大且快速增长的生态系统。Kubernetes 的服务,支持和工具广泛可用。
Kubernetes 这个名字起源于希腊语,意思是舵手或飞行员。Google 在 2014 年开源了 Kubernetes 项目。Kubernetes 建立在 Google 大规模运行生产工作负载的十年半的经验的基础上,并结合了社区中最好的想法和实践。
Kubeadm 是一个工具,它提供了 kubeadm init 以及 kubeadm join 这两个命令作为快速创建 kubernetes 集群的最佳实践。
相关配置来自李哥博客
配置软件源:
# 安装系统工具
apt-get update && apt-get install -y apt-transport-https
# 安装 GPG 证书
curl https://mirrors.aliyun.com/kubernetes/apt/doc/apt-key.gpg | apt-key add -
# 写入软件源;注意:我们用系统代号为 bionic,但目前阿里云不支持,所以沿用 16.04 的 xenial
cat << EOF >/etc/apt/sources.list.d/kubernetes.list
> deb https://mirrors.aliyun.com/kubernetes/apt/ kubernetes-xenial main
> EOF
安装 kubeadm, kubelet 和 kubectl:
apt-get update
apt-get install -y kubelet kubeadm kubectl
Reading package lists... Done
root@boke-master:~# apt-get install -y kubelet kubeadm kubectl
Reading package lists... Done
Building dependency tree
Reading state information... Done
The following additional packages will be installed:
  conntrack cri-tools kubernetes-cni socat
The following NEW packages will be installed:
  conntrack cri-tools kubeadm kubectl kubelet kubernetes-cni socat
0 upgraded, 7 newly installed, 0 to remove and 140 not upgraded.
Need to get 54.3 MB of archives.
After this operation, 291 MB of additional disk space will be used.
Get:1 http://mirrors.aliyun.com/ubuntu bionic/main amd64 conntrack amd64 1:1.4.4+snapshot20161117-6ubuntu2 [30.6 kB]
Get:2 http://mirrors.aliyun.com/ubuntu bionic/main amd64 socat amd64 1.7.3.2-2ubuntu2 [342 kB]
Get:3 https://mirrors.aliyun.com/kubernetes/apt kubernetes-xenial/main amd64 cri-tools amd64 1.13.0-00 [8,776 kB]
Get:4 https://mirrors.aliyun.com/kubernetes/apt kubernetes-xenial/main amd64 kubernetes-cni amd64 0.7.5-00 [6,473 kB]
Get:5 https://mirrors.aliyun.com/kubernetes/apt kubernetes-xenial/main amd64 kubelet amd64 1.16.2-00 [20.7 MB]
Get:6 https://mirrors.aliyun.com/kubernetes/apt kubernetes-xenial/main amd64 kubectl amd64 1.16.2-00 [9,234 kB]
Get:7 https://mirrors.aliyun.com/kubernetes/apt kubernetes-xenial/main amd64 kubeadm amd64 1.16.2-00 [8,761 kB]
Fetched 54.3 MB in 6s (9,086 kB/s)
Selecting previously unselected package conntrack.
(Reading database ... 83213 files and directories currently installed.)
Preparing to unpack .../0-conntrack_1%3a1.4.4+snapshot20161117-6ubuntu2_amd64.deb ...
Unpacking conntrack (1:1.4.4+snapshot20161117-6ubuntu2) ...
Selecting previously unselected package cri-tools.
Preparing to unpack .../1-cri-tools_1.13.0-00_amd64.deb ...
Unpacking cri-tools (1.13.0-00) ...
Selecting previously unselected package kubernetes-cni.
Preparing to unpack .../2-kubernetes-cni_0.7.5-00_amd64.deb ...
Unpacking kubernetes-cni (0.7.5-00) ...
Selecting previously unselected package socat.
Preparing to unpack .../3-socat_1.7.3.2-2ubuntu2_amd64.deb ...
Unpacking socat (1.7.3.2-2ubuntu2) ...
Selecting previously unselected package kubelet.
Preparing to unpack .../4-kubelet_1.16.2-00_amd64.deb ...
Unpacking kubelet (1.16.2-00) ...
Selecting previously unselected package kubectl.
Preparing to unpack .../5-kubectl_1.16.2-00_amd64.deb ...
Unpacking kubectl (1.16.2-00) ...
Selecting previously unselected package kubeadm.
Preparing to unpack .../6-kubeadm_1.16.2-00_amd64.deb ...
Unpacking kubeadm (1.16.2-00) ...
Setting up conntrack (1:1.4.4+snapshot20161117-6ubuntu2) ...
Setting up kubernetes-cni (0.7.5-00) ...
Setting up cri-tools (1.13.0-00) ...
Setting up socat (1.7.3.2-2ubuntu2) ...
Setting up kubelet (1.16.2-00) ...
Created symlink /etc/systemd/system/multi-user.target.wants/kubelet.service → /lib/systemd/system/kubelet.service.
Setting up kubectl (1.16.2-00) ...
Processing triggers for man-db (2.8.3-2ubuntu0.1) ...
 # 注意这里的kubeadm版本号 后面要用到
Setting up kubeadm (1.16.2-00) ...
# 设置 kubelet 自启动,并启动 kubelet
systemctl enable kubelet && systemctl start kubelet# 导出配置文件
kubeadm config print init-defaults --kubeconfig ClusterConfiguration > kubeadm.yml修改配置文件:
apiVersion: kubeadm.k8s.io/v1beta2
bootstrapTokens:
- groups:
  - system:bootstrappers:kubeadm:default-node-token
  token: abcdef.0123456789abcdef
  ttl: 24h0m0s
  usages:
  - signing
  - authentication
kind: InitConfiguration
localAPIEndpoint:
  # 修改为自己的ip
  advertiseAddress: 192.168.17.180
  bindPort: 6443
nodeRegistration:
  criSocket: /var/run/dockershim.sock
  name: boke-master
  taints:
  - effect: NoSchedule
    key: node-role.kubernetes.io/master
---
apiServer:
  timeoutForControlPlane: 4m0s
apiVersion: kubeadm.k8s.io/v1beta2
certificatesDir: /etc/kubernetes/pki
clusterName: kubernetes
controllerManager: {}
dns:
  type: CoreDNS
etcd:
  local:
    dataDir: /var/lib/etcd
    # 修改阿里云镜像
imageRepository: registry.aliyuncs.com/google_containers
kind: ClusterConfiguration
   # 修改版本号
kubernetesVersion: v1.16.2
networking:
  dnsDomain: cluster.local
  # 配置成 Calico 的网段(后面会用到)
  podSubnet: "10.244.0.0/16"
  serviceSubnet: 10.96.0.0/12
scheduler: {}
---
# 开启 IPVS 模式
apiVersion: kubeproxy.config.k8s.io/v1alpha1
kind: KubeProxyConfiguration
featureGates:
  SupportIPVSProxyMode: true
mode: ipvs
初始化 kubeadm:
kubeadm init --config=kubeadm.yml | tee kubeadm-init.log


[init] Using Kubernetes version: v1.16.2
[preflight] Running pre-flight checks
	[WARNING IsDockerSystemdCheck]: detected "cgroupfs" as the Docker cgroup driver. The recommended driver is "systemd". Please follow the guide at https://kubernetes.io/docs/setup/cri/
[preflight] Pulling images required for setting up a Kubernetes cluster
[preflight] This might take a minute or two, depending on the speed of your internet connection
[preflight] You can also perform this action in beforehand using ''kubeadm config images pull''
[kubelet-start] Writing kubelet environment file with flags to file "/var/lib/kubelet/kubeadm-flags.env"
[kubelet-start] Writing kubelet configuration to file "/var/lib/kubelet/config.yaml"
[kubelet-start] Activating the kubelet service
[certs] Using certificateDir folder "/etc/kubernetes/pki"
[certs] Generating "ca" certificate and key
[certs] Generating "apiserver" certificate and key
[certs] apiserver serving cert is signed for DNS names [boke-master kubernetes kubernetes.default kubernetes.default.svc kubernetes.default.svc.cluster.local] and IPs [10.96.0.1 192.168.17.180]
[certs] Generating "apiserver-kubelet-client" certificate and key
[certs] Generating "front-proxy-ca" certificate and key
[certs] Generating "front-proxy-client" certificate and key
[certs] Generating "etcd/ca" certificate and key
[certs] Generating "etcd/server" certificate and key
[certs] etcd/server serving cert is signed for DNS names [boke-master localhost] and IPs [192.168.17.180 127.0.0.1 ::1]
[certs] Generating "etcd/peer" certificate and key
[certs] etcd/peer serving cert is signed for DNS names [boke-master localhost] and IPs [192.168.17.180 127.0.0.1 ::1]
[certs] Generating "etcd/healthcheck-client" certificate and key
[certs] Generating "apiserver-etcd-client" certificate and key
[certs] Generating "sa" key and public key
[kubeconfig] Using kubeconfig folder "/etc/kubernetes"
[kubeconfig] Writing "admin.conf" kubeconfig file
[kubeconfig] Writing "kubelet.conf" kubeconfig file
[kubeconfig] Writing "controller-manager.conf" kubeconfig file
[kubeconfig] Writing "scheduler.conf" kubeconfig file
[control-plane] Using manifest folder "/etc/kubernetes/manifests"
[control-plane] Creating static Pod manifest for "kube-apiserver"
[control-plane] Creating static Pod manifest for "kube-controller-manager"
[control-plane] Creating static Pod manifest for "kube-scheduler"
[etcd] Creating static Pod manifest for local etcd in "/etc/kubernetes/manifests"
[wait-control-plane] Waiting for the kubelet to boot up the control plane as static Pods from directory "/etc/kubernetes/manifests". This can take up to 4m0s
[apiclient] All control plane components are healthy after 16.002589 seconds
[upload-config] Storing the configuration used in ConfigMap "kubeadm-config" in the "kube-system" Namespace
[kubelet] Creating a ConfigMap "kubelet-config-1.16" in namespace kube-system with the configuration for the kubelets in the cluster
[upload-certs] Skipping phase. Please see --upload-certs
[mark-control-plane] Marking the node boke-master as control-plane by adding the label "node-role.kubernetes.io/master=''''"
[mark-control-plane] Marking the node boke-master as control-plane by adding the taints [node-role.kubernetes.io/master:NoSchedule]
[bootstrap-token] Using token: abcdef.0123456789abcdef
[bootstrap-token] Configuring bootstrap tokens, cluster-info ConfigMap, RBAC Roles
[bootstrap-token] configured RBAC rules to allow Node Bootstrap tokens to post CSRs in order for nodes to get long term certificate credentials
[bootstrap-token] configured RBAC rules to allow the csrapprover controller automatically approve CSRs from a Node Bootstrap Token
[bootstrap-token] configured RBAC rules to allow certificate rotation for all node client certificates in the cluster
[bootstrap-token] Creating the "cluster-info" ConfigMap in the "kube-public" namespace
[addons] Applied essential addon: CoreDNS
[addons] Applied essential addon: kube-proxy

Your Kubernetes control-plane has initialized successfully!

To start using your cluster, you need to run the following as a regular user:
  # 配置kubectl
  mkdir -p $HOME/.kube
  sudo cp -i /etc/kubernetes/admin.conf $HOME/.kube/config
  sudo chown $(id -u):$(id -g) $HOME/.kube/config

You should now deploy a pod network to the cluster.
Run "kubectl apply -f [podnetwork].yaml" with one of the options listed at:
  https://kubernetes.io/docs/concepts/cluster-administration/addons/

Then you can join any number of worker nodes by running the following on each as root:

# 子节点加入命令
kubeadm join 192.168.17.180:6443 --token abcdef.0123456789abcdef \
    --discovery-token-ca-cert-hash sha256:ea37964dc96f76f3e658b27ffdc220f60ced82de387aafd8effafe9618f5e6cb
子节点加入命令的token有效期默认是1天,可以在kubeadm.yml中修改,失效可以从官方文档查看解决办法

配置kubectl:
mkdir -p $HOME/.kube
  sudo cp -i /etc/kubernetes/admin.conf $HOME/.kube/config
  sudo chown $(id -u):$(id -g) $HOME/.kube/config
查看是否配置成功:
kubectl get nodes
# 能打印出节点信息就成功了
NAME          STATUS     ROLES    AGE   VERSION
boke-master   NotReady   master   39m   v1.16.2
我们今天的关于Kubernetes排障指南和kubernetes排错的分享已经告一段落,感谢您的关注,如果您想了解更多关于KubeKey 升级 Kubernetes 次要版本实战指南、KubeKey 升级 KubeSphere 和 Kubernetes 补丁版本实战指南、Kubernetes - Launch Single Node Kubernetes Cluster、kubernetes - 使用 kubeadm 部署 kubernetes 集群的相关信息,请在本站查询。
本文标签:


