本文将带您了解关于CoreCLRHost源码简单分析的新内容,同时我们还将为您解释coredns源码的相关知识,另外,我们还将为您提供关于.NET跨平台之旅:corehost是如何加载coreclr的
本文将带您了解关于Core CLR Host 源码简单分析的新内容,同时我们还将为您解释coredns 源码的相关知识,另外,我们还将为您提供关于.NET跨平台之旅:corehost 是如何加载 coreclr 的、ASIHTTPRequest源码简单分析、ASP.NET Core[源码分析篇] - WebHost、CLRCore (CLR 核心机制)的实用信息。
本文目录一览:- Core CLR Host 源码简单分析(coredns 源码)
- .NET跨平台之旅:corehost 是如何加载 coreclr 的
- ASIHTTPRequest源码简单分析
- ASP.NET Core[源码分析篇] - WebHost
- CLRCore (CLR 核心机制)
")
Core CLR Host 源码简单分析(coredns 源码)
在定制 CLR Host的时候,可以通过调用如下代码,来获取当前需要被宿主的程序调用入口:
hr = Host->CreateDelegate(
domainId,
L"Main,Version=1.0.0.0",
L"Main.Program",	// Target managed type
L"Main",	// Target entry point (static method)
(INT_PTR*)&pfnDelegate);
CreateDelegate 会进入到corhost.cpp里面
HRESULT CorHost2::CreateDelegate(
    DWORD appDomainID,
    LPCWSTR wszAssemblyName,
    LPCWSTR wszClassName,
    LPCWSTR wszMethodName,
    INT_PTR* fnPtr)
{
    WRAPPER_NO_CONTRACT;

    return _CreateDelegate(appDomainID, wszAssemblyName, wszClassName, wszMethodName, fnPtr);
}
然后_CreateDelegate 会CorHost2::_CreateDelegate,这个函数里面首先实例化了一个AssemblySpec,然后用传递过来的程序集名称初始化,通过AssemblySpec的LoadfAssembly实例化程序集。
获取程序集的类加载器,通过类加载器加载TypeHandle,传递的参数分别为程序集实例和ClassName。然后再通过MemberLoader::FindMethodByName获取到类里面的所需要查找的方法。
通过AppDomain的GetUMEntryThunkCache函数返回UMEntryThunk,最后通过UMEntryThunk->GetCode()返回要查找的函数指针。代码如下:
HRESULT CorHost2::_CreateDelegate(
    DWORD appDomainID,
    LPCWSTR wszAssemblyName,
    LPCWSTR wszClassName,
    LPCWSTR wszMethodName,
    INT_PTR* fnPtr)
{

    CONTRACTL
    {
        NOTHROW;
        if (GetThread()) {GC_TRIGGERS;} else {DISABLED(GC_NOTRIGGER);}
        ENTRY_POINT;  // This is called by a host.
    }
    CONTRACTL_END;

    HRESULT hr=S_OK;

    EMPTY_STRING_TO_NULL(wszAssemblyName);
    EMPTY_STRING_TO_NULL(wszClassName);
    EMPTY_STRING_TO_NULL(wszMethodName);

    if (fnPtr == NULL)
       return E_POINTER;
    *fnPtr = NULL;

    if(wszAssemblyName == NULL)
        return E_INVALIDARG;

    if(wszClassName == NULL)
        return E_INVALIDARG;

    if(wszMethodName == NULL)
        return E_INVALIDARG;

    if (!m_fStarted)
        return HOST_E_INVALIDOPERATION;

    BEGIN_ENTRYPOINT_NOTHROW;

    BEGIN_EXTERNAL_ENTRYPOINT(&hr);
    GCX_COOP_THREAD_EXISTS(GET_THREAD());

    MAKE_UTF8PTR_FROMWIDE(szAssemblyName, wszAssemblyName);
    MAKE_UTF8PTR_FROMWIDE(szClassName, wszClassName);
    MAKE_UTF8PTR_FROMWIDE(szMethodName, wszMethodName);

    ADID id;
    id.m_dwId=appDomainID;//获取appdomid,通过CreateAppDomainWithManager函数来获取的

    ENTER_DOMAIN_ID(id)

    GCX_PREEMP();

    AssemblySpec spec; //实例化一个 AssemblySpec类
    spec.Init(szAssemblyName); //用传递过来的程序集名称初始化这类
    Assembly* pAsm=spec.LoadAssembly(FILE_ACTIVE);//加载此程序集,返回程序集实例

    TypeHandle th=pAsm->GetLoader()->LoadTypeByNameThrowing(pAsm,NULL,szClassName);//获取到程序集的类加载器加载实例TypeHandle 并返回
    MethodDesc* pMD=NULL;

    if (!th.IsTypeDesc())
    {
        pMD = MemberLoader::FindMethodByName(th.GetMethodTable(), szMethodName, MemberLoader::FM_Unique);//通过typehandle的方法表以及传递过来的方法名称,获取到方法描述类methoddesc
        if (pMD == NULL)
        {
            // try again without the FM_Unique flag (error path)
            pMD = MemberLoader::FindMethodByName(th.GetMethodTable(), szMethodName, MemberLoader::FM_Default);
            if (pMD != NULL)
            {
                // the method exists but is overloaded
                ThrowHR(COR_E_AMBIGUOUSMATCH);
            }
        }
    }

    if (pMD==NULL || !pMD->IsStatic() || pMD->ContainsGenericVariables())
        ThrowHR(COR_E_MISSINGMETHOD);

    UMEntryThunk *pUMEntryThunk = GetAppDomain()->GetUMEntryThunkCache()->GetUMEntryThunk(pMD);//通过 appdomain 的 getumeentrythunk函数获取到umeentrythunk
    *fnPtr = (INT_PTR)pUMEntryThunk->GetCode(); //通过上面获取的 umentrythunk类调用参数getcode ,赋值给传递过来的需要的函数指针参数

    END_DOMAIN_TRANSITION;

    END_EXTERNAL_ENTRYPOINT;

    END_ENTRYPOINT_NOTHROW;

    return hr;//标志是否成功
}
.NET跨平台之旅:corehost 是如何加载 coreclr 的
在 探秘 dotnet run 如何运行 .NET Core 应用程序 中,在好奇心的驱使下,探秘了 dotnet run ,发现了神秘的 corehost —— 运行 .NET Core 应用程序的幕后英雄。有时神秘就是一种诱惑,神秘的 corehost 让人产生了新的好奇心 —— corehost 是如何加载 coreclr 的?于是,“.NET跨平台之旅”开启了新的旅程 —— 带着这个疑问,游览cli/src/corehost/ 。
corehost 的入口是 corehost.cpp 的 main() ,进来后一条大道通向 corehost.run() 。
在 corehost.run() 中,首先调用的是 libhost.cpp 中的 detect_operating_mode() ,它根据 coreclr 所在的路径决定 corehost 的运行模式,有三种运行模式:muxer, standalone, split-fx。如果 corehost 与 coreclr 不在同一个文件夹,运行模式则是 muxer 。如果 corehost 与 coreclr 在同一个文件夹,并且文件夹下存在 .deps.json 文件或者不存在 .runtimeconfig.json 文件,则是 standalone 模式;否则是 split-fx 模式。
return ((pal::file_exists(own_deps_json)
        || !pal::file_exists(own_config_filename))
    && pal::file_exists(own_dll)) ?
    host_mode_t::standalone : host_mode_t::split_fx;
dotent cli 默认使用的模式是 split-fx 模式,我们的示例站点 about.cnblogs.com 用的也是这种模式,通过下面的 tracing 信息可以看出来(export COREHOST_TRACE=2):
Checking if CoreCLR path exists=[/usr/share/dotnet-nightly/bin/libcoreclr.so]
Detecting mode... CoreCLR present in own dir [/usr/share/dotnet-nightly/bin] and checking if [corehost.deps.json] file present=[0]
Host operating in split mode; own dir=[/usr/share/dotnet-nightly/bin]
这次旅程也因此选择“split-fx 模式”这条游览路线。
针对 split-fx 模式,corehost.run() 接着会调用 hostpolicy.cpp 的 run() 方法(通过 corehost_init_t ),run() 方法中调用 deps_resolver.cpp 的resolve_coreclr_dir() 解析 coreclr 所在的路径,然后调用 coreclr.cpp 的 bind() 与 initialize() 方法加载 coreclr 。
在 bind() 方法中,根据之前解析出的 coreclr 路径,调用 pal.unix.cpp(针对的是Linux运行环境)的 load_library() 打开 coreclr 的库文件 libcoreclr.so (实际是调用 Linux 的 C 函数 dlopen() ),从而得到 coreclr 中3个函数(coreclr_initialize, coreclr_shutdown,coreclr_execute_assembly)的句柄。
在 initialize() 方法中,根据 bind() 中得到的句柄调用 coreclr 的 coreclr_initialize() 方法启动 coreclr , 加载 coreclr 的工作就这样完成了。
找到 coreclr 库文件所在的位置,打开它,调用它的 coreclr_initialize() 方法,corehost 加载 coreclr 就这么简单。如果你有兴趣,可以用 C++ 写一个自己的 corehost 。
开源的 .NET 变得更有意思,即使没有任何文档,即使没有正式发布,你也可以通过源码学习它,了解它。
相关文章
ASP.NET Core 1.0 入门——Application Startup
ASP.NET Core 1.0 入门——了解一个空项目
ASP.NET Core 1.0 部署 HTTPS (.NET Framework 4.5.1)
.NET Core 1.0、ASP.NET Core 1.0和EF Core 1.0简介
云服务器下ASP.NET Core 1.0环境搭建(包含mono与coreclr)
使用VS Code开发ASP.NET Core 应用程序
dotnet run是如何启动asp.net core站点的
ASP.NET Core提供模块化Middleware组件
“dotnet restore"和"dotnet run"都做了些什么?
探秘 dotnet run 如何运行 .NET Core 应用程序
.NET Portability Analyzer 已开源
原文地址:http://www.cnblogs.com/cmt/p/5282937.html
.NET社区新闻,深度好文,微信中搜索dotNET跨平台或扫描二维码关注
本文分享自微信公众号 - dotNET跨平台(opendotnet)。
如有侵权,请联系 support@oschina.cn 删除。
本文参与“OSC源创计划”,欢迎正在阅读的你也加入,一起分享。

ASIHTTPRequest源码简单分析
1.前言
ASIHttprequest 是基于CFNetwork的,由于CFNetwork是比较底层的http库,功能比较少,因此,在ASIHttprequest中实现了http协议中比较多的功能,包括代理、gzip、认证、缓存等等。目前,虽然ASIHTTPRequest已经不如前两年那么流行,但是分析一下其代码,对掌握CFNetwork库和HTTP协议还是有好处的,本文将简单分析一下ASIHTTPRequest中几个主要函数的流程。
2.处理HTTP Request的主要函数
ASIHTTPRequest::main流程如下(只列举了主要工作):
{
(1)若允许后台运行,则调用beginBackgroundTaskWithExpirationHandler允许程序后台运行十分钟
(2) 调用buildPostBody函数构造post的body部分,该函数有两个,一个是基类中的,主要负责压缩body数据,另一个是派生类ASIFormDataRequest中,分别针对post表单和post文件的方式,分别设置content-type为application/x-www-form-urlencoded和multipart/form-data。
(3)根据url和请求的方法来创建CFHTTPMessageRef对象。
(4)调用buildRequestHeaders函数来构造header部分,这里只是简单的将各个header字段放到一个NSDictionary变量中。
(5)如果设置了缓存,并且允许从缓存取数据,则从缓存中读取数据,然后返回。
(6)调用applyAuthorizationHeader向header字典中添加HTTP认证相关的字段。
(7)调用CFHTTPMessageSetHeaderFieldValue来将header数据添加到CFHTTPMessageRef对象中。
(8)调用configureProxies来配置代理。
(9)调用startRequest来发送请求。
}
ASIHTTPRequest::startRequest
{
(1)向主线程发送requestStarted消息
(2)如果存在body,且需要post本地文件,则将本地文件读到postBodyReadStream对象中。然后调用CFReadStreamCreateForStreamedHTTPRequest函数,传入之前创建的CFHTTPMessageRef对象和postBodyReadStream对象,来创建一个用来读取response 的CFReadStream对象。
如果是post数据,则先根据shouldCompressRequestBody的值来判断是否要压缩,然后根据postBody的数据来创建一个NSInputStream对象,并赋给postBodyReadStream对象,然后调用CFReadStreamCreateForStreamedHTTPRequest,传入之前的header和stream对象,来创建NSReadStream对象。
如果不存在body,则直接通过CFReadStreamCreateForHTTPRequest函数来创建NSReadStream对象。
(3)针对https的情况,调用CFReadStreamSetProperty进行设置
(4)如果请求中设置了代理,则调用CFReadStreamSetProperty对stream进行代理相关的设置
(5)处理http持久连接相关的设置
(6)调用scheduleInRunLoop,将readStream对象放入runloop中
(7)调用CFReadStreamSetClient函数来将readStream关联到一个回调函数ReadStreamClientCallBack中,并使用CFReadStreamOpen打开readStream对象
(8)调用进度通知相关的函数
(9)创建一个计时器,用来调用updateStatus函数来更新进度,并将计时器放入当前runloop。
}
3.处理HTTP Response的主要函数
ASIHTTPRequest::handleNetworkEvent (该函数用来处理回调事件)
{
(1)当收到kCFStreamEventHasBytesAvailable 事件时 ,调用handleBytesAvailable(此时表示下层已经读到了response里的数据,这数据可能包含全部的header也可能header尚未读完)
(2)kCFStreamEventEndEncountered,调用handleStreamComplete,此时表示全部的数据包括header和body都已经读完,而且对应chunked数据,底层也已经将其合并完。
(3)kCFStreamEventErrorOccurred事件,调用handleStreamError处理错误
}
ASIHTTPRequest::handleBytesAvailable
{
(1)如果responseHeader对象尚未赋值,则调用readResponseHeaders读取header
(2)申请一块buffer,读取readStream对象里面的数据,此时如果能读到数据,则表示header已经读完了,当前读到的是body里面数据(因为header不是用read方法读的),如果读不到数据,则表示还没有收到body,则返回。
(3)读取到数据之后,如果header里面显示数据是压缩过的,则进行解压缩
(4)解压出数据之后有三种处理方式:
如果用户设置了didReceiveDataSelector或者dataReceivedBlock,这就表示用户希望自己处理每次得到的data,则向主线程发送passOnReceivedData消息。
如果用户在request中设置了下载路径,则将数据写到文件中
如果以上都不满足,则将数据append到rawResponseData中。
}
ASIHTTPRequest::readResponseHeaders
{
(1)使用CFReadStreamCopyProperty从readStream对象中读取header,创建一个CFHTTPMessageRef对象,并且使用CFHTTPMessageIsHeaderComplete检查该对象,判断header是否已经读完,若没有读完,则销毁该对象并返回
(2) 使用CFHTTPMessageCopyAllHeaderFields从CFHTTPMessageRef读出header到一个dictionary中
(3)如果有缓存,且允许读取缓存,则从缓存中读取header并返回。
(4)根据header中的状态码来判断是否需要进行http认证,如果需要则处理认证相关的工作
(5) 从header中content-type,用于对body进行解码,如没有该字段,则使用默认的解码方式对content进行解码
(6)处理cookie相关的工作
(7)如果不需要重定向,则从header中读取content-length,然后根据length做相关处理
(8)处理keepalive相关的工作
(9)最后向主线程发送requestReceivedResponseHeaders通知
}
ASIHTTPRequest::handleStreamComplete
{
该函数做的事情比较简单,主要就是设置各种下载结束的标志、设置读取到的文件大小并发送通知消息、移动下载的临时文件、保存cache等等。
}
![ASP.NET Core[源码分析篇] - WebHost](http://www.gvkun.com/zb_users/upload/2025/02/ffd725f2-212b-4c03-8770-64ba2d68aed31738340083151.jpg "ASP.NET Core[源码分析篇] - WebHost")
ASP.NET Core[源码分析篇] - WebHost
_configureServicesDelegates的承接
在【ASP.NET Core[源码分析篇] - Startup】这篇文章中,我们得知了目前为止(UseStartup),所有的动作都是在_configureServicesDelegates里面添加了注册的委托,那么系统是什么时候执行这些委托完成注册的呢?
真正的注册
通过之前的一系列眼花缭乱的操作,我们得到了所有需要注册的委托_configureServicesDelegates,我们看一下WebHostBuilder.Build如何实现真正的注册。
WebHostBuilder.Build()
  public IWebHost Build()
    {
      if (this._webHostBuilt)
        throw new InvalidOperationException(Resources.WebHostBuilder_SingleInstance);
      this._webHostBuilt = true;
      AggregateException hostingStartupErrors;
      IServiceCollection serviceCollection1 = this.BuildCommonServices(out hostingStartupErrors);
      IServiceCollection serviceCollection2 = serviceCollection1.Clone();
      IServiceProvider providerFromFactory = GetProviderFromFactory(serviceCollection1);
      .....

    WebHost webHost = new WebHost(serviceCollection2, providerFromFactory, this._options, this._config, hostingStartupErrors);
      try
      {
        webHost.Initialize();
        return (IWebHost) webHost;
      }
      catch
      {
        webHost.Dispose();
        throw;
      }

    IServiceProvider GetProviderFromFactory(IServiceCollection collection)
      {
        ServiceProvider serviceProvider = collection.BuildServiceProvider();
        IServiceProviderFactory<IServiceCollection> service = ((IServiceProvider) serviceProvider).GetService<IServiceProviderFactory<IServiceCollection>>();
        if (service == null)
          return (IServiceProvider) serviceProvider;
        using (serviceProvider)
          return service.CreateServiceProvider(service.CreateBuilder(collection));
      }
    }
这里面有个最重要的方法BuildCommonServices,这个方法实现了委托的真正的执行。
private IServiceCollection BuildCommonServices(
      out AggregateException hostingStartupErrors)
    {
        .....
     ServiceCollection services = new ServiceCollection();

        services.AddTransient<IApplicationBuilderFactory, ApplicationBuilderFactory>();
        services.AddTransient<IHttpContextFactory, HttpContextFactory>();
        services.AddScoped<IMiddlewareFactory, MiddlewareFactory>();
        services.AddOptions();
        services.AddLogging();
        services.AddTransient<IStartupFilter, AutoRequestServicesStartupFilter>();
        services.AddTransient<IServiceProviderFactory<IServiceCollection>, DefaultServiceProviderFactory>();

    .....

      foreach (Action<WebHostBuilderContext, IServiceCollection> servicesDelegate in this._configureServicesDelegates)
        servicesDelegate(this._context, (IServiceCollection) services);
      return (IServiceCollection) services;
}从上面的代码我们可以看到,首先创建了一个真正的ServiceCollection实例,然后基于这个实例添加了一些额外的重要的注册(ApplicationBuilderFactory,HttpContextFactory,DefaultServiceProviderFactory等),然后把这个ServiceCollection实例作为参数传递到_configureServicesDelegates列表的各个委托中并执行,这样的话所有在Startup需要注册的实例都已经注册在services这个ServiceCollection实例中。
需要注意的是,到此为止程序并没有执行Startup里面的方法。
WebHost
当我们的BuildCommonServices完成后,返回一个ServiceCollection实例,并且基于这个ServiceCollection实例生成了一个ServiceProvider对象,然后做为生成WebHost对象的参数传递到WebHost中。
WebHost webHost = new WebHost(serviceCollection2, providerFromFactory, this._options, this._config, hostingStartupErrors);

webHost.Initialize();
WebHost.Initialize()
我们先看一下WebHost的Initialize方法
  public void Initialize()
    {
      try
      {
        this.EnsureApplicationServices();
      }
      catch (Exception ex)
      {
        if (this._applicationServices == null)
          this._applicationServices = (IServiceProvider) this._applicationServiceCollection.BuildServiceProvider();
        if (!this._options.CaptureStartupErrors)
          throw;
        else
          this._applicationServicesException = ExceptionDispatchInfo.Capture(ex);
      }
    }

  private void EnsureApplicationServices()
    {
      if (this._applicationServices != null)
        return;
      this.EnsureStartup();
      this._applicationServices = this._startup.ConfigureServices(this._applicationServiceCollection);
    }

    private void EnsureStartup()
    {
      if (this._startup != null)
        return;
      this._startup = this._hostingServiceProvider.GetService<IStartup>();
      if (this._startup == null)
        throw new InvalidOperationException(string.Format("No startup configured. Please specify startup via WebHostBuilder.UseStartup, WebHostBuilder.Configure, injecting {0} or specifying the startup assembly via {1} in the web host configuration.", (object) "IStartup", (object) "StartupAssemblyKey"));
    }
从上面的代码流程可以看出
- 解析Startup类
- 执行Startup类的ConfigureServices方法注册自定义的服务并返回一个IServiceProvider对象
至此,我们的Startup类中的ConfigureServices已经执行过,并且WebHost已经具有了IServiceProvider对象
WebHost.Run()
当我们调用WebHost的扩展方法Run启动应用的时候,本质上是调用了WebHost的StartAsync方法,这个过程创建了我们应用程序最为重要的用于监听、接收、处理和响应HTTP请求的管道。
  public virtual async Task StartAsync(CancellationToken cancellationToken = default (CancellationToken))
    {
      HostingEventSource.Log.HostStart();
      this._logger = this._applicationServices.GetRequiredService<ILogger<WebHost>>();
      this._logger.Starting();
      RequestDelegate application = this.BuildApplication();
      this._applicationLifetime = this._applicationServices.GetRequiredService<Microsoft.AspNetCore.Hosting.IApplicationLifetime>() as ApplicationLifetime;
      this._hostedServiceExecutor = this._applicationServices.GetRequiredService<HostedServiceExecutor>();
      DiagnosticListener requiredService1 = this._applicationServices.GetRequiredService<DiagnosticListener>();
      IHttpContextFactory requiredService2 = this._applicationServices.GetRequiredService<IHttpContextFactory>();
      ILogger<WebHost> logger = this._logger;
      DiagnosticListener diagnosticSource = requiredService1;
      IHttpContextFactory httpContextFactory = requiredService2;
      await this.Server.StartAsync<HostingApplication.Context>((IHttpApplication<HostingApplication.Context>) new HostingApplication(application, (ILogger) logger, diagnosticSource, httpContextFactory), cancellationToken).ConfigureAwait(false);
      this._applicationLifetime?.NotifyStarted();
      await this._hostedServiceExecutor.StartAsync(cancellationToken).ConfigureAwait(false);
     .....
    }

  private RequestDelegate BuildApplication()
    {
        this._applicationServicesException?.Throw();
        this.EnsureServer();
        IApplicationBuilder builder = this._applicationServices.GetRequiredService<IApplicationBuilderFactory>().CreateBuilder(this.Server.Features);
        builder.ApplicationServices = this._applicationServices;
        IEnumerable<IStartupFilter> service = this._applicationServices.GetService<IEnumerable<IStartupFilter>>();
        Action<IApplicationBuilder> next = new Action<IApplicationBuilder>(this._startup.Configure);
        foreach (IStartupFilter startupFilter in service.Reverse<IStartupFilter>())
          next = startupFilter.Configure(next);
        next(builder);
        return builder.Build();
      }

  private void EnsureServer()
    {
      if (this.Server != null)
        return;
      this.Server = this._applicationServices.GetRequiredService<IServer>();
      IServerAddressesFeature addressesFeature = this.Server.Features?.Get<IServerAddressesFeature>();
      ICollection<string> addresses = addressesFeature?.Addresses;
      if (addresses == null || addresses.IsReadOnly || addresses.Count != 0)
        return;
      string str1 = this._config[WebHostDefaults.ServerUrlsKey] ?? this._config[WebHost.DeprecatedServerUrlsKey];
      if (string.IsNullOrEmpty(str1))
        return;
      addressesFeature.PreferHostingUrls = WebHostUtilities.ParseBool(this._config, WebHostDefaults.PreferHostingUrlsKey);
      string str2 = str1;
      char[] separator = new char[1]{ '';'' };
      foreach (string str3 in str2.Split(separator, StringSplitOptions.RemoveEmptyEntries))
        addresses.Add(str3);
    }
这块主要是Server的创建,管道的创建和监听Http请求的Server启动,我们将分步进行剖析。
1. EnsureServer
我们先看一下这个Server是什么
public interface IServer : IDisposable
{
    IFeatureCollection Features { get; }

    Task StartAsync<TContext>(IHttpApplication<TContext> application, CancellationToken cancellationToken);

    Task StopAsync(CancellationToken cancellationToken);
}
IServer的实例其实是在开始Program里面的CreateDefaultBuilder中,已经指定了KestrelServer作为默认的Server实例。
public static IWebHostBuilder UseKestrel(this IWebHostBuilder hostBuilder)
{
    hostBuilder.UseLibuv();

    return hostBuilder.ConfigureServices(services =>
    {
        services.AddTransient<IConfigureOptions<KestrelServerOptions>, KestrelServerOptionsSetup>();
        services.AddSingleton<IServer, KestrelServer>();
    });
}
那么这个Server是做什么用的呢?Server 是一个HTTP服务器,负责HTTP的监听,接收一组 FeatureCollection 类型的原始请求,并将其包装成 HttpContext 以供我们的应用程序完成响应的处理。那它负责监听哪里?从代码可以看到Addresses 是通过在UseUrls里面指定的参数(WebHostDefaults.ServerUrlsKey) 或者是DeprecatedServerUrlsKey(配置文件里面的server.urls)中来查找的。
2. BuildApplication
在上面我们获取了一个Server用来监听请求,那么下一步我们是要构建处理Http请求的管道,IApplicationBuilder 就是用于构建应用程序的请求管道。
我们一般的管道创建是在 Startup 类的 Configure 方法中对 IApplicationBuilder 进行配置,嗯其实在这里还有一个 IStartupFilter 也可以用来配置 IApplicationBuilder,并且在 Startup 类的Configure 方法之前执行,所有我们看到在BuildApplication方法中,一个大概的步骤是这样的:
- 基于IApplicationBuilderFactory创建IApplicationBuilder对象
- 基于IStartupFilter的管道构建
- 调用IApplicationBuilder对象的Build方法完成完整的管道
public RequestDelegate Build()
    {
      RequestDelegate requestDelegate = (RequestDelegate) (context =>
      {
        context.Response.StatusCode = 404;
        return Task.CompletedTask;
      });
      foreach (Func<RequestDelegate, RequestDelegate> func in this._components.Reverse<Func<RequestDelegate, RequestDelegate>>())
        requestDelegate = func(requestDelegate);
      return requestDelegate;
    }
3. Server.StartAsync
在这里,Server的启动是需要一个IHttpApplication类型的参数的,来负责 HttpContext 的创建,我们看一下这个参数
public interface IHttpApplication<TContext>
{
    TContext CreateContext(IFeatureCollection contextFeatures);

    Task ProcessRequestAsync(TContext context);

    void DisposeContext(TContext context, Exception exception);
}
它的默认实现类是它的默认实现是 HostingApplication 类
public class HostingApplication : IHttpApplication<HostingApplication.Context>
  {
    private readonly RequestDelegate _application;
    private readonly IHttpContextFactory _httpContextFactory;public Task ProcessRequestAsync(HostingApplication.Context context)
    {
      return this._application(context.HttpContext);
    }
  ......
}
我们来看一下Server的Http监听绑定
public async Task StartAsync<TContext>(
      IHttpApplication<TContext> application,
      CancellationToken cancellationToken)
    {
      try
      {
        if (!BitConverter.IsLittleEndian)
          throw new PlatformNotSupportedException(CoreStrings.BigEndianNotSupported);
        this.ValidateOptions();
        if (this._hasStarted)
          throw new InvalidOperationException(CoreStrings.ServerAlreadyStarted);
        this._hasStarted = true;
        this._heartbeat.Start();
        await AddressBinder.BindAsync(this._serverAddresses, this.Options, (ILogger) this.Trace, new Func<ListenOptions, Task>(OnBind)).ConfigureAwait(false);
      }
      catch (Exception ex)
      {
        this.Trace.LogCritical((EventId) 0, ex, "Unable to start Kestrel.");
        this.Dispose();
        throw;
      }

      async Task OnBind(ListenOptions endpoint)
      {
        endpoint.UseHttpServer<TContext>((IList<IConnectionAdapter>) endpoint.ConnectionAdapters, this.ServiceContext, application, endpoint.Protocols);
        ConnectionDelegate connectionDelegate = endpoint.Build();
        if (this.Options.Limits.MaxConcurrentConnections.HasValue)
          connectionDelegate = new ConnectionDelegate(new ConnectionLimitMiddleware(connectionDelegate, this.Options.Limits.MaxConcurrentConnections.Value, this.Trace).OnConnectionAsync);
        ConnectionDispatcher connectionDispatcher = new ConnectionDispatcher(this.ServiceContext, connectionDelegate);
        ITransport transport = this._transportFactory.Create((IEndPointInformation) endpoint, (IConnectionDispatcher) connectionDispatcher);
        this._transports.Add(transport);
        await transport.BindAsync().ConfigureAwait(false);
      }
    }
至此为止,Server已经绑定一个监听端口,注册了HTTP连接事件,剩下的就是开启监听了。
4. HostedService
HostedService 为我们开启了一个后台运行服务,它会在随着程序启动而启动。
public class HostedServiceExecutor
  {
    private readonly IEnumerable<IHostedService> _services;public async Task StartAsync(CancellationToken token)
    {
    await this.ExecuteAsync((Func<IHostedService, Task>) (service => service.StartAsync(token)));
    }

    public async Task StopAsync(CancellationToken token)
    {
    await this.ExecuteAsync((Func<IHostedService, Task>) (service => service.StopAsync(token)));
    }

    private async Task ExecuteAsync(Func<IHostedService, Task> callback)
    {
      List<Exception> exceptions = (List<Exception>) null;
      foreach (IHostedService service in this._services)
      {
        try
        {
          await callback(service);
        }
        catch (Exception ex)
        {
          if (exceptions == null)
            exceptions = new List<Exception>();
          exceptions.Add(ex);
        }
      }
      if (exceptions != null)
        throw new AggregateException((IEnumerable<Exception>) exceptions);
    }
  }
总结
这两篇文章从Startup开始到最后的Http管道创建和HttpServer的启动监听,涉及到了很多关键点,从代码流程来看,只要抓住几个关键点即可理解整体的一个流程。大家可以带着以下这些问题去跟着文章走:
- Startup有多少种实例化方式?
- IStartup在哪里被实例化的?
- IServiceCollection何时实例化的?
- IServiceProvider何时实例化的?
- Startup的ConfigureService方法何时被执行?
- IApplicationBuilder何时实例化的?
- Startup的Configure方法何时被执行?
- Http监听管道是何时和如何构建的?
原文出处:https://www.cnblogs.com/lex-wu/p/11228612.html
")
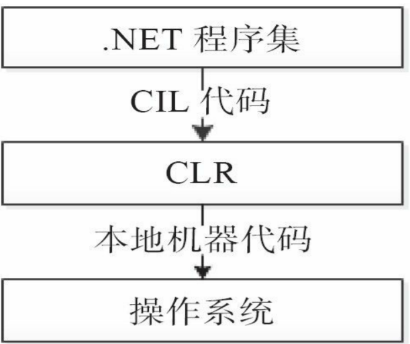
CLRCore (CLR 核心机制)
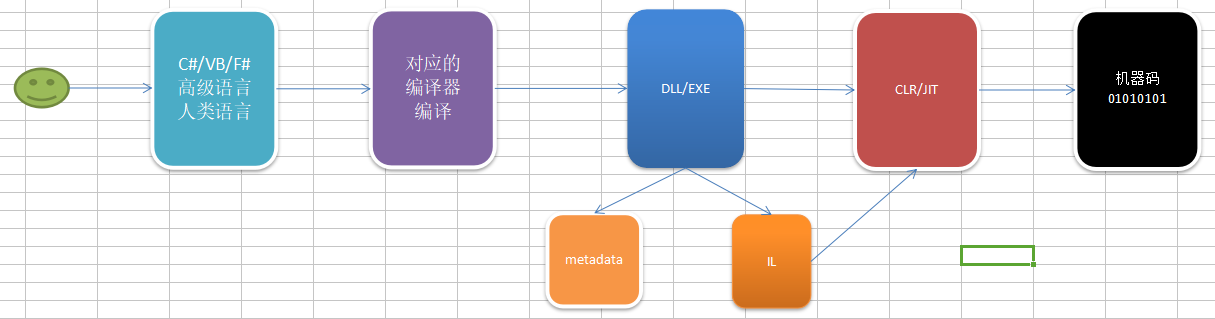
JIT-- 第一次 -- 标记已 -- 存根 -- 调用 -- 查找存根 -- 执行机器码
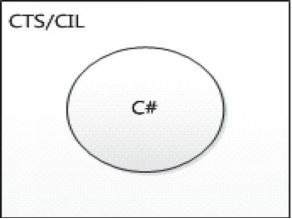
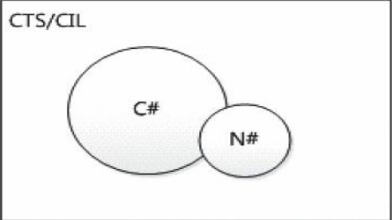
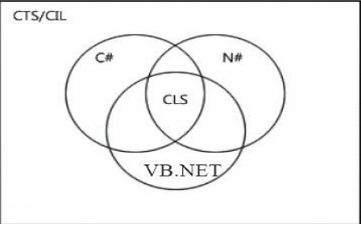
C# 和 CIL 的关系:
C# 和 N# 都是 CIL 实现,但是彼此不能互通:
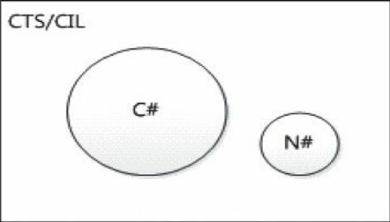
C# 和 N# 公开不分满足规范,我们才能互通
CLS 就是描述多语言互通的规范
内存分配:线程栈
堆 Heap:
一个程序运行时,该进程存放引用类型变量的一块内存,全局唯一!只有一个堆
栈 Stack:
数据结构,先进后出,线程栈,一个线程存放变量的内存(一个线程有一个)
值类型分配在栈上,比如结构、枚举、int 等
引用类型分配在堆上,比如类、接口、委托等
引用类型
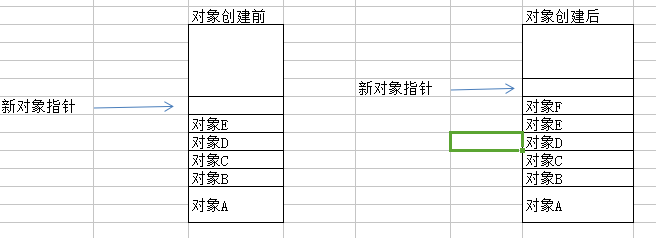
1、调用 new 的时候,就会去栈上开辟内存,创建实例。这就是为什么在构造函数中跨域使用 this
2、把实例的引用传递给构造函数
3、执行构造函数
4、返回引用
装箱拆箱
int i=3;
obect obj=i;//装箱
int k=(int)obj;//拆箱
引用类型在哪里?值类型在哪里?
值类型的值,会随着对象的位置存储。引用类型的值,一定在堆里面。值类型的长度是确定的,引用类型的长度是不确定的,只有堆才能放各种值。
下面有一个例子:
public class MyTest
{
    private int x;
    public MyTest(int n)
    {
        this.x=n;
    }
}
MyTest t=new MyTest(3);//引用类型那么,t.x 这个 3,是存放在哪里呢?是堆上还是栈上?
===.》出现在堆里面,因为值类型的属性,会随着对象的位置存储
public struct ValuePoint// : System.ValueType  结构不能有父类,因为隐式继承了ValueType
 {
     public int x;
     public ValuePoint(int x)
     {
         this.x = x;
         this.Text = "1234";
     }

     public string Text;//堆还是栈?
 }
struct 是值类型,但是里面的 Text,是存放在堆还是栈?答案是,对立面,因为引用类型的值,一定出现在堆里面。
string 字符串内存分配
string student = "bingle1";
string student2 = student;

Console.WriteLine(student);//bingle1
Console.WriteLine(student2);//bingle1

student2 = "bingle2";//=new string(APP);
Console.WriteLine(student);//bingle1
Console.WriteLine(student2);//bingle2
Console.ReadLine();
string student = "bingle1";
string student2 = "bingle2";//共享
student2 = "bingle1";
Console.WriteLine(object.ReferenceEquals(student, student2));//true为什么是 true?因为同一个变量,享元分配内存。为什么享元?节约内存。
student2 = "binglebingle";//等于重新开辟一块内存叫“binglebingle”  new String("binglebingle")
Console.WriteLine(student);//bingle1
还是 bingle1,为什么?因为字符串的不可变性。为什么字符串不可以变,开辟新内存不浪费吗?因为在堆上是连续拜访的,如果有变化,会导致其他变量全部移动,成本太高,还不如重新 new 一个。
string student3 = string.Format("bing{0}", "le");
Console.WriteLine(object.ReferenceEquals(student, student3));//false
为什么是 false?没有享元。分配地址,然后计算,才知道是 "bingle"。
string student4 = "bing" + "le";
 Console.WriteLine(object.ReferenceEquals(student, student4));//true
 //true  编译器优化了,直接就是bingle
string halfStudent = "le";
string student5= "bing" + halfStudent;
Console.WriteLine(object.ReferenceEquals(student, student5));
//false 也是先内存,再计算东西放在站上速度快,但是值类型是不能继承的,长度也有限。
垃圾回收 ---CLR 提供 GC,托管堆垃圾回收
1、什么样的对象需要垃圾回收?
托管资源 + 引用类型。线程栈的是不需要垃圾回收的,用完立马就回收了。
2、托管资源和非托管资源
托管资源的就是 CLR 控制的,new 的对象、string 字符串。非托管就不是 CLR 控制的,数据库连接、文件流、句柄、打印机连接。using (SqlConnection)// 被 C# 封装了管道了那个非托管的数据库连接资源。只要手动释放的,都是非托管的。
3、哪些对象的内存,能被 GC 回收?
对象访问不到了,那就可以被回收了。程序 ---- 入口 ---- 去找对象 --- 建立对象图 ---- 访问不到的就是垃圾,就可以回收了。
4、对象是如何分配在堆上的?
连续分配在堆上的,每次分配就先检查空间够不够。
5、什么时候执行 GC?
a、new 对象的时候 ---- 临界点
b、GC.Collection (), 这个方法会强制 GC
c、程序退出时会 GC
a="123"
a=null
GC.Collect 可以 GC,但是频繁 GC 是不好的,GC 是全局的
项目中有 6 个小时才运行 new 一次,什么时候 GC? 不 GC,可以手动 GC
6、GC 的过程是怎么样的?
N 个对象,全部标机 Wie 垃圾,入口开始遍历,访问到的就标机可以访问(+1),遍历完就清理内存,产生不连续的内存,压缩,地址移动,修改变量指向,所以全局会阻塞。
清理内存分两种情况:
a、无析构函数,直接清理内存
b、把对象转到一个单独的队列,会有一个析构函数专门做这个。通常在析构函数内部是用来做非托管资源释放,因为 CLR 肯定调用,所以避免使用者忘记的气矿。
7、垃圾回收策略
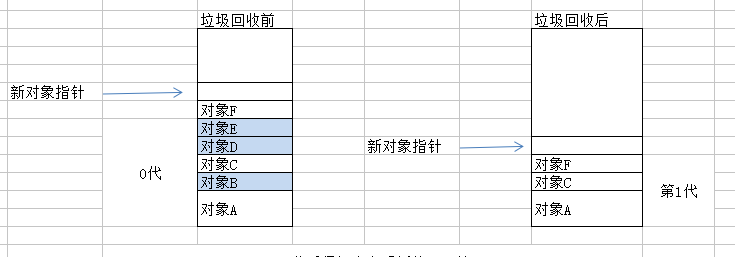
对象分代:3 代
0 代:第一次分配到堆,就是 0 代
1 代:经历了一次 GC,还存在的
2 代:经历了两次或以上的 GC,还存在的。
垃圾回收时,优先回收 0 代,提升小路,最多也最容器释放。0 代不够,找 1 代,1 代不够找 2 代,再不够就不用了。。。代的数值越大,越难回收。
大对象堆:一是内存移动大对象;二是 0 代空间问题。80000 字节就叫大对象,没有分代,直接都是 2 代。
那么,静态资源在程序退出的时候,会 GC 吗?答案是,会的。(其实回收的不是变量,是某个对象所占据的内存,如果存在一个对象,指向它的引用变量的数量为 0,那个 GC 会择机回收它占据的内存。应用程序域卸载的时候回收静态变量。)
析构函数:被动清理;Dispose:主动清理
public class StandardDispose : IDisposable
 {
     //演示创建一个非托管资源
     private string _UnmanageResource = "未被托管的资源";
     //演示创建一个托管资源
     private string _ManageResource = "托管的资源";


     private bool _disposed = false;

     /// <summary>
     /// 实现IDisposable中的Dispose方法
     /// </summary>
     public void Dispose()
     {
         this.Dispose(true); //必须为true
         GC.SuppressFinalize(this);//通知垃圾回收机制不再调用终结器(析构器)
     }

     /// <summary>
     /// 不是必要的,提供一个Close方法仅仅是为了更符合其他语言(如C++)的规范
     /// </summary>
     public void Close()
     {
         this.Dispose();
     }

     /// <summary>
     /// 必须,以备程序员忘记了显式调用Dispose方法
     /// </summary>
     ~StandardDispose()
     {
         //必须为false
         this.Dispose(false);
     }

     /// <summary>
     /// 非密封类修饰用protected virtual
     /// 密封类修饰用private
     /// </summary>
     /// <param name="disposing"></param>
     protected virtual void Dispose(bool disposing)
     {
         if (this._disposed)//已经被释放的还可以不异常
         {
             return;
         }
         if (disposing)
         {
             // 清理托管资源
             if (this._ManageResource != null)
             {
                 //Dispose
                 this._ManageResource = null;
             }
         }
         // 清理非托管资源
         if (this._UnmanageResource != null)
         {
             //Dispose  conn.Dispose()
             this._UnmanageResource = null;
         }
         //让类型知道自己已经被释放
         this._disposed = true;
     }

     public void PublicMethod()
     {
         if (this._disposed)
         {
             throw new ObjectDisposedException("StandardDispose", "StandardDispose is disposed");
         }
         //
     }
今天关于Core CLR Host 源码简单分析和coredns 源码的讲解已经结束,谢谢您的阅读,如果想了解更多关于.NET跨平台之旅:corehost 是如何加载 coreclr 的、ASIHTTPRequest源码简单分析、ASP.NET Core[源码分析篇] - WebHost、CLRCore (CLR 核心机制)的相关知识,请在本站搜索。
本文标签:


