在这篇文章中,我们将为您详细介绍FEP:测试lineage,获得CPU,MEMORY统计信息的内容,并且讨论关于fpu测试是什么的相关问题。此外,我们还会涉及一些关于.NETMemoryissuesl
在这篇文章中,我们将为您详细介绍FEP: 测试 lineage, 获得 CPU, MEMORY 统计信息的内容,并且讨论关于fpu测试是什么的相关问题。此外,我们还会涉及一些关于.NET Memory issues loading ~40 images, memory not reclaimed, potentially due to LOH fragmentation、c – ReadProcessMemory比SharedMemory上的memcpy更快、Caffe源码理解2:SyncedMemory CPU和GPU间的数据同步、com.facebook.imagepipeline.memory.PooledByteBuffer的实例源码的知识,以帮助您更全面地了解这个主题。
本文目录一览:- FEP: 测试 lineage, 获得 CPU, MEMORY 统计信息(fpu测试是什么)
- .NET Memory issues loading ~40 images, memory not reclaimed, potentially due to LOH fragmentation
- c – ReadProcessMemory比SharedMemory上的memcpy更快
- Caffe源码理解2:SyncedMemory CPU和GPU间的数据同步
- com.facebook.imagepipeline.memory.PooledByteBuffer的实例源码
")
FEP: 测试 lineage, 获得 CPU, MEMORY 统计信息(fpu测试是什么)
#----------------------------------------------------------------------------------------
测试 lineage, 获得 CPU, MEMORY 统计信息
#----------------------------------------------------------------------------------------
### number of lineages: 1
# (in Host)
cd /mnt/vm_img/fep-irp-nougat/
./stats-cpu-memory.sh > log-stats-cpu-memory-lineage-1.txt

#-- log_lineage_1.txt 记录 ./fep-irp-auto-run-vbox-and-docker.sh create, destroy 的时间点
/bin/rm log_lineage_1.txt
echo "==================================" >> log_lineage_1.txt
date +%H:%M:%S >> log_lineage_1.txt
echo "./fep-irp-auto-run-vbox-and-docker.sh create" >> log_lineage_1.txt
echo "==================================" >> log_lineage_1.txt
./fep-irp-auto-run-vbox-and-docker.sh create 0 1 centos-fep-irp lineage-irp- /mnt/vm_img/fep-irp-nougat

echo "==================================" >> log_lineage_1.txt
date +%H:%M:%S >> log_lineage_1.txt
echo "./fep-irp-auto-run-vbox-and-docker.sh create" >> log_lineage_1.txt
echo "==================================" >> log_lineage_1.txt
./fep-irp-auto-run-vbox-and-docker.sh destroy 0 1 centos-fep-irp lineage-irp- /mnt/vm_img/fep-irp-nougat
#---------------------------------------------------------
### number of lineages: 2
# (in Host)
cd /mnt/vm_img/fep-irp-nougat/
./stats-cpu-memory.sh > log-stats-cpu-memory-lineage-2.txt

#-- log_lineage_2.txt 记录 ./fep-irp-auto-run-vbox-and-docker.sh create, destroy 的时间点
/bin/rm log_lineage_2.txt
echo "==================================" >> log_lineage_2.txt
date +%H:%M:%S >> log_lineage_2.txt
echo "./fep-irp-auto-run-vbox-and-docker.sh create" >> log_lineage_2.txt
echo "==================================" >> log_lineage_2.txt
./fep-irp-auto-run-vbox-and-docker.sh create 0 2 centos-fep-irp lineage-irp- /mnt/vm_img/fep-irp-nougat

echo "==================================" >> log_lineage_2.txt
date +%H:%M:%S >> log_lineage_2.txt
echo "./fep-irp-auto-run-vbox-and-docker.sh create" >> log_lineage_2.txt
echo "==================================" >> log_lineage_2.txt
./fep-irp-auto-run-vbox-and-docker.sh destroy 0 2 centos-fep-irp lineage-irp- /mnt/vm_img/fep-irp-nougat
#---------------------------------------------------------
### number of lineages: 3
# (in Host)
cd /mnt/vm_img/fep-irp-nougat/
./stats-cpu-memory.sh > log-stats-cpu-memory-lineage-3.txt

#-- log_lineage_3.txt 记录 ./fep-irp-auto-run-vbox-and-docker.sh create, destroy 的时间点
/bin/rm log_lineage_3.txt
echo "==================================" >> log_lineage_3.txt
date +%H:%M:%S >> log_lineage_3.txt
echo "./fep-irp-auto-run-vbox-and-docker.sh create" >> log_lineage_3.txt
echo "==================================" >> log_lineage_3.txt
./fep-irp-auto-run-vbox-and-docker.sh create 0 3 centos-fep-irp lineage-irp- /mnt/vm_img/fep-irp-nougat

echo "==================================" >> log_lineage_3.txt
date +%H:%M:%S >> log_lineage_3.txt
echo "./fep-irp-auto-run-vbox-and-docker.sh create" >> log_lineage_3.txt
echo "==================================" >> log_lineage_3.txt
./fep-irp-auto-run-vbox-and-docker.sh destroy 0 3 centos-fep-irp lineage-irp- /mnt/vm_img/fep-irp-nougat
#---------------------------------------------------------
### number of lineages: 4
# (in Host)
cd /mnt/vm_img/fep-irp-nougat/
./stats-cpu-memory.sh > log-stats-cpu-memory-lineage-4.txt

#-- log_lineage_4.txt 记录 ./fep-irp-auto-run-vbox-and-docker.sh create, destroy 的时间点
/bin/rm log_lineage_4.txt
echo "==================================" >> log_lineage_4.txt
date +%H:%M:%S >> log_lineage_4.txt
echo "./fep-irp-auto-run-vbox-and-docker.sh create" >> log_lineage_4.txt
echo "==================================" >> log_lineage_4.txt
./fep-irp-auto-run-vbox-and-docker.sh create 0 4 centos-fep-irp lineage-irp- /mnt/vm_img/fep-irp-nougat

echo "==================================" >> log_lineage_4.txt
date +%H:%M:%S >> log_lineage_4.txt
echo "./fep-irp-auto-run-vbox-and-docker.sh create" >> log_lineage_4.txt
echo "==================================" >> log_lineage_4.txt
./fep-irp-auto-run-vbox-and-docker.sh destroy 0 4 centos-fep-irp lineage-irp- /mnt/vm_img/fep-irp-nougat
#---------------------------------------------------------
### number of lineages: 5
# (in Host)
cd /mnt/vm_img/fep-irp-nougat/
./stats-cpu-memory.sh > log-stats-cpu-memory-lineage-5.txt

#-- log_lineage_5.txt 记录 ./fep-irp-auto-run-vbox-and-docker.sh create, destroy 的时间点
/bin/rm log_lineage_5.txt
echo "==================================" >> log_lineage_5.txt
date +%H:%M:%S >> log_lineage_5.txt
echo "./fep-irp-auto-run-vbox-and-docker.sh create" >> log_lineage_5.txt
echo "==================================" >> log_lineage_5.txt
./fep-irp-auto-run-vbox-and-docker.sh create 0 5 centos-fep-irp lineage-irp- /mnt/vm_img/fep-irp-nougat

echo "==================================" >> log_lineage_5.txt
date +%H:%M:%S >> log_lineage_5.txt
echo "./fep-irp-auto-run-vbox-and-docker.sh create" >> log_lineage_5.txt
echo "==================================" >> log_lineage_5.txt
./fep-irp-auto-run-vbox-and-docker.sh destroy 0 5 centos-fep-irp lineage-irp- /mnt/vm_img/fep-irp-nougat
#----------------------------------------------------------------------------------------
.NET Memory issues loading ~40 images, memory not reclaimed, potentially due to LOH fragmentation
Well, this is my first foray into memory profiling a .NET app (CPU tuning I
have done) and I am hitting a bit of a wall here.
I have a view in my app which loads 40 images (max) per page, each running
about ~3MB. The max number of pages is 10. Seeing as I don’t want to keep 400
images or 1.2GB in memory at once, I set each image to null when the page is
changed.
Now, at first I thought that I must just have stale references to these
images. I downloaded ANTS profiler (great tool BTW) and ran a few tests. The
object lifetime graph tells me that I don’t have any references to these
images other than the single reference in the parent class (which is by
design, also confirmed by meticulously combing through my code):

The parent class SlideViewModelBase sticks around forever in a cache, but
the MacroImage property is set to null when the page is changed. I don’t see
any indication that these objects should be kept around longer than expected.
I next took a look at the large object heap and memory usage in general. After
looking at three pages of images I have 691.9MB of unmanaged memory allocated
and 442.3MB on the LOH. System.Byte[], which comes from mySystem.Drawing.Bitmap to BitmapImage conversion is taking pretty much all
of the LOH space. Here is my conversion code:
public static BitmapSource ToBmpSrc( this Bitmap b ){ var bi = new BitmapImage(); var ms = new MemoryStream(); bi.CacheOption = BitmapCacheOption.OnLoad; b.Save( ms, ImageFormat.Bmp ); ms.Position = 0; bi.BeginInit(); ms.Seek( 0, SeekOrigin.Begin ); bi.StreamSource = ms; bi.EndInit(); return bi;}I am having a hard time finding where all of that unmanaged memory is going. I
suspected the System.Drawing.Bitmap objects at first, but ANTS doesn’t show
them sticking around, and I also ran a test where I made absolutely sure that
all of them were disposed and it didn’t make a difference. So I haven’t yet
figured out where all of that unmanaged memory is coming from.
My two current theories are:
- LOH fragmentation. If I navigate away from the paged view and click a couple of buttons about half of the ~1.5GB is reclaimed. Still too much, but interesting nonetheless.
- Some weird WPF binding thing. We do use databinding to display these images and I am no expert in regards to the ins and outs of how these WPF controls work.
If anyone has any theories or profiling tips I would be extremely grateful as
(of course) we are on a tight deadline and I am scrambling a bit to get this
final part done and working. I think I’ve been spoiled by tracking down memory
leaks in C++ … who woulda’ thought?
If you need more info or would like me to try something else please ask. Sorry
about the wall-o-text here, I tried to keep it as concise as possible.
答案1
小编典典This blog
post
appears to descibe what you are seeing, and the proposed solution was to
create an implementation of Stream that wraps another
stream.
The Dispose method of this wrapper class needs to release the wrapped stream,
so that it can be garbage collected. Once the BitmapImage is initialised with
this wrapper stream, the wrapper stream can be disposed, releasing the
underlying stream, and allowing the large byte array itself to be freed.
The BitmapImage keeps a reference to the source stream so it keeps the
MemoryStream object alive. Unfortunately, even though MemoryStream.Dispose
has been invoked, it doesn’t release the byte array that the memory stream
wraps. So, in this case, bitmap is referencing stream, which is referencing
buffer, which may be taking up a lot of space on the large object heap.
There isn’t a true memory leak; when there are no more references to bitmap,
all these objects will (eventually) be garbage collected. But since bitmap
has already made its own private copy of the image (for rendering), it seems
rather wasteful to have the now-unnecessary original copy of the bitmap
still in memory.
Also, what version of .NET are you using? Prior to .NET 3.5 SP1, there was a
known issue where a BitmapImage could cause a memory
leak. The workaround was to call
Freeze on the
BitmapImage.

c – ReadProcessMemory比SharedMemory上的memcpy更快
我知道我不应该这样使用SharedMemory(最好直接在共享内存中读取),但我仍然想知道为什么会发生这种情况.通过进一步调查,另一件事出现了:如果我在相同的共享内存区域(实际上是同一区域)上连续执行2次memcpy,则第二个副本比第一个快两倍.
以下是显示问题的示例代码.在这个例子中,只有一个进程,但问题在于此处.从共享内存区域执行memcpy比在我自己的进程上执行相同区域的ReadProcessMemory要慢!
#include <tchar.h>
#include <basetsd.h>
#include <iostream>

#include <boost/interprocess/mapped_region.hpp>
#include <boost/interprocess/windows_shared_memory.hpp>
#include <time.h>
namespace bip = boost::interprocess;
#include <boost/asio.hpp>

 bip::windows_shared_memory* AllocateSharedMemory(UINT32 a_UI32_Size)
{
    bip::windows_shared_memory* l_pShm = new bip::windows_shared_memory (bip::create_only,"Global\\testSharedMemory",bip::read_write,a_UI32_Size);
    bip::mapped_region l_region(*l_pShm,bip::read_write);
    std::memset(l_region.get_address(),1,l_region.get_size());
    return l_pShm;
}

//copy the shared memory with memcpy
void copySharedMemory(UINT32 a_UI32_Size)
{
    bip::windows_shared_memory m_shm(bip::open_only,bip::read_only);
    bip::mapped_region l_region(m_shm,bip::read_only);
    void* l_pData = malloc(a_UI32_Size);
    memcpy(l_pData,l_region.get_address(),a_UI32_Size);
    free(l_pData);
}

//copy the shared memory with ReadProcessMemory
void ProcesscopySharedMemory(UINT32 a_UI32_Size)
{
    bip::windows_shared_memory m_shm(bip::open_only,bip::read_only);
    void* l_pData = malloc(a_UI32_Size);
    HANDLE hProcess = OpenProcess( PROCESS_ALL_ACCESS,FALSE,(DWORD) GetCurrentProcessId());
    size_t l_szt_CurRemote_Readsize;
    ReadProcessMemory(hProcess,(LPCVOID)((void*)l_region.get_address()),l_pData,a_UI32_Size,(SIZE_T*)&l_szt_CurRemote_Readsize);
    free(l_pData);
}

// do 2 memcpy on the same shared memory
void copySharedMemory2(UINT32 a_UI32_Size)
{
    bip::windows_shared_memory m_shm(bip::open_only,bip::read_only);
    clock_t begin = clock();
    void* l_pData = malloc(a_UI32_Size);
    memcpy(l_pData,a_UI32_Size);
    clock_t end = clock();
    std::cout << "Firstcopy: " << (end - begin) * 1000 / CLOCKS_PER_SEC << " ms" << std::endl;
    free(l_pData);

    begin = clock();
    l_pData = malloc(a_UI32_Size);
    memcpy(l_pData,a_UI32_Size);
    end = clock();
    std::cout << "Secondcopy: " << (end - begin) * 1000 / CLOCKS_PER_SEC << " ms" << std::endl;
    free(l_pData);
}

int _tmain(int argc,_TCHAR* argv[])
{
    UINT32 l_UI32_Size = 1048576000;
    bip::windows_shared_memory* l_pShm = AllocateSharedMemory(l_UI32_Size);
    clock_t begin = clock();
    for (int i=0; i<10 ; i++)
        copySharedMemory(l_UI32_Size);
    clock_t end = clock();
    std::cout << "Memcopy: " << (end - begin) * 1000 / CLOCKS_PER_SEC << " ms" << std::endl;
    begin = clock();
    for (int i=0; i<10 ; i++)
        ProcesscopySharedMemory(l_UI32_Size);
    end = clock();
    std::cout << "ReadProcessMemory: " << (end - begin) * 1000 / CLOCKS_PER_SEC << " ms" << std::endl;

    for (int i=0; i<10 ; i++)
        copySharedMemory2(l_UI32_Size);

    delete l_pShm;
    return 0;
}
这是输出:
Memcopy: 8891 ms
ReadProcessMemory: 6068 ms

Firstcopy: 796 ms
Secondcopy: 327 ms
Firstcopy: 795 ms
Secondcopy: 328 ms
Firstcopy: 780 ms
Secondcopy: 344 ms
Firstcopy: 780 ms
Secondcopy: 343 ms
Firstcopy: 780 ms
Secondcopy: 327 ms
Firstcopy: 795 ms
Secondcopy: 343 ms
Firstcopy: 780 ms
Secondcopy: 344 ms
Firstcopy: 796 ms
Secondcopy: 343 ms
Firstcopy: 796 ms
Secondcopy: 327 ms
Firstcopy: 780 ms
Secondcopy: 328 ms
如果有人知道为什么memcpy如此缓慢以及是否有解决这个问题的解决方案,我全都听见了.
谢谢.
解决方法
在大块内存中使用“memcpy”需要操作系统为每个复制的新页面筛选其进程/内存表.反过来,使用’ReadProcessMemory’告诉操作系统哪些页面应从哪个进程复制到哪个进程.
当您使用单页进行基准测试时,这种差异消失了,确认了其中的一部分.
我可以猜测’memcpy’在’小’场景中更快的原因可能是’ReadProcessMemory’有一个从用户到内核模式的额外切换.另一方面,Memcpy将任务卸载到底层内存管理系统,该系统始终与您的进程并行运行,并且在某种程度上由硬件原生支持.

Caffe源码理解2:SyncedMemory CPU和GPU间的数据同步
博客:blog.shinelee.me | 博客园 | CSDN
[toc]
写在前面
在Caffe源码理解1中介绍了Blob类,其中的数据成员有
shared_ptr<SyncedMemory> data_;
shared_ptr<SyncedMemory> diff_;
std::shared_ptr 是共享对象所有权的智能指针,当最后一个占有对象的shared_ptr被销毁或再赋值时,对象会被自动销毁并释放内存,见cppreference.com。而shared_ptr所指向的SyncedMemory即是本文要讲述的重点。
在Caffe中,SyncedMemory有如下两个特点:
- 屏蔽了CPU和GPU上的内存管理以及数据同步细节
- 通过惰性内存分配与同步,提高效率以及节省内存
背后是怎么实现的?希望通过这篇文章可以将以上两点讲清楚。
成员变量的含义及作用
SyncedMemory的数据成员如下:
enum SyncedHead { UNINITIALIZED, HEAD_AT_CPU, HEAD_AT_GPU, SYNCED };
void* cpu_ptr_; // CPU侧数据指针
void* gpu_ptr_; // GPU侧数据指针
size_t size_; // 数据所占用的内存大小
SyncedHead head_; // 指示再近一次数据更新发生在哪一侧,在调用另一侧数据时需要将该侧数据同步过去
bool own_cpu_data_; // 指示cpu_ptr_是否为对象内部调用CaffeMallocHost分配的CPU内存
bool cpu_malloc_use_cuda_; // 指示是否使用cudaMallocHost分配页锁定内存,系统malloc分配的是可分页内存,前者更快
bool own_gpu_data_; // 指示gpu_ptr_是否为对象内部调用cudaMalloc分配的GPU内存
int device_; // GPU设备号
cpu_ptr_和gpu_ptr_所指向的数据空间有两种来源,一种是对象内部自己分配的,一种是外部指定的,为了区分这两种情况,于是有了own_cpu_data_和own_gpu_data_,当为true时表示是对象内部自己分配的,因此需要对象自己负责释放(析构函数),如果是外部指定的,则由外部负责释放,即谁分配谁负责释放。
外部指定数据时需调用set_cpu_data和set_gpu_data,代码如下:
void SyncedMemory::set_cpu_data(void* data) {
  check_device();
  CHECK(data);
  if (own_cpu_data_) { // 如果自己分配过内存,先释放,换外部指定数据
    CaffeFreeHost(cpu_ptr_, cpu_malloc_use_cuda_);
  }
  cpu_ptr_ = data; // 直接指向外部数据
  head_ = HEAD_AT_CPU; // 指示CPU侧更新了数据
  own_cpu_data_ = false; // 指示数据来源于外部
}

void SyncedMemory::set_gpu_data(void* data) {
  check_device();
#ifndef CPU_ONLY
  CHECK(data);
  if (own_gpu_data_) { // 如果自己分配过内存,先释放,换外部指定数据
    CUDA_CHECK(cudaFree(gpu_ptr_));
  }
  gpu_ptr_ = data; // 直接指向外部数据
  head_ = HEAD_AT_GPU; // 指示GPU侧更新了数据
  own_gpu_data_ = false; // 指示数据来源于外部
#else
  NO_GPU;
#endif
}
构造与析构
在SyncedMemory构造函数中,获取GPU设备(如果使用了GPU的话),注意构造时head_ = UNINITIALIZED,初始化成员变量,但并没有真正的分配内存。
// 构造
SyncedMemory::SyncedMemory(size_t size)
  : cpu_ptr_(NULL), gpu_ptr_(NULL), size_(size), head_(UNINITIALIZED),
    own_cpu_data_(false), cpu_malloc_use_cuda_(false), own_gpu_data_(false) {
#ifndef CPU_ONLY
#ifdef DEBUG
  CUDA_CHECK(cudaGetDevice(&device_));
#endif
#endif
}

// 析构
SyncedMemory::~SyncedMemory() {
  check_device(); // 校验当前GPU设备以及gpu_ptr_所指向的设备是不是构造时获取的GPU设备
  if (cpu_ptr_ && own_cpu_data_) { // 自己分配的空间自己负责释放
    CaffeFreeHost(cpu_ptr_, cpu_malloc_use_cuda_);
  }

#ifndef CPU_ONLY
  if (gpu_ptr_ && own_gpu_data_) { // 自己分配的空间自己负责释放
    CUDA_CHECK(cudaFree(gpu_ptr_));
  }
#endif  // CPU_ONLY
}

// 释放CPU内存
inline void CaffeFreeHost(void* ptr, bool use_cuda) {
#ifndef CPU_ONLY
  if (use_cuda) {
    CUDA_CHECK(cudaFreeHost(ptr));
    return;
  }
#endif
#ifdef USE_MKL
  mkl_free(ptr);
#else
  free(ptr);
#endif
}
但是,在析构函数中,却释放了CPU和GPU的数据指针,那么是什么时候分配的内存呢?这就要提到,Caffe官网中说的“在需要时分配内存” ,以及“在需要时同步CPU和GPU”,这样做是为了提高效率、节省内存。
Blobs conceal the computational and mental overhead of mixed CPU/GPU operation by synchronizing from the CPU host to the GPU device as needed. Memory on the host and device is allocated on demand (lazily) for efficient memory usage.
具体怎么实现的?我们接着往下看。
内存同步管理
SyncedMemory成员函数如下:
const void* cpu_data(); // to_cpu(); return (const void*)cpu_ptr_; 返回CPU const指针
void set_cpu_data(void* data);
const void* gpu_data(); // to_gpu(); return (const void*)gpu_ptr_; 返回GPU const指针
void set_gpu_data(void* data);
void* mutable_cpu_data(); // to_cpu(); head_ = HEAD_AT_CPU; return cpu_ptr_;
void* mutable_gpu_data(); // to_gpu(); head_ = HEAD_AT_GPU; return gpu_ptr_;
enum SyncedHead { UNINITIALIZED, HEAD_AT_CPU, HEAD_AT_GPU, SYNCED };
SyncedHead head() { return head_; }
size_t size() { return size_; }
#ifndef CPU_ONLY
  void async_gpu_push(const cudaStream_t& stream);
#endif
其中,cpu_data()和gpu_data()返回const指针只读不写,mutable_cpu_data()和mutable_gpu_data()返回可写指针,它们4个在获取数据指针时均调用了to_cpu()或to_gpu(),两者内部逻辑一样,内存分配发生在第一次访问某一侧数据时分配该侧内存,如果不曾访问过则不分配内存,以此按需分配来节省内存。同时,用head_来指示最近一次数据更新发生在哪一侧,仅在调用另一侧数据时才将该侧数据同步过去,如果访问的仍是该侧,则不会发生同步,当两侧已同步都是最新时,即head_=SYNCED,访问任何一侧都不会发生数据同步。下面以to_cpu()为例,
inline void SyncedMemory::to_cpu() {
  check_device();
  switch (head_) {
  case UNINITIALIZED: // 如果未分配过内存(构造函数后就是这个状态)
    CaffeMallocHost(&cpu_ptr_, size_, &cpu_malloc_use_cuda_); // to_CPU时为CPU分配内存
    caffe_memset(size_, 0, cpu_ptr_); // 数据清零
    head_ = HEAD_AT_CPU; // 指示CPU更新了数据
    own_cpu_data_ = true;
    break;
  case HEAD_AT_GPU: // 如果GPU侧更新过数据,则同步到CPU
#ifndef CPU_ONLY
    if (cpu_ptr_ == NULL) { // 如果CPU侧没分配过内存,分配内存
      CaffeMallocHost(&cpu_ptr_, size_, &cpu_malloc_use_cuda_);
      own_cpu_data_ = true;
    }
    caffe_gpu_memcpy(size_, gpu_ptr_, cpu_ptr_); // 数据同步
    head_ = SYNCED; // 指示CPU和GPU数据已同步一致
#else
    NO_GPU;
#endif
    break;
  case HEAD_AT_CPU: // 如果CPU数据是最新的,不操作
  case SYNCED: // 如果CPU和GPU数据都是最新的,不操作
    break;
  }
}

// 分配CPU内存
inline void CaffeMallocHost(void** ptr, size_t size, bool* use_cuda) {
#ifndef CPU_ONLY
  if (Caffe::mode() == Caffe::GPU) {
    CUDA_CHECK(cudaMallocHost(ptr, size)); // cuda malloc
    *use_cuda = true;
    return;
  }
#endif
#ifdef USE_MKL
  *ptr = mkl_malloc(size ? size:1, 64);
#else
  *ptr = malloc(size);
#endif
  *use_cuda = false;
  CHECK(*ptr) << "host allocation of size " << size << " failed";
}
下面看一下head_状态是如何转换的,如下图所示:
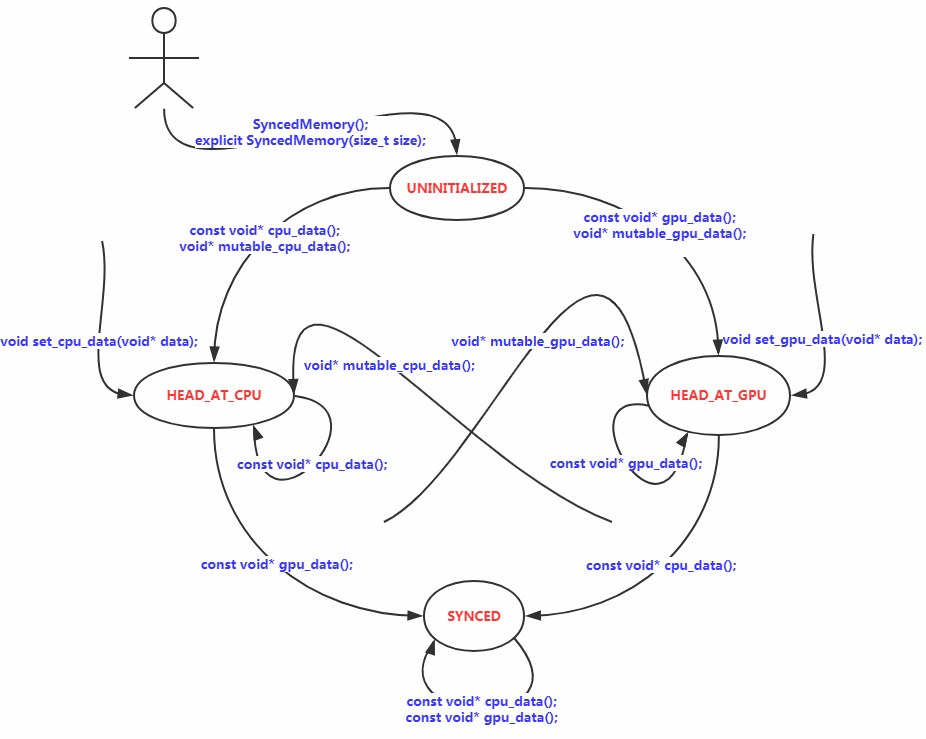
若以X指代CPU或GPU,Y指代GPU或CPU,需要注意的是,如果HEAD_AT_X表明X侧为最新数据,调用mutable_Y_data()时,在to_Y()内部会将X侧数据同步至Y,会暂时将状态置为SYNCED,但退出to_Y()后最终仍会将状态置为HEAD_AT_Y,如mutable_cpu_data()代码所示,
void* SyncedMemory::mutable_cpu_data() {
  check_device();
  to_cpu();
  head_ = HEAD_AT_CPU;
  return cpu_ptr_;
}
不管之前是何种状态,只要调用了mutable_Y_data(),则head_就为HEAD_AT_Y。背后的思想是,无论当前是HEAD_AT_X还是SYNCED,只要调用了mutable_Y_data(),就意味着调用者可能会修改Y侧数据,所以认为接下来Y侧数据是最新的,因此将其置为HEAD_AT_Y。
至此,就可以理解Caffe官网上提供的何时发生内存同步的例子,以及为什么建议不修改数据时要调用const函数,不要调用mutable函数了。
// Assuming that data are on the CPU initially, and we have a blob.
const Dtype* foo;
Dtype* bar;
foo = blob.gpu_data(); // data copied cpu->gpu.
foo = blob.cpu_data(); // no data copied since both have up-to-date contents.
bar = blob.mutable_gpu_data(); // no data copied.
// ... some operations ...
bar = blob.mutable_gpu_data(); // no data copied when we are still on GPU.
foo = blob.cpu_data(); // data copied gpu->cpu, since the gpu side has modified the data
foo = blob.gpu_data(); // no data copied since both have up-to-date contents
bar = blob.mutable_cpu_data(); // still no data copied.
bar = blob.mutable_gpu_data(); // data copied cpu->gpu.
bar = blob.mutable_cpu_data(); // data copied gpu->cpu.
A rule of thumb is, always use the const call if you do not want to change the values, and never store the pointers in your own object. Every time you work on a blob, call the functions to get the pointers, as the SyncedMem will need this to figure out when to copy data.
以上。
参考
- Blobs, Layers, and Nets: anatomy of a Caffe model
- cudaMallocHost函数详解
原文出处:https://www.cnblogs.com/shine-lee/p/10050067.html

com.facebook.imagepipeline.memory.PooledByteBuffer的实例源码
public static void loadResourceFromUrl(Context context,Uri uri,String cookie,String referer,BaseDataSubscriber dataSubscriber) {
    if (uri.getScheme().startsWith("http")) {
        JsonObject header = new JsonObject();
        header.addProperty("Cookie",cookie);
        header.addProperty("Referer",referer);
        if (HProxy.isEnabled() && HProxy.isAllowPicture()) {
            HProxy proxy = new HProxy(uri.toString());
            header.addProperty(proxy.getHeaderKey(),proxy.getHeaderValue());
        }
        MyOkHttpNetworkFetcher.headers.put(uri,getGson().toJson(header));
    }
    ImagePipeline imagePipeline = Fresco.getimagePipeline();
    ImageRequestBuilder builder = ImageRequestBuilder.newBuilderWithSource(uri);
    ImageRequest request = builder.build();
    DataSource<CloseableReference<PooledByteBuffer>>
            dataSource = imagePipeline.fetchEncodedImage(request,context);
    dataSource.subscribe(dataSubscriber,CallerThreadExecutor.getInstance());
}
@Override
protected void onNewResultImpl(DataSource<CloseableReference<PooledByteBuffer>> dataSource) {
    if (!dataSource.isFinished() || dataSource.getResult() == null) {
        return;
    }

    // if we try to retrieve image file by cache key,it will return null
    // so we need to create a temp file,little bit hack :(
    PooledByteBufferInputStream inputStream = null;
    FileOutputStream outputStream = null;
    try {
        inputStream = new PooledByteBufferInputStream(dataSource.getResult().get());
        outputStream = new FileOutputStream(mTempFile);
        IoUtils.copy(inputStream,outputStream);

        mFinished = true;
        onSuccess(mTempFile);
    } catch (IOException e) {
        onFail(e);
    } finally {
        IoUtils.closeQuietly(inputStream);
        IoUtils.closeQuietly(outputStream);
    }
}
@Override
public void loadImage(Uri uri,final Callback callback) {
    ImageRequest request = ImageRequest.fromUri(uri);

    File localCache = getCacheFile(request);
    if (localCache.exists()) {
        callback.onCacheHit(localCache);
    } else {
        callback.onStart(); // ensure `onStart` is called before `onProgress` and `onFinish`
        callback.onProgress(0); // show 0 progress immediately

        ImagePipeline pipeline = Fresco.getimagePipeline();
        DataSource<CloseableReference<PooledByteBuffer>> source
                = pipeline.fetchEncodedImage(request,true);
        source.subscribe(new ImageDownloadSubscriber(mAppContext) {
            @Override
            protected void onProgress(int progress) {
                callback.onProgress(progress);
            }

            @Override
            protected void onSuccess(File image) {
                callback.onFinish();
                callback.onCacheMiss(image);
            }

            @Override
            protected void onFail(Throwable t) {
                // Todo: 12/11/2016 fail
                t.printstacktrace();
            }
        },mExecutorsupplier.forBackgroundTasks());
    }
}
@Override
public void onProgressUpdate(DataSource<CloseableReference<PooledByteBuffer>> dataSource) {
    if (!mFinished) {
        onProgress((int) (dataSource.getProgress() * 100));
    }
}
@Override
protected void onFailureImpl(DataSource<CloseableReference<PooledByteBuffer>> dataSource) {
    mFinished = true;
    onFail(new RuntimeException("onFailureImpl"));
}
今天关于FEP: 测试 lineage, 获得 CPU, MEMORY 统计信息和fpu测试是什么的分享就到这里,希望大家有所收获,若想了解更多关于.NET Memory issues loading ~40 images, memory not reclaimed, potentially due to LOH fragmentation、c – ReadProcessMemory比SharedMemory上的memcpy更快、Caffe源码理解2:SyncedMemory CPU和GPU间的数据同步、com.facebook.imagepipeline.memory.PooledByteBuffer的实例源码等相关知识,可以在本站进行查询。
本文标签:


