本文将介绍Githubapi【Restful接口规范】的详细情况,特别是关于githubrestapi的相关信息。我们将通过案例分析、数据研究等多种方式,帮助您更全面地了解这个主题,同时也将涉及一些关
本文将介绍Github api【Restful接口规范】的详细情况,特别是关于github rest api的相关信息。我们将通过案例分析、数据研究等多种方式,帮助您更全面地了解这个主题,同时也将涉及一些关于AI-restful接口写法、api - php写restful接口?、CHENGDU3-Restful API 接口规范、django-rest-framework 框架、Django-rest framework框架的安装配置、简介、Web API接口和Restful接口规范、基于原生django书写满足restful规范的接口的知识。
本文目录一览:- Github api【Restful接口规范】(github rest api)
- AI-restful接口写法
- api - php写restful接口?
- CHENGDU3-Restful API 接口规范、django-rest-framework 框架
- Django-rest framework框架的安装配置、简介、Web API接口和Restful接口规范、基于原生django书写满足restful规范的接口
")
Github api【Restful接口规范】(github rest api)
Overview
This describes the resources that make up the official GitHub REST API v3. If you have any problems or requests, please contact GitHub Support.
- Current version
- Schema
- Authentication
- Parameters
- Root endpoint
- GraphQL global node IDs
- Client errors
- HTTP redirects
- HTTP verbs
- Hypermedia
- Pagination
- Rate limiting
- User agent required
- Conditional requests
- Cross origin resource sharing
- JSON-P callbacks
- Timezones
Current version
By default, all requests to https://api.github.com receive the v3 version of the REST API. We encourage you to explicitly request this version via the Accept header.
Accept: application/vnd.github.v3+json
For information about GitHub''s GraphQL API v4, see the v4 documentation. For information about migrating to GraphQL, see "Migrating from REST."
Schema
All API access is over HTTPS, and accessed from https://api.github.com. All data is sent and received as JSON.
curl -i https://api.github.com/users/octocat/orgs
HTTP/1.1 200 OK
Server: nginx
Date: Fri, 12 Oct 2012 23:33:14 GMT
Content-Type: application/json; charset=utf-8 Connection: keep-alive Status: 200 OK ETag: "a00049ba79152d03380c34652f2cb612" X-GitHub-Media-Type: github.v3 X-RateLimit-Limit: 5000 X-RateLimit-Remaining: 4987 X-RateLimit-Reset: 1350085394 Content-Length: 5 Cache-Control: max-age=0, private, must-revalidate X-Content-Type-Options: nosniff
Blank fields are included as null instead of being omitted.
All timestamps return in ISO 8601 format:
YYYY-MM-DDTHH:MM:SSZ
For more information about timezones in timestamps, see this section.
Summary representations
When you fetch a list of resources, the response includes a subset of the attributes for that resource. This is the "summary" representation of the resource. (Some attributes are computationally expensive for the API to provide. For performance reasons, the summary representation excludes those attributes. To obtain those attributes, fetch the "detailed" representation.)
Example: When you get a list of repositories, you get the summary representation of each repository. Here, we fetch the list of repositories owned by the octokit organization:
GET /orgs/octokit/repos
Detailed representations
When you fetch an individual resource, the response typically includes all attributes for that resource. This is the "detailed" representation of the resource. (Note that authorization sometimes influences the amount of detail included in the representation.)
Example: When you get an individual repository, you get the detailed representation of the repository. Here, we fetch the octokit/octokit.rb repository:
GET /repos/octokit/octokit.rb
The documentation provides an example response for each API method. The example response illustrates all attributes that are returned by that method.
Authentication
There are two ways to authenticate through GitHub API v3. Requests that require authentication will return 404 Not Found, instead of 403 Forbidden, in some places. This is to prevent the accidental leakage of private repositories to unauthorized users.
Basic authentication
curl -u "username" https://api.github.com
OAuth2 token (sent in a header)
curl -H "Authorization: token OAUTH-TOKEN" https://api.github.com
Note: GitHub recommends sending OAuth tokens using the Authorization header. GitHub accepts sending OAuth tokens as a query parameter, but it is less secure because URLs can be logged by any system along the request path.
Read more about OAuth2. Note that OAuth2 tokens can be acquired programmatically, for applications that are not websites.
OAuth2 key/secret
curl ''https://api.github.com/users/whatever?client_id=xxxx&client_secret=yyyy''
Using your client_id and client_secret does not authenticate as a user, it will only identify your OAuth application to increase your rate limit. Permissions are only granted to users, not applications, and you will only get back data that an unauthenticated user would see. For this reason, you should only use the OAuth2 key/secret in server-to-server scenarios. Don''t leak your OAuth application''s client secret to your users.
Read more about unauthenticated rate limiting.
Failed login limit
Authenticating with invalid credentials will return 401 Unauthorized:
curl -i https://api.github.com -u foo:bar
HTTP/1.1 401 Unauthorized
{
  "message": "Bad credentials",
 "documentation_url": "https://developer.github.com/v3" }
After detecting several requests with invalid credentials within a short period, the API will temporarily reject all authentication attempts for that user (including ones with valid credentials) with 403 Forbidden:
curl -i https://api.github.com -u valid_username:valid_password
HTTP/1.1 403 Forbidden
{
  "message": "Maximum number of login attempts exceeded. Please try again later.",
 "documentation_url": "https://developer.github.com/v3" }
Parameters
Many API methods take optional parameters. For GET requests, any parameters not specified as a segment in the path can be passed as an HTTP query string parameter:
curl -i "https://api.github.com/repos/vmg/redcarpet/issues?state=closed"
In this example, the ''vmg'' and ''redcarpet'' values are provided for the :owner and :repo parameters in the path while :state is passed in the query string.
For POST, PATCH, PUT, and DELETE requests, parameters not included in the URL should be encoded as JSON with a Content-Type of ''application/json'':
curl -i -u username -d ''{"scopes":["public_repo"]}'' https://api.github.com/authorizations
Root endpoint
You can issue a GET request to the root endpoint to get all the endpoint categories that the REST API v3 supports:
curl https://api.github.com
GraphQL global node IDs
See the guide on "Using Global Node IDs" for detailed information about how to find node_ids via the REST API v3 and use them in GraphQL operations.
Client errors
There are three possible types of client errors on API calls that receive request bodies:
-
Sending invalid JSON will result in a
400 Bad Requestresponse.HTTP/1.1 400 Bad Request Content-Length: 35 {"message":"Problems parsing JSON"} -
Sending the wrong type of JSON values will result in a
400 Bad Requestresponse.HTTP/1.1 400 Bad Request Content-Length: 40 {"message":"Body should be a JSON object"} -
Sending invalid fields will result in a
422 Unprocessable Entityresponse.HTTP/1.1 422 Unprocessable Entity Content-Length: 149 { "message": "Validation Failed", "errors": [ { "resource": "Issue", "field": "title", "code": "missing_field" } ] }
All error objects have resource and field properties so that your client can tell what the problem is. There''s also an error code to let you know what is wrong with the field. These are the possible validation error codes:
| Error Name | Description |
|---|---|
missing |
This means a resource does not exist. |
missing_field |
This means a required field on a resource has not been set. |
invalid |
This means the formatting of a field is invalid. The documentation for that resource should be able to give you more specific information. |
already_exists |
This means another resource has the same value as this field. This can happen in resources that must have some unique key (such as Label names). |
Resources may also send custom validation errors (where code is custom). Custom errors will always have a message field describing the error, and most errors will also include a documentation_url field pointing to some content that might help you resolve the error.
HTTP redirects
API v3 uses HTTP redirection where appropriate. Clients should assume that any request may result in a redirection. Receiving an HTTP redirection is not an error and clients should follow that redirect. Redirect responses will have a Location header field which contains the URI of the resource to which the client should repeat the requests.
| Status Code | Description |
|---|---|
301 |
Permanent redirection. The URI you used to make the request has been superseded by the one specified in the Location header field. This and all future requests to this resource should be directed to the new URI. |
302, 307 |
Temporary redirection. The request should be repeated verbatim to the URI specified in the Location header field but clients should continue to use the original URI for future requests. |
Other redirection status codes may be used in accordance with the HTTP 1.1 spec.
HTTP verbs
Where possible, API v3 strives to use appropriate HTTP verbs for each action.
| Verb | Description |
|---|---|
HEAD |
Can be issued against any resource to get just the HTTP header info. |
GET |
Used for retrieving resources. |
POST |
Used for creating resources. |
PATCH |
Used for updating resources with partial JSON data. For instance, an Issue resource has title and body attributes. A PATCH request may accept one or more of the attributes to update the resource. PATCH is a relatively new and uncommon HTTP verb, so resource endpoints also accept POST requests. |
PUT |
Used for replacing resources or collections. For PUT requests with no body attribute, be sure to set the Content-Length header to zero. |
DELETE |
Used for deleting resources. |
Hypermedia
All resources may have one or more *_url properties linking to other resources. These are meant to provide explicit URLs so that proper API clients don''t need to construct URLs on their own. It is highly recommended that API clients use these. Doing so will make future upgrades of the API easier for developers. All URLs are expected to be proper RFC 6570 URI templates.
You can then expand these templates using something like the uri_template gem:
>> tmpl = URITemplate.new(''/notifications{?since,all,participating}'')
>> tmpl.expand
=> "/notifications"

>> tmpl.expand :all => 1
=> "/notifications?all=1"

>> tmpl.expand :all => 1, :participating => 1
=> "/notifications?all=1&participating=1"
Pagination
Requests that return multiple items will be paginated to 30 items by default. You can specify further pages with the ?page parameter. For some resources, you can also set a custom page size up to 100 with the ?per_page parameter. Note that for technical reasons not all endpoints respect the ?per_pageparameter, see events for example.
curl ''https://api.github.com/user/repos?page=2&per_page=100''
Note that page numbering is 1-based and that omitting the ?page parameter will return the first page.
For more information on pagination, check out our guide on Traversing with Pagination.
Link header
Note: It''s important to form calls with Link header values instead of constructing your own URLs.
The Link header includes pagination information:
Link: <https://api.github.com/user/repos?page=3&per_page=100>; rel="next",
  <https://api.github.com/user/repos?page=50&per_page=100>; rel="last"
The example includes a line break for readability.
This Link response header contains one or more Hypermedia link relations, some of which may require expansion as URI templates.
The possible rel values are:
| Name | Description |
|---|---|
next |
The link relation for the immediate next page of results. |
last |
The link relation for the last page of results. |
first |
The link relation for the first page of results. |
prev |
The link relation for the immediate previous page of results. |
Rate limiting
For API requests using Basic Authentication or OAuth, you can make up to 5000 requests per hour. Authenticated requests are associated with the authenticated user, regardless of whether Basic Authentication or an OAuth token was used. This means that all OAuth applications authorized by a user share the same quota of 5000 requests per hour when they authenticate with different tokens owned by the same user.
For unauthenticated requests, the rate limit allows for up to 60 requests per hour. Unauthenticated requests are associated with the originating IP address, and not the user making requests.
Note that the Search API has custom rate limit rules.
The returned HTTP headers of any API request show your current rate limit status:
curl -i https://api.github.com/users/octocat
HTTP/1.1 200 OK
Date: Mon, 01 Jul 2013 17:27:06 GMT
Status: 200 OK
X-RateLimit-Limit: 60 X-RateLimit-Remaining: 56 X-RateLimit-Reset: 1372700873 | Header Name | Description |
|---|---|
X-RateLimit-Limit |
The maximum number of requests you''re permitted to make per hour. |
X-RateLimit-Remaining |
The number of requests remaining in the current rate limit window. |
X-RateLimit-Reset |
The time at which the current rate limit window resets in UTC epoch seconds. |
If you need the time in a different format, any modern programming language can get the job done. For example, if you open up the console on your web browser, you can easily get the reset time as a JavaScript Date object.
new Date(1372700873 * 1000) // => Mon Jul 01 2013 13:47:53 GMT-0400 (EDT) If you exceed the rate limit, an error response returns:
HTTP/1.1 403 Forbidden
Date: Tue, 20 Aug 2013 14:50:41 GMT
Status: 403 Forbidden
X-RateLimit-Limit: 60
X-RateLimit-Remaining: 0 X-RateLimit-Reset: 1377013266 {  "message": "API rate limit exceeded for xxx.xxx.xxx.xxx. (But here''s the good news: Authenticated requests get a higher rate limit. Check out the documentation for more details.)",  "documentation_url": "https://developer.github.com/v3/#rate-limiting" }
You can check your rate limit status without incurring an API hit.
Increasing the unauthenticated rate limit for OAuth applications
If your OAuth application needs to make unauthenticated calls with a higher rate limit, you can pass your app''s client ID and secret as part of the query string.
curl -i ''https://api.github.com/users/whatever?client_id=xxxx&client_secret=yyyy''
HTTP/1.1 200 OK
Date: Mon, 01 Jul 2013 17:27:06 GMT
Status: 200 OK
X-RateLimit-Limit: 5000 X-RateLimit-Remaining: 4966 X-RateLimit-Reset: 1372700873
Note: Never share your client secret with anyone or include it in client-side browser code. Use the method shown here only for server-to-server calls.
Staying within the rate limit
If you exceed your rate limit using Basic Authentication or OAuth, you can likely fix the issue by caching API responses and using conditional requests.
Abuse rate limits
In order to provide quality service on GitHub, additional rate limits may apply to some actions when using the API. For example, using the API to rapidly create content, poll aggressively instead of using webhooks, make multiple concurrent requests, or repeatedly request data that is computationally expensive may result in abuse rate limiting.
Abuse rate limits are not intended to interfere with legitimate use of the API. Your normal rate limitsshould be the only limit you target. To ensure you''re acting as a good API citizen, check out our Best Practices guidelines.
If your application triggers this rate limit, you''ll receive an informative response:
HTTP/1.1 403 Forbidden
Content-Type: application/json; charset=utf-8
Connection: close
{
 "message": "You have triggered an abuse detection mechanism and have been temporarily blocked from content creation. Please retry your request again later.",  "documentation_url": "https://developer.github.com/v3/#abuse-rate-limits" }
User agent required
All API requests MUST include a valid User-Agent header. Requests with no User-Agent header will be rejected. We request that you use your GitHub username, or the name of your application, for the User-Agent header value. This allows us to contact you if there are problems.
Here''s an example:
User-Agent: Awesome-Octocat-AppcURL sends a valid User-Agent header by default. If you provide an invalid User-Agent header via cURL (or via an alternative client), you will receive a 403 Forbidden response:
curl -iH ''User-Agent: '' https://api.github.com/meta
HTTP/1.0 403 Forbidden
Connection: close
Content-Type: text/html
Request forbidden by administrative rules. Please make sure your request has a User-Agent header. Check https://developer.github.com for other possible causes.
Conditional requests
Most responses return an ETag header. Many responses also return a Last-Modified header. You can use the values of these headers to make subsequent requests to those resources using the If-None-Match and If-Modified-Since headers, respectively. If the resource has not changed, the server will return a 304 Not Modified.
Note: Making a conditional request and receiving a 304 response does not count against your Rate Limit, so we encourage you to use it whenever possible.
curl -i https://api.github.com/user
HTTP/1.1 200 OK
Cache-Control: private, max-age=60
ETag: "644b5b0155e6404a9cc4bd9d8b1ae730"
Last-Modified: Thu, 05 Jul 2012 15:31:30 GMT Status: 200 OK Vary: Accept, Authorization, Cookie X-RateLimit-Limit: 5000 X-RateLimit-Remaining: 4996 X-RateLimit-Reset: 1372700873 curl -i https://api.github.com/user -H ''If-None-Match: "644b5b0155e6404a9cc4bd9d8b1ae730"'' HTTP/1.1 304 Not Modified Cache-Control: private, max-age=60 ETag: "644b5b0155e6404a9cc4bd9d8b1ae730" Last-Modified: Thu, 05 Jul 2012 15:31:30 GMT Status: 304 Not Modified Vary: Accept, Authorization, Cookie X-RateLimit-Limit: 5000 X-RateLimit-Remaining: 4996 X-RateLimit-Reset: 1372700873 curl -i https://api.github.com/user -H "If-Modified-Since: Thu, 05 Jul 2012 15:31:30 GMT" HTTP/1.1 304 Not Modified Cache-Control: private, max-age=60 Last-Modified: Thu, 05 Jul 2012 15:31:30 GMT Status: 304 Not Modified Vary: Accept, Authorization, Cookie X-RateLimit-Limit: 5000 X-RateLimit-Remaining: 4996 X-RateLimit-Reset: 1372700873
Cross origin resource sharing
The API supports Cross Origin Resource Sharing (CORS) for AJAX requests from any origin. You can read the CORS W3C Recommendation, or this intro from the HTML 5 Security Guide.
Here''s a sample request sent from a browser hitting http://example.com:
curl -i https://api.github.com -H "Origin: http://example.com"
HTTP/1.1 302 Found
Access-Control-Allow-Origin: *
Access-Control-Expose-Headers: ETag, Link, X-GitHub-OTP, X-RateLimit-Limit, X-RateLimit-Remaining, X-RateLimit-Reset, X-OAuth-Scopes, X-Accepted-OAuth-Scopes, X-Poll-Interval
This is what the CORS preflight request looks like:
curl -i https://api.github.com -H "Origin: http://example.com" -X OPTIONS
HTTP/1.1 204 No Content
Access-Control-Allow-Origin: *
Access-Control-Allow-Headers: Authorization, Content-Type, If-Match, If-Modified-Since, If-None-Match, If-Unmodified-Since, X-GitHub-OTP, X-Requested-With
Access-Control-Allow-Methods: GET, POST, PATCH, PUT, DELETE
Access-Control-Expose-Headers: ETag, Link, X-GitHub-OTP, X-RateLimit-Limit, X-RateLimit-Remaining, X-RateLimit-Reset, X-OAuth-Scopes, X-Accepted-OAuth-Scopes, X-Poll-Interval
Access-Control-Max-Age: 86400
JSON-P callbacks
You can send a ?callback parameter to any GET call to have the results wrapped in a JSON function. This is typically used when browsers want to embed GitHub content in web pages by getting around cross domain issues. The response includes the same data output as the regular API, plus the relevant HTTP Header information.
curl https://api.github.com?callback=foo
/**/foo({
  "meta": {
    "status": 200,
 "X-RateLimit-Limit": "5000",  "X-RateLimit-Remaining": "4966",  "X-RateLimit-Reset": "1372700873",  "Link": [ // pagination headers and other links  ["https://api.github.com?page=2", {"rel": "next"}]  ]  },  "data": {  // the data  } })
You can write a JavaScript handler to process the callback. Here''s a minimal example you can try out:
<html>
<head>
<script type="text/javascript">
function foo(response) {
  var meta = response.meta;
  var data = response.data;
  console.log(meta);
  console.log(data);
}

var script = document.createElement(''script'');
script.src = ''https://api.github.com?callback=foo'';

document.getElementsByTagName(''head'')[0].appendChild(script);
</script>
</head>

<body>
  <p>Open up your browser''s console.</p>
</body>
</html>
All of the headers are the same String value as the HTTP Headers with one notable exception: Link. Link headers are pre-parsed for you and come through as an array of [url, options] tuples.
A link that looks like this:
Link: <url1>; rel="next", <url2>; rel="foo"; bar="baz"
... will look like this in the Callback output:
{
  "Link": [ [ "url1", { "rel": "next" } ], [ "url2", { "rel": "foo", "bar": "baz" } ] ] }
Timezones
Some requests that create new data, such as creating a new commit, allow you to provide time zone information when specifying or generating timestamps. We apply the following rules, in order of priority, to determine timezone information for API calls.
- Explicitly providing an ISO 8601 timestamp with timezone information
- Using the
Time-Zoneheader - Using the last known timezone for the user
- Defaulting to UTC without other timezone information
Explicitly providing an ISO 8601 timestamp with timezone information
For API calls that allow for a timestamp to be specified, we use that exact timestamp. An example of this is the Commits API.
These timestamps look something like 2014-02-27T15:05:06+01:00. Also see this example for how these timestamps can be specified.
Using the Time-Zone header
It is possible to supply a Time-Zone header which defines a timezone according to the list of names from the Olson database.
curl -H "Time-Zone: Europe/Amsterdam" -X POST https://api.github.com/repos/github/linguist/contents/new_file.md
This means that we generate a timestamp for the moment your API call is made in the timezone this header defines. For example, the Contents API generates a git commit for each addition or change and uses the current time as the timestamp. This header will determine the timezone used for generating that current timestamp.
Using the last known timezone for the user
If no Time-Zone header is specified and you make an authenticated call to the API, we use the last known timezone for the authenticated user. The last known timezone is updated whenever you browse the GitHub website.
Defaulting to UTC without other timezone information
If the steps above don''t result in any information, we use UTC as the timezone to create the git commit.
https://developer.github.com/v3/

AI-restful接口写法
AI-restful接口写法
restful接口规范
http协议请求方式:GET POST DELETE PUT PATCH OPTION HEAD
设计接口时必须使用这种格式的数据
GET 查看数据 book/1 ----->查看单条数据 {}
GET 查看数据 books-------->返回数据列表 [{},{},{}]
POST 提交数据添加到数据库 --------->返回添加数据 {}
PUT 更新 pk=1的数据 ------>返回更新后的数据 {}
PATCH 更新所有的数据
OPTION
HEAD 返回请求方式 比如 GET POST等
不使用DRF,来写接口
对于我们后台人员,写好接口把数据传给前端就okay了!
#url
urlpatterns = [
    url(r''^admin/'', admin.site.urls),
    url(r''^course/'', views.Courseview.as_view()),
]
#views.py
from django.shortcuts import render,HttpResponse
from django.views import View
# Create your views here.
from app01.models import *
import json
class Courseview(View):
def get(self,request):
ret=[] #get的接收方式为[{},{},{}]
course_list = Course.objects.all()
for course in course_list:
ret.append([
{"course_name": course.title},
{"course_desc":course.desc},
])
return HttpResponse(json.dumps(ret,ensure_ascii=False))
#也可以不使用json格式,效果一样,如下:
#return HttpResponse(ret)
#mdoels.py
from django.db import models

# Create your models here.
class Course(models.Model):
    title=models.CharField(max_length=32)
    desc=models.CharField(max_length=32)
前端接收:
[[{"course_name": "羊肚儿"}, {"course_desc": "煮10秒钟,贼香"}], [{"course_name": "宽粉"}, {"course_desc": "两盘儿,配上我妈给我调的料"}]]DRF
(1) APIView  (*****)
  (2) 序列化组件(*****)
  (3) 视图类(mixin)(*****)
  (4) 认证组件
  (5) 权限组件
  (6) 频率组件
  (7) 分页组件
  (8) 解析器组件(*****)
  (9) 响应器组件
  (10) url控制器
使用DRF,做数据接口--APIView(*****)
#views.py
from django.shortcuts import render,HttpResponse
from django.views import View
from rest_framework.views import APIView
# Create your views here.
from app01.models import *
import json

class Courseview(APIView):
    def get(self,request):
        ret=[]
        course_list = Course.objects.all()
        for course in course_list:
            ret.append([
                {"course_name": course.title},
                {"course_desc":course.desc},
            ])
        return HttpResponse(json.dumps(ret,ensure_ascii=False))
APIView源码解析
相比于View类,增加了“重装request方法”,“认证、权限、频率”等,本质功能还是做分发!!
下边代码可以不看,知道View源码即可,只是在View的dispatch方法里增加了认证、权限、频率等组件而已!
#1.开始

urlpatterns = [
    url(r''^admin/'', admin.site.urls),
    url(r''^course/'', views.Courseview.as_view()),
]


#2.在Courseview的父类APIView中找as_view方法
class APIView(View):
    schema = DefaultSchema()

    @classmethod
    def as_view(cls, **initkwargs):

    #在APIView父类中找as_view方法
        view = super(APIView, cls).as_view(**initkwargs)
        view.cls = cls
        view.initkwargs = initkwargs

#3.在APIView父类中找as_view方法
class View(object):

    http_method_names = [''get'', ''post'', ''put'', ''patch'', ''delete'', ''head'', ''options'', ''trace'']


    @classonlymethod
    def as_view(cls, **initkwargs):


        def view(request, *args, **kwargs):
            self = cls(**initkwargs)   #self即Courseview实例化对象
            if hasattr(self, ''get'') and not hasattr(self, ''head''):
                self.head = self.get
            self.request = request
            self.args = args
            self.kwargs = kwargs
            return self.dispatch(request, *args, **kwargs)  在Courseview中找dispatch方法
        view.view_class = cls

        return view   返回了view,当收到请求时,执行view()方法


#4.在Courseview中找dispatch方法,没有就在父类中找class Courseview(APIView):
    def get(self,request):
        ret=[]
        course_list = Course.objects.all()
        for course in course_list:
            ret.append([
                {"course_name": course.title},
                {"course_desc":course.desc},
            ])
        return HttpResponse(json.dumps(ret,ensure_ascii=False))


#5.APIView中的dispatch方法
    def dispatch(self, request, *args, **kwargs):
        self.args = args
        self.kwargs = kwargs
    #重装一个新的request对象
        request = self.initialize_request(request, *args, **kwargs)
        self.request = request
        self.headers = self.default_response_headers  # deprecate?

        try:
       #认证
            self.initial(request, *args, **kwargs)

            # Get the appropriate handler method
            if request.method.lower() in self.http_method_names:
                handler = getattr(self, request.method.lower(),
                                  self.http_method_not_allowed)
            else:
                handler = self.http_method_not_allowed

            response = handler(request, *args, **kwargs)

        except Exception as exc:
            response = self.handle_exception(exc)

        self.response = self.finalize_response(request, response, *args, **kwargs)
        return self.response
解析器组件(*****)
本质:基于http协议的数据编码格式

解析器中,两种数据编码格式:

  a,urlencoded

  b,json

  这两种数据编码格式的区别在于:
    urlencoded格式的数据,django会默认解析成{xx:oo,xx:ooo}格式;而json格式,django不会解析成固定格式,得自己解析
a.urlencoding
#url.py
urlpatterns = [
    url(r''^admin/'', admin.site.urls),
    url(r''^login/'', views.Loginview.as_view()),
]#views.py
from django.shortcuts import render,HttpResponse
from django.views import View
# Create your views here.
class Loginview(View):
def get(self,request):
return render(request,"login.html")
def post(self,request):
print(request.body) #请求体重的原生数据
#b''csrfmiddlewaretoken=eZ95jvkSlvVeB9lTkK85EYvgID5iMu171WyV421cEXVGXsxmj6BlCRxzLfKQf6zJ&user=zhang&pwd=111''
print(request.post) #djanog会默认解析urlencoded格式的数据
#<QueryDict: {''csrfmiddlewaretoken'': [''eZ95jvkSlvVeB9lTkK85EYvgID5iMu171WyV421cEXVGXsxmj6BlCRxzLfKQf6zJ''], ''user'': [''zhang''], ''pwd'': [''111'']}>
return HttpResponse("ddd"){## login.html#}
<form action="" method="post" enctype="application/x-www-form-urlencoded"> #默认解析格式为application/urlencoded
{% csrf_token %}
用户名:<input type="text" name="user">
密码:<input type="password" name="pwd">
<button type="submit">提交</button>
</form>提交用户信息后
页面-检查-内容
#Request.HEADER
Accept: text/html,application/xhtml+xml,application/xml;q=0.9,image/webp,image/apng,*/*;q=0.8
Accept-Encoding: gzip, deflate, br
Accept-Language: zh,zh-CN;q=0.9
Cache-Control: no-cache
Connection: keep-alive
Content-Length: 105
Content-Type: application/x-www-form-urlencoded 数据编码格式
Cookie: csrftoken=WyCTGzykwCoTLvAm7XBwGbxPLIXPwOpS5WwxOUrXqAbfeWsSwmi8gTXOZ85ctcvm
Host: 127.0.0.1:8011
Origin: http://127.0.0.1:8011
Pragma: no-cache
Referer: http://127.0.0.1:8011/login/
Upgrade-Insecure-Requests: 1
User-Agent: Mozilla/5.0 (Linux; Android 6.0; Nexus 5 Build/MRA58N) AppleWebKit/537.36 (KHTML, like Gecko) Chrome/67.0.3396.87 Mobile Safari/537.36
#Form Data 接收到的数据格式是“application/x-www-form-urlencoded” ,格式为:使用“&”符号,将信息连接起来
csrfmiddlewaretoken=nFrqVKA7F5p8iJCGkcfqI5wE0O9KipzZw3l435tKz3cuLaucJBW2iNWDeeh7fNFt&user=dudu&pwd=12332
#View Parsered django将接收到的格式转化为?????格式 格式为xxx:ooo
csrfmiddlewaretoken: nFrqVKA7F5p8iJCGkcfqI5wE0O9KipzZw3l435tKz3cuLaucJBW2iNWDeeh7fNFt
user: dudu
pwd: 123321b.json
#login.html

<button class="btn">Ajax</button>
<script>
    $(".btn").click(function () {
        $.ajax({
            url:"",
            type:"post",
            contentType:"json",
            data:JSON.stringify({
                user:"dudu",
                pwd:"555"
            }),
            success:function (data) {
                console.log(data)
            }
        })
    })
</script>
#views.py


from django.shortcuts import render,HttpResponse
from django.views import View
# Create your views here.
class Loginview(View):
    def get(self,request):
        return render(request,"login.html")


    def post(self,request):

        import json
        print(request.body) # 请求体中的原生数据
     #b''{"user":"dudu","pwd":"555"}''

        print(request.POST) #django默认不会对你的数据进行解析
     #<QueryDict: {}>

        # import json
        print(json.loads(request.body.decode("utf8"))) #自己解析数据
     #{''user'': ''dudu'', ''pwd'': ''555''}
        print(json.loads(request.body.decode("utf8"))["user"])

        print(type(request))
        from django.core.handlers.wsgi import WSGIRequest

        return HttpResponse("POST")
DRF编码格式
from django.shortcuts import render,HttpResponse
from django.views import View
from rest_framework.views import APIView
# Create your views here.
from app01.models import *
import json

class Courseview(APIView):  #从APIViewrest_framework.views中导入
    def get(self,request):
        ret=[]
        course_list = Course.objects.all()
        for course in course_list:
            ret.append([
                {"course_name": course.title},
                {"course_desc":course.desc},
            ])
        return HttpResponse(json.dumps(ret,ensure_ascii=False))

    def post(self,request):
        print(request.data)  #这个request是APIView中重新建立的request,
                 #相比于View的request,多了一个request.data方法
                 #这个“新的”request.data方法,可以解码所有的数据格式,都是DRF的功劳!!
       return HttpResponse("POST")
a.当使用postman发送POST请求,使用json发送数据,发送的数据格式必须是json格式
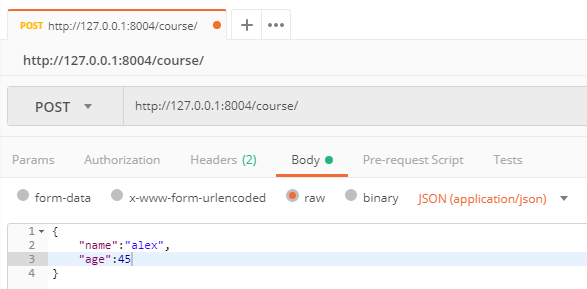
前端在post方法中,打印request.data,得到结果
{''name'': ''alex'', ''age'': 45}b.当使用postman发送POST请求,使用url-encoded发送数据
前端在post方法中,打印request.data,得到结果
<QueryDict: {''alex'': [''22''], ''dudu'': [''3333'']}>

api - php写restful接口?
想用php实现一个简单restfull api
发现php没有nodejs那样容易控制路由规则,路由是由apache给控制的
能给点建议不,怎么控制路由实现restful api ?
回复内容:
想用php实现一个简单restfull api
发现php没有nodejs那样容易控制路由规则,路由是由apache给控制的
能给点建议不,怎么控制路由实现restful api ?
http://frapi.github.io/developing/creati... 直接用后台生成api接口
立即学习“PHP免费学习笔记(深入)”;
没有规定路由必须交给Apache呀!你可以将所有请求集合到统一入口,再解析请求的URI和Method,调度到对应的接口Api程序,一样能实现Restful接口。很多PHP框架也是专门针对Restful开发的,比如Slim。而且大部分PHP框架也都支持Restful形式的路由,具体实现看看他们的代码就知道了。
Yii / Laravel 框架
可以使用这样的重定向规则,将找不到的文件转发到index.php
Options +FollowSymLinks
RewriteEngine On

RewriteCond %{REQUEST_FILENAME} !-d
RewriteCond %{REQUEST_FILENAME} !-f
RewriteRule ^ index.php [L]
然后你就可以自己定义Routes了
试试laravel你就会发现和express很相似的,推荐用laravel
你需要的是一个php路由控制器,slim确实很好。
所有框架都是可以自由定制路由的,比如ci和thinkphp这种只是默认把路由和对应的控制器进行了绑定。

CHENGDU3-Restful API 接口规范、django-rest-framework 框架
Restful API 接口规范、django-rest-framework 框架
问题:什么是 API?
答:API是接口,提供url.
接口有两个用途:
为别人提供服务,前后端分离。
为什么使用前后端分离?
答:主要为了数据的解耦,提高开发效率。
如果更新了数据,web页面需要更改,而且网站的前端页面变动很大,后端也可能更改,会非常麻烦。
使用前端框架VUE.js,能快速搭建前端项目,不需要依赖后端。
后端只需做序列化,返回json数据即可,并不涉及更多操作。
Restful API 规范?
答:之前我们是没有用rest api规范的,都是通过django的url自己来做的,后来我们选择用了rest api。
(1):API与用户的通信协议,使用的是http协议
(2):域名尽量部署在专有域名之下,若API很简单,不会进一步扩展,可以考虑放在主域名下。
(3):应将api的版本号放入url,还可以将版本号放入Http请求头信息中,但不如放在url中方便。
也可以放在子域名上(放在子域名上会存在跨域的问题,)
(4):在RESTful架构中,每个网址代表一种资源(resource),所以网址中不能有动词,只能有名词,
而且所用的名词往往与数据库的表格名对应。一般来说,
数据库中的表都是同种记录的"集合",所以API中的名词也应该使用复数。
(5):如果记录数量很多,服务器不可能都将它们返回给用户。API应该提供参数,过滤返回结果。
(6)根据请求方式的不同,来区分不同的行为。post----get----put----patch----delete。
(7):服务器向用户返回的状态码和提示信息。
(8):返回json数据。
常用的请求方式有那些?
答:Get :获取数据,Post:创建数据,Patch:部分修改
Put :全部修改,DELETE:删除数据,
Options:如果有跨域,会先发一个option请求,先做预检,完了在执行自己发的请求
常见的状态码有那些?
答:200:响应成功,302:重定向,403:Forbidden
404:找不到页面,500:服务端代码有误
谈谈你对 restful framework 的认识?
答:我们一开始是没有用restful framework,
用django写一些装饰器或中间件也能实现。
但是它为我们事先提供了一部分接口,
常用的有:获取版本,认证,权限,分流 ,
我们只需要按照restful的规范,只需要写几个类就好了,或者在配置文件里面配置一下就可以使用。
尤其是在用户访问频率限制的时候,restful里面都已经封装好了,我们直接调用它的方法就行了。

我们写的时候是基于CBV模式写的,这个和django中的CBV是一样的,
请求先进来会走dispatch方法,根据请求方法不同反射执行不同的方法。
我们写的类是继承APIView的View,去执行它的dispatch先找自己的,自己没有就找父类的。

restful framework执行流程?
restful framework请求进来到达路由.as_view(),在as_view里面return了一个view函数,请求进来先执行一个view函数。
as_views调用了dispath方法根据请求方式的不同,触发不同的方法。
initialize_request这个方法接收客户端的request请求,再重新封装成新的request。请求一些相关的东西放到request中
然后进行初始化,获取版本,认证调用request.user方法,检查权限,检查限制访问。
执行对应视图函数。
对返回结果再次进行加工。重要的功能在APIviews的dispath中实现。
Django Rest Framework 的的请求生命周期
TTP请求 —> wsgi —> 中间件 —> 路由分发 —> 执行对应类的dispatch方法 —> 视图函数 —>返回
采用CBV的请求方式。

经过“中间件”时,依次执行中间件内部的 process_request--->process_view--->process_template_response
---->process_exception---->process_response
restful framework 中包括那些?
答:有版本,认证,权限,访问频率的限制,路由系统,视图,渲染器,序列化,分页,解析器。
认证?
答:执行认证功能,确认进行后续操作的用户是被允许的,perform_authentication方法返回经过认证的用户对象,
传入的request是重新封装过的。
版本?
功能的更新迭代。
可以放在url,也可以放在请求头,但不是很方便,也可以放在子域名上,但存在跨域的问题。
可以用三种方法实现:get传参方式,基于url正则传参
如果url中有版本信息,就获取发送到服务端的版本,返回一个元组.
权限?
答:如果用户通过认证,检查用户是否有权限访问url中所传的路径,如用用户访问的是没有没有权限的路径,则会抛出异常。
访问频率的限制?
答:作用是检查用户是否被限制了访问主机的次数。
解析器
答:对请求数据进行解析,对请求体进行解析。
如何进行序列化的?
答:有两种方法实现
一:从数据去取出数据,return response
二:从数据库求出数据,赋值给instance,设置是否是单对象,再进行赋值,然后return response(.data)返回。
ser = UsersSerializer(instance=user_list,many=True)
return Response(ser.data)
序列化?
答:解决QuerySet序列化问题。
序列化:
基本序列化:单对象,多对象。instance=user_list,many=True
跨表序列化:
复杂序列化:
基于Model实现序列化:
生成url:
全部生成url:
请求数据验证:

Django-rest framework框架的安装配置、简介、Web API接口和Restful接口规范、基于原生django书写满足restful规范的接口
[toc]
Django-rest framework框架的安装配置、简介、Web API接口和Restful接口规范、基于原生django书写满足restful规范的接口
drf框架安装配置
一.安装
pip3 install djangorestframework
二.配置
# 注册drf app
INSTALLED_APPS = [
    # ...
    ''rest_framework'',
]
三.特点
# 具体功能在具体模块下
from rest_framework.request import Request
from rest_framework.response import Response
from rest_framework.exceptions import APIException
from rest_framework.filters import OrderingFilter
from rest_framework.views import APIView
from rest_framework.pagination import PageNumberPagination
from rest_framework.settings import APISettings

# 自定义drf配置 - 在自己的settings.py
REST_FRAMEWORK = {
    # 自定义修改drf的配置们
}
什么是drf框架
一、drf优点
1. Django-rest framework可以帮助我们简化以下两部分的代码编写,大大提高REST API的开发速度。
- 在序列化与反序列化时,虽然操作的数据不尽相同,但是执行的过程却是相似的,也就是说这部分代码是可以复用简化编写的。
- 在开发REST API的视图中,虽然每个视图具体操作的数据不同,但增、删、改、查的实现流程基本套路化,所以这部分代码也是可以复用简化编写的。
- 增:校验请求数据 -> 执行反序列化过程 -> 保存数据库 -> 将保存的对象序列化并返回
- 删:判断要删除的数据是否存在 -> 执行数据库删除
- 改:判断要修改的数据是否存在 -> 校验请求的数据 -> 执行反序列化过程 -> 保存数据库 -> 将保存的对象序列化并返回
- 查:查询数据库 -> 将数据序列化并返回
2. Django REST framework 框架是一个用于构建Web API 的强大而又灵活的工具。通常简称为DRF框架或REST framework。
3. DRF框架是建立在Django框架基础之上,由Tom Christie大牛二次开发的开源项目。
二、特点
- 提供了定义序列化器Serializer的方法,可以快速根据 Django ORM 或者其它库自动序列化/反序列化;
- 提供了丰富的类视图、Mixin扩展类,简化视图的编写;
- 丰富的定制层级:函数视图、类视图、视图集合到自动生成 API,满足各种需要;
- 多种身份认证和权限认证方式的支持;
- 内置了限流系统;
- 直观的 API web 界面;
- 可扩展性,插件丰富
接口规范
drf框架的作用:写接口
Web API 接口
什么是Web API接口
Web API接口就是通过网络,规定了前后台信息交互规则的url链接,也就是<font color=''red''>前后台信息交互的媒介</font>。
明确了请求方式,提供对应后台所需参数,请求url链接可以得到后台的响应数据。
怎么写接口
参照某种规则(规范)书写url链接,同时根据规则制定请求方式,请求数据与响应结果。
接口的四个核心部分:请求方式、请求地址、请求参数、响应结果。
Web API接口的四大特点
Web API接口和一般的url链接还是有区别的,Web API 接口简单概括有下面四大特点
-
url:长得像返回数据的url链接
- https://api.map.baidu.com/place/v2/search
-
请求方式:get(取)、post(增)、put(整体改)、patch(局部改)、delete(删除)
- 采用get方式请求上方接口
-
请求参数:json或xml格式的key-value类型数据
- ak:6E823f587c95f0148c19993539b99295
- region:上海
- query:肯德基
- output:json
-
响应结果:json或xml格式的数据
-
上方请求参数的output参数值决定了响应数据的格式
-
# 网络状态码:200
{
    "status": 0,
    "msg": "ok",
    "results": [
        {
            "name": "西游记",
            "img": "https://api.oldboy.com/media/img/xyj.png"
        }
    ]
}
-
接口文档的编写:YApi 接口管理平台
接口文档:提供给前后台开发人员与测试人员查看
YApi是去哪网大前端技术中心的一个开源可视化接口管理平台。
YApi项目可以搭建在任何本地或云服务器上,完成后台项目开发时的接口编写。为开发、测试等人员提供可视化的接口预览。
YApi进行接口编写的步骤:
- 访问测试网站
- 创建接口项目
- 创建接口
- 编写接口
接口测试工具:Postman
Postman是一款接口调试工具,是一款免费的可视化软件,同时支持各种操作系统平台,是测试接口的首选工具。
Postman可以直接从官网:https://www.getpostman.com/downloads/ 下载获得,然后进行傻瓜式安装。
Restful 接口规范
Restful 作为目前最流行的API设计规范,一定有着它独有的魅力:强大、简洁、易上手。
URL设计
数据的安全保障
url链接一般都采用https协议进行传输。
注:采用https协议,可以提高数据交互过程中的安全性
接口特征表现
要用api关键字标识接口url:
- https://api.baidu.com
- https://www.baidu.com/api
上面两种形式都可以
注:看到api字眼,就代表该请求url链接是完成前后台数据交互的。
多数据版本共存
要在url链接中标识数据版本
- https://api.baidu.com/v1
- https://api.baidu.com/v2
注:url链接中的v1、v2就是不同数据版本的体现(只有在一种数据资源有多版本的情况下)
数据即是资源
接口一般都是完成前后台数据的交互,交互的数据称之为资源。
eg:
- https://api.baidu.com/users
- https://api.baidu.com/books
- https://api.baidu.com/book
注:一般提倡用资源的复数形式,在url链接中尽量不要出现操作资源的动词,错误示范:https://api.baidu.com/delete-user
特殊的接口可以出现动词,因为这些接口一般没有一个明确的资源,或是动词就是接口的核心含义:
- https://api.baidu.com/place/search
- https://api.baidu.com/login
资源操作方式由请求方式决定
操作资源一般都会涉及到增删改查,我们提供请求方式来标识增删改查动作
eg:
- https://api.baidu.com/books - get请求:获取所有书
- https://api.baidu.com/books/1 - get请求:获取主键为1的书
- https://api.baidu.com/books - post请求:新增一本书
- https://api.baidu.com/books/1 - put请求:整体修改主键为1的书
- https://api.baidu.com/books/1 - patch请求:局部修改主键为1的书
- https://api.baidu.com/books/1 - delete请求:删除主键为1的书
响应状态码
正常响应
响应状态码2xx:
- 200:常规请求
- 201:创建成功
重定向响应
响应状态码3xx:
- 301:永久重定向
- 302:暂时重定向
客户端异常
响应状态码4xx:
- 403:请求无权限
- 404:请求路径不存在
- 405:请求方法不存在
服务器异常
响应状态码5xx:
- 500:服务器异常
响应结果
响应数据要有状态码、状态信息以及数据本身
{
     "status":0,    //状态响应码
     "message":"ok",    //状态信息
     "results":[    //响应数据
     {
         "name":"肯德基(罗餐厅)",
         "location":{
             "lat":31.415354,
             "lng":121.357339
            },
         "address":"月罗路2380号",
         "province":"上海市",
         "city":"上海市",
         "area":"宝山区",
         "street_id":"339ed41ae1d6dc320a5cb37c",
         "telephone":"(021)56761006",
         "detail":1,
         "uid":"339ed41ae1d6dc320a5cb37c"
     }
     ...
     ]
}
需要url请求的资源需要访问资源的请求链接
{
    "status": 0,
    "msg": "ok",
    "results":[
        {
            "name": "肯德基",
            "img": "https://image.baidu.com/kfc/001.png"
        }
    ]
}
基于原生django书写满足restful规范的接口
两个url 对应 一个视图类 完成十大接口,用到路由分发
路由分发需要在app文件夹下也创建一个urls.py文件
项目名下的urls.py
from django.conf.urls import url, include
from django.contrib import admin
from api import views

urlpatterns = [
    url(r''^admin/'', admin.site.urls),
    url(r''^test/'', views.Test.as_view()),
    # 路由分发
    url(r''^api/'', include(''api.urls'')),
]
app名下的urls.py:api\urls.py
from django.conf.urls import url
from . import views

urlpatterns = [
    url(r''^books/$'', views.Book.as_view()),    # 群查
    url(r''^books/(?P<pk>\d+)/$'', views.Book.as_view()),   # 单查
]
上面两个url都对应视图函数文件内的视图类Book
view.py
from django.http import JsonResponse
from django.views import View
from . import models
from rest_framework.views import APIView

class Book(View):
    def get(self, request, *args, **kwargs):
        pk = kwargs.get(''pk'', None)
        if pk:  # 单查
            book_dic = models.Book.objects.filter(pk=pk).values(''name'', ''price'').first()
            results = book_dic
        else:  # 群查
            book_query = models.Book.objects.values(''name'', ''price'')
            results = list(book_query)
        if not results:
            return JsonResponse({
                ''status'': 1,
                ''msg'': ''data error'',
            })
        return JsonResponse({
            ''status'': 0,
            ''msg'': ''ok'',
            ''results'': results
        })
CBV请求生命周期
as_view()方法完成路由匹配 => url请求会调用as_view()的返回值视图函数view => 调用dispatch()方法完成请求分发 => 视图类的具体视图方法处理请求 => 返回给前台
我们今天的关于Github api【Restful接口规范】和github rest api的分享已经告一段落,感谢您的关注,如果您想了解更多关于AI-restful接口写法、api - php写restful接口?、CHENGDU3-Restful API 接口规范、django-rest-framework 框架、Django-rest framework框架的安装配置、简介、Web API接口和Restful接口规范、基于原生django书写满足restful规范的接口的相关信息,请在本站查询。
本文标签:


