以上就是给各位分享CENTOS7使用Docker安装oracle11g,其中也会对docker在centos7中安装进行解释,同时本文还将给你拓展CentOS5.5安装Oracle11gRAC问题汇总
以上就是给各位分享CENTOS 7 使用 Docker 安装 oracle 11g,其中也会对docker在centos7中安装进行解释,同时本文还将给你拓展CentOS 5.5 安装 Oracle 11g RAC 问题汇总、CentOS 5.8安装Oracle 11g、CentOS 5.9安装Oracle 11g、Centos 6 Oracle 11G 超详细安装等相关知识,如果能碰巧解决你现在面临的问题,别忘了关注本站,现在开始吧!
本文目录一览:- CENTOS 7 使用 Docker 安装 oracle 11g(docker在centos7中安装)
- CentOS 5.5 安装 Oracle 11g RAC 问题汇总
- CentOS 5.8安装Oracle 11g
- CentOS 5.9安装Oracle 11g
- Centos 6 Oracle 11G 超详细安装
")
CENTOS 7 使用 Docker 安装 oracle 11g(docker在centos7中安装)
转载的文章,但是在安装的时候也遇到一些问题:
1.docker 第一次安装失败,下一次会提示同名的容器已经存在,解决办法:
docker container ls -a
根据上面执行的接口,选择一个 containerid,然后带入到下面的命令
docker container rm -f containerid
2. 安装的时候报文件找不到
我是在 WINDOWS 上通过 CHROME 浏览器下载并在 WINDOWS 上解压的(经验告诉我解压第一个 PART 会自动解压第二个,但是并没有),只解压了第一个 oracle 安装文件(linux.x64_11gR2_database_1of2.zip),第二个(linux.x64_11gR2_database_2of2.zip)没有解压。。。所以报错。
3. 修改 sys/system 用户密码
使用 sqlplus /as sysdba 登陆进去之后执行如下命令:
alter user sys identified by abc123;
alter user system identified by abc123;
4. 创建新用户
使用 sqlplus /as sysdba 登陆进去之后执行如下命令或者使用 IDE 工具以 SYS/SYSTEM 登录之后执行:
create user acct identified by abc123;
grant resource,connect to acct;
grant select any table to acct;
grant debug any procedure,debug connect session to acct;
5. 查看 ORACLE SID 或者 SERVICENAME
一般来说 SID 和 SERVICENAME 是一致的
使用 sqlplus /as sysdba 登陆进去之后执行如下命令:
select instance_name from V$instance;
6. 重启服务器之后重启 docker(要求 root 权限)

执行命令:
docker start 043afeb3a74d
![]()
检查 oracle 是否启动成功
netstat -anp|grep 1521
![]()
7. 设置开机启动
7.1 首先 docker 自己得先开机启动
systemctl enable docker.service
7.2 将 oracle 容器设置为开机启动
要求容器没有运行
docker run --restart=always 043afeb3a74d
要求 containerid=043afeb3a74d 的容器是运行着的(我自己测试这种方式)
docker update --restart=always 043afeb3a74d
测试:先 reboot 机器
然后执行 netstat -anp|grep 1521

使用 Docker 安装 oracle 11g
简介
Oracle Database,又名 Oracle RDBMS,或简称 Oracle。是甲骨文公司的一款关系数据库管理系统。
借助 docker,安装 oracle 不再困难,只需要几步即可。
一,安装 Docker(就不截图了)
如果没有 root 用户或者你的用户没有加入 sudoers 列表,你是没法玩的
yum update
yum install -y yum-utils device-mapper-persistent-data lvm2
yum-config-manager --add-repo https://download.docker.com/linux/centos/docker-ce.repo
yum list docker-ce --showduplicates | sort -r
yum install docker-ce-18.06.3.ce-3.el7
二,安装
2.1、安装 oracle 11g 镜像到 docker
2.1.1、搜索符合条件的镜像
docker search oracle

NAME                                  DESCRIPTION                                     STARS               OFFICIAL            AUTOMATED
oraclelinux                           Official Docker builds of Oracle Linux.         573                 [OK]
jaspeen/oracle-11g                    Docker image for Oracle 11g database            99                                      [OK]
oracle/openjdk                        Docker images containing OpenJDK Oracle Linux   55                                      [OK]
……
2.1.2、选择安装 jaspeen/oracle-11g,等待下载安装完成
docker pull jaspeen/oracle-11g
2.1.3、查看下载好的镜像
docker images

REPOSITORY                 TAG                 IMAGE ID            CREATED             SIZE
jaspeen/oracle-11g         latest              0c8711fe4f0f        3 years ago         281MB
注意,这个镜像没有直接安装好 oracle,他帮我们配置好了环境,提供了安装脚本,我们只需要按照要求把 oracle 的安装目录配置好,启动镜像,即可
2.2、准备 oracle 11g 安装文件
2.2.1、下载 oracle 11g 安装文件
从 oracle 官网 下载所需要的安装包,这里我们以 oracle 11g 为例子,分别下载 linux.x64_11gR2_database_1of2.zip 和 linux.x64_11gR2_database_2of2.zip 两个压缩包,下载完成后解压到 home 目录 (如下目录结构)
  home
    └─database
        ├─doc
        ├─install
        ├─response
        ├─rpm
        ├─sshsetup
        ├─stage
        ├─runInstaller
        └─welcome.html
2.3、安装 oracle
2.3.1、注意事项
为什么要解压成上面的目录结构,我们先来看看 jaspeen/oracle-11g 镜像提供的安装脚本
#!/usr/bin/env bash
set -e
source /assets/colorecho

trap "echo_red ''******* ERROR: Something went wrong.''; exit 1" SIGTERM
trap "echo_red ''******* Caught SIGINT signal. Stopping...''; exit 2" SIGINT

if [ ! -d "/install/database" ]; then
	echo_red "Installation files not found. Unzip installation files into mounted(/install) folder"
	exit 1
fi

echo_yellow "Installing Oracle Database 11g"

su oracle -c "/install/database/runInstaller -silent -ignorePrereq -waitforcompletion -responseFile /assets/db_install.rsp"
/opt/oracle/oraInventory/orainstRoot.sh
/opt/oracle/app/product/11.2.0/dbhome_1/root.sh
从脚本里可以看到它会读取 /install/database 目录,如果不存在会给出提示 Installation files not found. Unzip installation files into mounted(/install) folder
2.3.2、启动镜像(执行安装 oracle)
命令的解释:
- docker run 启动容器的命令
- privileged 给这个容器特权,安装 oracle 可能需要操作需要 root 权限的文件或目录
- name 给这个容器名一个名字
- p 映射端口
- v 挂在文件到容器指定目录 (
/home对应容器/install/database) - jaspeen/oracle-11g 代表启动指定的容器
docker run --privileged --name oracle11g -p 1521:1521 -v /home:/install jaspeen/oracle-11g

Database is not installed. Installing...
Installing Oracle Database 11g
Starting Oracle Universal Installer...

Checking Temp space: must be greater than 120 MB.   Actual 47303 MB    Passed
Checking swap space: must be greater than 150 MB.   Actual 1023 MB    Passed
Preparing to launch Oracle Universal Installer from /tmp/OraInstall2019-04-17_08-14-23AM. Please wait ...
You can find the log of this install session at:
 /opt/oracle/oraInventory/logs/installActions2019-04-17_08-14-23AM.log
 ……
这个安装过程会很漫长,日志也很多,这里只提供部分。注意到日志里有 100% complete 打印,代表 oracle 安装成功
2.3.3、安装完成
再次查看运行状态,oracle 已经启动完成
docker ps -a

CONTAINER ID        IMAGE                COMMAND                  CREATED             STATUS                      PORTS                                                                             NAMES
7f53f07c93e5        jaspeen/oracle-11g   "/assets/entrypoint.…"   About an hour ago   Up About an hour            0.0.0.0:1521->1521/tcp, 8080/tcp                                                  oracle11g
2.3.4、其他需要注意的,如果日志长时间没有更新,检查 docker 是否已经死掉
查看 docker 的状态
docker ps -a
Error response from daemon: An invalid argument was supplied.
如果出现如上提示,表示 docker 已经死掉,我们只需要重新执行安装步骤,让 oracle 安装完成
ps: 根据我的猜测,我给 docker 分配的资源不够导致的,我重新把 docker 的内存和 cpu 调高一点后 oracle 顺利安装完成。
docker rm oracle11g
docker run --privileged --name oracle11g -p 1521:1521 -v oracleinstall:/install jaspeen/oracle-11g
三,配置
默认 scott 用户是被锁定的,我们需要解锁,通过数据库工具即可成功连接到 oracle
3.1,连接到容器,
docker exec -it oracle11g /bin/bash
3.2,切换到 oracle 用户,然后连接到 sql 控制台
[root@7f53f07c93e5 /]# su - oracle
Last login: Wed Apr 17 08:29:31 UTC 2019
[oracle@7f53f07c93e5 ~]$ sqlplus / as sysdba

SQL*Plus: Release 11.2.0.1.0 Production on Wed Apr 17 09:29:49 2019

Copyright (c) 1982, 2009, Oracle.  All rights reserved.


Connected to:
Oracle Database 11g Enterprise Edition Release 11.2.0.1.0 - 64bit Production
With the Partitioning, OLAP, Data Mining and Real Application Testing options

SQL>
3.3,解锁账户
SQL> alter user scott account unlock;
User altered.
SQL> commit;
Commit complete.
SQL> conn scott/tiger
ERROR:
ORA-28001: the password has expired
Changing password for scott
New password:
Retype new password:
Password changed
Connected.
SQL>
3.4,使用 PL/SQL Devolper 连接 Oracle 数据库
编辑本机 oracle 客户端或者服务端 tnsnames.ora 文件,增加如下配置
ACCT_LOCAL_DCOKER =
(DESCRIPTION =
(ADDRESS = (PROTOCOL = TCP)(HOST = 192.168.10.11)(PORT = 1521))
(CONNECT_DATA =
(SERVER = DEDICATED)
(SERVICE_NAME = orcl)
)
)
打开 PL/SQL Developer 选择 ACCT_LOCAL_DCOKER,输入账号、密码即可
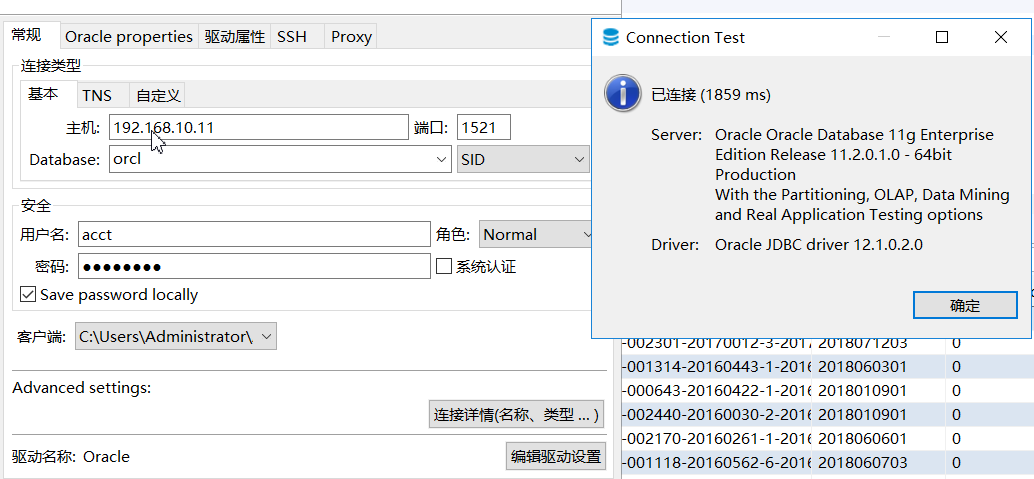
3.5 使用 DBeaver 连接 Oracle

CentOS 5.5 安装 Oracle 11g RAC 问题汇总
CentOS 5.5 安装 Oracle 11g RAC 问题汇总
在安装RAC 时,出了不少问题。
现汇总如下:
1、开始安装时,因两节点同时运行了root.sh,以至出错, ohasd 不能启动。
后来删除重新安装,先前建立的CRS 磁盘组已不能选择了。只好再退出来,(选择已是磁盘成员)
(后面经查询资料才知,可以在删除文件前,执行ASMCA进行管理ASM磁盘组)
先删除CRS对应的3个磁盘 CRS1,CRS2,CRS3, 再使用 Oracleasm createdisk 重新建立。
再进入安装界面,可以选择此3个磁盘进行建立磁盘组CRS 了。
2.提示:ADVM/ACFS is not supported on CentOS-release-5-5.el5.centos
不知是否会有后遗症,但暂时没出错。
3.最后执行root.sh 完后,安装步骤走到最后一步,又出: [INS-20802] Oracle Cluster Verification Utility failed
错误。
这里暂时没有其它更好的解决办法,,只好跳过去。安装ORACLE 数据库,并建立一个数据库(DBCA)
有的人说是: 原来就是节点一致性上做的有问题 ,但我的检查,全部通过。
****************************************************************************
[root@rac1 ~]# /opt/app/grid/root.sh
Running Oracle 11g root.sh script...The following environment variables are set as:
ORACLE_OWNER= grid
ORACLE_HOME= /opt/app/grid
Enter the full pathname of the local bin directory: [/usr/local/bin]:
Copying dbhome to /usr/local/bin ...
Copying oraenv to /usr/local/bin ...
Copying coraenv to /usr/local/bin ...
Creating /etc/oratab file...
Entries will be added to the /etc/oratab file as needed by
Database Configuration Assistant when a database is created
Finished running generic part of root.sh script.
Now product-specific root actions will be performed.
2011-07-26 18:40:03: Parsing the host name
2011-07-26 18:40:03: Checking for super user privileges
2011-07-26 18:40:03: User has super user privileges
Using configuration parameter file: /opt/app/grid/crs/install/crsconfig_params
Creating trace directory
LOCAL ADD MODE
Creating OCR keys for user ''root'', privgrp ''root''..
Operation successful.
root wallet
root wallet cert
root cert export
peer wallet
profile reader wallet
pa wallet
peer wallet keys
pa wallet keys
peer cert request
pa cert request
peer cert
pa cert
peer root cert TP
profile reader root cert TP
pa root cert TP
peer pa cert TP
pa peer cert TP
profile reader pa cert TP
profile reader peer cert TP
peer user cert
pa user cert
Adding daemon to inittab
CRS-4123: Oracle High Availability Services has been started.
ohasd is starting
ADVM/ACFS is not supported on centos-release-5-5.el5.centos
CRS-2672: 尝试启动 ''ora.gipcd'' (在 ''rac1'' 上)
CRS-2672: 尝试启动 ''ora.mdnsd'' (在 ''rac1'' 上)
CRS-2676: 成功启动 ''ora.gipcd'' (在 ''rac1'' 上)
CRS-2676: 成功启动 ''ora.mdnsd'' (在 ''rac1'' 上)
CRS-2672: 尝试启动 ''ora.gpnpd'' (在 ''rac1'' 上)
CRS-2676: 成功启动 ''ora.gpnpd'' (在 ''rac1'' 上)
CRS-2672: 尝试启动 ''ora.cssdmonitor'' (在 ''rac1'' 上)
CRS-2676: 成功启动 ''ora.cssdmonitor'' (在 ''rac1'' 上)
CRS-2672: 尝试启动 ''ora.cssd'' (在 ''rac1'' 上)
CRS-2672: 尝试启动 ''ora.diskmon'' (在 ''rac1'' 上)
CRS-2676: 成功启动 ''ora.diskmon'' (在 ''rac1'' 上)
CRS-2676: 成功启动 ''ora.cssd'' (在 ''rac1'' 上)
CRS-2672: 尝试启动 ''ora.ctssd'' (在 ''rac1'' 上)
CRS-2676: 成功启动 ''ora.ctssd'' (在 ''rac1'' 上)
ASM created and started successfully.
DiskGroup CRS created successfully.
clscfg: -install mode specified
Successfully accumulated necessary OCR keys.
Creating OCR keys for user ''root'', privgrp ''root''..
Operation successful.
CRS-2672: 尝试启动 ''ora.crsd'' (在 ''rac1'' 上)
CRS-2676: 成功启动 ''ora.crsd'' (在 ''rac1'' 上)
CRS-4256: Updating the profile
Successful addition of voting disk 39168288fb9d4fb2bf4de6654d44bb81.
Successfully replaced voting disk group with +CRS.
CRS-4256: Updating the profile
CRS-4266: Voting file(s) successfully replaced
## STATE File Universal Id File Name Disk group
-- ----- ----------------- --------- ---------
1. ONLINE 39168288fb9d4fb2bf4de6654d44bb81 (/dev/oracleasm/disks/CRS1) [CRS]
Located 1 voting disk(s).
CRS-2673: 尝试停止 ''ora.crsd'' (在 ''rac1'' 上)
CRS-2677: 成功停止 ''ora.crsd'' (在 ''rac1'' 上)
CRS-2673: 尝试停止 ''ora.asm'' (在 ''rac1'' 上)
CRS-2677: 成功停止 ''ora.asm'' (在 ''rac1'' 上)
CRS-2673: 尝试停止 ''ora.ctssd'' (在 ''rac1'' 上)
CRS-2677: 成功停止 ''ora.ctssd'' (在 ''rac1'' 上)
CRS-2673: 尝试停止 ''ora.cssdmonitor'' (在 ''rac1'' 上)
CRS-2677: 成功停止 ''ora.cssdmonitor'' (在 ''rac1'' 上)
CRS-2673: 尝试停止 ''ora.cssd'' (在 ''rac1'' 上)
CRS-2677: 成功停止 ''ora.cssd'' (在 ''rac1'' 上)
CRS-2673: 尝试停止 ''ora.gpnpd'' (在 ''rac1'' 上)
CRS-2677: 成功停止 ''ora.gpnpd'' (在 ''rac1'' 上)
CRS-2673: 尝试停止 ''ora.gipcd'' (在 ''rac1'' 上)
CRS-2677: 成功停止 ''ora.gipcd'' (在 ''rac1'' 上)
CRS-2673: 尝试停止 ''ora.mdnsd'' (在 ''rac1'' 上)
CRS-2677: 成功停止 ''ora.mdnsd'' (在 ''rac1'' 上)
CRS-2672: 尝试启动 ''ora.mdnsd'' (在 ''rac1'' 上)
CRS-2676: 成功启动 ''ora.mdnsd'' (在 ''rac1'' 上)
CRS-2672: 尝试启动 ''ora.gipcd'' (在 ''rac1'' 上)
CRS-2676: 成功启动 ''ora.gipcd'' (在 ''rac1'' 上)
CRS-2672: 尝试启动 ''ora.gpnpd'' (在 ''rac1'' 上)
CRS-2676: 成功启动 ''ora.gpnpd'' (在 ''rac1'' 上)
CRS-2672: 尝试启动 ''ora.cssdmonitor'' (在 ''rac1'' 上)
CRS-2676: 成功启动 ''ora.cssdmonitor'' (在 ''rac1'' 上)
CRS-2672: 尝试启动 ''ora.cssd'' (在 ''rac1'' 上)
CRS-2672: 尝试启动 ''ora.diskmon'' (在 ''rac1'' 上)
CRS-2676: 成功启动 ''ora.diskmon'' (在 ''rac1'' 上)
CRS-2676: 成功启动 ''ora.cssd'' (在 ''rac1'' 上)
CRS-2672: 尝试启动 ''ora.ctssd'' (在 ''rac1'' 上)
CRS-2676: 成功启动 ''ora.ctssd'' (在 ''rac1'' 上)
CRS-2672: 尝试启动 ''ora.asm'' (在 ''rac1'' 上)
CRS-2676: 成功启动 ''ora.asm'' (在 ''rac1'' 上)
CRS-2672: 尝试启动 ''ora.crsd'' (在 ''rac1'' 上)
CRS-2676: 成功启动 ''ora.crsd'' (在 ''rac1'' 上)
CRS-2672: 尝试启动 ''ora.evmd'' (在 ''rac1'' 上)
CRS-2676: 成功启动 ''ora.evmd'' (在 ''rac1'' 上)
CRS-2672: 尝试启动 ''ora.asm'' (在 ''rac1'' 上)
CRS-2676: 成功启动 ''ora.asm'' (在 ''rac1'' 上)
CRS-2672: 尝试启动 ''ora.CRS.dg'' (在 ''rac1'' 上)
CRS-2676: 成功启动 ''ora.CRS.dg'' (在 ''rac1'' 上)
rac1 2011/07/26 18:45:46 /opt/app/grid/cdata/rac1/backup_20110726_184546.olr
Configure Oracle Grid Infrastructure for a Cluster ... succeeded
Updating inventory properties for clusterware
Starting Oracle Universal Installer...
Checking swap space: must be greater than 500 MB. Actual 63999 MB Passed
The inventory pointer is located at /etc/oraInst.loc
The inventory is located at /opt/app/oraInventory
''UpdateNodeList'' was successful.
--------------- rac2 run root.sh --------------------------
[root@rac2 etc]# /opt/app/grid/root.sh
Running Oracle 11g root.sh script...
The following environment variables are set as:
ORACLE_OWNER= grid
ORACLE_HOME= /opt/app/grid
Enter the full pathname of the local bin directory: [/usr/local/bin]:
Copying dbhome to /usr/local/bin ...
Copying oraenv to /usr/local/bin ...
Copying coraenv to /usr/local/bin ...
Creating /etc/oratab file...
Entries will be added to the /etc/oratab file as needed by
Database Configuration Assistant when a database is created
Finished running generic part of root.sh script.
Now product-specific root actions will be performed.
2011-07-26 18:46:36: Parsing the host name
2011-07-26 18:46:36: Checking for super user privileges
2011-07-26 18:46:36: User has super user privileges
Using configuration parameter file: /opt/app/grid/crs/install/crsconfig_params
Creating trace directory
LOCAL ADD MODE
Creating OCR keys for user ''root'', privgrp ''root''..
Operation successful.
Adding daemon to inittab
CRS-4123: Oracle High Availability Services has been started.
ohasd is starting
ADVM/ACFS is not supported on centos-release-5-5.el5.centos
CRS-4402: CSS 守护程序已在独占模式下启动, 但在节点 rac1 (编号为 1) 上发现活动 CSS 守护程序, 因此正在终止
An active cluster was found during exclusive startup, restarting to join the cluster
CRS-2672: 尝试启动 ''ora.mdnsd'' (在 ''rac2'' 上)
CRS-2676: 成功启动 ''ora.mdnsd'' (在 ''rac2'' 上)
CRS-2672: 尝试启动 ''ora.gipcd'' (在 ''rac2'' 上)
CRS-2676: 成功启动 ''ora.gipcd'' (在 ''rac2'' 上)
CRS-2672: 尝试启动 ''ora.gpnpd'' (在 ''rac2'' 上)
CRS-2676: 成功启动 ''ora.gpnpd'' (在 ''rac2'' 上)
CRS-2672: 尝试启动 ''ora.cssdmonitor'' (在 ''rac2'' 上)
CRS-2676: 成功启动 ''ora.cssdmonitor'' (在 ''rac2'' 上)
CRS-2672: 尝试启动 ''ora.cssd'' (在 ''rac2'' 上)
CRS-2672: 尝试启动 ''ora.diskmon'' (在 ''rac2'' 上)
CRS-2676: 成功启动 ''ora.diskmon'' (在 ''rac2'' 上)
CRS-2676: 成功启动 ''ora.cssd'' (在 ''rac2'' 上)
CRS-2672: 尝试启动 ''ora.ctssd'' (在 ''rac2'' 上)
CRS-2676: 成功启动 ''ora.ctssd'' (在 ''rac2'' 上)
CRS-2672: 尝试启动 ''ora.asm'' (在 ''rac2'' 上)
CRS-2676: 成功启动 ''ora.asm'' (在 ''rac2'' 上)
CRS-2672: 尝试启动 ''ora.crsd'' (在 ''rac2'' 上)
CRS-2676: 成功启动 ''ora.crsd'' (在 ''rac2'' 上)
CRS-2672: 尝试启动 ''ora.evmd'' (在 ''rac2'' 上)
CRS-2676: 成功启动 ''ora.evmd'' (在 ''rac2'' 上)
rac2 2011/07/26 18:49:59 /opt/app/grid/cdata/rac2/backup_20110726_184959.olr
Configure Oracle Grid Infrastructure for a Cluster ... succeeded
Updating inventory properties for clusterware
正在启动 Oracle Universal Installer...
检查交换空间: 必须大于 500 MB。 实际为 66463 MB 通过
The inventory pointer is located at /etc/oraInst.loc
The inventory is located at /opt/app/oraInventory
''UpdateNodeList'' 成功。
[INS-20802] Oracle Cluster Verification Utility failed
![]()

CentOS 5.8安装Oracle 11g
一直没总结Oracle11g的安装过程,今天公司不忙,好好整理一下并记录下来,以便于再次安装时参考。
OS:CentOS5.8
Oracle: 11g2
过程如下:
1:将Oracle上传到服务器上如:
-rw-r--r-- 1 root root 1239269270 08-17 12:47 linux.x64_11gR2_database_1of2.zip
-rw-r--r-- 1 root root 1111416131 08-17 12:49 linux.x64_11gR2_database_2of2.zip
先在同一个目录下解压以上2个文件,注意:先解压第一个,然后再解压第二个。
unzip linux.x64_11gR2_database_1of2.zip
完成后会在该目录下产生一个database的目录。
如果你想解决在sqlplus下产生上下键乱码bug,就得准备 rlwrap-0.37.tar.gz 。
下载地址为:http://www.linuxidc.com/Linux/2011-11/47463.htm
解压文件:
tar -zxvf rlwrap-0.37.tar.gz
解压后会产生rlwrap-0.37目录,进入目录进行安装并测试:
[root@test zip]# cd rlwrap-0.37
[root@test rlwrap-0.37]# ./configure && make && make install 安装
....过程省略
[root@test rlwrap-0.37]# which rlwrap 检查是否安装成功
/usr/local/bin/rlwrap
根据oracle文档要求创建dba用户组,安装oracle软件的oinstall组(os级别的用户组)和用户oracle。并创建oracle软件的home目录,该目录的创建方式请遵循oracle文档中OFA即Optimal Flexible Architecture原则。
[root@test rlwrap-0.37]# groupadd dba
[root@test rlwrap-0.37]# groupadd oinstall
[root@test rlwrap-0.37]# useradd -g oinstall -G dba oracle
[root@test rlwrap-0.37]# mkdir -p /u01/app/oracle/product/11.2.0/db_1
[root@test rlwrap-0.37]# passwd oracle
Changing password for user oracle.
New UNIX password:
BAD PASSWORD: it is based on a dictionary word
Retype new UNIX password:
passwd: all authentication tokens updated successfully.
切换到用户oracle,编辑环境变量,并做如下设置:
[oracle@test ~]$ vi .bash_profile
# .bash_profile
# Get the aliases and functions
if [ -f ~/.bashrc ]; then
. ~/.bashrc
fi
# User specific environment and startup programs
PATH=$PATH:$HOME/bin
export PATH
export ORACLE_SID=test
export ORACLE_BASE=/u01/app/oracle
export ORACLE_HOME=$ORACLE_BASE/product/11.2.0/db_1
export PATH=$ORACLE_HOME/bin:$PATH
export NLS_LANG=AMERICAN_AMERICA.ZHS16GBK 常用字符集格式还有AMERICAN_AMERICA.AL32UTF-8
LD_LIBRARY_PATH=$ORACLE_HOME/lib:$LD_LIBRARY_PATH
export ORACLE_SID ORACLE_BASE ORACLE_HOME LD_LIBRARY_PATH PATH
stty erase ^h 用于解决sqlplus下上下键乱码的问题
alias sqlplus="rlwrap sqlplus"
alias rman="rlwrap rman"
修改后保存即可,测试修改是否成功:
[oracle@test ~]$ exit
logout
[root@test ~]# su - oracle
[oracle@test ~]$ env | grep ORA
ORACLE_SID=test
ORACLE_BASE=/u01/app/oracle
ORACLE_HOME=/u01/app/oracle/product/11.2.0/db_1
此时就可以通过远程工具如:xmanger等来进行远程安装数据库了
[Oracle@test ~]$ export disPLAY=172.16.17.1:0.0 此处的ip为你要显示的机器的ip,如果是在虚拟机中,网络连接用的host-only的话,该ip设置为虚拟机网卡1的ip
[oracle@test ~]$ xclock
如果在机器的右上角有时钟的窗口弹出 表示配置成功。做完如下工作后便可以安装数据库了
[root@test zip]# mv database /u01/
[root@test zip]# chown -R oracle:oinstall /u01
[root@test zip]# ll /u01
总计 8
drwxr-xr-x 3 oracle oinstall 4096 01-13 06:10 app
drwxr-xr-x 8 oracle oinstall 4096 2009-08-21 database
数据库软件安装:
[oracle@test ~]$ pwd
/home/oracle
[oracle@test ~]$ cd /u01/database/
[oracle@test database]$
[oracle@test database]$
[oracle@test database]$ ./runInstaller -ignoreSysPrereqs
正在启动 Oracle Universal Installer...
检查临时空间: 必须大于 120 MB。 实际为 9502 MB 通过
检查交换空间: 必须大于 150 MB。 实际为 1027 MB 通过
检查监视器: 监视器配置至少必须显示 256 种颜色。 实际为 16777216 通过
准备从以下地址启动 Oracle Universal Installer /tmp/OraInstall2013-01-13_06-41-27AM. 请稍候...
此时安装界面就出来了 以下为安装过程的截图

点击继续

点击下一步一直到出现以下这个页面:

此时 点击图中用红方框标记出来的按钮 并以root用户执行该按钮弹出框中的脚本。完成后安装oracle软件所需要的安装包。
[root@test zip]# /tmp/CVU_11.2.0.1.0_Oracle/runfixup.sh
Response file being used is :/tmp/CVU_11.2.0.1.0_oracle/fixup.response
Enable file being used is :/tmp/CVU_11.2.0.1.0_oracle/fixup.enable
Log file location: /tmp/CVU_11.2.0.1.0_oracle/orarun.log
Setting Kernel Parameters...
kernel.sem = 250 32000 100 128
fs.file-max = 6815744
net.ipv4.ip_local_port_range = 9000 65500
net.core.rmem_default = 262144
net.core.wmem_default = 262144
net.core.rmem_max = 4194304
net.core.wmem_max = 1048576
fs.aio-max-nr = 1048576
uid=500(oracle) gid=501(oinstall) groups=501(oinstall),500(dba)
以root用户安装检查失败的程序包:
[root@test rpm]# rpm -ivh sys* --正常安装
warning: sysstat-7.0.2-11.el5.x86_64.rpm: Header V3 DSA signature: NOKEY,key ID e8562897
Preparing... ########################################### [100%]
1:sysstat ########################################### [100%]
[root@test rpm]# rpm -ivh un* --nodeps --强制安装
此处检查失败项要全部保证通过,除

可忽略(测试环境下)。
软件安装到最后出现:

按照提示 以root用户执行脚本后 安装数据库软件就完成了

CentOS 5.9安装Oracle 11g
环境:CentOS 5.9企业版 官网可以下载到 虚拟机virtualBox Oracle 11g R2 这边贴出下载地址:http://www.oracle.com/
环境:centos 5.9企业版 官网可以下载到
虚拟机virtualbox
oracle 11g r2 这边贴出下载地址:
1.简单描述下安装过程
主要参考oracle官方文档,当然是英文的看起来相当的累
(1)硬件要求:
swap空间:内存的两倍 一般大于2g
查看swap 大小 grep swaptotal /proc/meminfo或者free
安装centos 时给与30g的空间安装
/tmp 目录至少大于1g
可只建立swap 分区和/tmp分区 将剩余空间直接挂载到根目录上
(2)软件要求:
根据oracle 11g 官方文档
内核要求:
on red hat enterprise linux 5 update 5
with the oracle unbreakable enterprise
kernel for linu:2.6.32 or later
查看内核版本:cat /proc/version
Package Requirements:
The following or later version of packages for Asianux 3, Oracle Linux 5, and Red
Hat Enterprise Linux 5 must be installed:
binutils-2.17.50.0.6
compat-libstdc++-33-3.2.3
compat-libstdc++-33-3.2.3 (32 bit)
elfutils-libelf-0.125
elfutils-libelf-devel-0.125
gcc-4.1.2
gcc-c++-4.1.2
glibc-2.5-24
glibc-2.5-24 (32 bit)
glibc-common-2.5
glibc-devel-2.5
glibc-devel-2.5 (32 bit)
glibc-headers-2.5
ksh-20060214
libaio-0.3.106
libaio-0.3.106 (32 bit)
libaio-devel-0.3.106
libaio-devel-0.3.106 (32 bit)
libgcc-4.1.2
libgcc-4.1.2 (32 bit)
libstdc++-4.1.2
libstdc++-4.1.2 (32 bit)
libstdc++-devel 4.1.2
make-3.81
sysstat-7.0.2
检查是否安装过该软件包:rpm – qa |grep 软件包名称
如果未安装,并且系统可以上网 可直接通过 yum install 软件包名称 安装
在Centos ISO镜像中也有软件包可以提供,不过不全,后续不全可以通过网络下载安装
(3)创建所需要oracle用户和组
groupadd oinstall
groupadd dba
mkdir –p /u01/oracle
useradd –g oinstall –G dba –d /u01/oracle oracle
passwd oracle
chown -R oracle:oinstall /u01/oracle/
chmod -R 775 /u01/oracle/
(4)配置内核参数Configuring Kernel Parameters:
vim /etc/sysctl.conf下添加:
fs.aio-max-nr = 1048576
fs.file-max = 6815744
kernel.shmall = 2097152
kernel.shmmax = 536870912
kernel.shmmni = 4096
kernel.sem = 250 32000 100 128
net.ipv4.ip_local_port_range = 9000 65500
net.core.rmem_default = 262144
net.core.rmem_max = 4194304
net.core.wmem_default = 262144
net.core.wmem_max = 1048576
重新启动:/sbin/chkconfig boot.sysctl on
sysctl -p
(5)检查Oracle安装用户(oracle)资源限制:
vim /etc/secourity/limits.conf
oracle soft nproc 2047
oracle hard nproc 16384
oracle soft nofile 1024
oracle hard nofile 65536
oracle soft stack 10240
(6) 检查display 查看系统是否支持图形界面
查看root用户下是否已设置DISPLAY变量
# echo $DISPLAY
如果有值出现,则说明已设置DISPLAY变量;否则,,就需要手动设置DISPLAY
# echo $DISPLAY =192.168.1.5 该服务器的IP
执行 xhost +
推荐阅读:
Rad Hat Enterprise Linux 5.5上安装Oracle 11g R2
![]()

Centos 6 Oracle 11G 超详细安装
Desktop Environment is not neccessary for Server usage, though. But Sometimes installation or using an application requires Desktop Environment, then build Desktop Environment as follwos. [root@dlp ~]#yum -y groupinstall X Window System [r
Desktop Environment is not neccessary for Server usage, though. But Sometimes installation or using an application requires Desktop Environment, then build Desktop Environment as follwos.[root@dlp ~]#yum -y groupinstall "X Window System"
[root@dlp ~]#yum -y groupinstall "Desktop"
# net.bridge.bridge-nf-call-iptables = 0
#
net.bridge.bridge-nf-call-arptables = 0
# add follows to the end
net.ipv4.ip_local_port_range = 9000 65500
fs.file-max = 6815744
kernel.shmall = 10523004
kernel.shmmax = 6465333657
kernel.shmmni = 4096
kernel.sem = 250 32000 100 128
net.core.rmem_default=262144
net.core.wmem_default=262144
net.core.rmem_max=4194304
net.core.wmem_max=1048576
fs.aio-max-nr = 1048576
[root@db01 ~]# sysctl -pnet.ipv4.ip_forward = 0
net.ipv4.conf.default.rp_filter = 1
net.ipv4.conf.default.accept_source_route = 0
kernel.sysrq = 0
kernel.core_uses_pid = 1
net.ipv4.tcp_syncookies = 1
net.ipv4.ip_local_port_range = 9000 65500
fs.file-max = 65536
kernel.shmall = 10523004
kernel.shmmax = 6465333657
kernel.shmmni = 4096
kernel.sem = 250 32000 100 128
net.core.rmem_default = 262144
net.core.wmem_default = 262144
net.core.rmem_max = 4194304
net.core.wmem_max = 1048576
fs.aio-max-nr = 1048576
[root@db01 ~]# groupadd -g 201 dba
[root@db01 ~]# useradd -u 440 -g oinstall -G dba -d /usr/
[root@db01 ~]# passwd oracle
Changing password for user oracle.
New password:
Retype new password:
passwd: all authentication tokens updated successfully.
[root@db01 ~]#vi /etc/pam.d/login # near line 14: add
session    required     pam_selinux.so open
session    required     pam_namespace.so
session required pam_limits.so
session    optional     pam_keyinit.so force revoke
session    include      system-auth
-session   optional     pam_ck_connector.so
# add follows to the end
oracle soft nproc 2047
oracle hard nproc 16384
oracle soft nofile 1024
oracle hard nofile 65536 [root@db01 ~]# vi /etc/profile
# add follows to the end
if [ $USER = "oracle" ]; then
if [ $SHELL = "/bin/ksh" ]; then
ulimit -p 16384
ulimit -n 65536
else
ulimit -u 16384 -n 65536
fi
fi
[oracle@db01 ~]$ chmod 755 /usr/oracle
[oracle@db01 ~]$mkdir /usr/oracle/app
[oracle@db01 ~]$chmod 775 /usr/oracle/app
[oracle@db01 ~]$mkdir /usr/oracle/oradata
[oracle@db01 ~]$chmod 775 /usr/oracle/oradata
[oracle@db01 ~]$vi ~/.bash_profile # add follows to the end
umask 022
export ORACLE_BASE=/usr/oracle/app # create a temporary directory for installation
[oracle@db01 ~]$mkdir tmp

http://www.oracle.com/technology/software/products/database/index.html
[oracle@db01 tmp]$ unzip linux.x64_11gR2_database_1of2.zip
[oracle@db01 tmp]$ unzip linux.x64_11gR2_database_2of2.zip
[oracle@db01 tmp]$ ./database/runInstaller


Changing permissions of /usr/oracle/oraInventory.
Adding read,write permissions for group.
Removing read,write,execute permissions for world.

Changing groupname of /usr/oracle/oraInventory to oinstall.
The execution of the script is complete.
[root@db01 ~]#
Running Oracle 11g root.sh script... The following environment variables are set as:
ORACLE_OWNER= oracle
ORACLE_HOME= /usr/oracle/app/product/11.2.0/dbhome_1 Enter the full pathname of the local bin directory: [/usr/local/bin]: # Enter
Copying dbhome to /usr/local/bin ...
Copying oraenv to /usr/local/bin ...
Copying coraenv to /usr/local/bin ... Creating /etc/oratab file...
Entries will be added to the /etc/oratab file as needed by
Database Configuration Assistant when a database is created
Finished running generic part of root.sh script.
Now product-specific root actions will be performed.
Finished product-specific root actions.

export ORACLE_HOME=$ORACLE_BASE/product/11.2.0/dbhome_1
export PATH=$PATH:$ORACLE_HOME/bin [oracle@db01 ~]$ source ~/.bash_profile
[oracle@db01 ~]$rm -rf tmp


db01:/usr/oracle/app/product/11.2.0/dbhome_1: Y [oracle@db01 ~]$vi ~/.bash_profile # add follows to the end
export ORACLE_SID=db01
#!/bin/bash

# oracle: Start/Stop Oracle Database 11g R2
#
# chkconfig: 345 90 10
# description: The Oracle Database is an Object-Relational Database Management System.
#
# processname: oracle

. /etc/rc.d/init.d/functions

LOCKFILE=/var/lock/subsys/oracle
ORACLE_HOME=/usr/oracle/app/product/11.2.0/dbhome_1
ORACLE_USER=oracle

case "$1" in
''start'')
    if [ -f $LOCKFILE ]; then
        echo $0 already running.
        exit 1
    fi
    echo -n $"Starting Oracle Database:"
    su - $ORACLE_USER -c "$ORACLE_HOME/bin/lsnrctl start"
    su - $ORACLE_USER -c "$ORACLE_HOME/bin/dbstart $ORACLE_HOME"
    su - $ORACLE_USER -c "$ORACLE_HOME/bin/emctl start dbconsole"
    touch $LOCKFILE
    ;;
''stop'')
    if [ ! -f $LOCKFILE ]; then
        echo $0 already stopping.
        exit 1
    fi
    echo -n $"Stopping Oracle Database:"
    su - $ORACLE_USER -c "$ORACLE_HOME/bin/lsnrctl stop"
    su - $ORACLE_USER -c "$ORACLE_HOME/bin/dbshut"
    su - $ORACLE_USER -c "$ORACLE_HOME/bin/emctl stop dbconsole"
    rm -f $LOCKFILE
    ;;
''restart'')
    $0 stop
    $0 start
    ;;
''status'')
    if [ -f $LOCKFILE ]; then
        echo $0 started.
    else
        echo $0 stopped.
    fi
    ;;
*)
    echo "Usage: $0 [start|stop|status]"
    exit 1
esac

exit 0
[root@db01 ~]#chkconfig --add oracle
[root@db01 ~]#chkconfig oracle on
关于CENTOS 7 使用 Docker 安装 oracle 11g和docker在centos7中安装的问题我们已经讲解完毕,感谢您的阅读,如果还想了解更多关于CentOS 5.5 安装 Oracle 11g RAC 问题汇总、CentOS 5.8安装Oracle 11g、CentOS 5.9安装Oracle 11g、Centos 6 Oracle 11G 超详细安装等相关内容,可以在本站寻找。
本文标签:


