public class DateEditor extends PropertyEditorSupport {
public void setAsText(String text) throws IllegalArgumentException {
SimpleDateFormat format = new SimpleDateFormat("yyyy-MM-dd HH:mm:ss");
date = format.parse(text);
} catch (ParseException e) {
format = new SimpleDateFormat("yyyy-MM-dd");
date = format.parse(text);
} catch (ParseException e1) {
这里我们将DateEditor提出来封装成一个类方便重用。
另外这里有个try...catch的小妙用,就是首先以"yyyy-MM-dd HH:mm:ss"的形式来解析用户输入的参数,若解析失败则转以"yyyy-MM-dd"的形式来解析。这样的逻辑就可以同时处理"yyyy-MM-dd HH:mm:ss"和"yyyy-MM-dd"形式的日期数据,我想在一般的中文系统中,这两种形式应该是最常用的了吧。
添加如上代码之后,@InitBinder所在的Controller就可以自动绑定日期类型的数据了,不过这仅仅是在该Controller中生效,若想在全局范围内生效的话,可以将@InitBinder注解所在的Controller定义为一个BaseController,其余Controller都继承这个Controller。当然还有另外的方法,若你有兴趣的话,请看2。
2、自定义WebBindingInitializer
public class MyWebBindingInitializer implements WebBindingInitializer {
public void initBinder(WebDataBinder binder, WebRequest request) {
binder.registerCustomEditor(Date.class, new DateEditor());
还是前面写的DateEditor,这么快又见面了,只不过注册的位置改变了,在WebBindingInitializer中注册的PropertyEditor是在全局范围内共享的。
不过光这样还不够,还要将WebBindingInitializer注入到AnnotationMethodHandlerAdapter中。
class="org.springframework.web.servlet.mvc.method.annotation.RequestMappingHandlerAdapter">
<property name="webBindingInitializer">
class="org.springframework.samples.petclinic.web.ClinicBindingInitializer" />
如果是用<mvc:annotation-driven />的童鞋,上面的配置就没效果了,而mvc命名空间也没提供如此细粒度的配置,怎么办呢?
别怕,方法还是有的,我们可以通过一个自定义PostBeanProcessor来处理:
public Object postProcessBeforeInitialization(Object bean, String beanName)
if (bean instanceof RequestMappingHandlerAdapter) {
RequestMappingHandlerAdapter adapter = (RequestMappingHandlerAdapter) bean;
adapter.setWebBindingInitializer(new MyWebBindingInitializer());
不过实际上<mvc:annotation-driven />默认就为我们提供了一个WebBindingInitializer——ConfigurableWebBindingInitializer
而上面的方法则会覆盖默认的ConfigurableWebBindingInitializer,其实我们可以直接使用这个Bean来注册我们的PropertyEditor:
public Object postProcessBeforeInitialization(Object bean, String beanName)
if(bean instanceof ConfigurableWebBindingInitializer){
ConfigurableWebBindingInitializer initializer = (ConfigurableWebBindingInitializer) bean;
initializer.setPropertyEditorRegistrar(new PropertyEditorRegistrar() {
public void registerCustomEditors(PropertyEditorRegistry registry) {
registry.registerCustomEditor(Date.class, new DateEditor());
这里需要说明一下,WebBindingInitializer中不仅仅能注册PropertyEditor,还能注册Converter,也就是下面的3
3、使用ConverstionService
Spring3新引入了Converter系统,而ConversionService则是一个Facade类,用来封装底层实现而对外提供便捷的类型转换。所以这里不能重用之间的DateEditor了,不过大致逻辑还是一样的。另外补充说明一下,Converter是处理任意两类型间的转换,而Formatter是处理字符串和另一类型之间的转换的。可以看出来,Formatter是一类特殊的Converter,并且在处理数据绑定时,Formatter比Converter更加合适。所以我们这里就用Formatter来做:
public class DateFormatter implements Formatter<Date> {
public String print(Date object, Locale locale) {
public Date parse(String text, Locale locale) throws ParseException {
SimpleDateFormat format = new SimpleDateFormat("yyyy-MM-dd HH:mm:ss");
date = format.parse(text);
format = new SimpleDateFormat("yyyy-MM-dd");
date = format.parse(text);
这里我们只写String到Date的逻辑。然后需要将DateFormatter注册到一个ConversionService中,最后再将ConversionService注册到Spring MVC中。
<bean id="conversionService"
class="org.springframework.format.support.FormattingConversionServiceFactoryBean">
<property name="formatters">
<bean class="com.test.common.core.DateFormatter"></bean>
如果是用<mvc:annotation-driven />的童鞋,那么很简单,只需要:
<mvc:annotation-driven conversion-service="conversionService"/>
而未使用<mvc:annotation-driven />的童鞋,需要定义一个WebBindingInitializer(或者使用ConfigurableWebBindingInitializer),然后注入到RequestMappingHandlerAdapter中去:
class="org.springframework.web.servlet.mvc.method.annotation.RequestMappingHandlerAdapter">
<property name="webBindingInitializer" ref="webBindingInitializer">
<bean id="webBindingInitializer" class="org.springframework.web.bind.support.ConfigurableWebBindingInitializer">
<property name="conversionService" ref="conversionService"></property>
此时可能有人会问,如果同时使用PropertyEditor和ConversionService,执行顺序是什么呢?内部首先查找PropertyEditor进行类型转换,如果没有找到相应的PropertyEditor再通过ConversionService进行转换。
4、PropertyEditor的自动注册
对了,这里再稍带提一下自动注册PropertyEditor,只需要将JavaBean和JavaBean名称+Editor这两个类放在同一包下,那么JavaBeans的基础结构会自动发现PropertyEditor的类,而无需你手动注册~

SpringMVC 学习 - 数据绑定
reader,writer,request,session
只要 Controller 的参数中存在 Reader,Writer,HttpSession,HttpServletRequest 对象即可
public void method1(HttpSession session,Writer writer)
public void method2(Writer writer, HttpServletRequest request)
public void method3(Reader reader,String str,Writer writer)
public void method4(Writer writer)
Public void method5(Writer writer,HttpServletRequest request)
@RequestMapping(value="/paramtype")
public void paramtype(HttpServletRequest request,HttpSession session,Writer writer) throws IOException{
		writer.write("sessionid: "+session.getId()+"\n");
		writer.write("contextPath: "+session.getServletContext().getContextPath()+"\n");
		writer.write("RequestURL: "+request.getRequestURL()+"\n");
	}

@RequestHeader
获取 header 信息
@RequestMapping(value="/header")
public void requestParam(
        @RequestHeader("User-Agent") String userAgent,
        @RequestHeader(value="Accept")String accepts,
        @RequestHeader(value="Accept-Encoding")String encoding,
        @RequestHeader(value="Accept-Language")String language,
        @RequestHeader(value="Cookie")String[] cookie,
         Writer writer){
		try {
			writer.write("userAgent:"+userAgent+"\n");
			writer.write("accepts:"+accepts+"\n");
			writer.write("encoding:"+encoding+"\n");
			writer.write("language:"+language+"\n");
			writer.write("cookie:"+Arrays.asList(cookie));
		} catch (IOException e) {
			e.printStackTrace();
		}
	}

@RequestParam
获取请求中的参数信息,参数之间用 & 分开,默认请求参数名和方法参数,required 属性默认为 true,如果不存在会报 404,也可指定 defaultValue 填充
//http://127.0.0.1:8080/hellomvc/databind/requestParam1.mvc?username=hello
	@RequestMapping(value="/requestParam1")
	public void requestParam1(@RequestParam String username,Writer writer) throws IOException{
		writer.write("hello "+username);
	}

	//http://127.0.0.1:8080/hellomvc/databind/requestParam2.mvc?name=sam&skills=java&skills=scala&cities=beijing&cities=shanghai
	@RequestMapping(value="/requestParam2")
	public void requestParam2(
			@RequestParam(value="name",defaultValue="Jane") String username,
			@RequestParam(required=false)List<String> skills,//也可使用String[]
			@RequestParam(required=false)String cities,//required默认是true,如果没有会报404
			Writer writer) throws IOException{
		writer.write("hello: "+username+"\n");
		writer.write("your skills:"+skills+"\n");
		writer.write("you live in:"+cities);
	}
	}

@PathVariable
将请求 URL 中模板变量映射到功能处理方法的参数上
	//http://127.0.0.1:8080/hellomvc/databind/path1/userid:10010/username/world.mvc
	@RequestMapping(value="/path1/userid:{userid}/username/{username}")
	public void pathVariable1(
			@PathVariable(value="userid")int userid,//参数如果不是Int会抛出异常
			@PathVariable(value="username")String username,
			Writer writer) throws IOException{
		writer.write("userid: "+userid+"\n");
		writer.write("username: "+username);
	}

@ModelAttribute
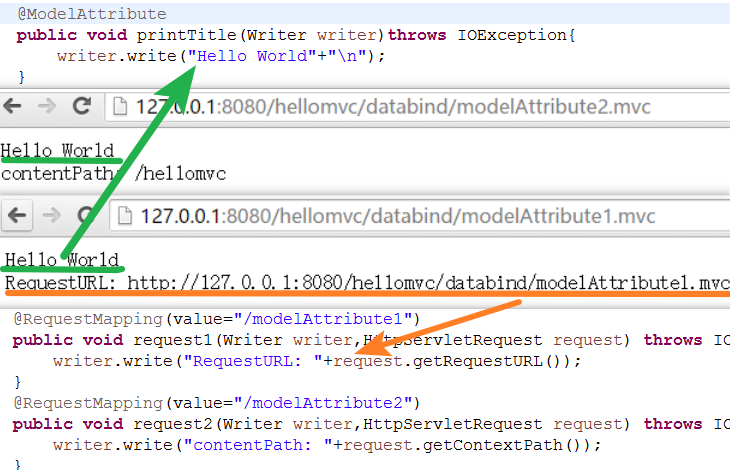
@ModelAttribute 修饰的方法会在每次该控制器的请求方法被调用时调用 如果返回一个对象,这个对象会放到 Model 中
@ModelAttribute("user1") //会将user放到model中
	public User modelAttribute(){
		User user=new User();
		user.setUsername("sam");
		user.setSkills(Arrays.asList("spring","mybatis"));
		return user;
	}

	@ModelAttribute
	public void printTitle(Writer writer)throws IOException{
		writer.write("Hello World"+"\n");
	}
@ModelAttribute 修饰的参数
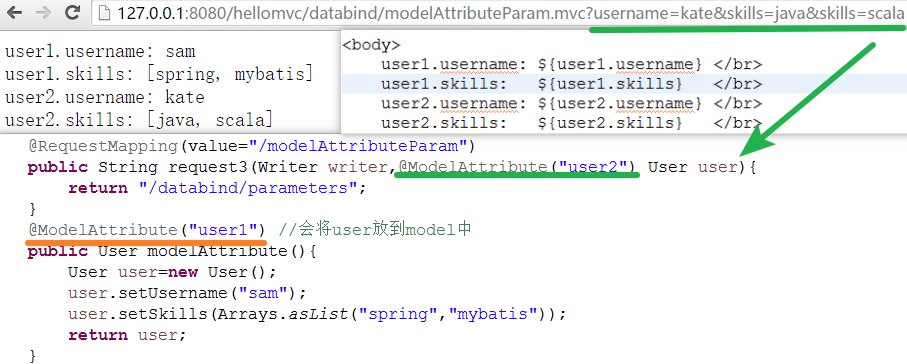
如下,会使用请求的参数构造 user 对象,放到 ModelMap 中,key 为 user2 中
//http://127.0.0.1:8080/hellomvc/databind/modelAttributeParam.mvc?username=kate&skills=java&skills=scala
	@RequestMapping(value="/modelAttributeParam")
	public String request3(Writer writer,@ModelAttribute("user2") User user)throws IOException{;
		return "/databind/parameters";
	}
@SessionAttribute
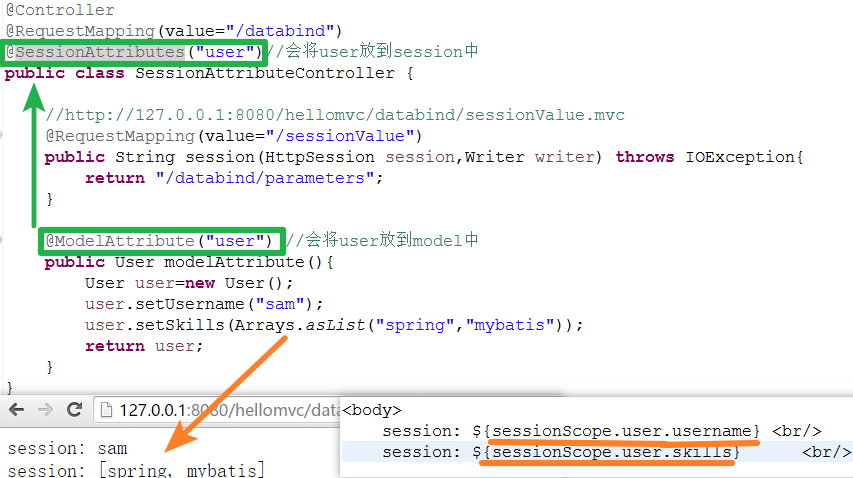
@SessionAttribute 修饰类,将 modelMap 中的属性放到 session 中
@SessionAttributes("user")//会将user放到session中
public class SessionAttributeController {
}
SpringMVC 学习系列 (4) 之 数据绑定 -1
在系列(3)中我们介绍了请求是如何映射到一个action上的,下一步当然是如何获取到请求中的数据,这就引出了本篇所要讲的内容—数据绑定。
首先看一下都有哪些绑定数据的注解:
1.@RequestParam,绑定单个请求数据,可以是URL中的数据,表单提交的数据或上传的文件;
2.@PathVariable,绑定URL模板变量值;
3.@CookieValue,绑定Cookie数据;
4.@RequestHeader,绑定请求头数据;
5.@ModelAttribute,绑定数据到Model;
6.@SessionAttributes,绑定数据到Session;
7.@RequestBody,用来处理Content-Type不是application/x-www-form-urlencoded编码的内容,例如application/json, application/xml等;
8.@RequestPart,绑定“multipart/data”数据,并可以根据数据类型进项对象转换;
下面我们来看如何使用:
1.@RequestParam:
为了验证文件绑定我们需要先做以下工作:
a.把commons-fileupload-1.3.1.jar和commons-io-2.4.jar两个jar包添加到我们项目。
b.配置我们项目中的springservlet-config.xml文件使之支持文件上传,内容如下:
<!-- 支持上传文件 -->
<bean id="multipartResolver" class="org.springframework.web.multipart.commons.CommonsMultipartResolver">
    <!-- 设置上传文件的最大尺寸为1MB -->
    <property name="maxUploadSize">
        <value>1048576</value>
    </property>
    <property name="defaultEncoding">
        <value>UTF-8</value>
    </property>
</bean>
其中maxUploadSize用于限制上传文件的最大大小,也可以不做设置,这样就代表上传文件的大小木有限制。defaultEncoding用于设置上传文件的编码格式,用于解决上传的文件中文名乱码问题。
下面就看具体如何使用:
添加一个DataBindController,里面有2个paramBind的action分别对应get和post请求:

package com.demo.web.controllers;

import javax.servlet.http.HttpServletRequest;
import org.springframework.stereotype.Controller;
import org.springframework.web.bind.ServletRequestUtils;
import org.springframework.web.bind.annotation.RequestMapping;
import org.springframework.web.bind.annotation.RequestMethod;
import org.springframework.web.bind.annotation.RequestParam;
import org.springframework.web.multipart.MultipartFile;
import org.springframework.web.multipart.MultipartHttpServletRequest;
import org.springframework.web.servlet.ModelAndView;

@Controller
@RequestMapping(value = "/databind")
public class DataBindController {

    @RequestMapping(value="/parambind", method = {RequestMethod.GET})
    public ModelAndView paramBind(){

        ModelAndView modelAndView = new ModelAndView();
        modelAndView.setViewName("parambind");
        return modelAndView;
    }

    @RequestMapping(value="/parambind", method = {RequestMethod.POST})
    public ModelAndView paramBind(HttpServletRequest request, @RequestParam("urlParam") String urlParam, @RequestParam("formParam") String formParam, @RequestParam("formFile") MultipartFile formFile){

        //如果不用注解自动绑定,我们还可以像下面一样手动获取数据
         String urlParam1 = ServletRequestUtils.getStringParameter(request, "urlParam", null);
        String formParam1 = ServletRequestUtils.getStringParameter(request, "formParam", null);
        MultipartFile formFile1 = ((MultipartHttpServletRequest) request).getFile("formFile");

        ModelAndView modelAndView = new ModelAndView();
        modelAndView.addObject("urlParam", urlParam);
        modelAndView.addObject("formParam", formParam);
        modelAndView.addObject("formFileName", formFile.getOriginalFilename());

        modelAndView.addObject("urlParam1", urlParam1);
        modelAndView.addObject("formParam1", formParam1);
        modelAndView.addObject("formFileName1", formFile1.getOriginalFilename());
        modelAndView.setViewName("parambindresult");
        return modelAndView;
    }

}

在views文件夹中添加parambind.jsp和parambindresult.jsp两个视图,内容分别如下:
<%@ page language="java" contentType="text/html; charset=UTF-8"
    pageEncoding="UTF-8"%>
<!DOCTYPE html PUBLIC "-//W3C//DTD HTML 4.01 Transitional//EN" "http://www.w3.org/TR/html4/loose.dtd">
<html>
<head>
<meta http-equiv="Content-Type" content="text/html; charset=UTF-8">
<title>Insert title here</title>
</head>
<body>
    <form action="parambind?urlParam=AAA" method="post" enctype="multipart/form-data">
        <input type="text" name="formParam" /><br/>
        <input type="file" name="formFile" /><br/>
        <input type="submit" value="Submit" />
    </form>
</body>
</html>
<%@ page language="java" contentType="text/html; charset=UTF-8"
    pageEncoding="UTF-8"%>
<!DOCTYPE html PUBLIC "-//W3C//DTD HTML 4.01 Transitional//EN" "http://www.w3.org/TR/html4/loose.dtd">
<html>
<head>
<meta http-equiv="Content-Type" content="text/html; charset=UTF-8">
<title>Insert title here</title>
</head>
<body>
    自动绑定数据:<br/><br/>
    ${urlParam}<br/>
    ${formParam}<br/>
    ${formFileName}<br/><br/><br/><br/>
    手动获取数据:<br/><br/>
    ${urlParam1}<br/>
    ${formParam1}<br/>
    ${formFileName1}<br/>
</body>
</html>
运行项目,输入内容,选择上传文件:
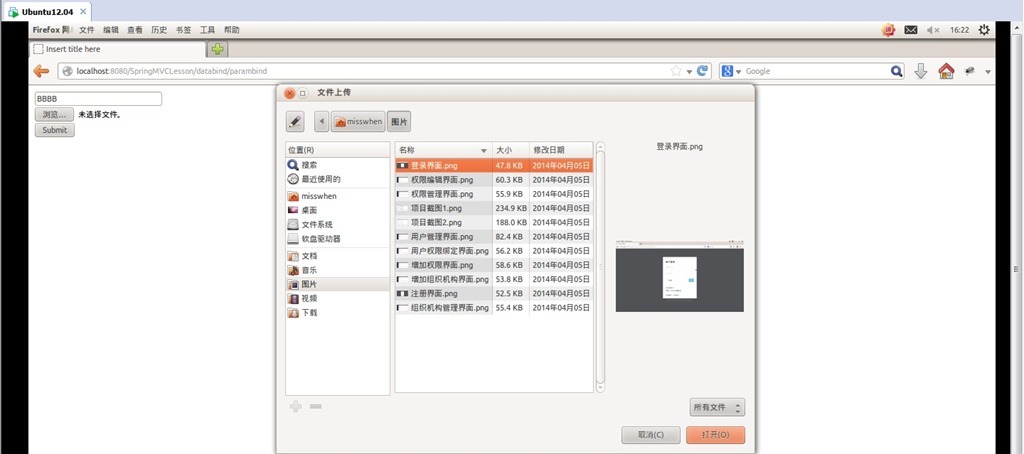
提交查看结果:

可以看到绑定的数据已经获取到了。
上面我们演示了如何把数据绑定到单个变量,但在实际应用中我们通常需要获取的是model对象,别担心,我们不需要把数据绑定到一个个变量然后在对model赋值,只需要把model加入相应的action参数(这里不需要指定绑定数据的注解)Spring MVC会自动进行数据转换并绑定到model对象上,一切就是这么简单。测试如下:
添加一个AccountModel类作为测试的model:
package com.demo.web.models;

public class AccountModel {

    private String username;
    private String password;

    public void setUsername(String username){
        this.username=username;
    }
    public void setPassword(String password){
        this.password=password;
    }

    public String getUsername(){
        return this.username;
    }
    public String getPassword(){
        return this.password;
    }
}
在DataBindController里面添加2个modelAutoBind的action分别对应get和post请求:
@RequestMapping(value="/modelautobind", method = {RequestMethod.GET})
public String modelAutoBind(HttpServletRequest request, Model model){

    model.addAttribute("accountmodel", new AccountModel());
    return "modelautobind";
}

@RequestMapping(value="/modelautobind", method = {RequestMethod.POST})
public String modelAutoBind(HttpServletRequest request, Model model, AccountModel accountModel){

    model.addAttribute("accountmodel", accountModel);
    return "modelautobindresult";
}
在views文件夹中添加modelautobind.jsp和modelautobindresult.jsp 2个视图用于提交数据和展示提交的数据:
modelautobind.jsp:
<%@ page language="java" contentType="text/html; charset=UTF-8"
    pageEncoding="UTF-8"%>
<!DOCTYPE html PUBLIC "-//W3C//DTD HTML 4.01 Transitional//EN" "http://www.w3.org/TR/html4/loose.dtd">

<%@ taglib prefix="form" uri="http://www.springframework.org/tags/form" %>

<html>
<head>
<meta http-equiv="Content-Type" content="text/html; charset=UTF-8">
<title>Insert title here</title>
</head>
<body>
    <form:form modelAttribute="accountmodel" method="post">
        用户名:<form:input path="username"/><br/>
        密 码:<form:password path="password"/><br/>
        <input type="submit" value="Submit" />
    </form:form>
</body>
</html>
modelautobindresult.jsp :
<%@ page language="java" contentType="text/html; charset=UTF-8"
    pageEncoding="UTF-8"%>
<!DOCTYPE html PUBLIC "-//W3C//DTD HTML 4.01 Transitional//EN" "http://www.w3.org/TR/html4/loose.dtd">
<html>
<head>
<meta http-equiv="Content-Type" content="text/html; charset=UTF-8">
<title>Insert title here</title>
</head>
<body>
    用户名:${accountmodel.username}<br/>
    密 码:${accountmodel.password}
</body>
</html>
运行测试:

用户名 输入AAA 密码 输入BBB,提交:

可以看到结果显示正确,说明自动绑定成功。
注:
1.关于@RequestParam的参数,这是一个@RequestParam的完整写法@RequestParam(value="username", required=true, defaultValue="AAA")。
value表示要绑定请求中参数的名字;
required表示请求中是否必须有这个参数,默认为true这是如果请求中没有要绑定的参数则返回404;
defaultValue表示如果请求中指定的参数值为空时的默认值;
要绑定的参数如果是值类型必须要有值否则抛异常,如果是引用类型则默认为null(Boolean除外,默认为false);
2.在刚才添加的2个action中可以看到返回类型和以前的不一样了由ModelAndView变成了String,这是由于Spring MVC 提供Model、ModelMap、Map让我们可以直接添加渲染视图需要的模型数据,在返回时直接指定对应视图名称就可以了。同时Map是继承于ModelMap的,而Model和ModelMap是继承于ExtendedModelMap的。
3.在刚才添加的视图modelautobind.jsp中可以看到<form:form、<form:input 等标签,这是Spring MVC提供的表单标签,借助于这些标签我们可以很方便的把模型数据绑定到表单上面(当然你也可以选择继续使用原生的HTML表单标签),要使用Spring MVC只要在视图中添加引用 <%@ taglib prefix="form" uri="http://www.springframework.org/tags/form" %>即可,关于Spring MVC表单标签的具体内容会在以后的文章中作介绍。
SpringMVC 学习系列 (5) 之 数据绑定 -2
在系列(4)中我们介绍了如何用@RequestParam来绑定数据,下面我们来看一下其它几个数据绑定注解的使用方法。
1.@PathVariable 用来绑定URL模板变量值,这个我们已经在系列(3)中介绍了使用方法,这里不在赘述。
2.@CookieValue 用来绑定Cookie中的数据。下面我们用获取Cookie中的sessionId做测试:
在DataBindController添加cookiebind action,代码如下:
//@CookieValue Test
@RequestMapping(value="/cookiebind", method = {RequestMethod.GET})
public String cookieBind(HttpServletRequest request, Model model, @CookieValue(value="JSESSIONID", defaultValue="") String jsessionId){

    model.addAttribute("jsessionId", jsessionId);
    return "cookiebindresult";
}
在views文件夹中添加一个cookiebindresult.jsp视图,代码如下:
<%@ page language="java" contentType="text/html; charset=UTF-8"
    pageEncoding="UTF-8"%>
<!DOCTYPE html PUBLIC "-//W3C//DTD HTML 4.01 Transitional//EN" "http://www.w3.org/TR/html4/loose.dtd">
<html>
<head>
<meta http-equiv="Content-Type" content="text/html; charset=UTF-8">
<title>Insert title here</title>
</head>
<body>
    ${jsessionId}
</body>
</html>
运行测试:

可以看到已经获取到了sessionId。
注:@CookieValue 与@RequestParam 一样也有3个参数,其含义与的@RequestParam 参数含义相同。
3.@RequestHeader 用来绑定请求头中的数据,我们用@RequestHeader获取User-Agent 来做演示:
在DataBindController添加requestheaderbind action,代码如下:
//@RequestHeader Test
@RequestMapping(value="/requestheaderbind", method = {RequestMethod.GET})
public String requestHeaderBind(HttpServletRequest request, Model model, @RequestHeader(value="User-Agent", defaultValue="") String userAgent){

    model.addAttribute("userAgent", userAgent);
    return "requestheaderbindresult";
}
在views文件夹中添加一个requestheaderbindresult.jsp视图,代码如下:
<%@ page language="java" contentType="text/html; charset=UTF-8"
    pageEncoding="UTF-8"%>
<!DOCTYPE html PUBLIC "-//W3C//DTD HTML 4.01 Transitional//EN" "http://www.w3.org/TR/html4/loose.dtd">
<html>
<head>
<meta http-equiv="Content-Type" content="text/html; charset=UTF-8">
<title>Insert title here</title>
</head>
<body>
    ${userAgent}
</body>
</html>
运行测试:

可以看到已经获取到了User-Agent 。
注:@RequestHeader 与@RequestParam 一样也有3个参数,其含义与的@RequestParam 参数含义相同。
4.@ModelAttribute 绑定数据到模型中。在系列(4)的modelAutoBind action中我们将表单提交的数据添加到Model中的代码如下:
@RequestMapping(value="/modelautobind", method = {RequestMethod.POST})
public String modelAutoBind(HttpServletRequest request, Model model, AccountModel accountModel){

    model.addAttribute("accountmodel", accountModel);
    return "modelautobindresult";
}
而借助于@ModelAttribute 我们可以更简单的讲数据添加到Model中,把上面的代码修改为:
@RequestMapping(value="/modelautobind", method = {RequestMethod.POST})
public String modelAutoBind(HttpServletRequest request, @ModelAttribute("accountmodel") AccountModel accountModel){

    return "modelautobindresult";
}
运行测试:

可以看到依然成功的绑定了提交的数据。
5.Model中的数据作用域是Request级别的,也就是说在一个Request请求中是获取不到其它Request请求的Model的数据的。但我们可以用@SessionAttributes 把数据存储到session中,来保持多次请求间数据,这样就可以来实现比如分步骤提交表单等需求。下面我们来看如何分2步把数据绑定到AccountModel中:
在DataBindController上添加:
@SessionAttributes(value = "sessionaccountmodel")
在DataBindController添加usernamebind和passwordbind action,代码如下:

//@SessionAttributes Test
@ModelAttribute("sessionaccountmodel")
public AccountModel initAccountModel(){

    return new AccountModel();
}

@RequestMapping(value="/usernamebind", method = {RequestMethod.GET})
public String userNameBind( Model model, AccountModel accountModel){

    model.addAttribute("sessionaccountmodel", new AccountModel());
    return "usernamebind";
}

@RequestMapping(value="/usernamebind", method = {RequestMethod.POST})
public String userNameBindPost( @ModelAttribute("sessionaccountmodel") AccountModel accountModel){

    //重定向到密码绑定测试
    return "redirect:passwordbind";
}

@RequestMapping(value="/passwordbind", method = {RequestMethod.GET})
public String passwordBind(@ModelAttribute("sessionaccountmodel") AccountModel accountModel){

    return "passwordbind";
}

@RequestMapping(value="/passwordbind", method = {RequestMethod.POST})
public String passwordBindPost(@ModelAttribute("sessionaccountmodel") AccountModel accountModel, SessionStatus status){

    //销毁@SessionAttributes存储的对象
    status.setComplete();
    //显示绑定结果
    return "sessionmodelbindresult";
}

由于我们在controller上指定了@SessionAttributes,所以在@ModelAttribute(“xxx”)注解的参数会直接在@SessionAttributes中查找名为”xxx”的对象,如果没有找到则调用@ModelAttribute(“xxx”)注解的方法返回对象并存入@SessionAttributes(如果没有找到且没有@ModelAttribute(“xxx”)注解的方法就会抛出HttpSessionRequiredException)。当执行到最后一步就可以调用SessionStatus .setComplete()方法把@SessionAttributes中保存对象销毁了(不会清除HttpSession中的数据)。
在views文件夹中添加usernamebind.jsp、passwordbind.jsp和sessionmodelbindresult.jsp视图内容分别如下:
<%@ page language="java" contentType="text/html; charset=UTF-8"
    pageEncoding="UTF-8"%>
<!DOCTYPE html PUBLIC "-//W3C//DTD HTML 4.01 Transitional//EN" "http://www.w3.org/TR/html4/loose.dtd">

<%@ taglib prefix="form" uri="http://www.springframework.org/tags/form" %>

<html>
<head>
<meta http-equiv="Content-Type" content="text/html; charset=UTF-8">
<title>Insert title here</title>
</head>
<body>
    <form:form modelAttribute="sessionaccountmodel" method="post">
        用户名:<form:input path="username"/><br/>
        <input type="submit" value="Submit" />
    </form:form>
</body>
</html>
<%@ page language="java" contentType="text/html; charset=UTF-8"
    pageEncoding="UTF-8"%>
<!DOCTYPE html PUBLIC "-//W3C//DTD HTML 4.01 Transitional//EN" "http://www.w3.org/TR/html4/loose.dtd">

<%@ taglib prefix="form" uri="http://www.springframework.org/tags/form" %>

<html>
<head>
<meta http-equiv="Content-Type" content="text/html; charset=UTF-8">
<title>Insert title here</title>
</head>
<body>
    <form:form modelAttribute="sessionaccountmodel" method="post">
        密 码:<form:password path="password"/><br/>
        <input type="submit" value="Submit" />
    </form:form>
</body>
</html>
<%@ page language="java" contentType="text/html; charset=UTF-8"
    pageEncoding="UTF-8"%>
<!DOCTYPE html PUBLIC "-//W3C//DTD HTML 4.01 Transitional//EN" "http://www.w3.org/TR/html4/loose.dtd">
<html>
<head>
<meta http-equiv="Content-Type" content="text/html; charset=UTF-8">
<title>Insert title here</title>
</head>
<body>
    用户名:${sessionaccountmodel.username}<br/>
    密 码:${sessionaccountmodel.password}
</body>
</html>
运行测试:


可以看到我们已经成功的分2步把数据绑定到AccountModel中了。
注:
@SessionAttributes有value和types两个参数其中value指明要对象的名称,types指定要绑定对象的类型,如@SessionAttributes(value = "sessionaccountmodel", types=AccountModel.class)两者是and关系,需要同时满足。也可以同时指定多个value和types 如:@SessionAttributes(value = {"aa", "aa"} , types={XXX.class, YYY.class}) 。
6.@RequestBody 调用合适的MessageConvert来把非application/x-www-form-urlencoded请求中的内容转换为指定的对象它通常与@ResponseBody合用,@ResponseBody与.@RequestBody刚好相反,他把指定的对象转换为合适的内容(请求头为Accept:application/json 则返回json数据)并返回。这里我们用一个ajax请求做演示:
由于Spring默认解析json用的是Jackson,所以我们这里要把jackson-core-asl-1.9.13.jar和jackson-mapper-asl-1.9.13.jar两个包添加到我们项目。
修改AccountModel让其继承Serializable接口,并添加一个空的构造函数(为了Jackson做转换)。
在DataBindController添加requestBodyBindaction,代码如下:
//@RequestBody Test
@RequestMapping(value="/requestbodybind", method = {RequestMethod.GET})
public String requestBodyBind(Model model){

    model.addAttribute("accountmodel", new AccountModel());
    return "requestbodybind";
}

@RequestMapping(value="/requestbodybind", method = {RequestMethod.POST})
public @ResponseBody AccountModel requestBodyBind(@RequestBody AccountModel accountModel){

    return accountModel;
}
在views文件夹中添加requestbodybind.jsp视图内容如下:

<%@ page language="java" contentType="text/html; charset=UTF-8"
    pageEncoding="UTF-8"%>
<!DOCTYPE html PUBLIC "-//W3C//DTD HTML 4.01 Transitional//EN" "http://www.w3.org/TR/html4/loose.dtd">

<%@ taglib prefix="form" uri="http://www.springframework.org/tags/form" %>

<html>
<head>

<script src="//ajax.googleapis.com/ajax/libs/jquery/1.8.3/jquery.min.js"></script>

<meta http-equiv="Content-Type" content="text/html; charset=UTF-8">
<title>Insert title here</title>
</head>
<body>
    <form:form modelAttribute="accountmodel" method="post">
        用户名:<form:input path="username"/><br/>
        密 码:<form:password path="password"/><br/>
        <input type="button" id="submit" value="Submit" />
    </form:form>

    <script type="text/javascript">
        $(function() {
            $("#submit").click(function() {
                var postdata = ''{"username":"'' + $(''#username'').val() + ''","password":"'' + $(''#password'').val() + ''"}'';
                $.ajax({
                    type : ''POST'',
                    contentType : ''application/json'',
                    url : ''http://localhost:8080/SpringMVCLesson/databind/requestbodybind'',
                    processData : false,
                    dataType : ''json'',
                    data : postdata,
                    success : function(data) {
                        alert(''username : ''+data.username+''\npassword : ''+data.password);
                    },
                    error : function() {
                        alert(''error...'');
                    }
                });
            });
        });
    </script>
</body>
</html>

运行测试:

结果正确,证明转换成功。
7.@RequestPart 绑定“multipart/form-data“类型数据,支持javax.servlet.http.Part文件上传,并可可以进行类型转换,详见官方文档:
http://docs.spring.io/spring-framework/docs/3.2.x/spring-framework-reference/htmlsingle/#new-in-3.1-mvc-requestpart
今天关于SpringMVC 内置的精准数据绑定 2和springmvc数据绑定方式的讲解已经结束,谢谢您的阅读,如果想了解更多关于JavaEE_Mybatis_SpringMVC__Spring MVC中数据绑定之日期类型、SpringMVC 学习 - 数据绑定、SpringMVC 学习系列 (4) 之 数据绑定 -1、SpringMVC 学习系列 (5) 之 数据绑定 -2的相关知识,请在本站搜索。


